On This Page
1. Adding basic store information2. Designing your store
3. Setting up your shipping plans
4. Connecting your domain
5. Setting up payment options
6. Final checklist before launch
Welcome to the world of eCommerce! 🎉 Launching your dropshipping store is an exciting step toward building your dream business. Whether you’re here to share your passion, start a side hustle, or create a global brand, this guide is your roadmap to success. Let’s get everything set up and ready to shine—your entrepreneurial journey starts now!
Adding basic store information
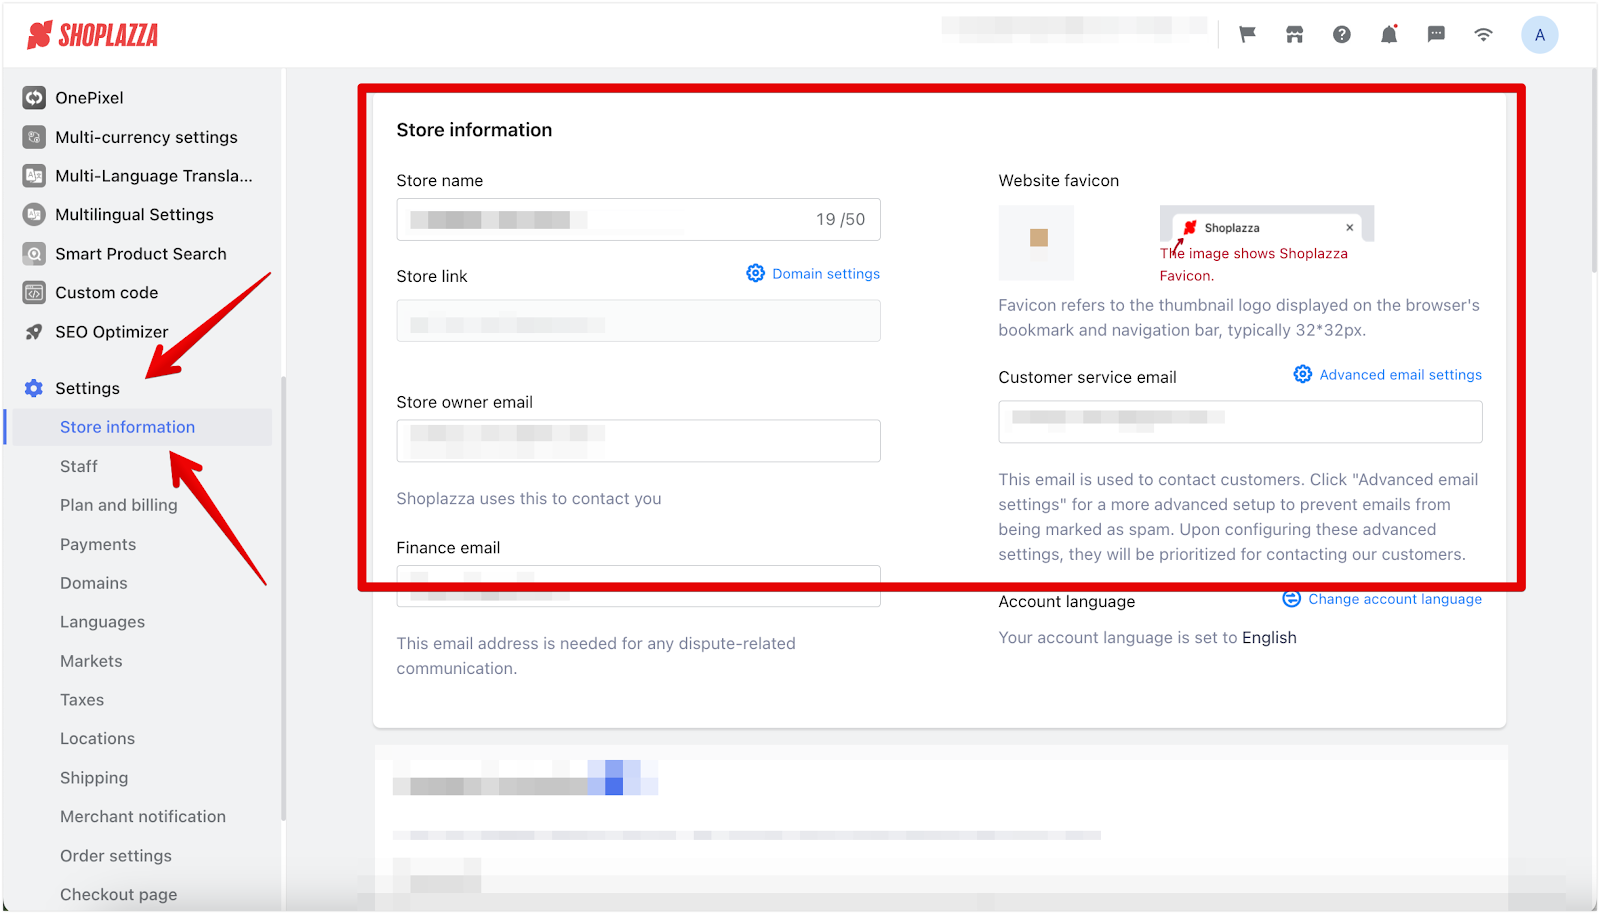
The first step is to fill in some essential details to set the foundation for your store. These details ensure your store appears professional and trustworthy to customers. Go to your Shoplazza admin > Settings > Store Information to add these details below:
- Enter your store name: This is the name that will represent your brand across your store and marketing materials.
- Provide an owner email address: Add an email address that you’ll use for managing the store and receiving notifications.
- Upload a favicon: This is the small icon that appears in browser tabs and bookmarks, helping your store stand out visually.
- Add a customer service email: Include an email address that customers can use to contact you with questions or concerns
💡 Why? These details help your store look polished and professional, building trust with your customers.
📖 Need more guidance? Dive into this article: Managing your Store information
Designing your store
Your store’s design plays a major role in attracting customers and creating a positive first impression. Shoplazza provides two great options to design your store:
1. Option 1: Customize your own theme: Use Shoplazza’s powerful theme editor to create a unique design that reflects your brand.
2. Option 2: Copy a demo store: Start quickly with a pre-built design that you can adjust to match your brand identity.
👉 Choose the option that best suits your needs and time below!
Option 1: Customizing your own new theme
If you prefer a hands-on approach to designing your store, customizing your theme is the way to go. Start with the Nova 2023 theme – it’s clean, modern, and perfect for any product category, from fashion to electronics! Ready to design? Follow this step-by-step guide: Theme Customization Guide
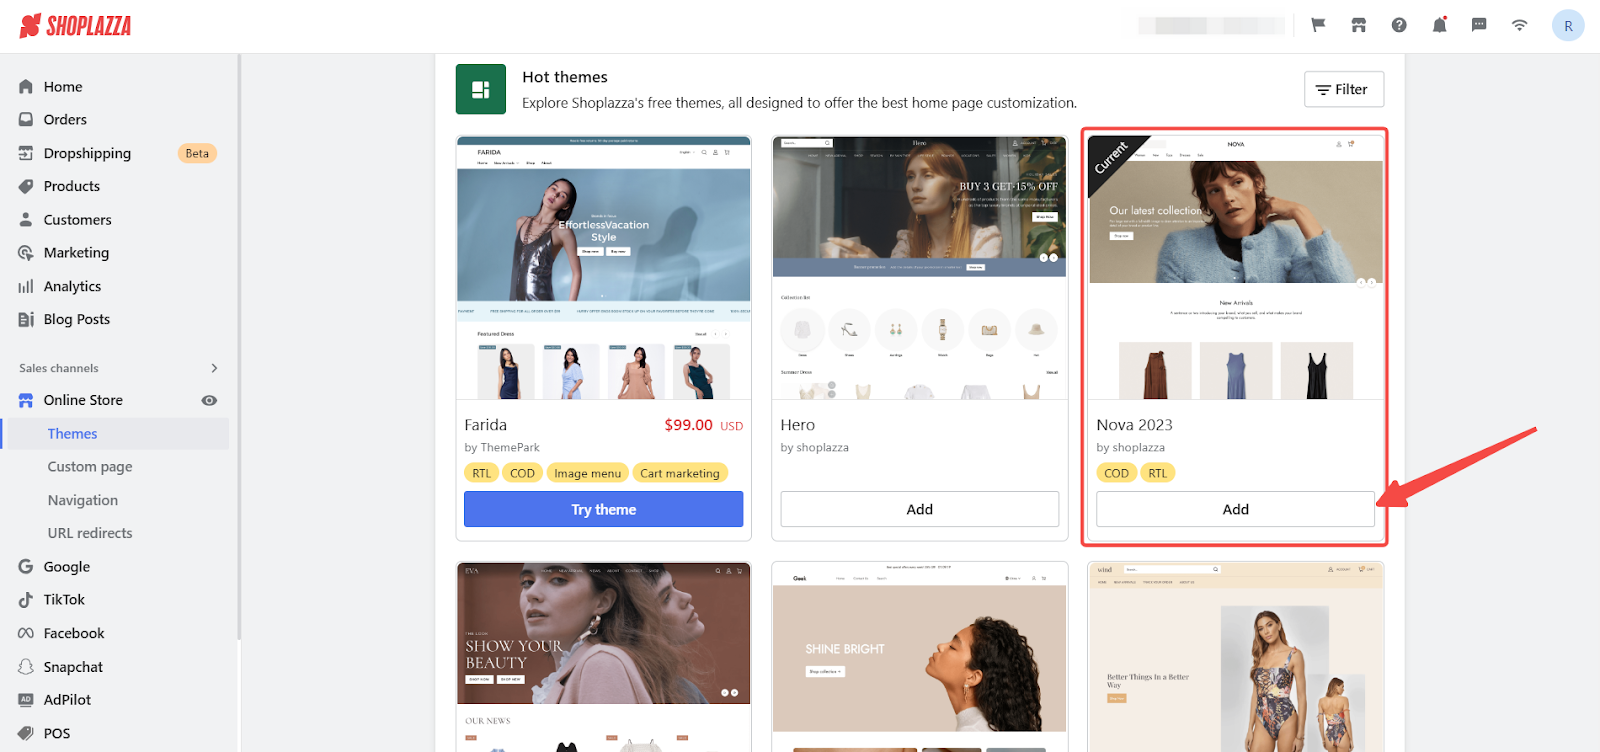
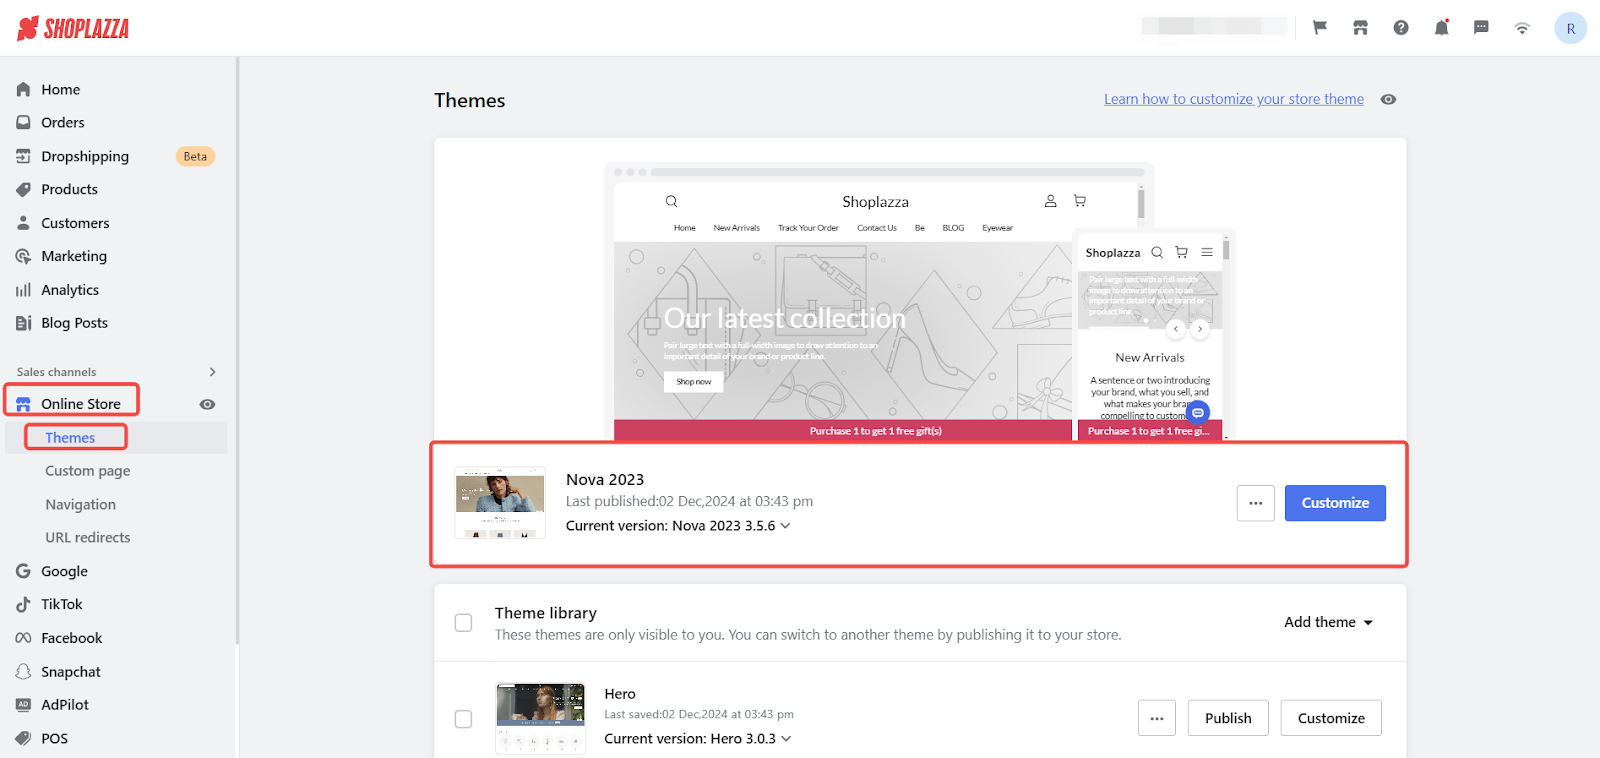
1. Download Nova 2023 theme: Head over to your Shoplazza admin > Online Store > Themes. Scroll down to the Hot Themes section, search for Nova 2023 and add theme to your store. If you've already added the theme to your store, click Customize to begin.
Option 2: Copy our demo store
Short on time? Copy our pre-designed demo store and make it your own with just a few tweaks!
✨ What’s Included in the Demo Store?
- A pre-designed theme: Demo Store Preview
- Pre-built header and footer menus
- Editable policy pages (Terms of Service, Privacy Policy, etc.)
- A fully functional “All Products” collection to display all your items.
- A global free shipping plan with cash-on-delivery enabled.
🛠️ How to copy the demo store:
1. Contact customer support: Reach out to our support team to get an invitation to the demo store for dropshipping. Be sure to include your contact information (name, email and storeID) and let them know that you are requesting access to the demo store for dropshipping.
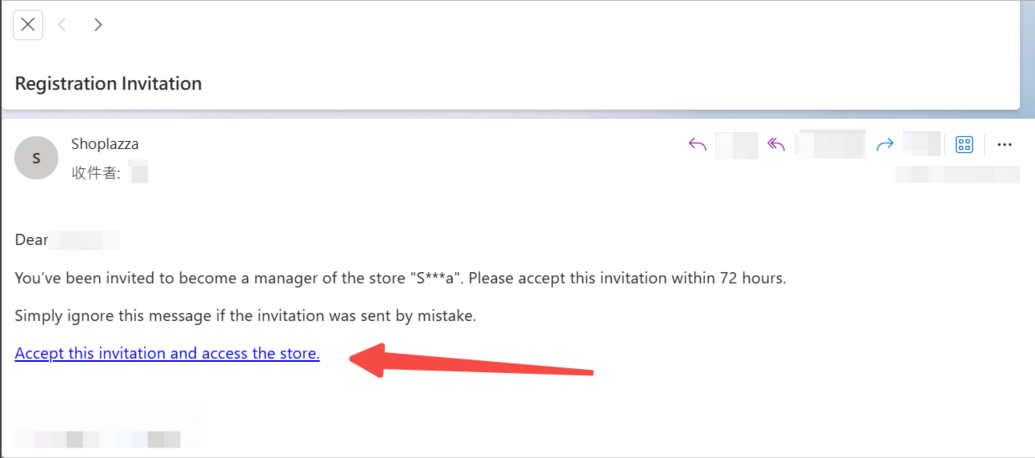
2. Accept the email invitation: Check your inbox for the invitation.
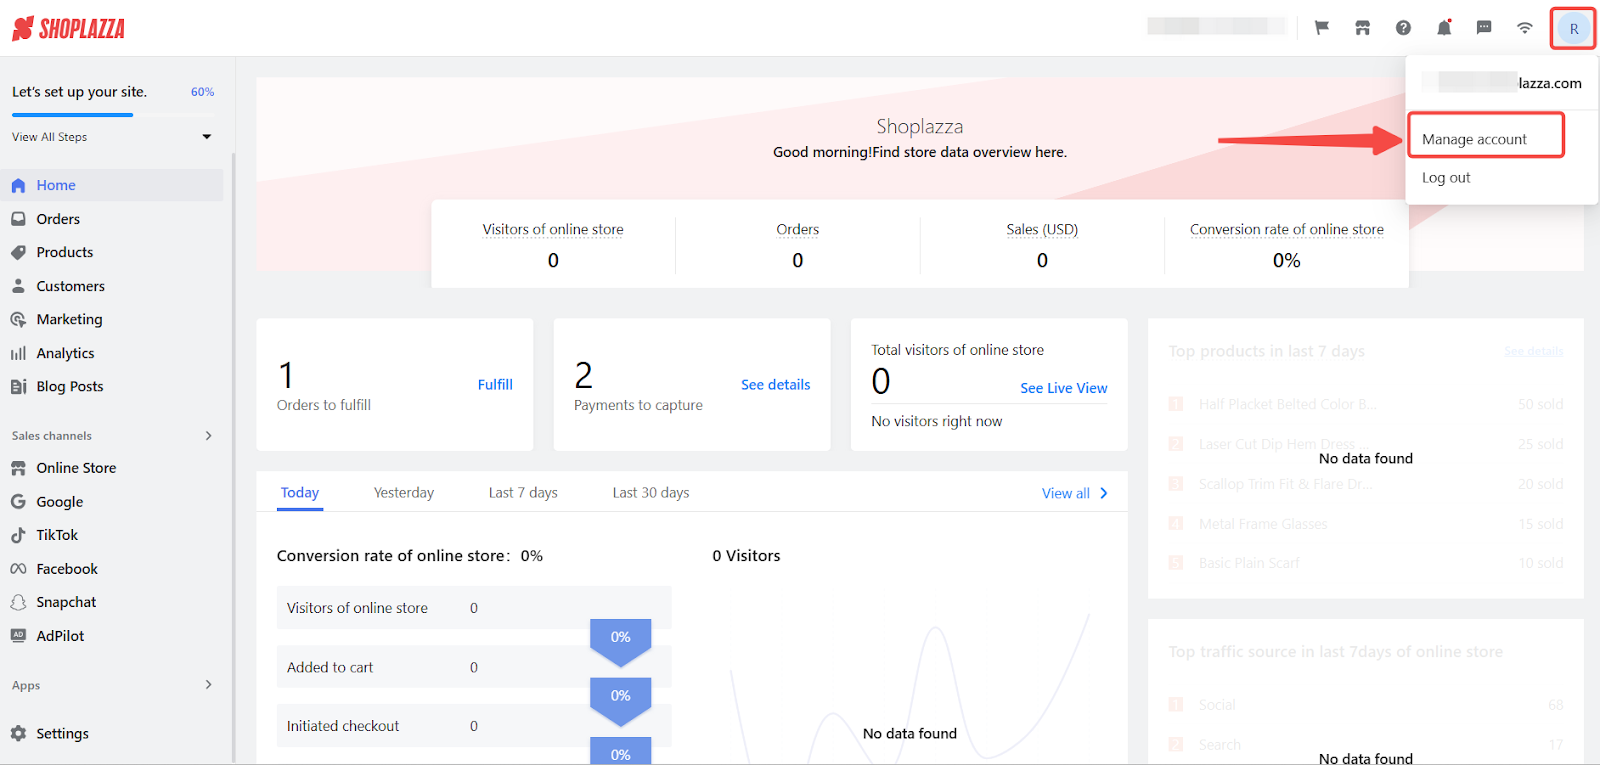
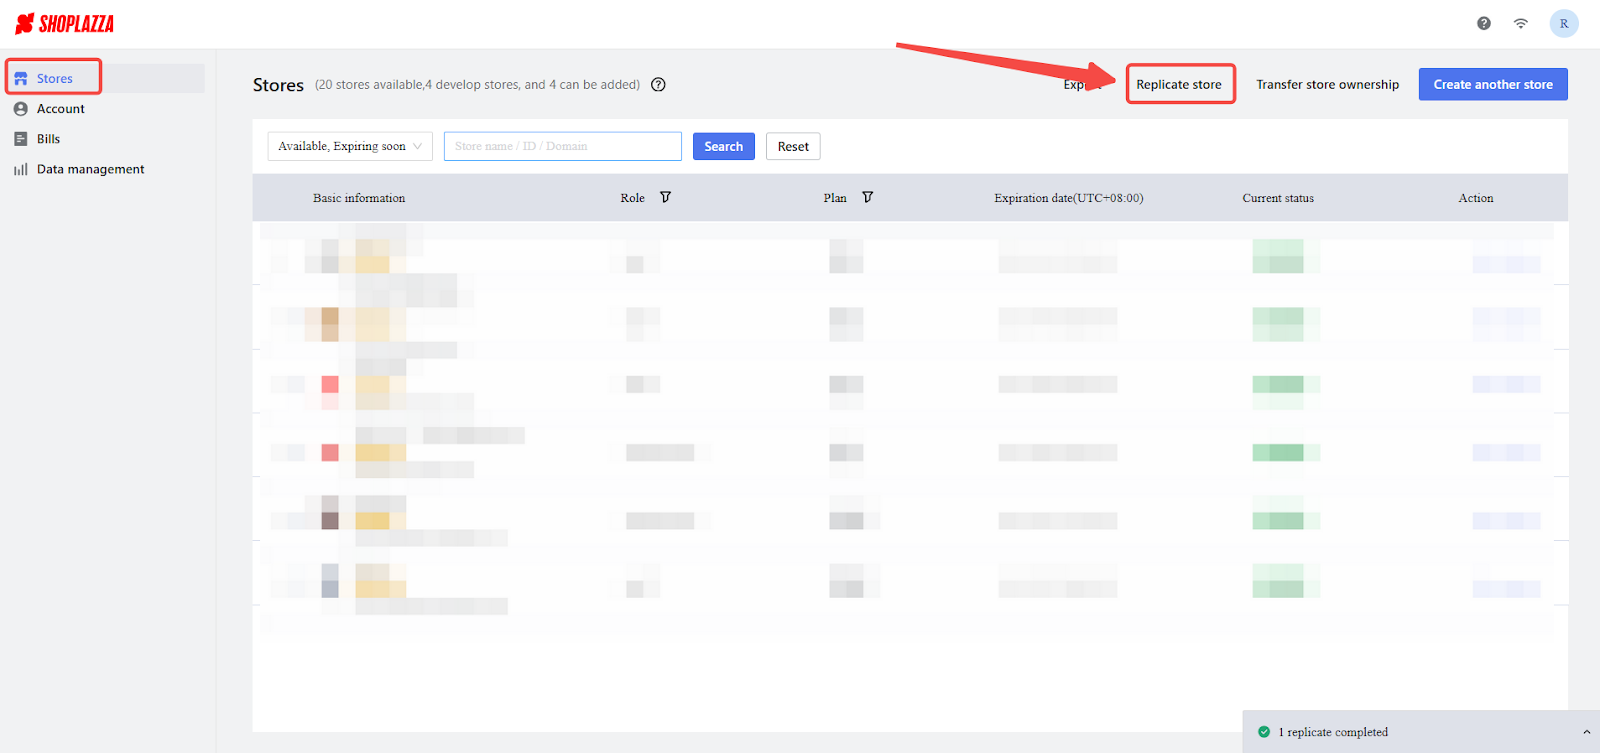
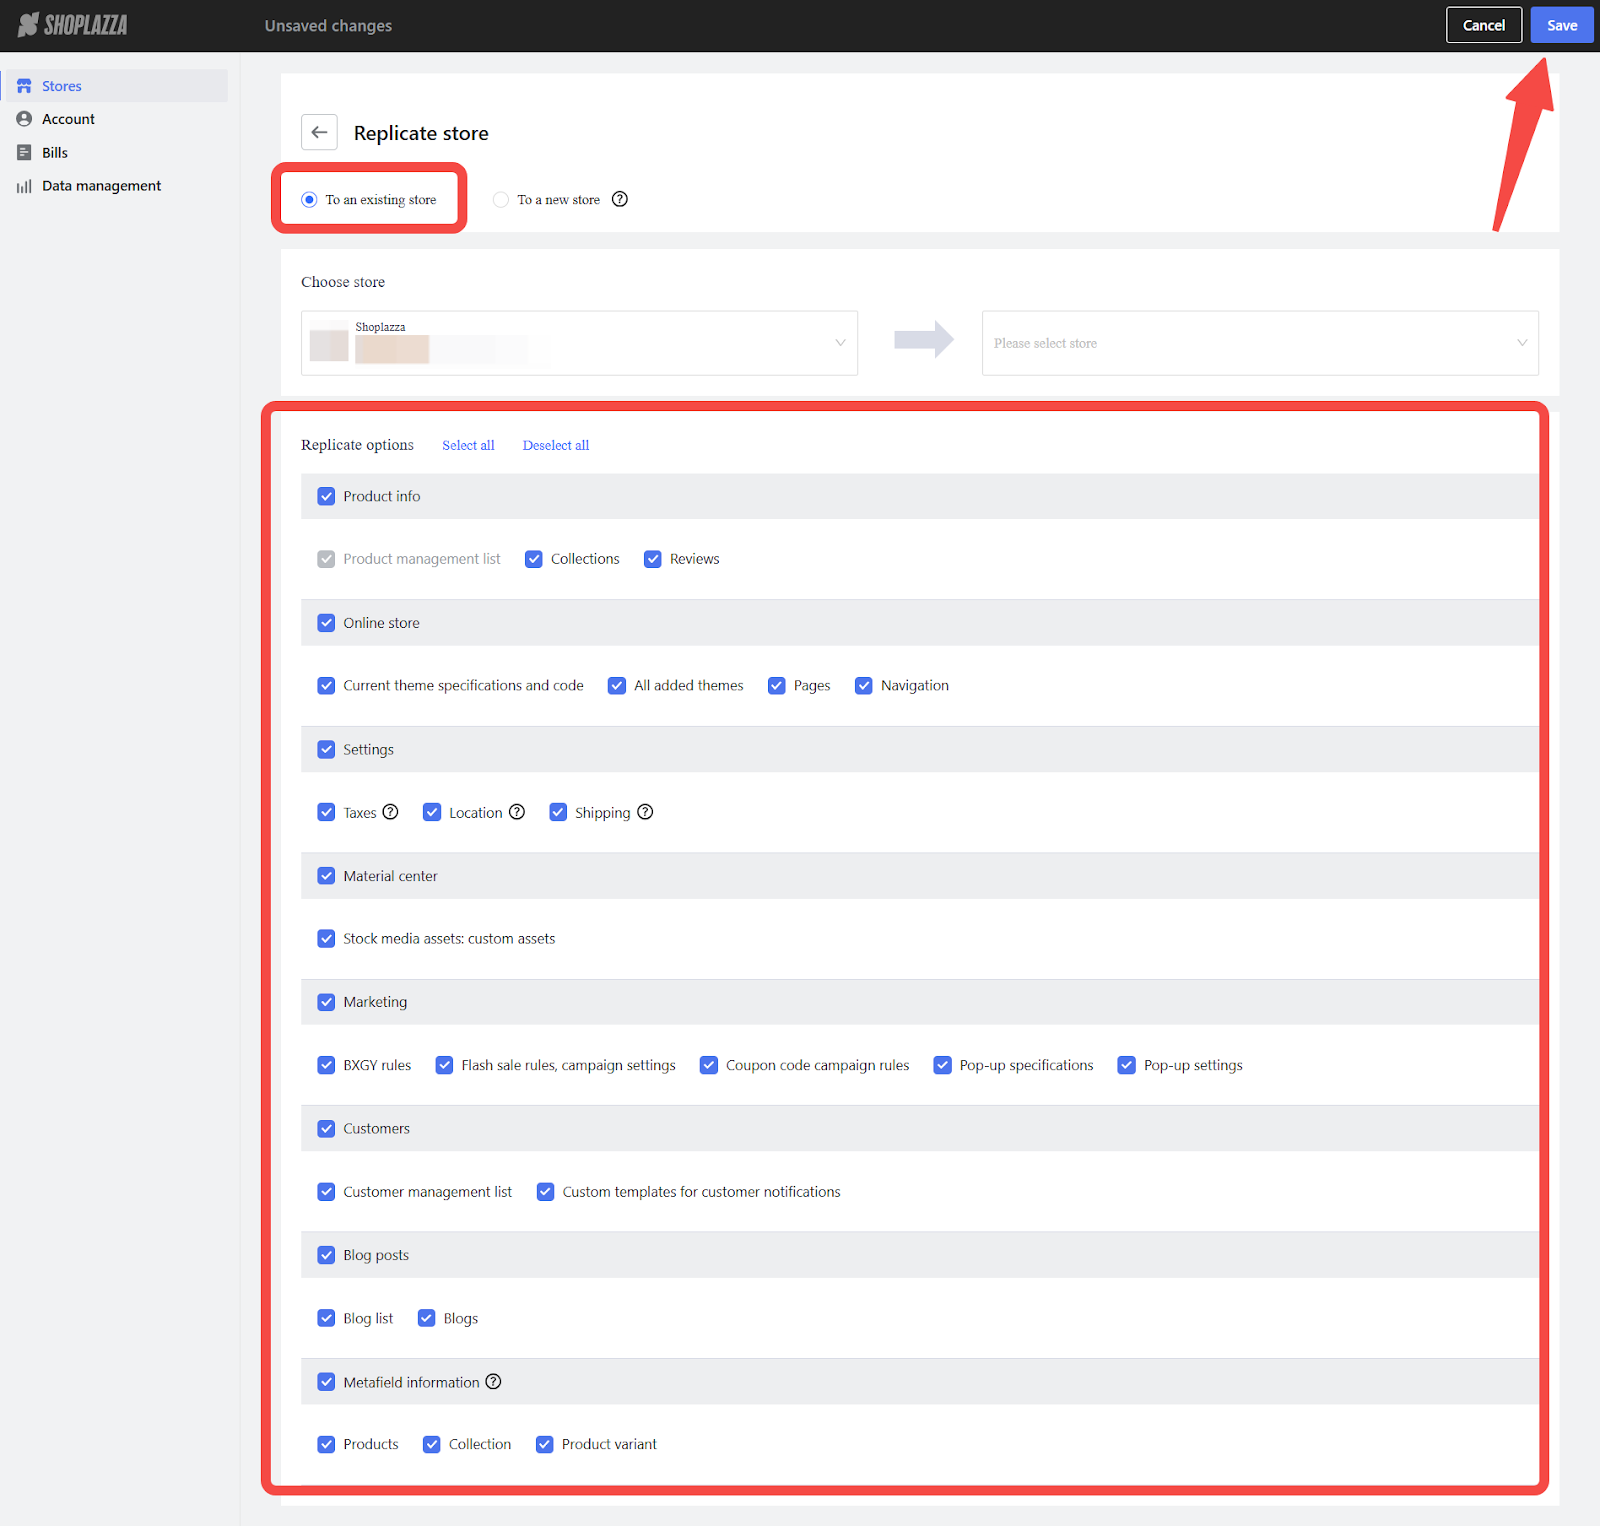
3. Replicate the demo store: In your Shoplazza admin, go to Manage Account > Store > Replicate Store and copy all its contents.
💡 Next steps:
- Customize navigation menus: Learn how to adjust your menus here.
- Update your policies: Go to Sales Channel > Online Store > Custom Pages and add your store’s unique details.
- Fine-tune your theme: Set up your store’s header and configure your store’s footer.
- Update banners and images: Design your store’s homepage and display listed products on your homepage.
📖 Need more help? Check out the article: Duplicating store data
Setting up your shipping plan
🚚 Shipping is a key part of the customer experience. You can either stick with the demo store’s global free shipping plan or create custom shipping options tailored to your business. If you're using the demo's store free shipping plan, skip this section and head over to the next section.
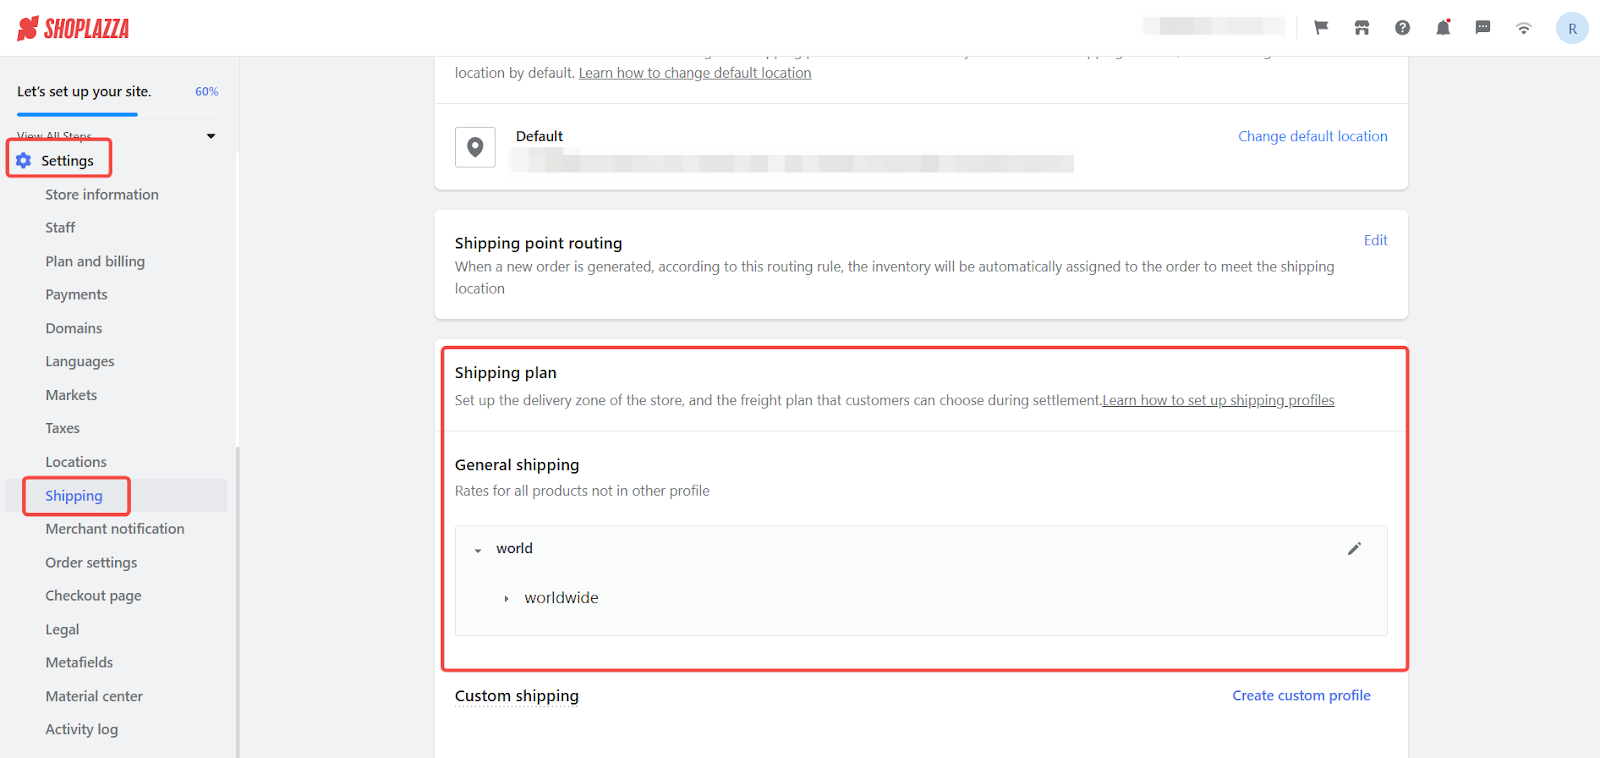
Need a custom shipping setup? No problem! Follow these steps:
- Understand shipping options: Learn more about shipping profiles.
-
Set up your shipping plans: Tailor your shipping options to your store’s needs:
- Flat-rate shipping: Set up flat shipping rates.
- Conditional free shipping: For example, offer free shipping for orders over $50. Learn how to set up free shipping rates.
Tips
Combine shipping rules to match your store's needs. For instance, offer free shipping for orders over $50 while charging a flat rate for smaller ones.
Connecting your domain
Want your store to look professional? Connect a custom domain!
- Purchase a domain: Providers like GoDaddy are great options.
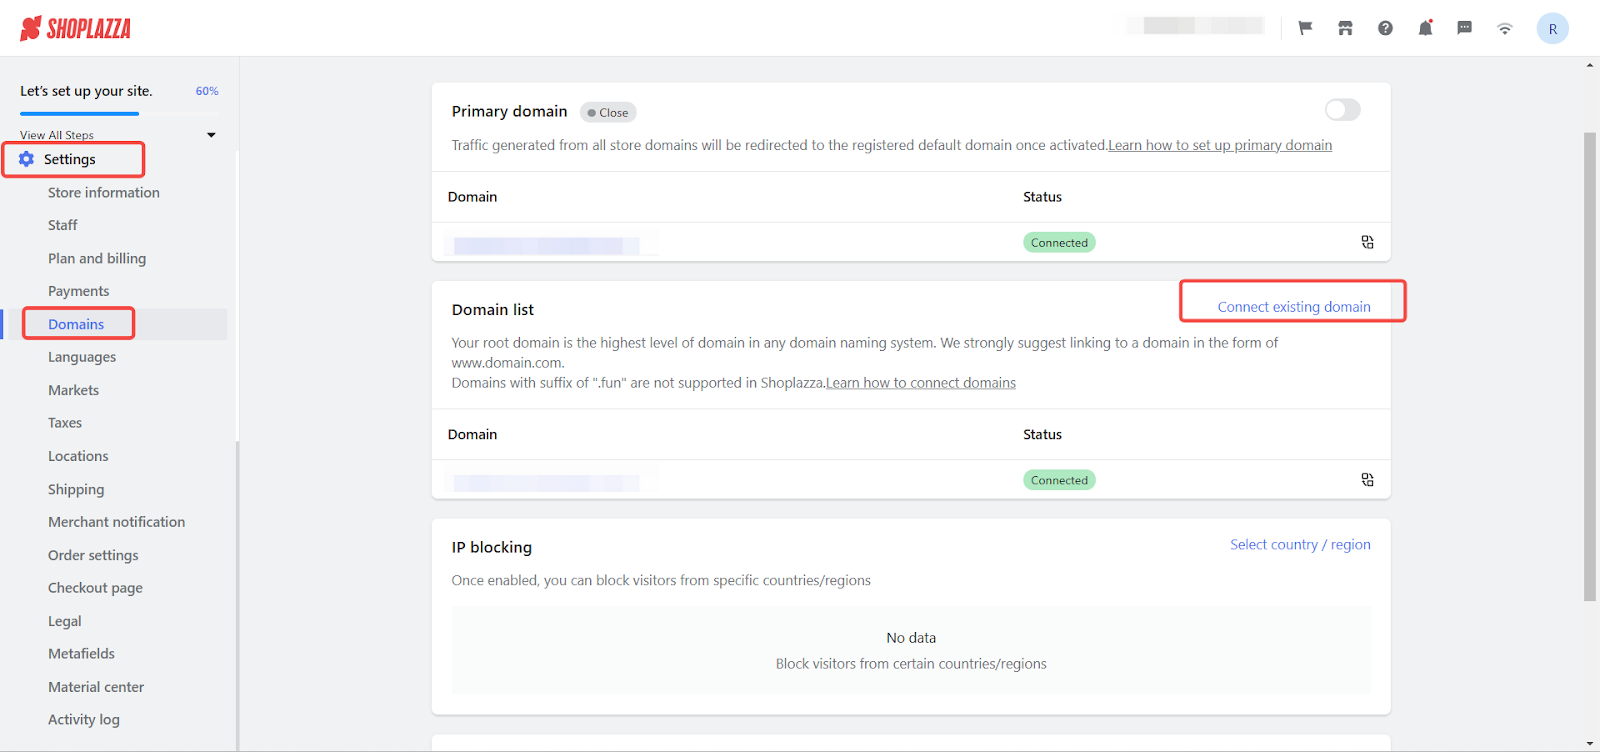
- Connect it to your store: Go to Settings > Domain > Connect Existing Domain.
Note
Domains ending in .FUN are not supported. DNS updates may take up to 10 minutes or longer to process. If your domain shows as “Not Secure,” the SSL certificate may take between 30 minutes and 2 hours to be issued.
📖 Need more help? Follow this guide: Verifying your domain
Setting up payment options
You’re almost there! Let’s make sure you can get paid:
- For personal accounts: Apply for PayPal or 2Checkout.
- For business accounts: Choose providers based on your market, like PayPal or credit cards for North America.
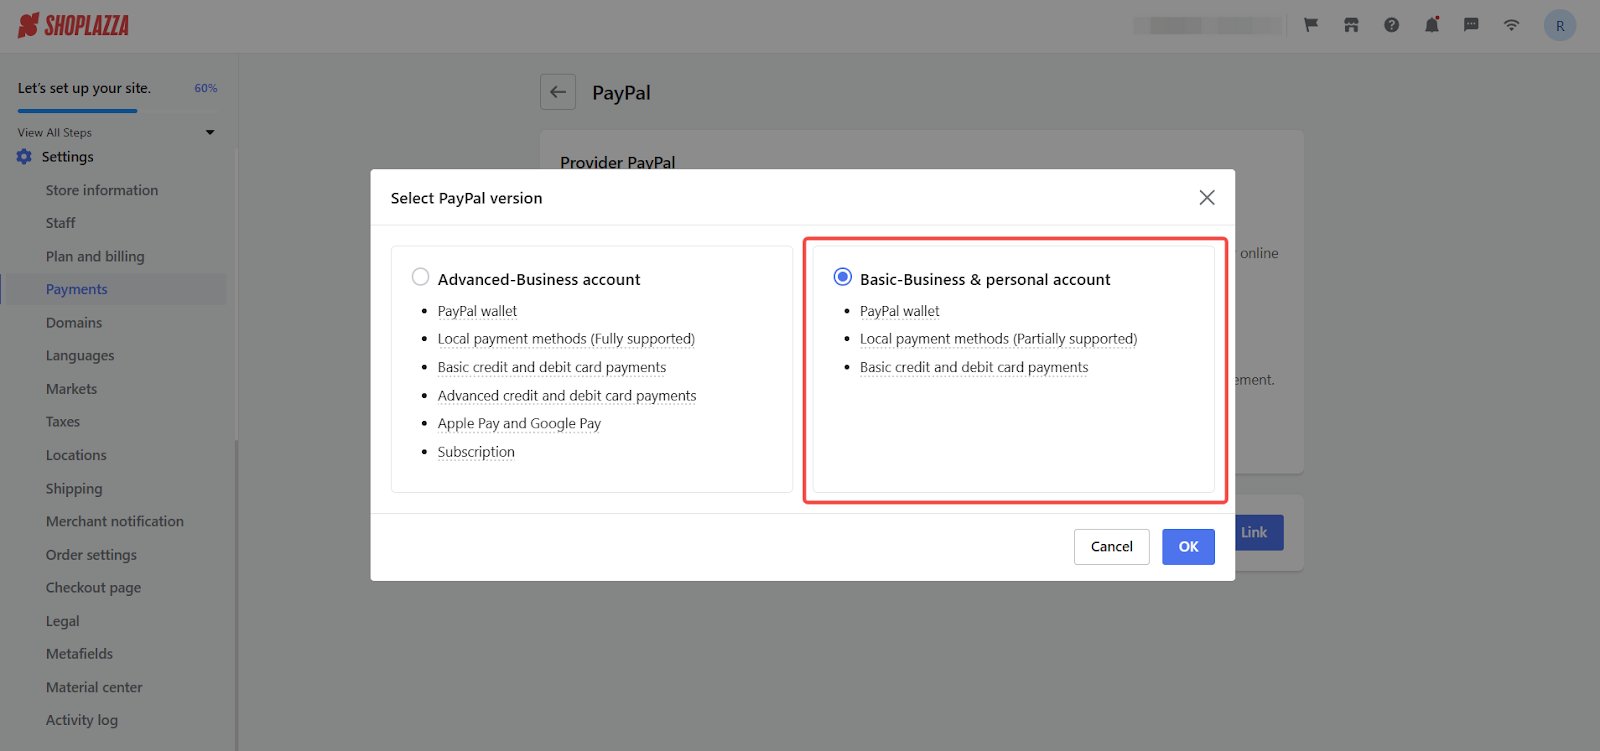
💡 Need guidance on adding a payment method? Check this out: Adding payment methods to your store.
Final checklist before launch
🎉 You’re nearly ready to go live! Make sure you check off these final steps:
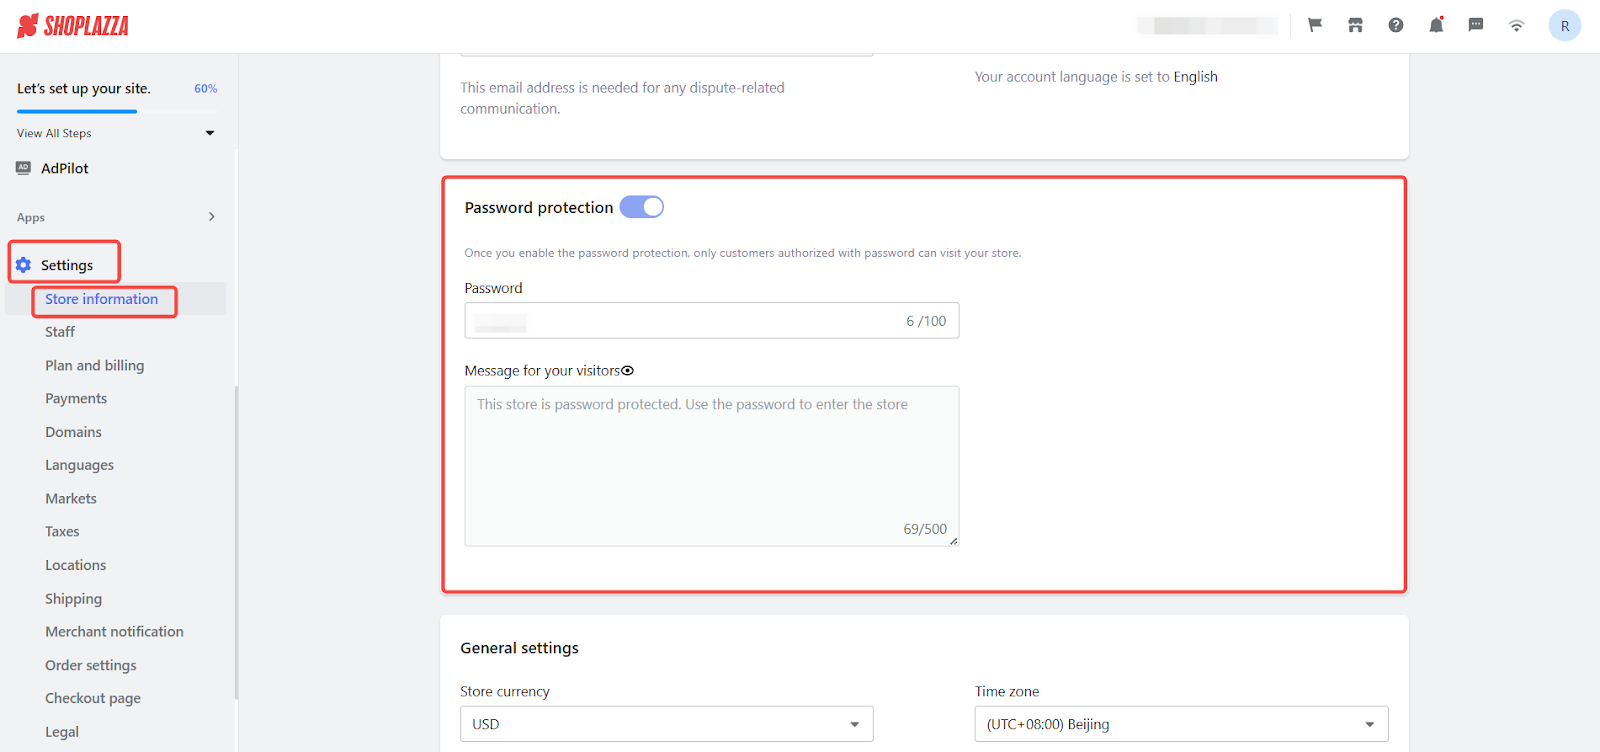
1. Disable password protection: Go to Settings > Store Information > Password Protection and turn it off.
2. Note: You must have a payment card linked for your subscription to disable password protection. Follow this guide for more details: Subscription Plans & Payment
1. Preview your store: Test it on both desktop and mobile to ensure the design looks good and everything functions properly.
2. Review your policies: Double-check your Terms of Service, Privacy Policy, and other pages to make sure all details are accurate.
💬 Need support? We’re here to help every step of the way. Reach out to us with any questions! Your dropshipping journey starts here—let’s turn your vision into reality! 🚀

Comments
Please sign in to leave a comment.