Embedding a Yahoo Advertising Code into your website involves a few key steps to ensure accurate tracking and functionality. This guide outlines the process, tailored for two different scenarios: tracking Product ID and tracking Variant ID.
Steps
1. Prepare the Code: Obtain the original Yahoo Advertising Code.
2. Customize the Pixel ID:
-
- Find the Pixel ID in the code (represented as '10120000').
- Replace this with your unique Pixel ID provided by Yahoo.
3. Choose and Modify the Appropriate Code:
For Product ID tracking:
-
-
- Use the following code snippet if your goal is to track the Product ID.
- Ensure to replace '10120000' with your Pixel ID in all four parts of the code.
-
<script type="text/javascript">

  (function (w, d, t, r, u) {

    w[u] = w[u] || [];

    w[u].push({

      'projectId': '10000',

      'properties': {

        'pixelId': '10120000'

      }

    });

    var s = d.createElement(t);

    s.src = r;

    s.async = true;

    s.onload = s.onreadystatechange = function () {

      var y, rs = this.readyState,

        c = w[u];

      if (rs && rs != "complete" && rs != "loaded") {

        return

      }

      try {

        y = YAHOO.ywa.I13N.fireBeacon;

        w[u] = [];

        w[u].push = function (p) {

          y([p])

        };

        y(c)

      } catch (e) {}

    };

    var scr = d.getElementsByTagName(t)[0],

      par = scr.parentNode;

    par.insertBefore(s, scr)

  })(window, document, "script", "https://s.yimg.com/wi/ytc.js", "dotq");


  $(function () {

    window.dotq = window.dotq || [];

    // 產品頁面

    $(document.body).on('dj.viewContent', function (e, data) {

      window.dotq.push({

        'projectId': '10000',

        'properties': {

          'pixelId': '10120000',

          'qstrings': {

            'et': 'custom',

            'ea': 'ViewProduct',

            'product_id': data.product.id

          }

        }

      });

    });

    // 加入購物車頁面

    $(document.body).on('dj.addToCart', function (e, v) {

      window.dotq.push({

        'projectId': '10000',

        'properties': {

          'pixelId': '10120000',

          'qstrings': {

            'et': 'custom',

            'ea': 'AddToCart',

            'gv': Number(v.item_price) * Number(v.number || 1),

            'product_id': v.id

          }

        }

      });

    });

    // 購買完成頁面

    $(document.body).on("dj.purchase", function (e, v) {

      v.line_items.map(function (item) {

        window.dotq.push({

          'projectId': '10000',

          'properties': {

            'pixelId': '10120000',

            'qstrings': {

              'et': 'custom',

              'ea': 'Purchase',

              'gv': Number(item.total),

              'product_id': item.product_id

            }

          }

        });

      });

    })

  })

</script>
// [Insert Product ID Tracking Code here]
;
For Variant ID tracking:
-
-
- If you need to track the Variant ID instead of the Product ID, use this second code.
- Again, replace '10120000' with your Pixel ID in all four parts of the code.
-
<script type="text/javascript">

  (function (w, d, t, r, u) {

    w[u] = w[u] || [];

    w[u].push({

      'projectId': '10000',

      'properties': {

        'pixelId': '10120000'

      }

    });

    var s = d.createElement(t);

    s.src = r;

    s.async = true;

    s.onload = s.onreadystatechange = function () {

      var y, rs = this.readyState,

        c = w[u];

      if (rs && rs != "complete" && rs != "loaded") {

        return

      }

      try {

        y = YAHOO.ywa.I13N.fireBeacon;

        w[u] = [];

        w[u].push = function (p) {

          y([p])

        };

        y(c)

      } catch (e) {}

    };

    var scr = d.getElementsByTagName(t)[0],

      par = scr.parentNode;

    par.insertBefore(s, scr)

  })(window, document, "script", "https://s.yimg.com/wi/ytc.js", "dotq");


  $(function () {

    window.dotq = window.dotq || [];

    // 產品頁面

    $(document.body).on('dj.viewContent', function (e, data) {

      window.dotq.push({

        'projectId': '10000',

        'properties': {

          'pixelId': '10120000',

          'qstrings': {

            'et': 'custom',

            'ea': 'ViewProduct',

            'product_id': data.selected && data.selected.id

          }

        }

      });

    });

    // 加入購物車頁面

    $(document.body).on('dj.addToCart', function (e, v) {

      window.dotq.push({

        'projectId': '10000',

        'properties': {

          'pixelId': '10120000',

          'qstrings': {

            'et': 'custom',

            'ea': 'AddToCart',

            'gv': Number(v.item_price) * Number(v.number || 1),

            'product_id': v.variant_id

          }

        }

      });

    });

    // 購買完成頁面

    $(document.body).on("dj.purchase", function (e, v) {

      v.line_items.map(function (item) {

        window.dotq.push({

          'projectId': '10000',

          'properties': {

            'pixelId': '10120000',

            'qstrings': {

              'et': 'custom',

              'ea': 'Purchase',

              'gv': Number(item.total),

              'product_id': item.variant_id

            }

          }

        });

      });

    })

  })

</script>
// [Insert Variant ID Tracking Code here];
4. Navigate to the Shoplazza app store:
-
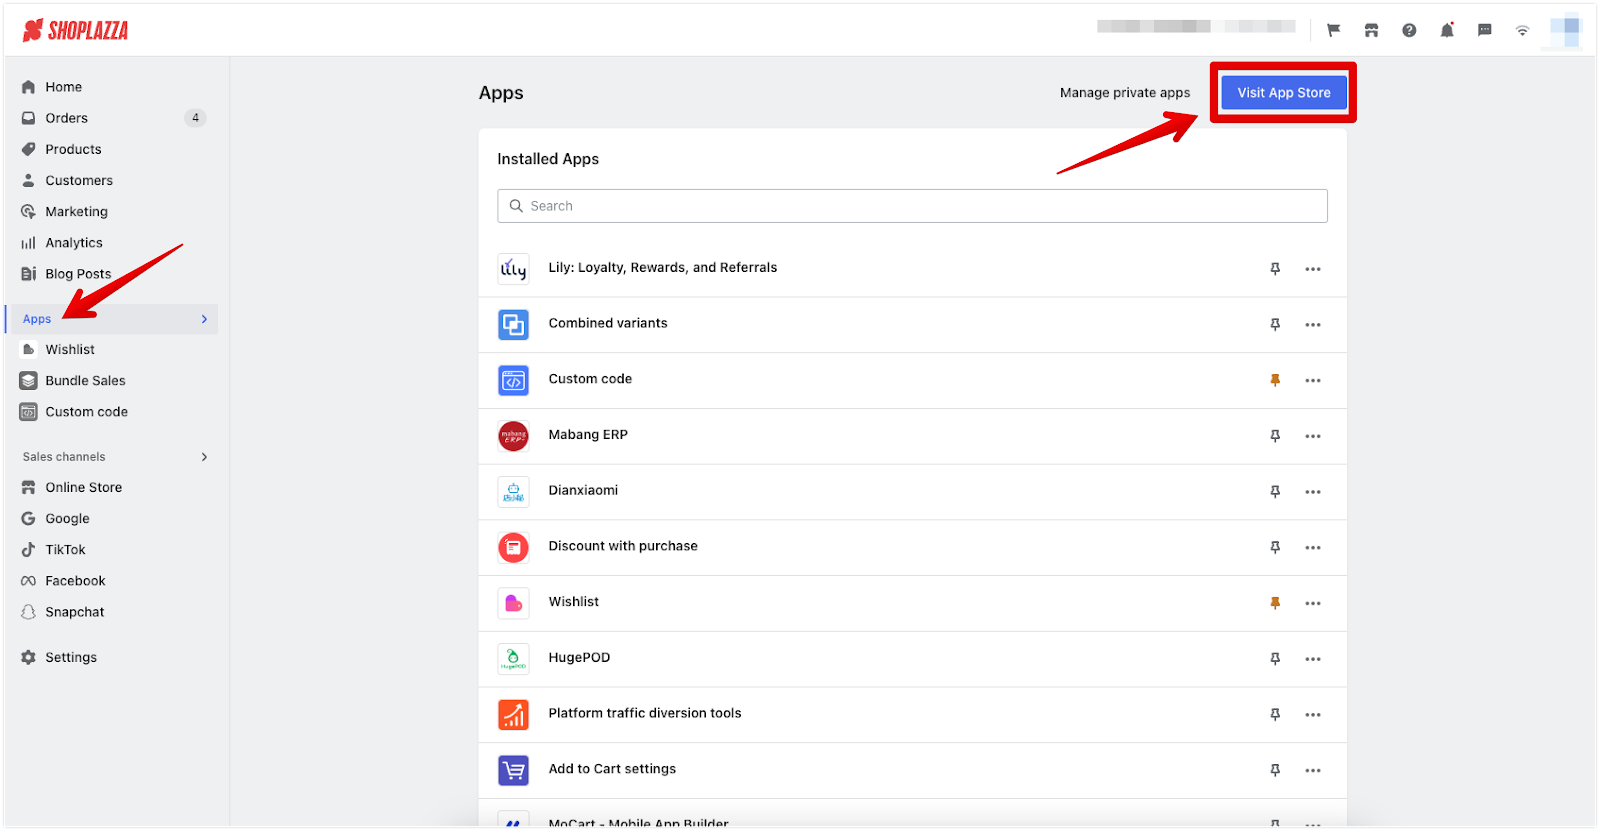
- Head over to your Shoplazza Admin > Apps and click on Visit App Store.
-
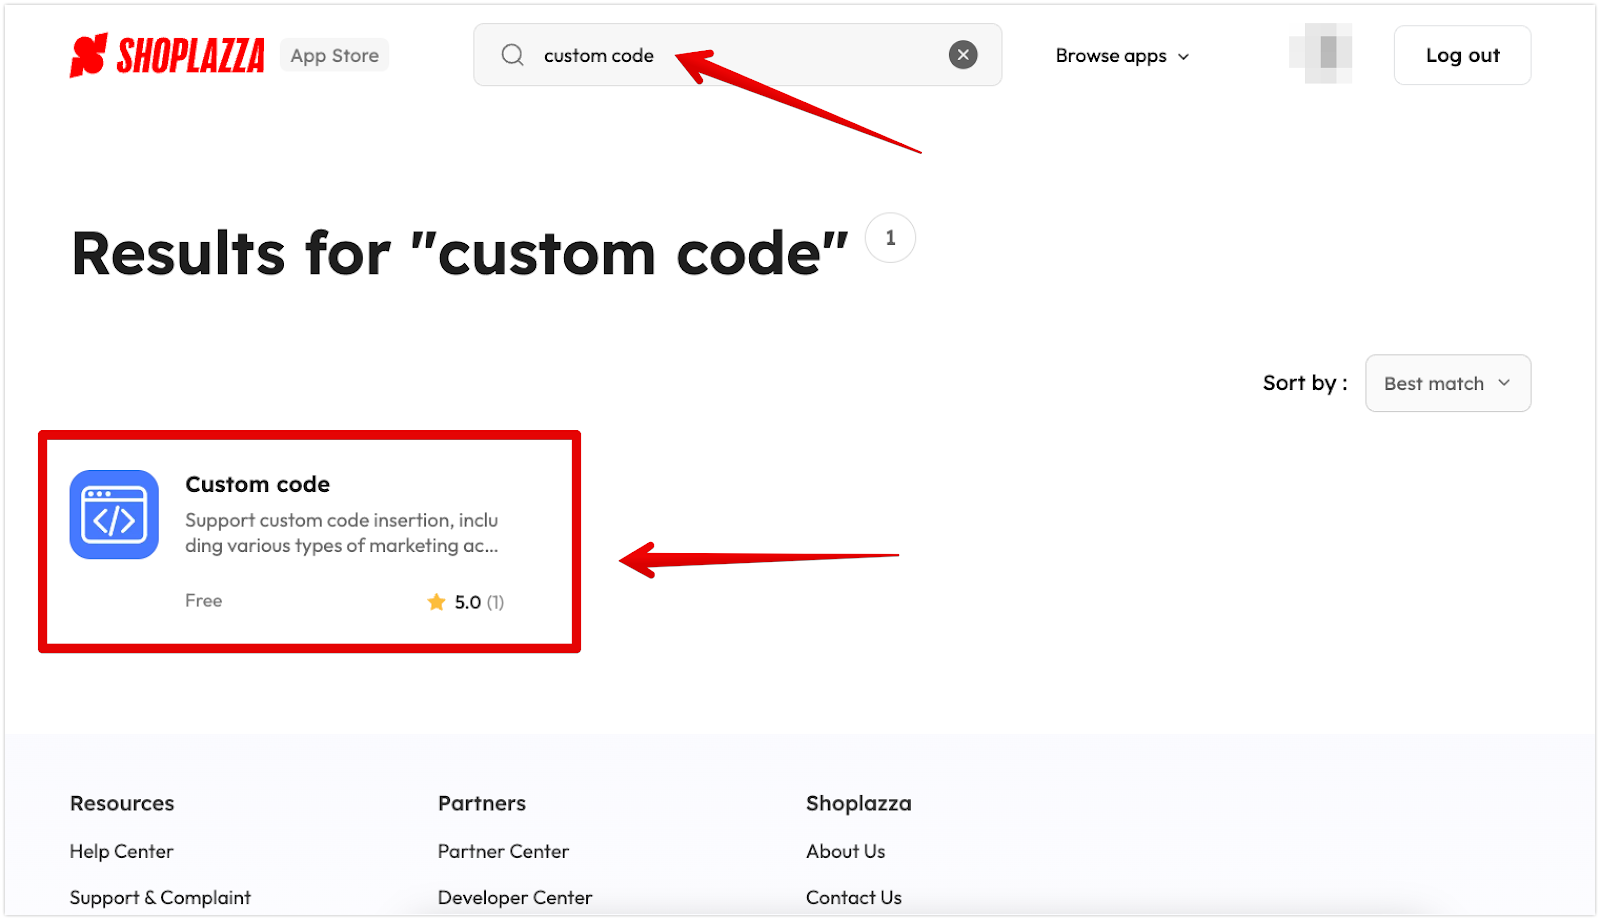
- Search for the app Custom code.
-
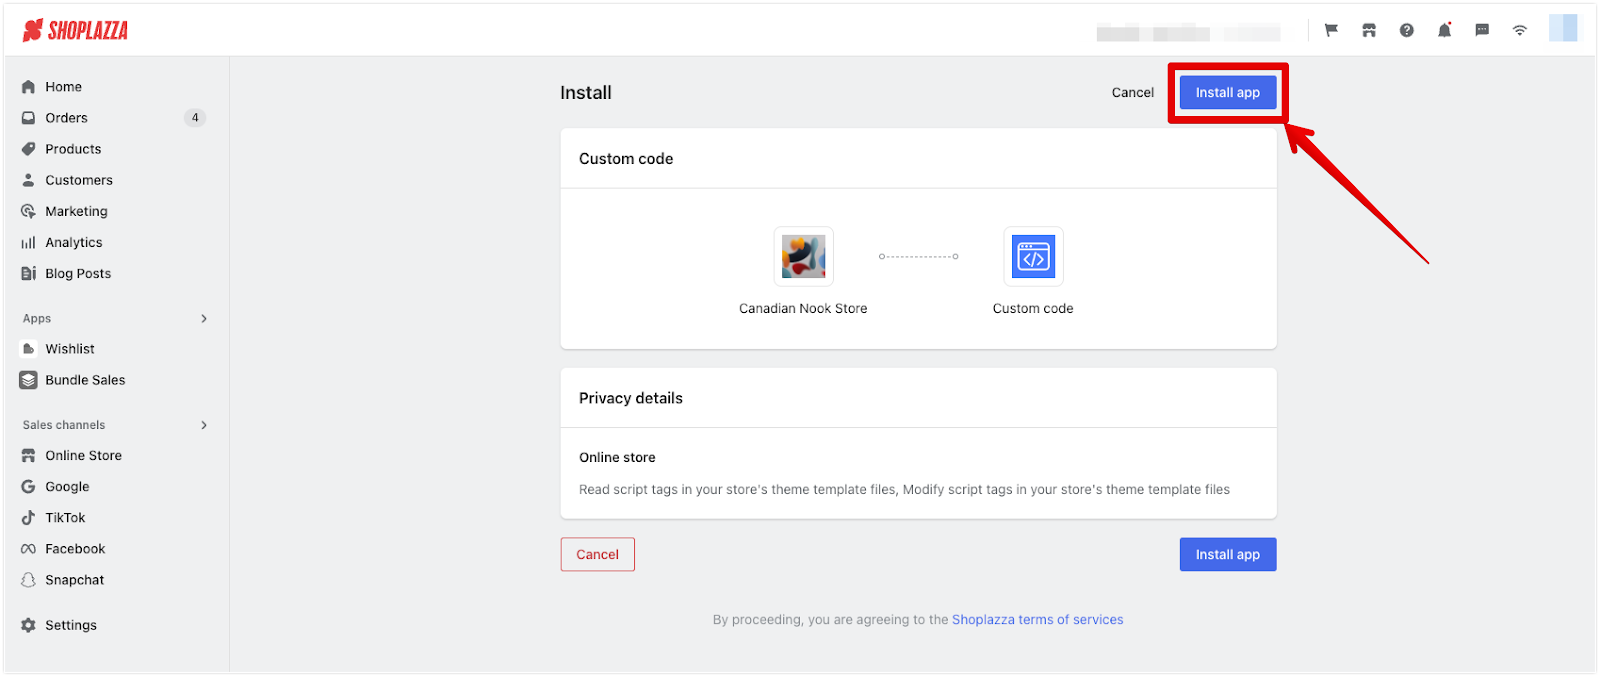
- Click on Install app.
5. Insert the code in the app:
-
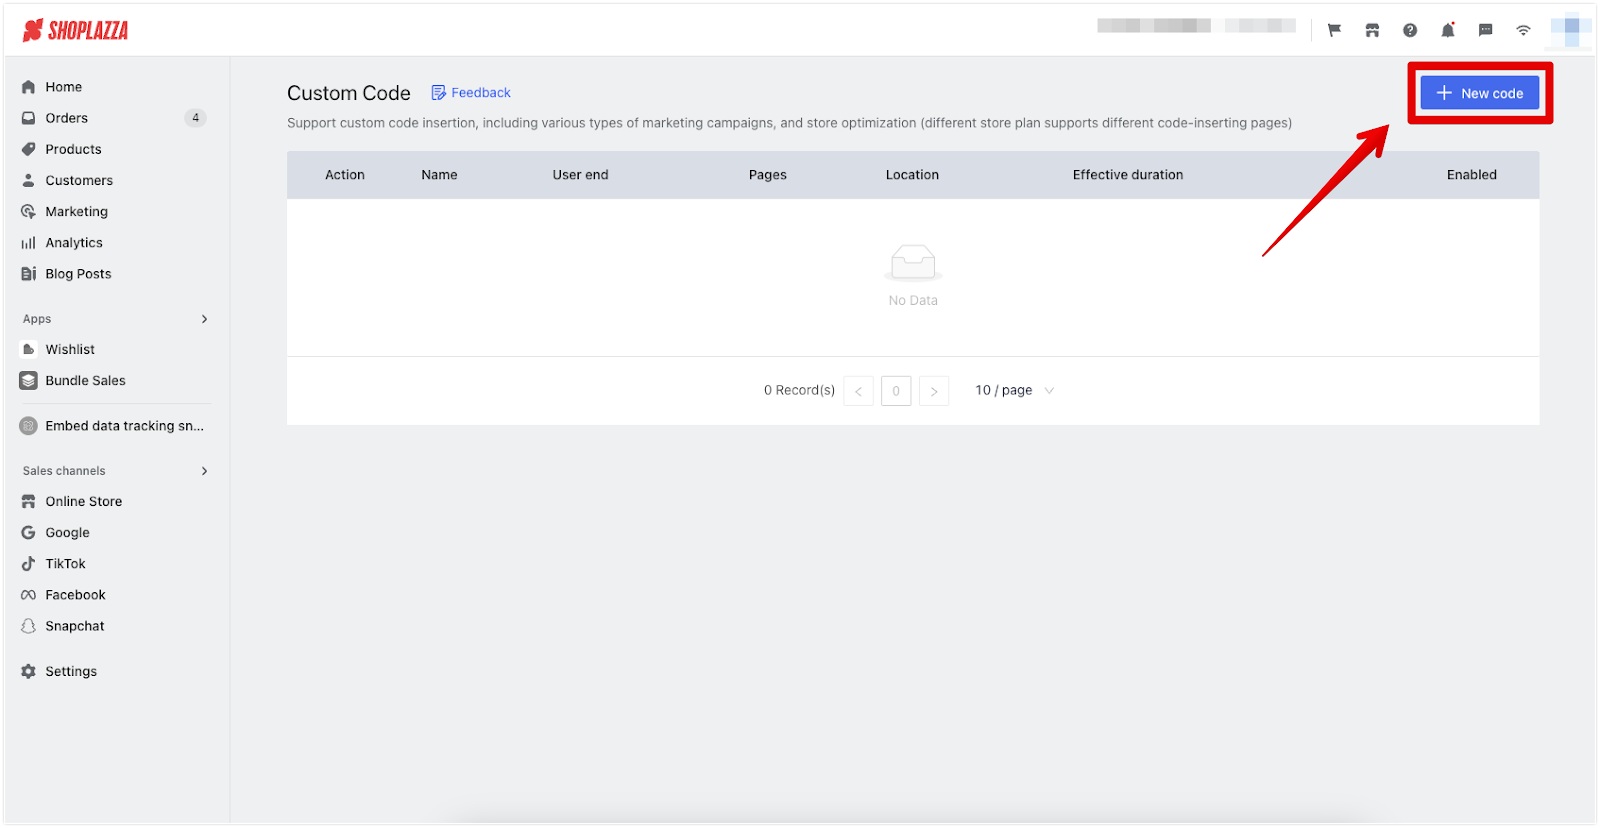
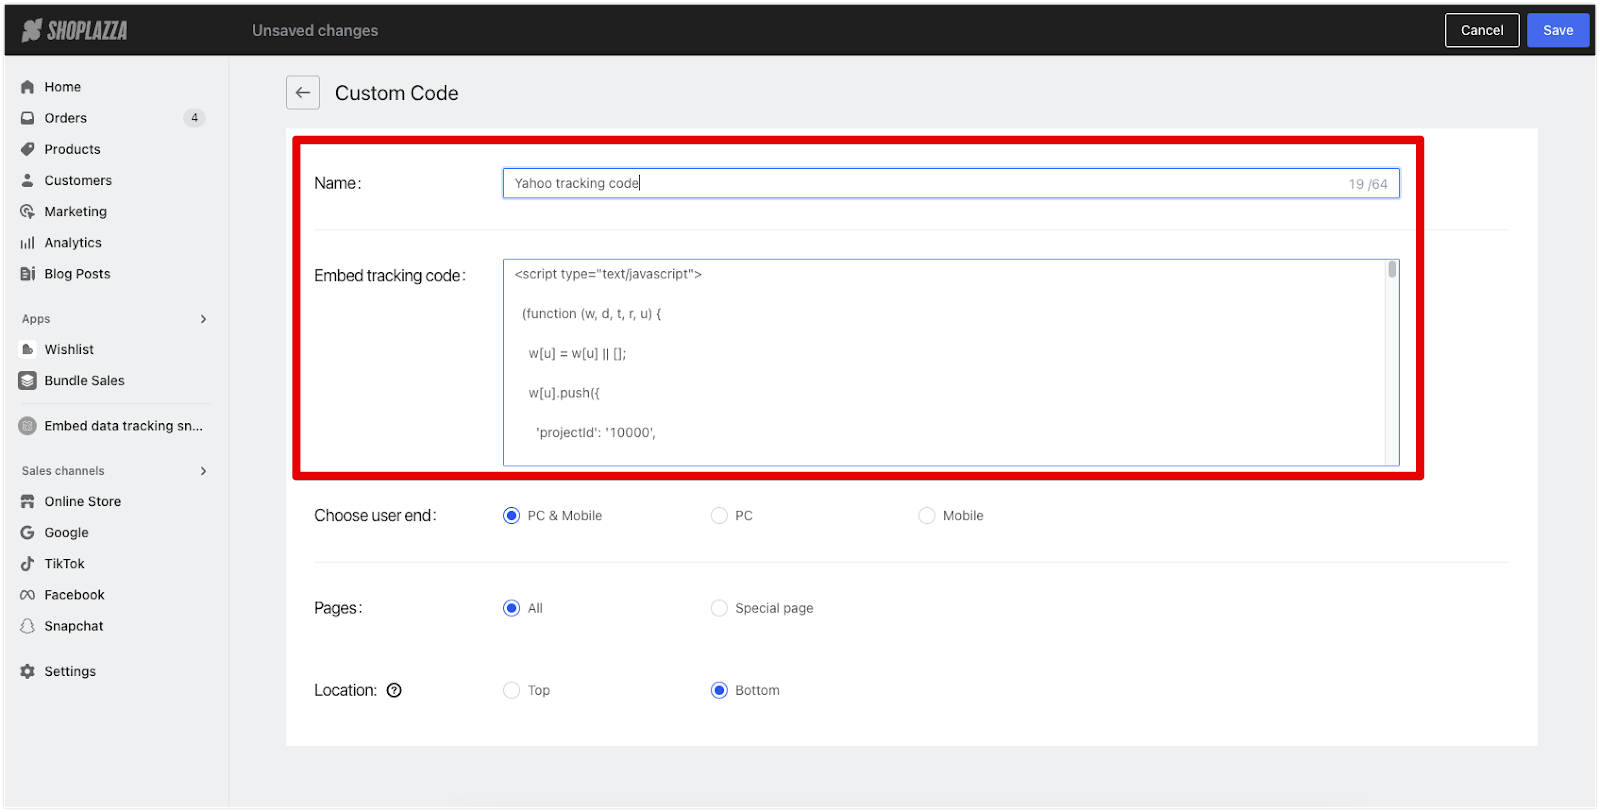
- Once installed, the page will automatically take you to the app. Click + New code.
-
- Give your snippet a name and paste the tracking code here.
-
- Choose PC & Mobile and select All pages and place the code at the Top of the page.
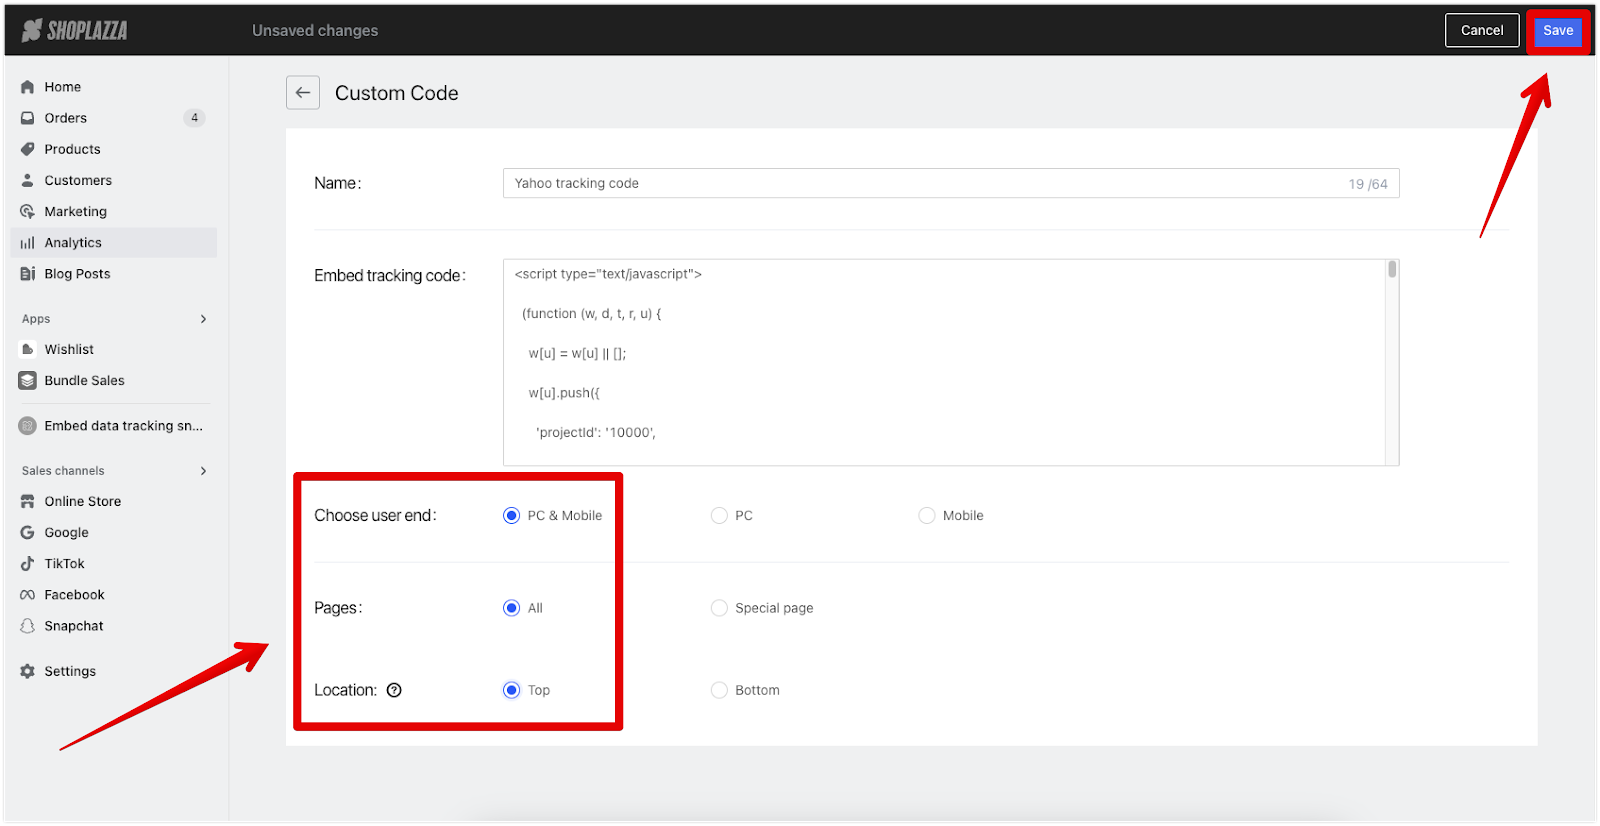
6. Save and Test: After embedding the code, save your changes. Ensure to test the functionality to verify that the tracking works as intended.
By carefully following these steps and using the correct code snippet for your specific need, you can successfully embed the Yahoo Advertising Code into your website. This will enable you to track user interactions more effectively, enhancing your online business strategy.


Comments
Article is closed for comments.