The Product Customizer app provides a seamless way to offer personalized products through Print on Demand (POD). From custom apparel to unique gifts and holiday-themed designs, this app simplifies product customization, enhances customer engagement, and unlocks new sales opportunities. This guide explains each step to maximize the app’s potential and elevate your store.
Installing the app
Installing and setting up the Product Customizer app is simple:
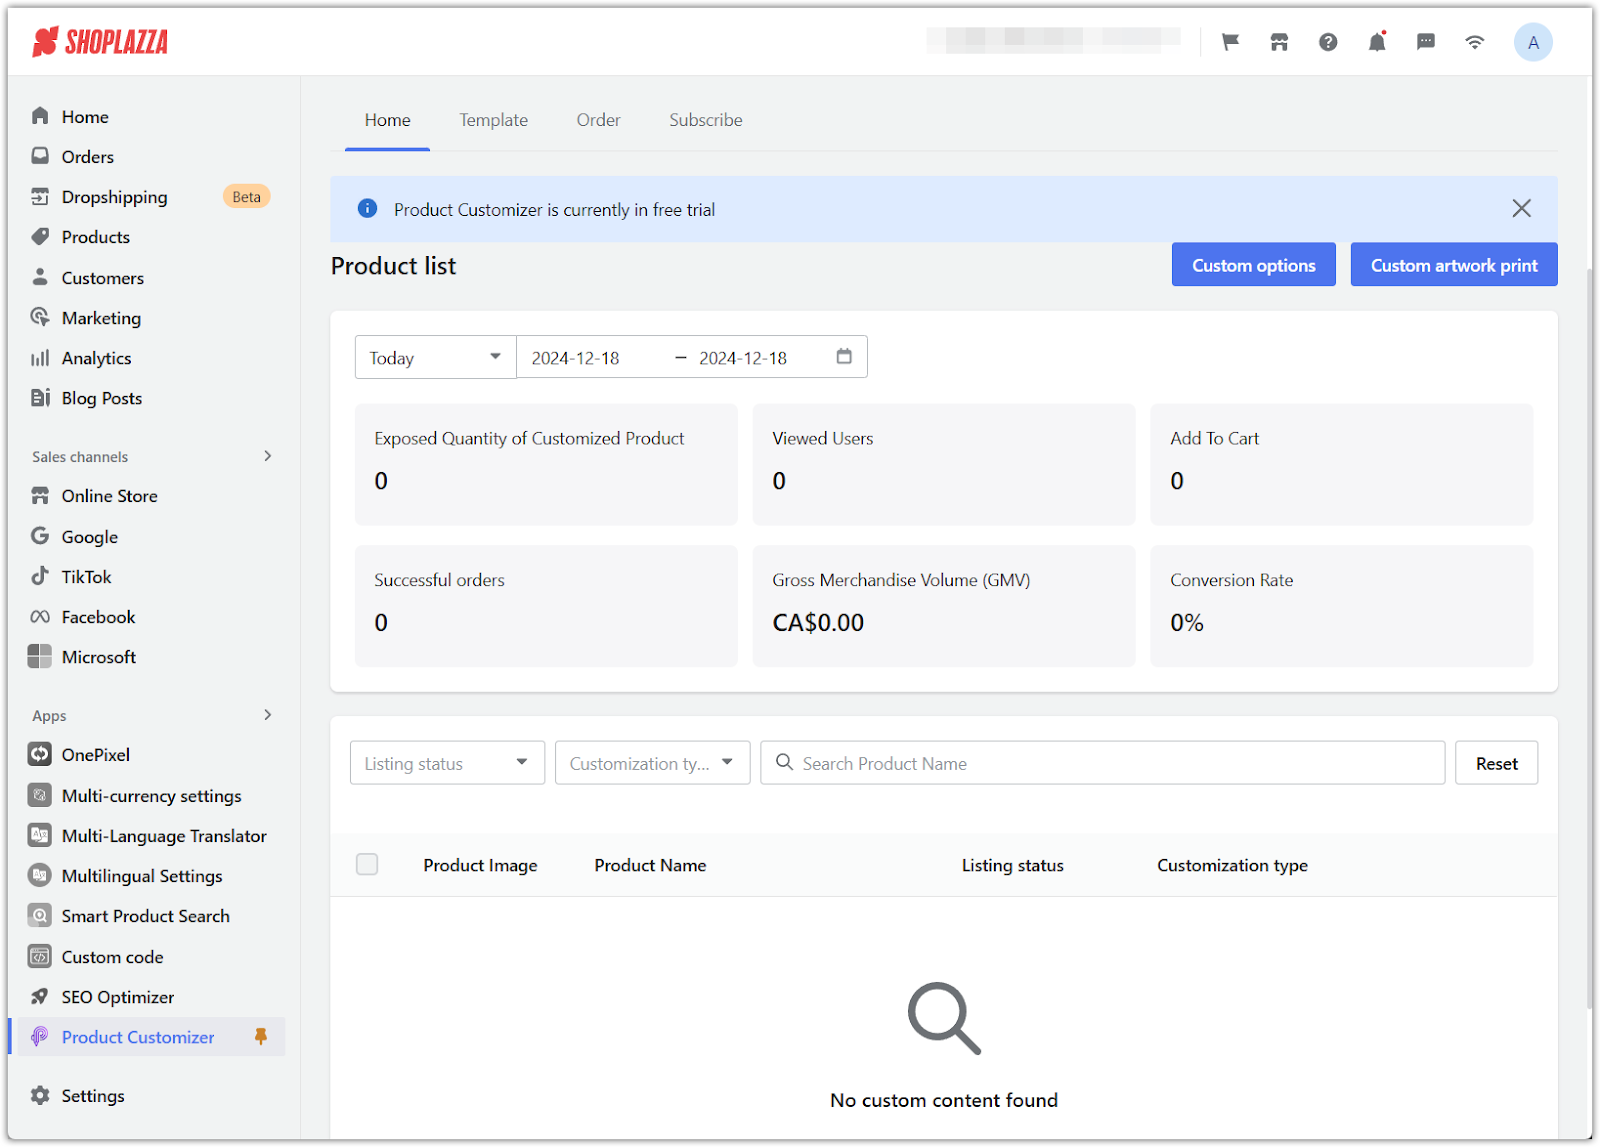
1. Install the app: Click Product Customizer to install it. After installation, the homepage provides access to key metrics, including order volume, total merchandise value (GMV), and conversion rates.
Setting up components
To enable customization options on your product pages, complete this quick one-time setup:
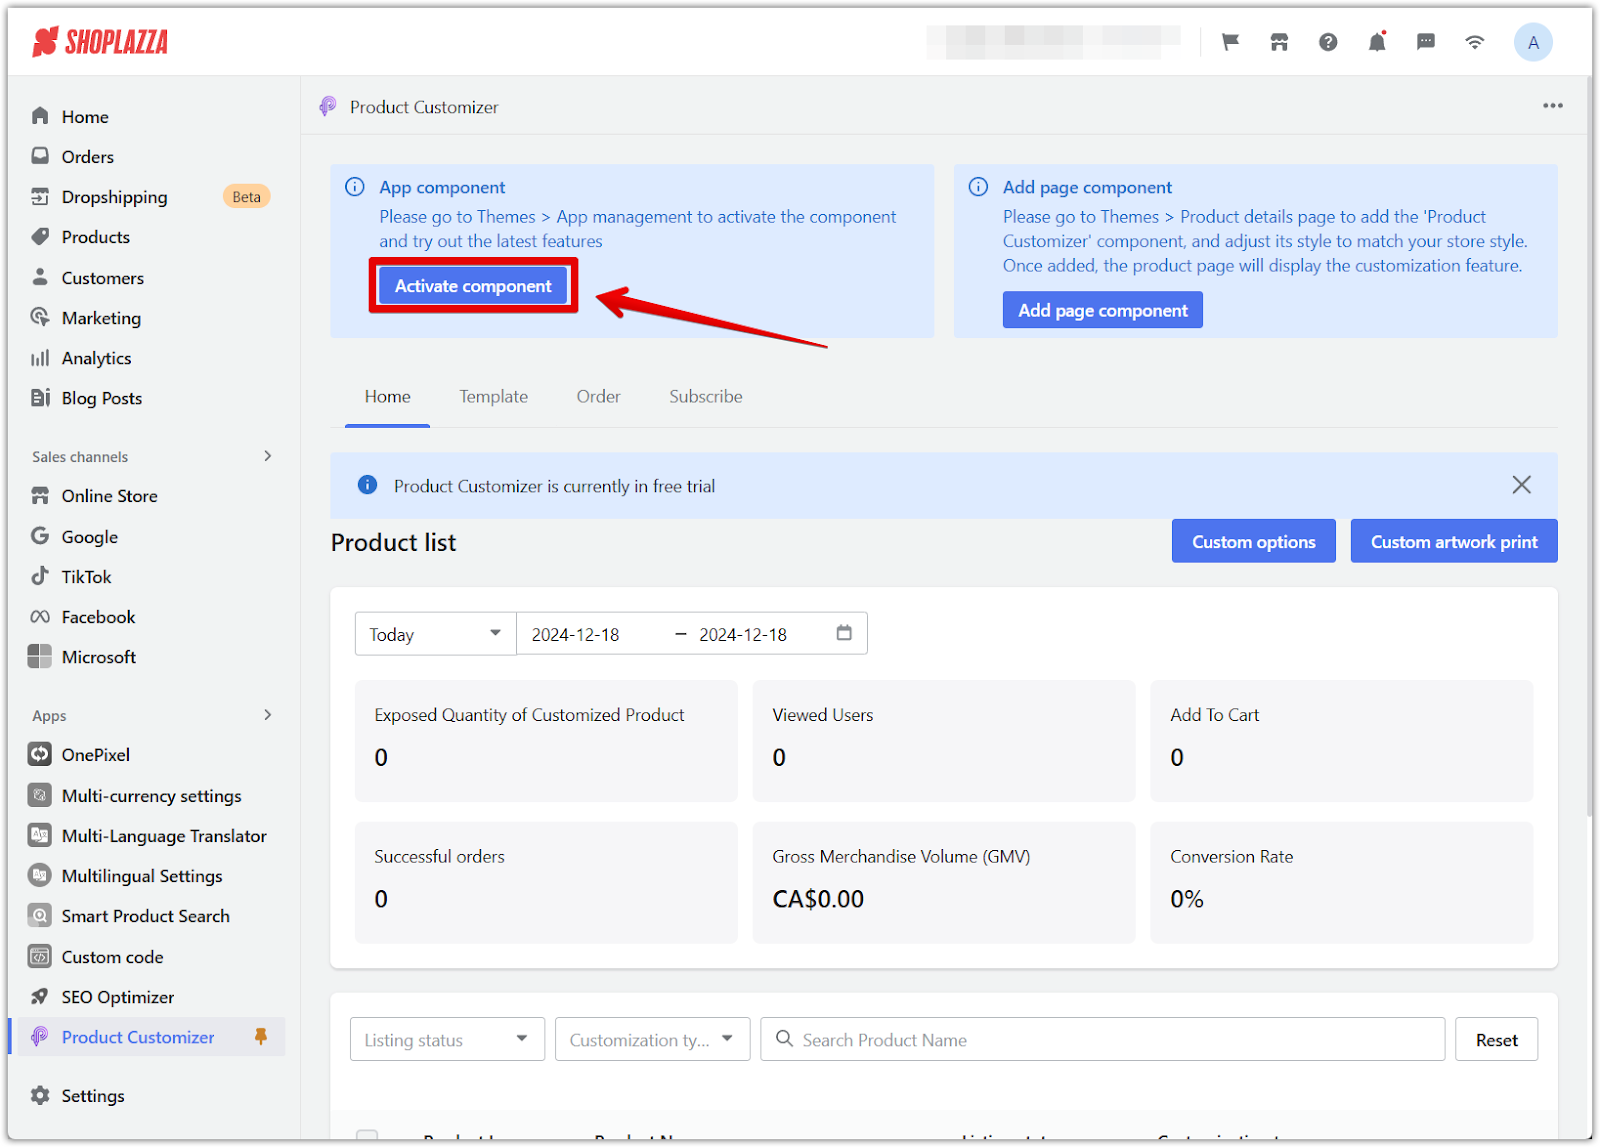
1. Activate the app component: Log in to your Shoplazza admin and go to Apps > Product Customizer. Click the Activate component to enable the Product Customizer.
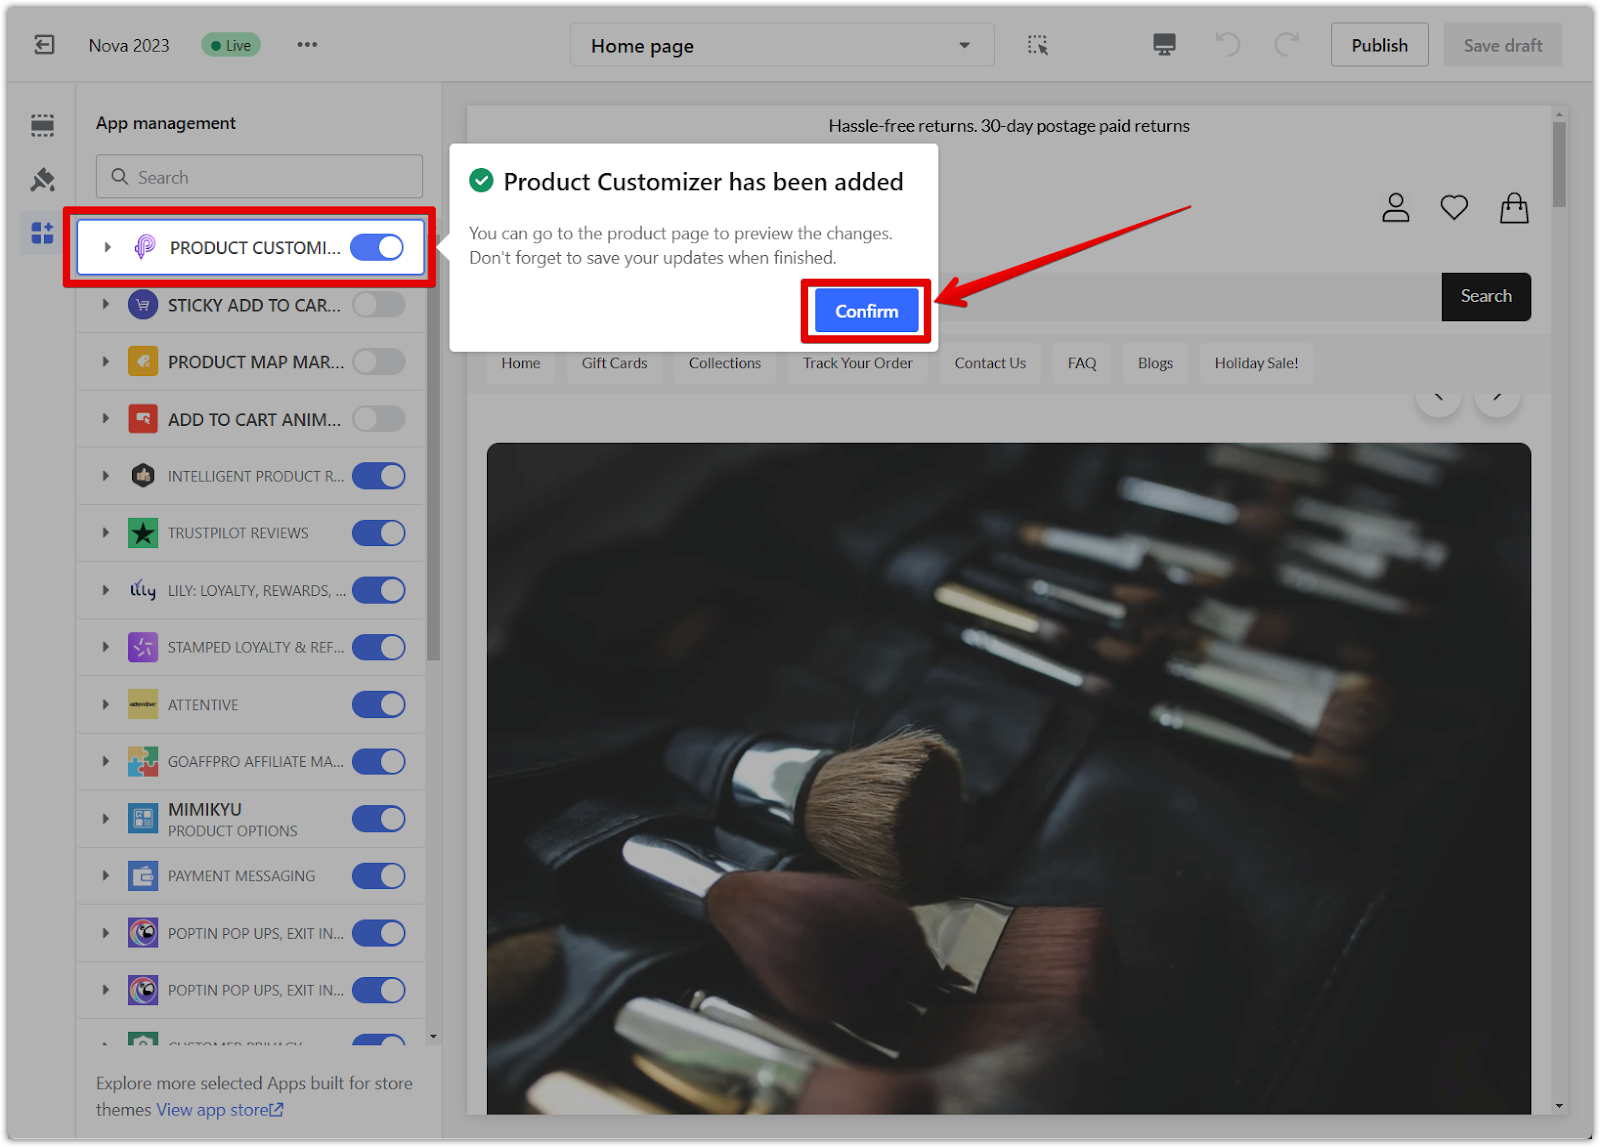
2. Enable the page component: After activation, you will be directed to the Theme Editor. Click Confirm to enable the Product Customizer in your store’s theme.
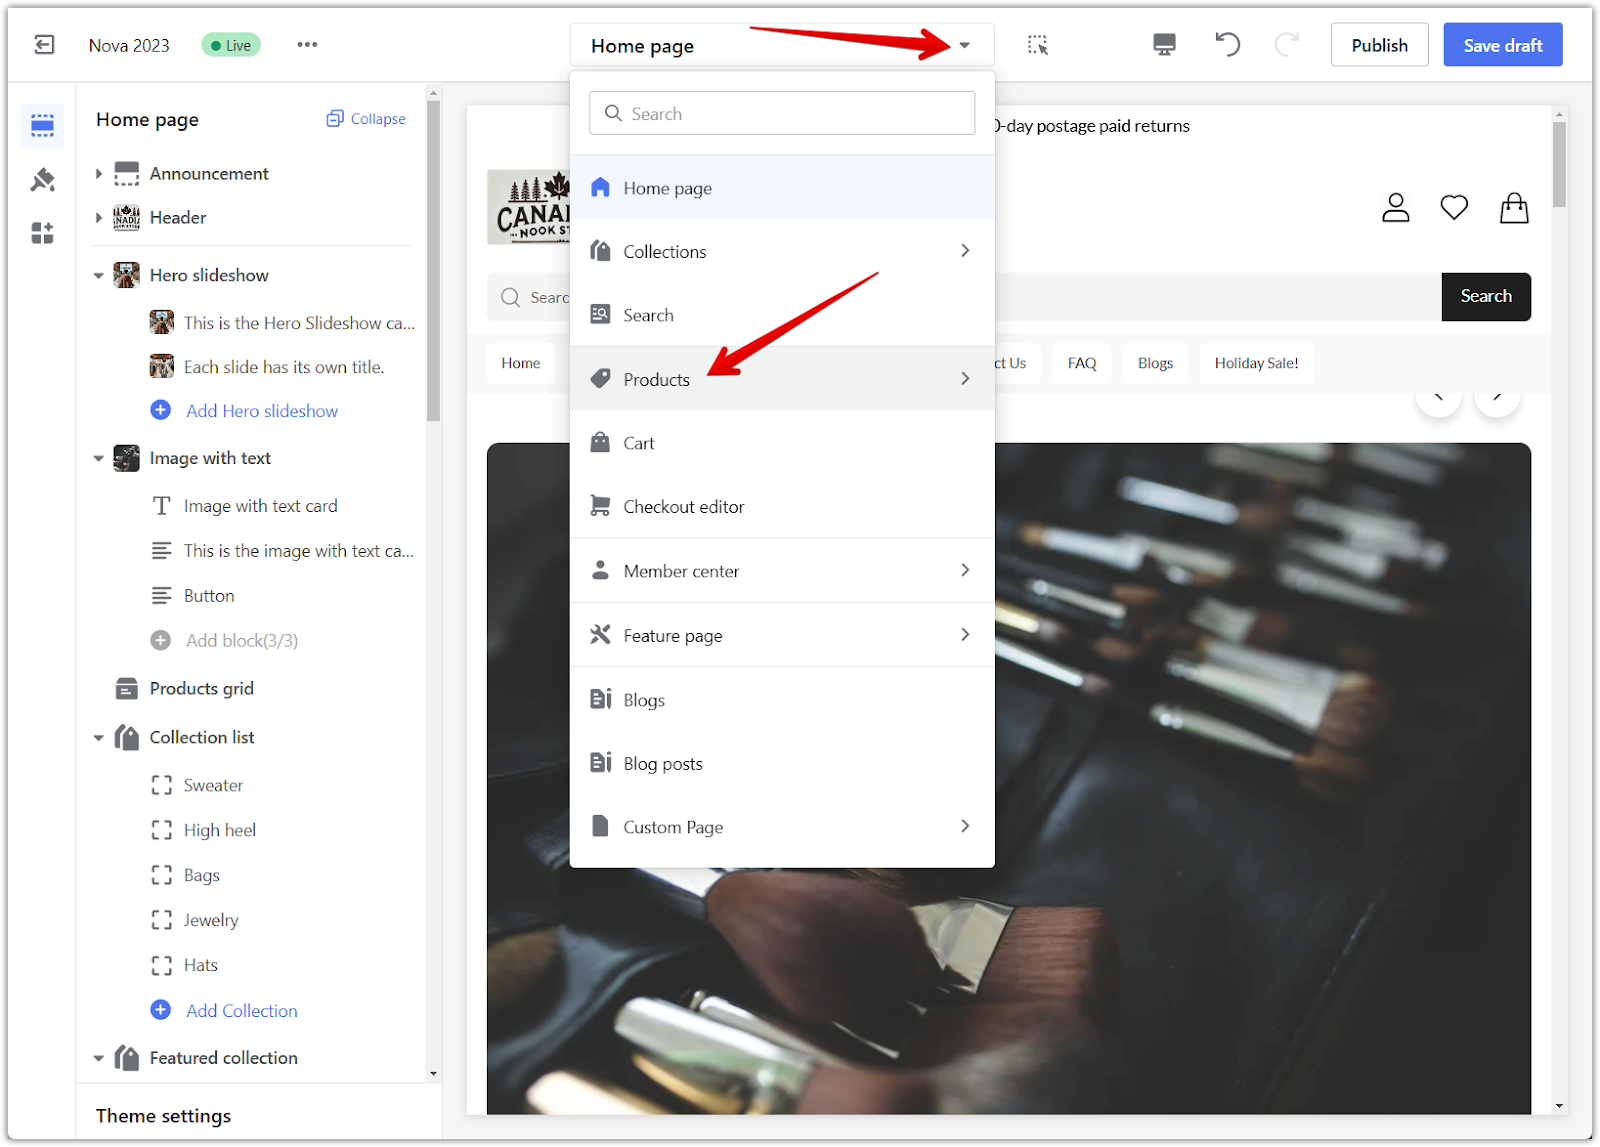
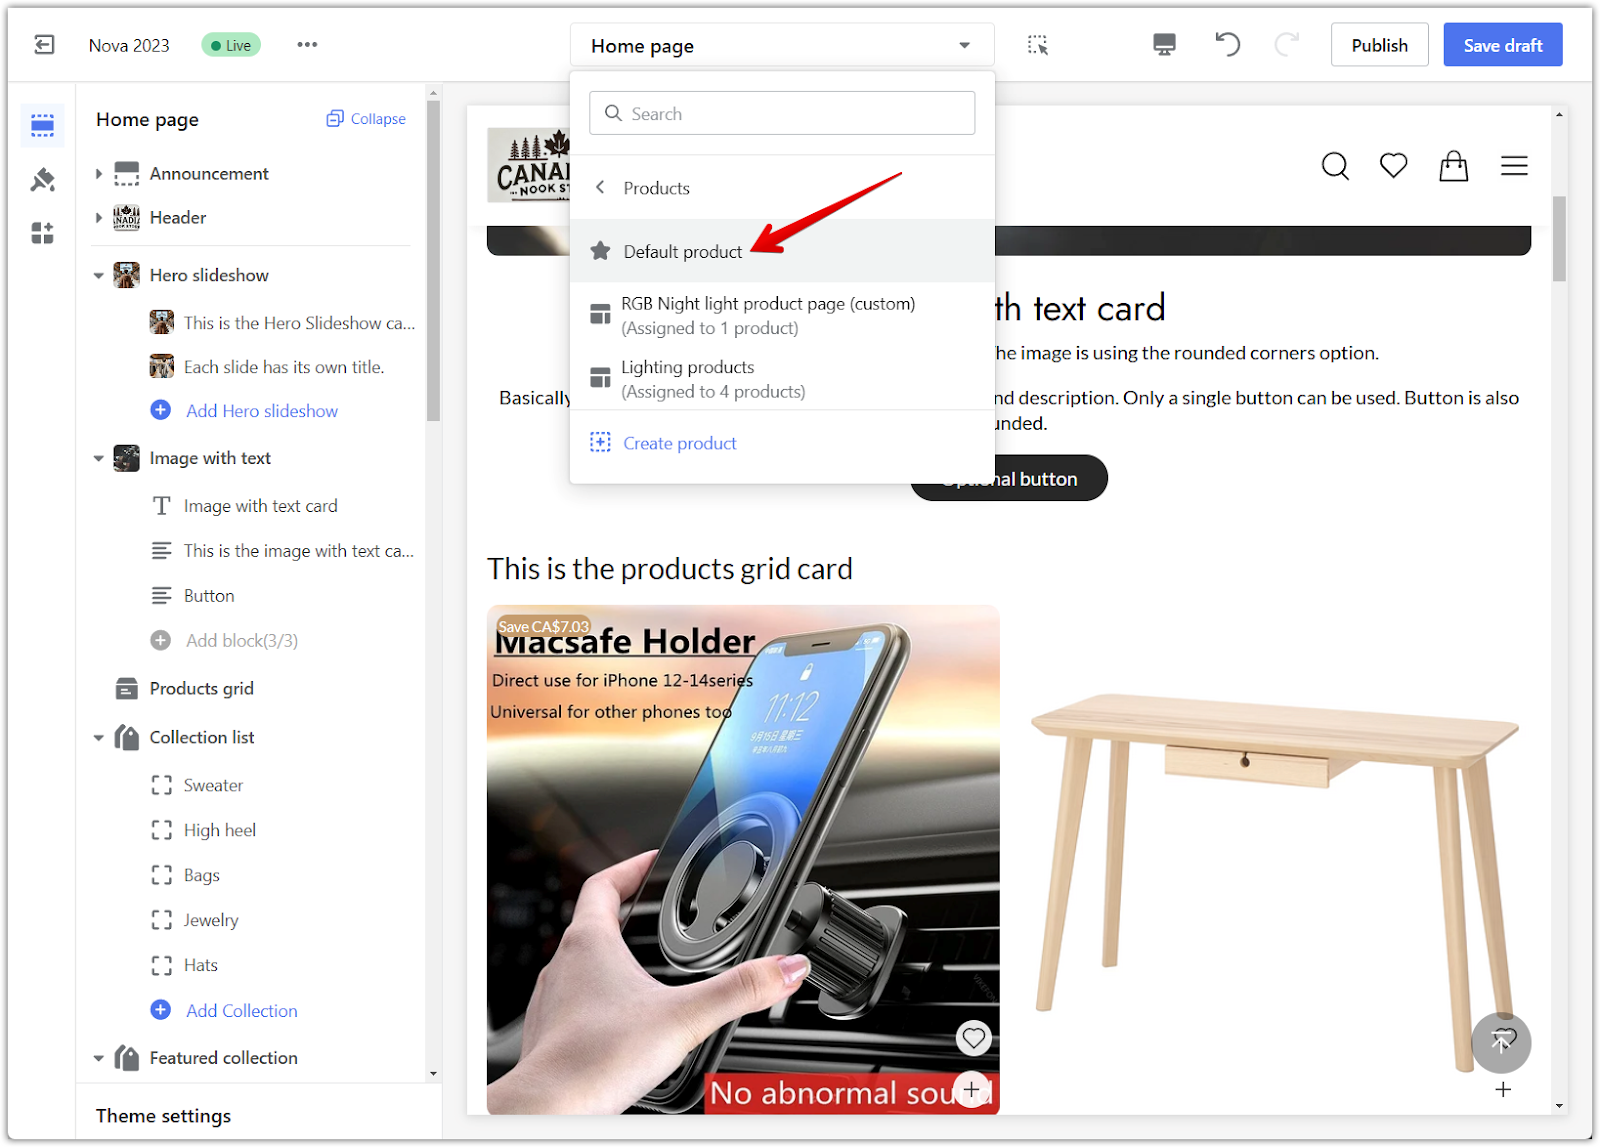
3. Navigate to the product section: In the Theme Editor, open the dropdown menu and select Products to begin customizing your product templates.
4. Select the default product page: Under the Products section, choose Default product as the base template for customization options.
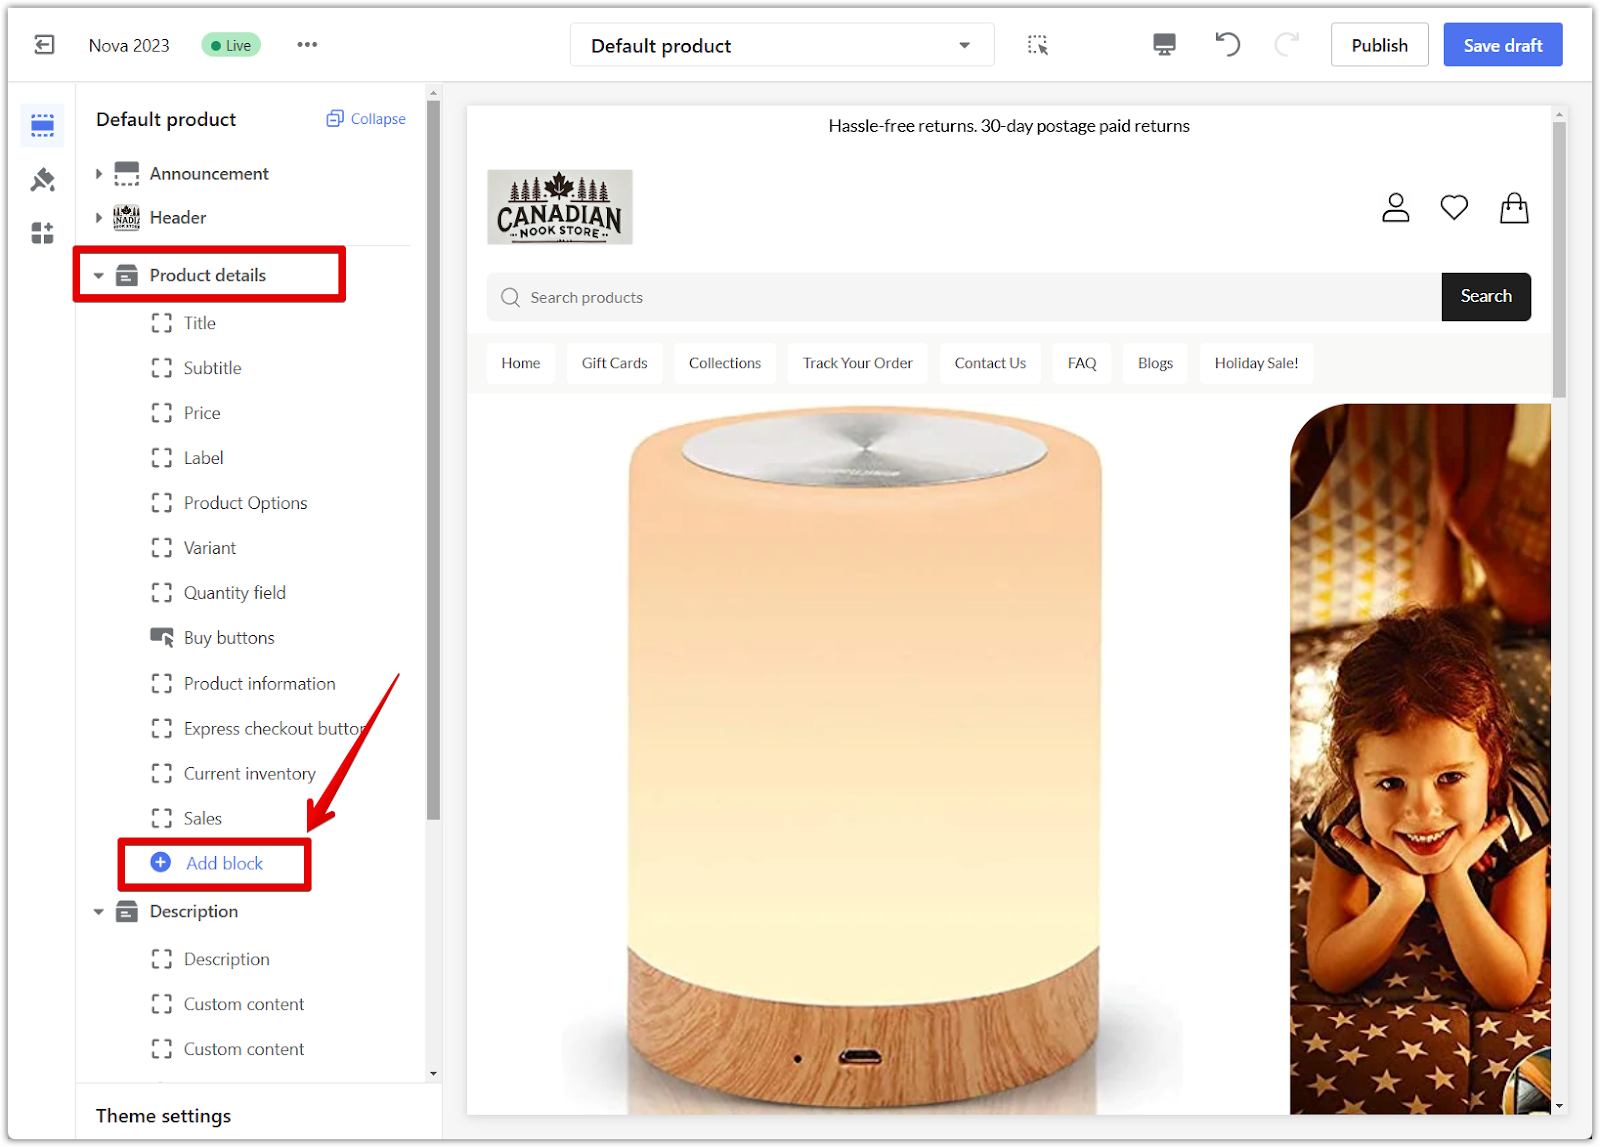
5. Add the product customizer block: In the Product details section, click Add Block and select Product Customizer from the app list.
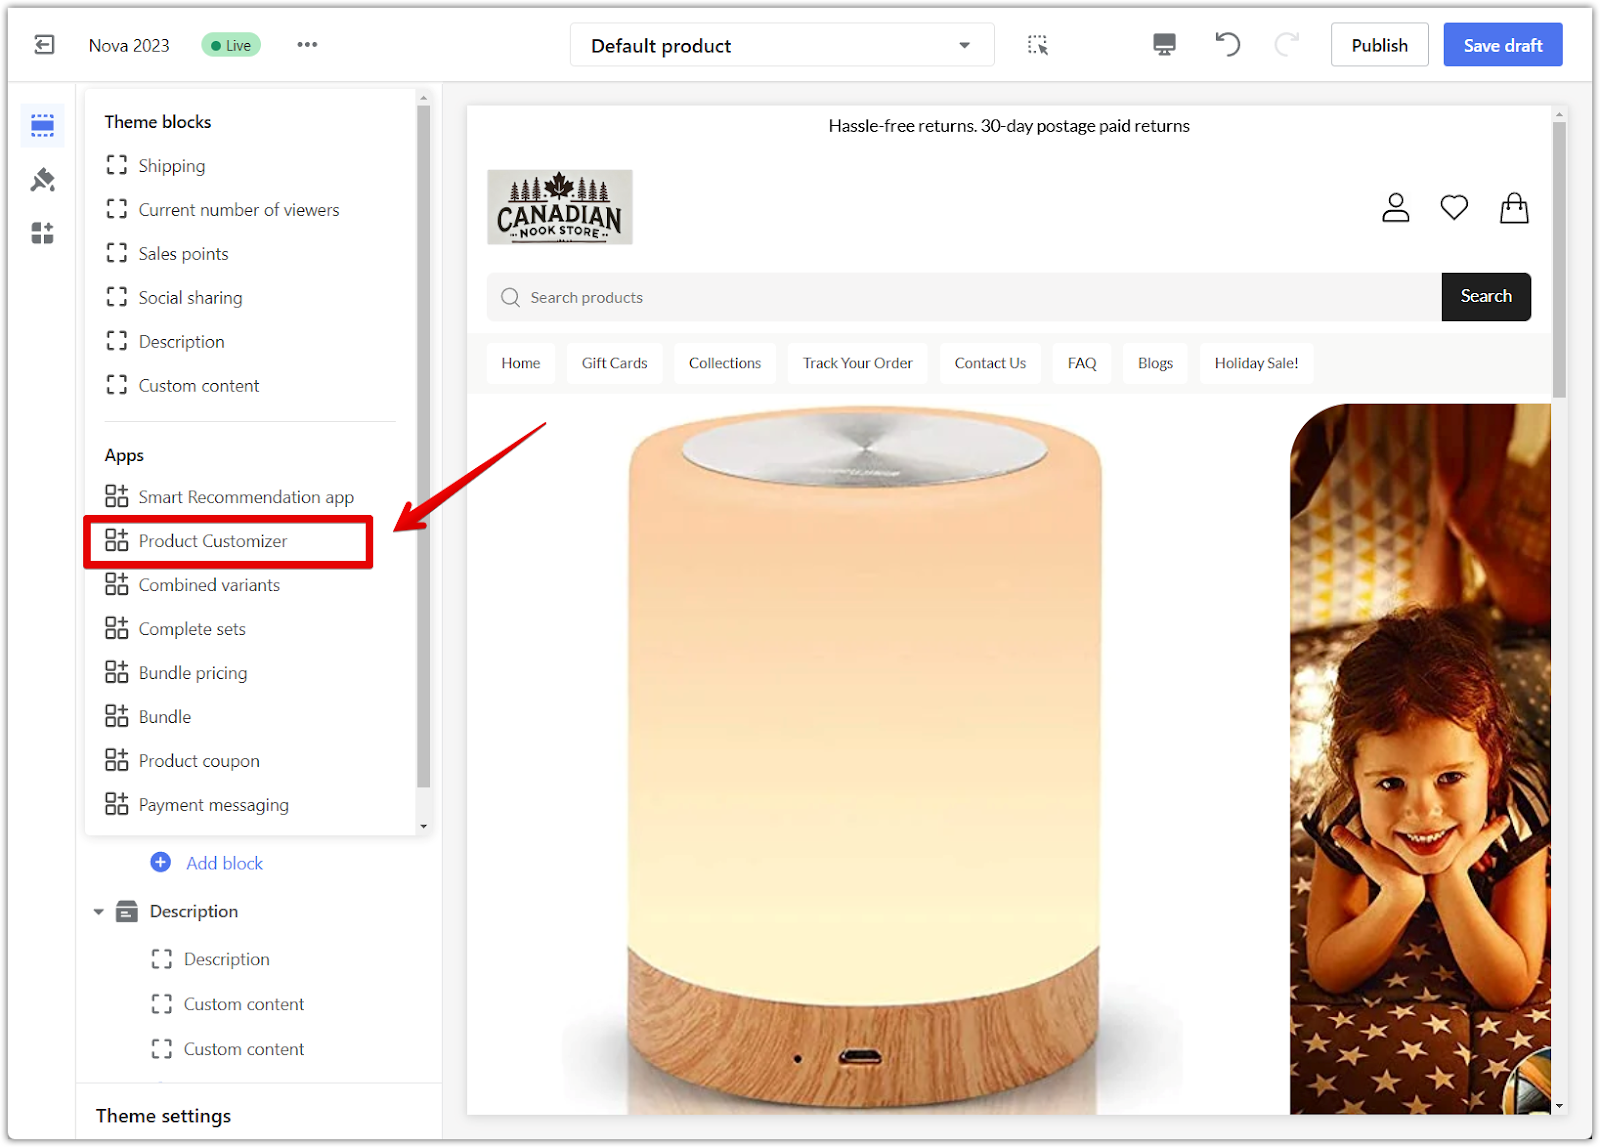
6. Adjust and enable the customizer: Confirm that the block is added under the Apps section. Adjust the display settings as necessary to position the customization options correctly on your product pages.
- Before configuration: No customization options appear on product pages.
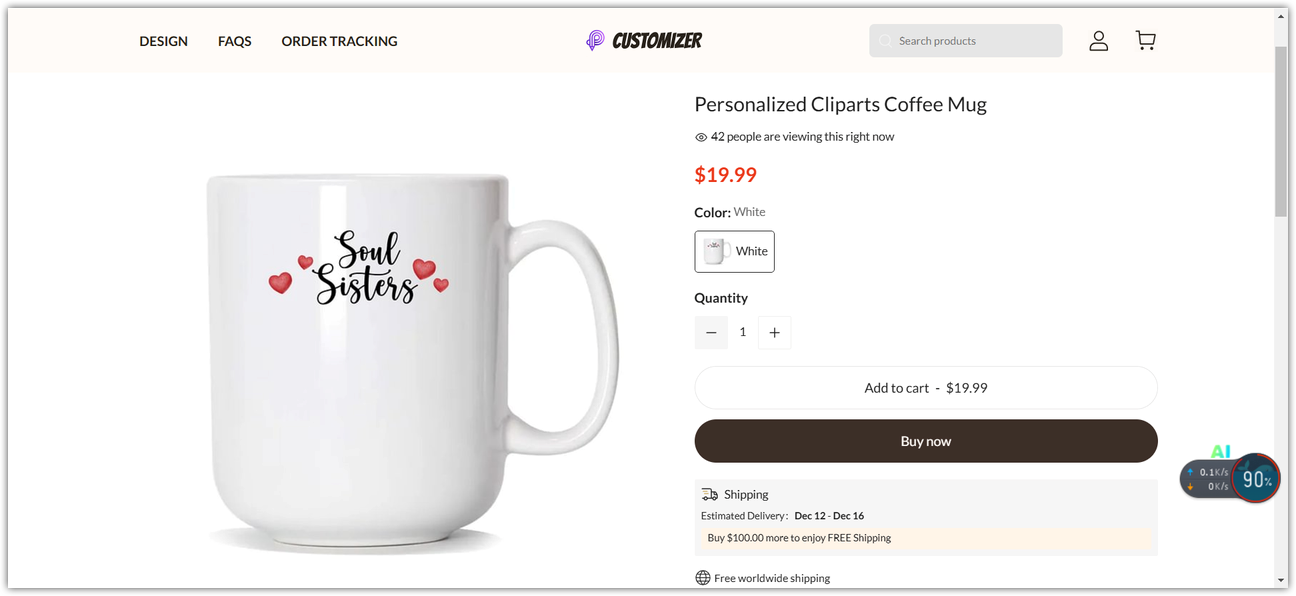
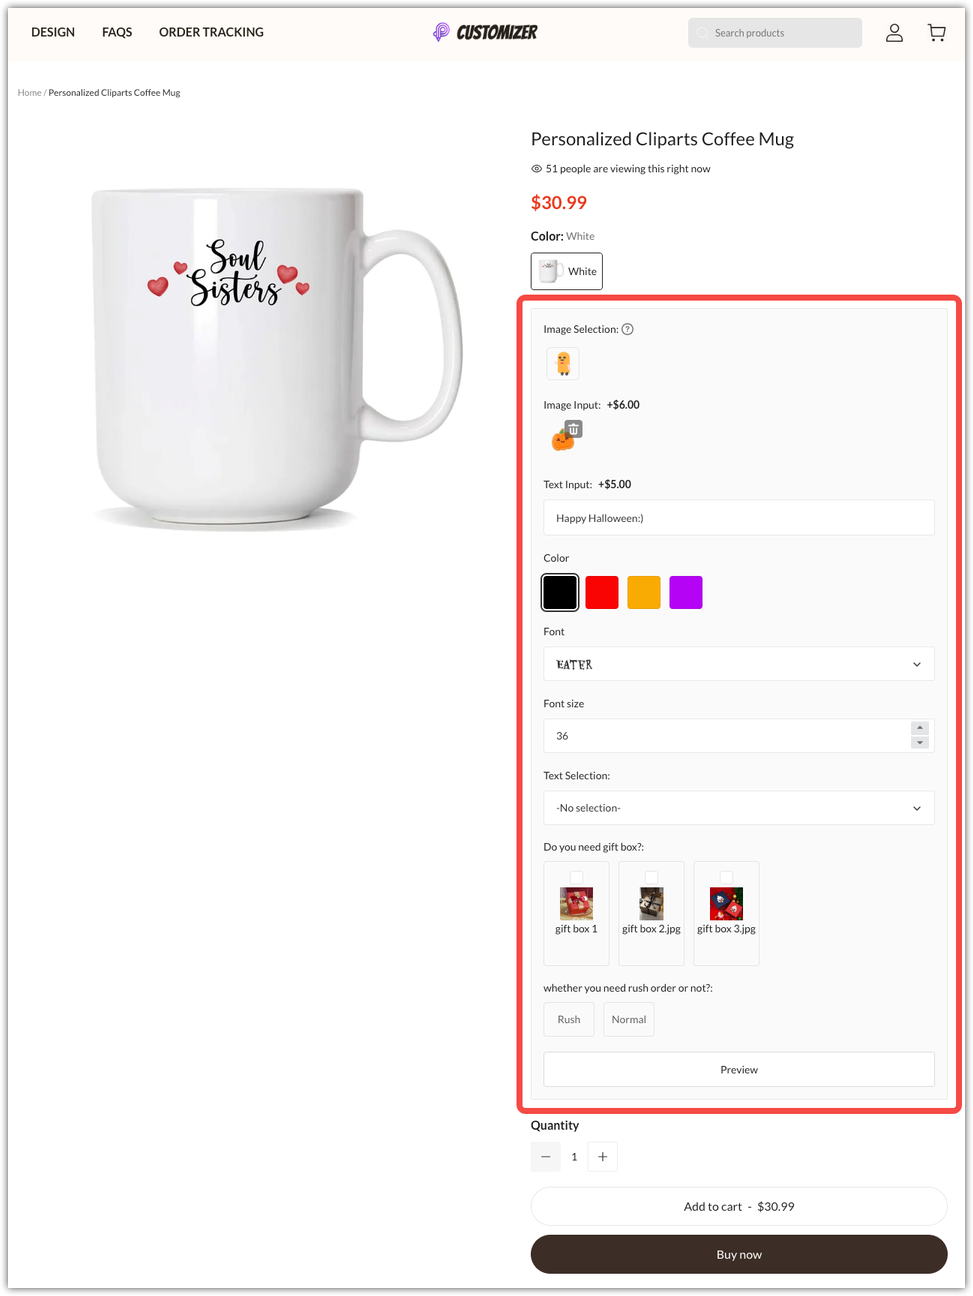
- After configuration: Customization options are fully integrated, allowing customers to personalize their products directly on the page.
Adding options to products
The Option Designer lets you create flexible customization options using seven versatile components:
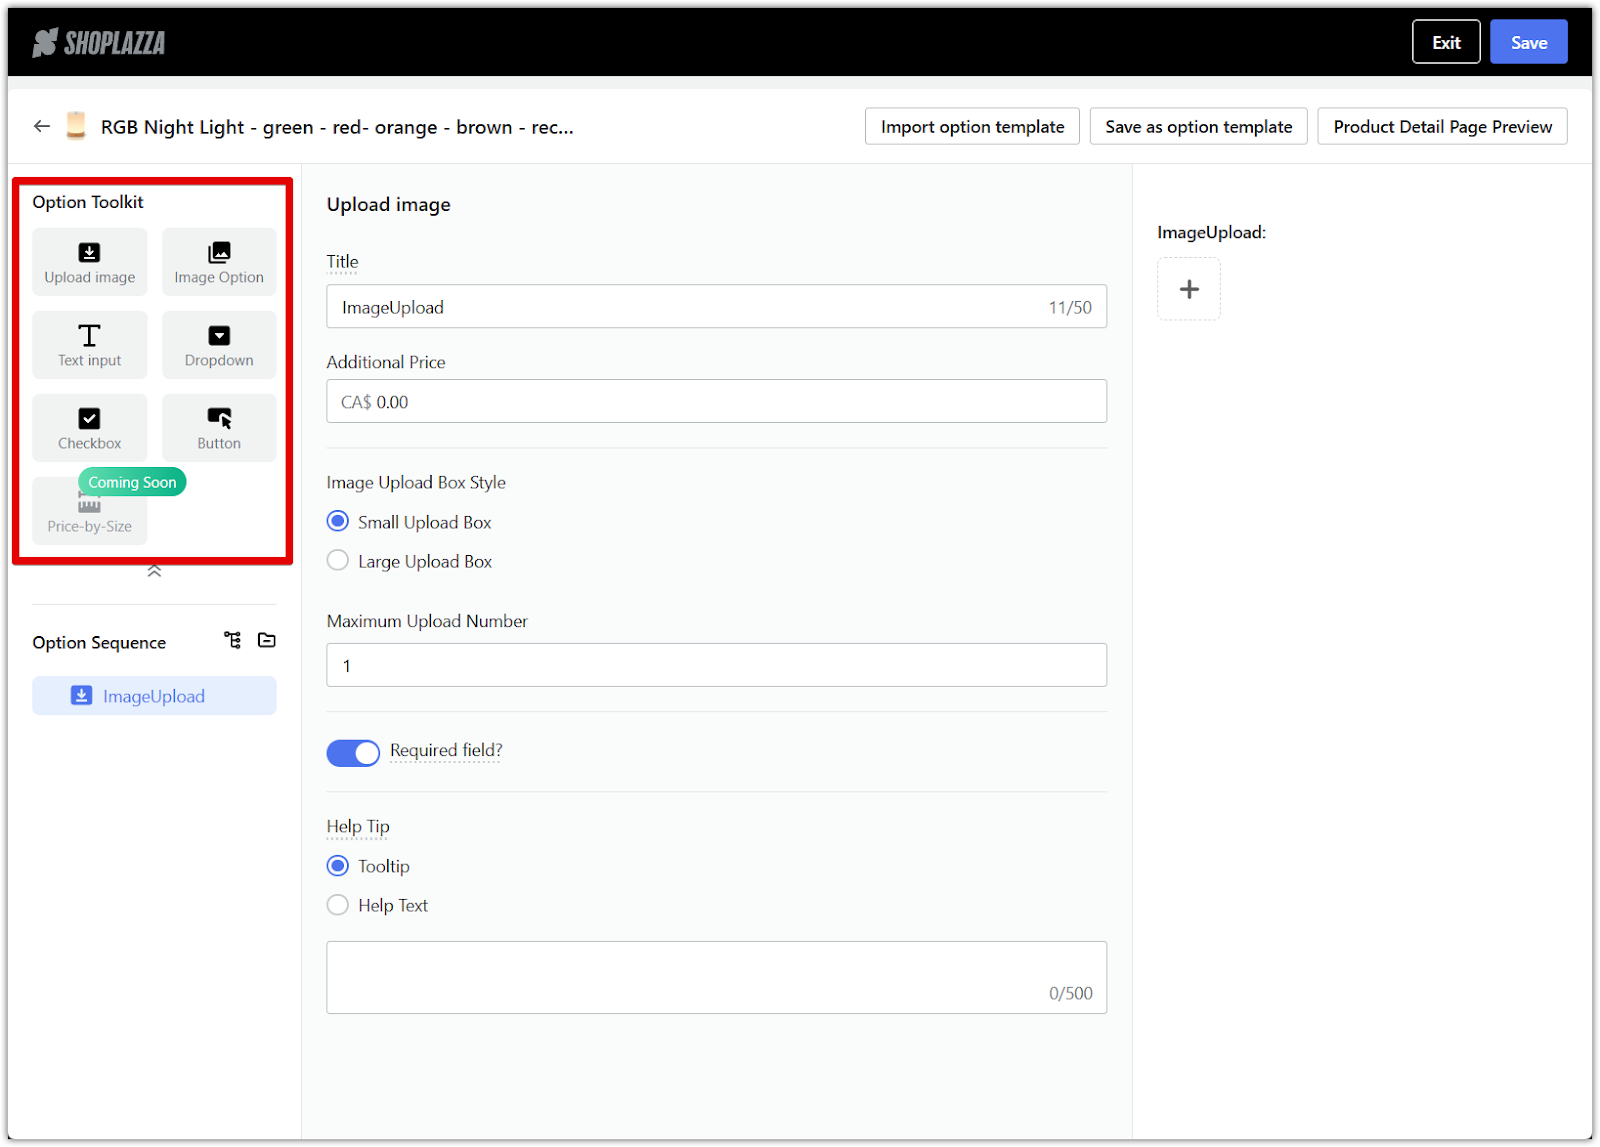
- Image upload: Customers upload their own images (e.g., personal photos for a mug).
- Image options: Provide a selection of pre-designed images (e.g., holiday graphics).
- Text input: Allow customers to enter custom text, such as names or messages.
- Dropdown options: Let customers choose variations (e.g., size or color).
- Checkboxes: Enable toggleable customization options (e.g., add gift wrapping).
- Buttons: Add clickable choices (e.g., choose a finish like matte or gloss).
- Price by size: Adjust pricing dynamically based on dimensions (e.g., curtains or carpets).
To set up:
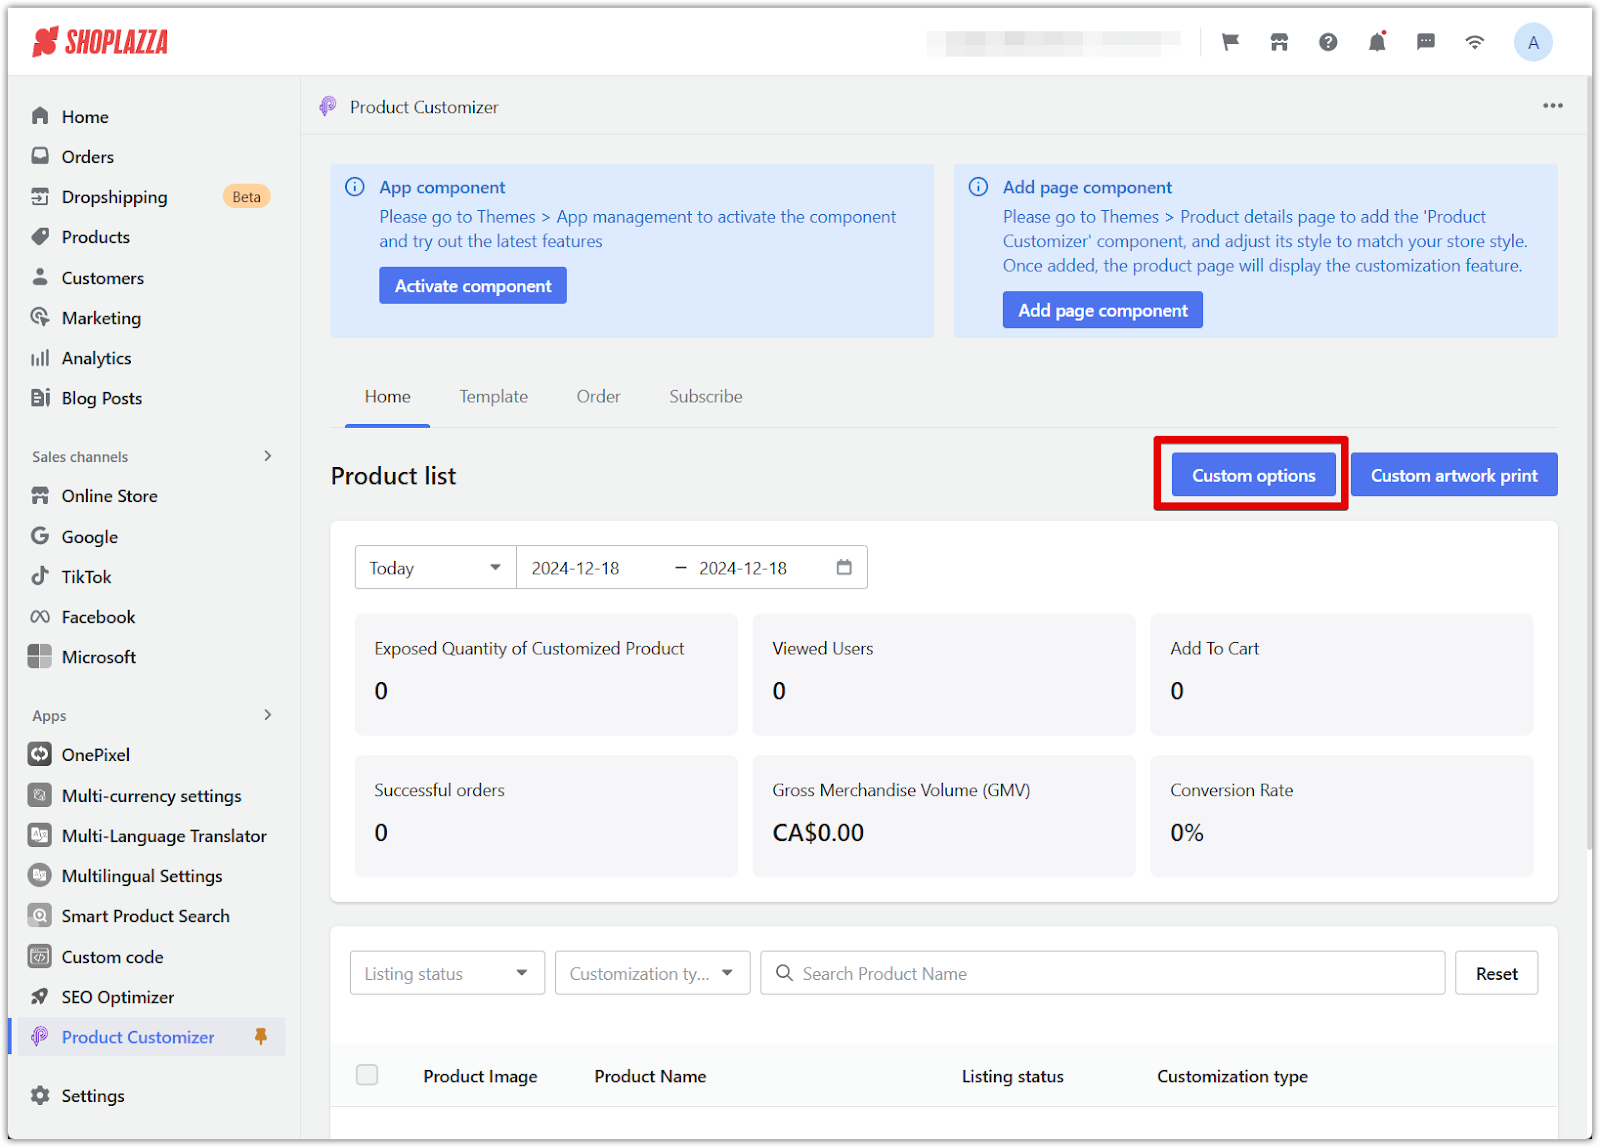
1. Access the option designer: Navigate to the Product Customizer homepage and click Custom Options.
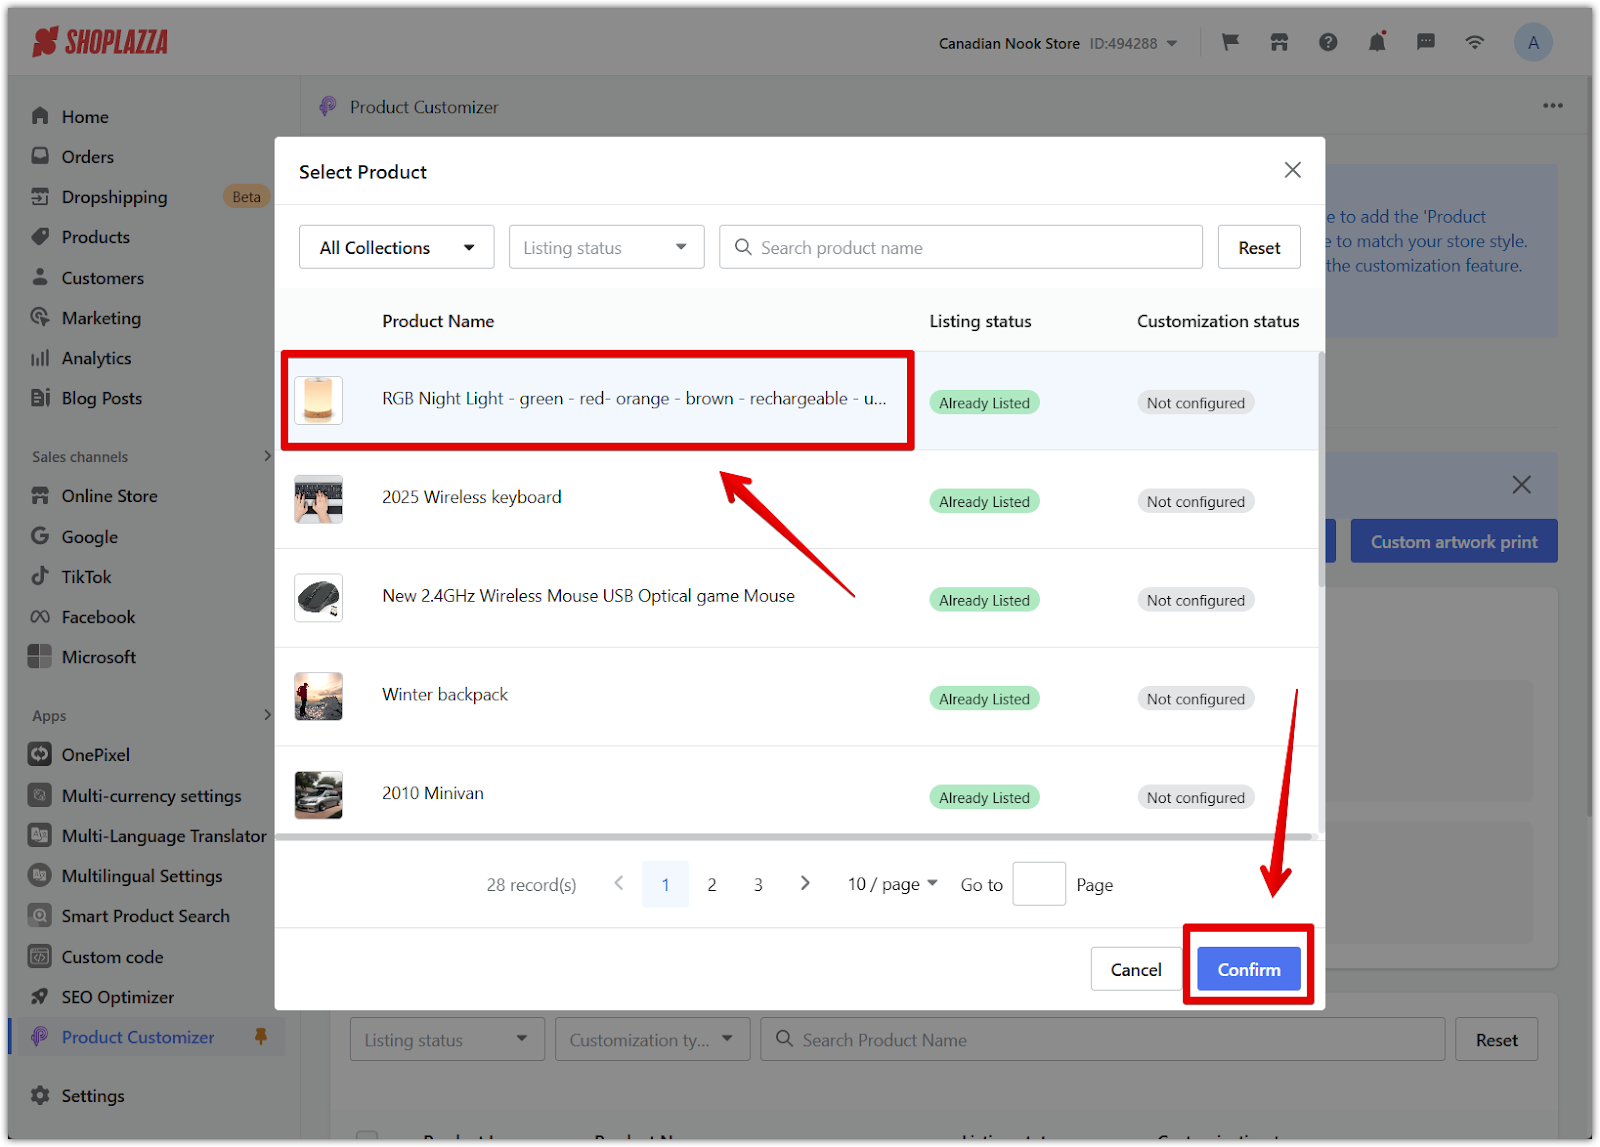
2. Select the product: Choose a product from the list, filter by status, or search by name. Click Confirm to proceed.
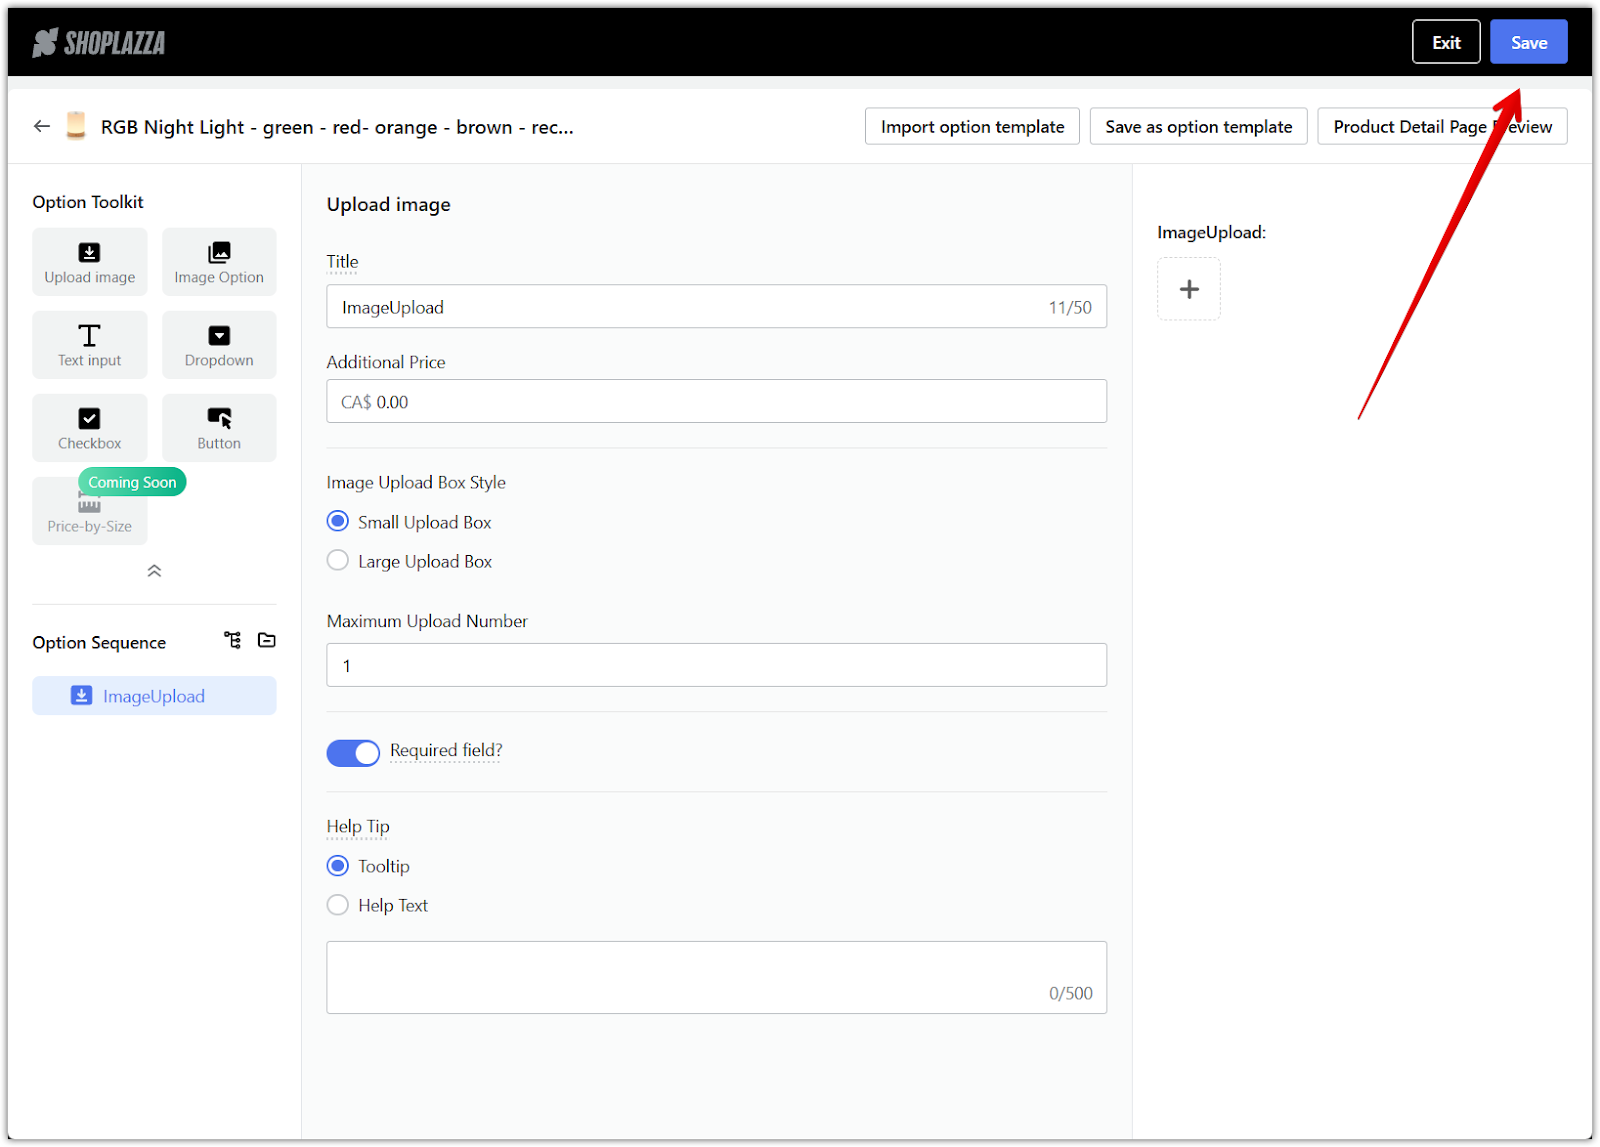
3. Add components: Use the Option Toolkit to add components like Upload Image or Dropdown Options. In the right-hand panel, customize each component’s behavior, sequence, and display settings.
4. Save the design: Once all components are configured, click Save at the top-right corner to apply the customization to your product.
Adding artwork printing customization
The Artwork Designer enables pattern-based customizations using six dynamic components:
- Image: Add fixed graphics (e.g., brand logos).
- Text: Include customizable text fields for customer input.
- Image selection: Offer pre-uploaded image options (e.g., seasonal clipart).
- Text selection: Provide predefined text options.
- Image input: Allow customers to upload their own images for customization.
- Text input: Enable customers to enter personalized text like names or messages.
To configure:
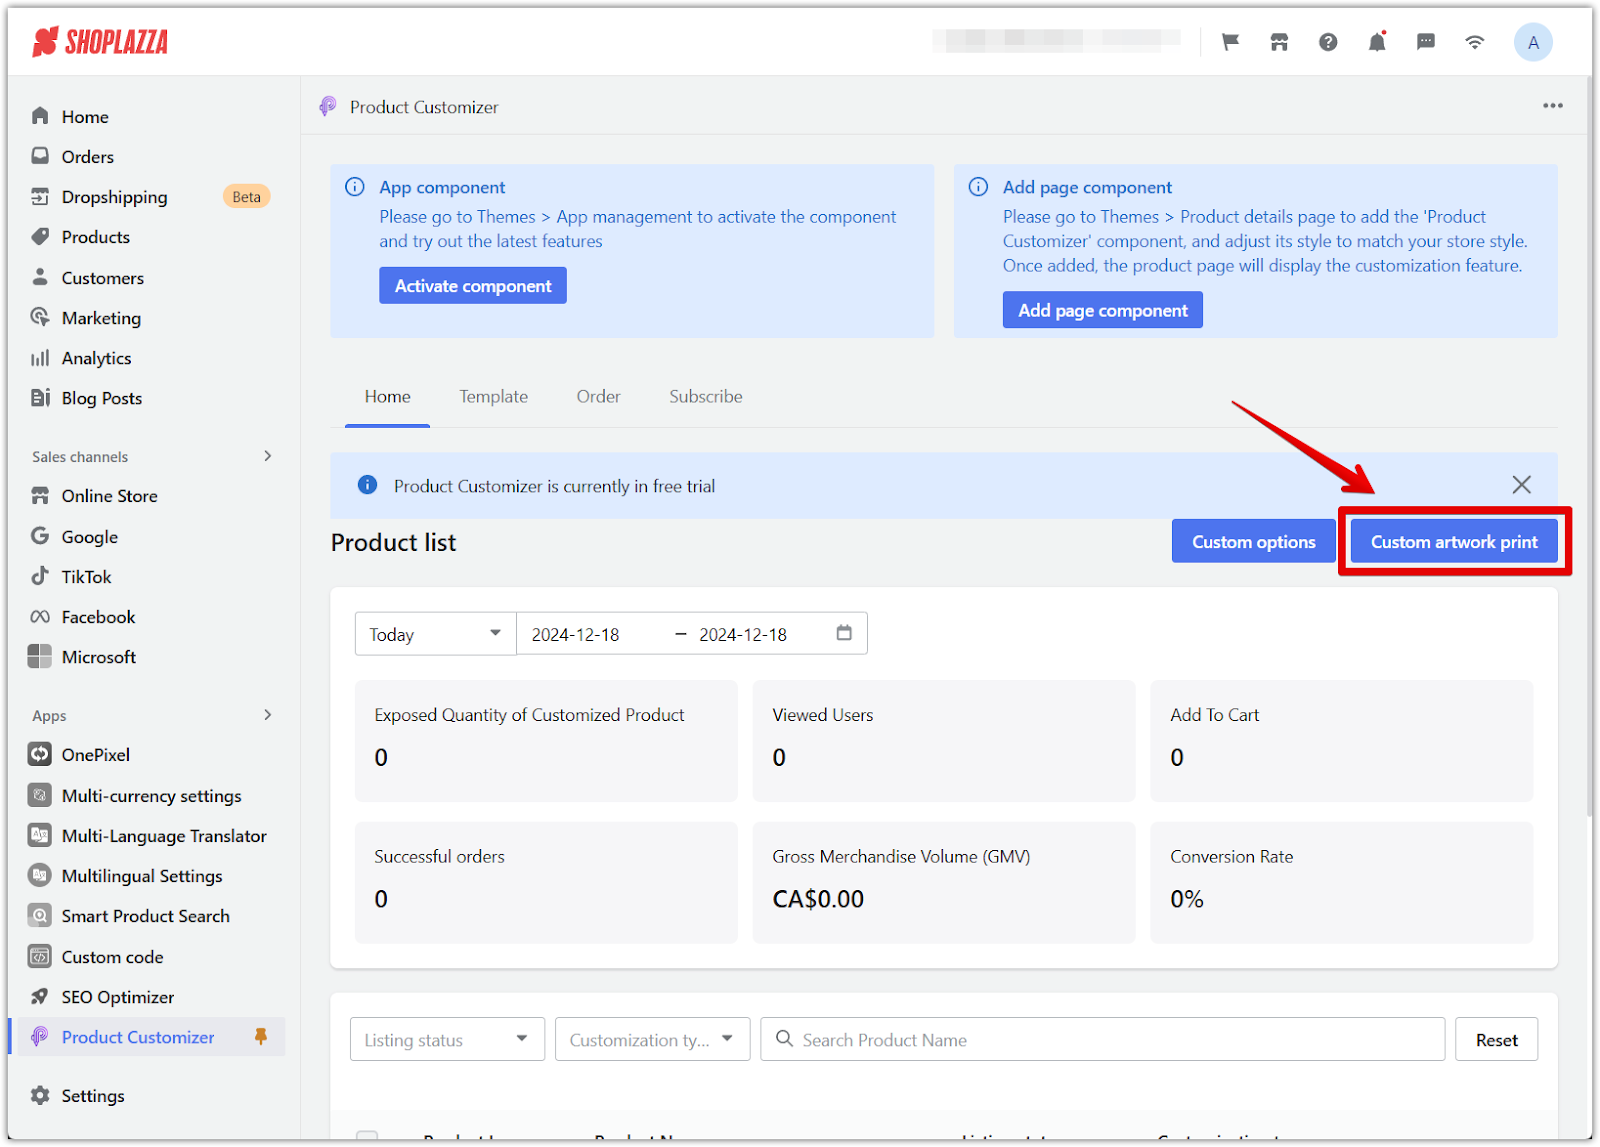
1. Open the artwork designer: On the Product Customizer homepage, click Custom artwork print.
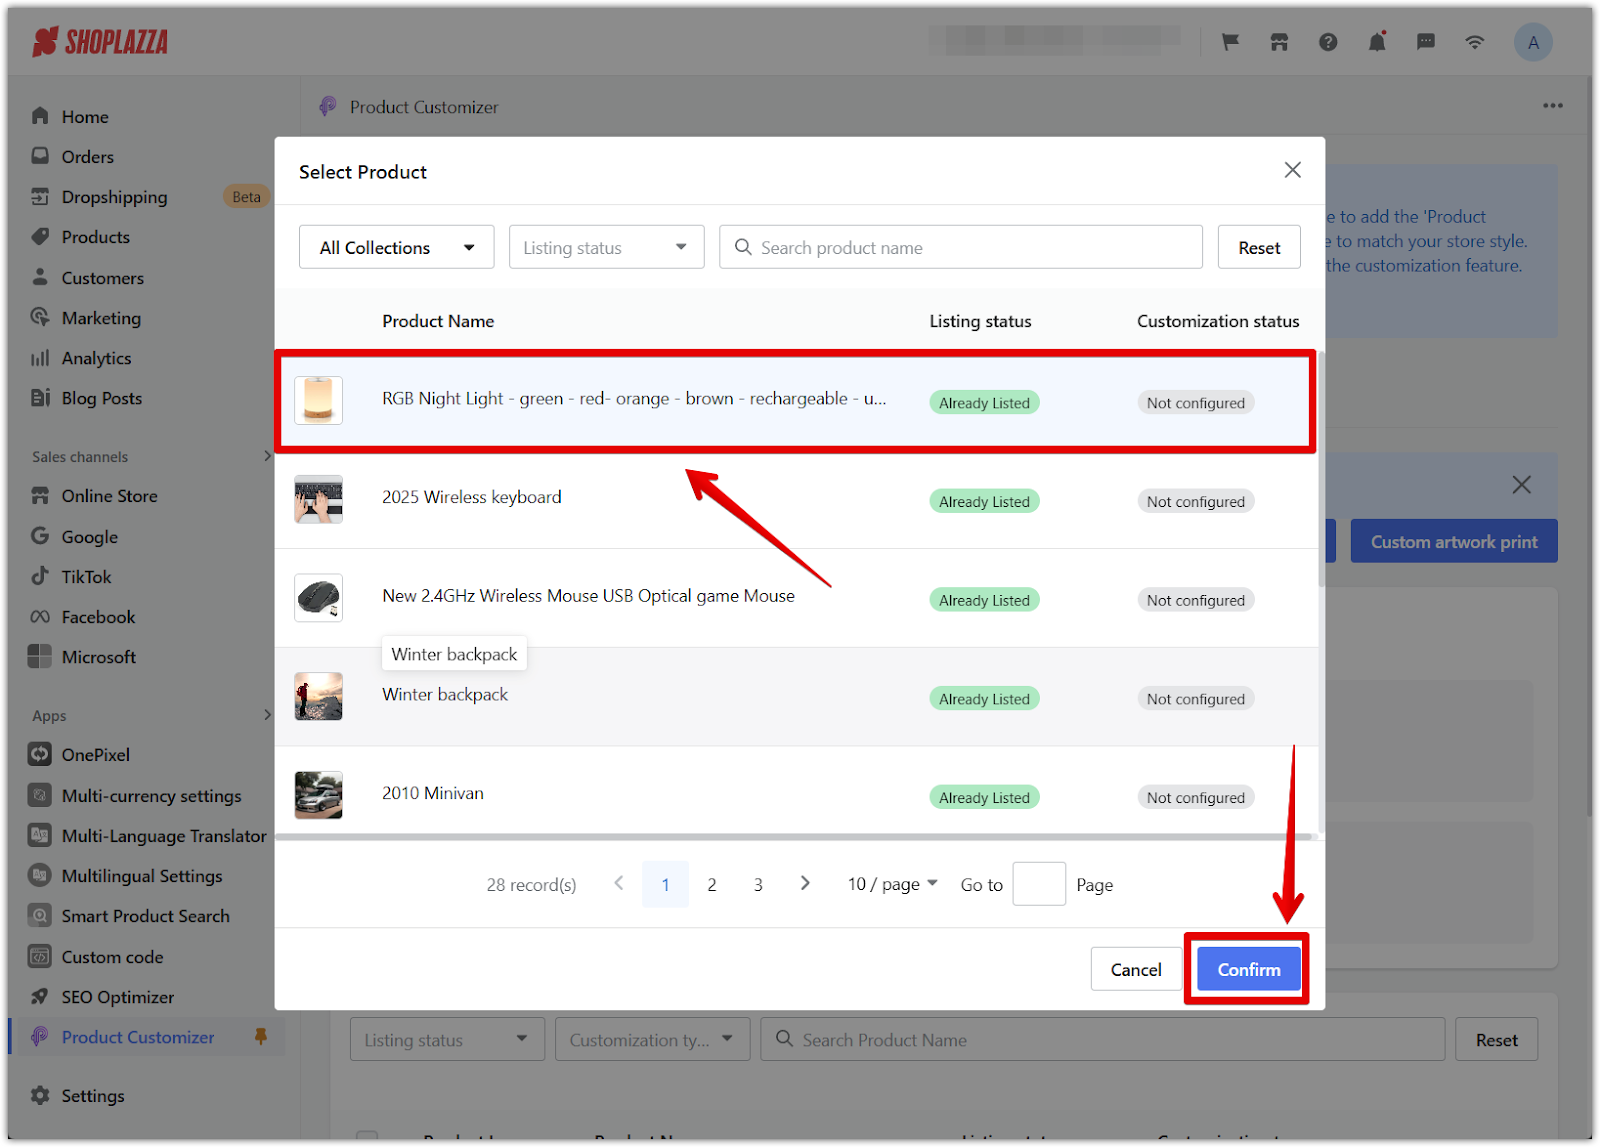
2. Select a product: Choose the product to customize using filters or search. Click Confirm to proceed.
3. Upload materials: Use the Artwork Toolkit to add images, text, or placeholders.
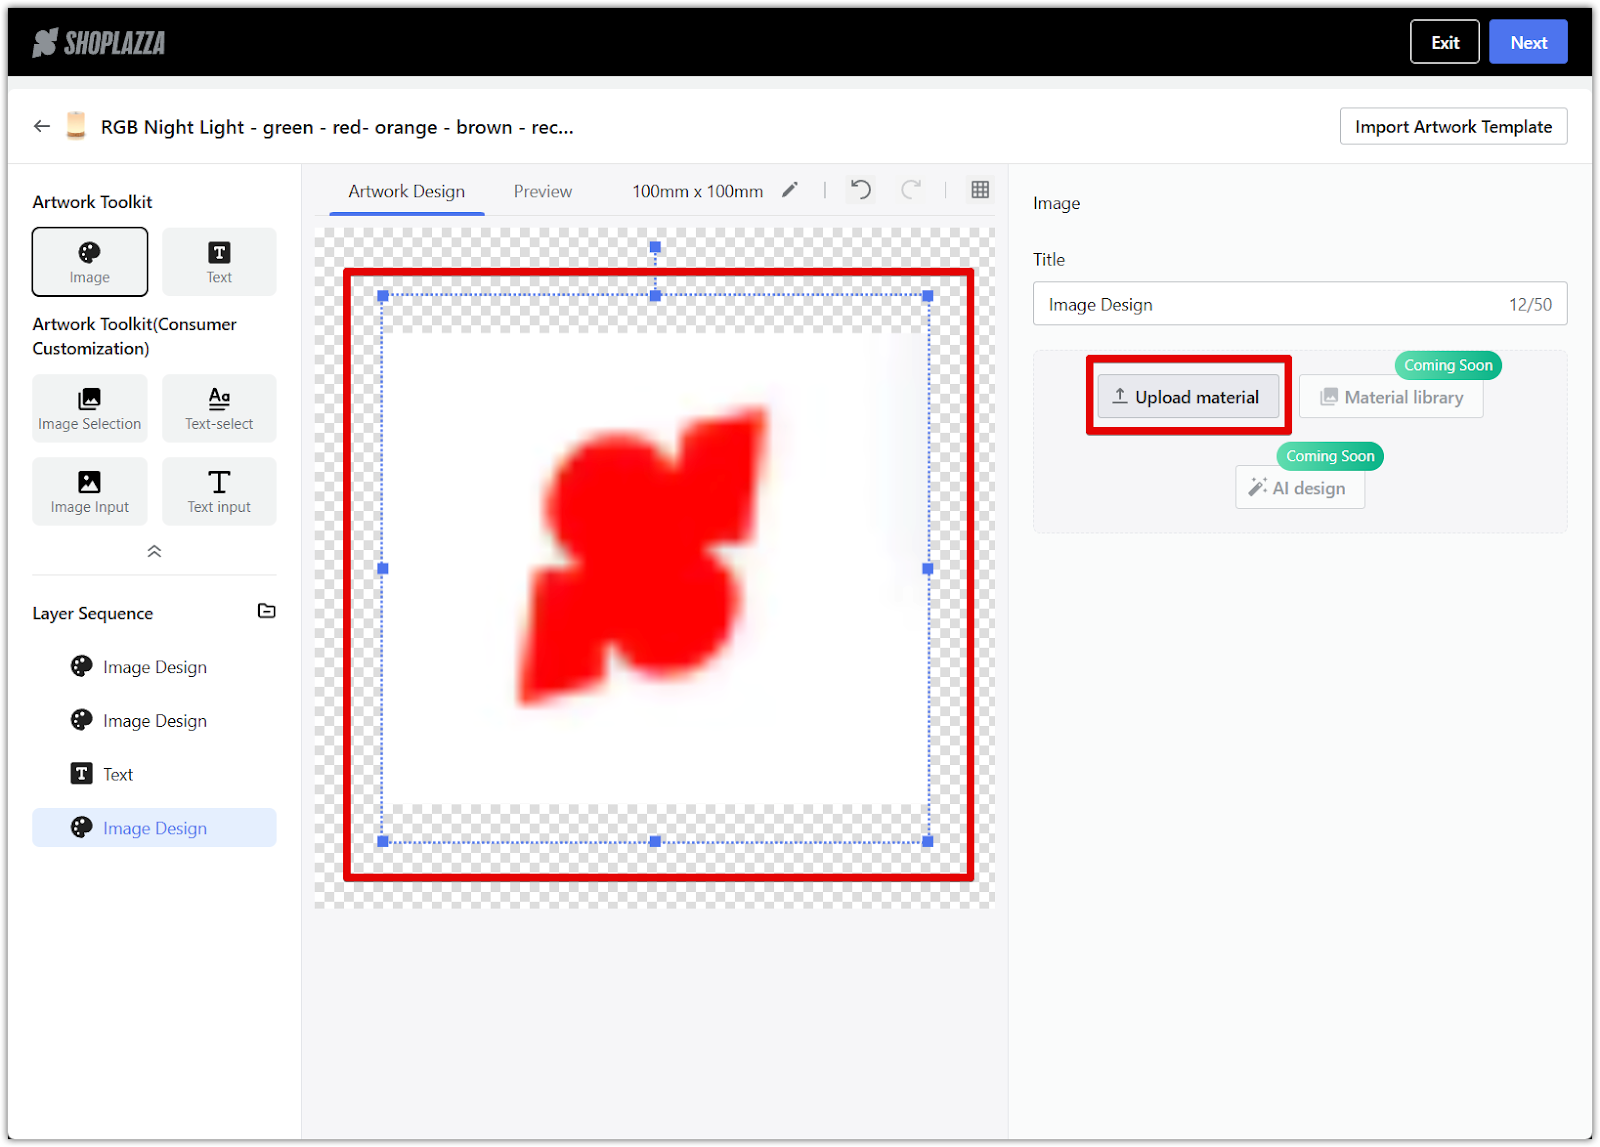
4. Add and configure components: In the right-hand panel, you can add elements from the toolkit and adjust settings like required fields, help text, or color options.
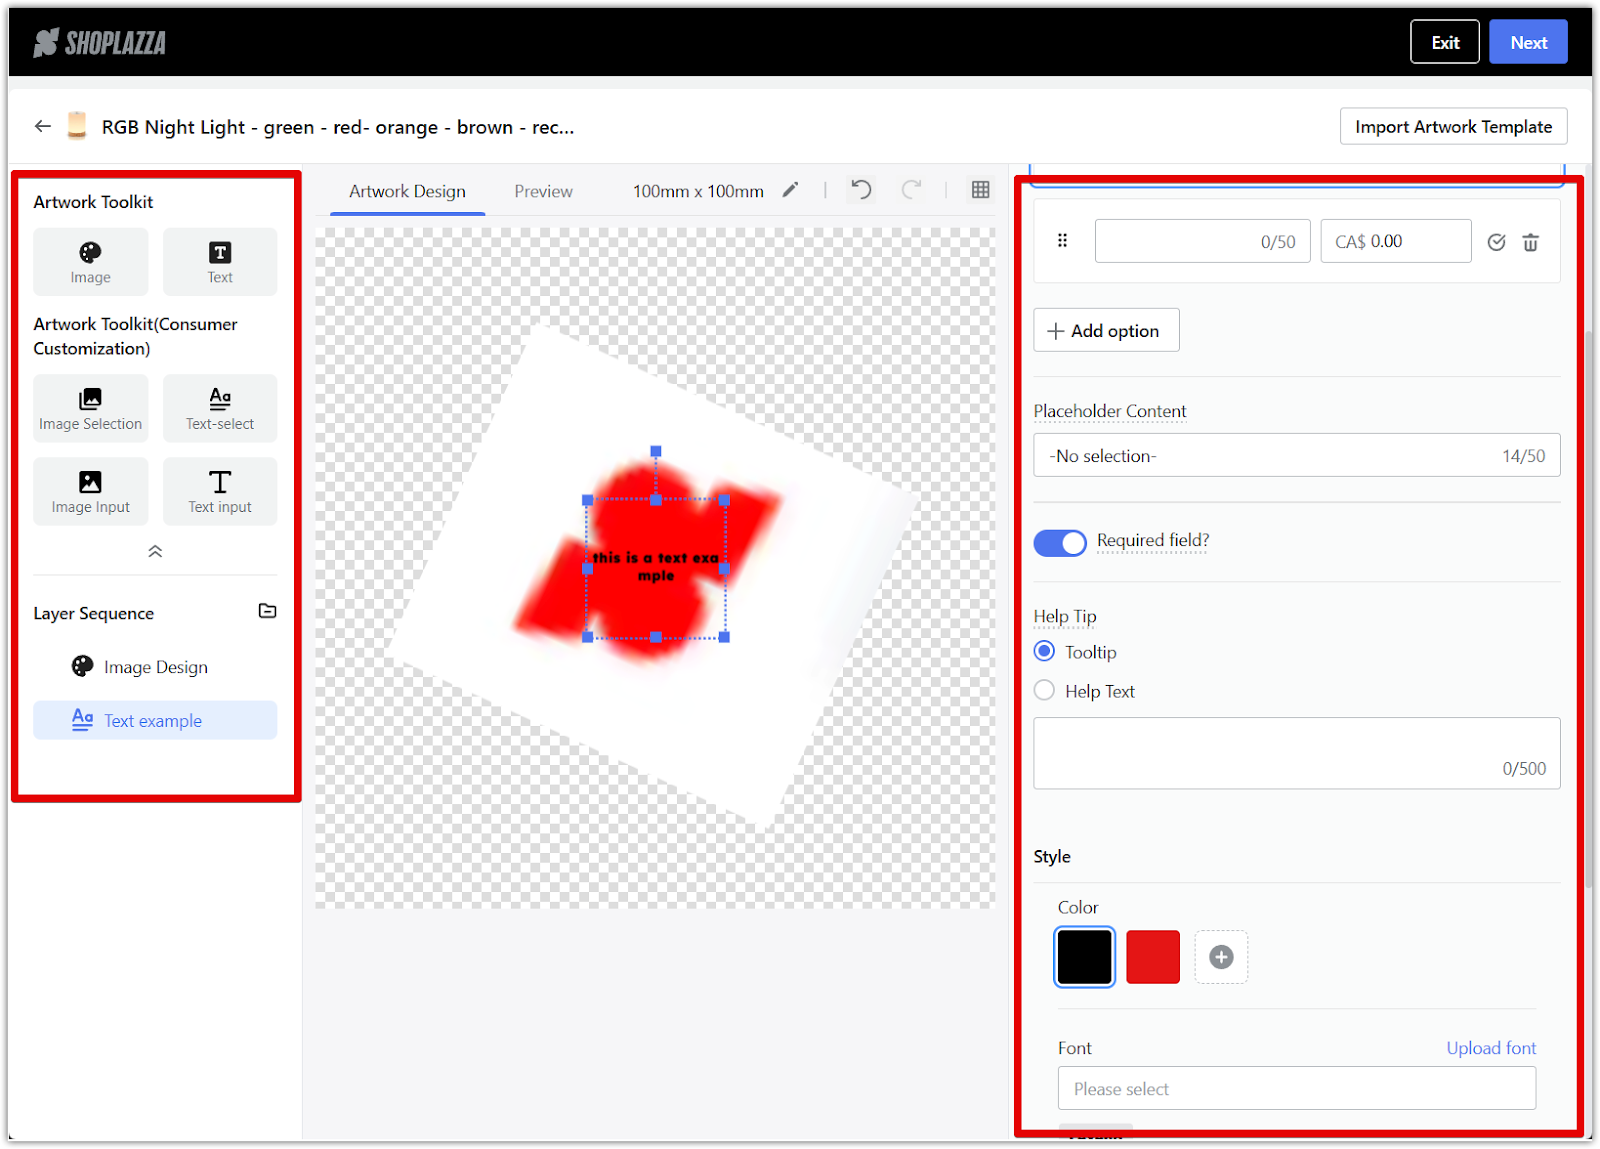
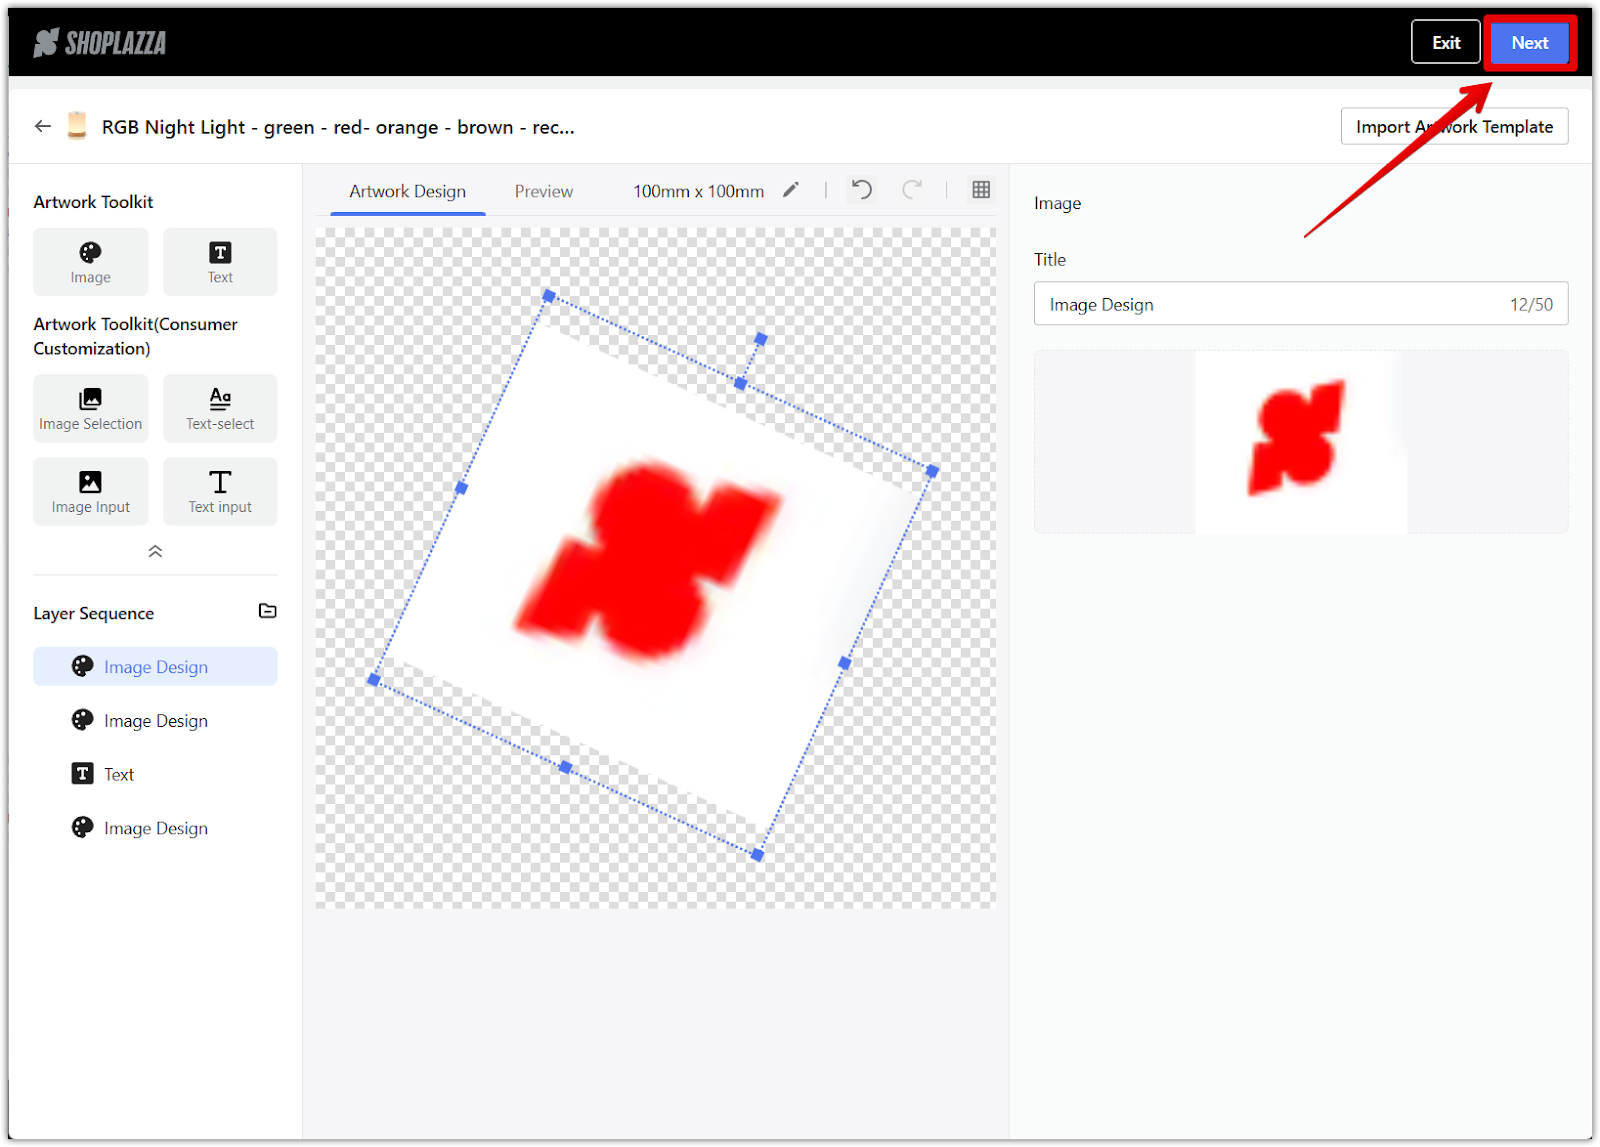
5. Preview and finalize: Review the design layout and click Next to save changes.
Using AI image processing
The Product Customizer app includes AI-powered tools designed to simplify image editing, making it easy for merchants to enhance product designs. These tools, such as background removal and high-definition reconstruction, can significantly improve the visual appeal of your products, thereby increasing customer engagement and sales.
-
Current AI features:
- Background removal: Remove unwanted image backgrounds (e.g., isolate a product photo from its background).
- High-Definition reconstruction: Improve image quality in one click (e.g., sharpen low-resolution logos).
Future updates will add additional functionality, such as logo creation, clipart generation, and style transfer, providing even more customization options.
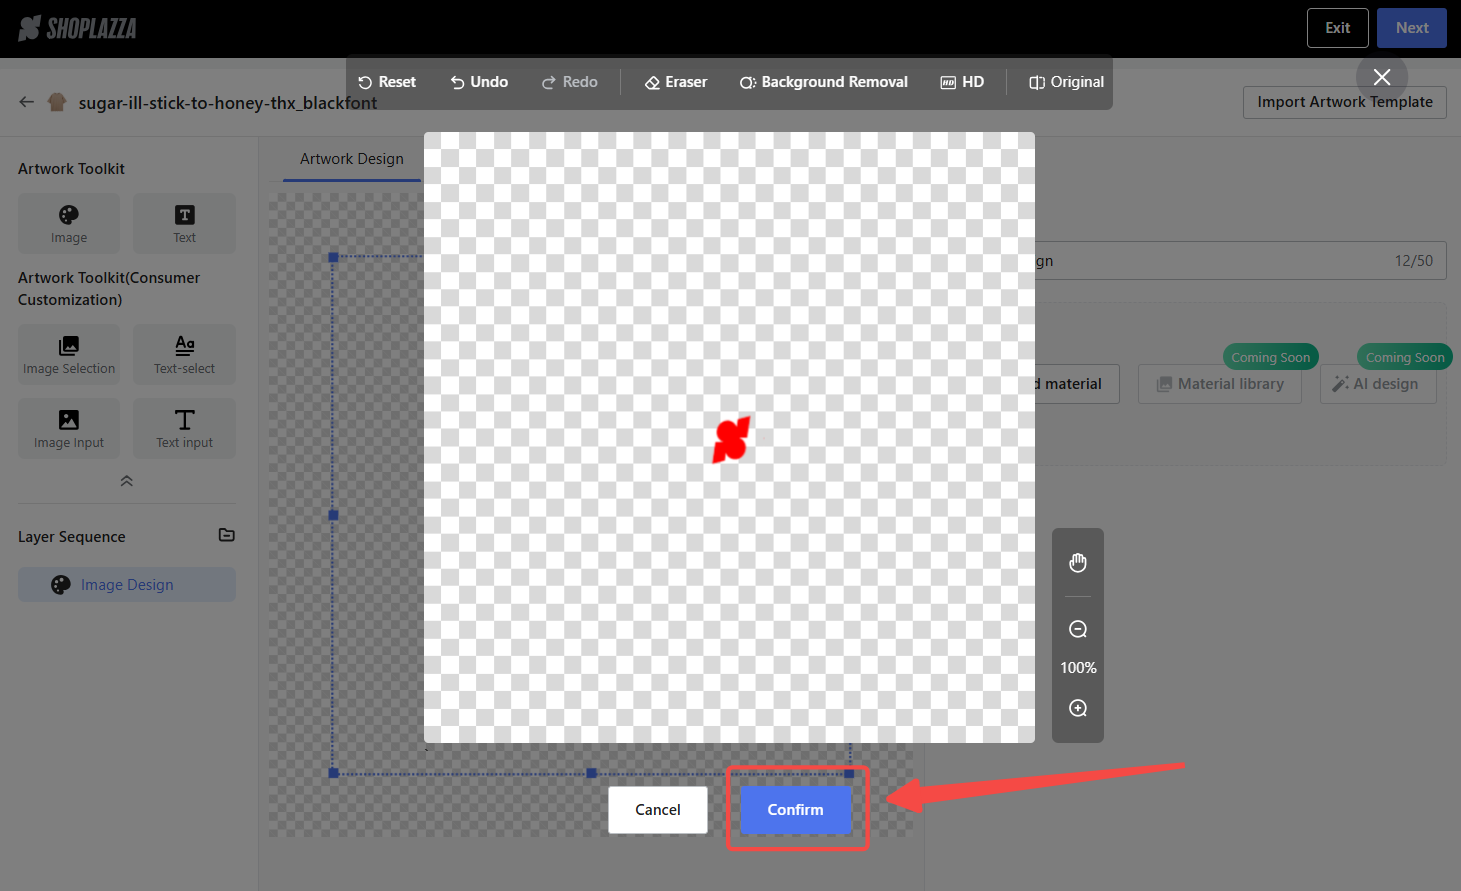
For individual images
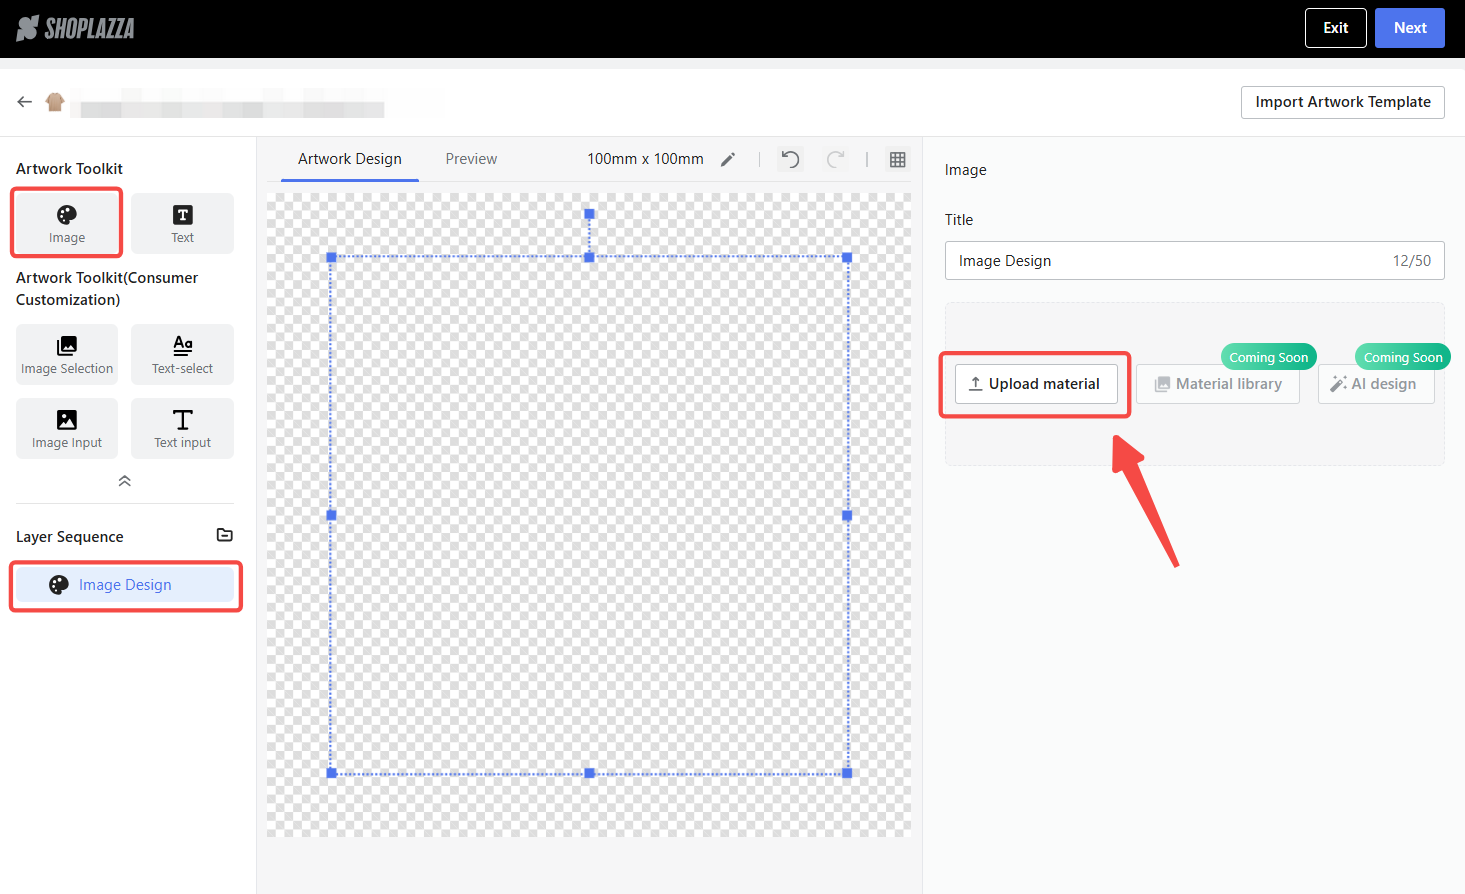
1. Upload an image: In the Artwork Toolkit, select Image and click Upload material to add your image.
2. Process the image: Use the Background Removal tool to remove the image’s background or the One-Click HD tool to enhance its quality.
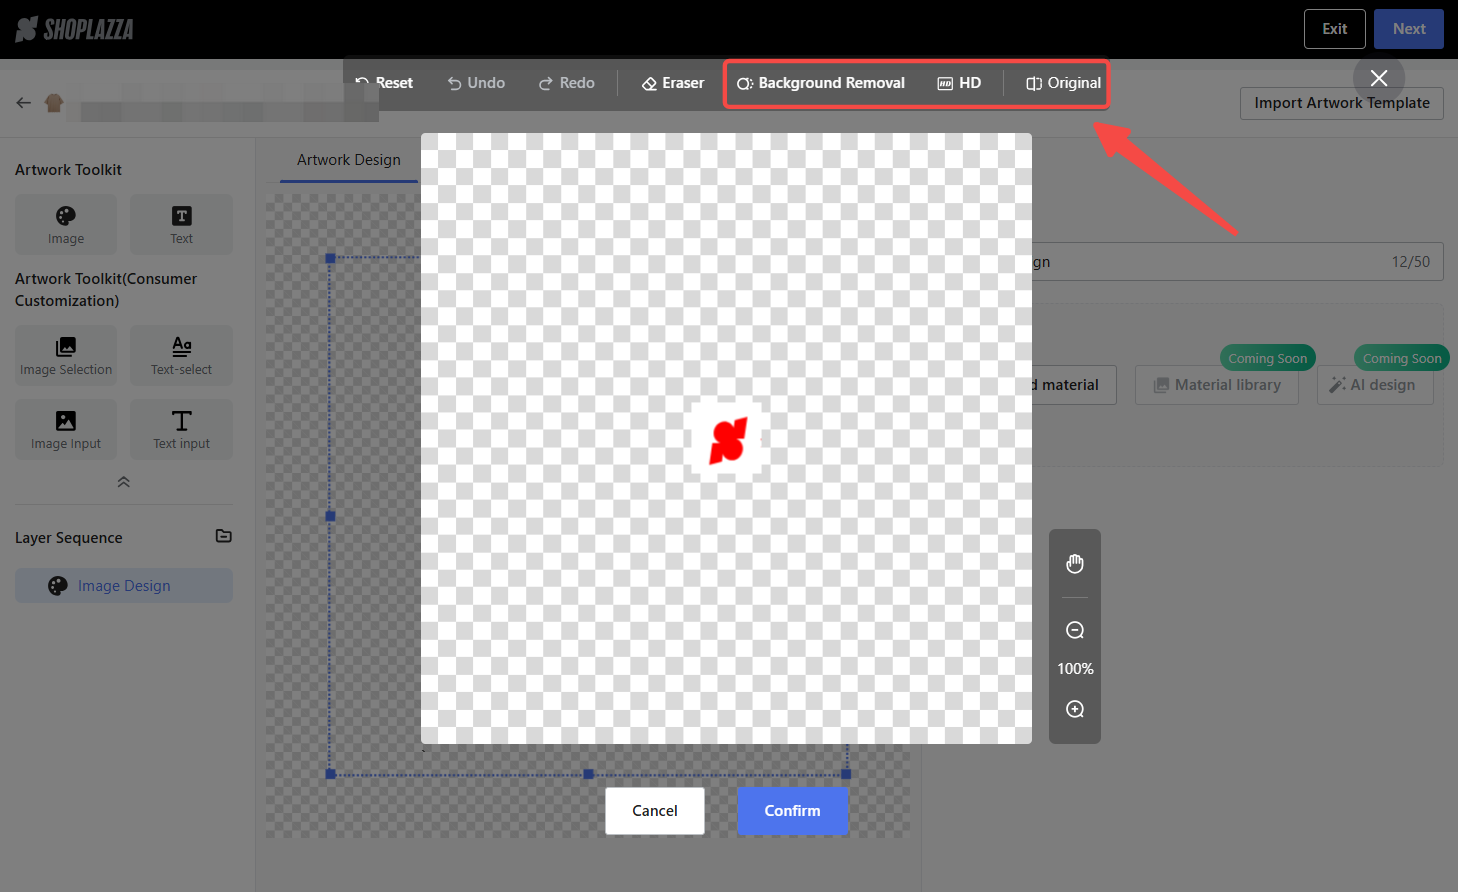
3. Save the changes: Click Confirm to save the processed image. The updated image will instantly appear on the design canvas and thumbnail.
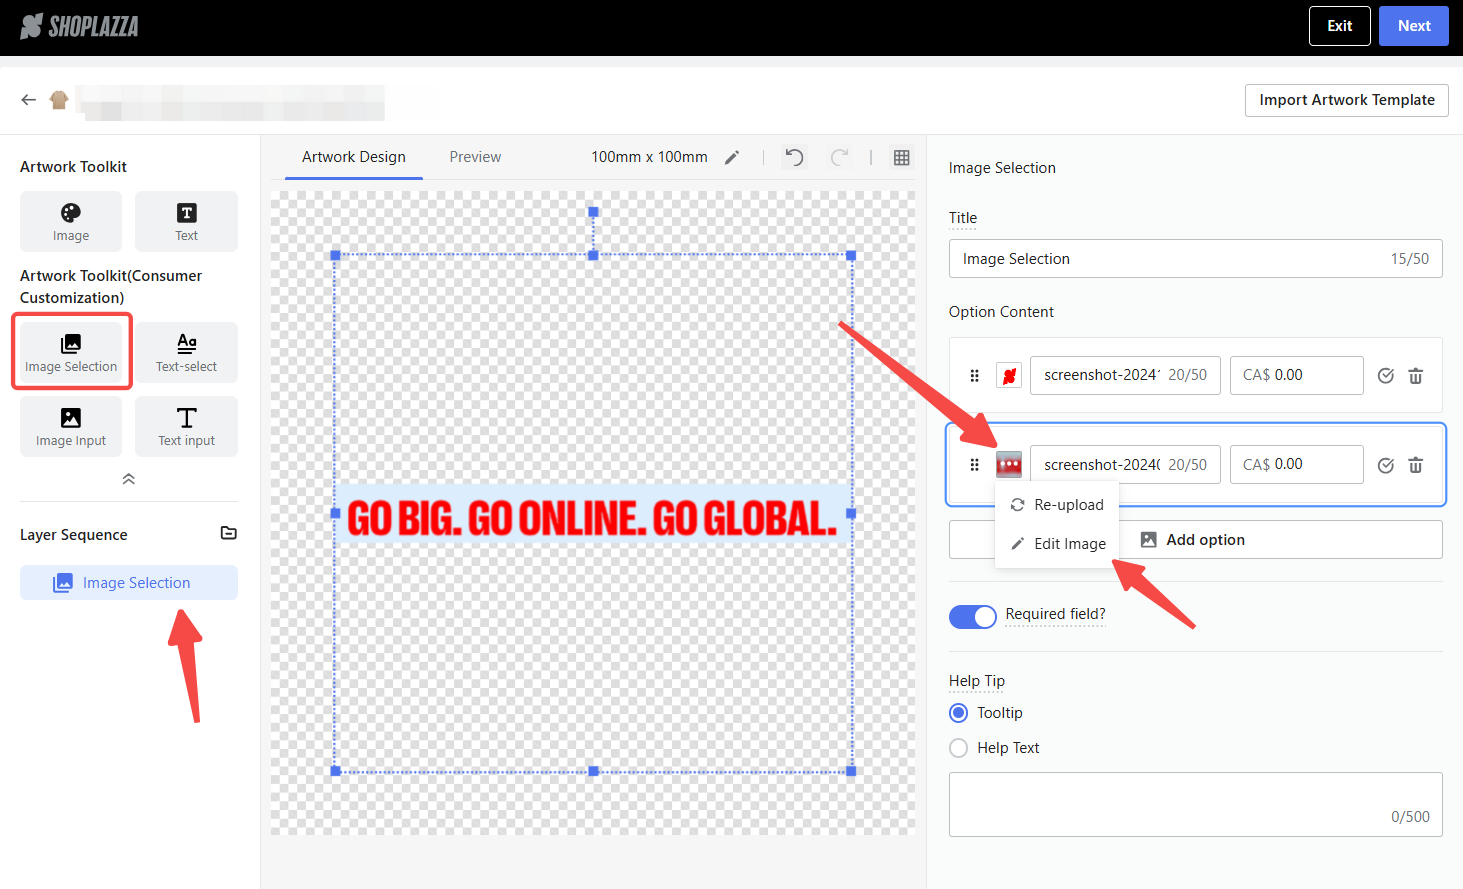
For Image selection
1. Upload and edit image materials: Select the Image Selection component from the Artwork Toolkit. In the right-hand form, upload single or multi-level images as needed. Hover over an uploaded image and click Edit Image to open the AI image processing pop-up window.
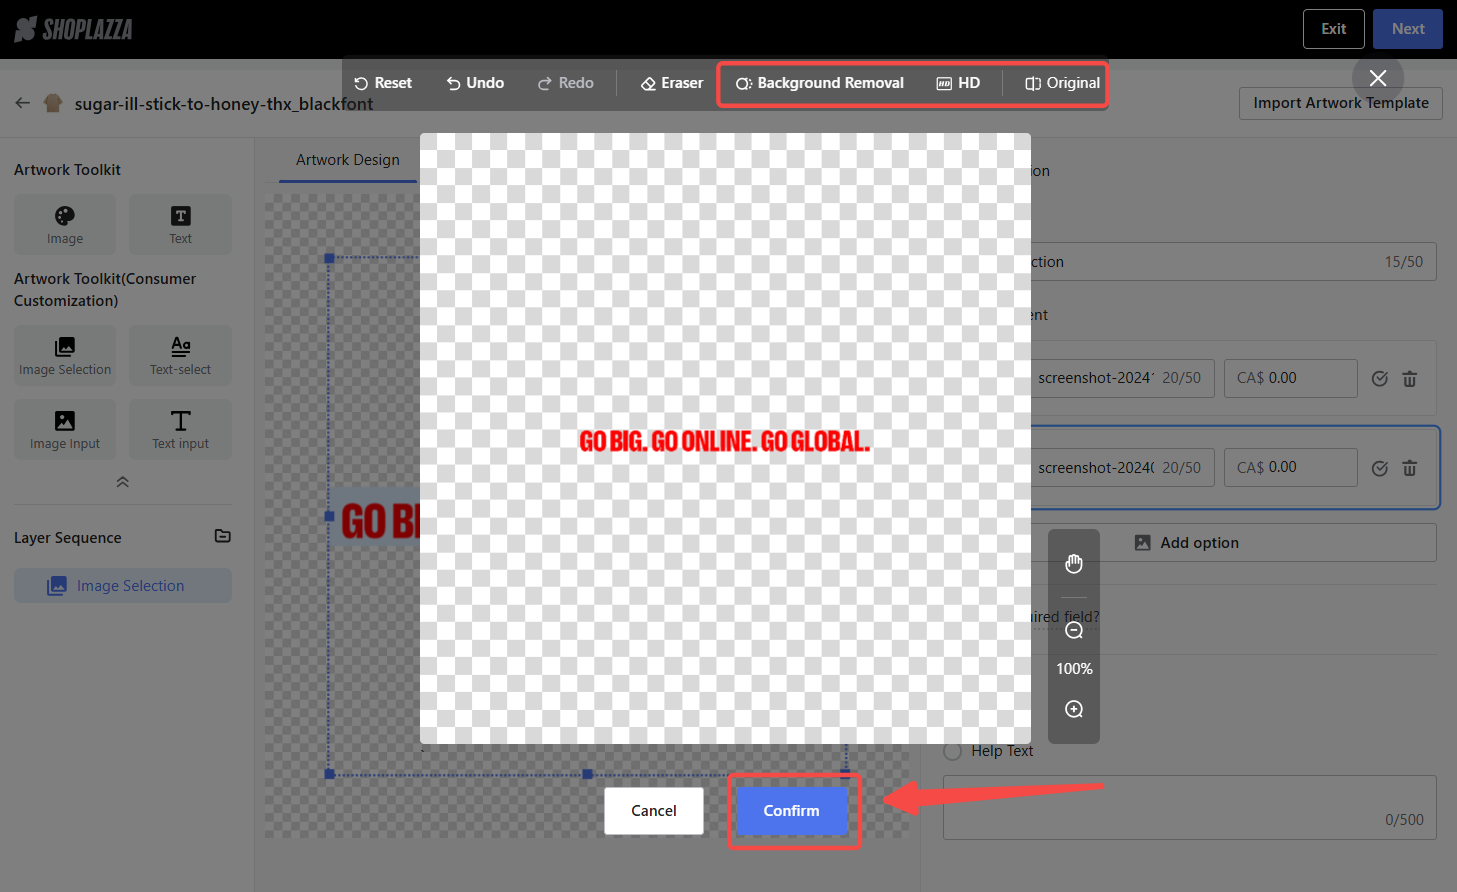
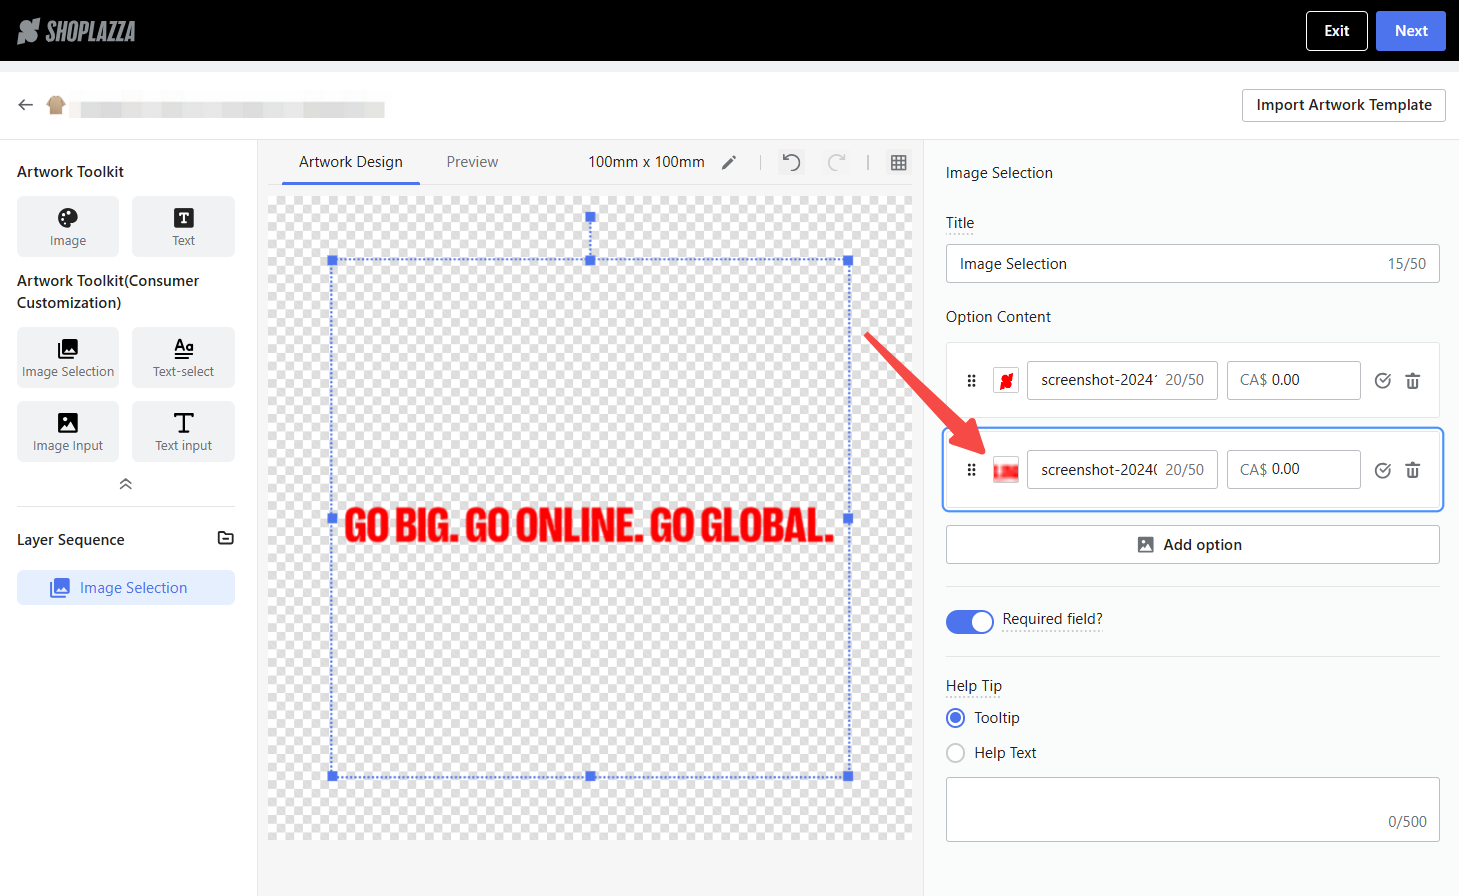
2. Process and save the image: Use AI tools such as Background Removal or One-Click HD to process the image once again. Once processing is complete, click Confirm to save the changes. The edited image will immediately update in both the option’s thumbnail and the design canvas.
Setting up preview images
The Preview Settings feature allows SKU-specific previews so customers can visualize their designs.
Steps include:
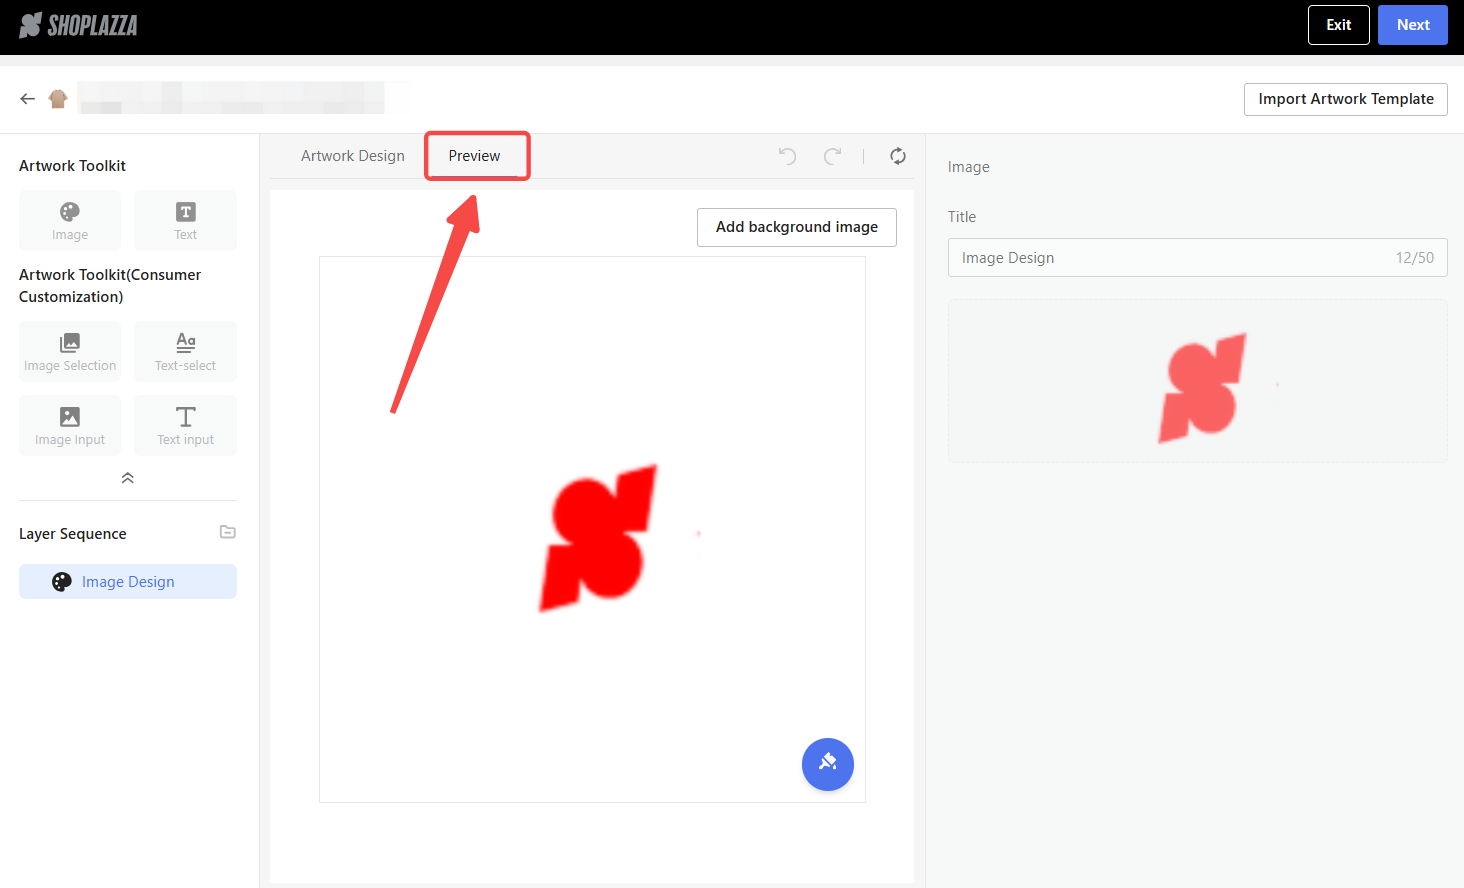
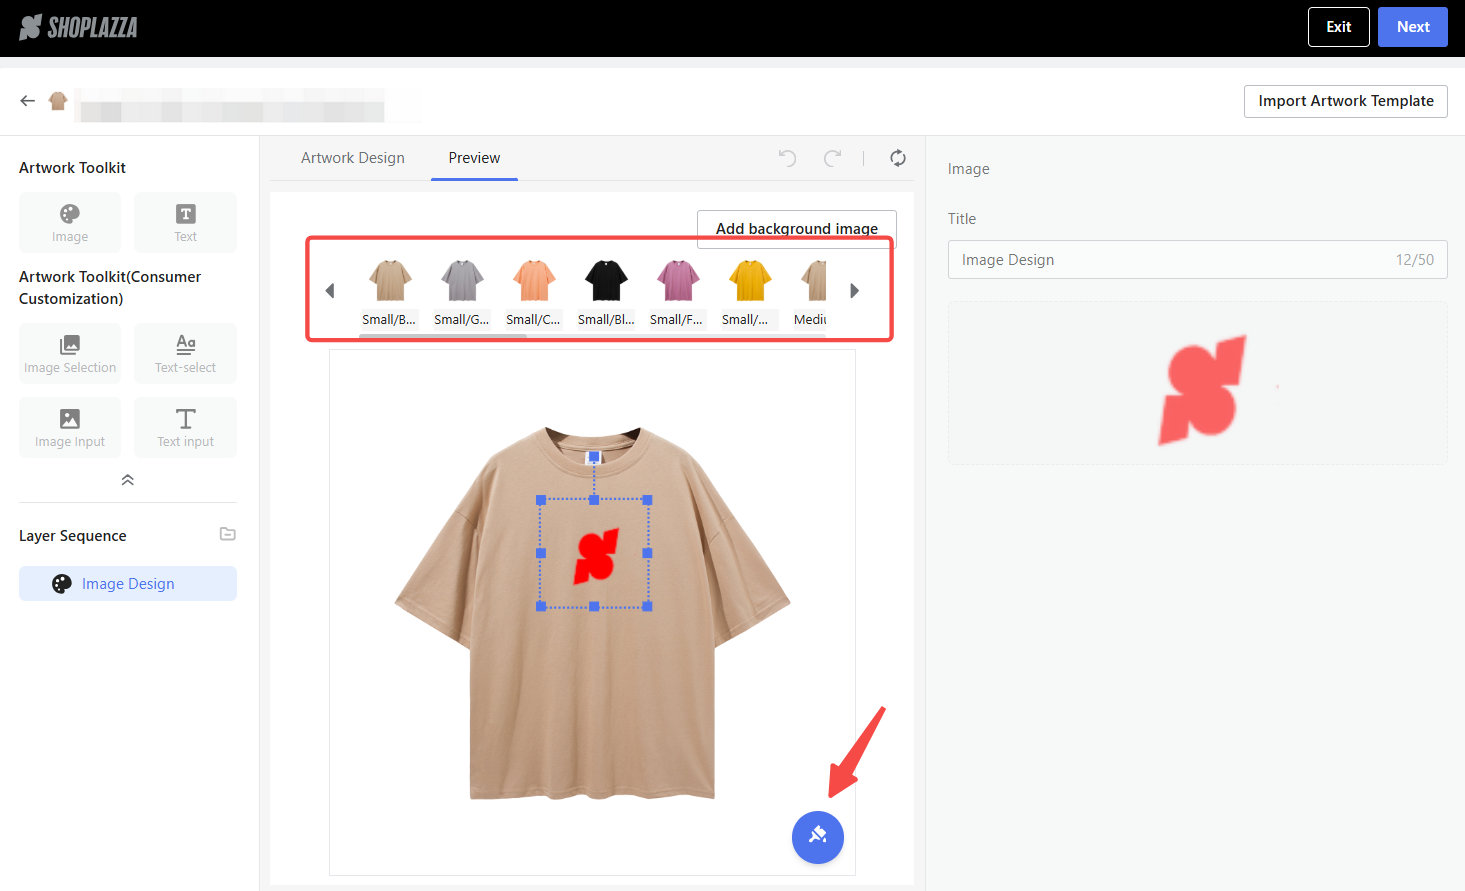
1. Open preview settings: After completing the artwork design, navigate to the top of the page and click the Preview tab to access the Preview Settings interface.
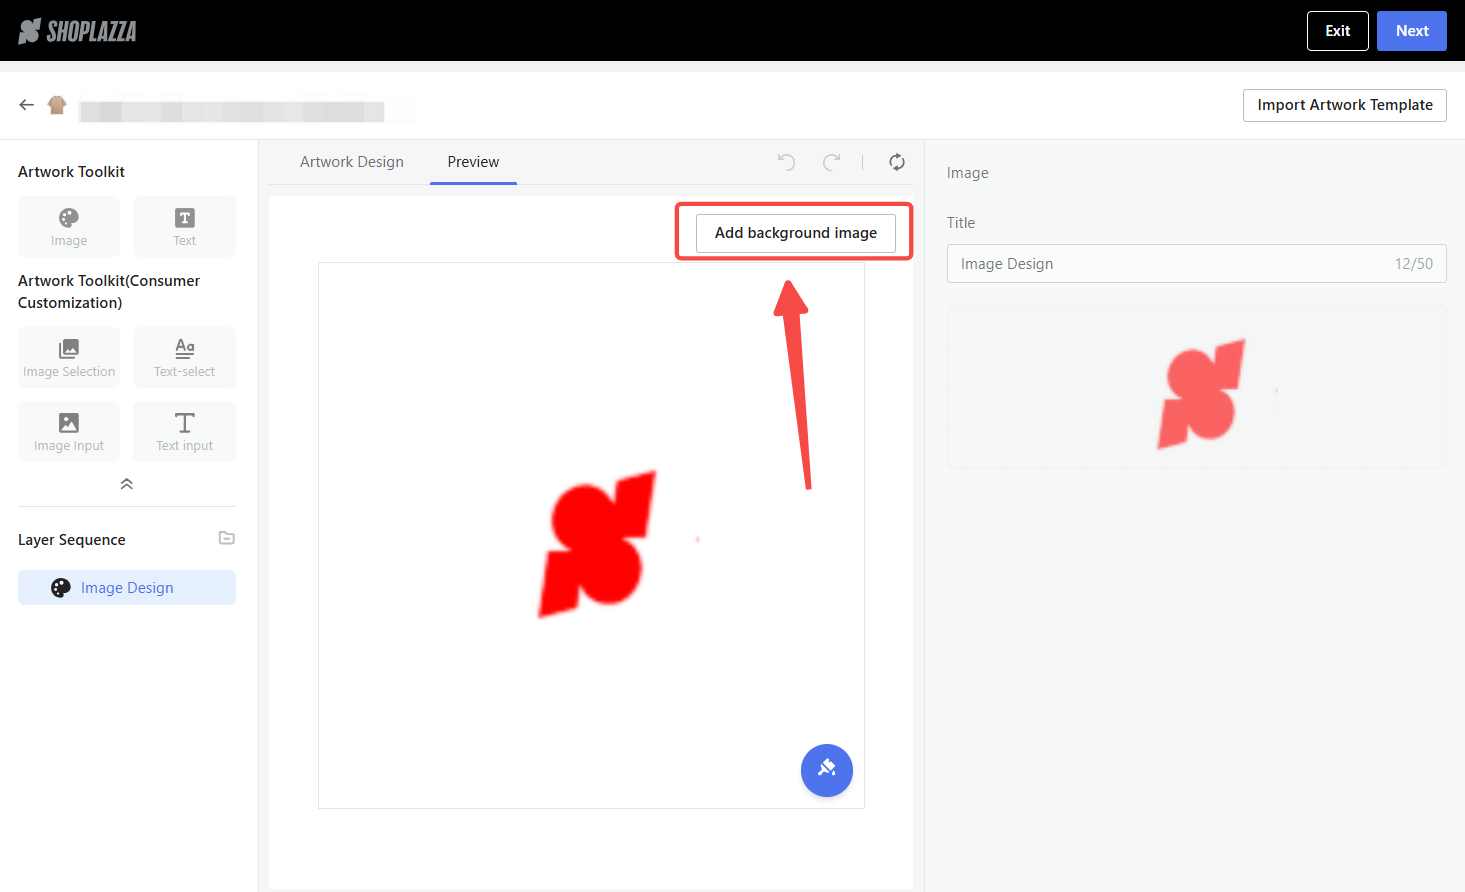
2. Add a background image: Click Add background image to upload a background that enhances your product’s presentation. Adjust the image’s position and size within the design area to fit your product layout.
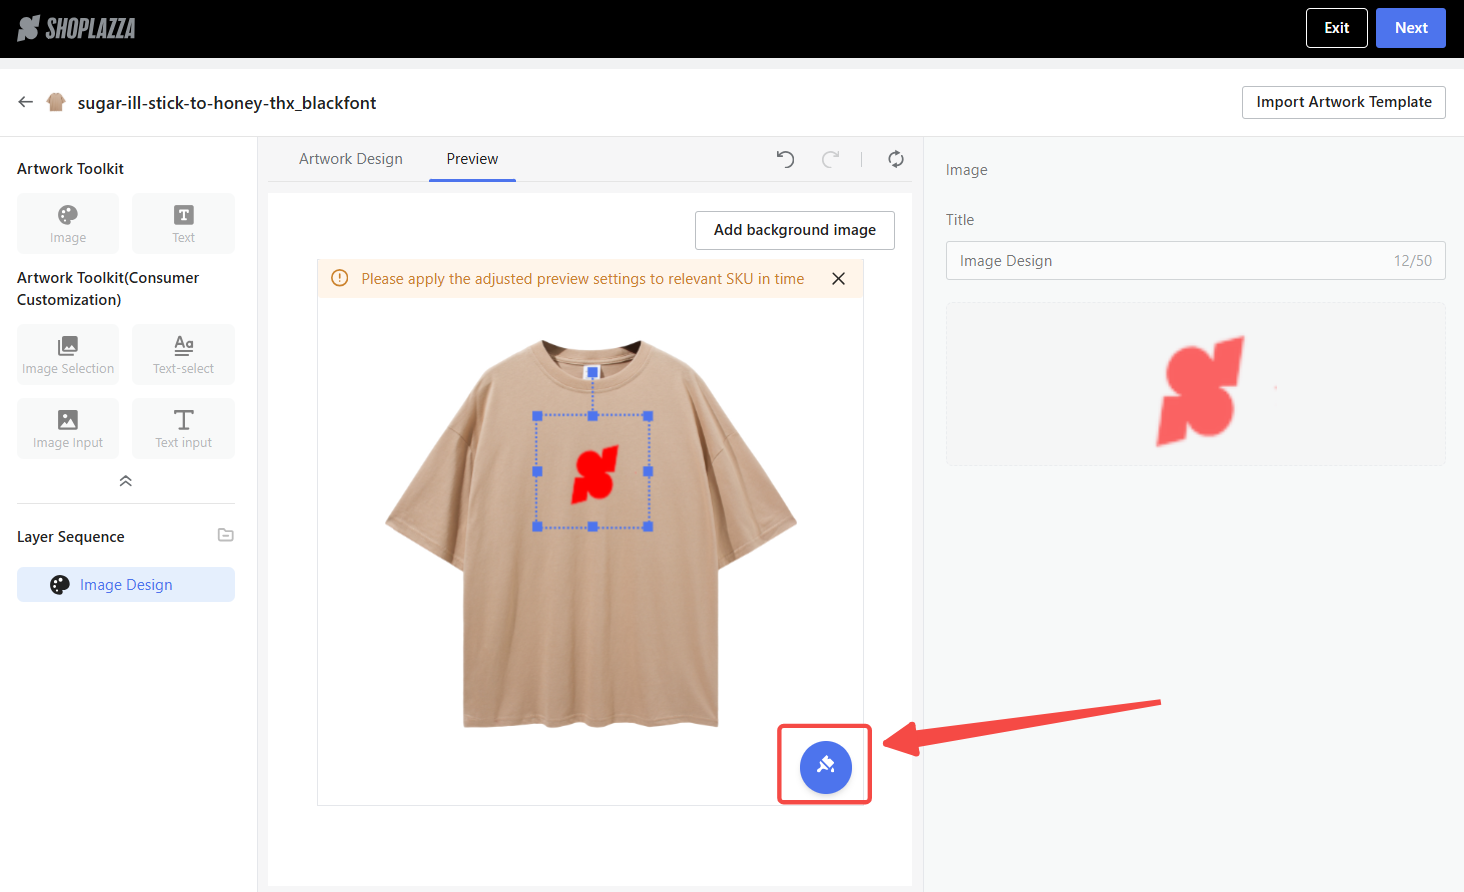
3. Apply to SKUs: Click Apply to SKU to assign the preview image to specific SKUs or all SKUs. This ensures each SKU has an accurate preview image reflecting its customization details, which is important for providing customers with a clear understanding of their chosen design.
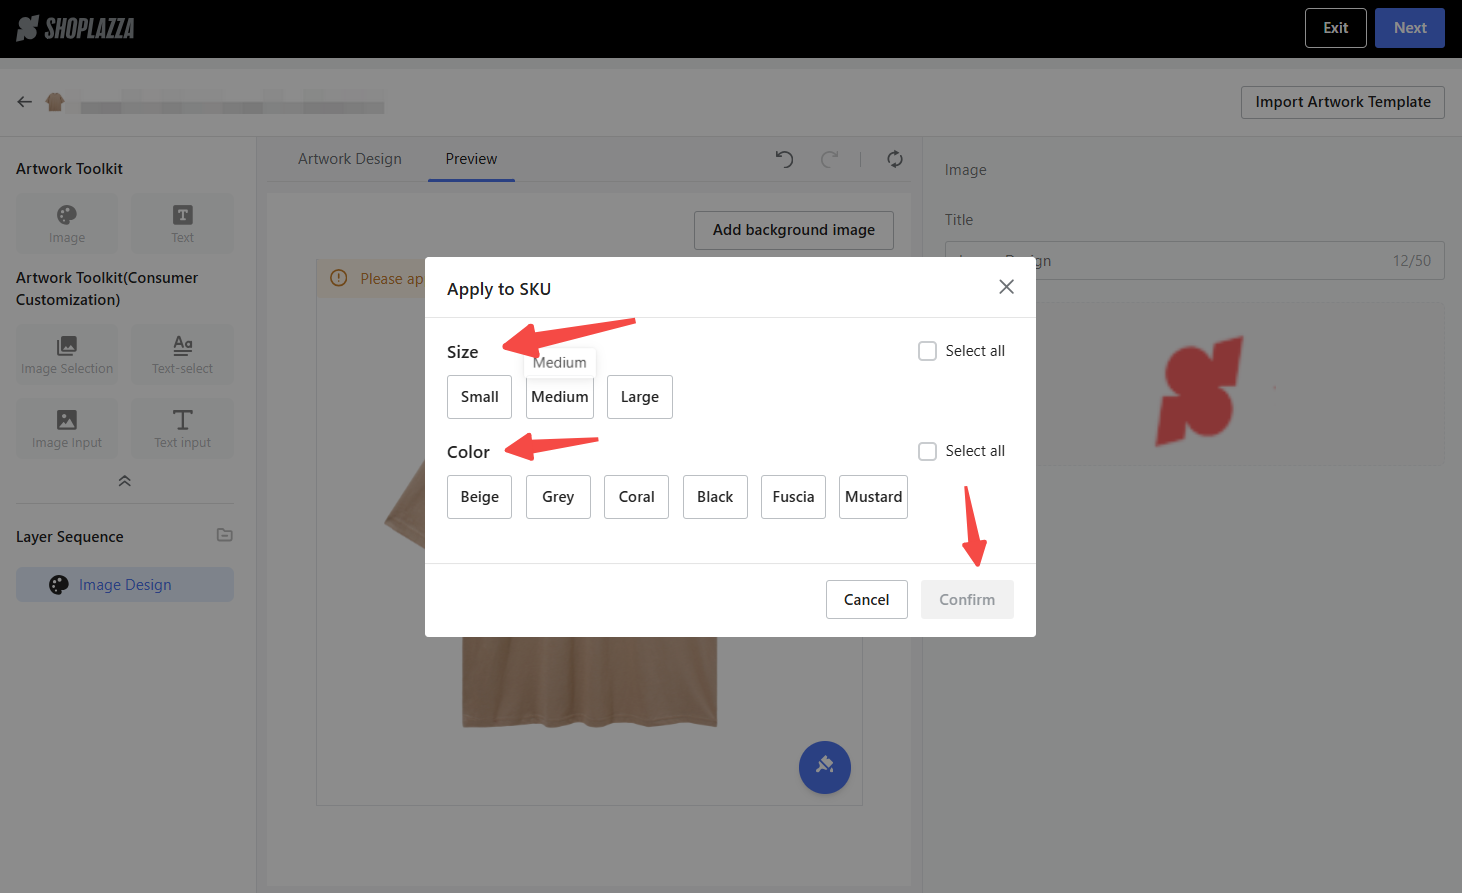
4. Finalize the preview settings: At the top of the interface, review the SKUs selected in the Apply to SKU step. Use the horizontal scroll to navigate between SKU preview images and verify their accuracy. If adjustments are needed, modify the preview images and click Apply to SKU again to save your changes. Once all SKUs are finalized, the preview settings process is complete.
Creating and applying templates
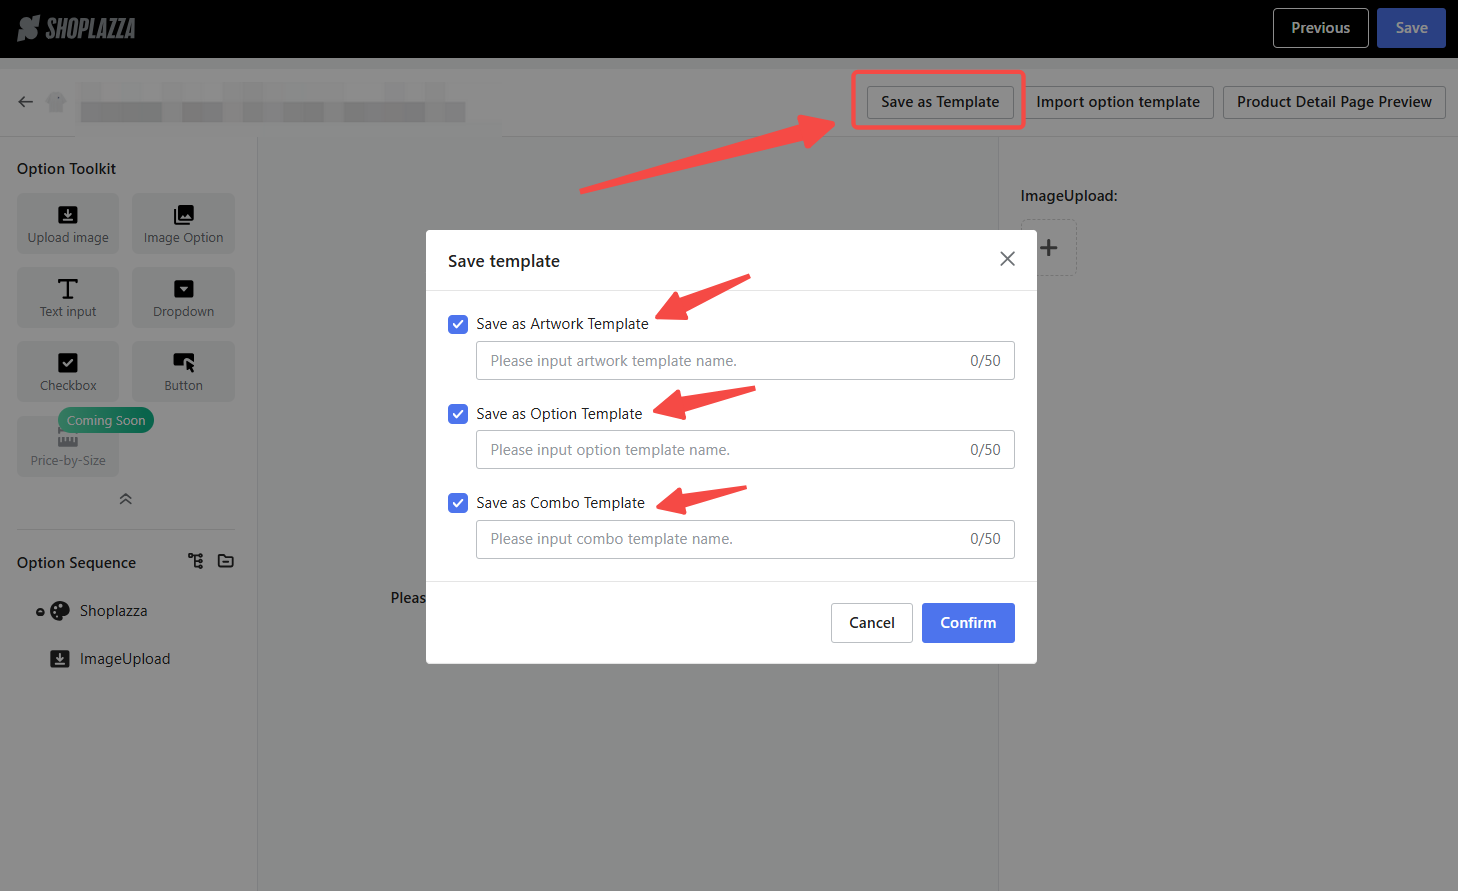
Templates streamline the customization process, allowing you to save and reuse designs across multiple products. With three templates available, you can efficiently manage your designs and maintain consistency across your store.
- Option templates: Save dropdowns, buttons, and text inputs.
- Artwork templates: Save artwork-specific components.
- Combo templates: Combine option and artwork templates.
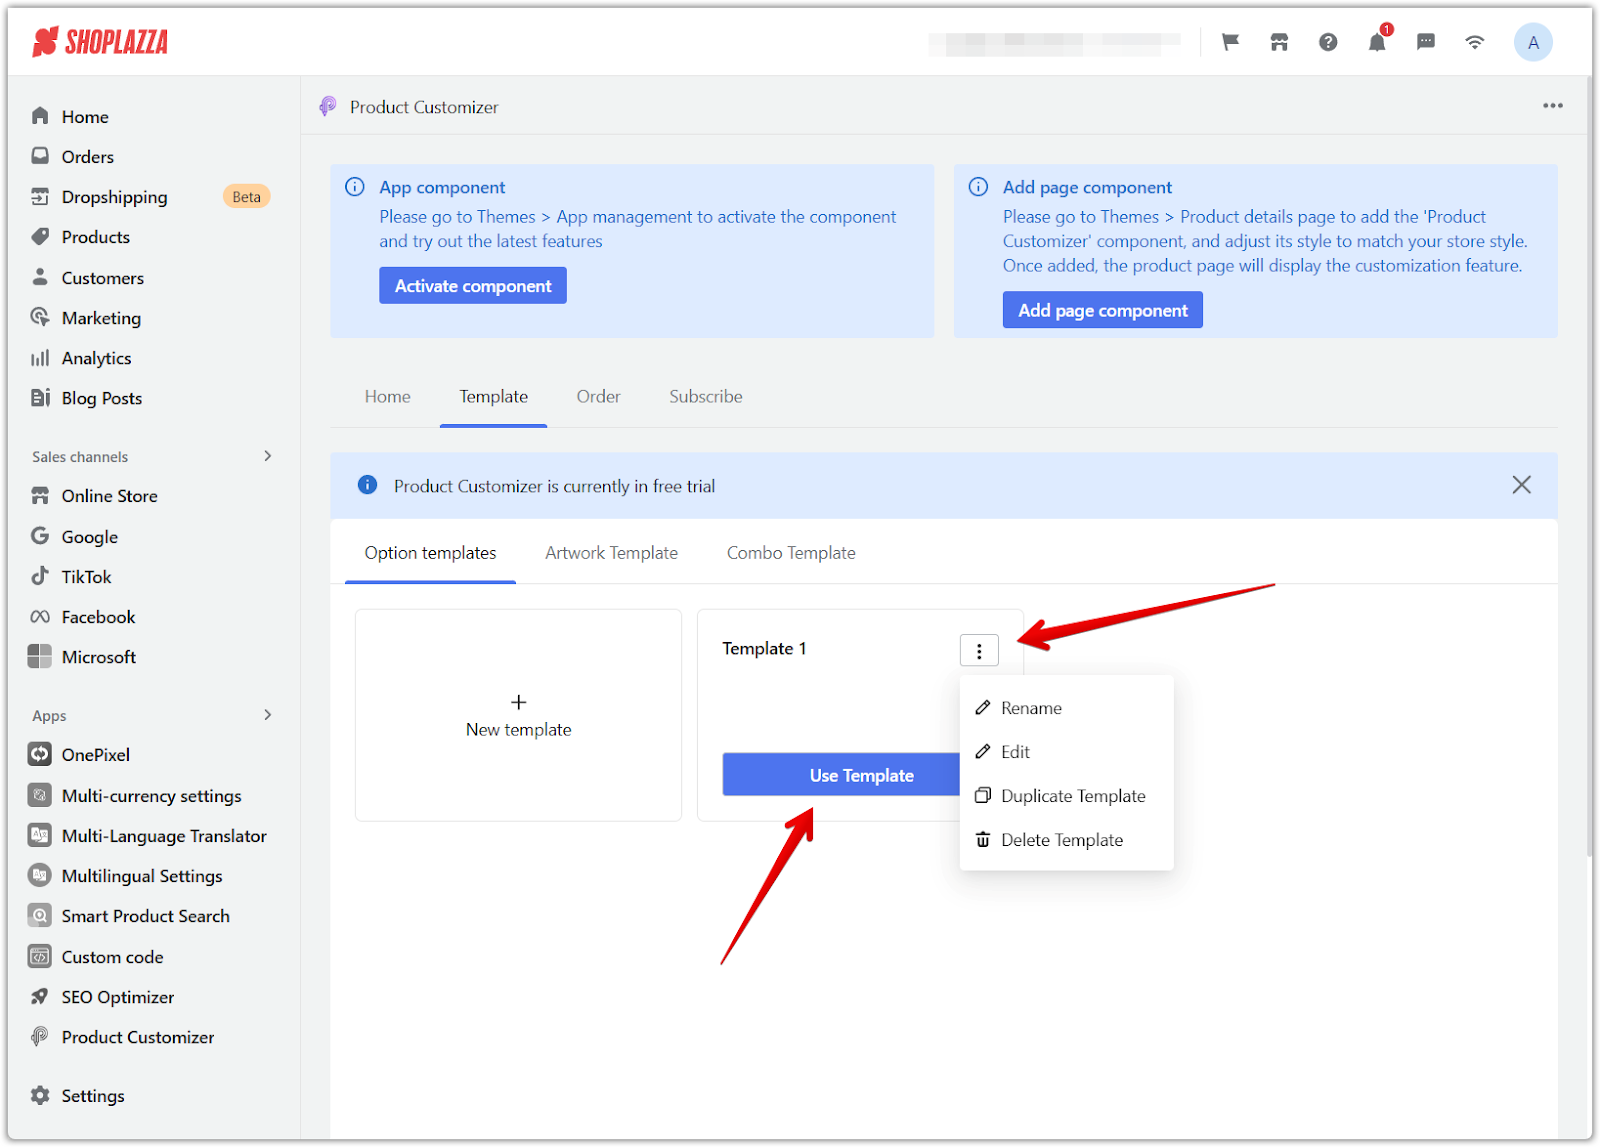
1. Manage templates: Navigate to the Template section of the app, where you can create, edit, copy, delete, or use existing templates. This section helps you organize your saved designs for easy application.
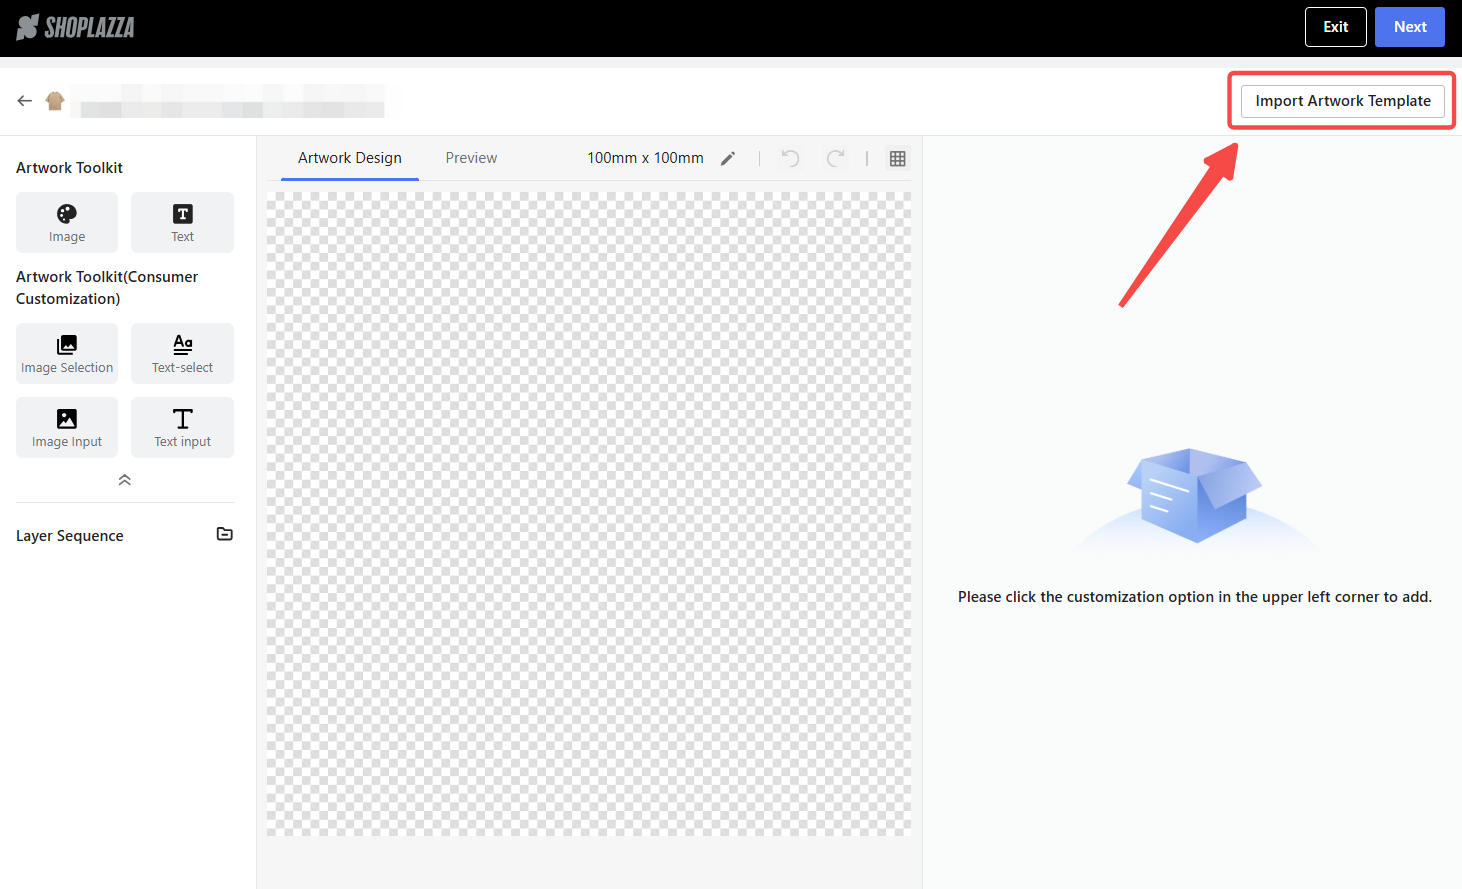
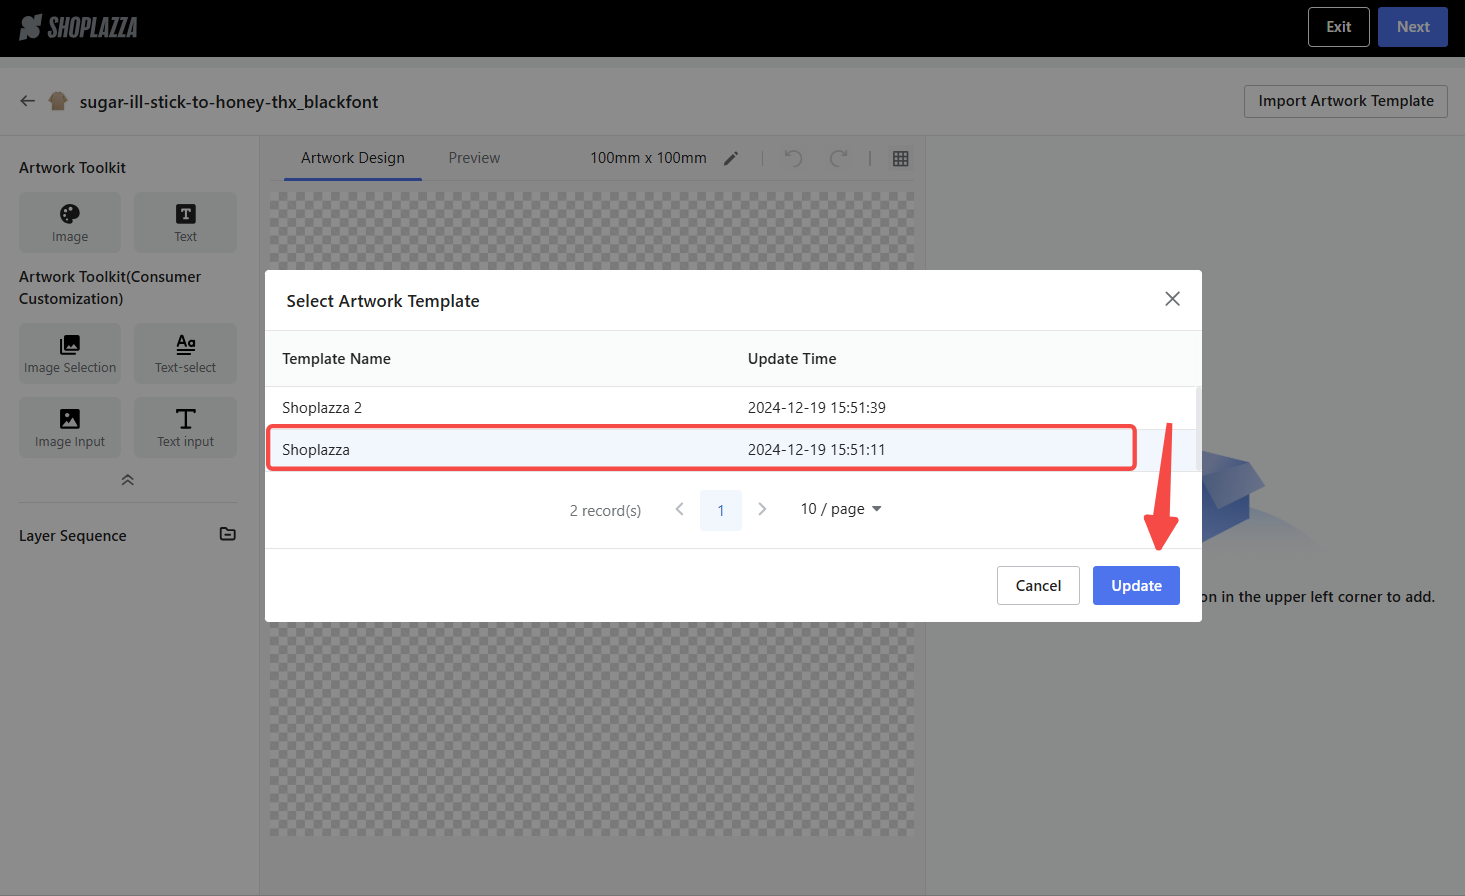
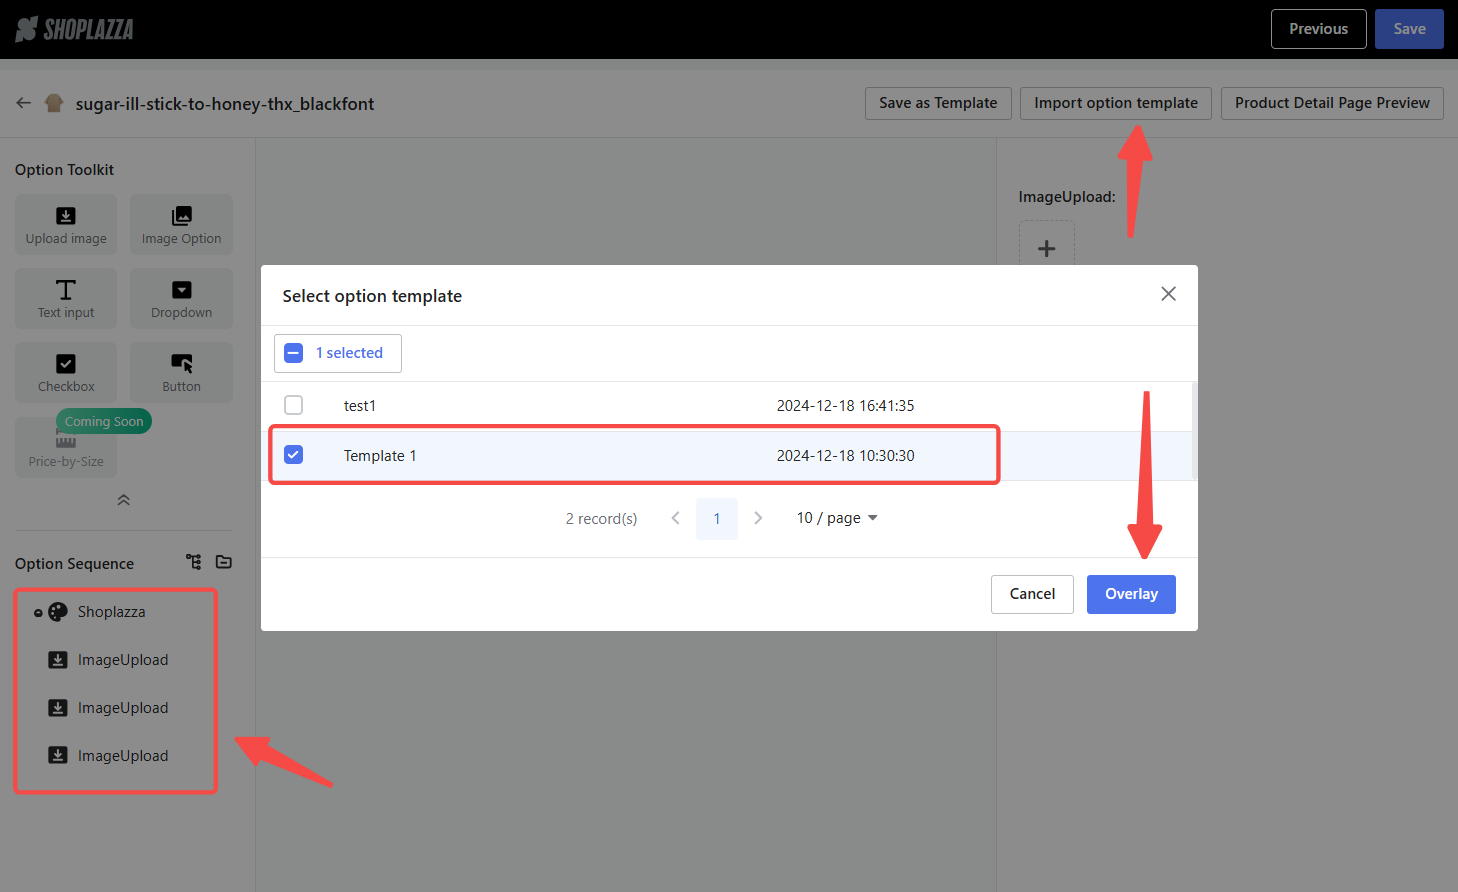
2. Import templates: While designing a product, click Import artwork template to apply a saved design quickly. You can import templates multiple times; each new import will replace the previous design by default.
3. Overlay option templates: Select the desired options and click Overlay to apply the template instantly. The imported templates will appear below the artwork components, and you can adjust their sequence as needed.
4. Save as template for future use: Click Save as Template to reuse the design for other products. In the pop-up window, choose the template type (Artwork, Option, or Combo). If no option components are included, the Confirm button will be unavailable.
Real-time preview and order fulfillment
Enhance the customer experience with real-time previews and detailed order tracking. These features help customers visualize their customizations and allow merchants to track orders effectively.
1. Real-Time preview:
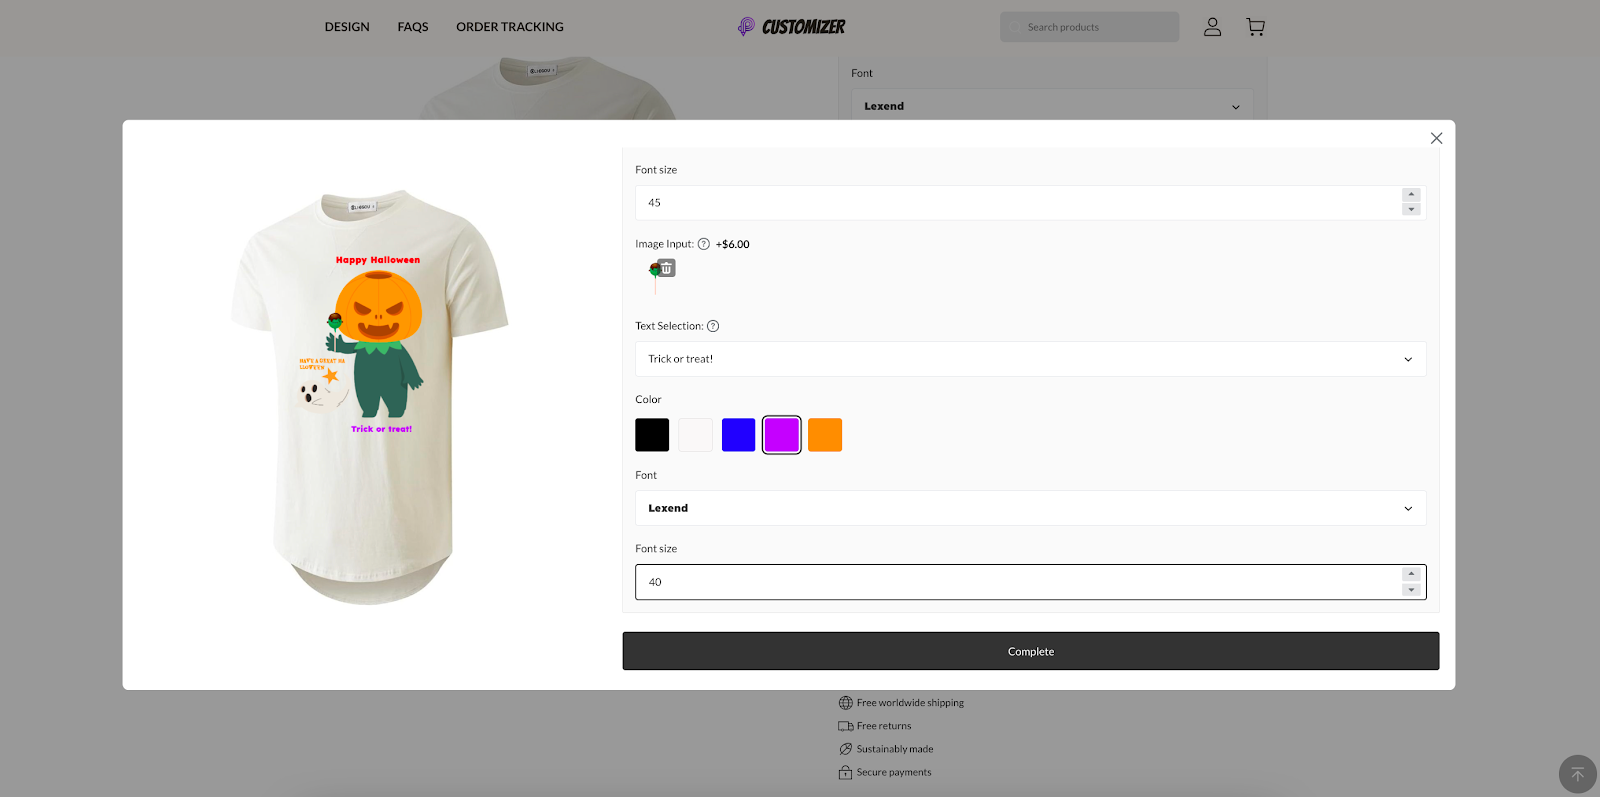
- Trigger a real-time preview: After completing artwork customization, click Preview on Product Page. Customers can view and adjust their personalized designs in real time.
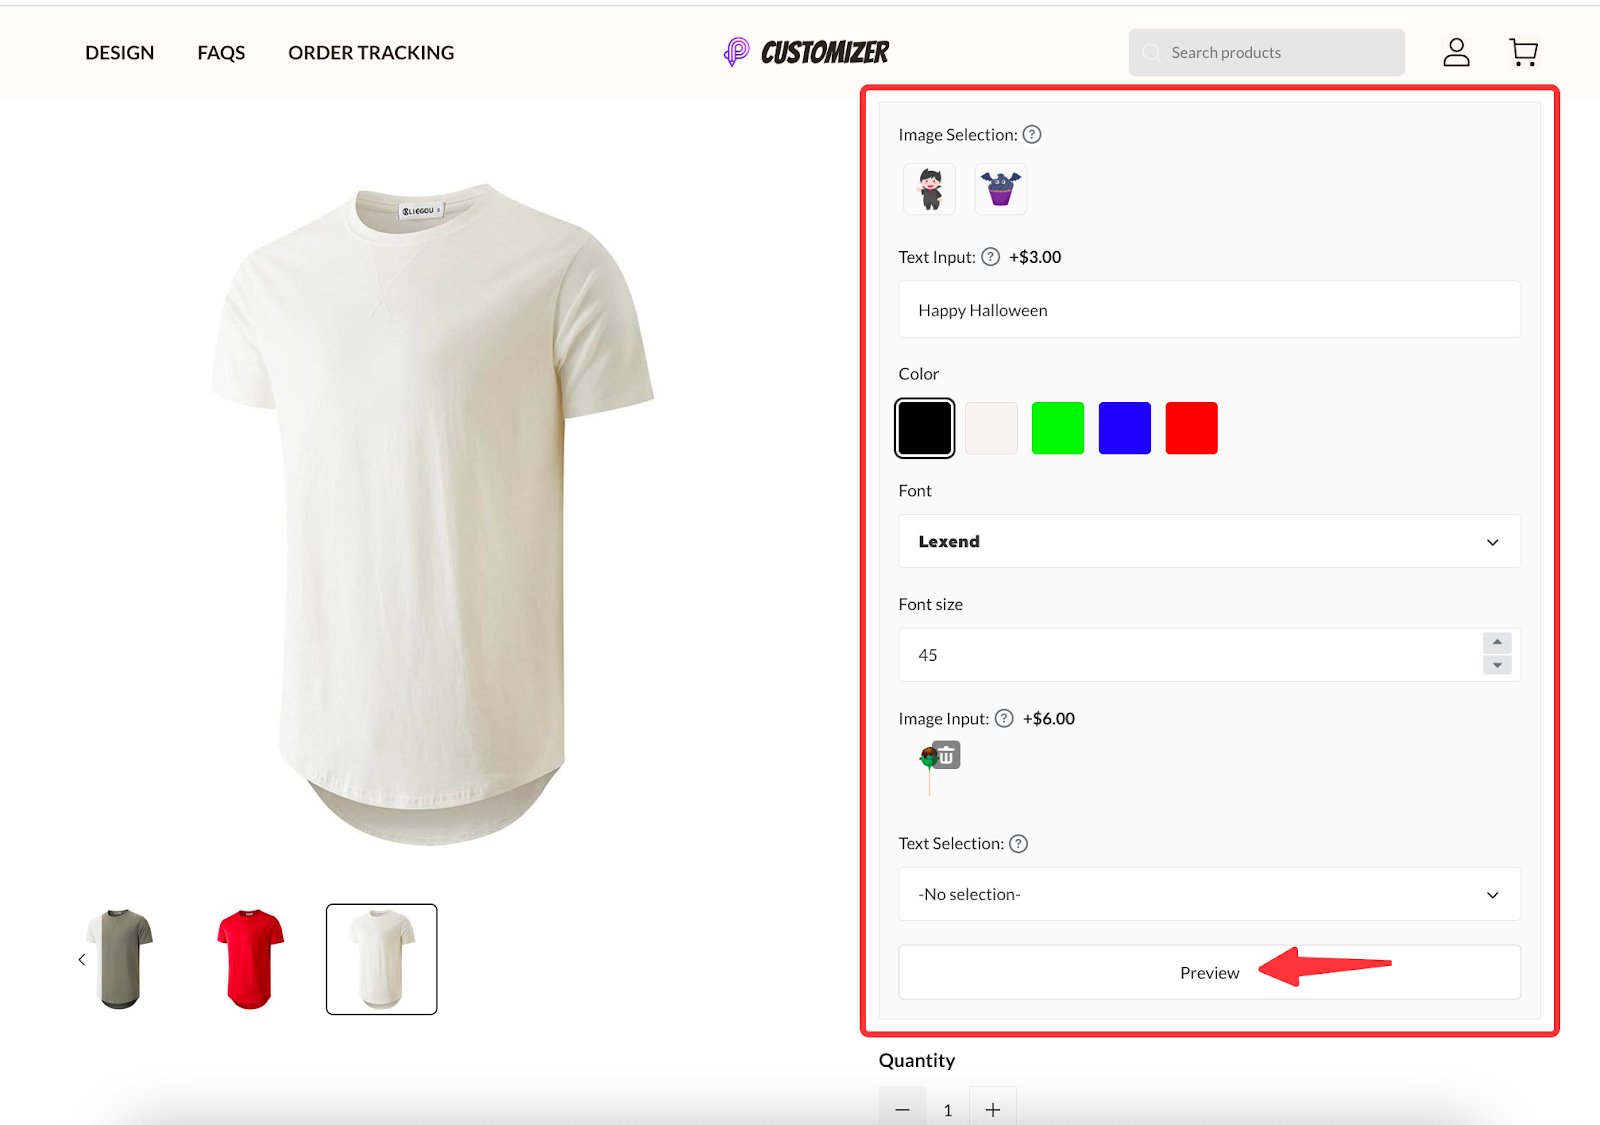
- Complete and place an order: Once satisfied, customers can proceed to checkout and complete their purchase.
2. Order fulfillment:
- View order details: Access the Orders section to monitor progress. Details include customization information, fulfillment status, and production images.

- Real-Time preview video guide: A step-by-step walkthrough demonstrating how customers interact with the real-time preview feature.
- Order fulfillment video guide: Explains how merchants can monitor and manage order fulfillment efficiently.
The Product Customizer app simplifies the customization process, enhances customer experience, and helps your store stand out. By following this guide, merchants can create unique products tailored to customer needs while maximizing sales potential.


Comments
Please sign in to leave a comment.