The Farida theme revolutionizes your online store by enabling you to add cover images to your menu items. This feature not only enhances the visual appeal of your store but also significantly improves the user experience and navigation. In today’s competitive online market, offering a seamless and engaging shopping experience can set your store apart. Visual menus allow your customers to quickly find what they are looking for, making their journey through your store enjoyable and efficient. This guide provides detailed instructions on configuring visual menus and explores the various benefits they bring to your online store.
Benefits of image menus
- Visual appeal: Image menus enhance your store’s attractiveness by displaying relevant images for each category or album, catching the eye of your customers.
- Improved navigation: Customers can easily identify and navigate to products, reducing search time and increasing the likelihood of purchases.
- Enhanced user experience: Providing a visual context improves the browsing experience, making it more intuitive and enjoyable for customers.
Key features
- Exclusive to Farida theme: This functionality is only available in the Farida theme, setting it apart from other themes. Farida’s unique design and capabilities are tailored to leverage the power of visual menus, providing a distinctive edge in creating a visually stunning and user-friendly store. By using the Farida theme, you can take full advantage of this advanced feature to enhance your site’s overall aesthetic and functionality.
- RTL Style Support: Adaptable for right-to-left languages, ensuring flexibility in presentation. This means that if your store caters to customers who read in languages such as Arabic, Hebrew, or Persian, the Farida theme will seamlessly adjust the layout to support right-to-left text. This feature broadens your store’s accessibility, making it more inclusive and easier to navigate for a diverse customer base.
Setting up visual menus
This section guides you through the steps to set up visual menus in your online store. Follow these instructions to configure your menu navigation settings and link secondary menus to collection pages with cover images
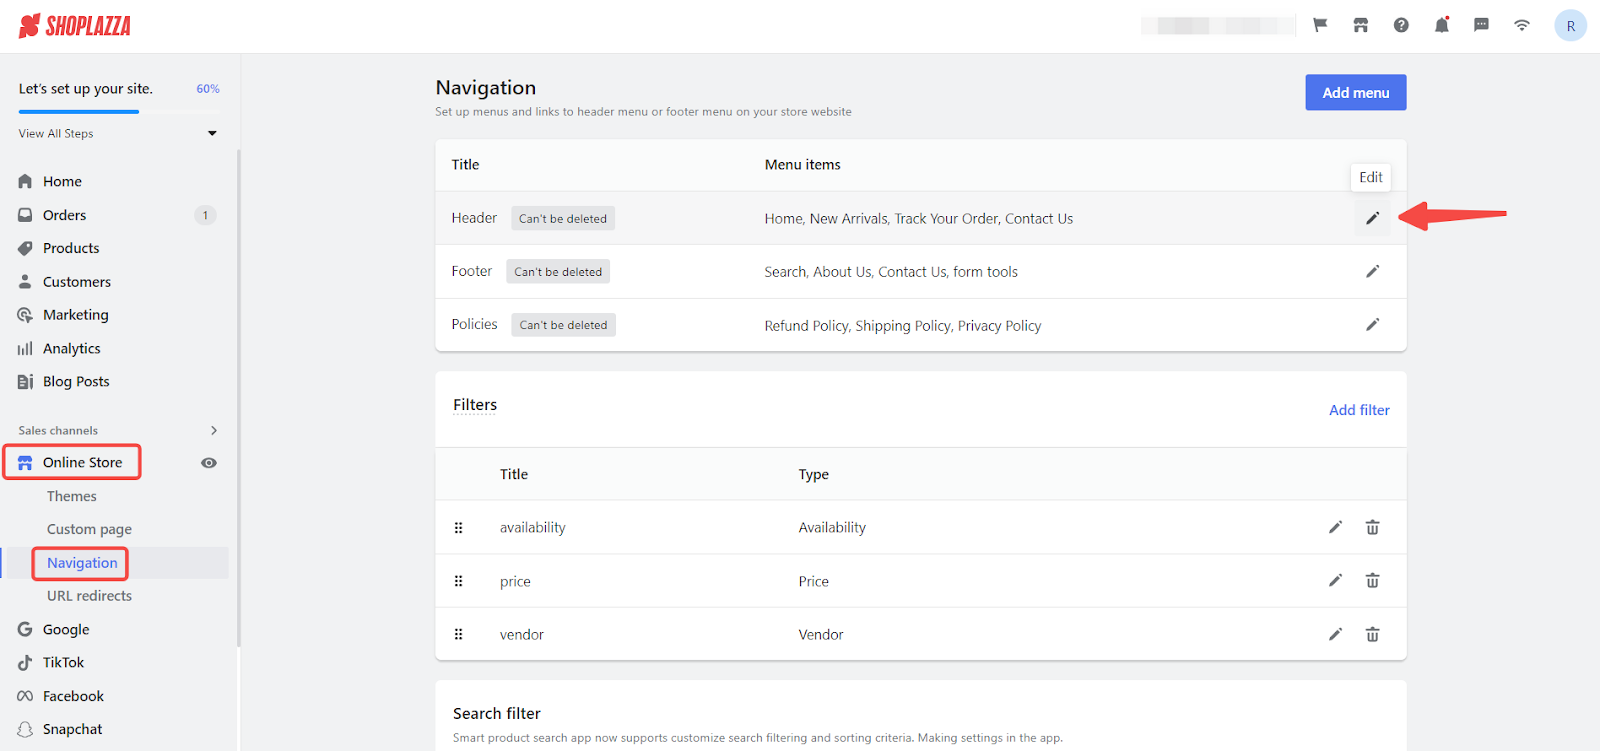
1. Set up menu navigation: Navigate to your Shoplazza admin > Online Store > Navigation to edit your menu settings.
Note
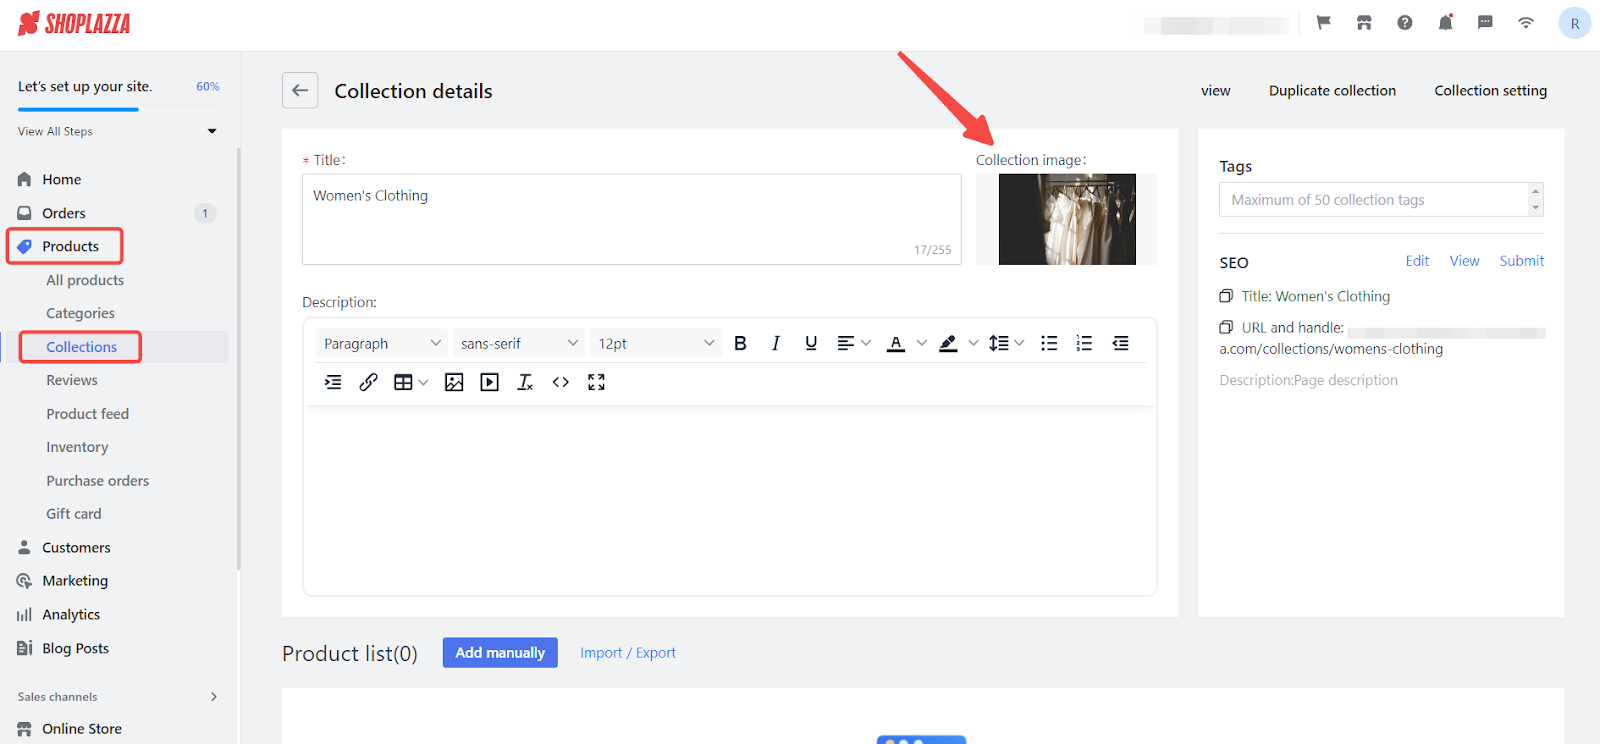
This feature applies only to secondary menus. Ensure secondary menu links are connected to the collection page and that the collection has a cover image uploaded. For more details, see Creating product collections. Refer to Navigation for detailed setup instructions.
Visual Representation
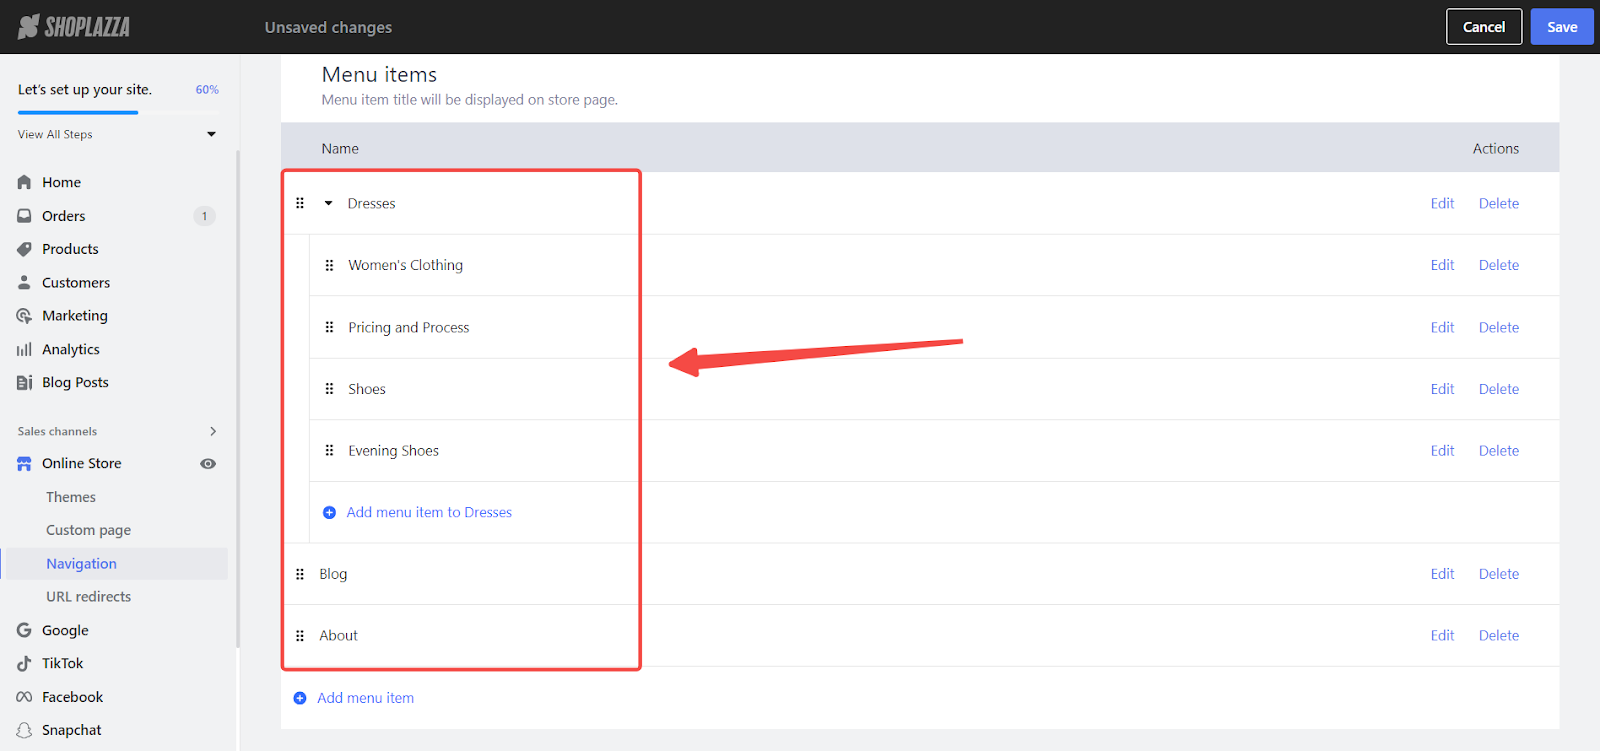
Understand the structure of your menu with this visual representation. This section provides a clearer view of how your first-level, second-level, and third-level menus should be organized for optimal navigation.
1. Example table: Refer to the example table below to understand the format. This hierarchical structure helps organize your products and pages, making it easier for customers to navigate your store.
| First-level menu | Second-level menu | Third-level menu |
| Dresses | Women's Clothing | |
| Pricing and Process | ||
| Shoes | ||
| Evening Shoes | ||
| Blog | ||
| About |
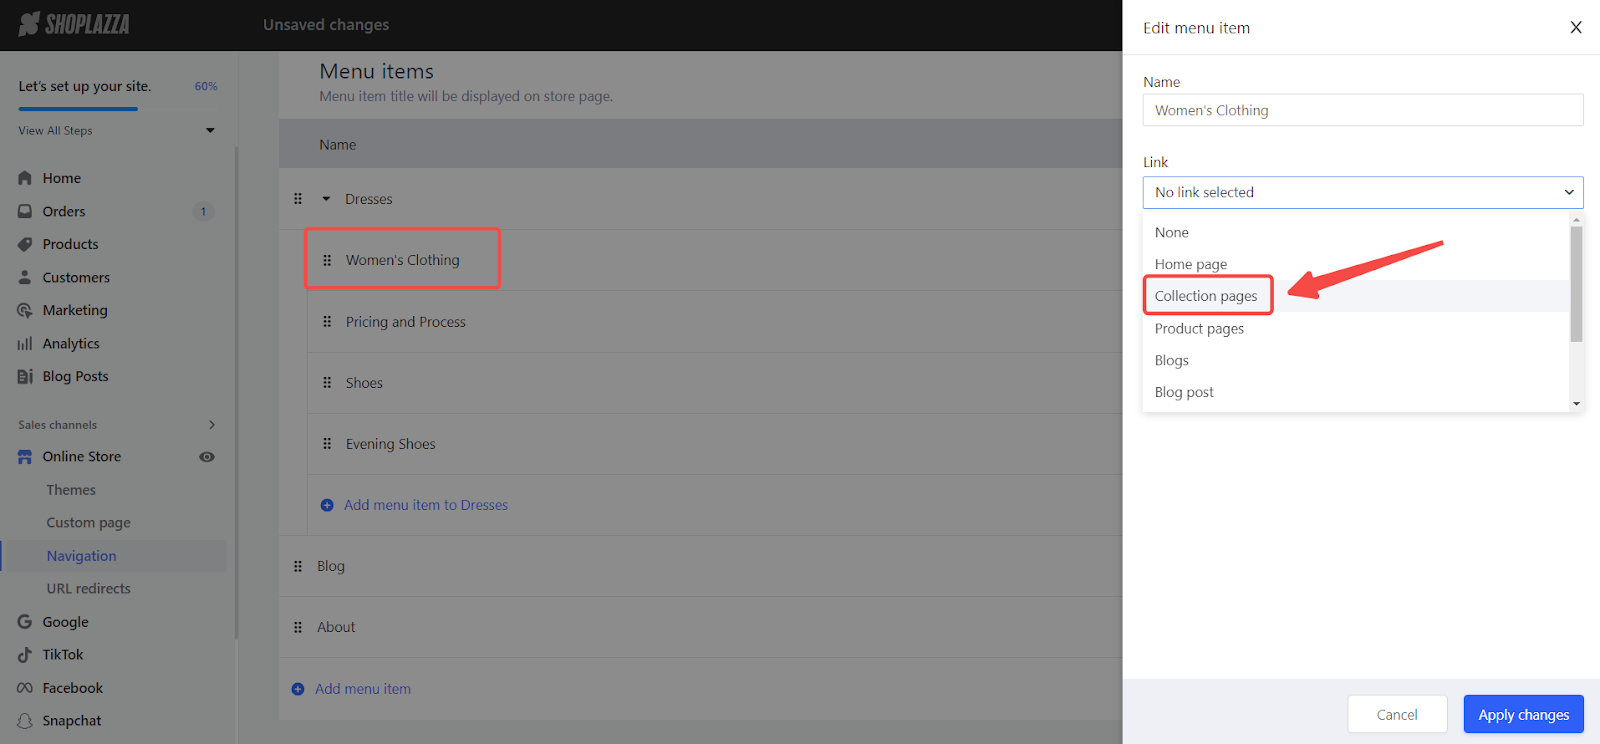
2. Connect secondary menus to collection pages: Ensure secondary menus are linked to collection detail pages with cover images uploaded.
Configuring visual menus in the theme
This section walks you through the customization process within the Farida theme. Learn how to access the theme customization page and adjust your visual menu settings for the best display.
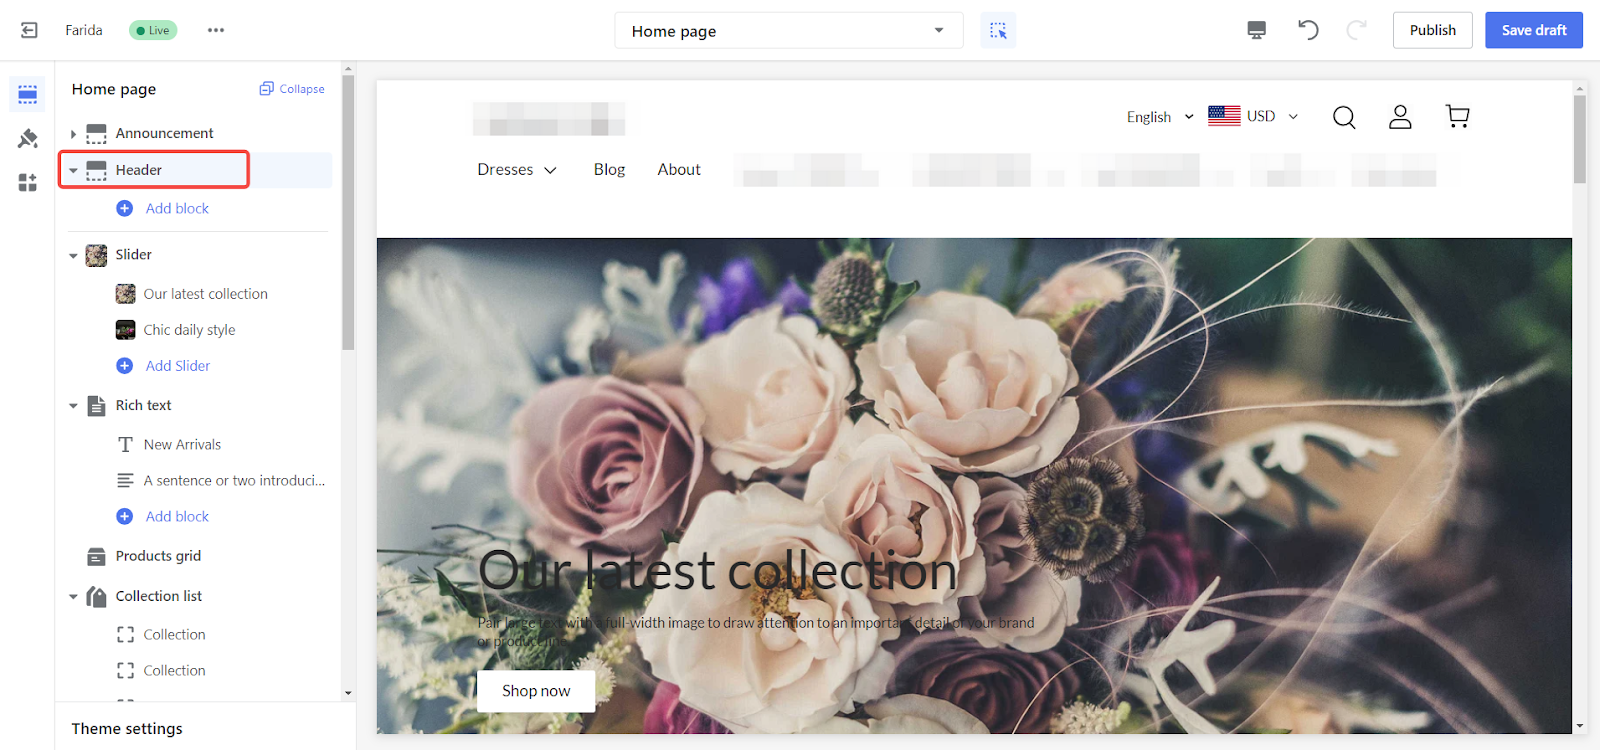
1. Access the theme customization page: Go to your Shoplazza admin > Online Store > Themes > Customize. On the homepage, click on the Header section.
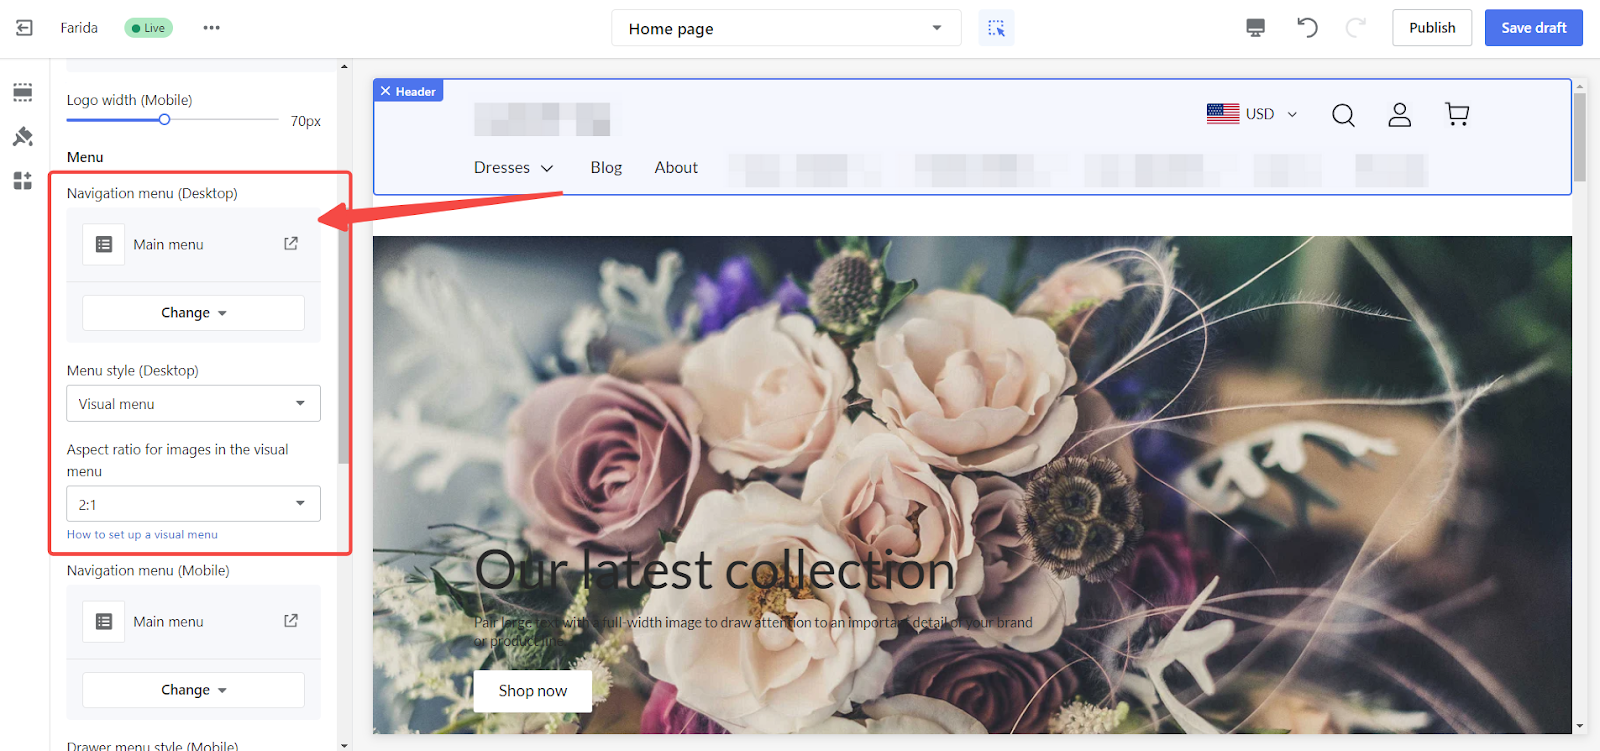
2. Choose the visual menu in desktop navigation: Locate the Navigation menu (Desktop) section. Select the menu configured with images, choose the visual menu option from the dropdown, and adjust the image ratio for optimal display.
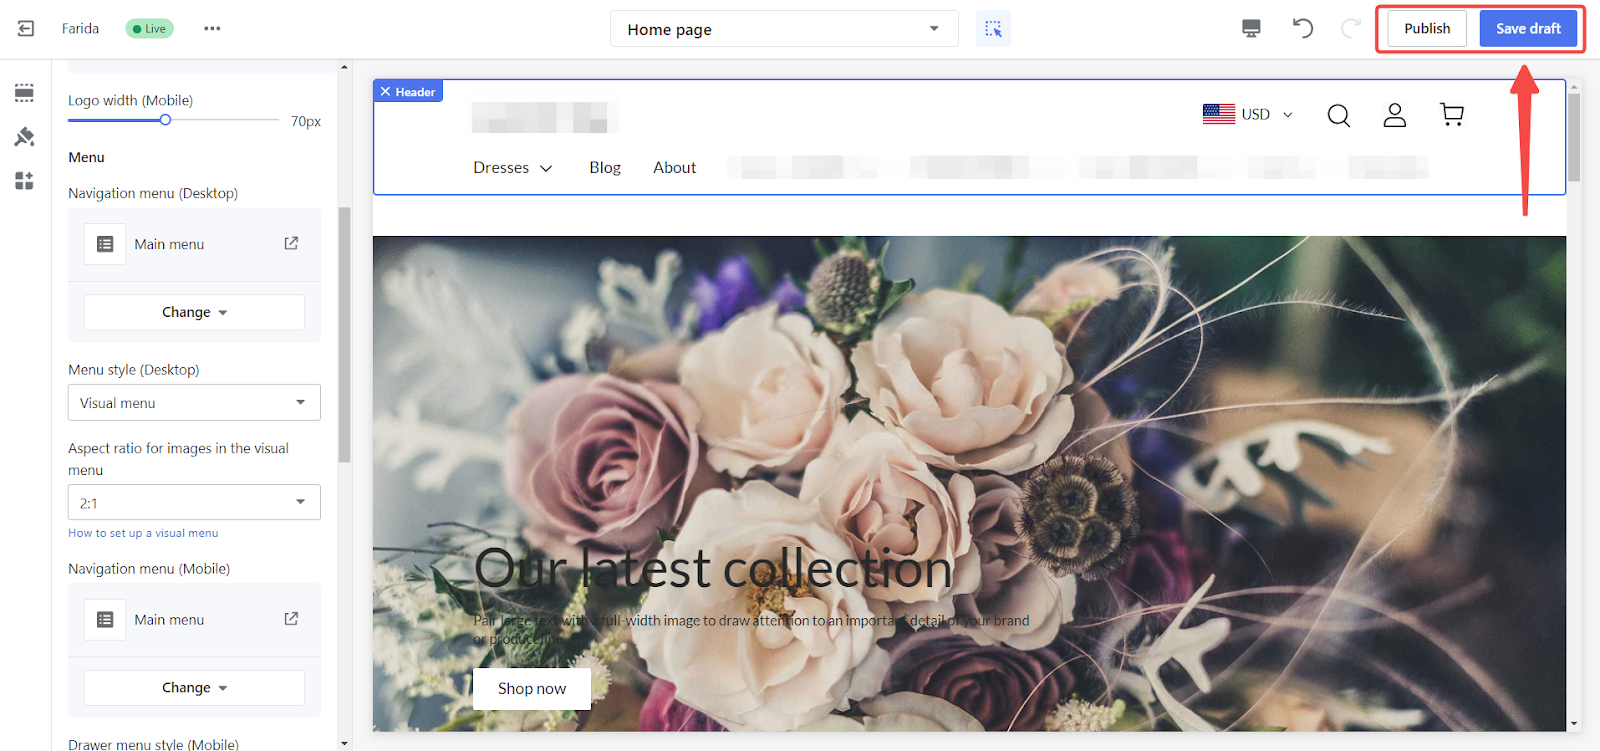
3. Finalize your configuration: Click Publish or Save draft to complete the setup.
Visual effects
Explore how visual menus enhance your store’s appearance. This section demonstrates the difference between menus with and without cover images, showcasing the impact on user experience.
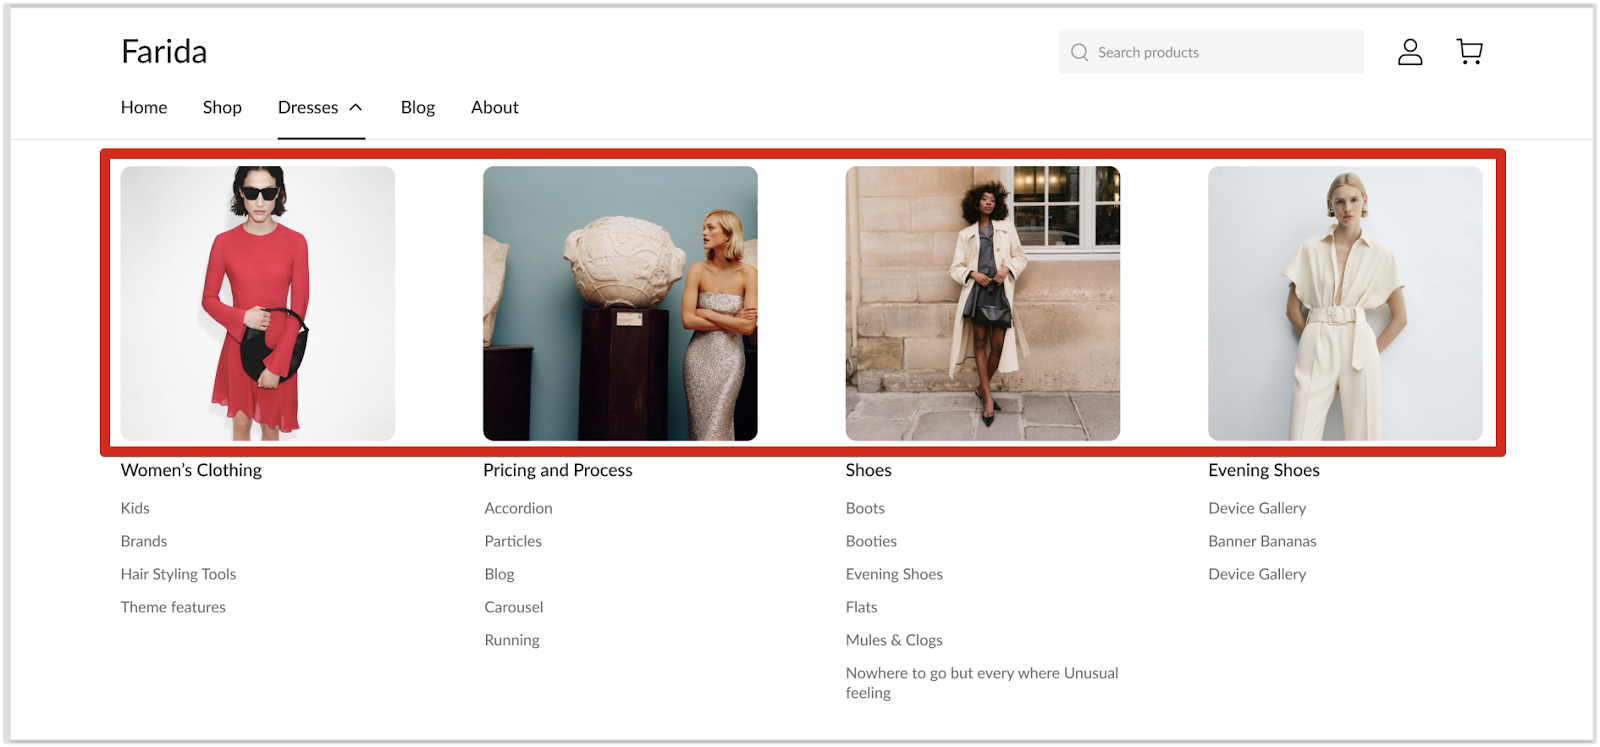
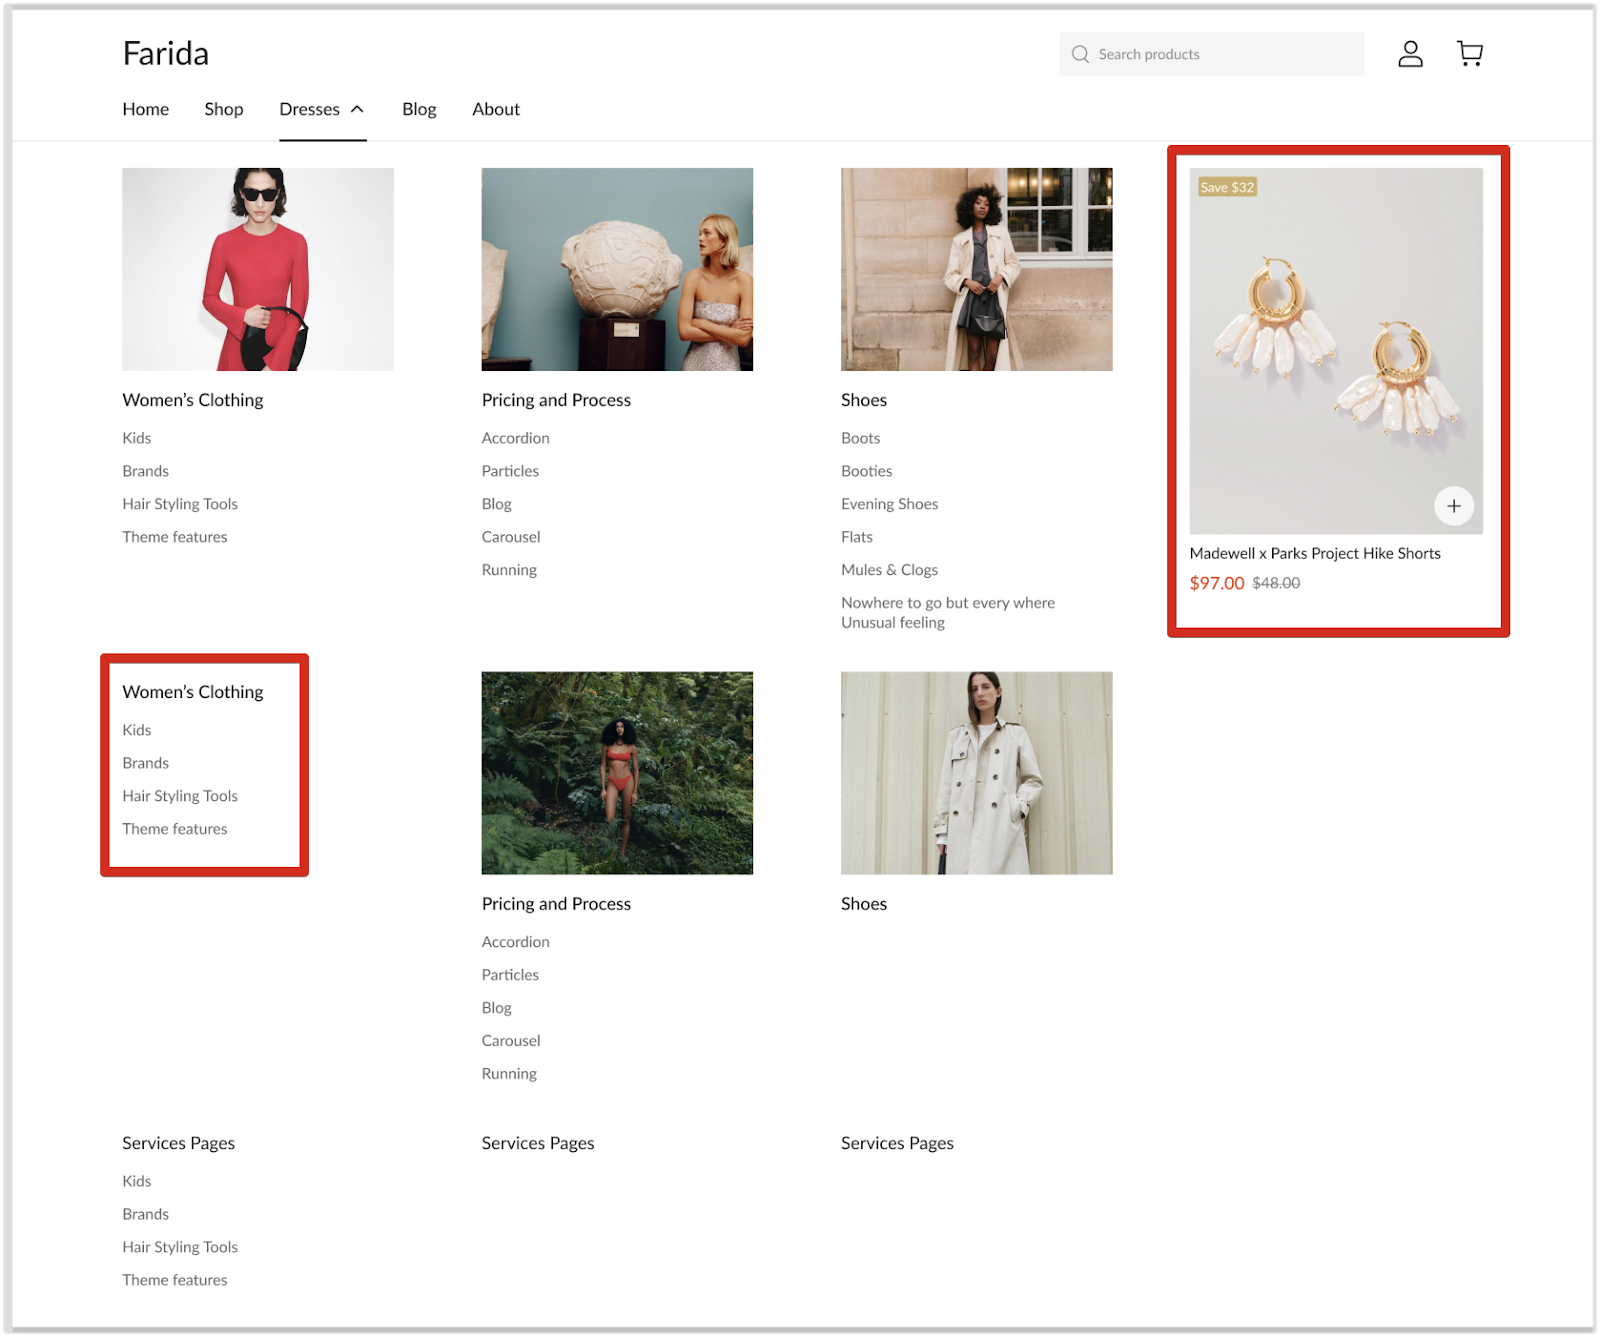
1. With cover image: When your secondary menu links to a collection page with a cover image, it will display as shown below:
2. Without cover image: The menu will display only the text items without images.
Note
By default, the main menu items are not linked to any collection when created. If the main menu item is linked to a collection, it will display the image of the first product in the linked collection on the right-hand side of the drop-down menu. Make sure to link your main menu items to collections if you want images to be displayed.
Setting up visual menus with the Farida theme can significantly enhance the appearance and usability of your online store. By following the steps outlined in this guide, you can create an attractive and intuitive navigation system that improves the shopping experience for your customers. Whether you are showcasing collections with cover images or providing a streamlined text-based menu, the Farida theme’s visual menus feature helps you present your store in the best possible light.


Comments
Please sign in to leave a comment.