
Discount with purchase is a marketing tool that offers various promotional activities to help you increase your sales and boost your revenue. It allows you to set up discount events and offer customers promotions on specific products, encouraging them to purchase multiple items. The aim is to get your customers buying more. In this guide, we'll walk you through how to set up and use the Discount with purchase app.
Note
When setting up multiple activities, it's important to ensure that its dates do not conflict with those of any existing activities. Overlapping dates between these two activity types will result in an error.
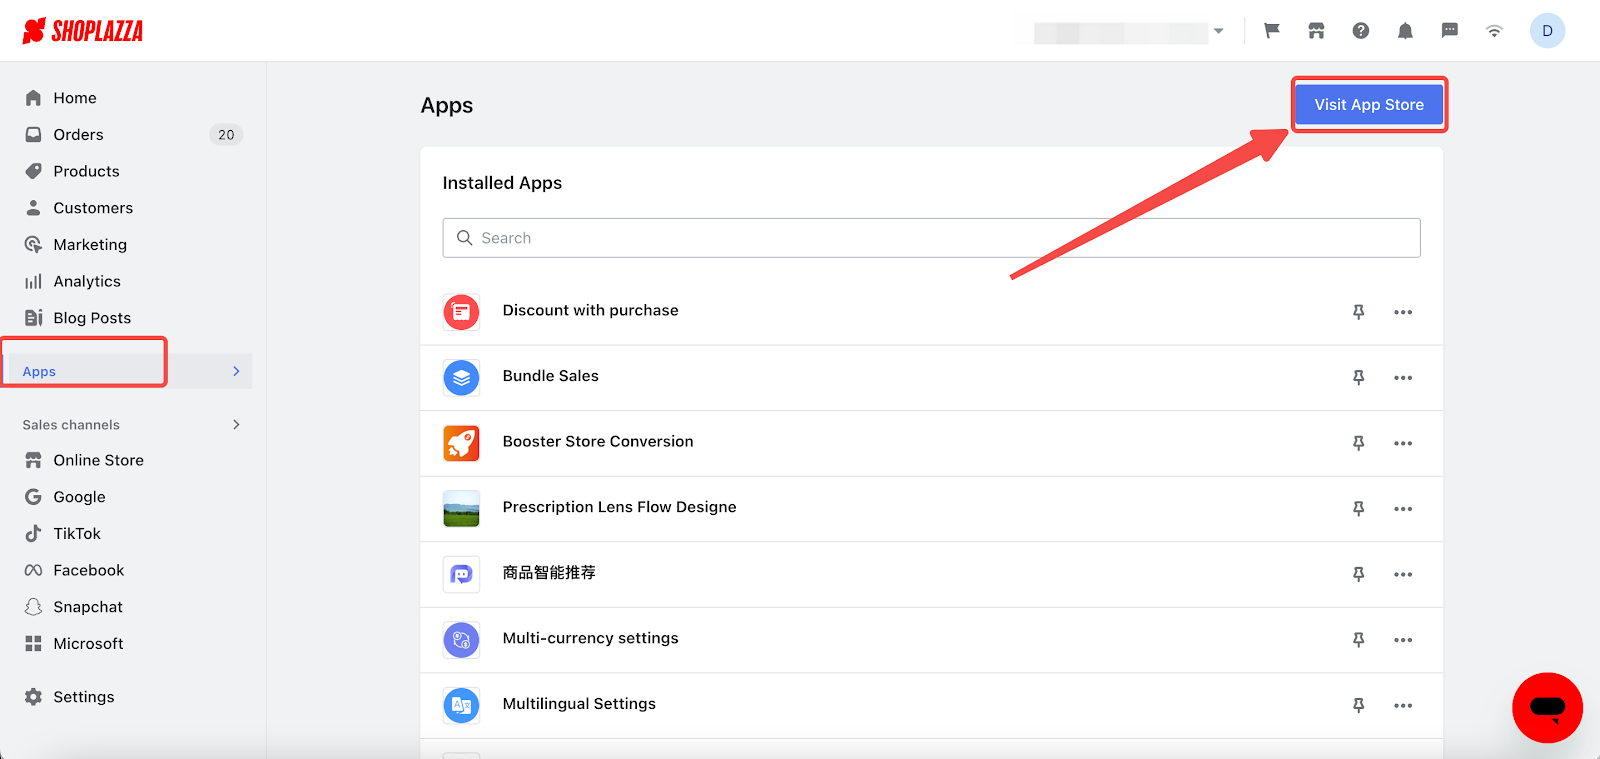
Installing the app
1. From your Shoplazza Admin, go to Apps > Visit App store.
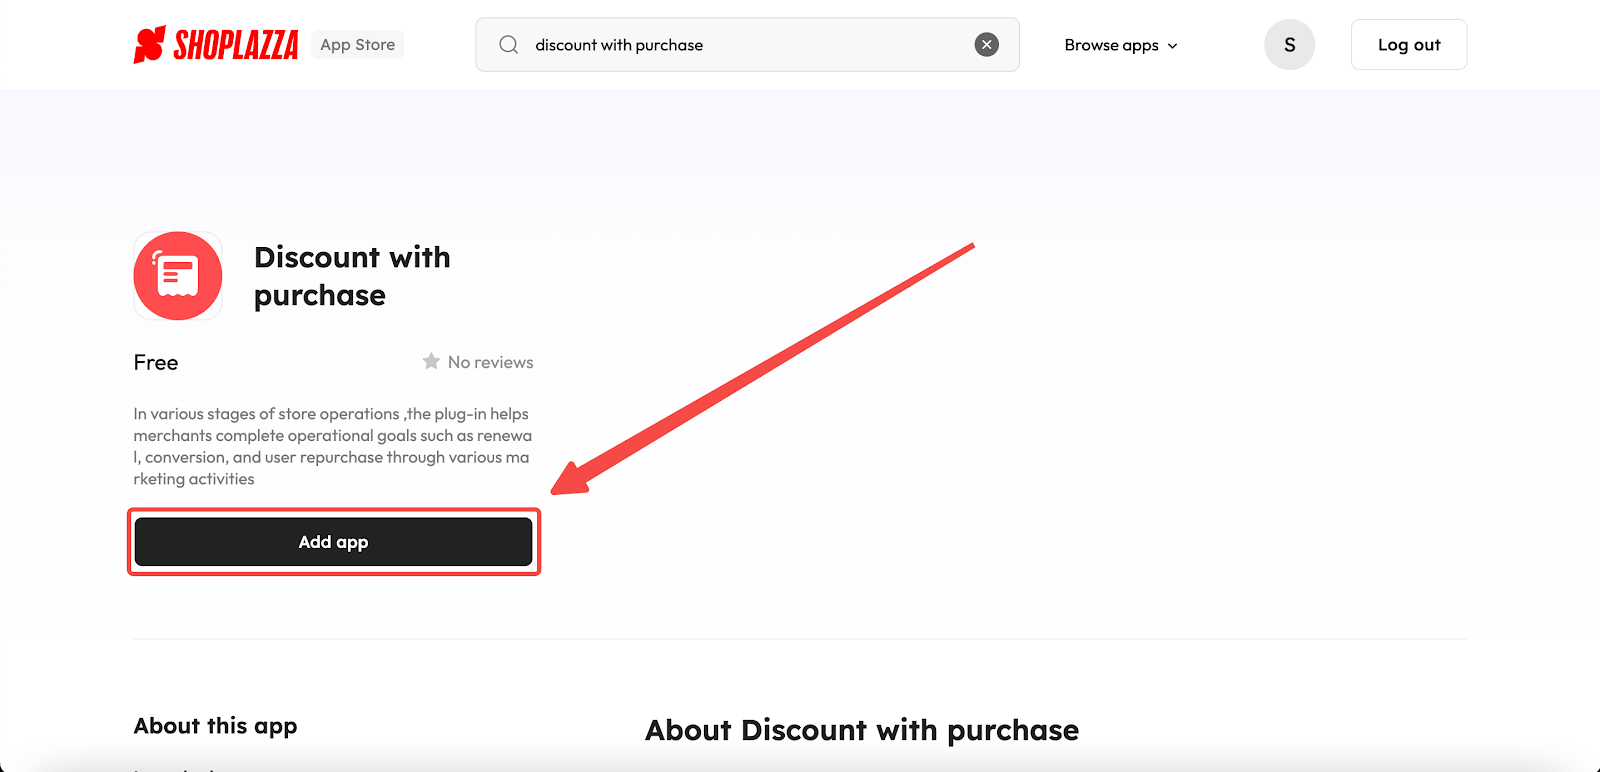
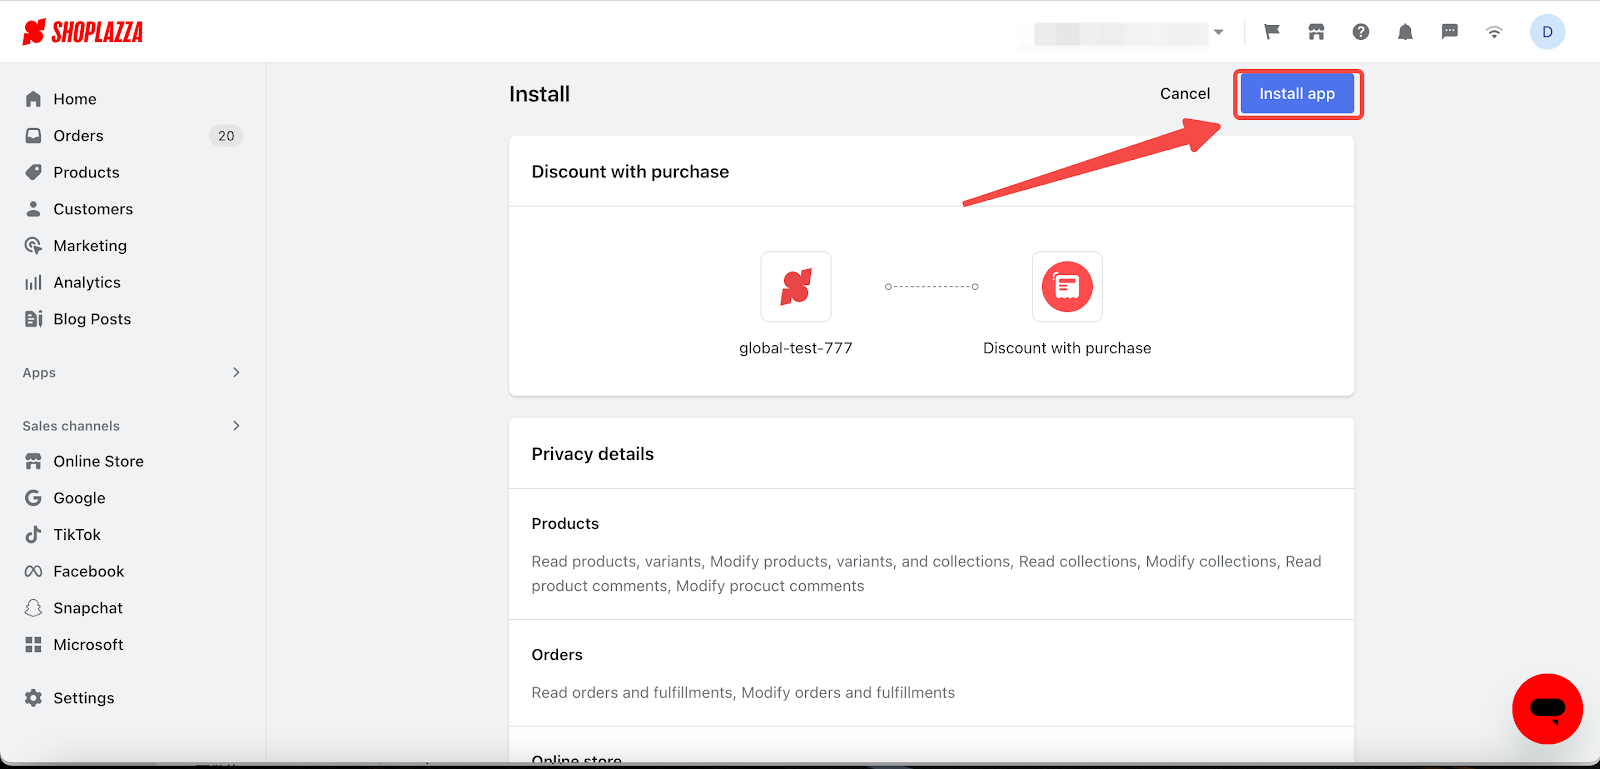
2. Search for Discount with purchase in the box and click on Add app to install it to your store.
Understanding your data center
Unlock insights about your online store through the data center feature. This section walks you through the essential metrics in the activity overview dashboard.
1. Choosing an activity time range: Select the date range for the activity you want to view and then click on the Confirm button.
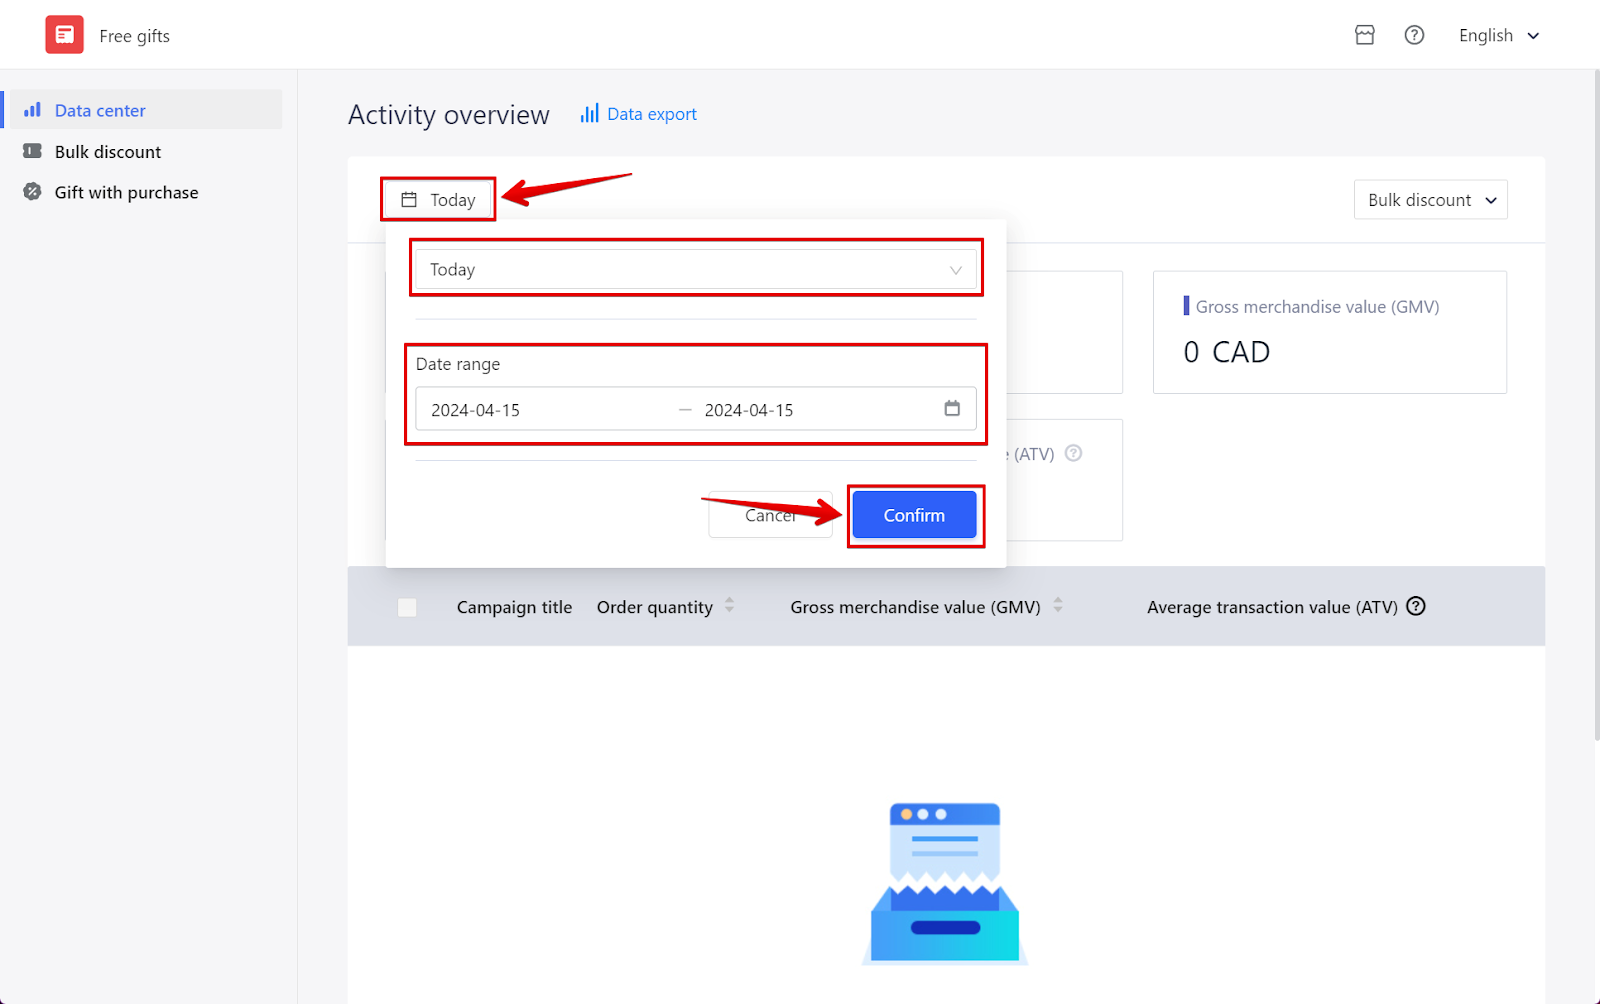
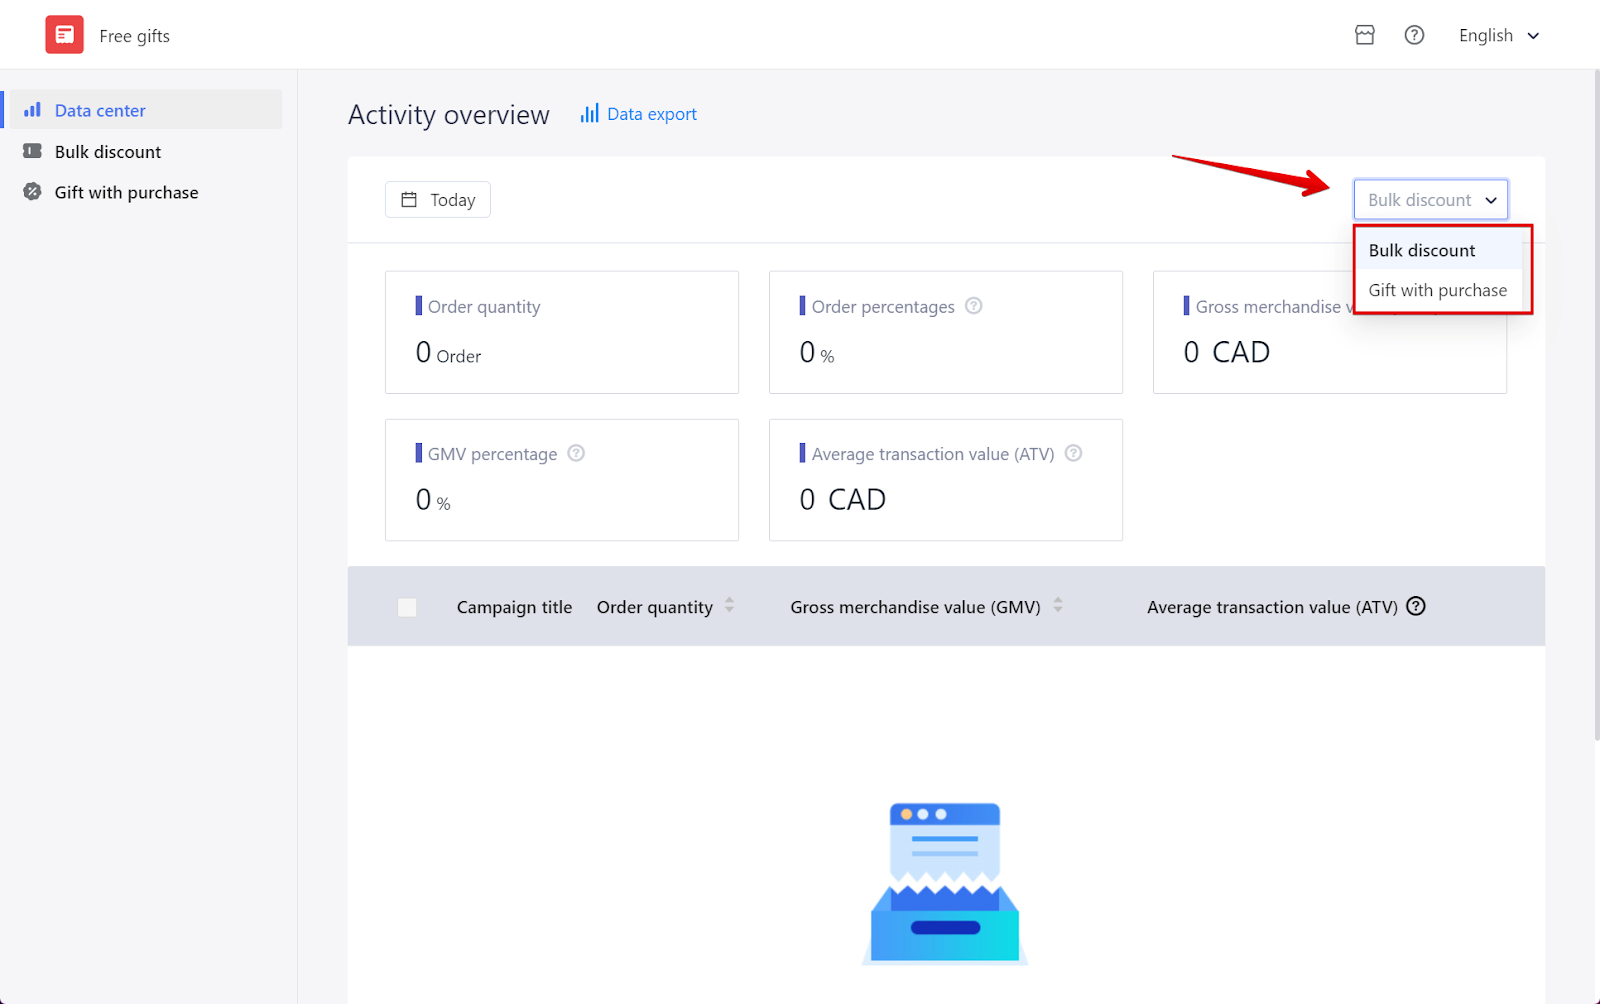
2. Selecting activity type: Choose the type of activity you want to view, either from Bulk discount or Gift with purchase.
3. Viewing basic metrics: This section feature offers valuable insights about your store. Below are the key metrics you can view on the Activity overview dashboard.
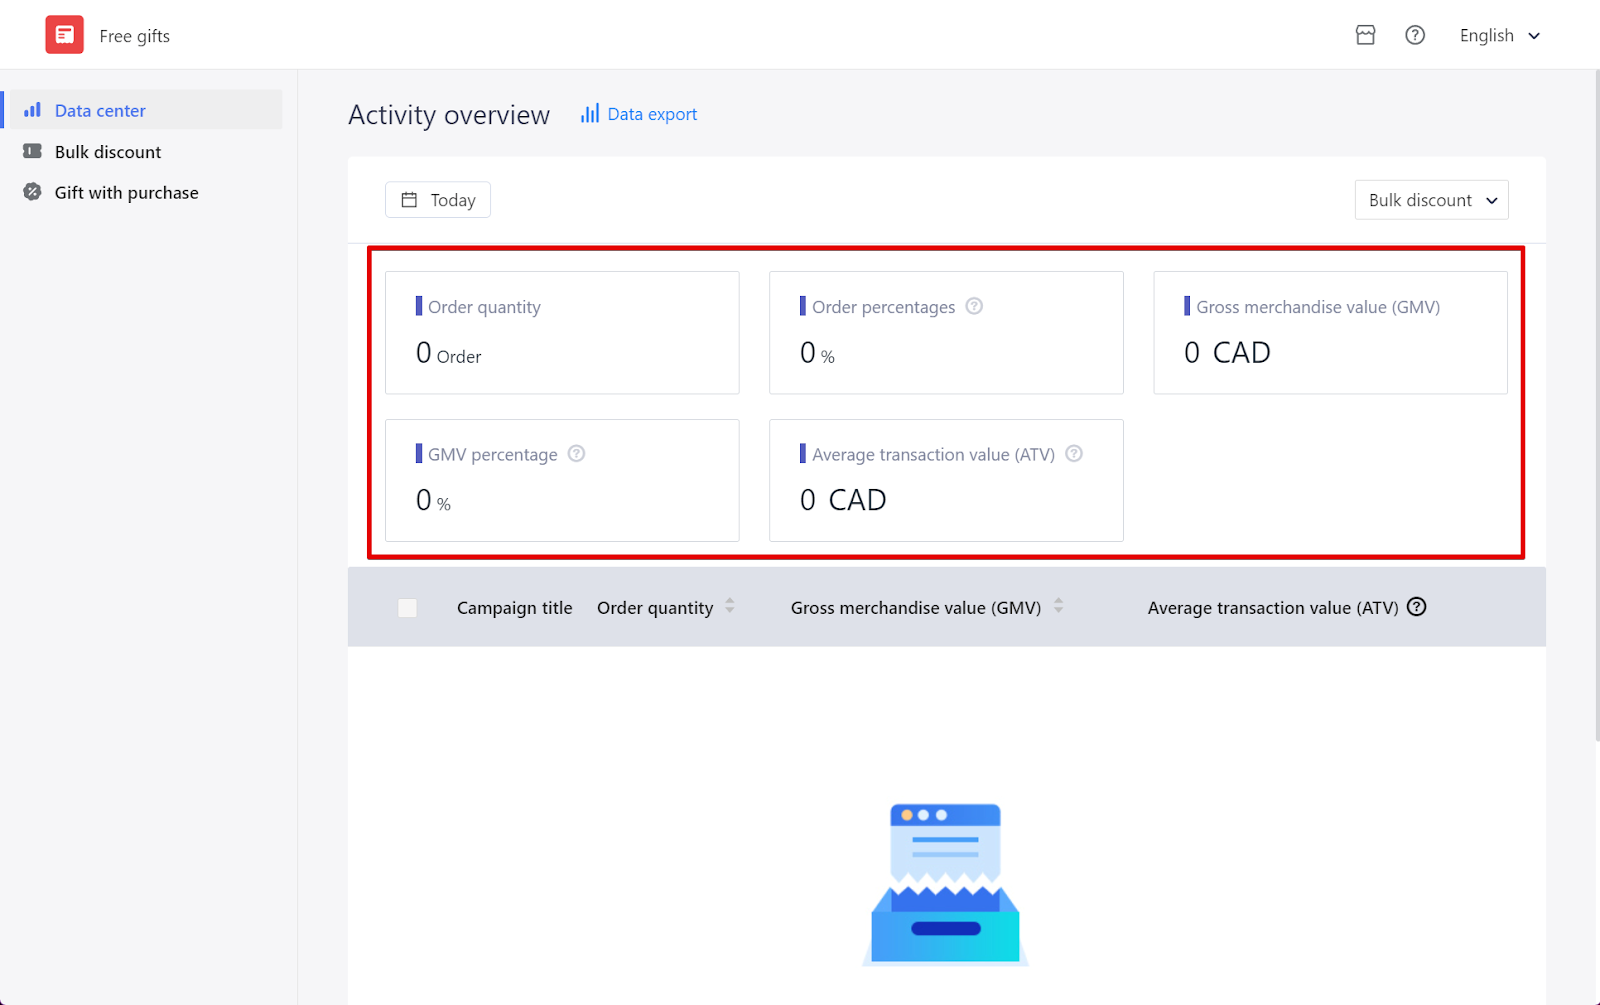
| Feature | Description |
| Order quantity | The number of orders participating in the activity. |
| Order percentages | The percentage of orders participating in the activity out of the total orders. |
| Gross merchandise value (GMV) | The revenue generated from orders participating in the activity. |
| GMV percentage | The percentage of revenue generated from the activity out of the total revenue. |
| Average transaction value (ATV) | The total revenue divided by the total number of orders. |
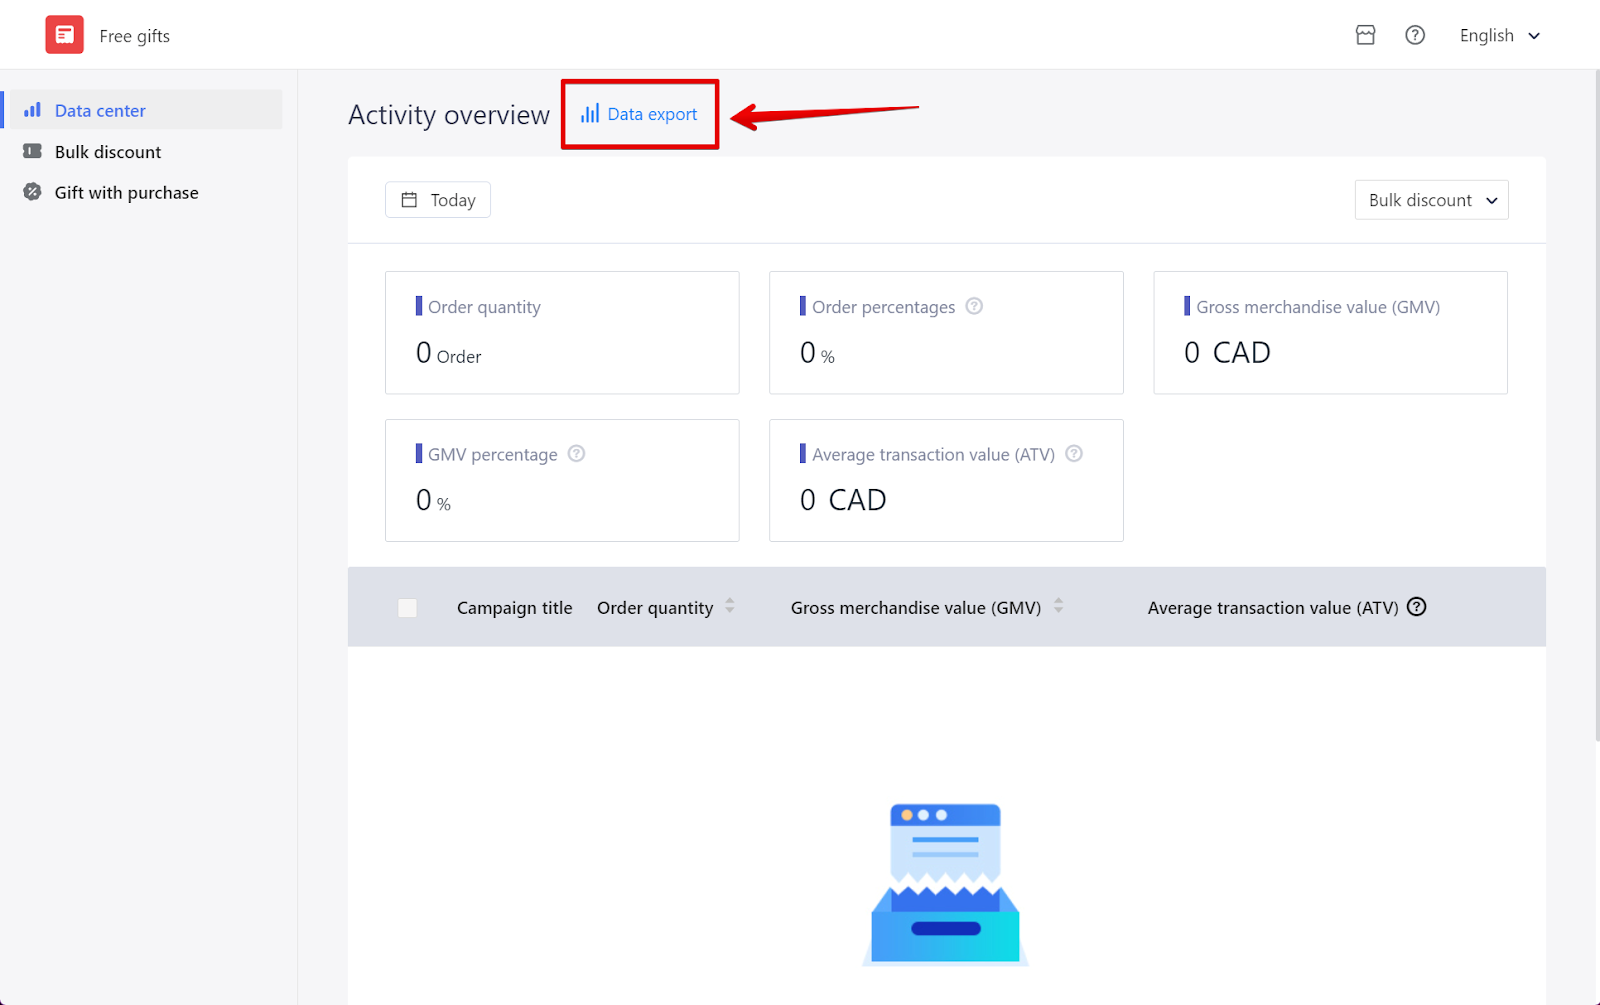
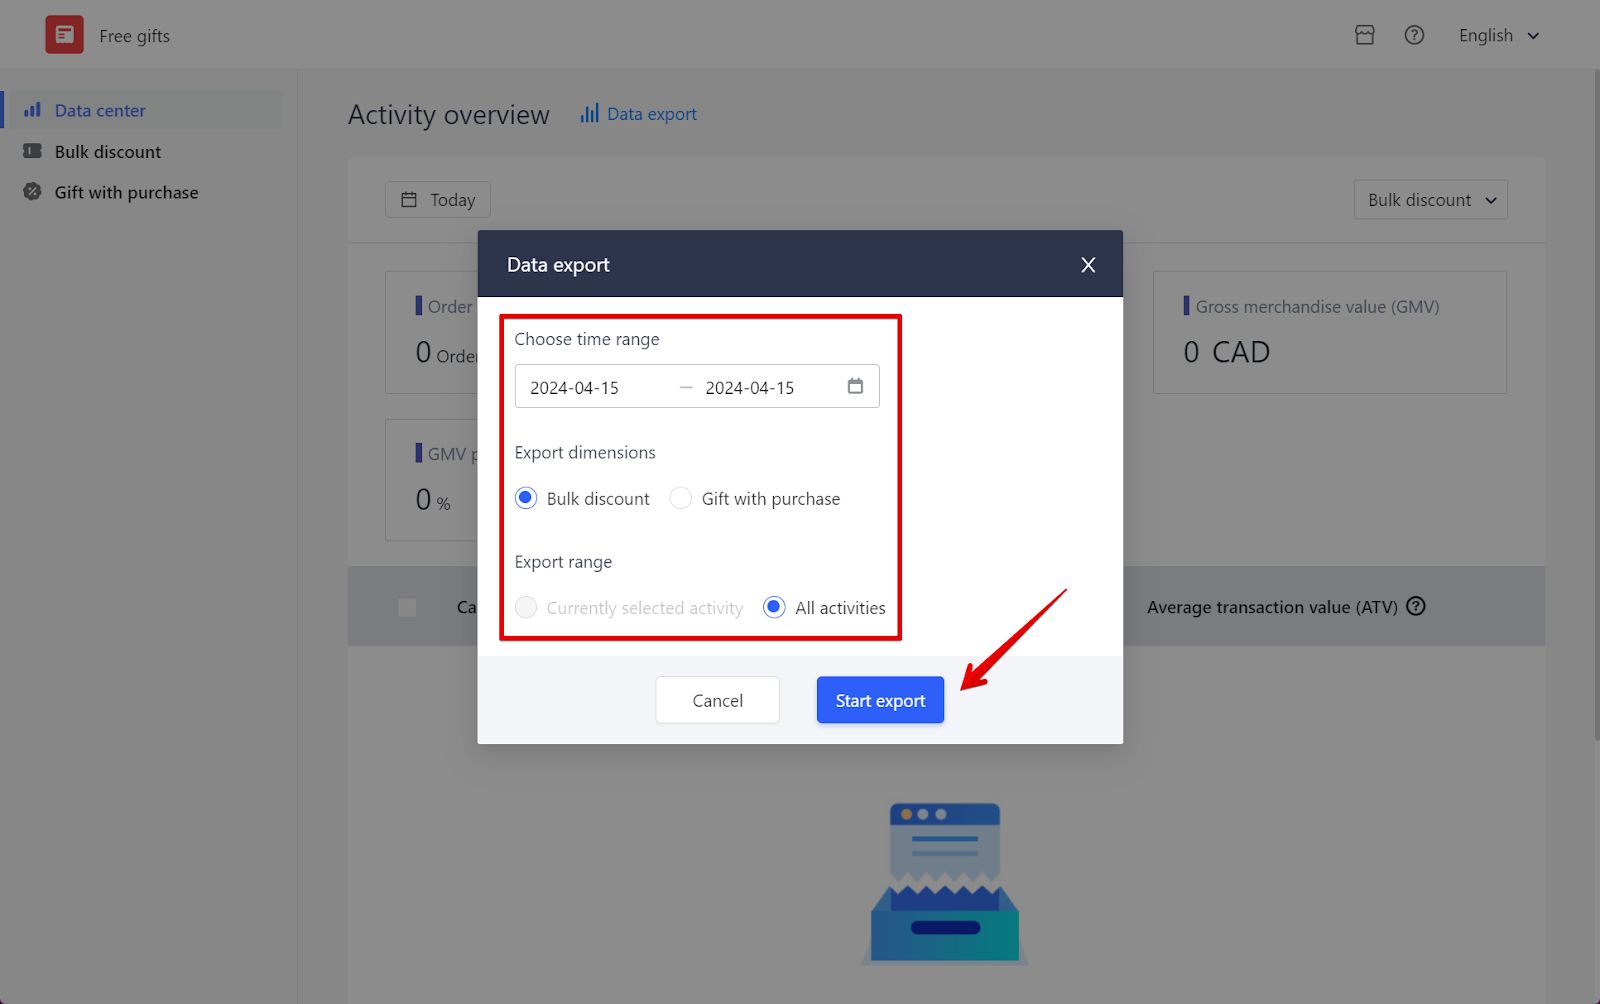
4. Exporting activity data: Click on the Data export button. Choose activity date range and type, then click on the Start export button to proceed.
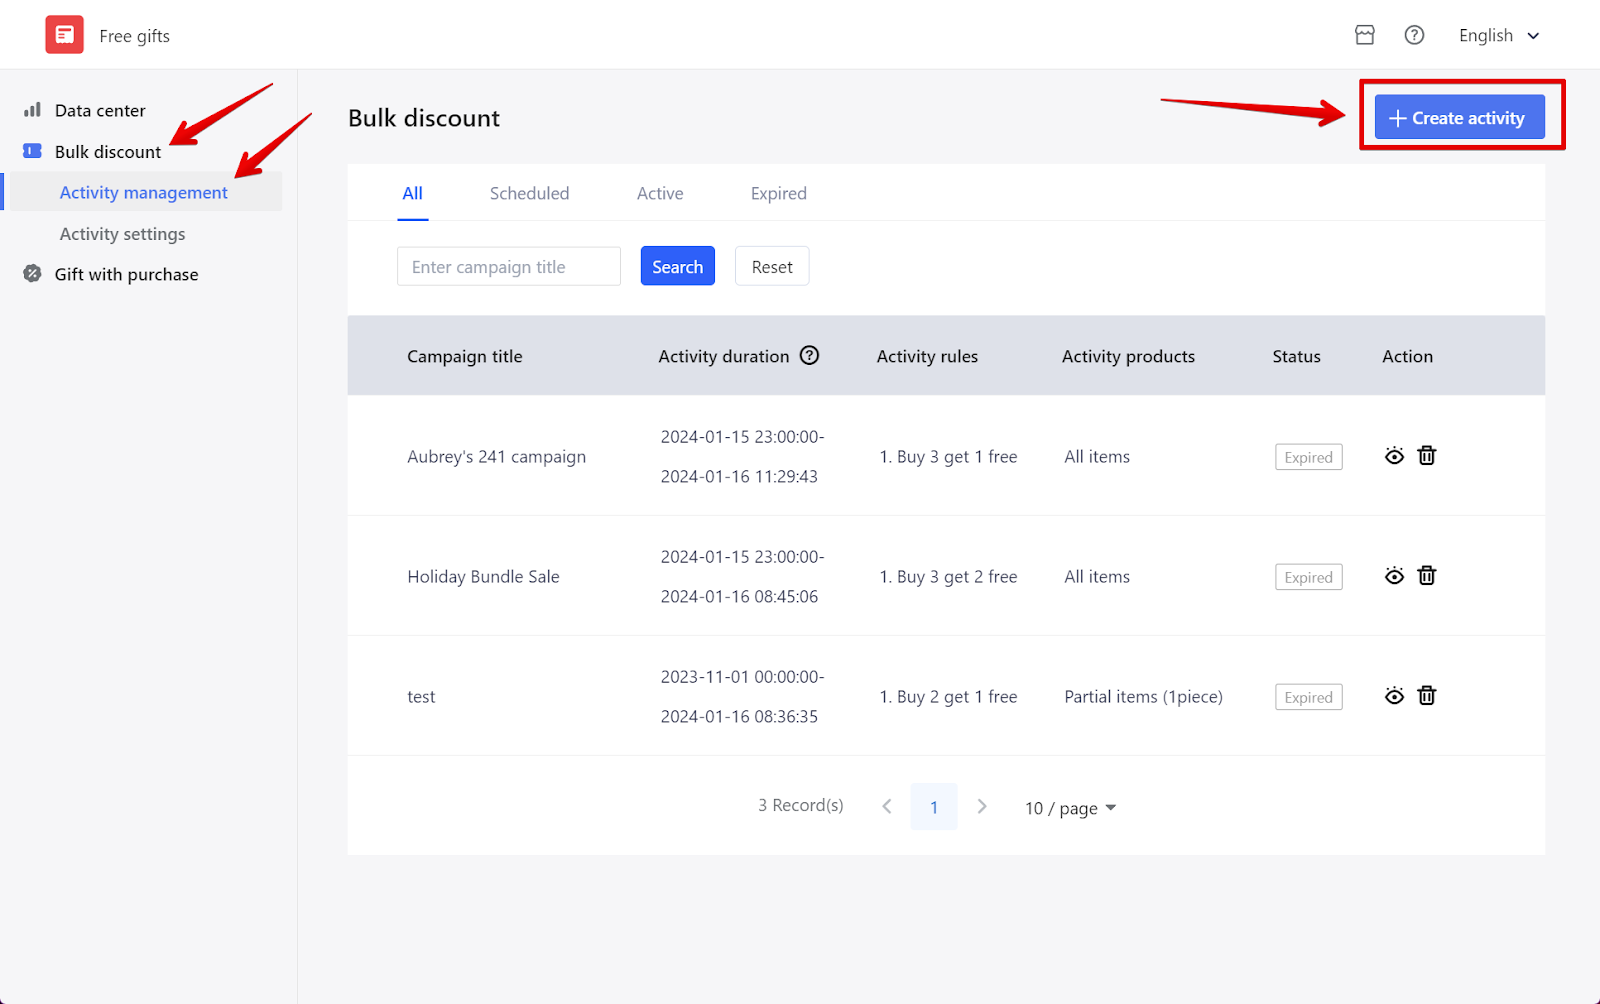
Setting up a Bulk discount
Creating a successful bulk discount activity involves the following steps:
1. Creating an activity: Switch over to Bulk discount > Activity management and click on Create activity.
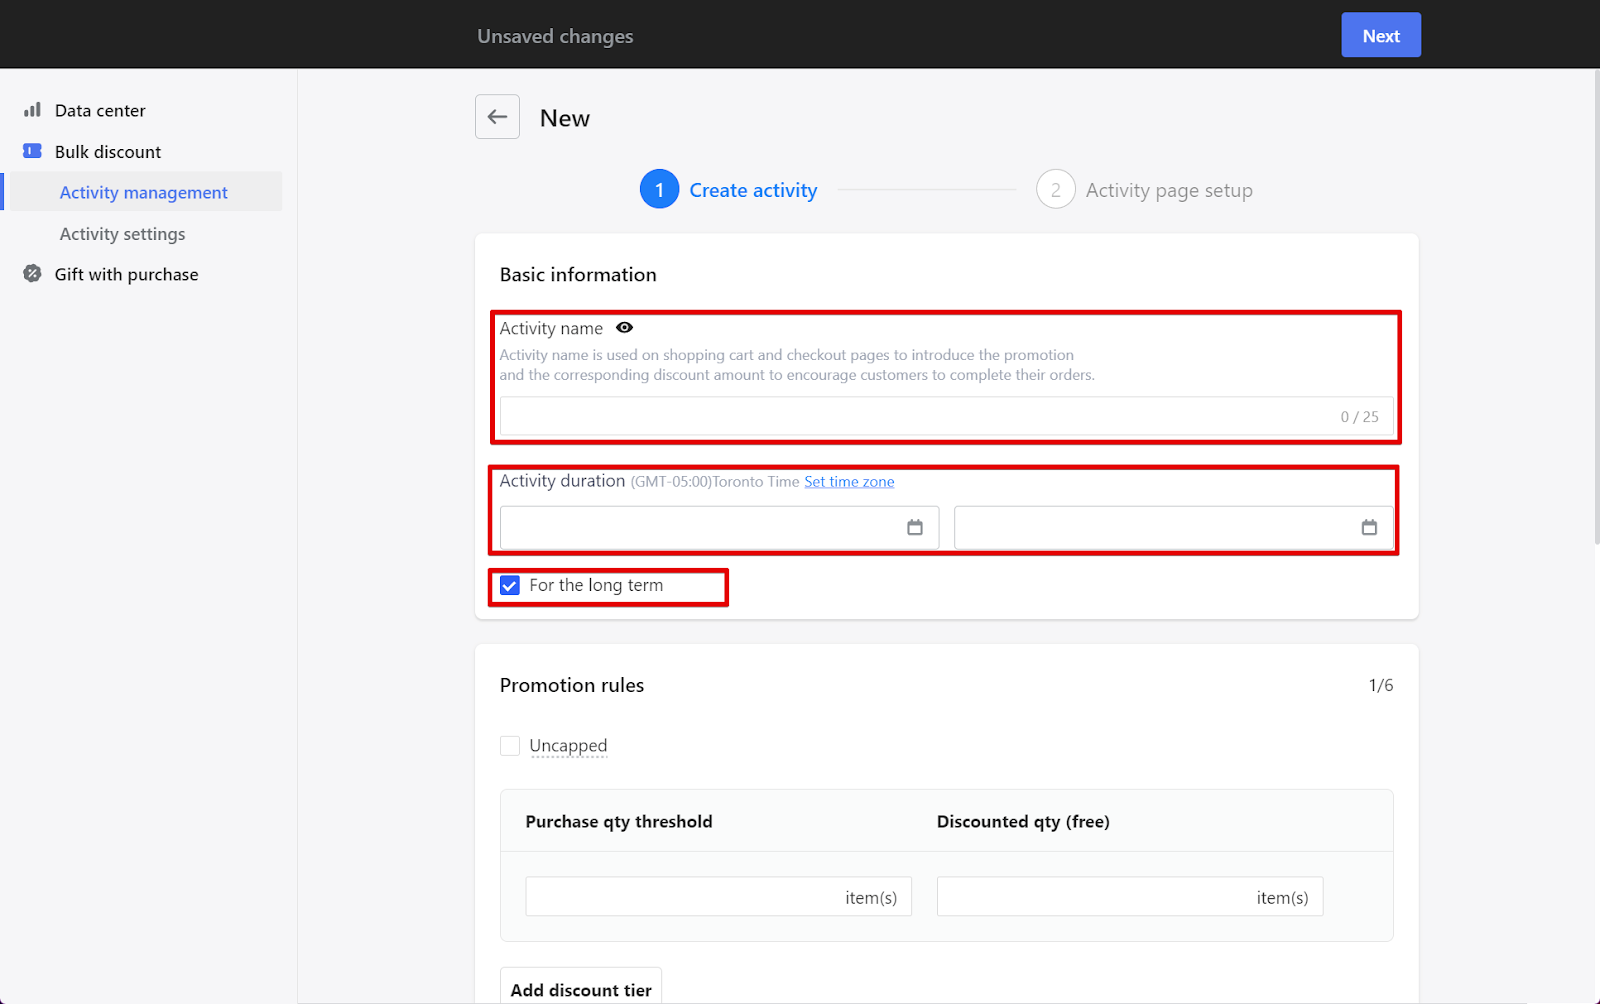
2. Step 1 details: Enter the basic information, define promotion rules, and select applicable products.
-
Basic information
- Activity name: When creating an activity, the Activity Name refers to the name you give to your promotion. This name should clearly reflect the discount being offered and will be shown on the shopping cart and checkout pages of your store. For example, 20% Off Sale.
- Activity active dates: The activity duration time is determined based on the time zone set in the store's general settings. Simply click on the Set time zone button, and you will be redirected to your store's general settings. The activity start time cannot be earlier than the current time, and the end time cannot be earlier than the start time.
- For the long term: Enable this if your activity does not have an end duration.
-
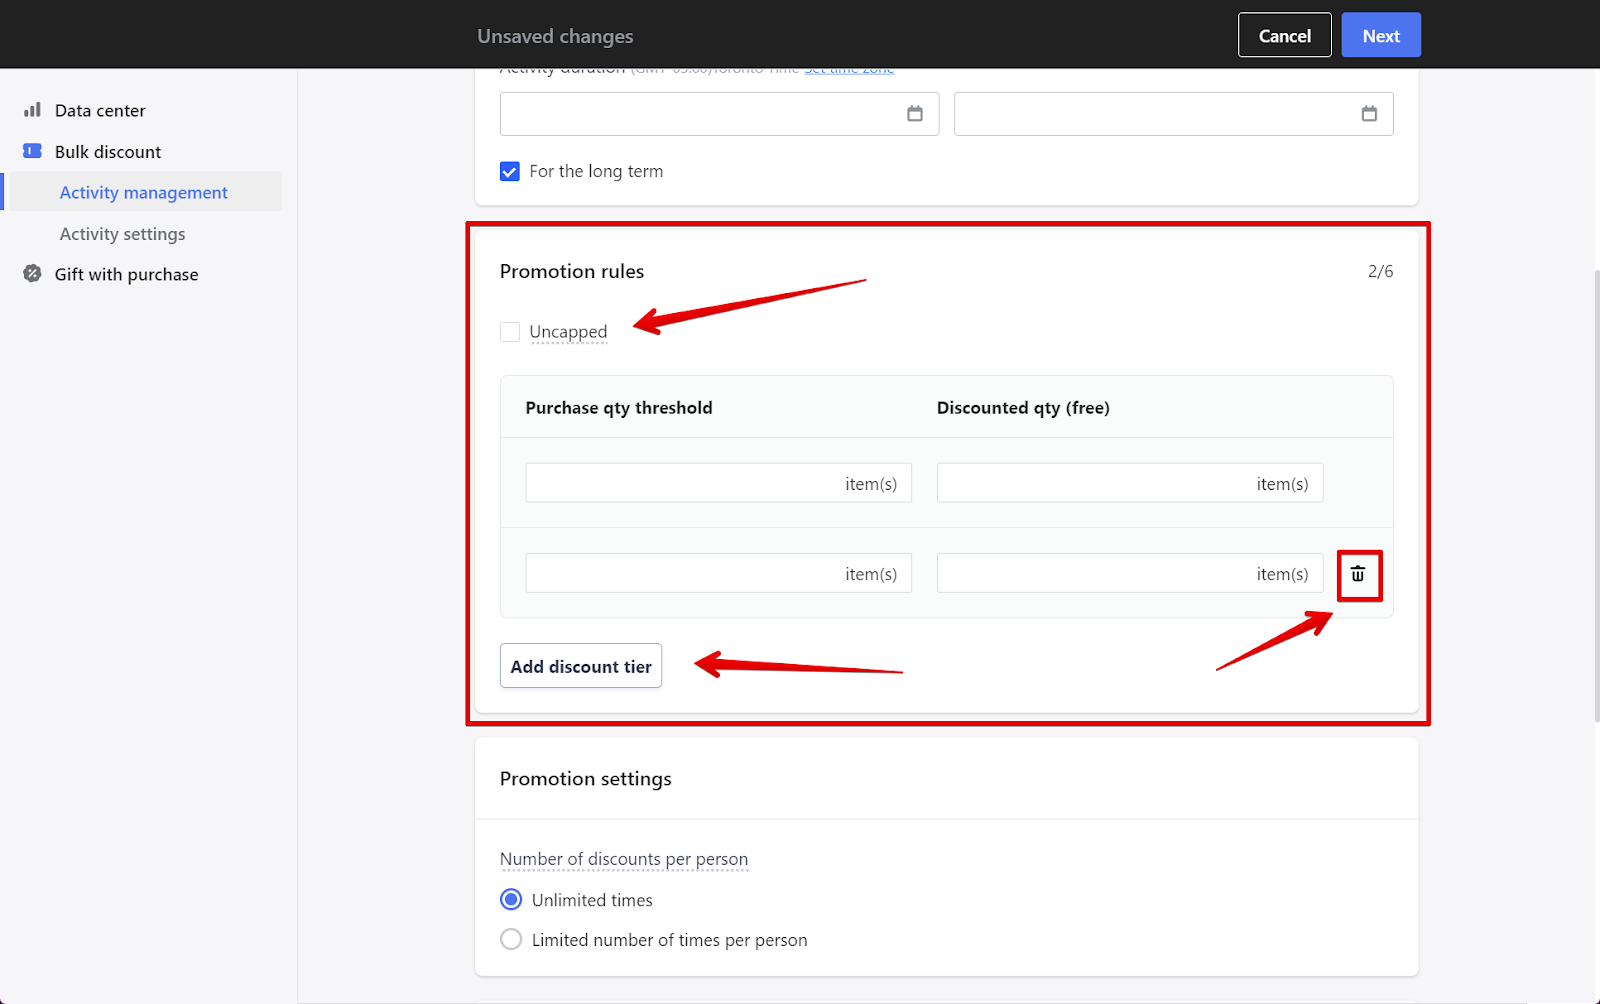
Promotion rules
- Uncapped: When you choose the Uncapped option for your promotion, it means the discounts will keep applying as customers buy more items. For example, if a customer buys three items, the least expensive one is free. If they buy six items, the two least expensive items are free, and this pattern continues as more items are purchased. If you do not select Uncapped and instead set only one level, the least expensive item will be free when customers purchase either three or six items. However, if you establish multiple levels, the discounts are applied according to the number of items bought, following the specific levels you've set.
- Add level: Add up to 6 levels, by clicking on the Add discount tier button.
- Delete level: You can also delete levels, simply by clicking on the Trash can icon on the right side of each level box.
-
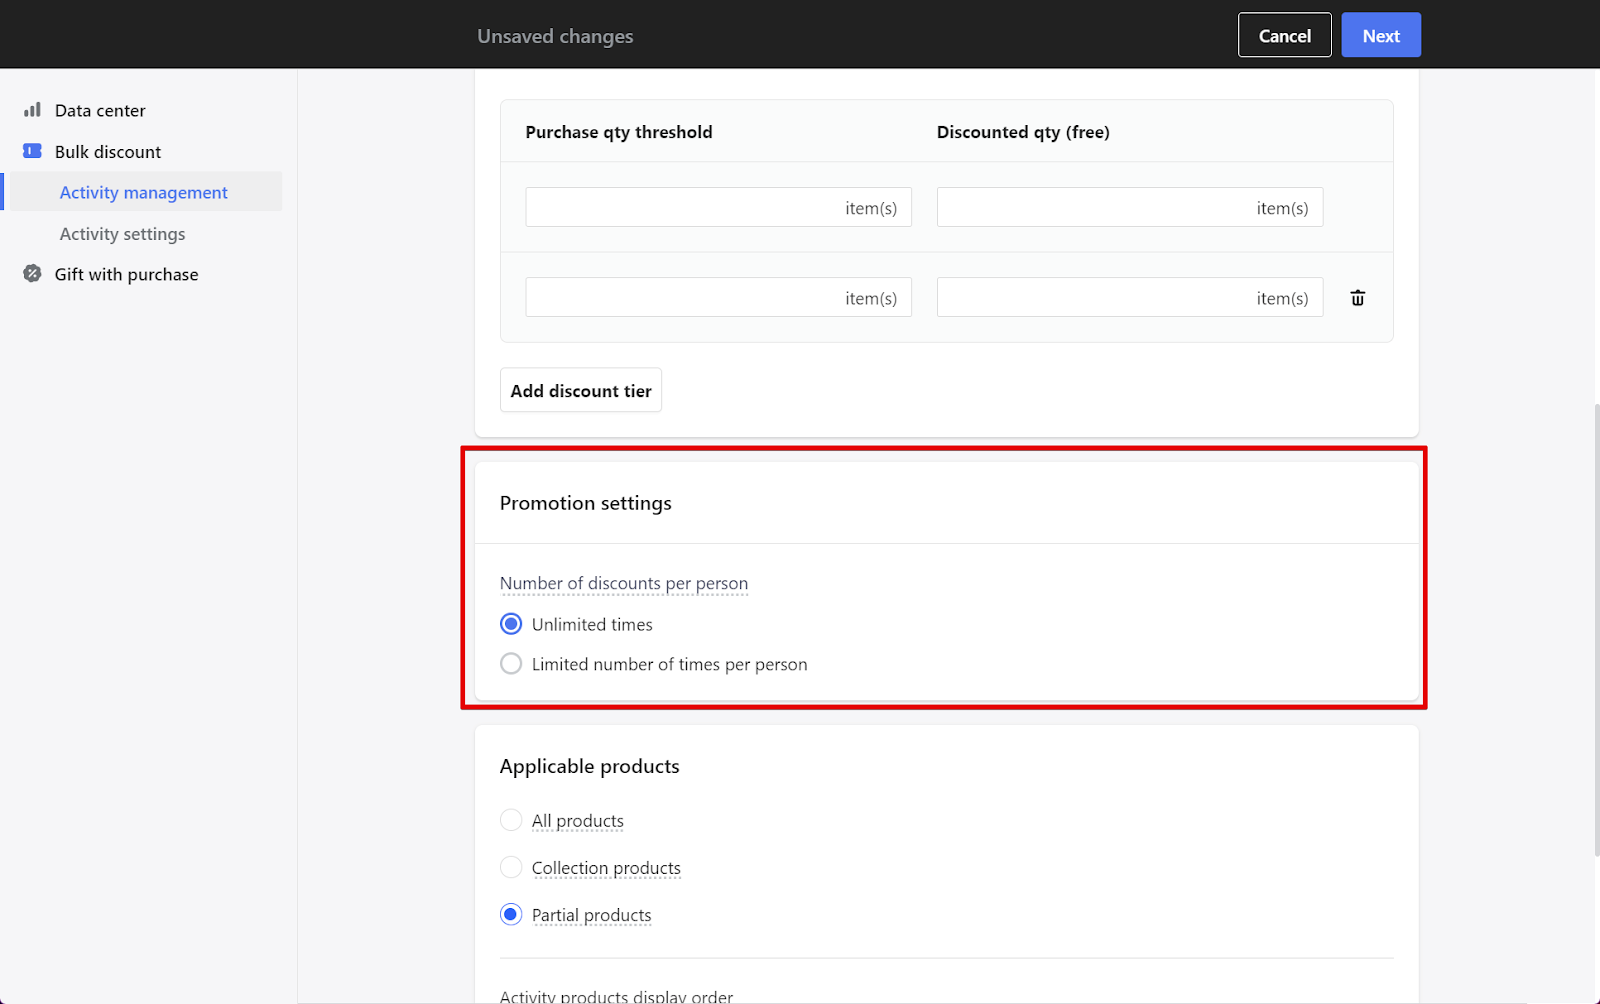
Promotion settings
- Unlimited (Uncapped): When set to unlimited, the discounts work in an ongoing manner. For instance, if 3 items are purchased, the least expensive one is free. If 6 items are bought, the two least expensive are free. This pattern continues without a set limit.
- Limited: If you don't choose unlimited (unchecked) and set just one level: purchasing 3 or 6 items will get the least expensive item free. If you set multiple levels, the discount is applied based on the level attained.
-
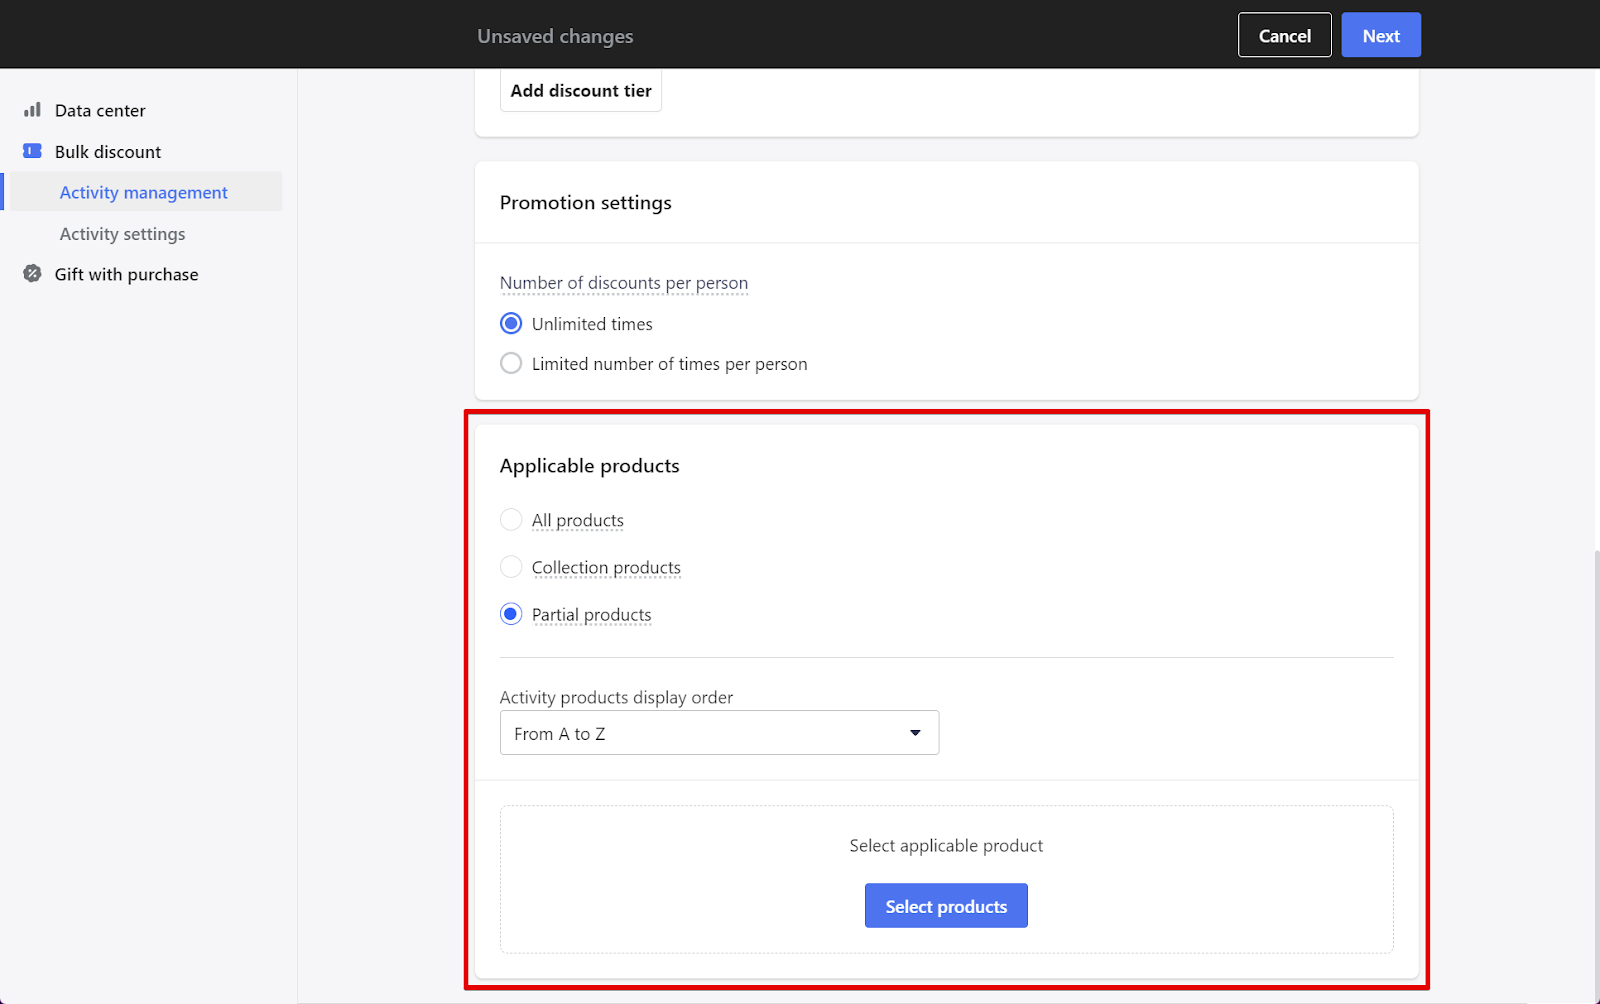
Applicable products
- All products: This option excludes items that are already part of another gift with purchase promotions.
- Collection products: For products that belong to multiple collections, the most recent discount with purchase activity from any of those collections will apply.
- Partial products: Use this option to select only those products that haven't been part of other gift with purchase activities.
- Sort by: Choose how products are sorted.
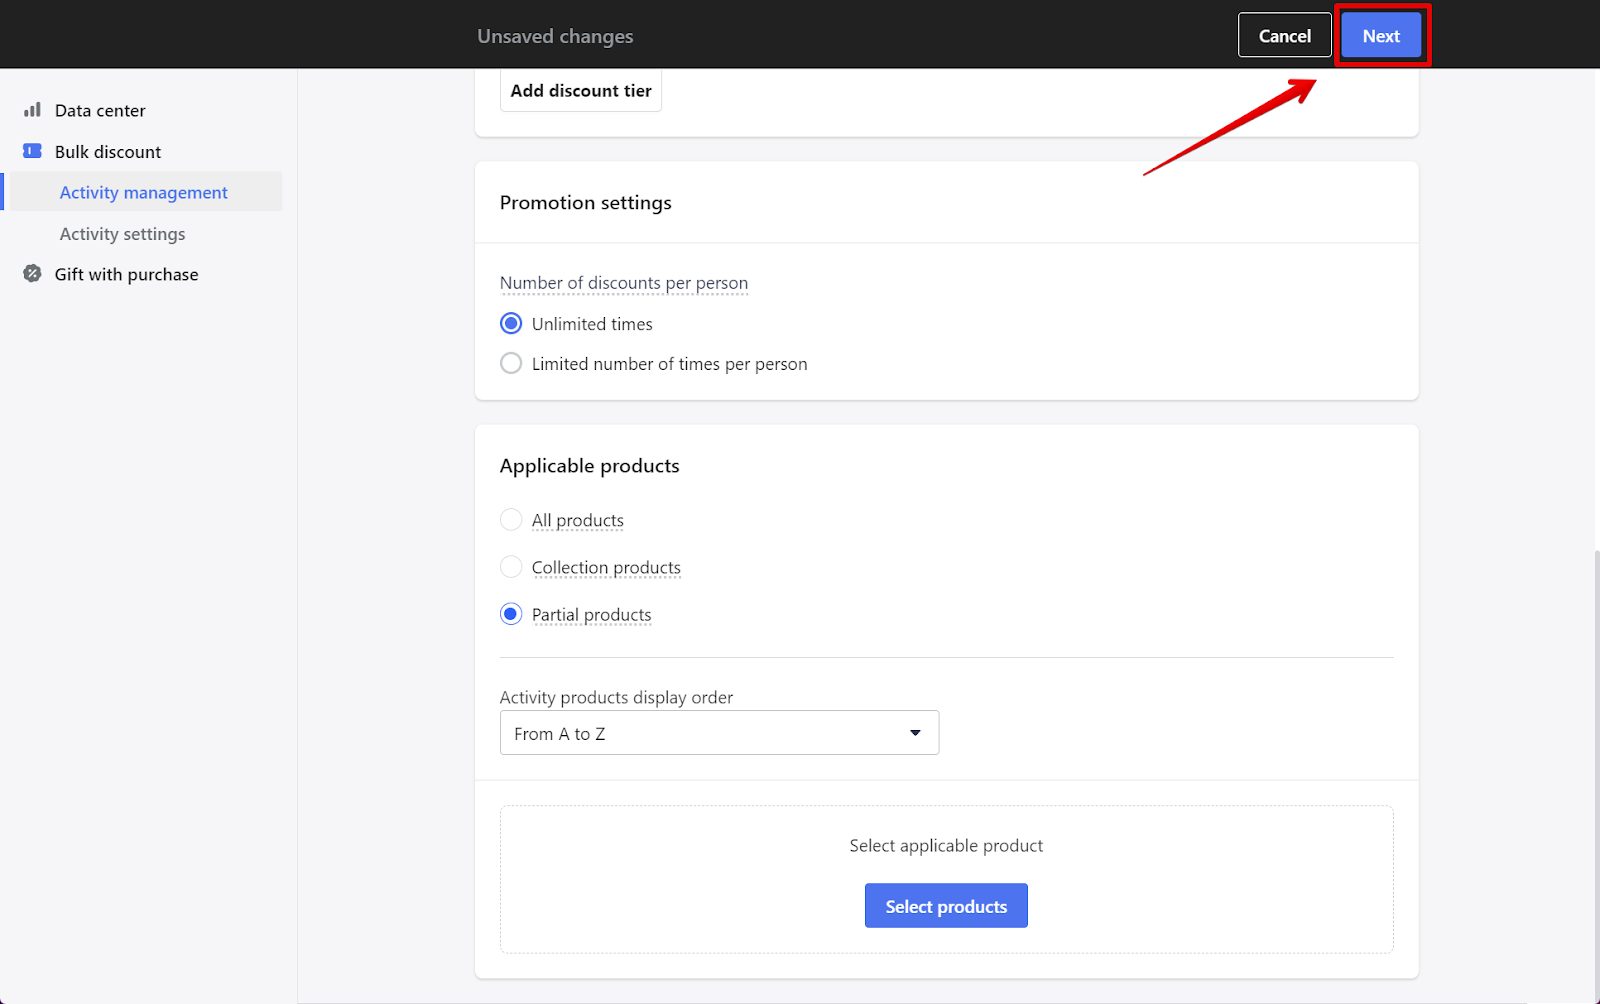
3. Continue to step 2: Once the activity is created, click Next to enter the activity page setup.
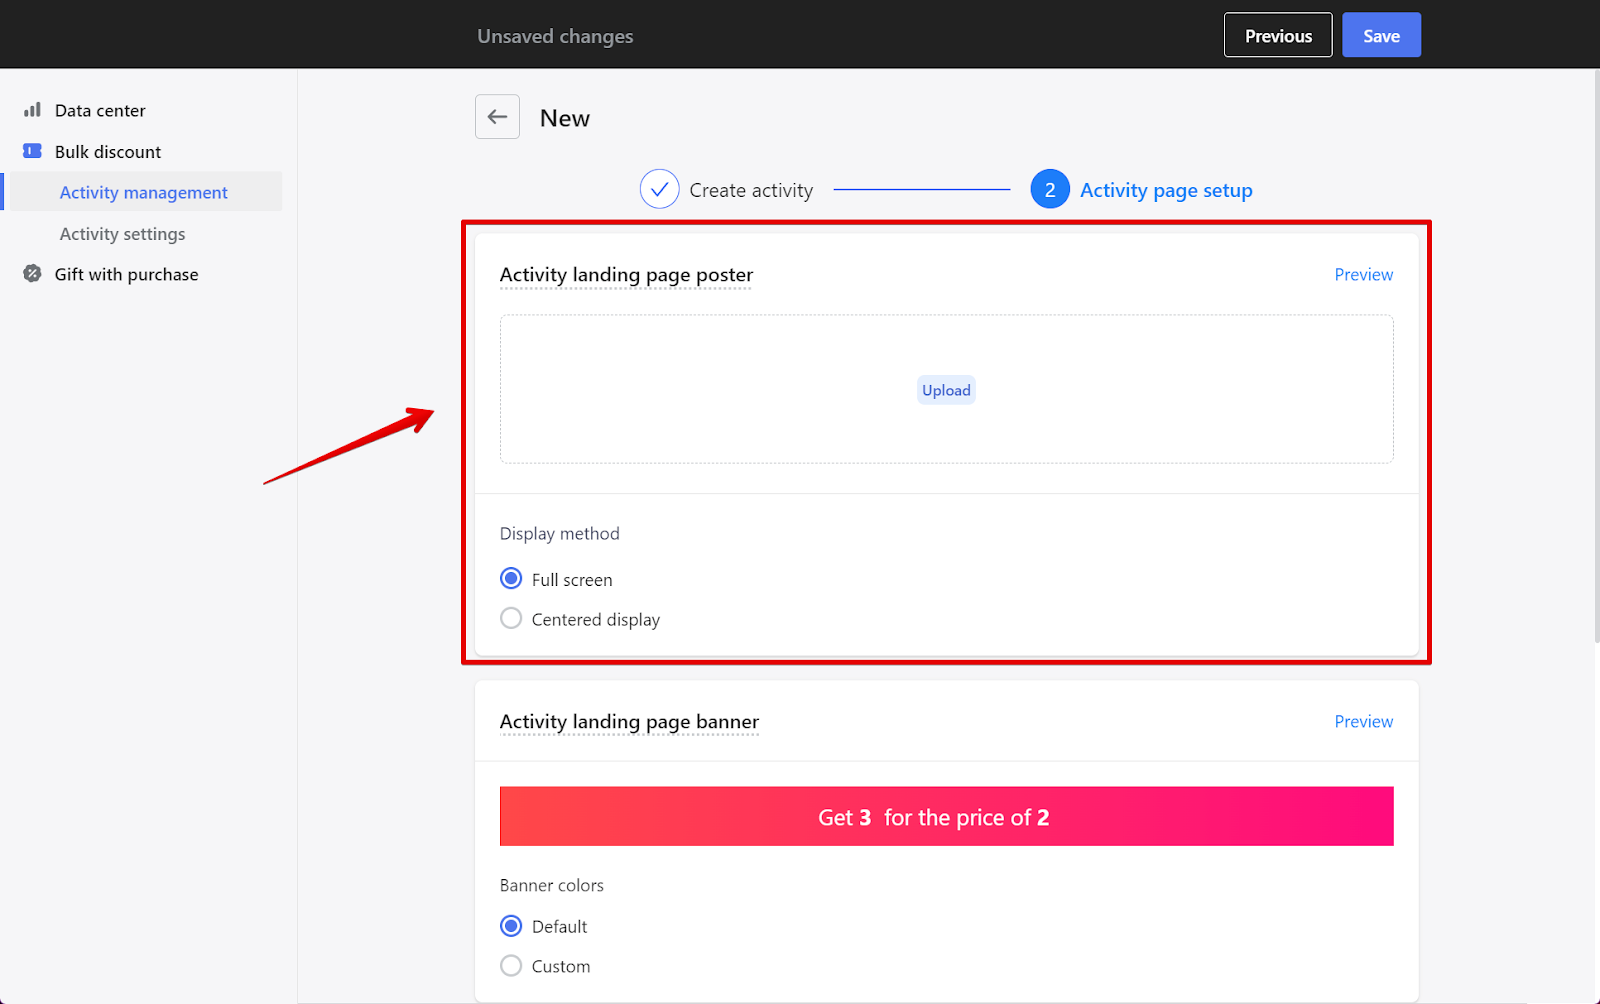
4. Activity page setup: Here, you have the opportunity to personalize various elements like the activity banner, its display settings (activity banner display), additional content, pop-up display, and the information bar (activity information bar display). To see a preview of how it will look to your customers, click the Preview button.
- Activity landing page poster: Upload your banner image from your desktop. You can opt for either a Full screen or Centered display. The recommended banner size is 1920PX x 300PX.
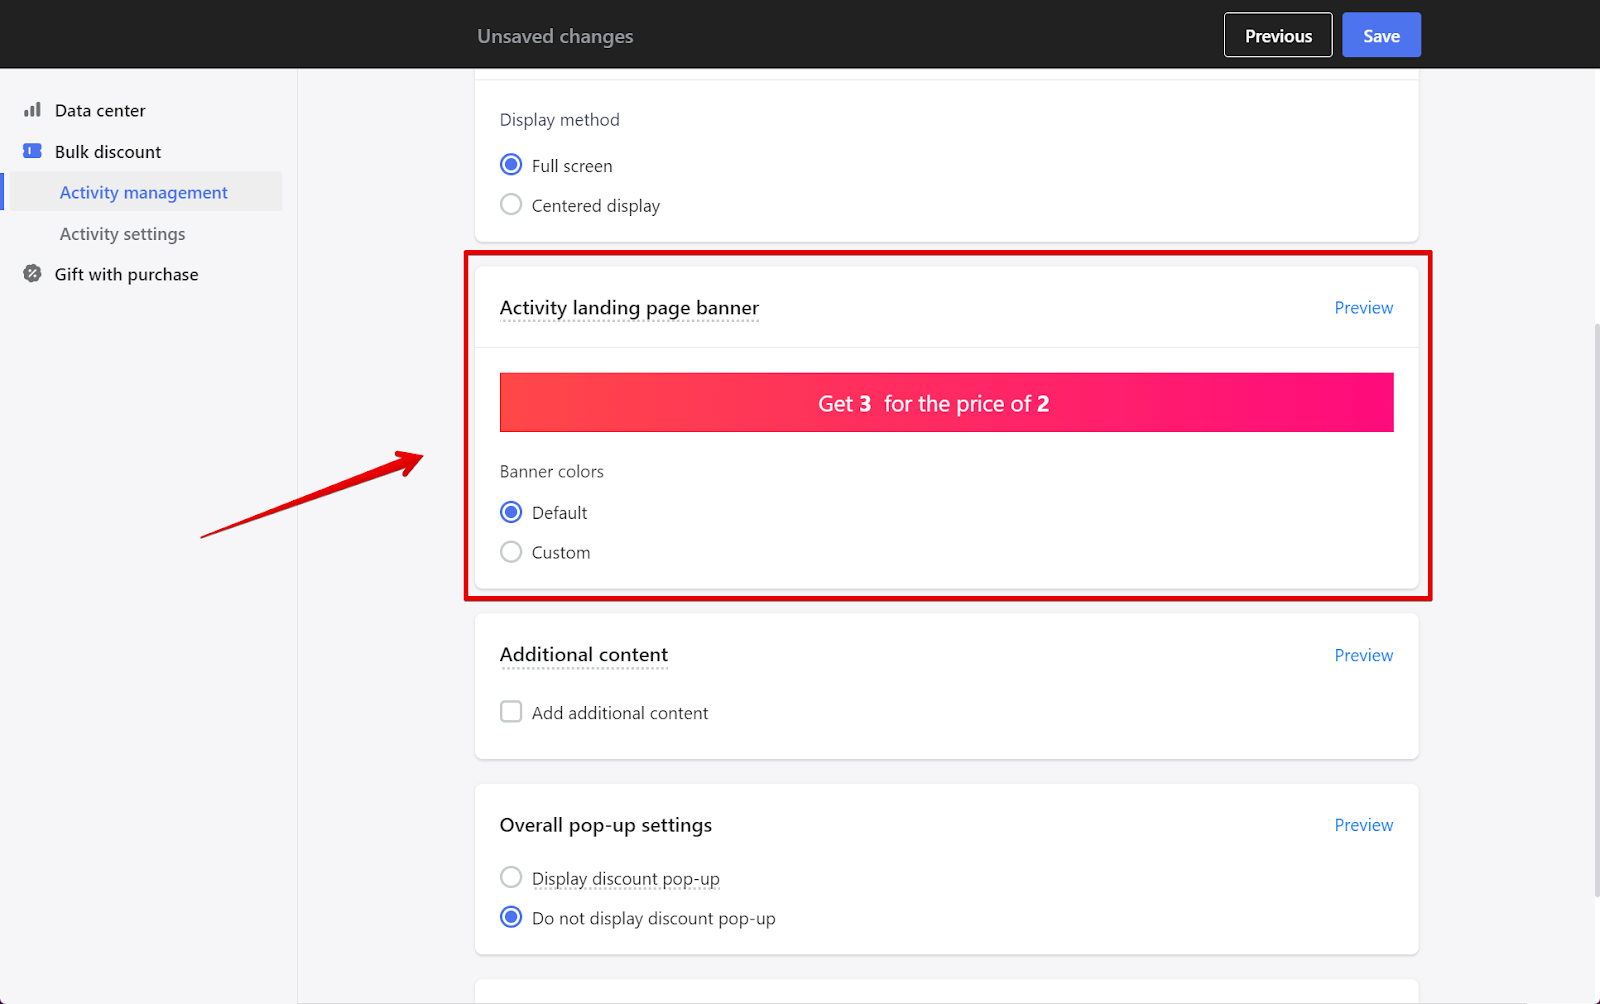
- Activity landing page banner: Decide the banner's color scheme by choosing either Default or Custom settings. If you opt for Custom, you can specify the Bottom color and text color (text color)
- Additional content: To include extra information, click the Add additional content button. Edit your content within a 300-character limit and, similar to the banner, select Default or Custom colors.
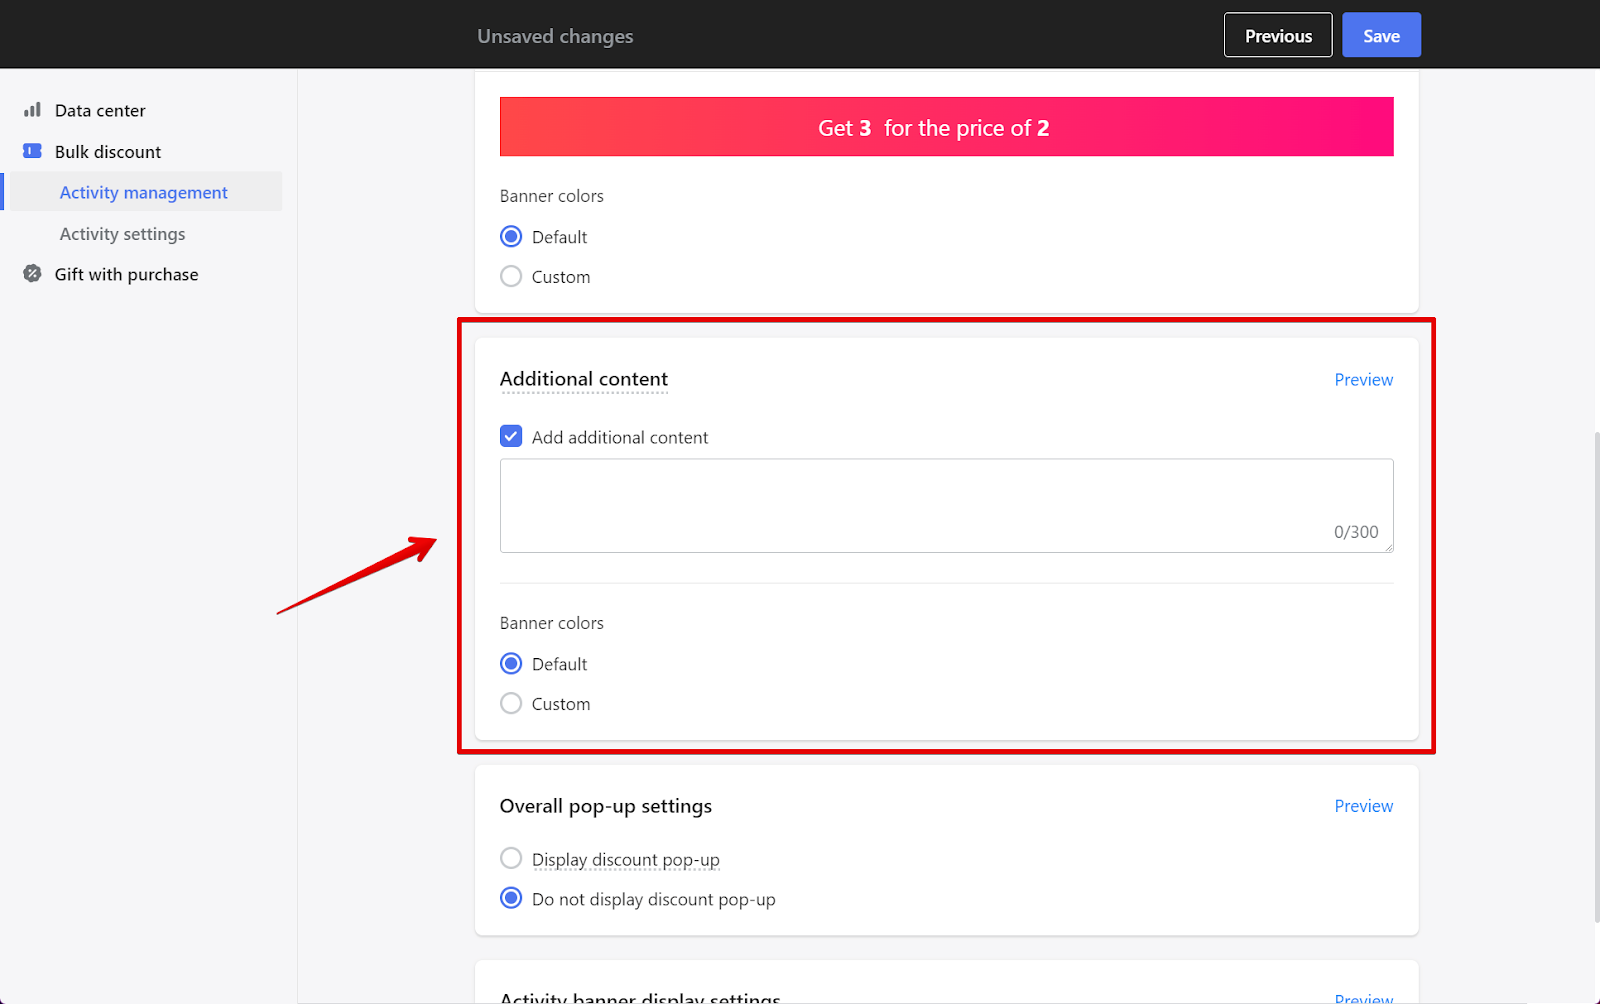
Note
Any footnotes related to activity rules will appear below the Countdown timer and reminder text.
- Pop-up display: Choose if you'd like a discount pop-up to appear. If enabled, this pop-up will show on all pages except checkout and registration, and will display once per visit. For more settings, click on Pop-up list Settings.
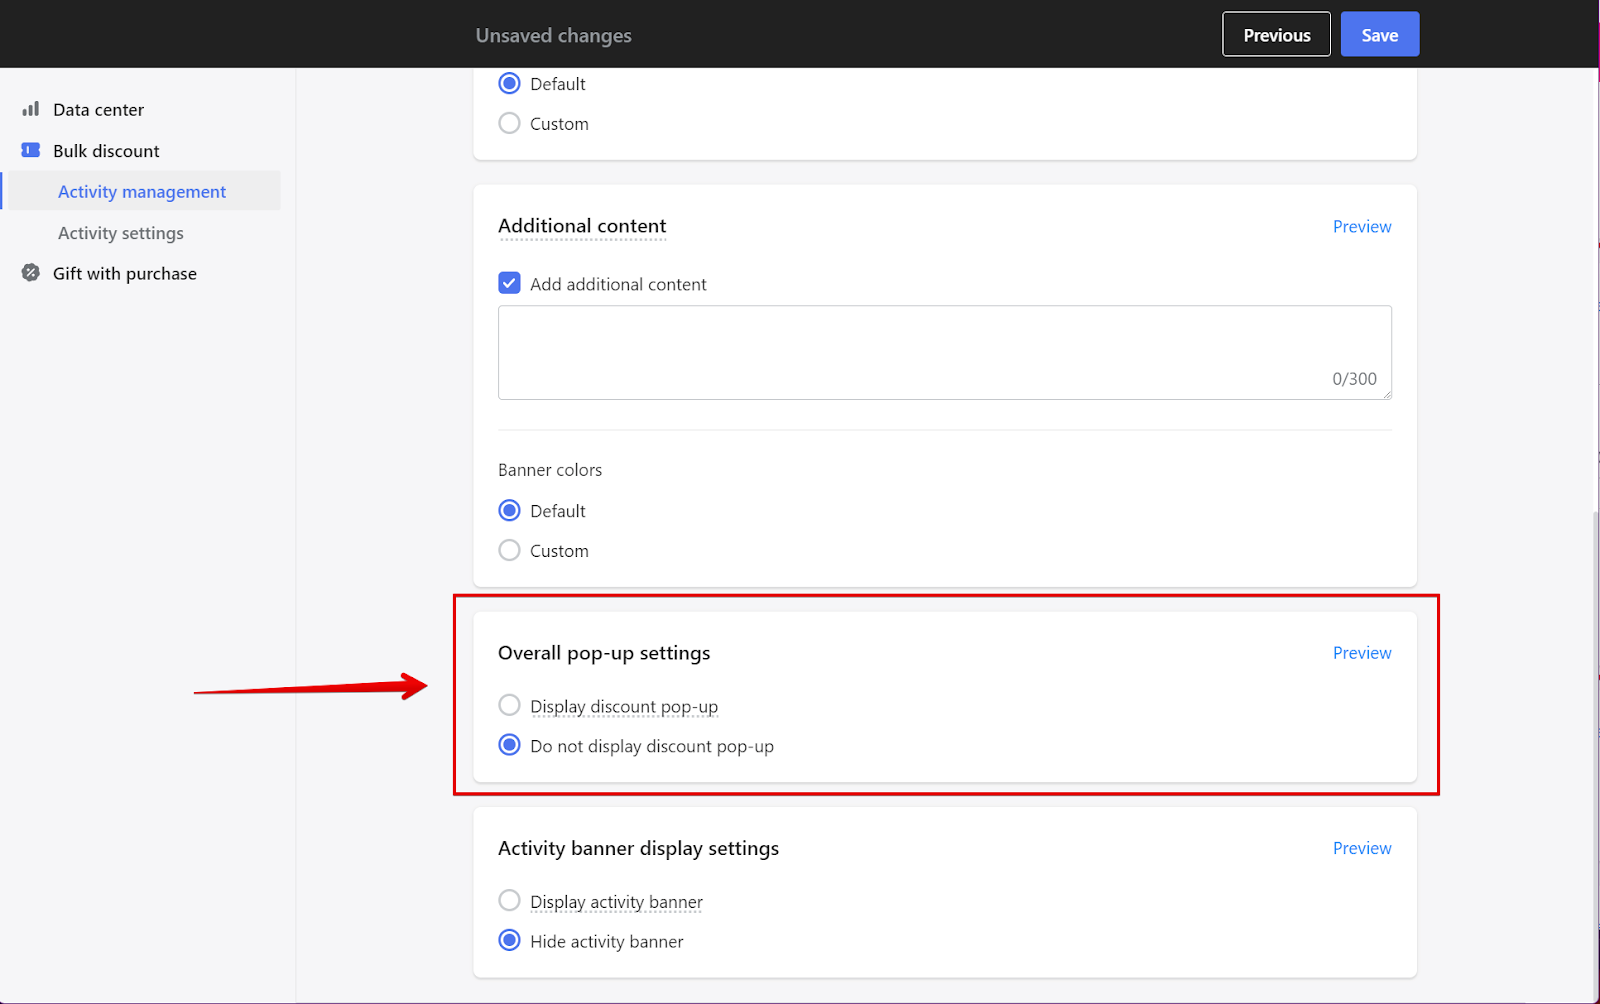
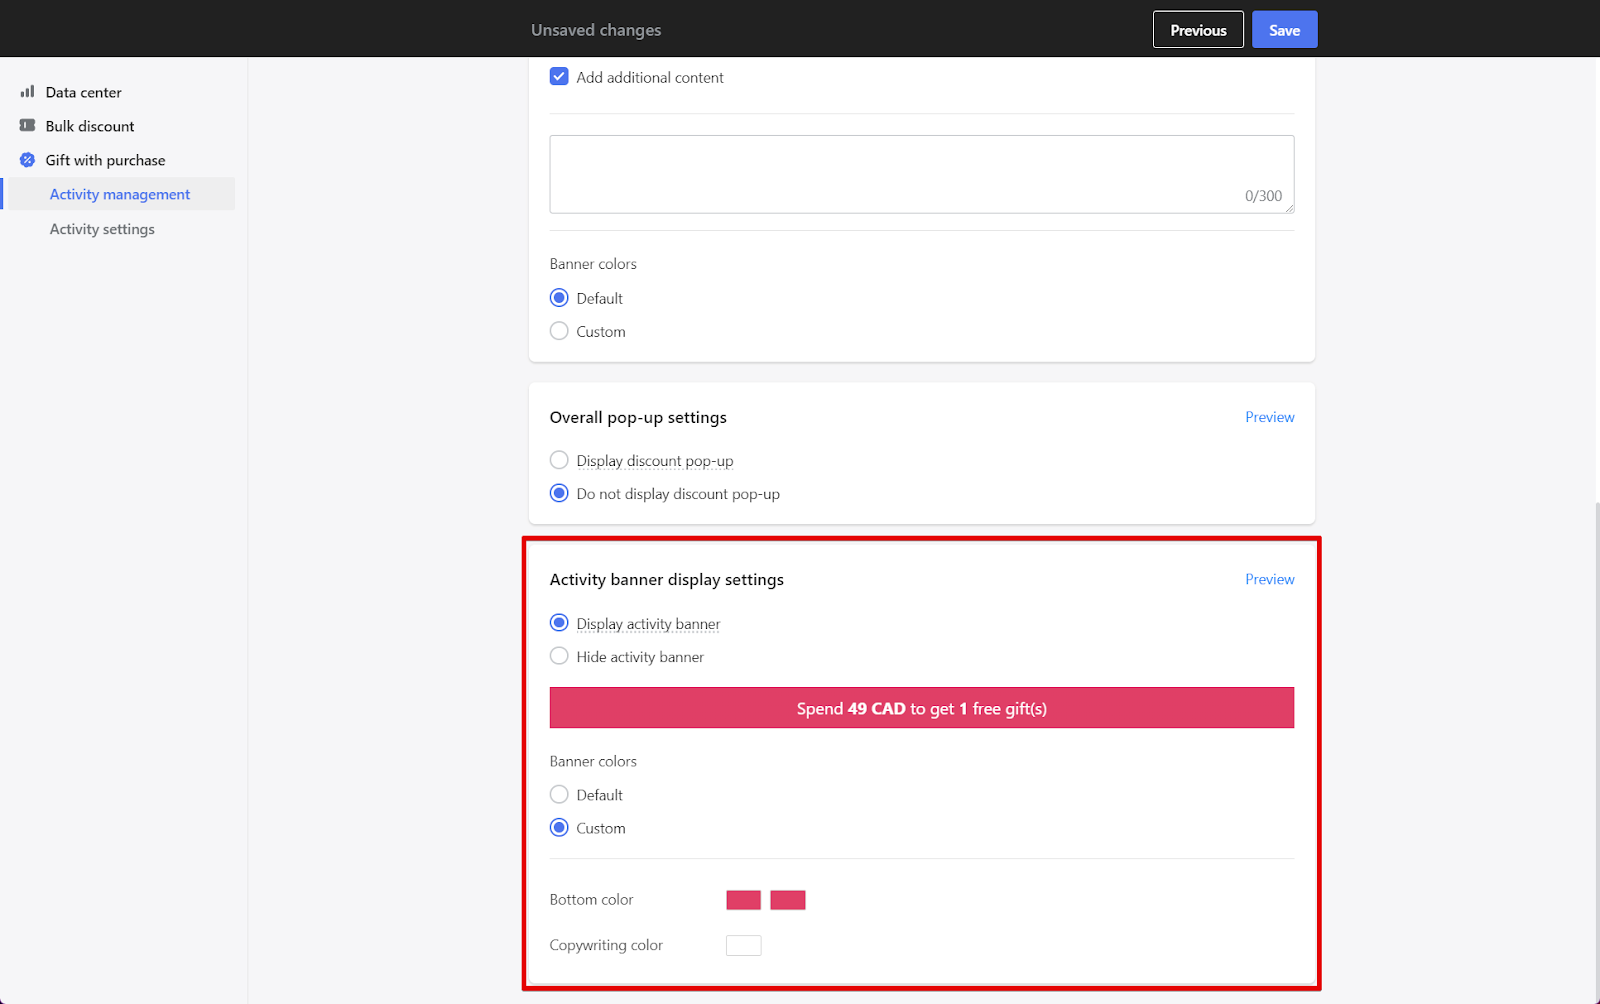
- Activity banner display settings: Decide if you want to display an information bar that highlights the activity. If enabled, this bar will be excluded from showing up on promotional shopping cart pages, as well as checkout and registration pages. You can also choose between Default or Custom color options for the banner. To finalize, click Save.

5. Activity settings:Switch over to the Activity settings to customize the Activity content and Promo pop-ups. Click Preview to see how the page for customers will look like before it goes live.
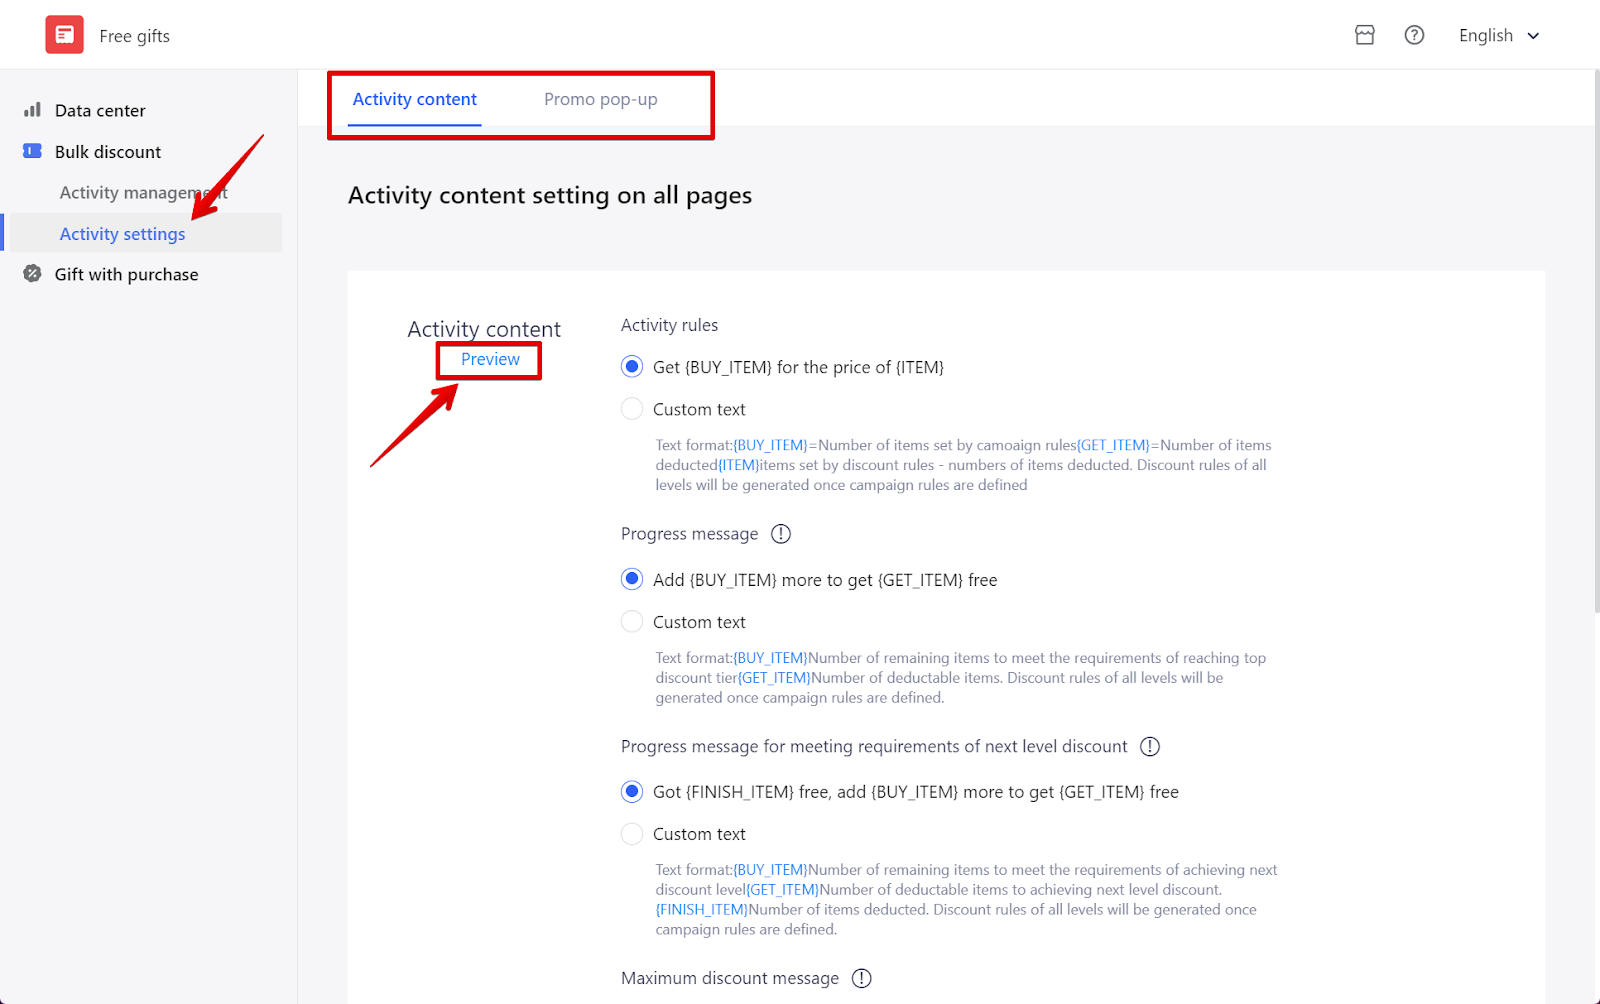
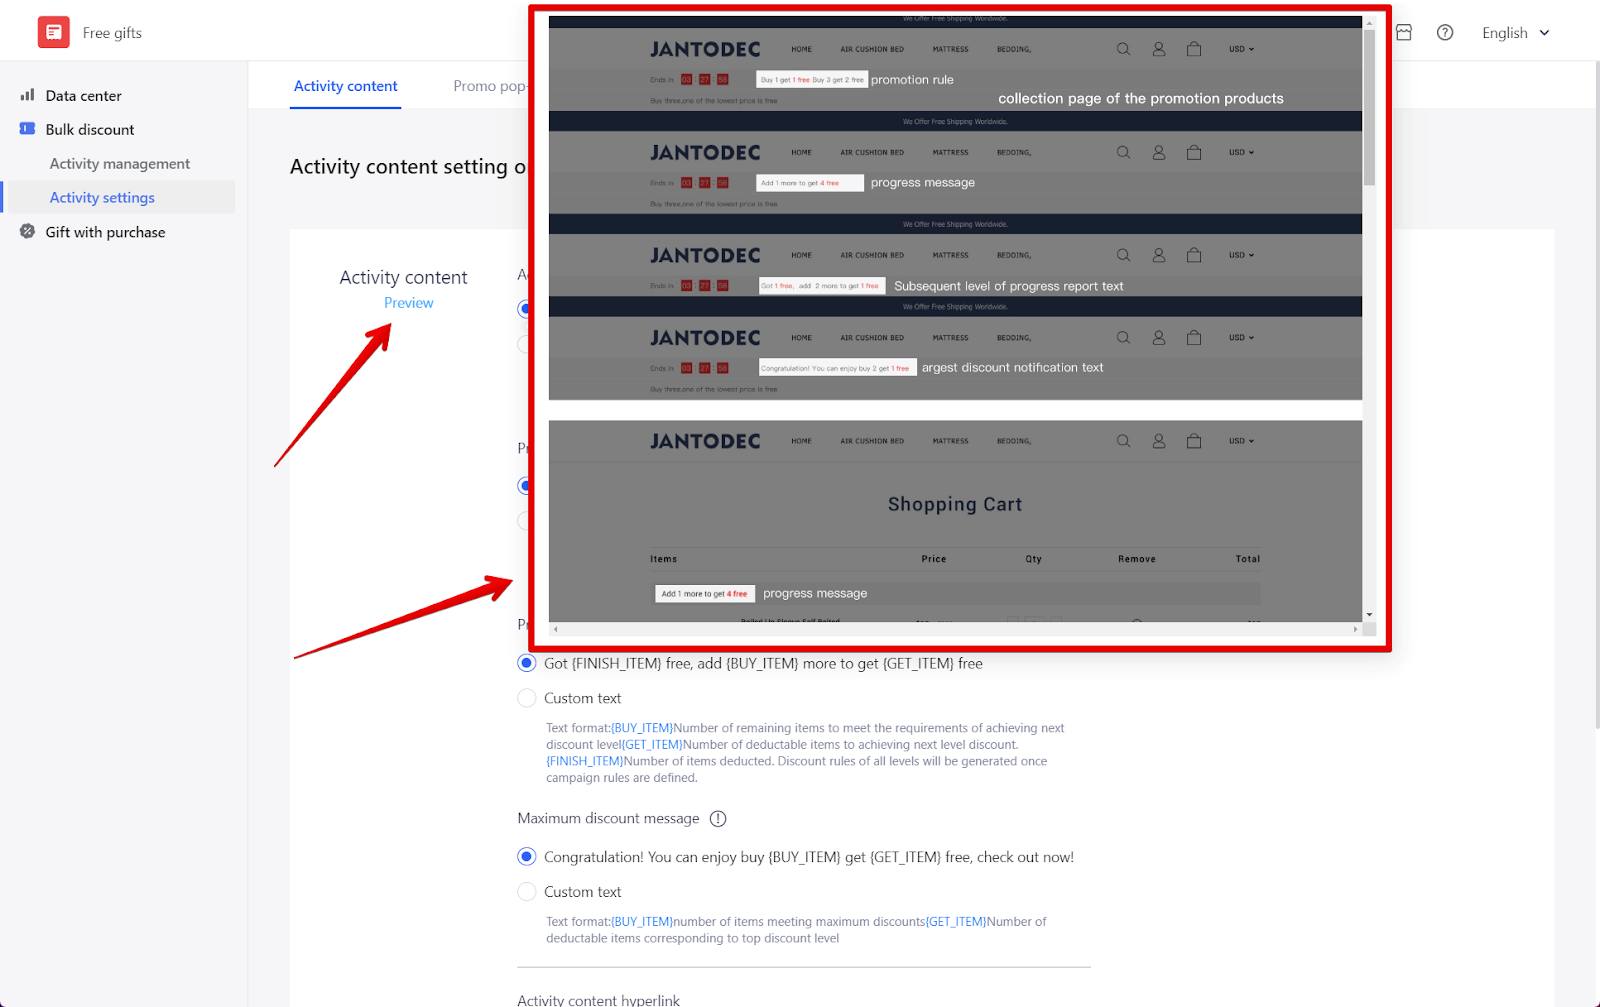
- Activity content: Choose to display either the default activity text or your own Custom text. You can also set up an option that allows customers to be directed to the activity page by clicking on the content.
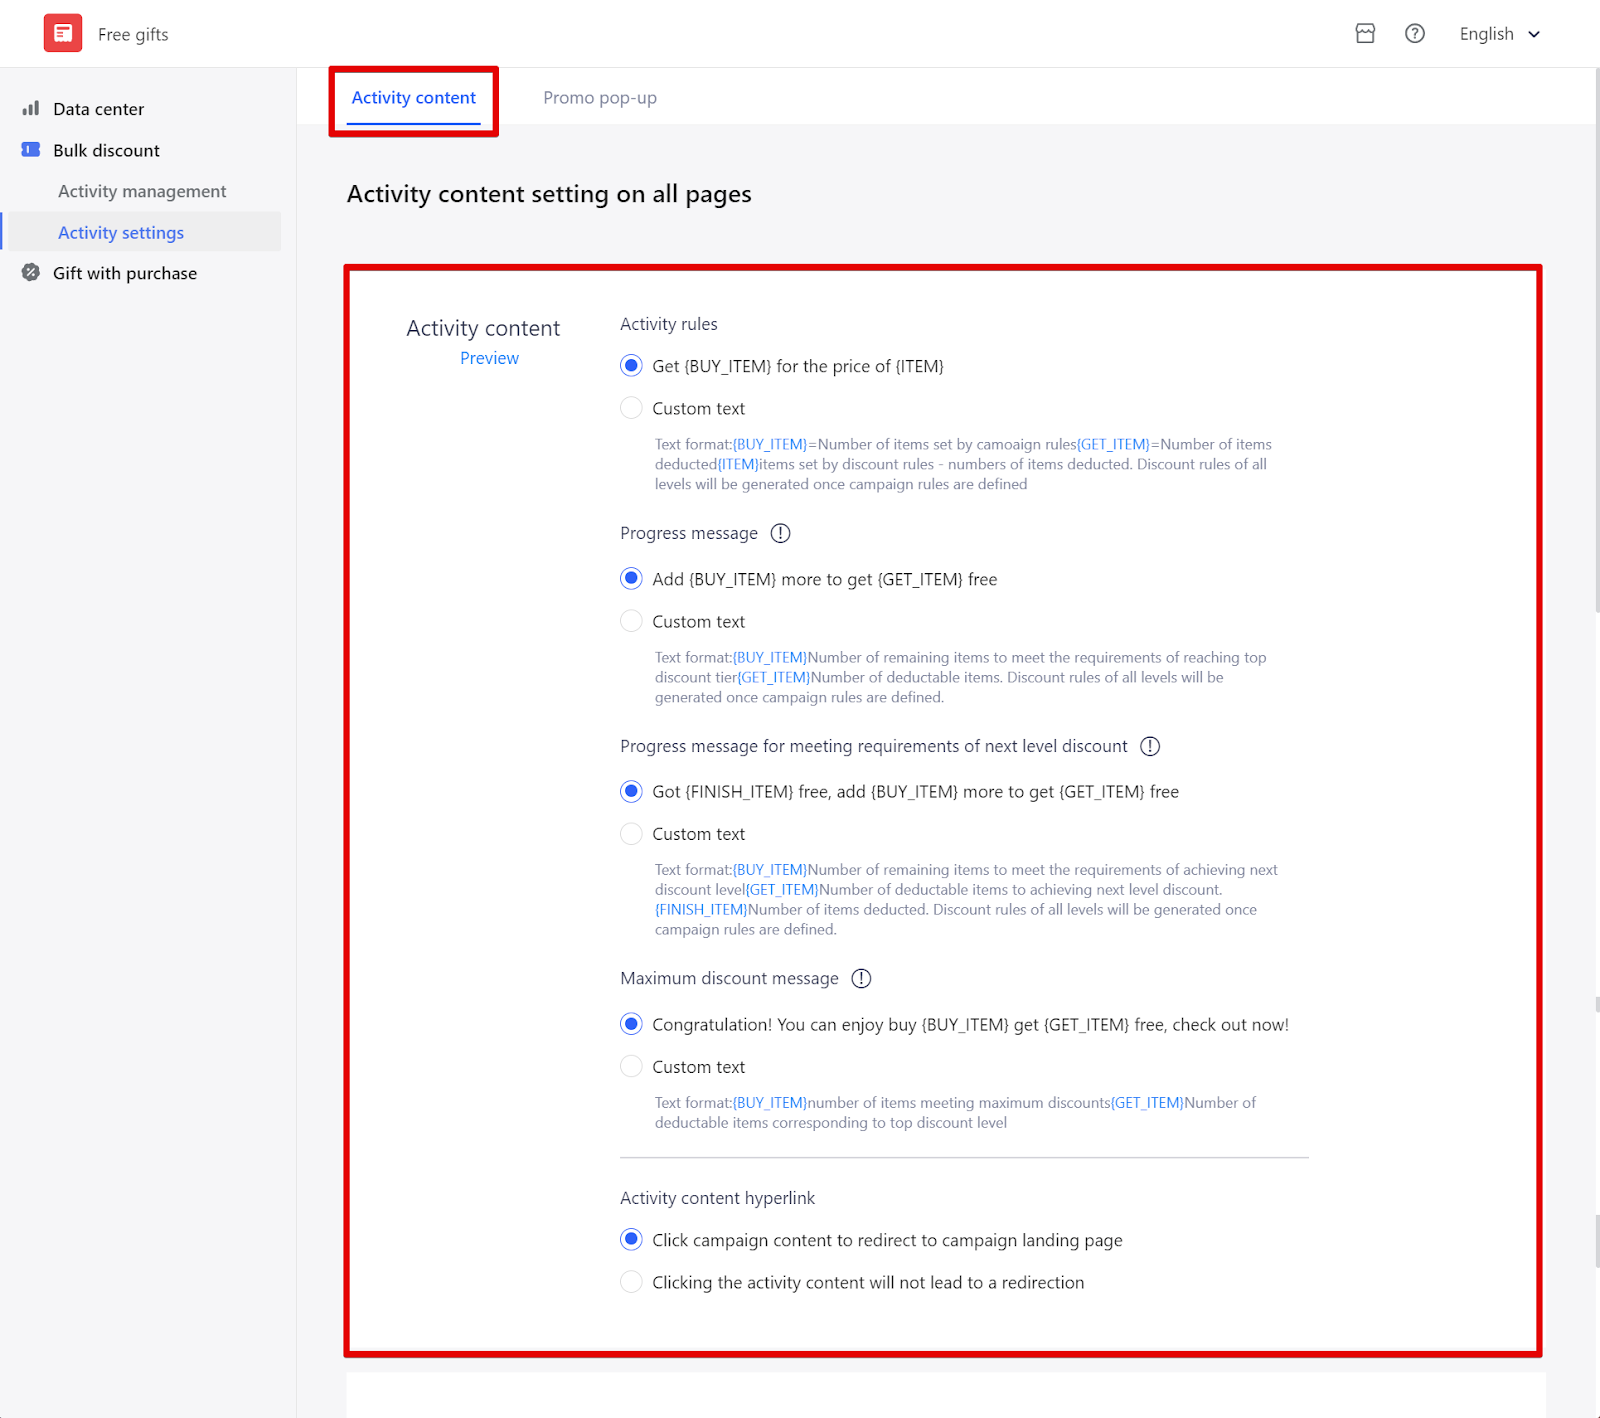
- To view on how it will be displayed to your customers, click on Preview.
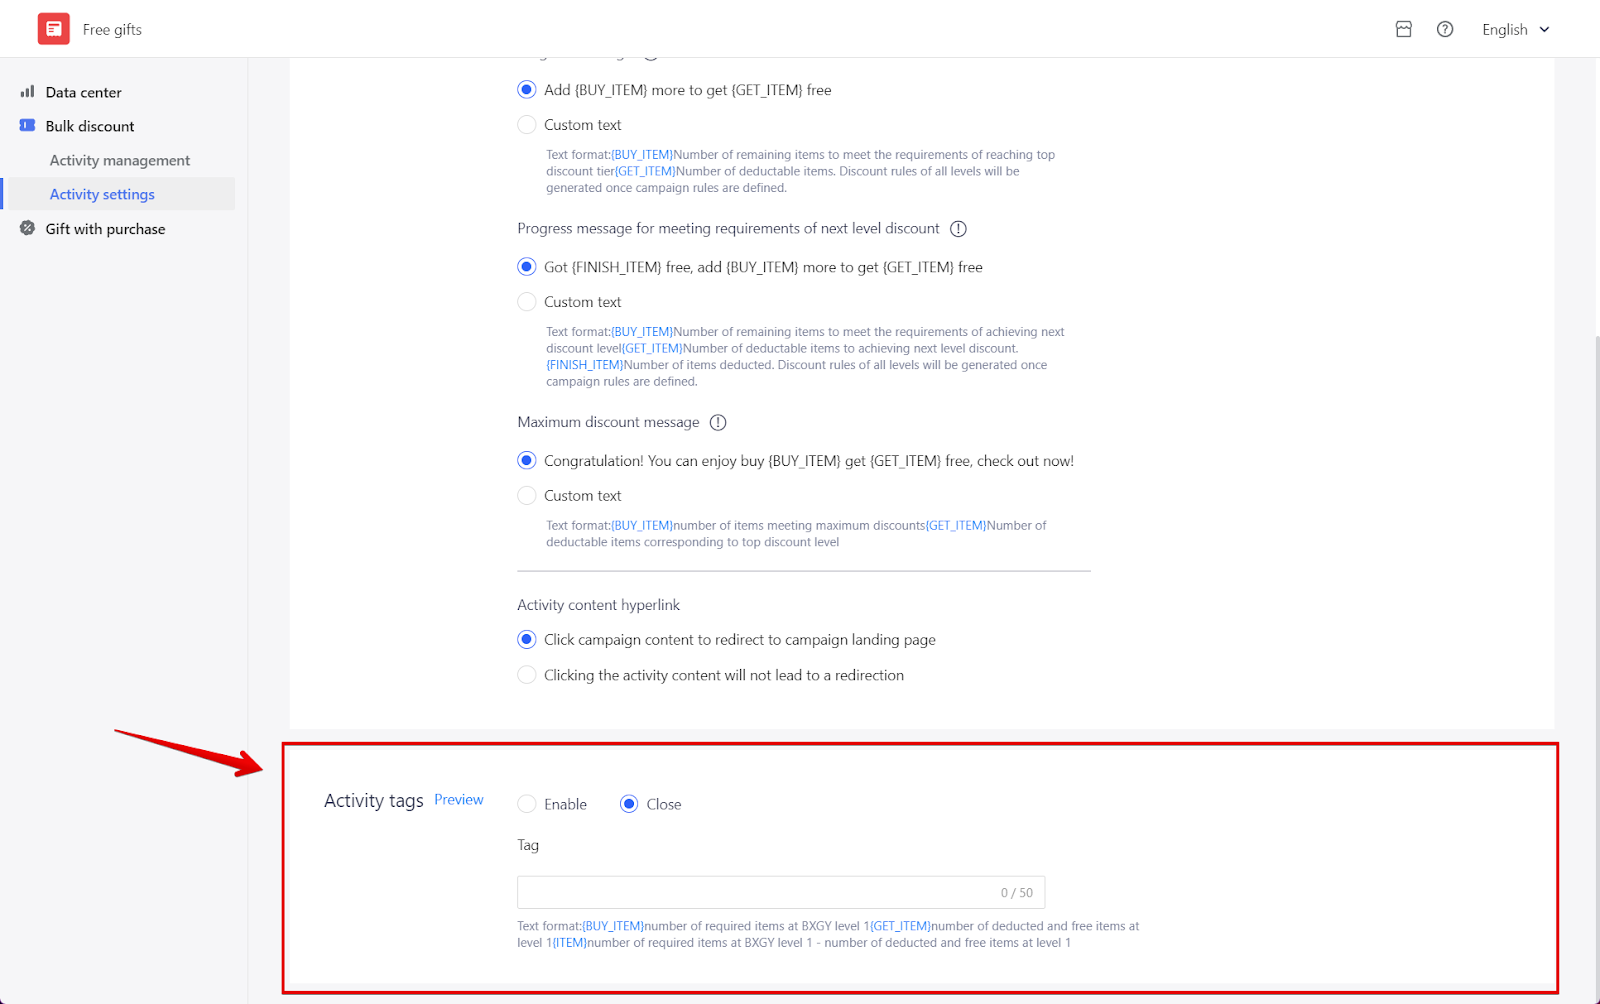
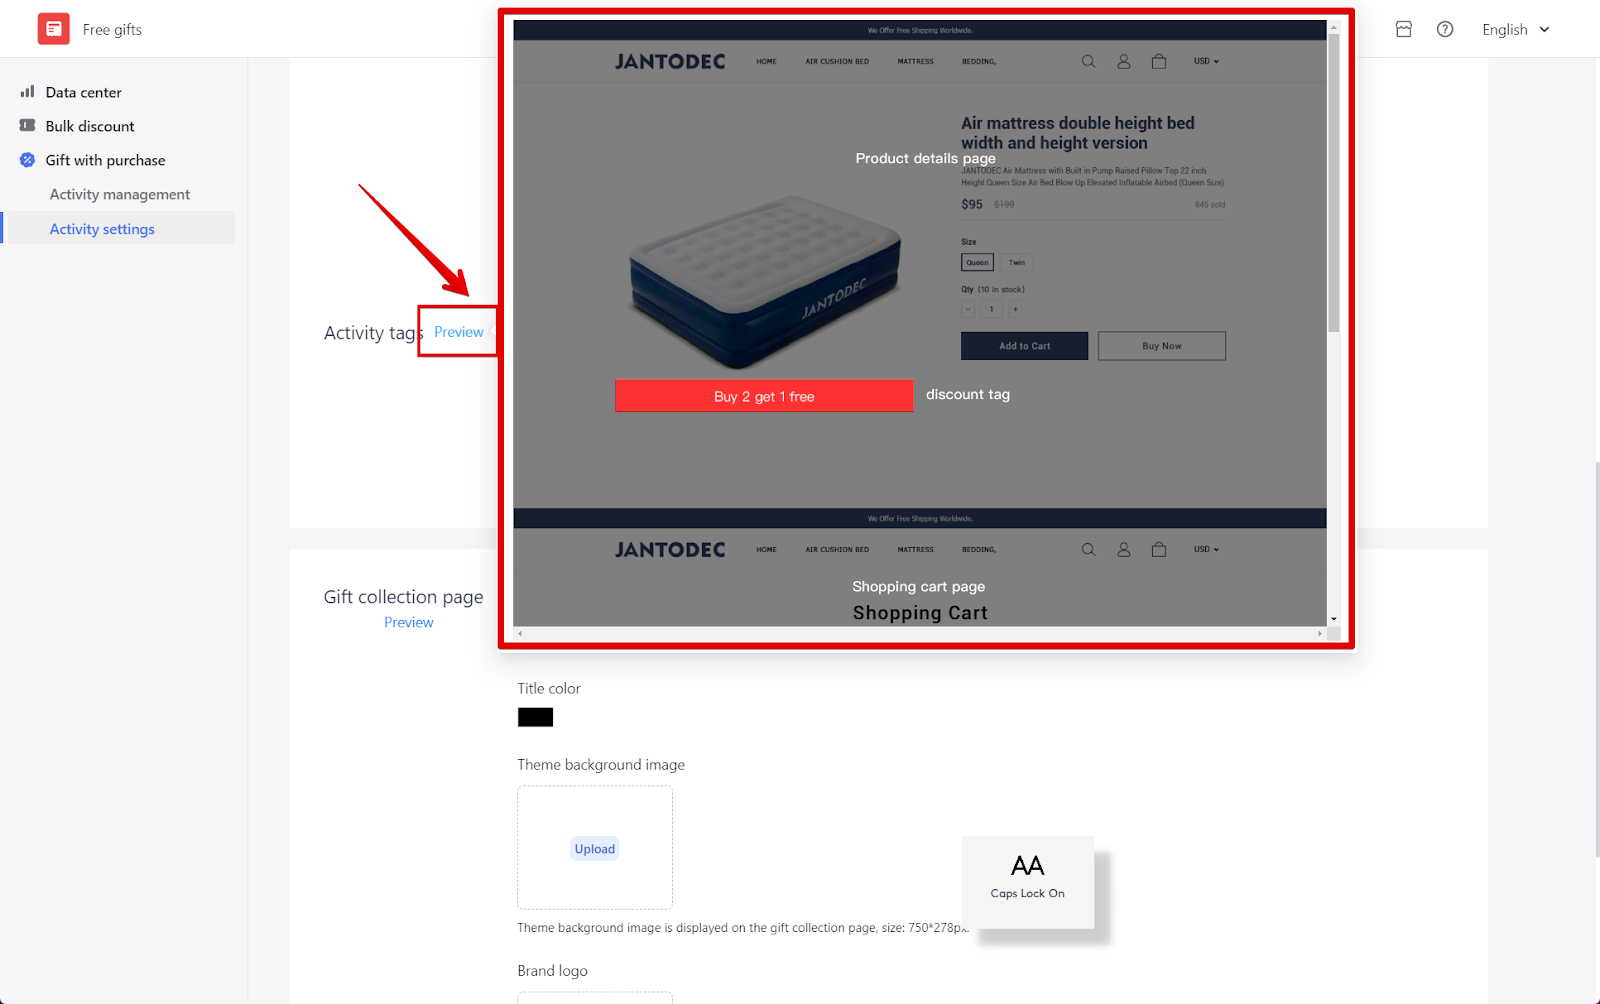
- Activity tags: You have the option to Enable or Disable (close) the display of activity labels. If you choose to enable it, you can edit the label text, but keep it within 50 characters. Again, click Preview to see how it will appear.
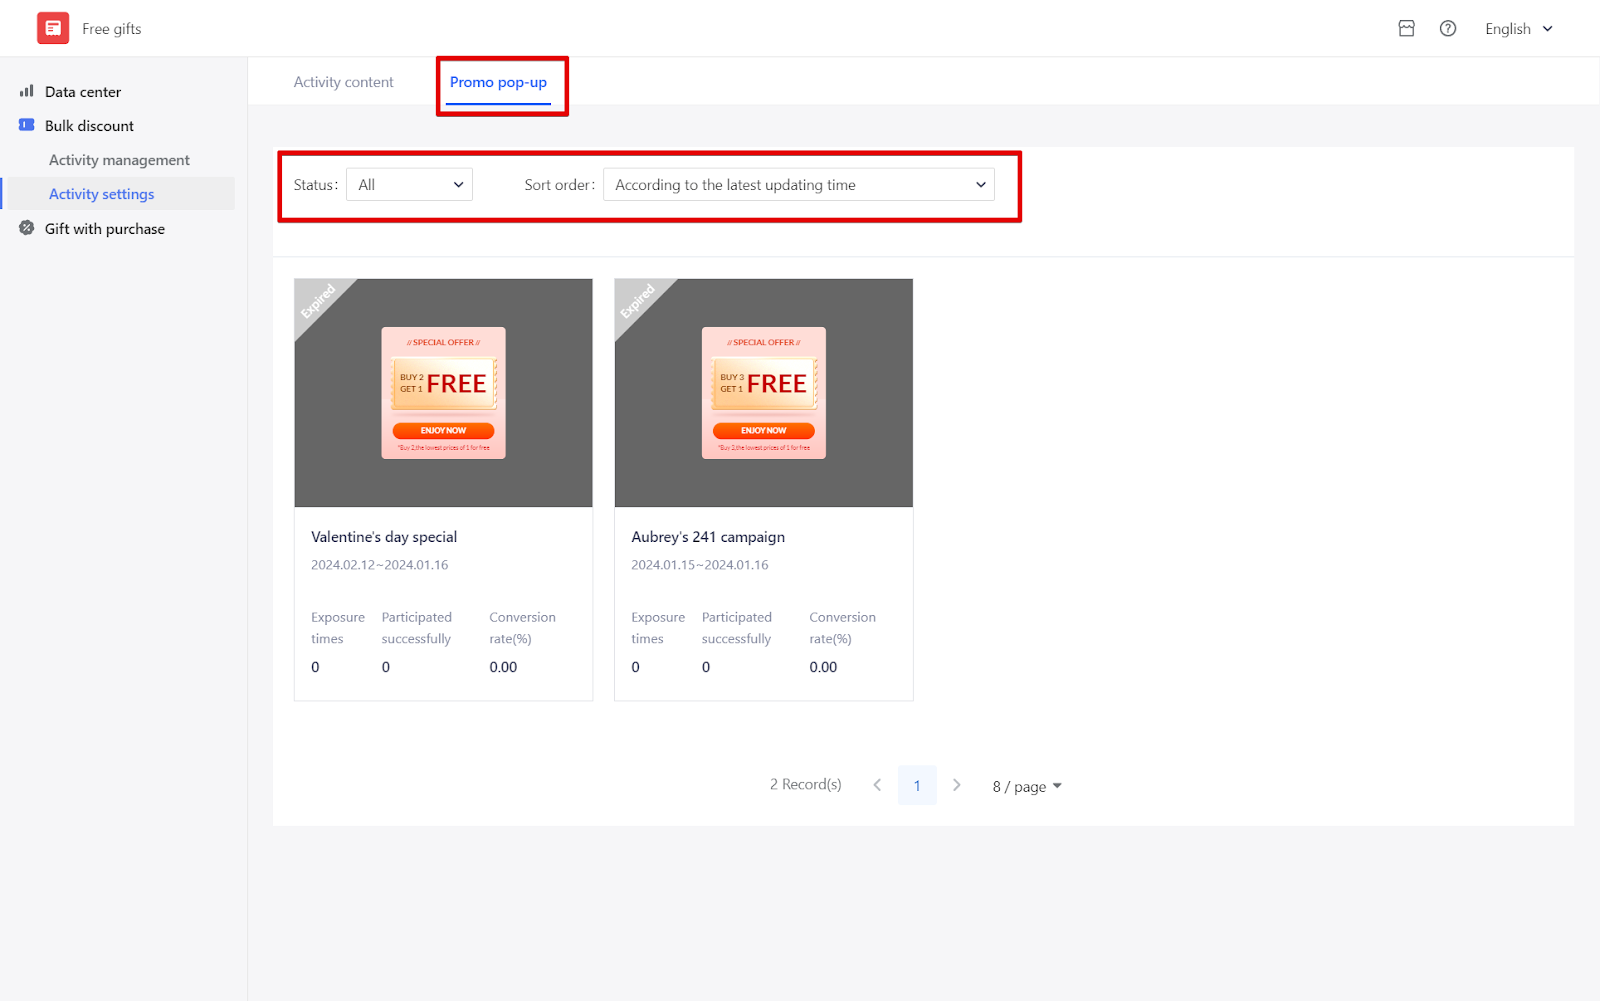
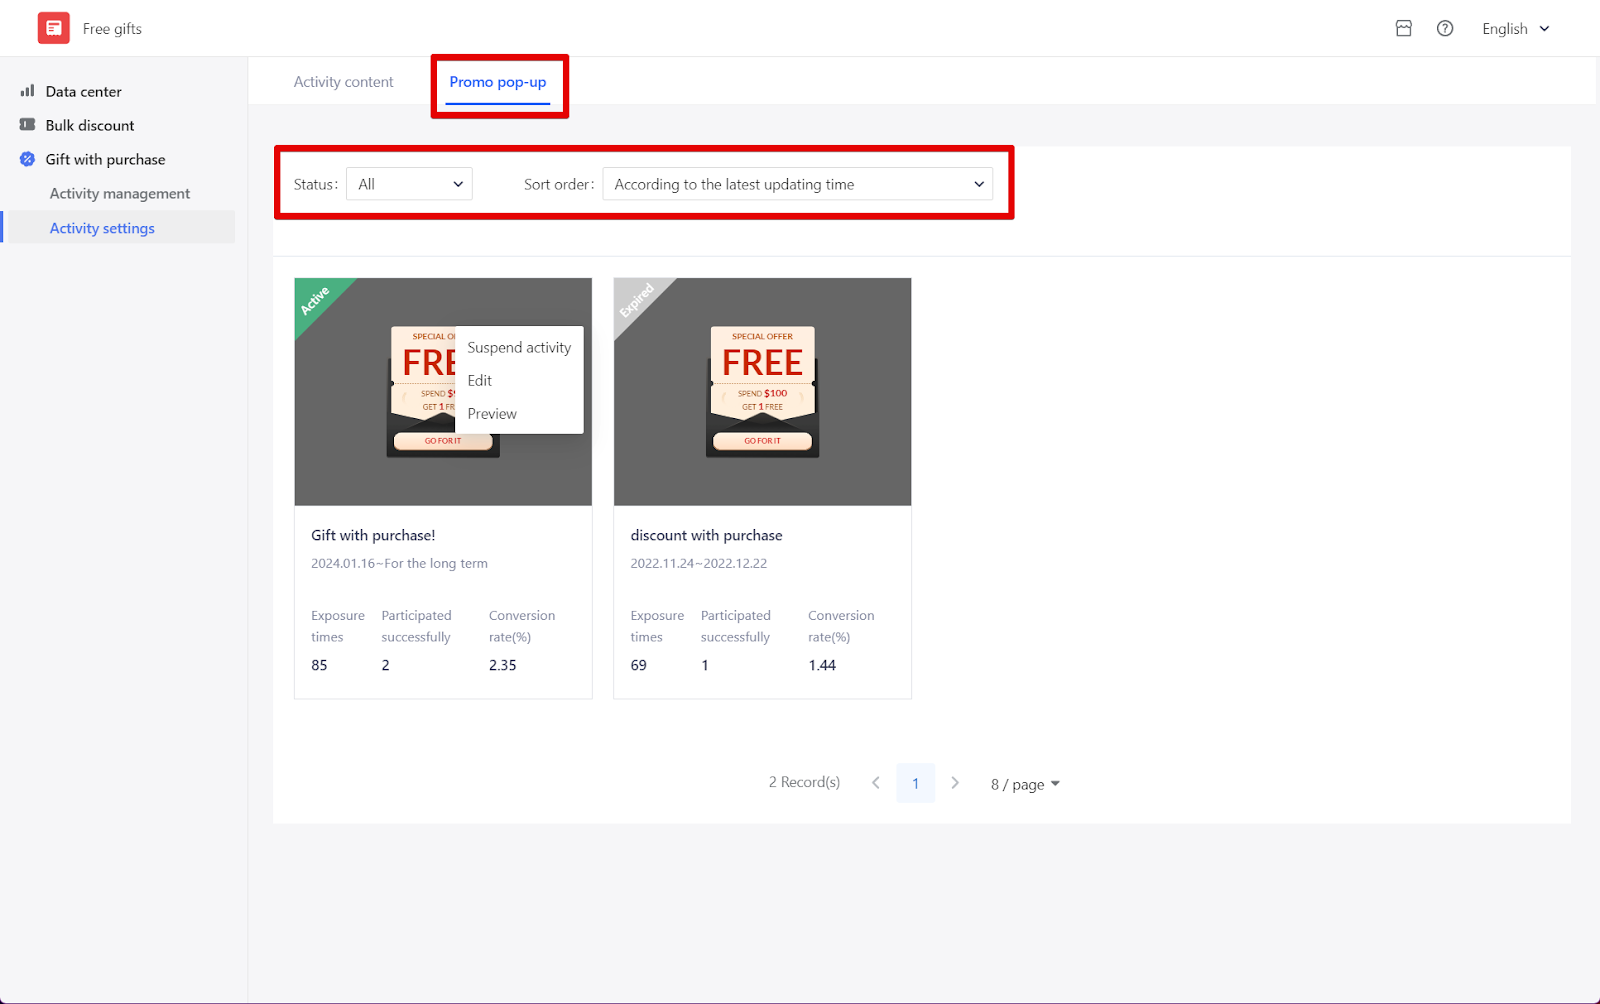
- Promo pop-up: Use the Status and Sort order filters to review your promotional pop-ups.
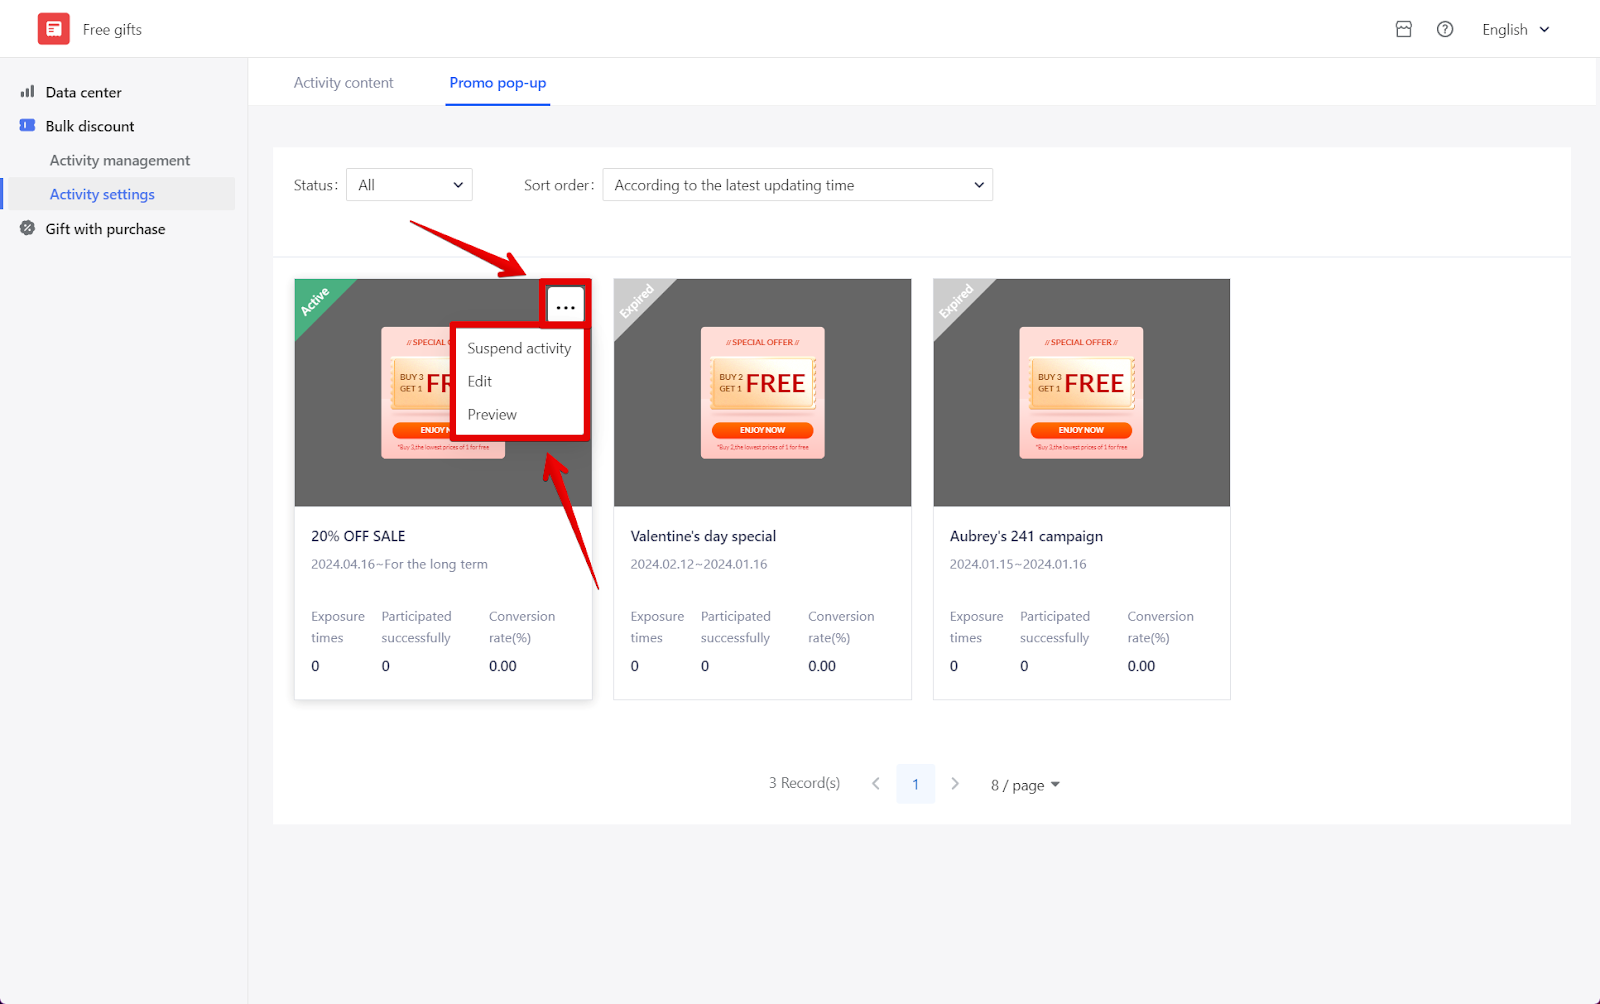
- Click on the "···" button for options to pause, edit, or preview the pop-up (Pop-up must be enabled in your initial activity settings).
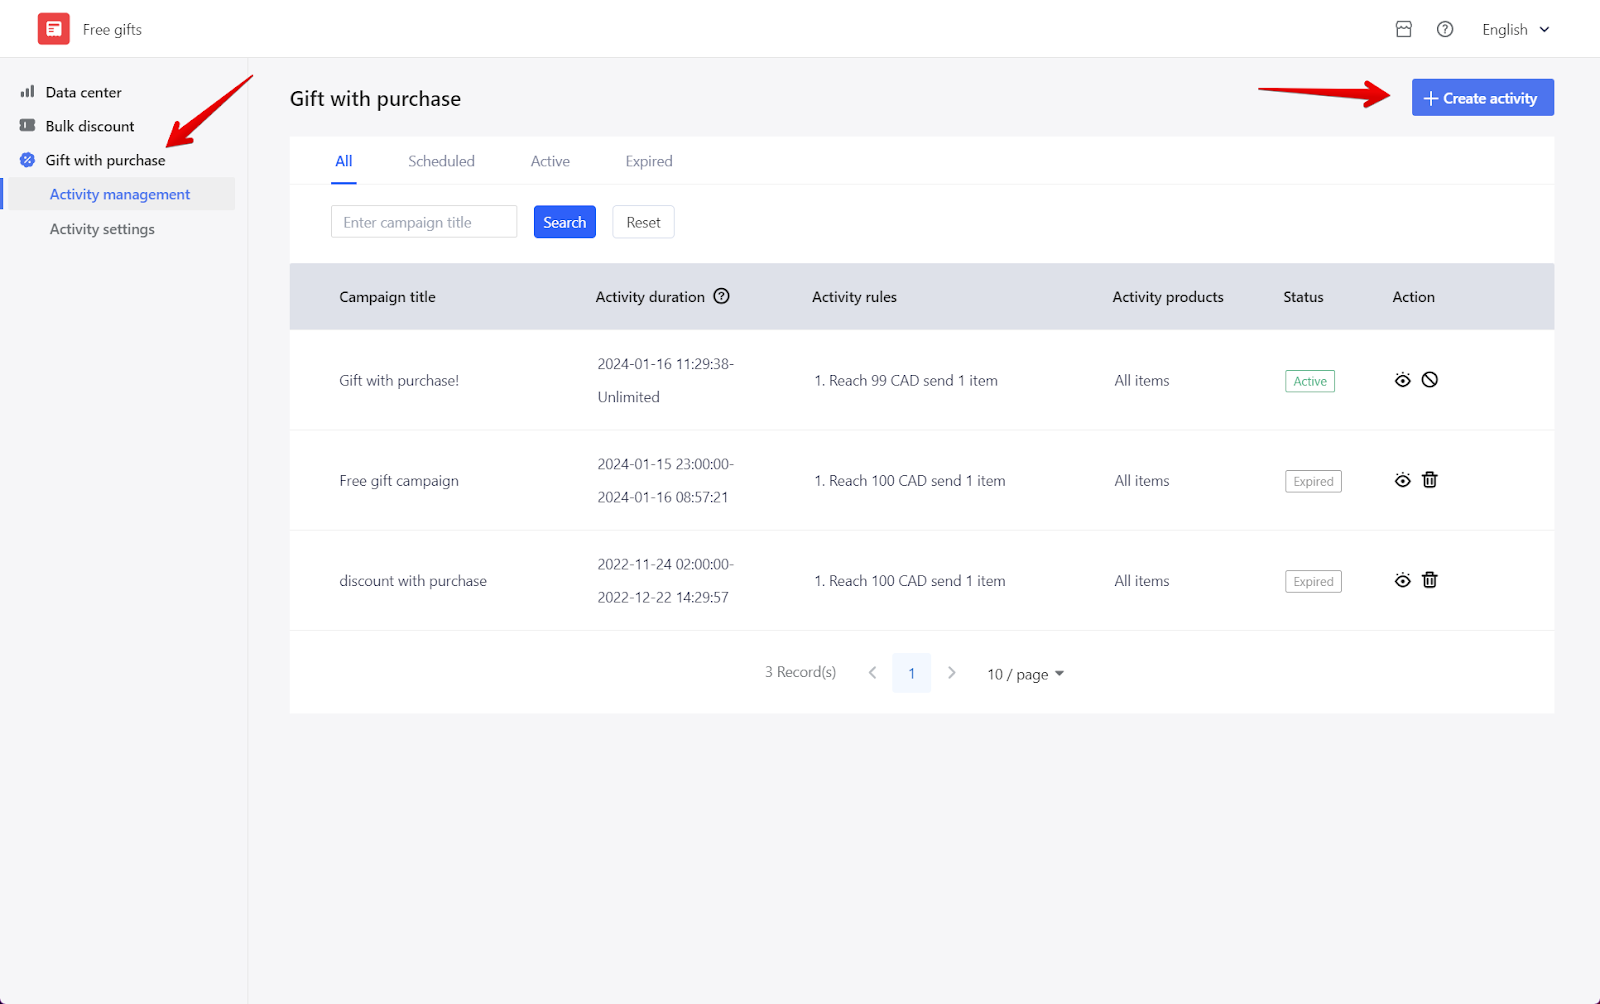
Setting up a Gift with purchase
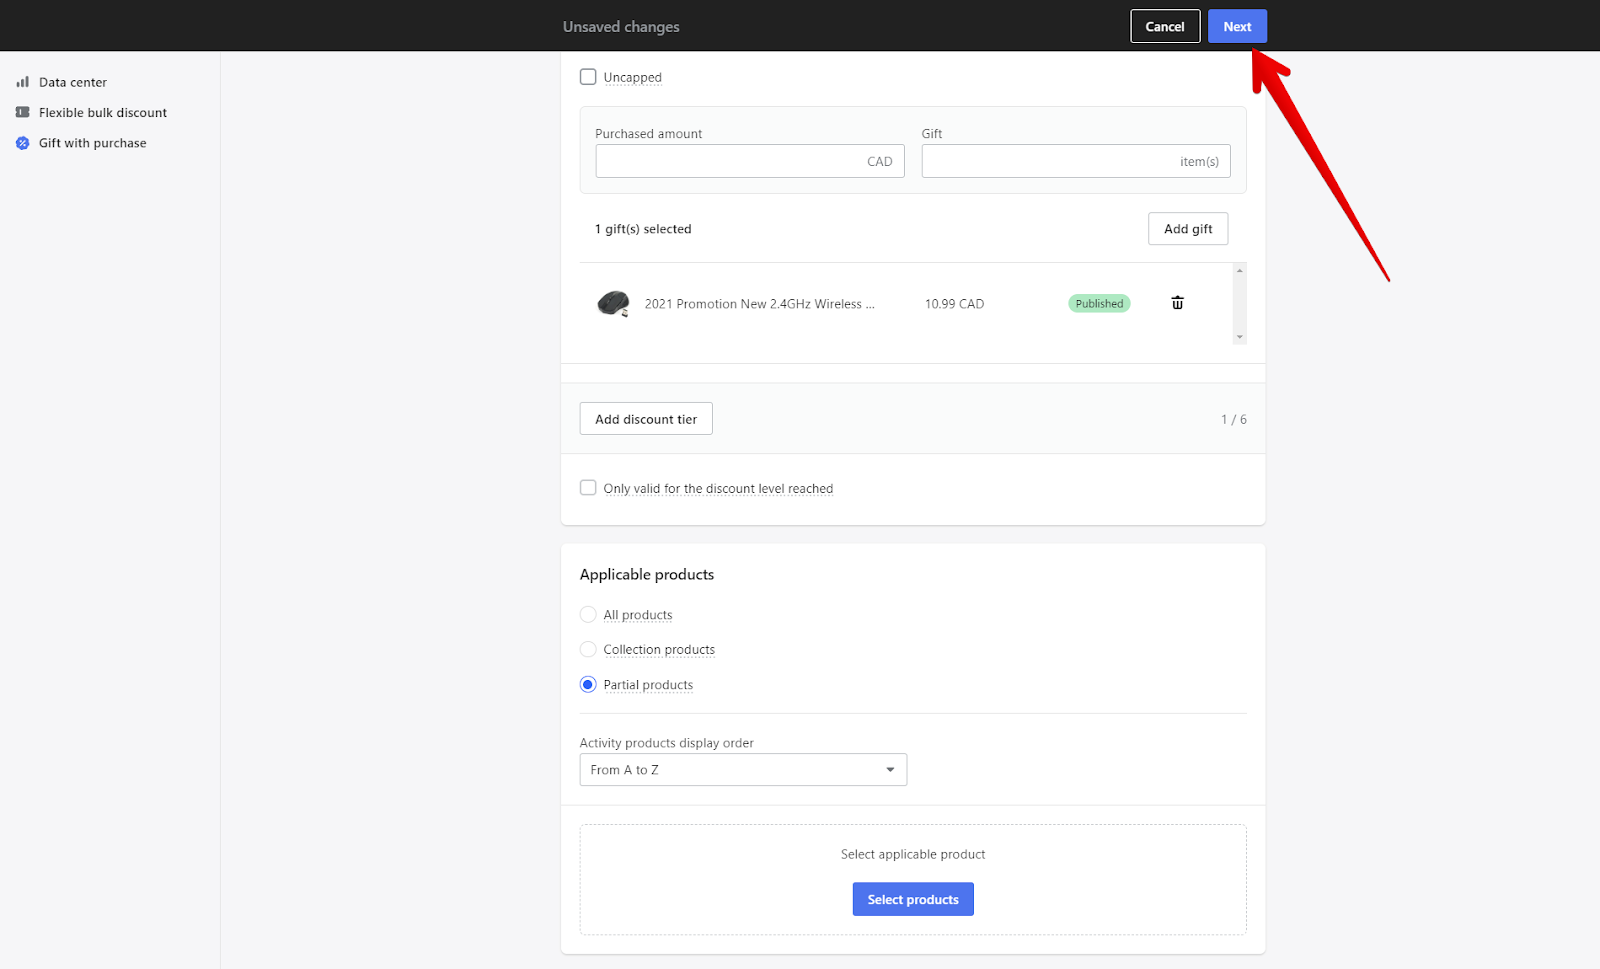
1. Create an activity: Switch over to Gift with purchase and click on Create Activity.
2. Step 1 Activity details: Enter the basic information, define promotion rules, and select applicable products.
-
Basic information
- Activity name: When creating a activity, the Activity Name refers to the name you give to your promotion. This name should clearly reflect the discount being offered and will be shown on the shopping cart and checkout pages of your store. For example, 20% Off Sale.
- Activity active dates: The activity duration time is determined based on the time zone set in the store's general settings. Simply click on the Set time zone button, and you will be redirected to your store's general settings. The activity start time cannot be earlier than the current time, and the end time cannot be earlier than the start time.
- For the long term: Enable this if your activity does not have an end duration.

- Promotion settings: Set up the number of discounts available for this activity and the number of times each person can use it.
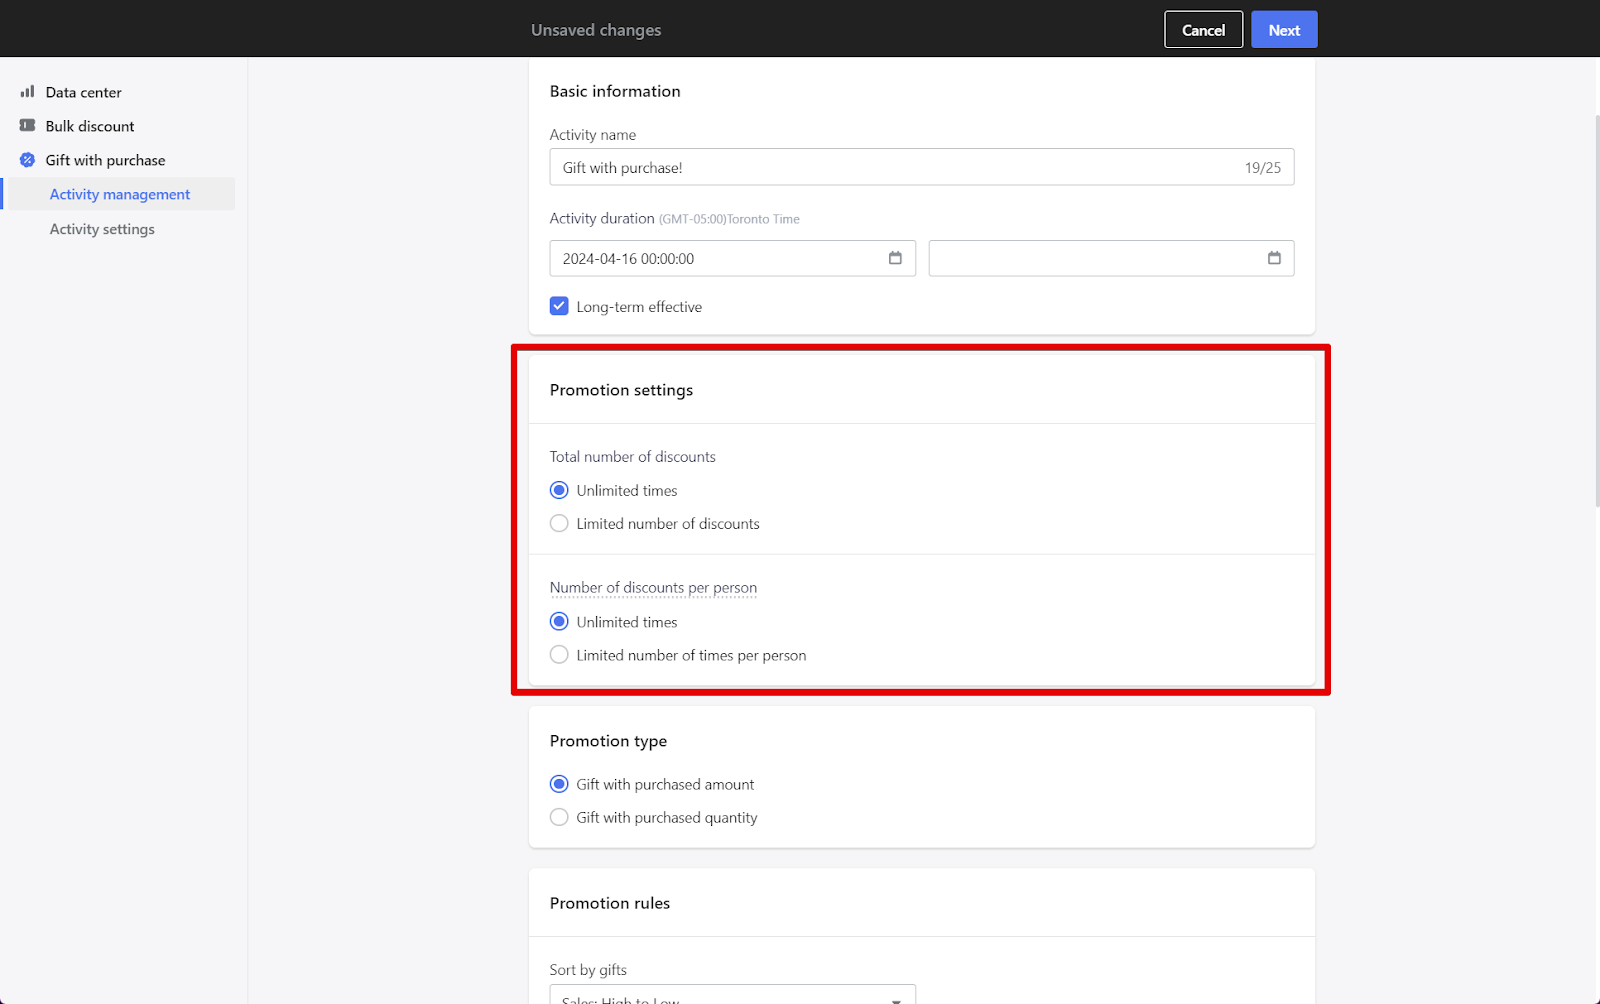
Note
- Activities will automatically end once all discount offers are collected,
- The store tracks the number of discounts per customer using browser cookies. If a customer isn't logged in and reaches their discount max, they will not receive the discount on their next purchases. However, if they add activity-related items to their cart, they'll still see the activity status and the option to select a gift during checkout.
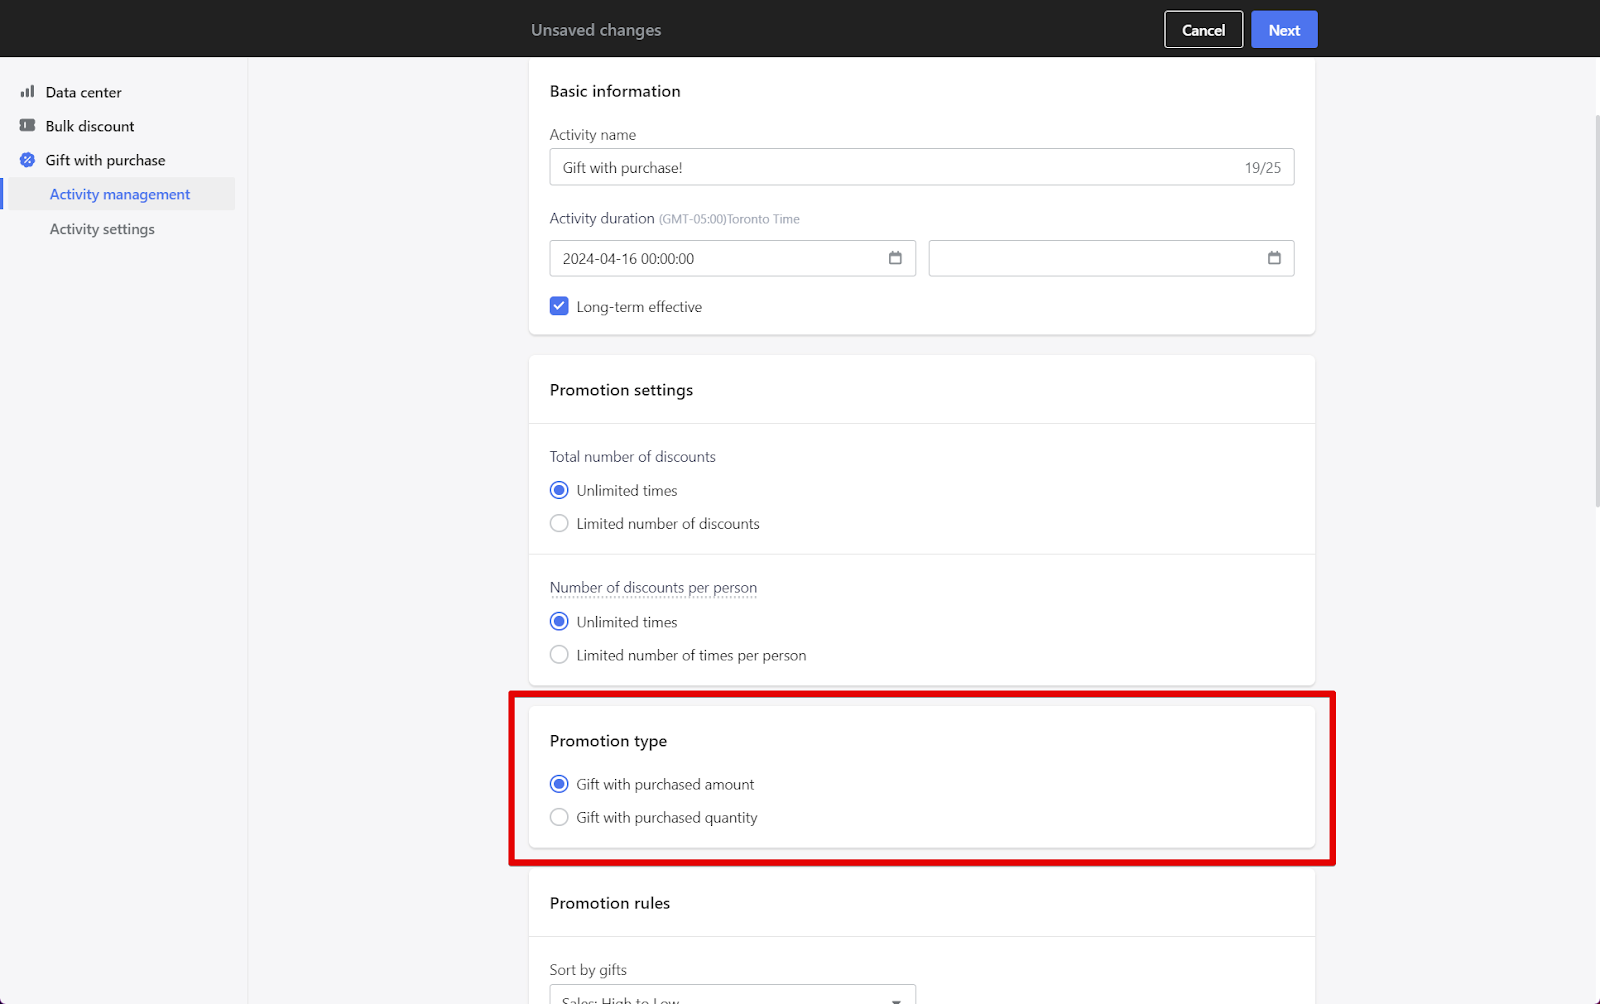
- Promotion type: Choose promotion type from Gift with purchased amount or Gift with purchased quantity.
-
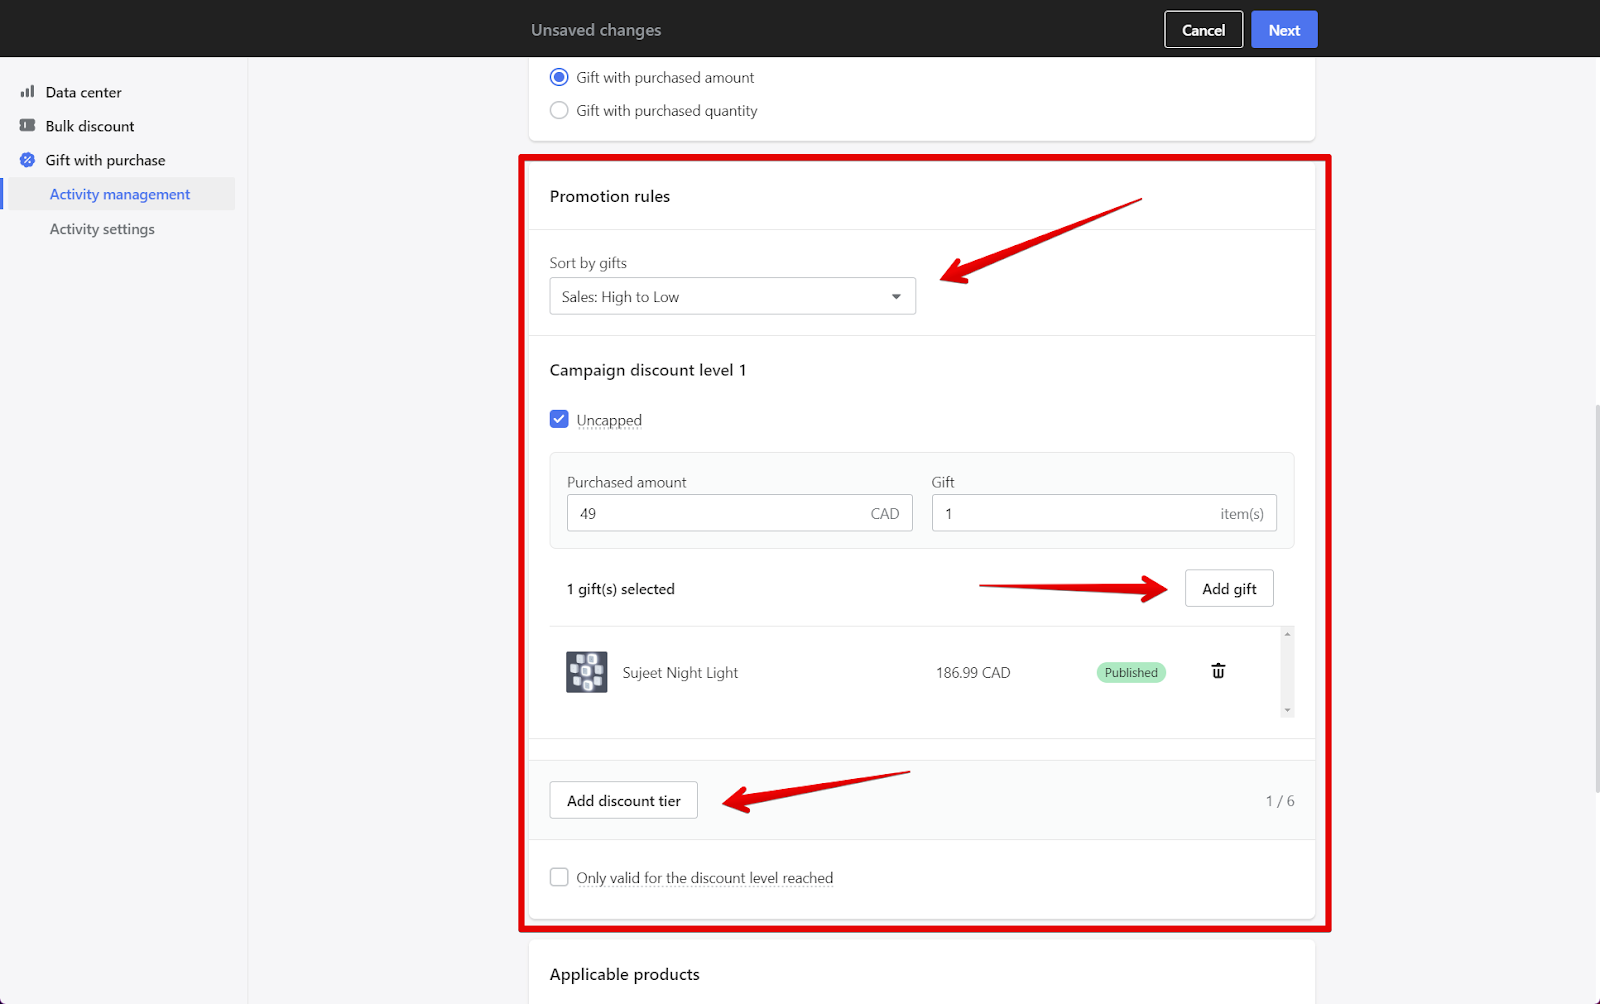
Promotion rules
- Gift sort: Choose how gifts are sorted from the dropdown menu.
- Add gift: Add your first gift by clicking on the Select products button. To add more gift, click the Add gift button.
- Delete gift: Delete any gifts, simply by clicking on the Trash can icon on the right side of each gift.
- Add discount tier: Add up to 6 discount levels, by clicking on the Add discount tier button.
- Delete level: Delete discount level, simply by clicking on the Delete button on the right side of each level box.
- Uncapped (Unlimited): for example, when one free item is set for every $200 spent, then one item will be sent when the amount reaches $200, two items will be sent when the amount reaches $400, and so on in the same manner.
- Capped (Limited): If unlimited isn't selected and only one level is defined, then one item will be given whether the amount reaches $200 or 400, but if multiple levels are set, items will be given according to the level.
Note
If you set discount level 1: get gift A for purchasing one item. For example, customers receive a free baseball cap with the purchase of a jacket.
For level 2: get gift B for purchasing two items, and when customers purchase two or more items. For example, they get a complimentary scarf if they buy two jackets.
If you select only valid for the discount level reached, then only B will be given as a gift, otherwise both A and B will be given as gifts. For example, customers buying two jackets will receive just the complimentary scarf.
If not, they'll receive both the baseball cap and the complimentary scarf when they buy two jackets.
-
Applicable products:
- All products: This option excludes items that are already part of another gift with purchase promotions.
- Collection products: For products that belong to multiple collections, the most recent discount with purchase activity from any of those collections will apply.
- Partial products: Use this option to select only those products that haven't been part of other gift with purchase activities.
- Sort by: Choose how products are sorted.

3. Continue to Step 2: Once the activity rules are configured, click Next to enter the activity page setup.
4. Activity page setup: Here, you have the opportunity to personalize various elements like the activity banner, its display settings (activity banner display), additional content, pop-up display, and the information bar (activity information bar display). To see a preview of how it will look to your customers, click the Preview button.
- Activity landing page poster: Upload your banner image from your desktop. You can opt for either a Full screen or Centered display. The recommended banner size is 1920PX x 300PX.

- Activity landing page banner: Decide the banner's color scheme by choosing either Default or Custom settings. If you opt for Custom, you can specify the Bottom color and text color (copywriting color)
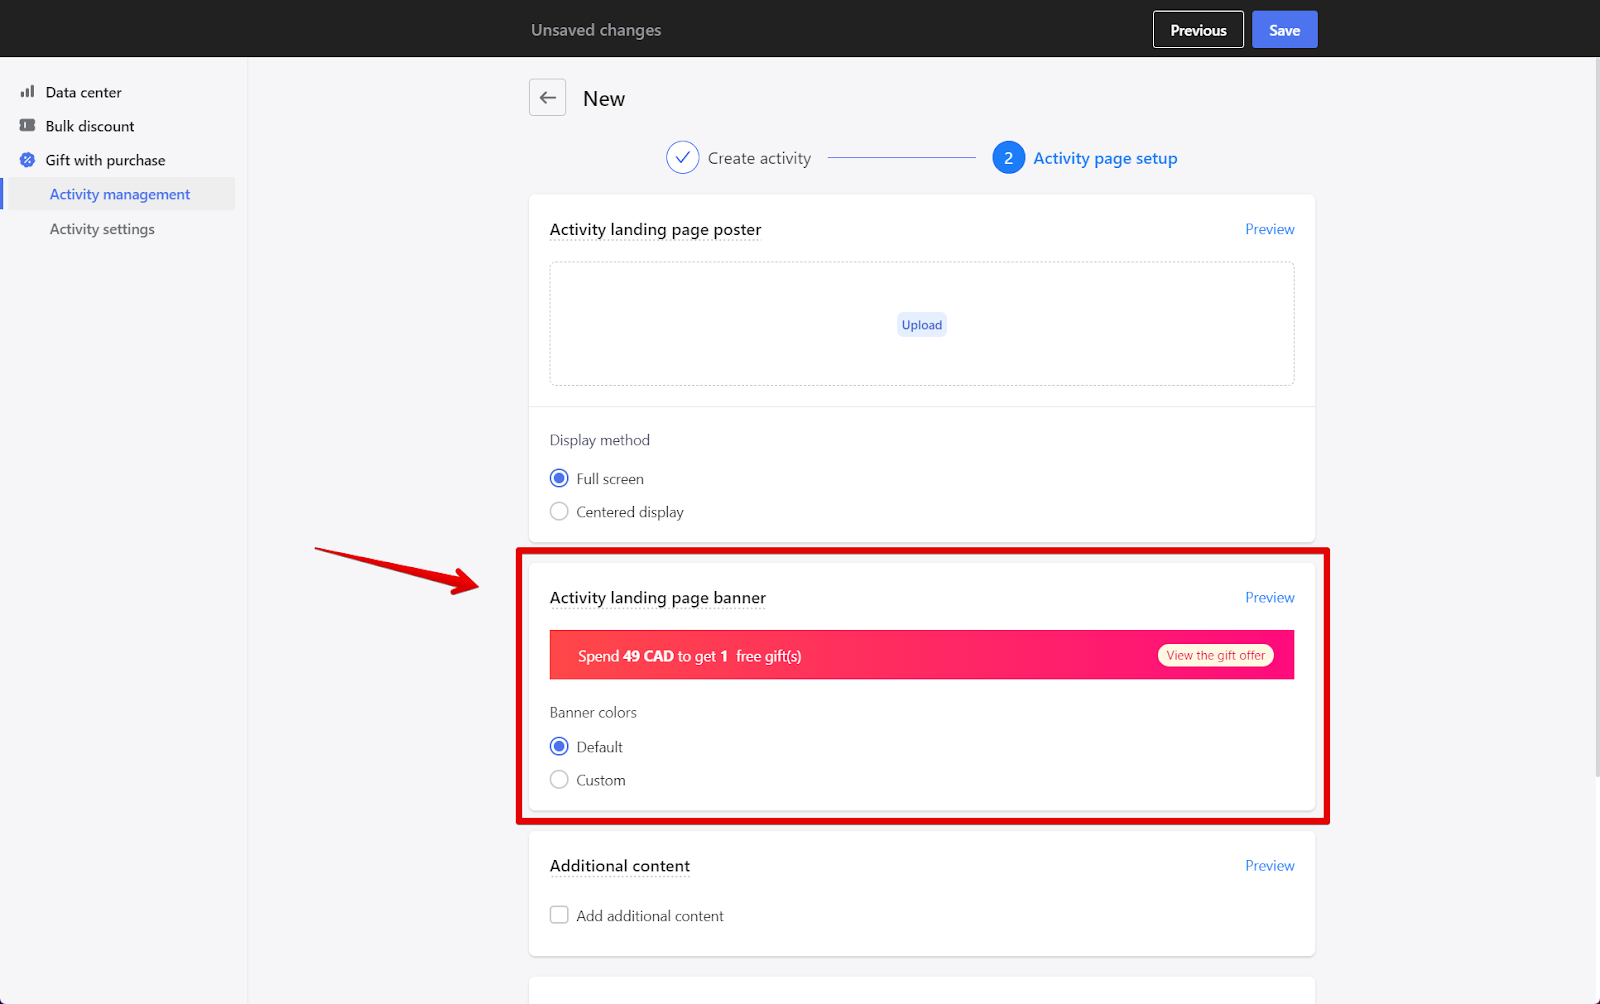
- Additional content: To include extra information, click the Add additional content button. Edit your content within a 300-character limit and, similar to the banner, select Default or Custom colors.
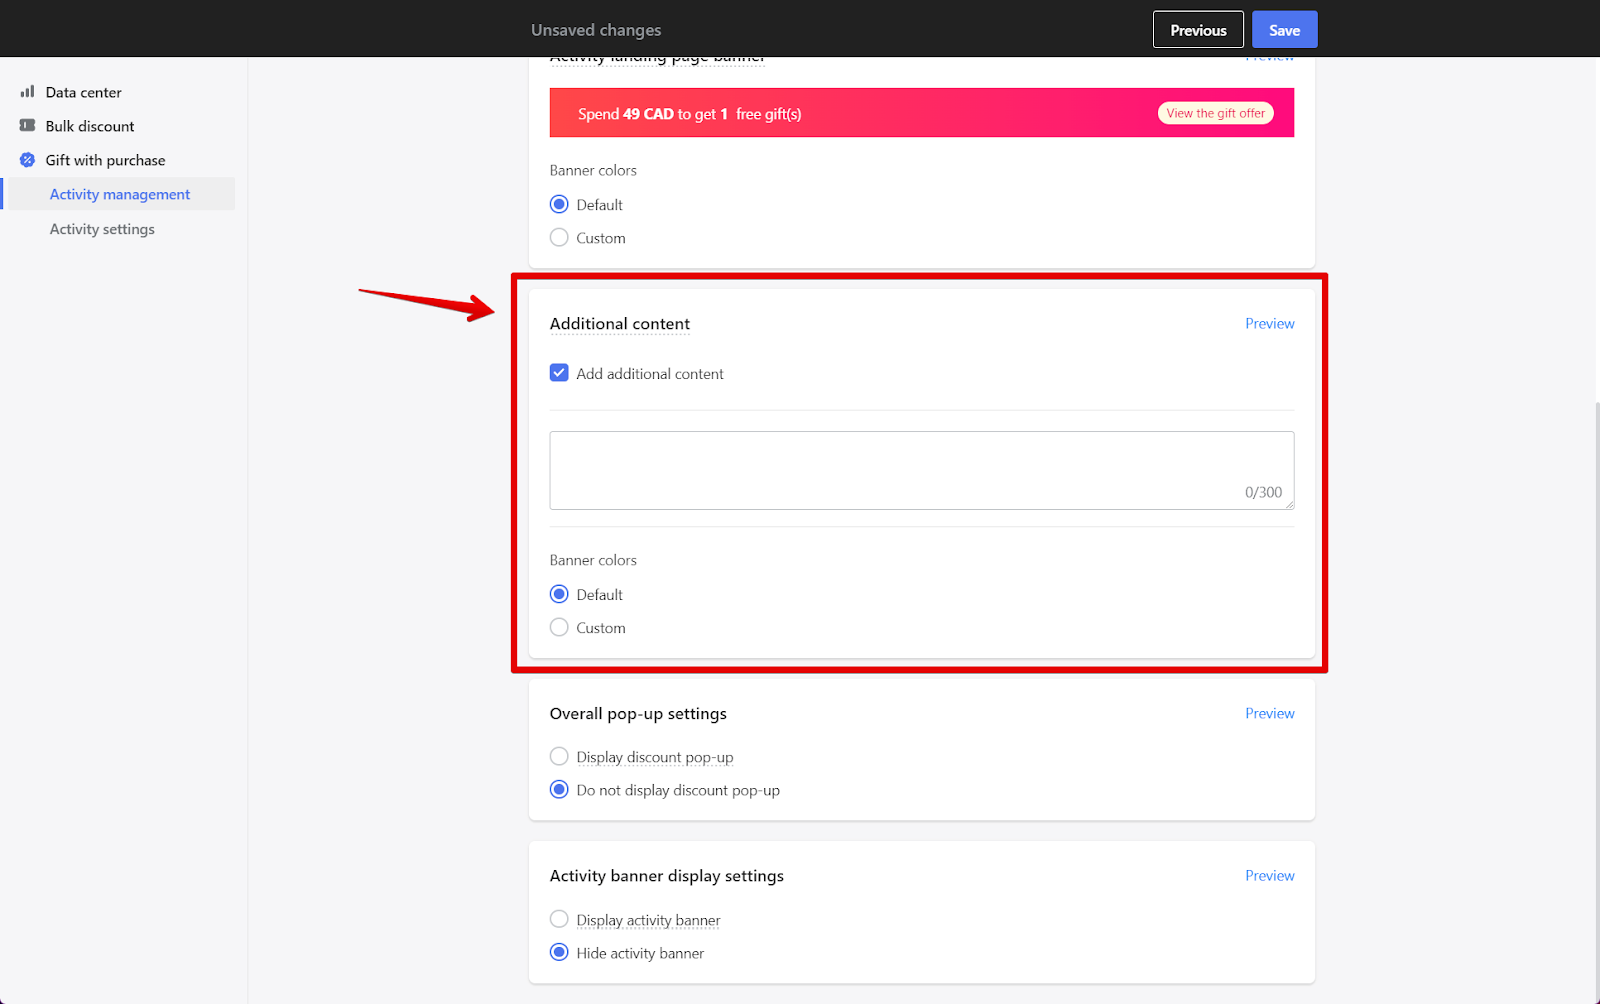
Note
Any footnotes related to activity rules will appear below the Countdown timer and reminder text.
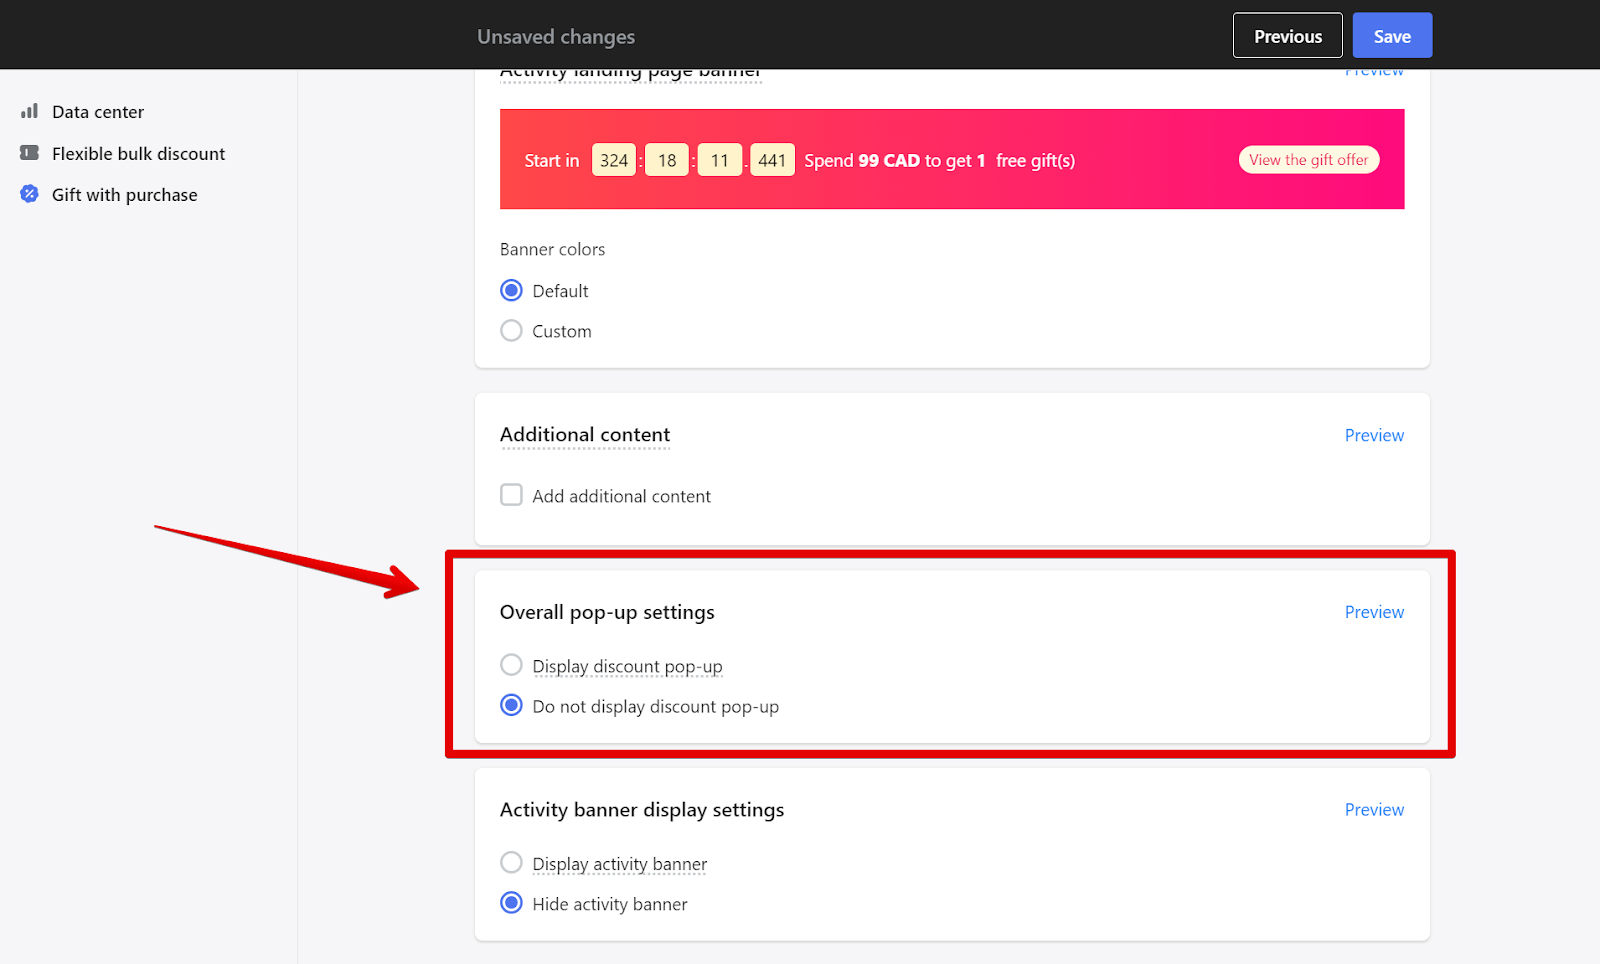
- Overall pop-up settings: Choose if you'd like a discount pop-up to appear. If enabled, this pop-up will show on all pages except checkout and registration, and will display once per visit.
- Activity information bar display: Decide if you want to display an information bar that highlights the activity. If enabled, this bar will be excluded from showing up on promotional shopping cart pages, as well as checkout and registration pages. You can also choose between Default or Custom color options for the banner. Click Save for next steps.
- Switch over to Activity settings. Here you can customize the Activity content and promo pop-up. Click Preview to see how the page for customers will look like before it goes live.
- Activity type: Choose activity type from Gift with purchased amount or Gift with purchased quantity.
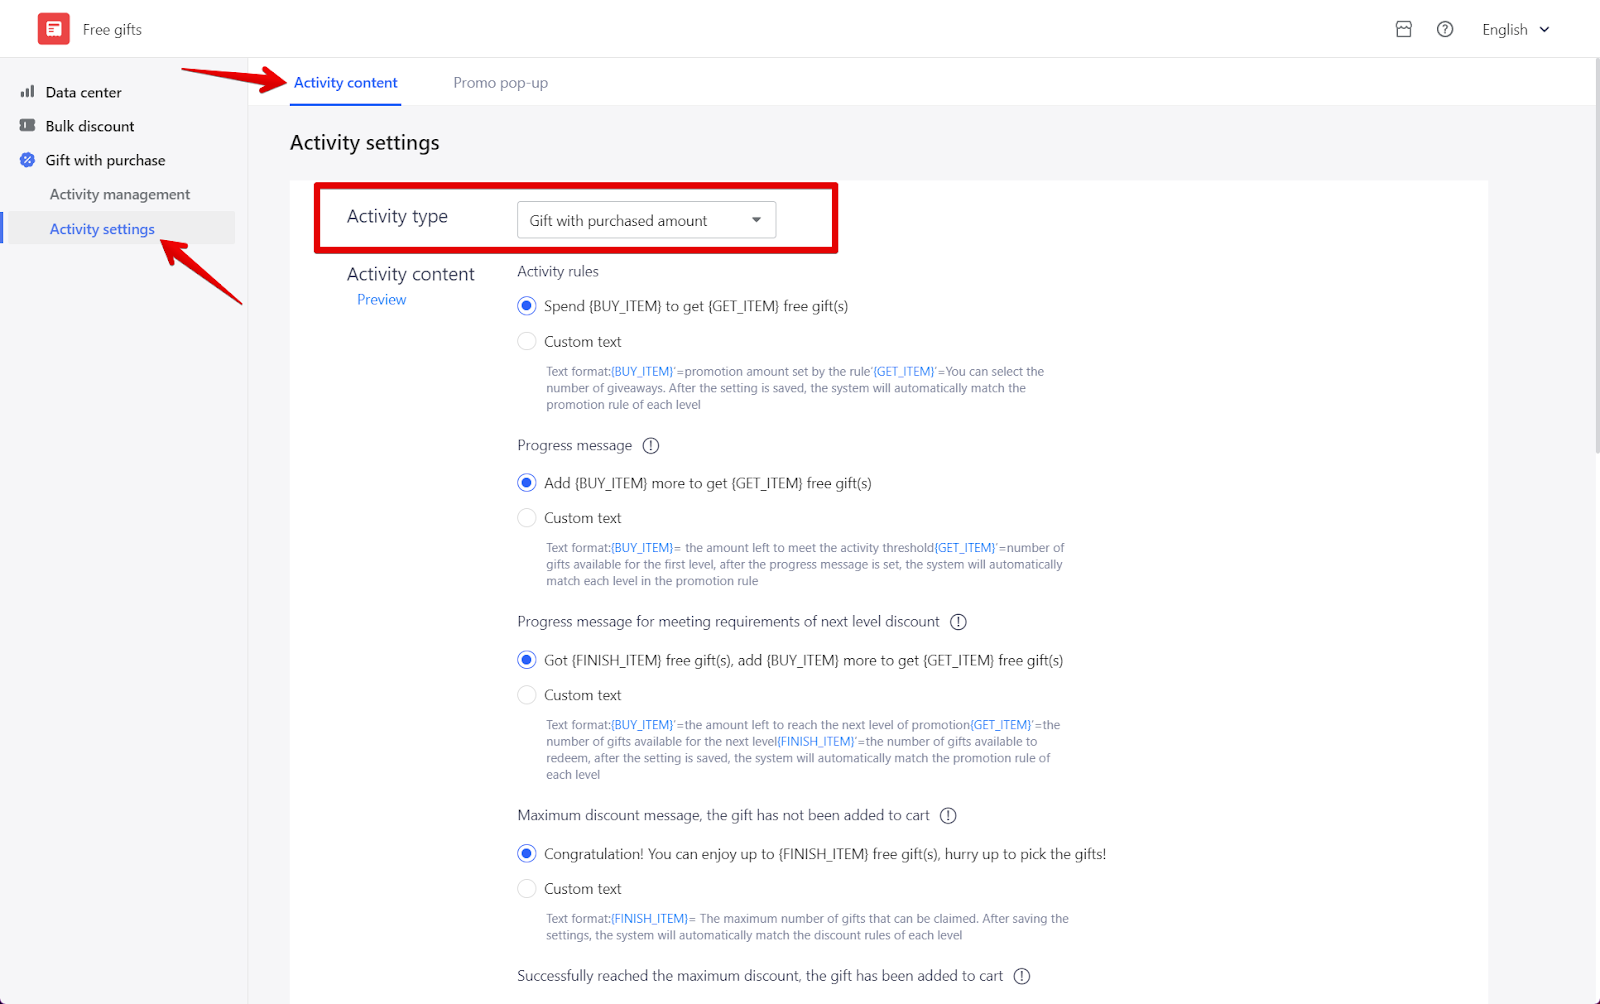
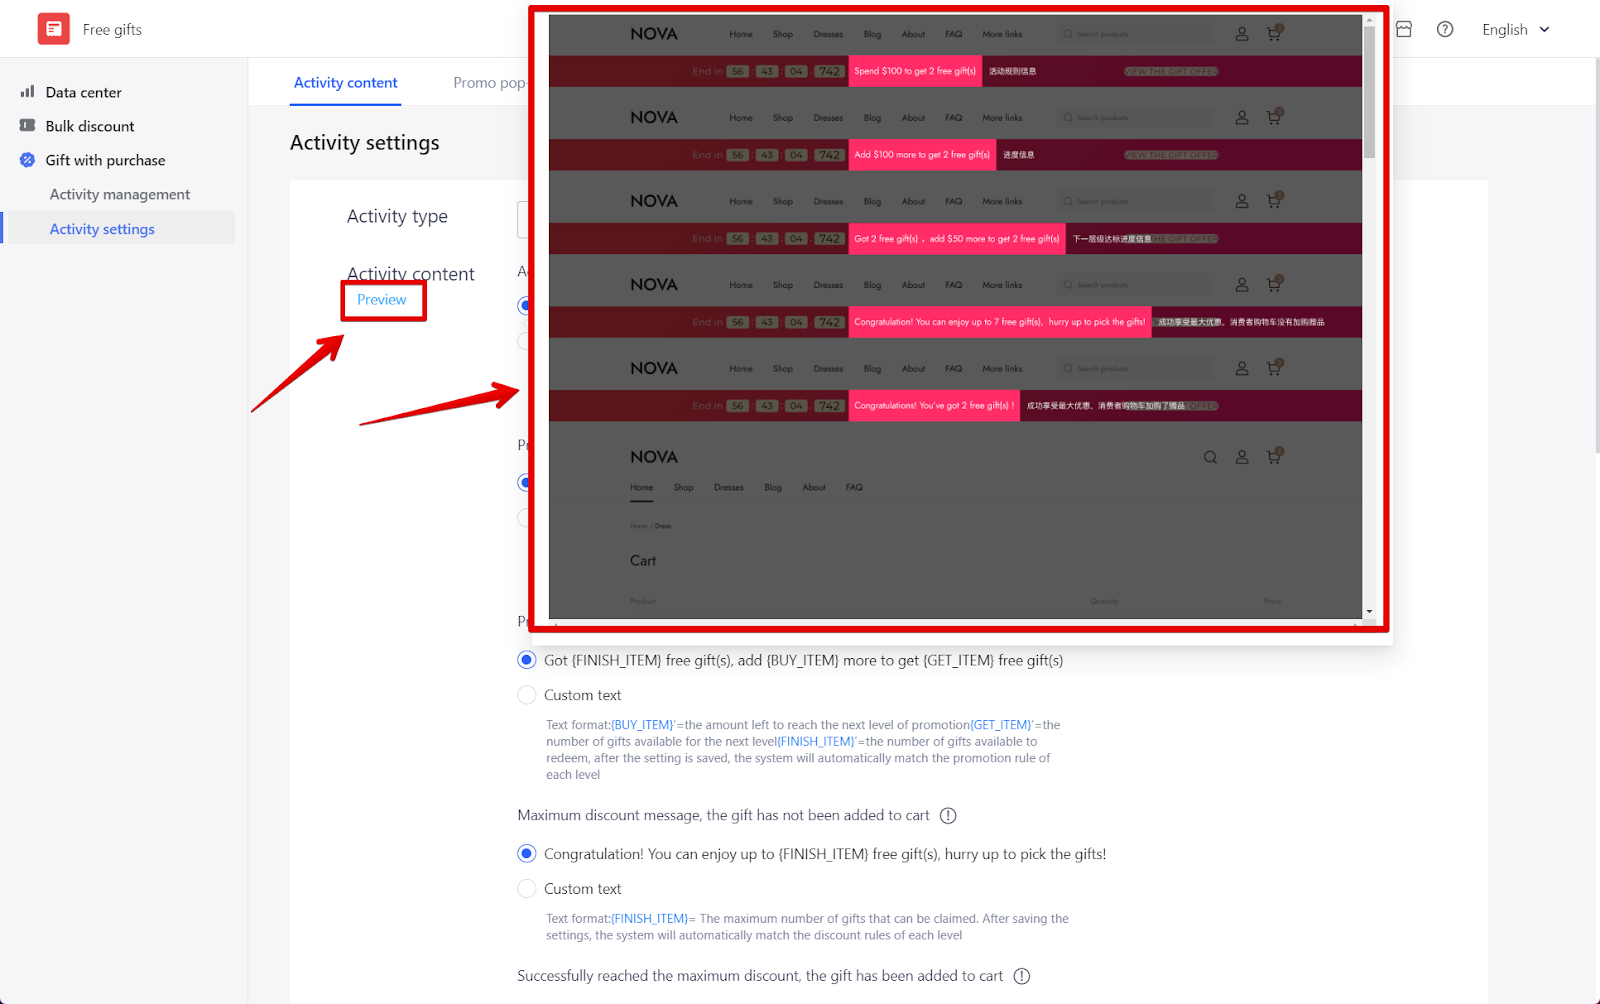
- Activity content: Choose to display either the default activity text or your own Custom text. You can also set up an option that allows customers to be directed to the activity page by clicking on the content.
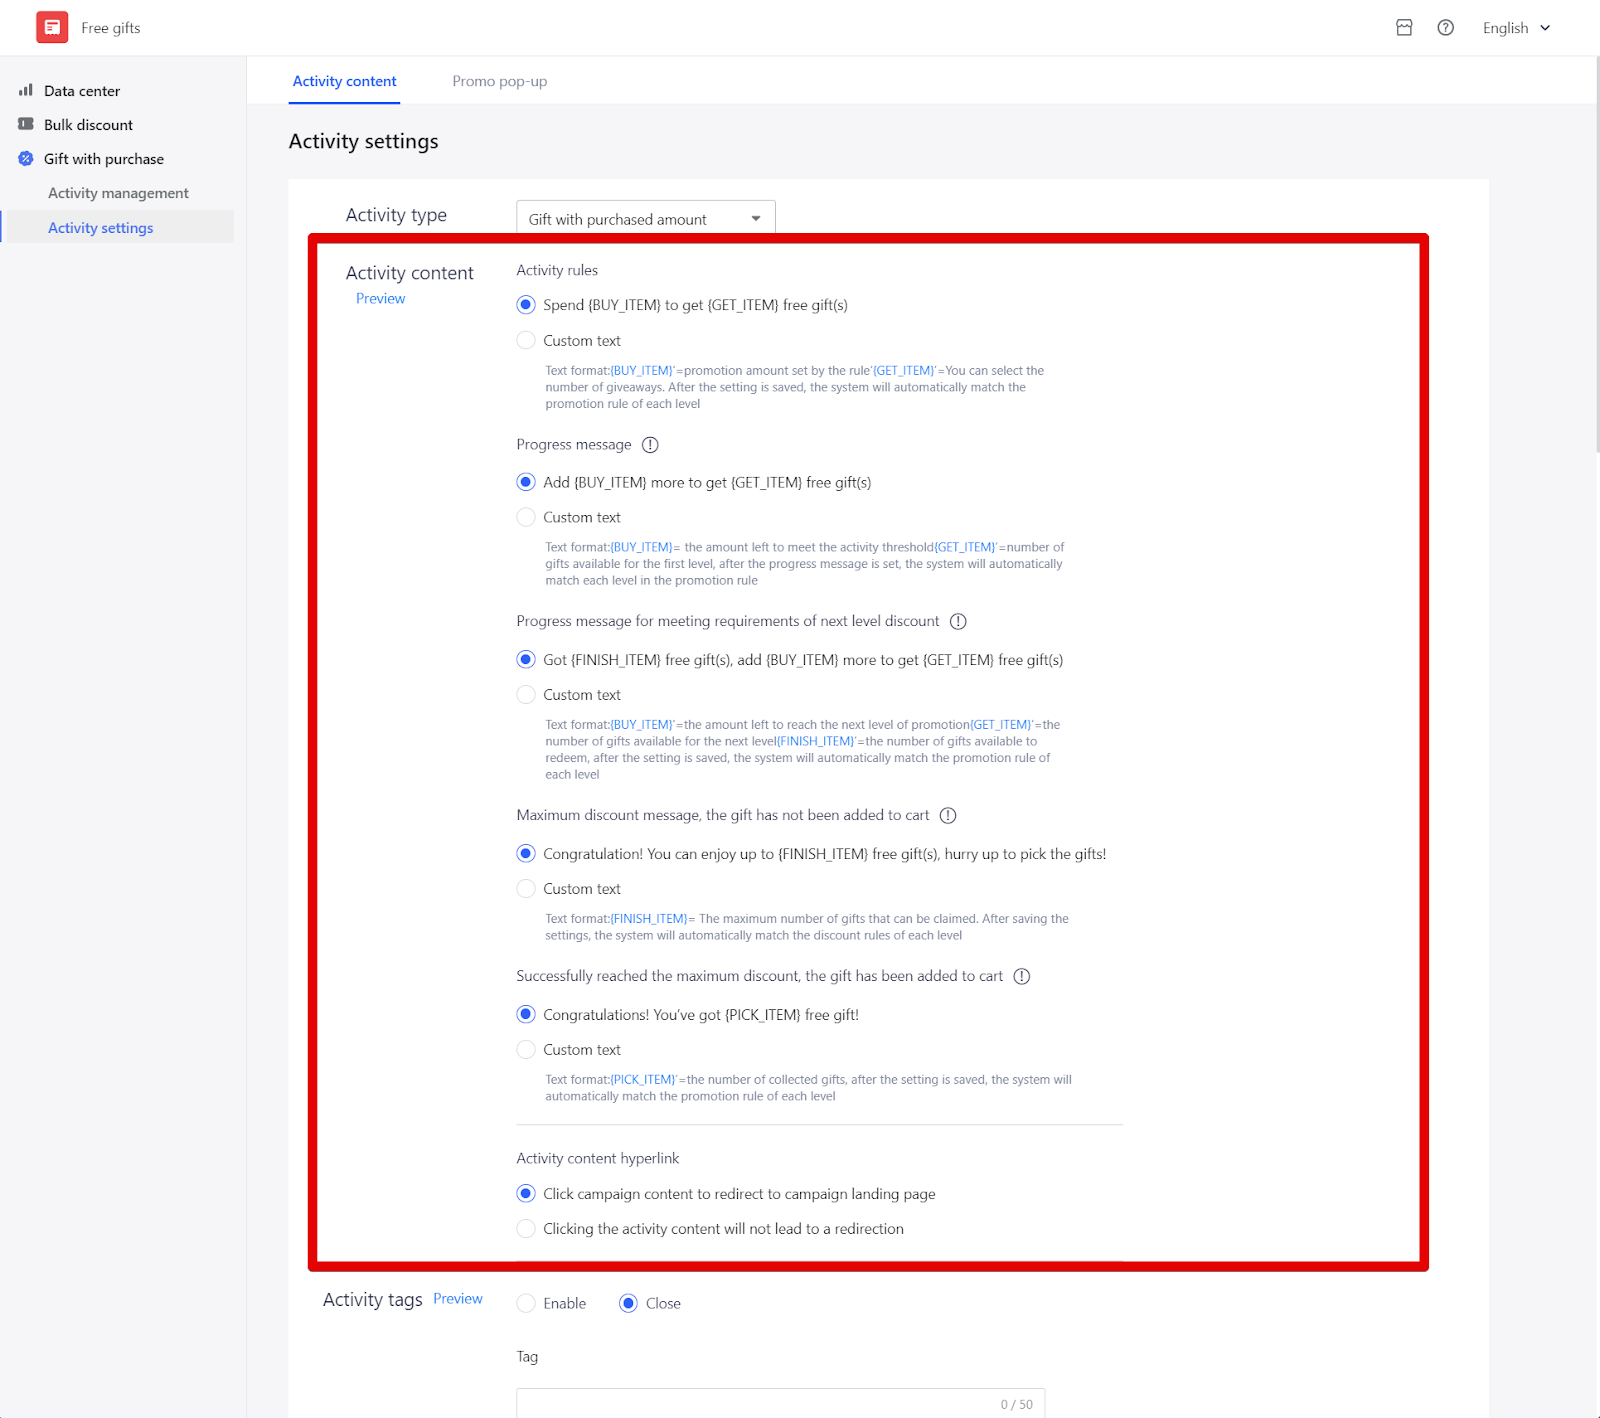
- Click on Preview to see how it will be displayed.
- Activity tags: You have the option to Enable or Disable (close) the display of activity tags. If you choose to enable it, you can edit the label text, but keep it within 50 characters.
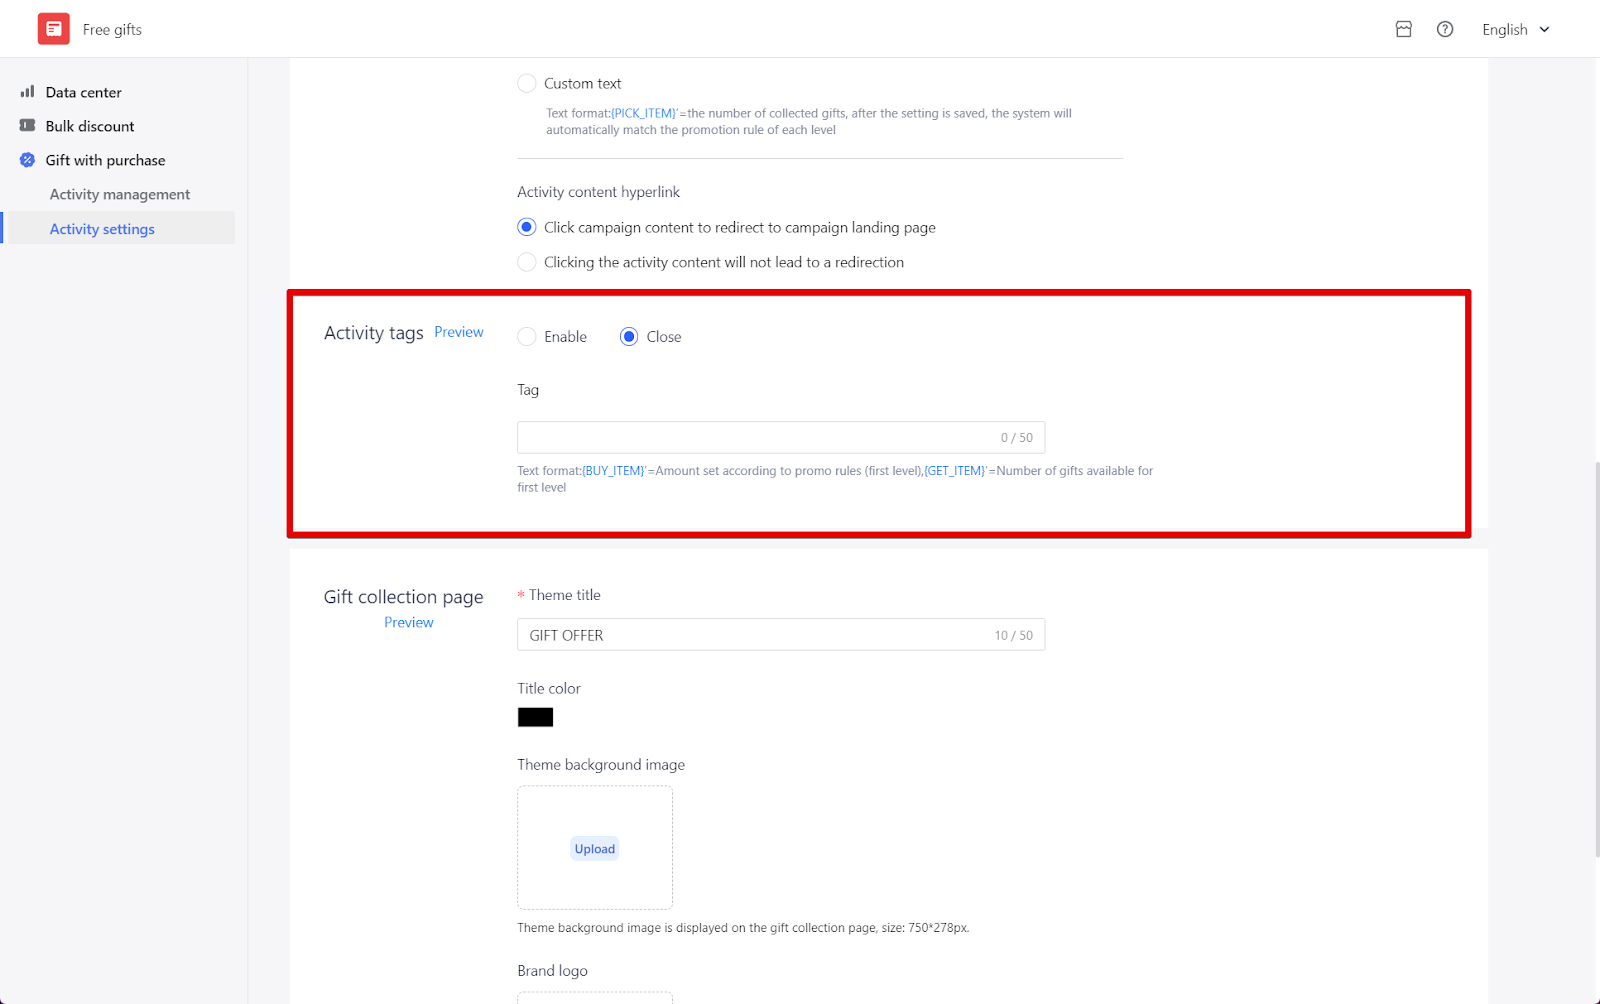
- Again, click Preview to see how it will appear.
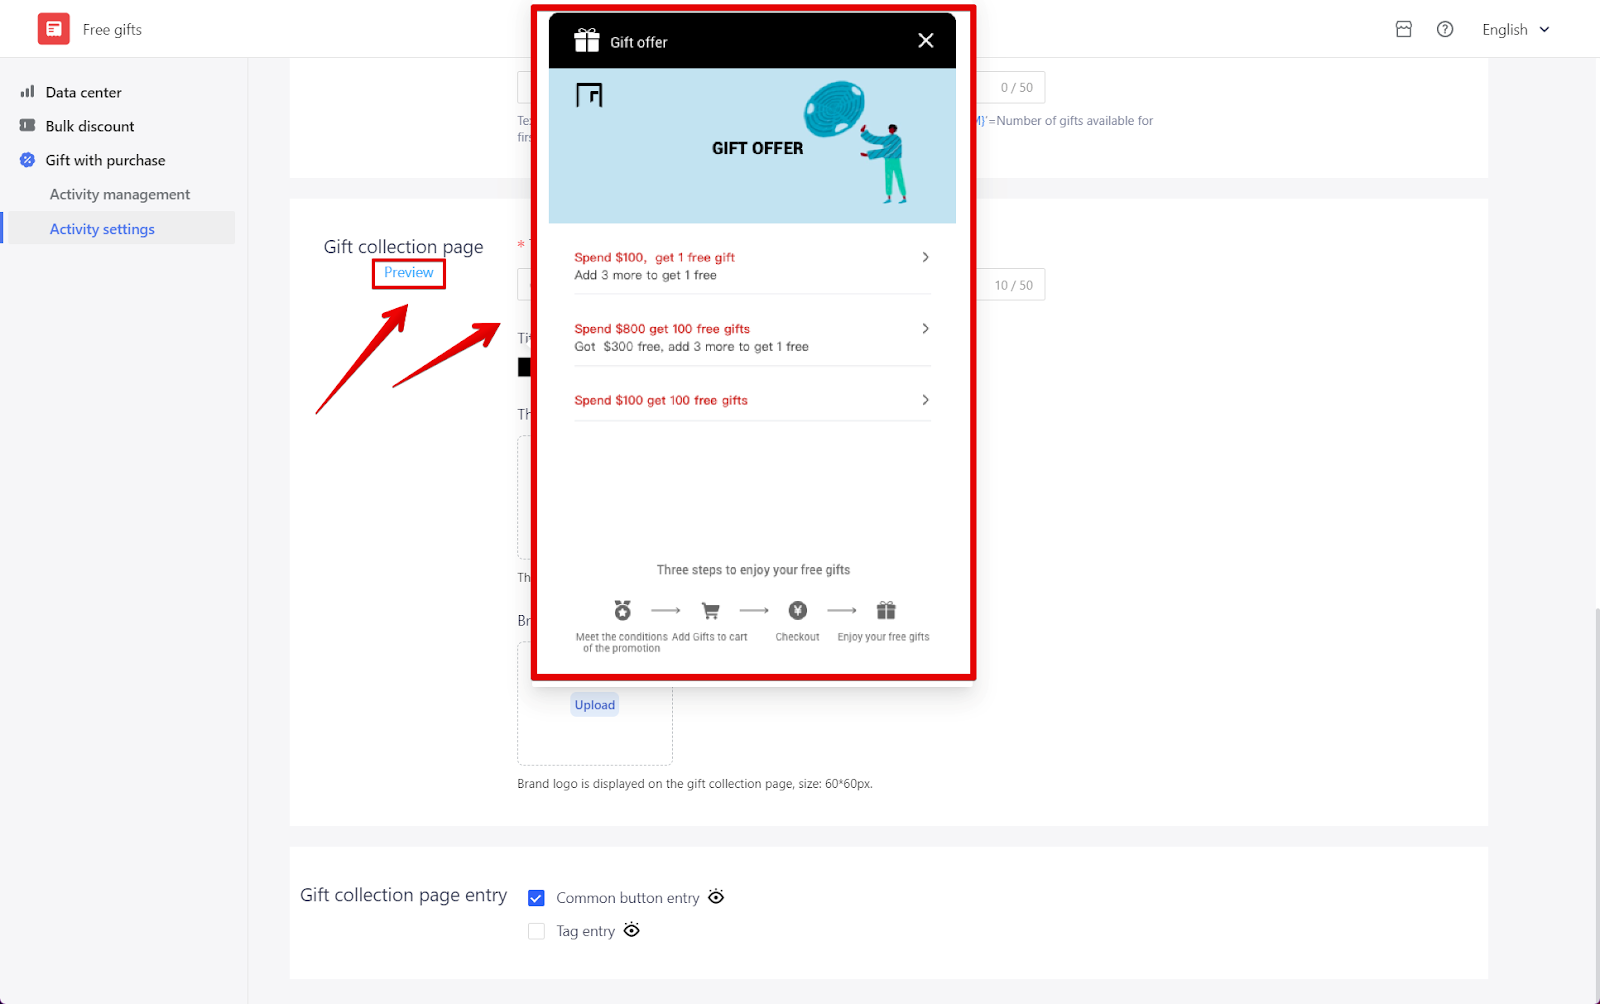
- Gift collection page: Enter the theme title and choose the title color. Upload the theme background image and brand logo from your desktop.
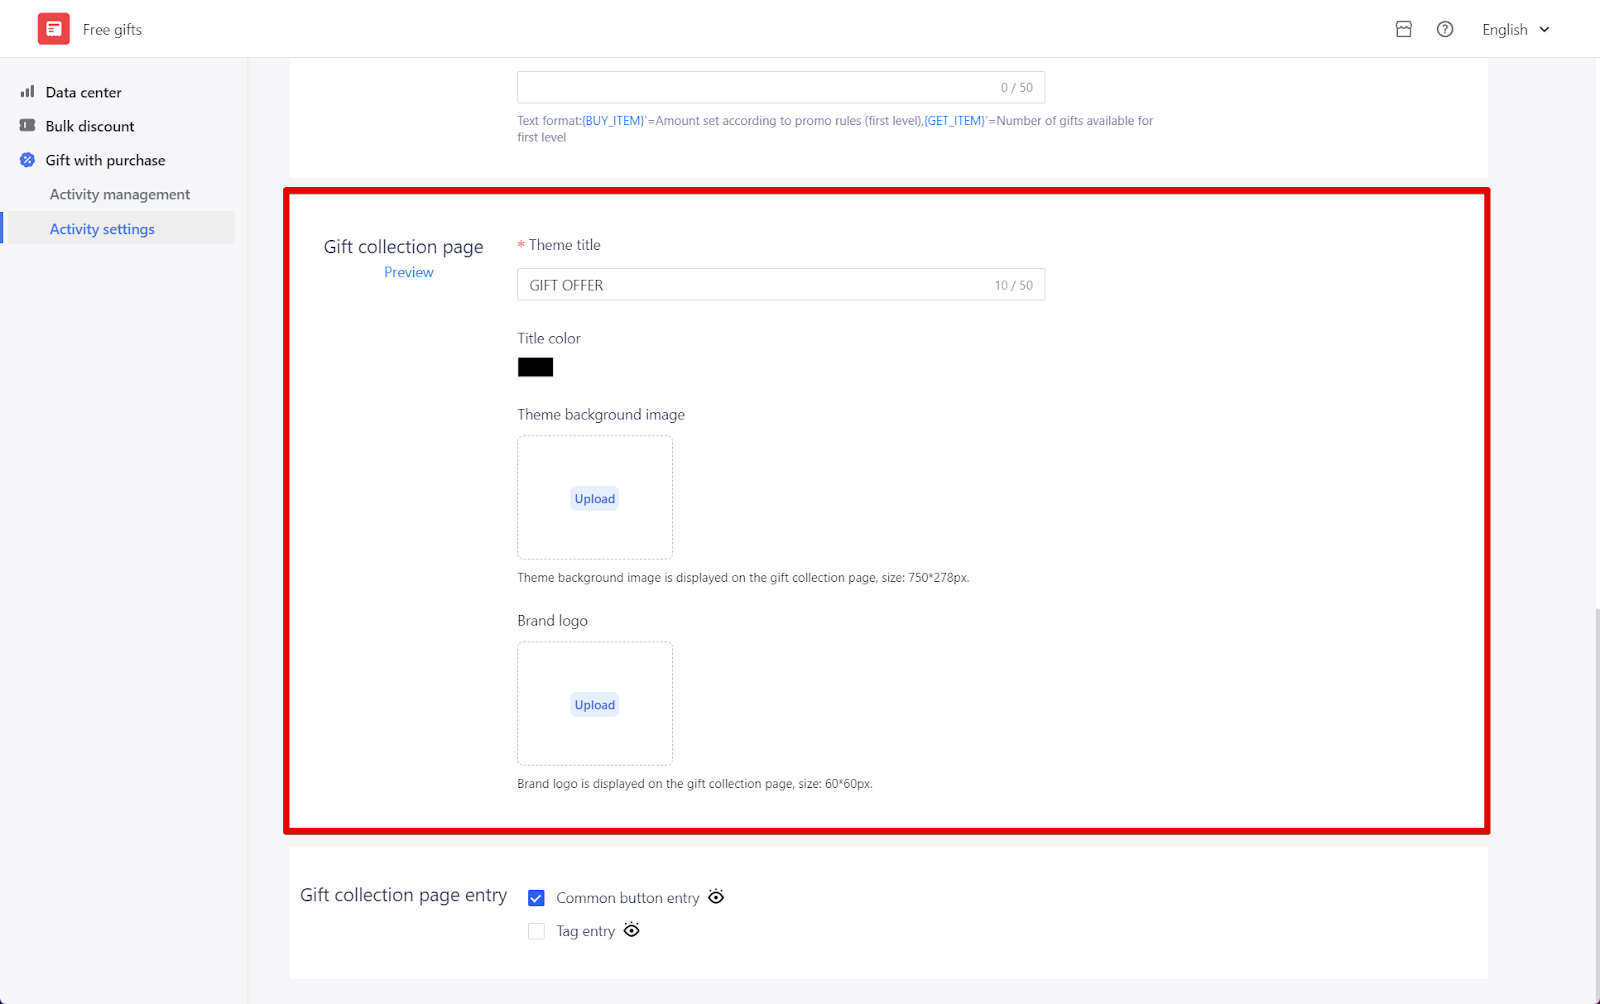
- Simply click on Preview to see how it will be displayed.
- Gift collection page entry: Select the type for your gift collection page entry.
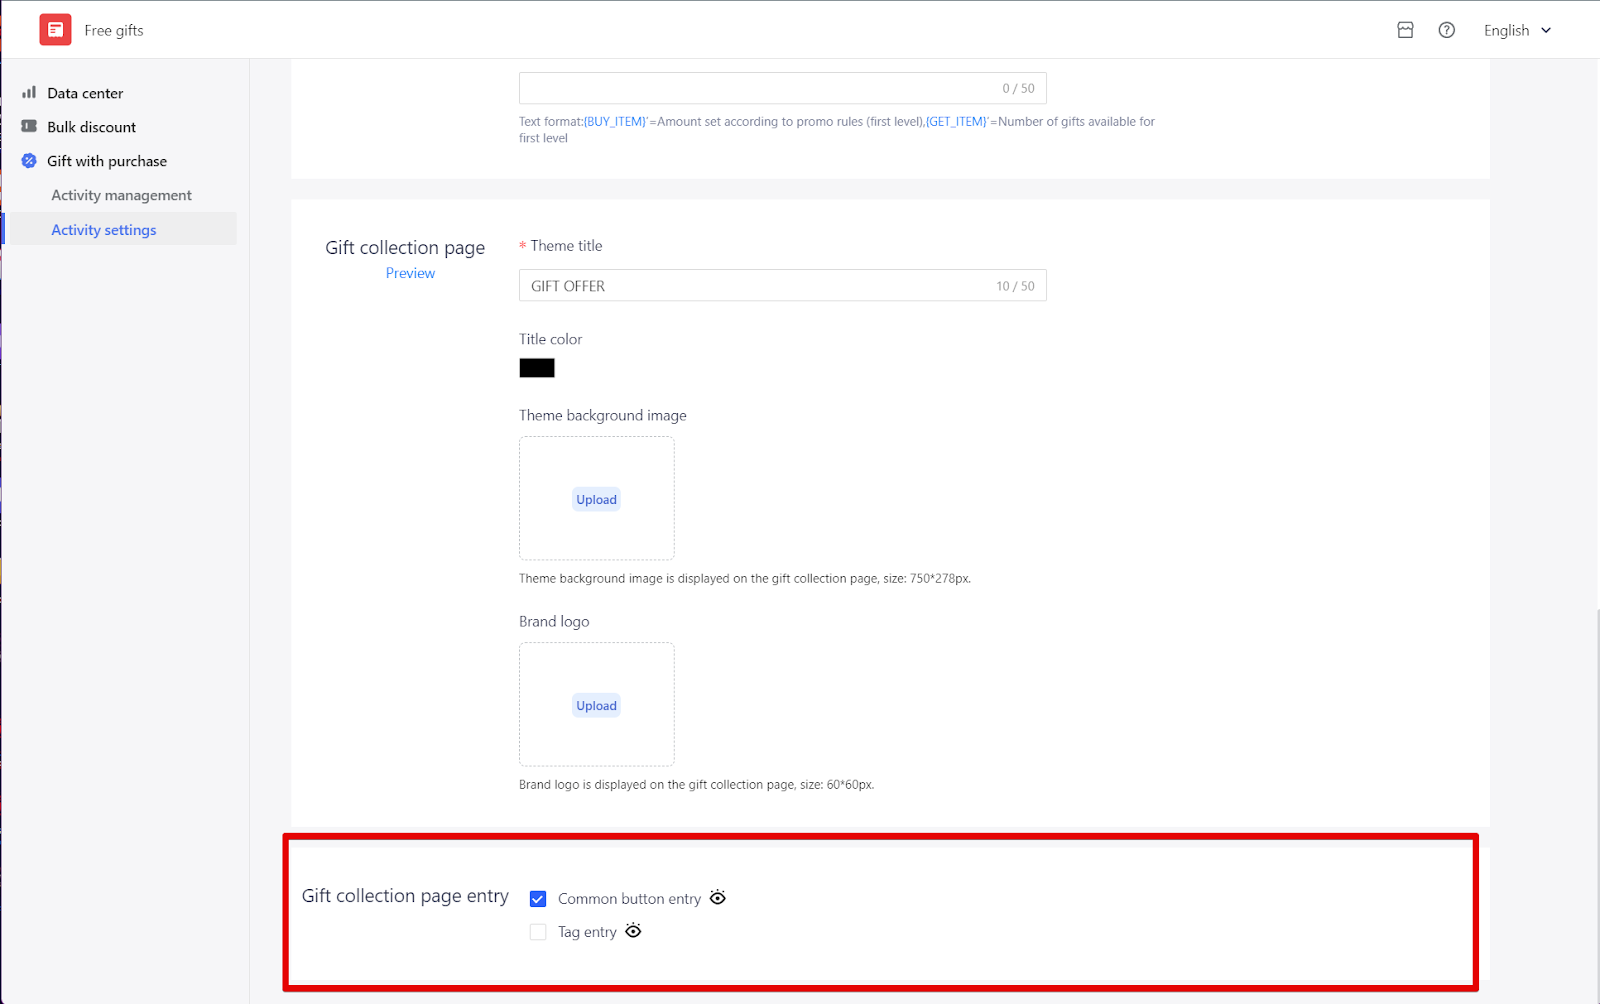
- Simply click on the Eye icon button to preview how it will be displayed.
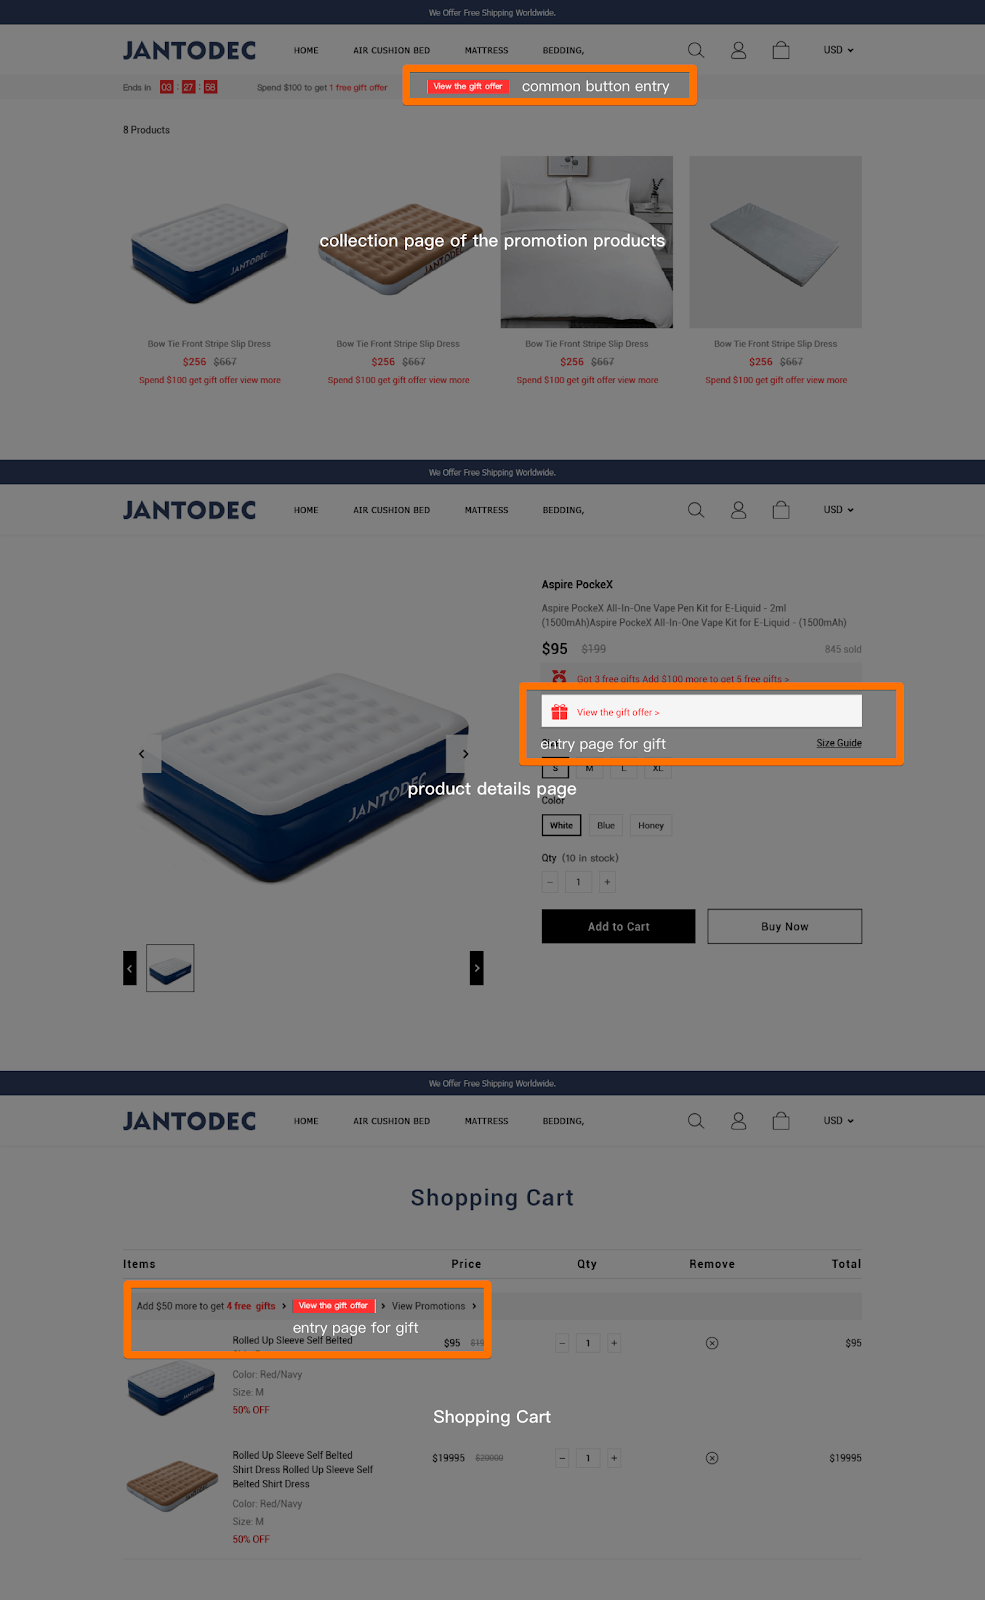
- Common button entry preview:
-
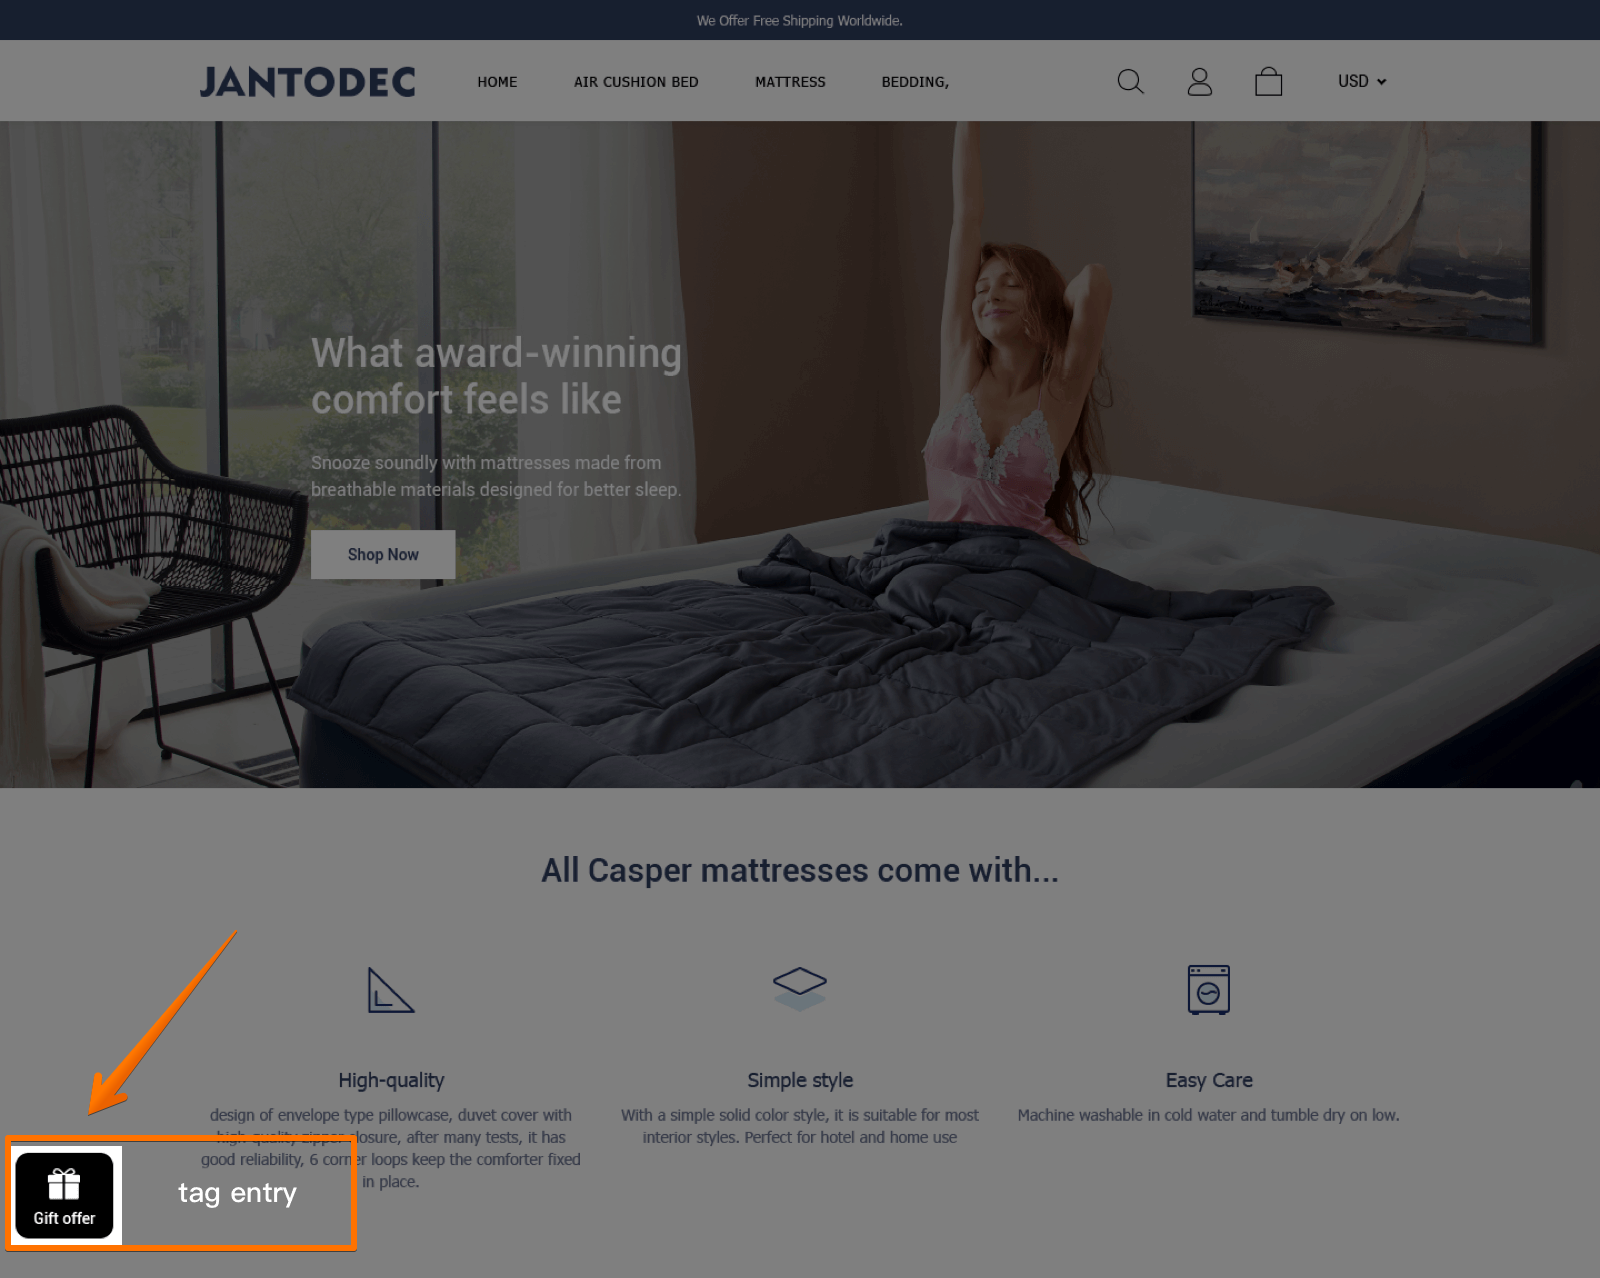
- Tag entry preview:
- Promo pop-up: Use the Status and Sort order filters to review your promotional pop-ups. Click on the "···" button for options to pause, edit, or preview the pop-up.

Note
- When the free gift is a single product and it is a specific item that is not eligible for any ongoing promotions, our system automatically adds the gift for you.
- If the free gift consists of multiple products, a pop-up window will appear during the checkout process, prompting your customers to add the gift to their order.
The Discount with Purchase app is a dynamic tool to enhance your online store's appeal and performance. By carefully setting up Bulk Discounts and Gift with Purchase activities, you can effectively drive sales while offering value to your customers. Remember, the key to successful activity management lies in understanding your customers' preferences and shopping behavior. Utilize the data insights provided by the app to tailor your promotions, ensuring they resonate well with your target audience.


Comments
Please sign in to leave a comment.