Product option

How do I customize product options?

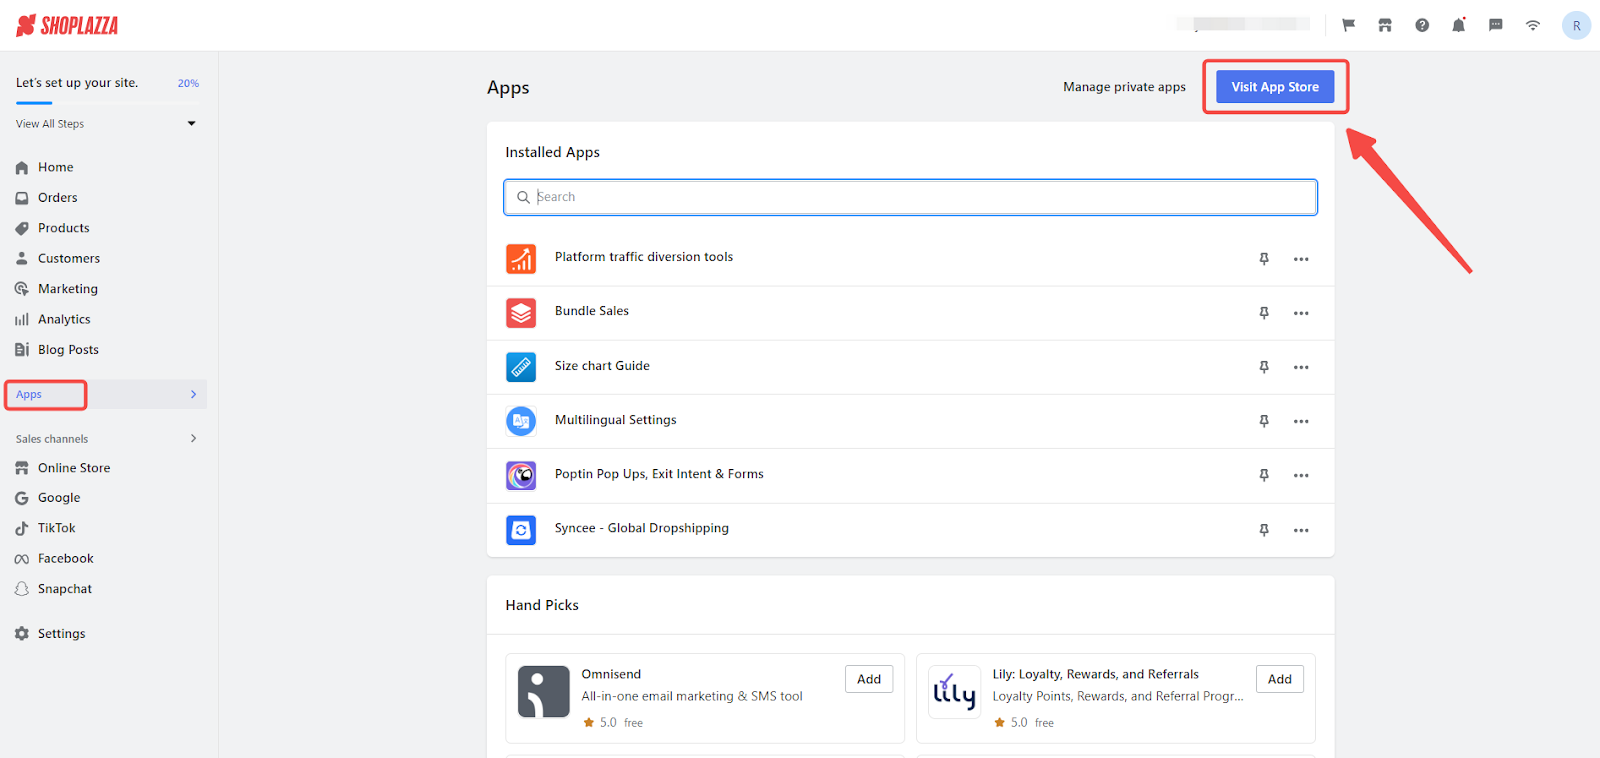
1. From your Shoplazza admin, go to Apps > Visit App store.

2. On the top of the page, click Categories > Merchandising > Product variations to find Product customizer. 

3. Click Add, check the Acknowledged box, then Confirm the installation of the app to your store.

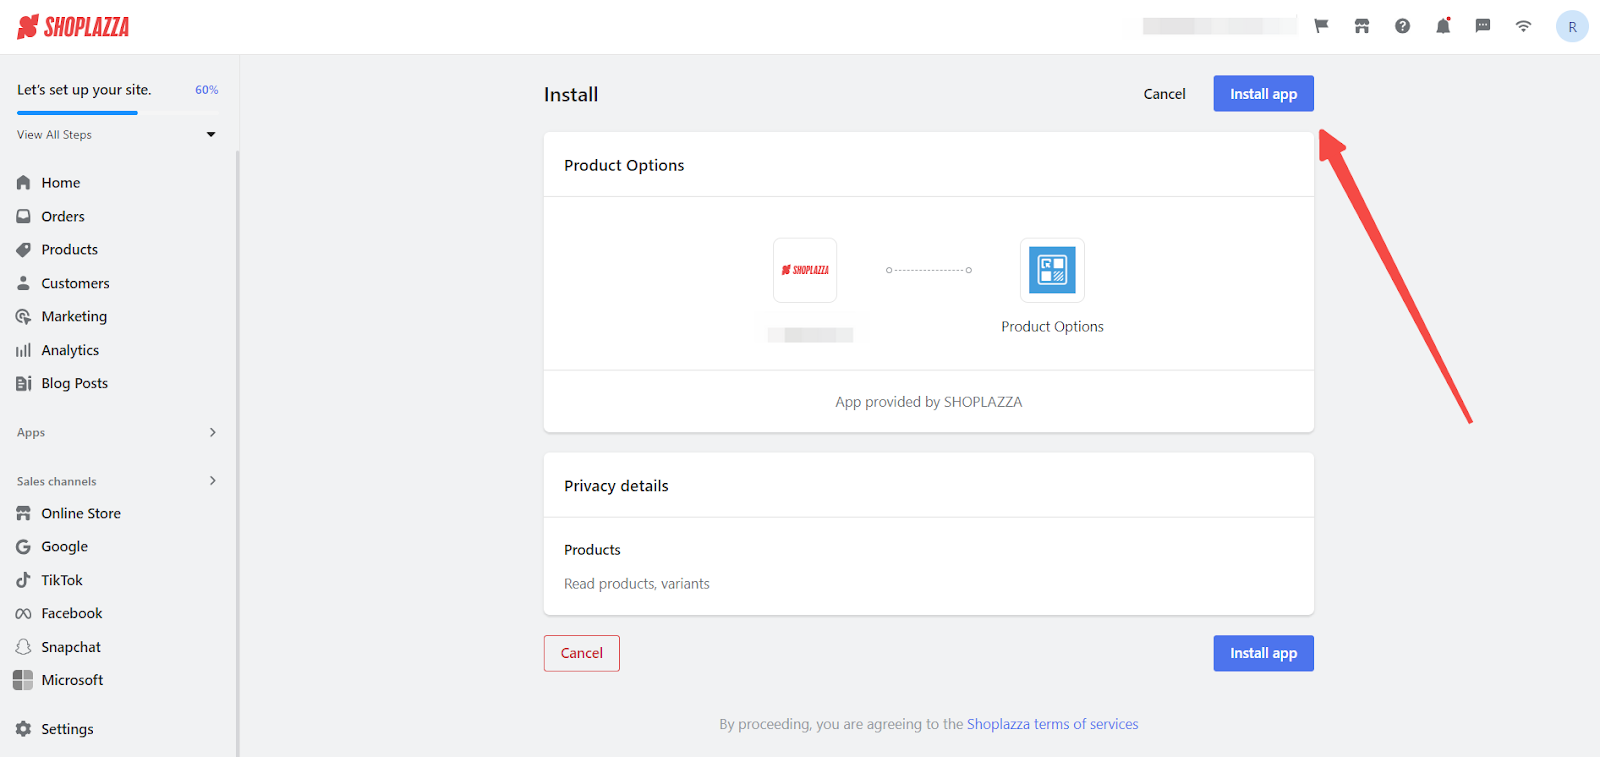
4. Once you go back to Shoplazza admin, click on Install app.

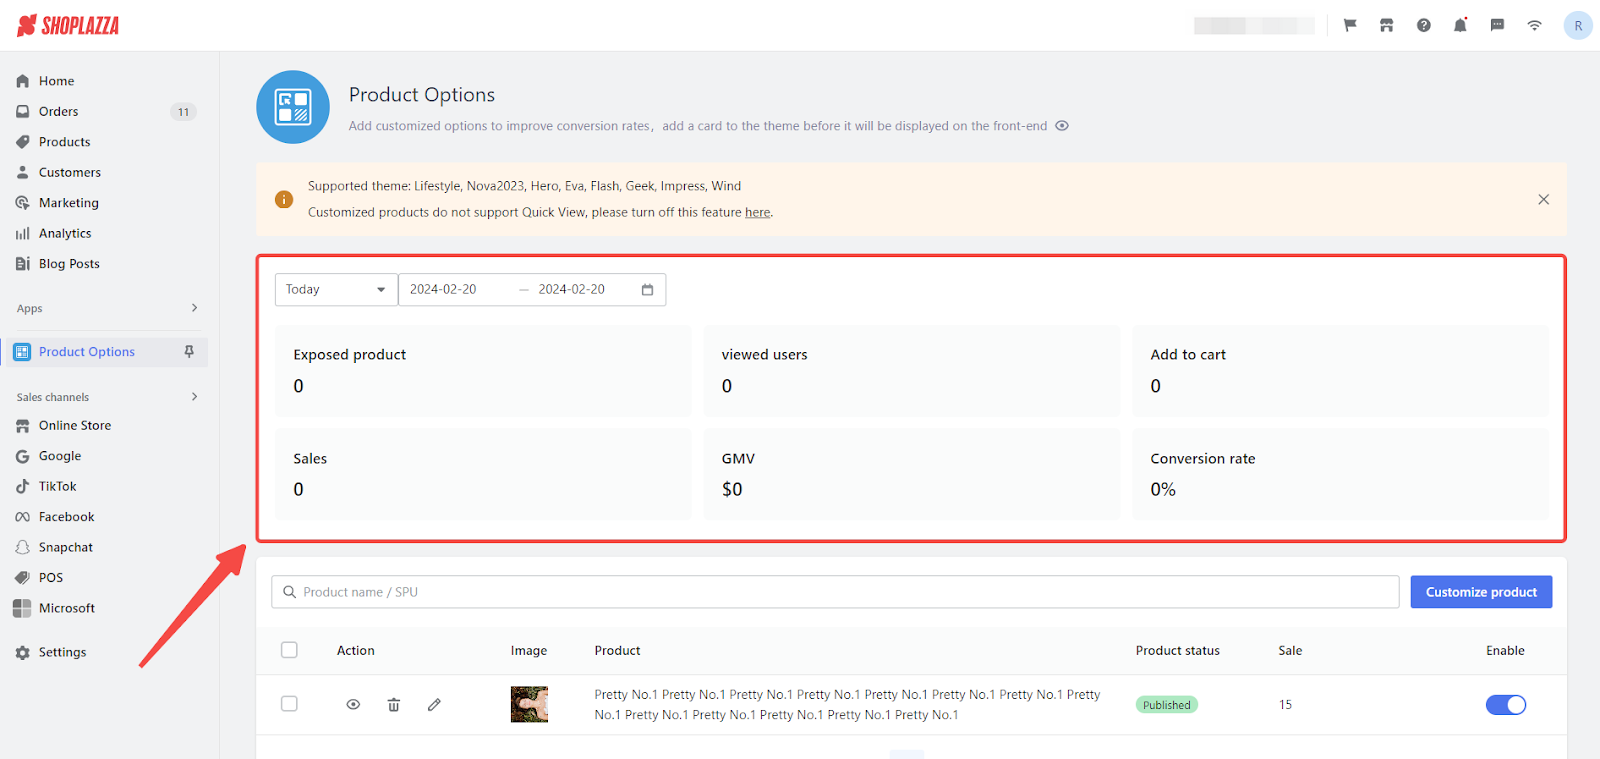
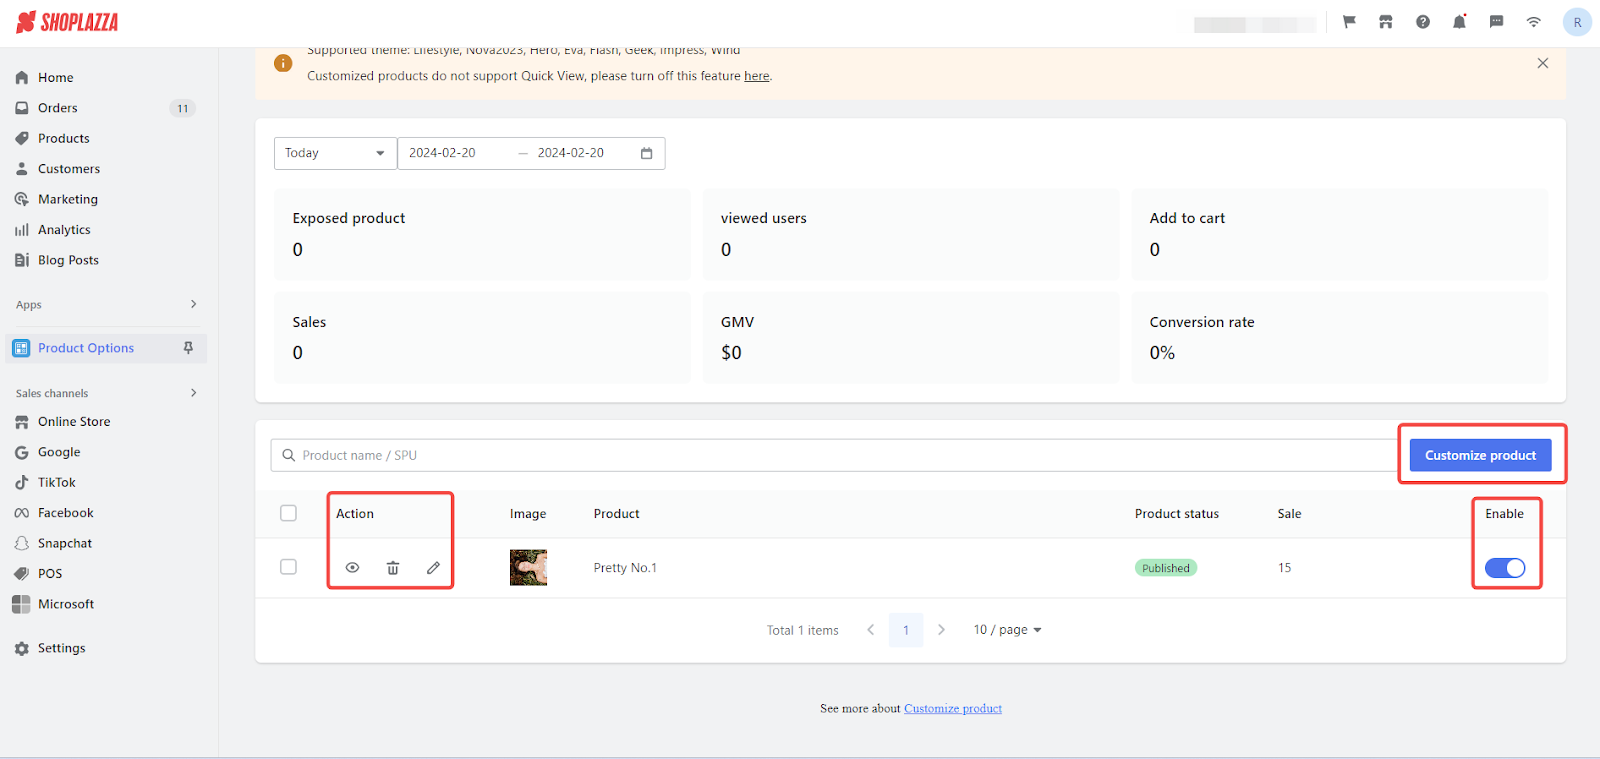
5. Click Customize product.

mceclip2.png

6. Select the products to be customized and click Confirm.

mceclip3.png

7. After clicking the Add option, select a type. Currently, the option types supported by the product customizer are swatch, dropdown, text, file upload, button and checkbox.

mceclip3.png

8. Add Swatch option. Fill in the Title in order and Title in the product page. Title in order will be displayed on the product page in the storefront.

mceclip5.png

  • Add swatch option by clicking the add image button.

mceclip6.png

  • After you choose to upload an image or pick a color, click Confirm.

mceclip7.png

9. Add a Dropdown option, Fill in the Title in order and Title in the product page. Title in order will be displayed on the product page in the storefront.

  • Fill in the option value (Bulk adding is supported, press ENTER to divide the values added in bulk)

mceclip0.png

  • Click Advanced Settings to enable displaying more than one dropdown box per row (ex. Color & Style).
  • Please note, all custom dropdown options must be set to the same # of Dropdown per line to display all dropdown in one line. 

mceclip8.png

10. Add Text option. Fill in the Title in order and Title in the product page. Title in order will be displayed on the product page in the storefront.

  • Fill in the default value, and the customer will enter the default text when they are shopping, or they can enter the text manually.

mceclip1.png

11. Add file upload option. Fill in the Title in order and Title in the product page. Title in order will be displayed on the product page in the storefront.

  • Once you enable the file upload option, customer can click the upload icon to upload the images. JPG and PNG format are supported.
  • By set up the Max file num, you can decide how many images can be uploaded.

mceclip2.png

12. Add button option. Fill in the Title in order and Title in the product page. Title in order will be displayed on the product page in the storefront.

  • Fill in the option value (Bulk adding is supported, press ENTER to divide the values added in bulk)

mceclip4.png

13. Add checkbox option. Fill in the Title in order and Title in the product page. Title in order will be displayed on the product page in the storefront.

  • Fill in the option value (Bulk adding is supported, press ENTER to divide the values added in bulk)

14. Click Save template to save the current configuration as a template.

mceclip9.png

15. Click Save to save the configuration.

mceclip10.png


How do I enable the product customizer on the product page?

1. From your Shoplazza admin, go to Online store > Themes.

2. Navigate to the right up corner of the page, and click on Customize.

mceclip11.png

3. Using the dropdown located in the theme editor header, switch the page type to the Default product page of the theme editor, add the Product Customizer block.

mceclip12.png

4. Once added, the Product Customizer block can be moved into the desired location based on need.

mceclip13.png

5. By clicking Publish, customers can see the customization options in the storefront.

mceclip14.png


Why can't I see product custom option in my store's shopping cart?

If your store uses Nova 2022, Eva, Hero, Boost themes and cannot be upgraded to the latest version, then you can deal with the following solutions.

If you are using Nova 2022 theme

  • Insert code snippets at theme/snippets/cart_items.liquid
<% var properties = $imports.JSON.parse(item.properties || "{}") %>

{% assign locales = '{"ar-SA": "ﻉﺮﺿ ﺎﻠﺻﻭﺭﺓ","de-DE": "Bild ansehen","en-US": "View image","es-ES": "Ver imagen","fr-FR": "Voir l' | append: "'" | append: 'image","id-ID": "Lihat gambar","it-IT": "Guarda l' | append: "'" | append: 'immagine","ja-JP": "画像を表示しま","ko-KR": "이미지를 봅니다","nl-NL": "Bekijk afbeelding","pl-PL": "Zobacz obrazek","pt-PT": "Ver imagem","ru-RU": "Просмотреть изображение","th-TH": "ดูภาพ","zh-CN": "查看图片","zh-TW": "查看圖片"}' | parse_json %}

// ...

<% for(var prop in properties){ %>

  <% if (prop[0] !== '_') { %>

    <p class="tw-m-0">

      <% if (/(\/\/.*\.(?:png|jpg|jpeg|gif|svg))/i.test(properties[prop])) { %>

        <%=prop%>/ <a class="tw-no-underline tw-text-black" href="<%=properties[prop]%>" target="_blank" >{{ locales[shop.locale] | default: locales["en-US"] }}</a>

      <% } else { %>

        <p class="tw-m-0"><%=prop%>/<%=properties[prop]%></p>

      <% } %>

    </p>

  <% } %>

<% } %>
  • Example

mceclip15.png

If you are using Eva theme

  • Insert code snippets at theme/snippets/cart_items.liquid
<% var properties = $imports.JSON.parse(item.properties || "{}") %>

{% assign locales = '{"ar-SA": "ﻉﺮﺿ ﺎﻠﺻﻭﺭﺓ","de-DE": "Bild ansehen","en-US": "View image","es-ES": "Ver imagen","fr-FR": "Voir l' | append: "'" | append: 'image","id-ID": "Lihat gambar","it-IT": "Guarda l' | append: "'" | append: 'immagine","ja-JP": "画像を表示しま","ko-KR": "이미지를 봅니다","nl-NL": "Bekijk afbeelding","pl-PL": "Zobacz obrazek","pt-PT": "Ver imagem","ru-RU": "Просмотреть изображение","th-TH": "ดูภาพ","zh-CN": "查看图片","zh-TW": "查看圖片"}' | parse_json %}

<div class="tw-mb-5 empty:tw-hidden"><% for(var k = 0; k < item.options.length; k++){ %><div class="tw-mb-1.25 last:tw-mb-0 tw-pr-4 two_line_text_truncate "><span class="tw-font-bold"><%=item.options[k].name%>:</span> <%=item.options[k].value%></div><% } %>

  <% for(var prop in properties){ %>

    <% if (prop[0] !== '_') { %>

      <% if (/(\/\/.*\.(?:png|jpg|jpeg|gif|svg))/i.test(properties[prop])) { %>

        <span class="tw-font-bold"><%=prop%>:</span> <a class="tw-no-underline tw-text-black" href="<%=properties[prop]%>" target="_blank" >{{ locales[shop.locale] | default: locales["en-US"] }}</a>

      <% } else { %>

        <p class="tw-break-normal tw-m-0"><span class="tw-font-bold"><%=prop%>:</span><%=properties[prop]%></p>

      <% } %>

    <% } %>

  <% } %>

</div>
  • Example

mceclip16.png

If you are using Hero theme

  • Insert code snippets at theme/snippets/cart_items.liquid
<% var properties = $imports.JSON.parse(item.properties || "{}") %>

{% assign locales = '{"ar-SA": "ﻉﺮﺿ ﺎﻠﺻﻭﺭﺓ","de-DE": "Bild ansehen","en-US": "View image","es-ES": "Ver imagen","fr-FR": "Voir l' | append: "'" | append: 'image","id-ID": "Lihat gambar","it-IT": "Guarda l' | append: "'" | append: 'immagine","ja-JP": "画像を表示しま","ko-KR": "이미지를 봅니다","nl-NL": "Bekijk afbeelding","pl-PL": "Zobacz obrazek","pt-PT": "Ver imagem","ru-RU": "Просмотреть изображение","th-TH": "ดูภาพ","zh-CN": "查看图片","zh-TW": "查看圖片"}' | parse_json %}

<div class="tw-mb-3 empty:tw-hidden tw-text-body-alpha-70"><% for(var k = 0; k < item.options.length; k++){ %><div class="cart__item-variant-info tw-mb-1.25 last:tw-mb-0 tw-text-light-text-color tw-pr-4 two_line_text_truncate "><span class="tw-font-bold"><%=item.options[k].name%>:</span> <%=item.options[k].value%></div><% } %>

  <% for(var prop in properties){ %>

    <% if (prop[0] !== '_') { %>

      <% if (/(\/\/.*\.(?:png|jpg|jpeg|gif|svg))/i.test(properties[prop])) { %>

        <span class="tw-font-bold"><%=prop%>:</span> <a class="tw-no-underline tw-text-black" href="<%=properties[prop]%>" target="_blank" >{{ locales[shop.locale] | default: locales["en-US"] }}</a>

      <% } else { %>

        <p class="tw-break-normal tw-m-0"><span class="tw-font-bold"><%=prop%>:</span><%=properties[prop]%></p>

      <% } %>

    <% } %>

  <% } %>

</div>
  • Example

mceclip17.png

If you are using Boost theme

1、 Replace the code snippet in theme/sections/cart.liquid

<% var properties = $imports.JSON.parse(item.properties || "{}") %>

{% assign locales = '{"ar-SA": "ﻉﺮﺿ ﺎﻠﺻﻭﺭﺓ","de-DE": "Bild ansehen","en-US": "View image","es-ES": "Ver imagen","fr-FR": "Voir l' | append: "'" | append: 'image","id-ID": "Lihat gambar","it-IT": "Guarda l' | append: "'" | append: 'immagine","ja-JP": "画像を表示しま","ko-KR": "이미지를 봅니다","nl-NL": "Bekijk afbeelding","pl-PL": "Zobacz obrazek","pt-PT": "Ver imagem","ru-RU": "Просмотреть изображение","th-TH": "ดูภาพ","zh-CN": "查看图片","zh-TW": "查看圖片"}' | parse_json %}

<div class="tw-mb-[6px] lg:tw-mb-3 empty:tw-hidden tw-text-body-light-color tw-space-y-[2px]"><% for(var k = 0; k < item.options.length; k++){ %><div class="tw-mb-1.25 last:tw-mb-0 tw-text-light-text-color tw-text-base lg:tw-text-sm tw-tracking-normal tw-pr-4 two_line_text_truncate"><%=item.options[k].name%>: <%=item.options[k].value%></div><% } %>

  <% for(var prop in properties){ %>

    <% if (prop[0] !== '_') { %>

      <p class="tw-m-0">

        <% if (/(\/\/.*\.(?:png|jpg|jpeg|gif|svg))/i.test(properties[prop])) { %>

          <%=prop%>: <a class="lg:tw-text-sm tw-text-body-light-color tw-text-base tw-no-underline" href="<%=properties[prop]%>" target="_blank" >{{ locales[shop.locale] | default: locales["en-US"] }}</a>

        <% } else { %>

          <p class="lg:tw-text-sm tw-text-light-text-color tw-text-base"><%=prop%>:<%=properties[prop]%></p>

        <% } %>

      </p>

    <% } %>

  <% } %>

</div>
  • Example

mceclip18.png

2、 Insert code snippet at theme/snippets/cart_product_items.liquid

{% assign locales = '{"ar-SA": "ﻉﺮﺿ ﺎﻠﺻﻭﺭﺓ","de-DE": "Bild ansehen","en-US": "View image","es-ES": "Ver imagen","fr-FR": "Voir l' | append: "'" | append: 'image","id-ID": "Lihat gambar","it-IT": "Guarda l' | append: "'" | append: 'immagine","ja-JP": "画像を表示しま","ko-KR": "이미지를 봅니다","nl-NL": "Bekijk afbeelding","pl-PL": "Zobacz obrazek","pt-PT": "Ver imagem","ru-RU": "Просмотреть изображение","th-TH": "ดูภาพ","zh-CN": "查看图片","zh-TW": "查看圖片"}' | parse_json %}

// ...

<% for(var prop in properties){ %>

  <% if (prop[0] !== '_') { %>

    <p class="tw-m-0 tw-text-body-light-color">

      <% if (/(\/\/.*\.(?:png|jpg|jpeg|gif|svg))/i.test(properties[prop])) { %>

        <p class="tw-text-body-light-color tw-m-0"><%=prop%>: <a class="tw-text-body-light-color tw-no-underline" href="<%=properties[prop]%>" target="_blank" >{{ locales[shop.locale] | default: locales["en-US"] }}</a></p>

      <% } else { %>

        <p class="tw-text-body-light-color tw-m-0"><%=prop%>:<%=properties[prop]%></p>

      <% } %>

    </p>

  <% } %>

<% } %>
  • Example

mceclip19.png

If you cannot see the customized product options on the product page, or you cannot see the customized product options on the shopping cart page after the above operations, you can contact the customer support.

Was this article helpful?
0 out of 0 found this helpful

Comments

0 comments

Please sign in to leave a comment.