
Overview
The Google channel is an all-in-one Google integration tool provided by Shoplazza. It enables merchants to configure the entire workflow for Google Merchant Center (GMC) product synchronization, Google Analytics (GA4) data tracking, and Google Ads conversion tracking directly from the Shoplazza admin, without having to manage multiple platforms manually.
Key Features:
- One-Click Authorization: Connect GMC, GA4, and Google Ads through a single Google OAuth authorization.
- Product Synchronization: Sync products from your Shoplazza store to GMC, with support for multiple markets, languages, and currencies.
- Product Attribute Enhancement: Automatically detect missing product attributes and guide merchants to complete required fields such as brand, GTIN, and product category to improve GMC approval rates.
- Data Tracking: Automatically inject GA4 tracking tags and Google Ads conversion tracking code into store pages without requiring manual code modifications.
Getting Started
Step 1: Authorize Your Google Account
When accessing the Google channel for the first time, you need to sign in with your Google account and authorize Shoplazza to access GMC, GA4, and Google Ads.
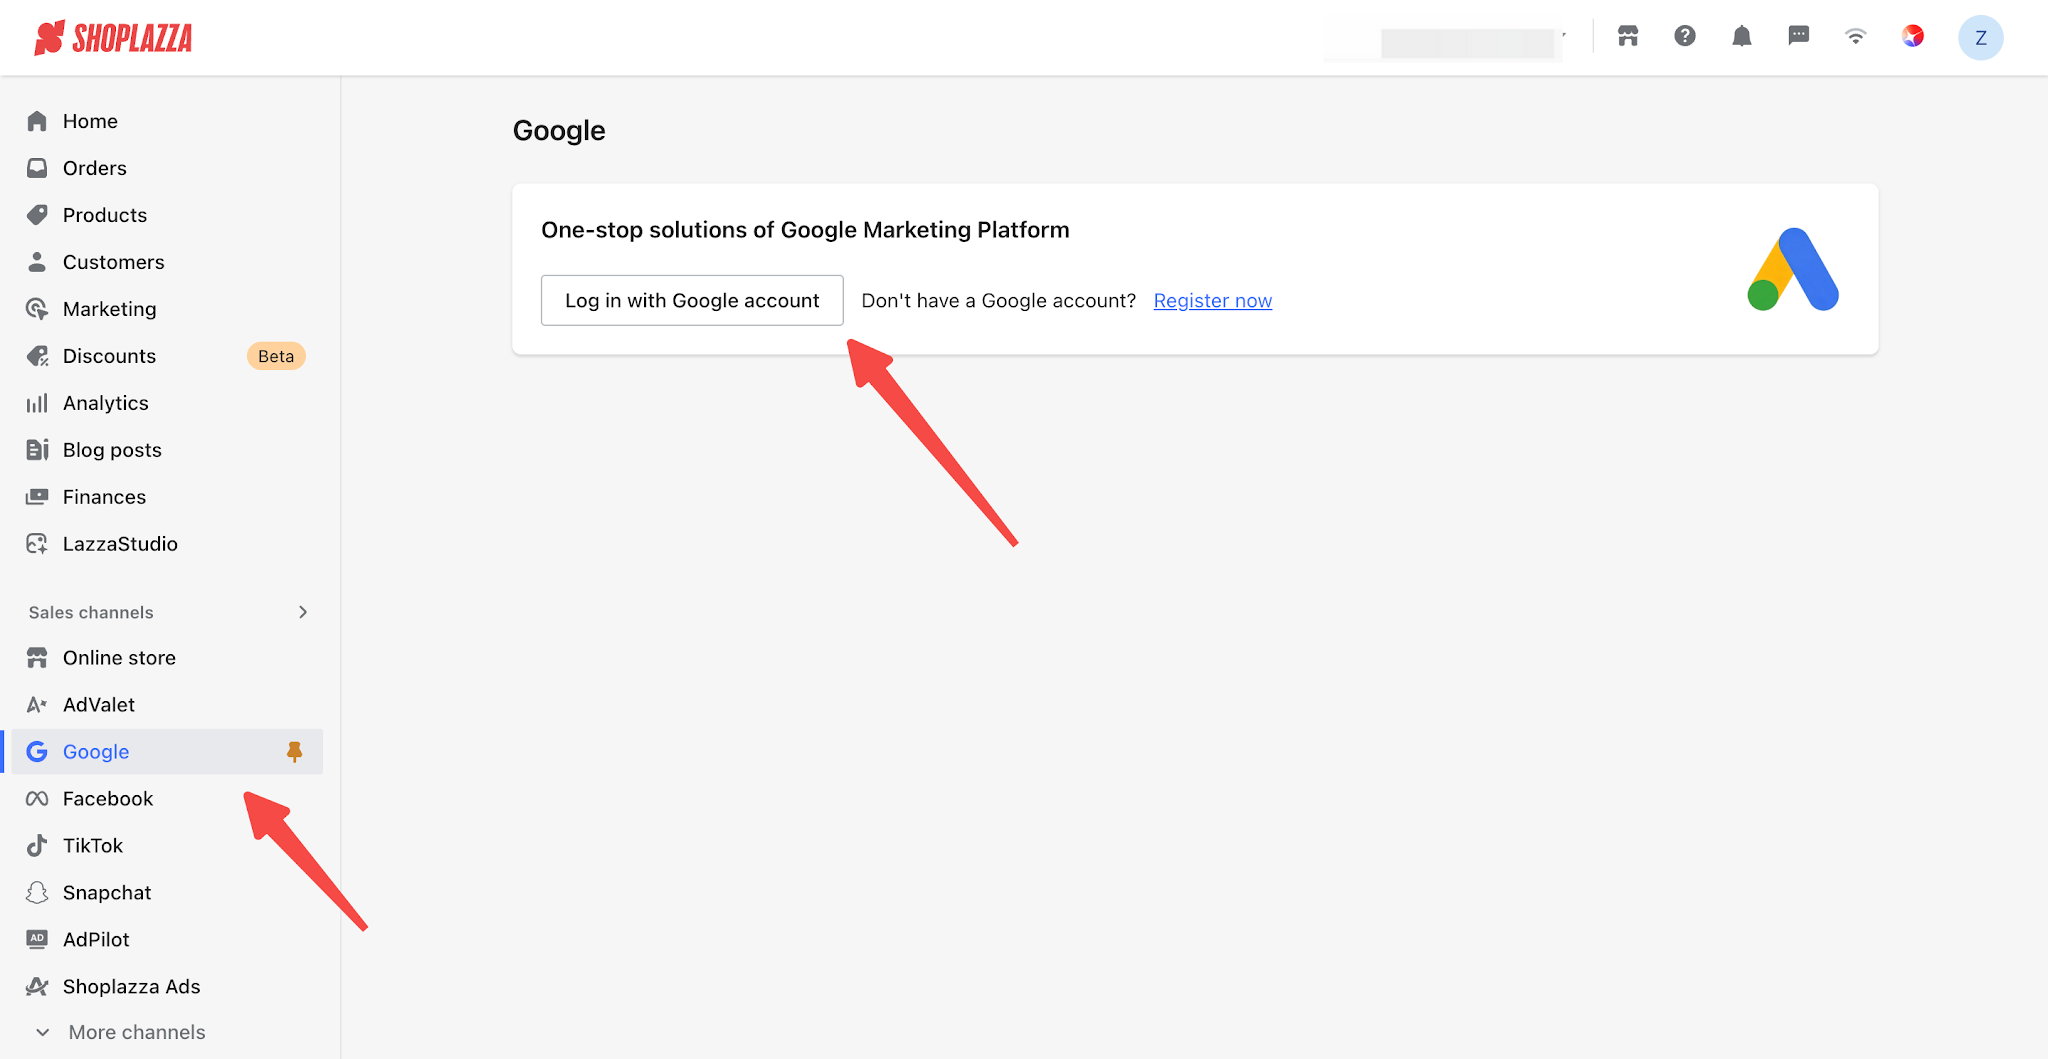
1. In the left-hand navigation menu of your Shoplazza admin, click Google to access the Google channel.
2. On the authorization page, click Sign in with Google to be redirected to the Google authorization page.
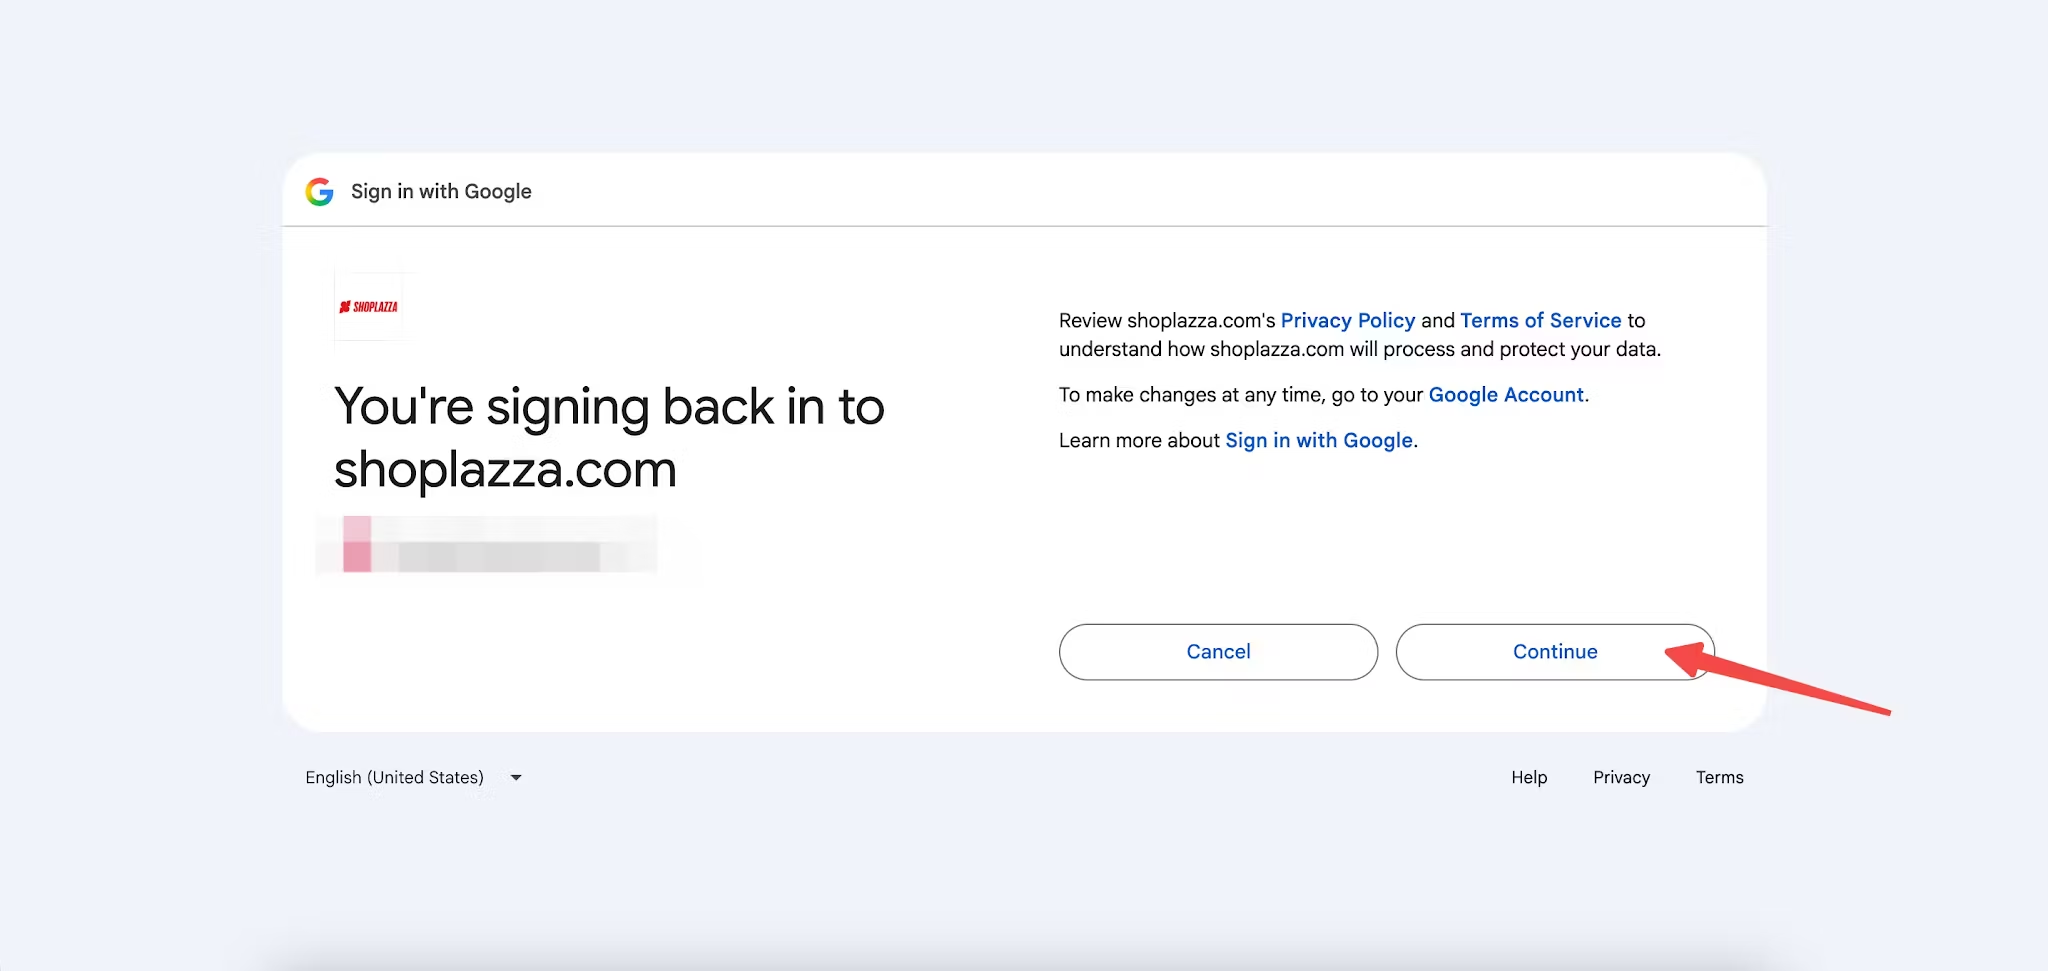
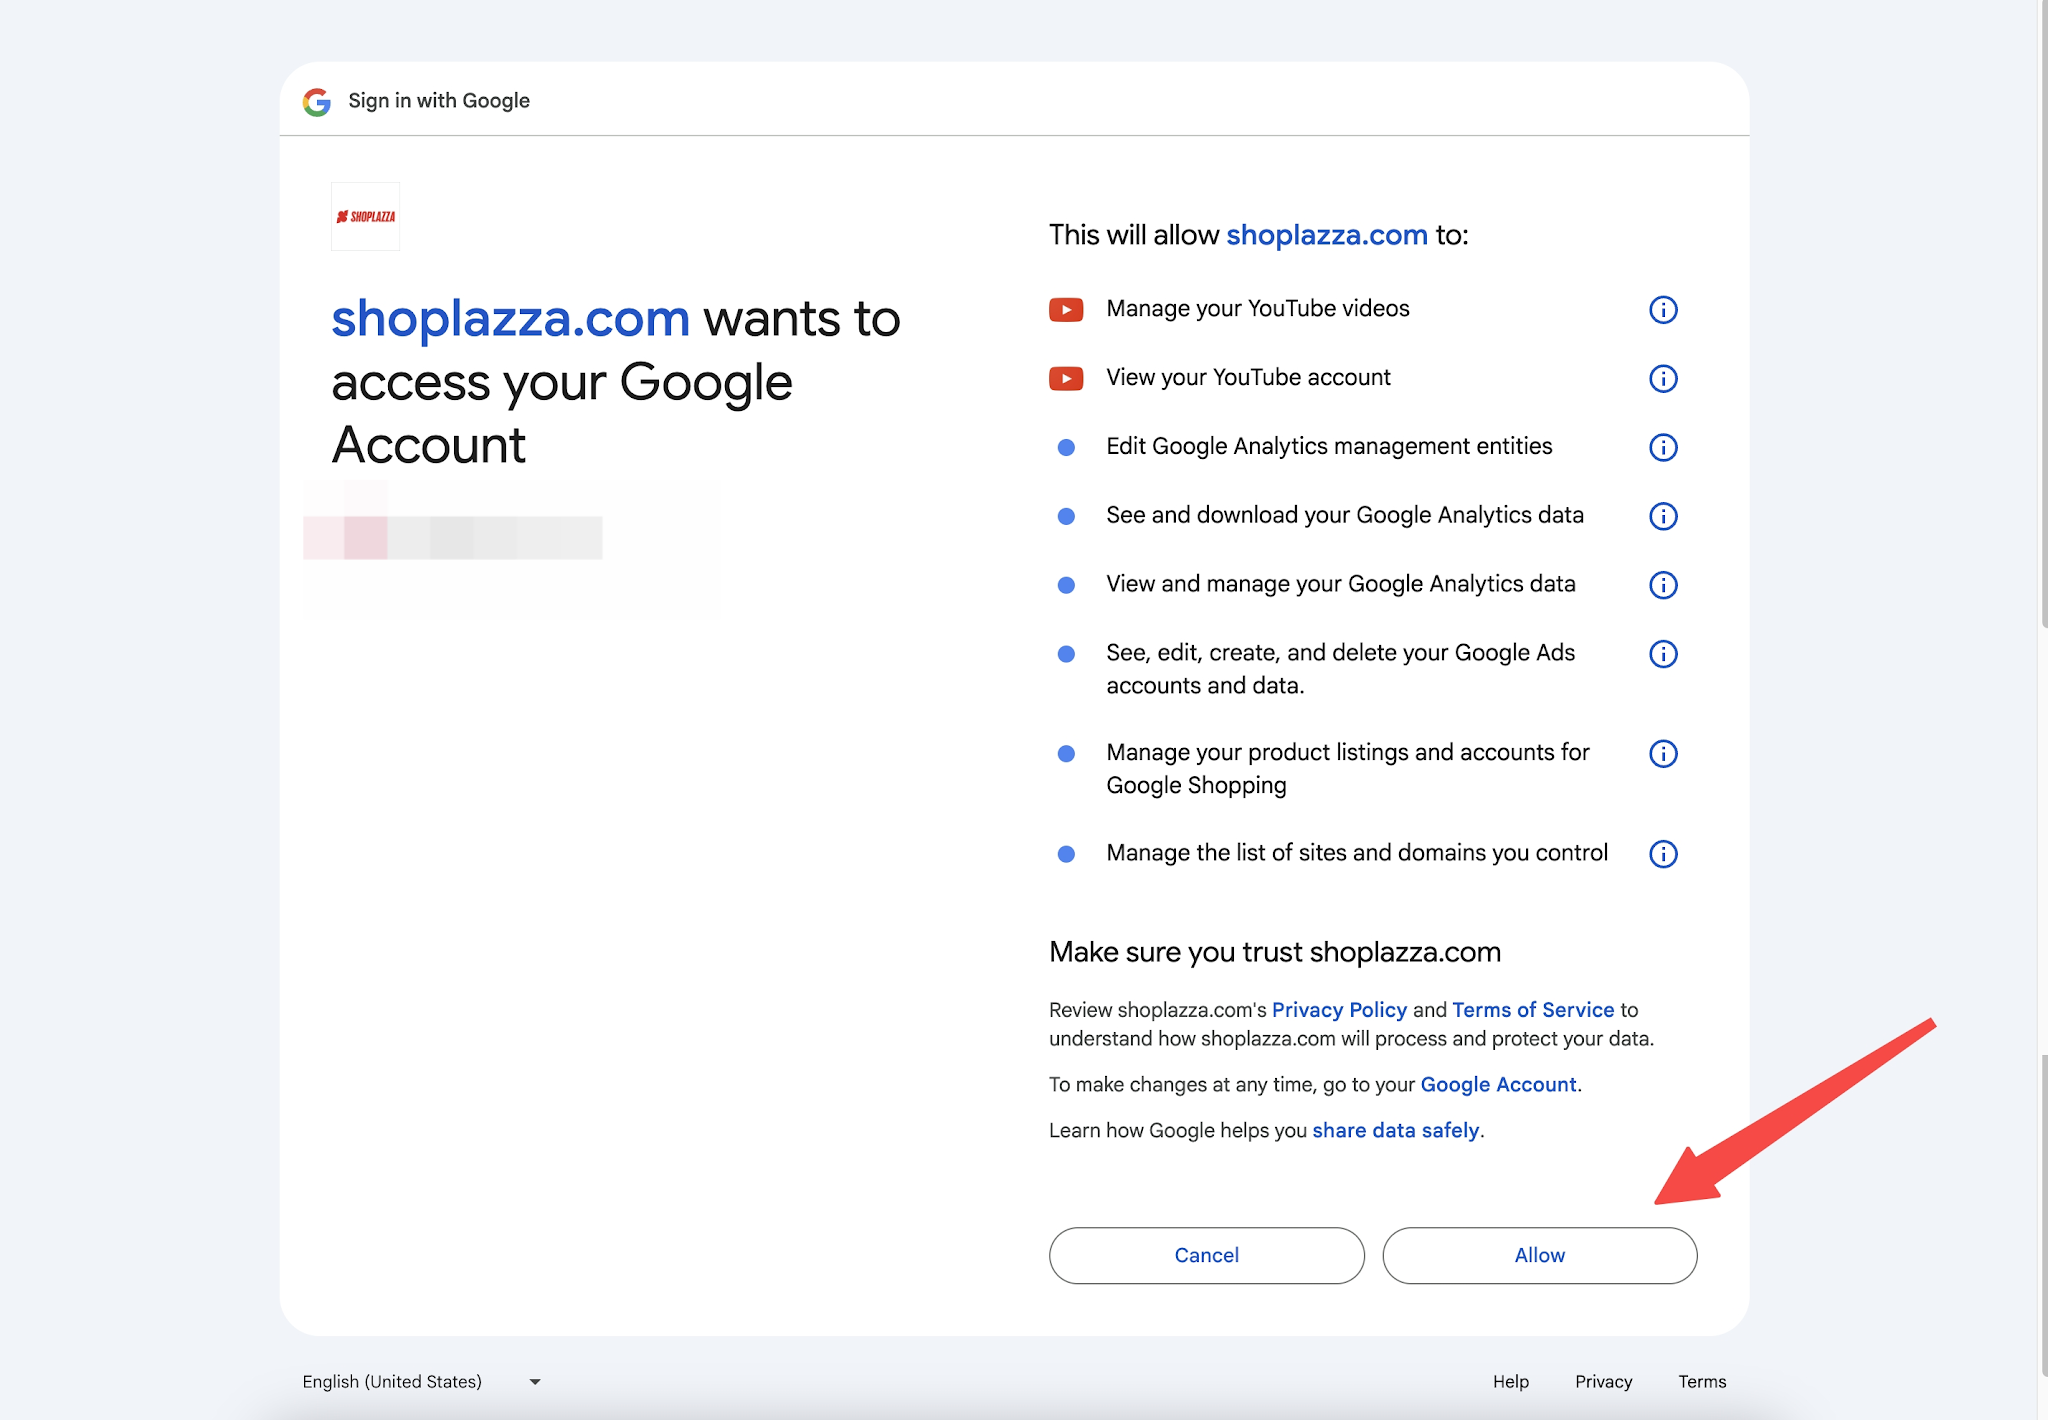
3. Select your Google account, review the requested permissions, and click Allow.
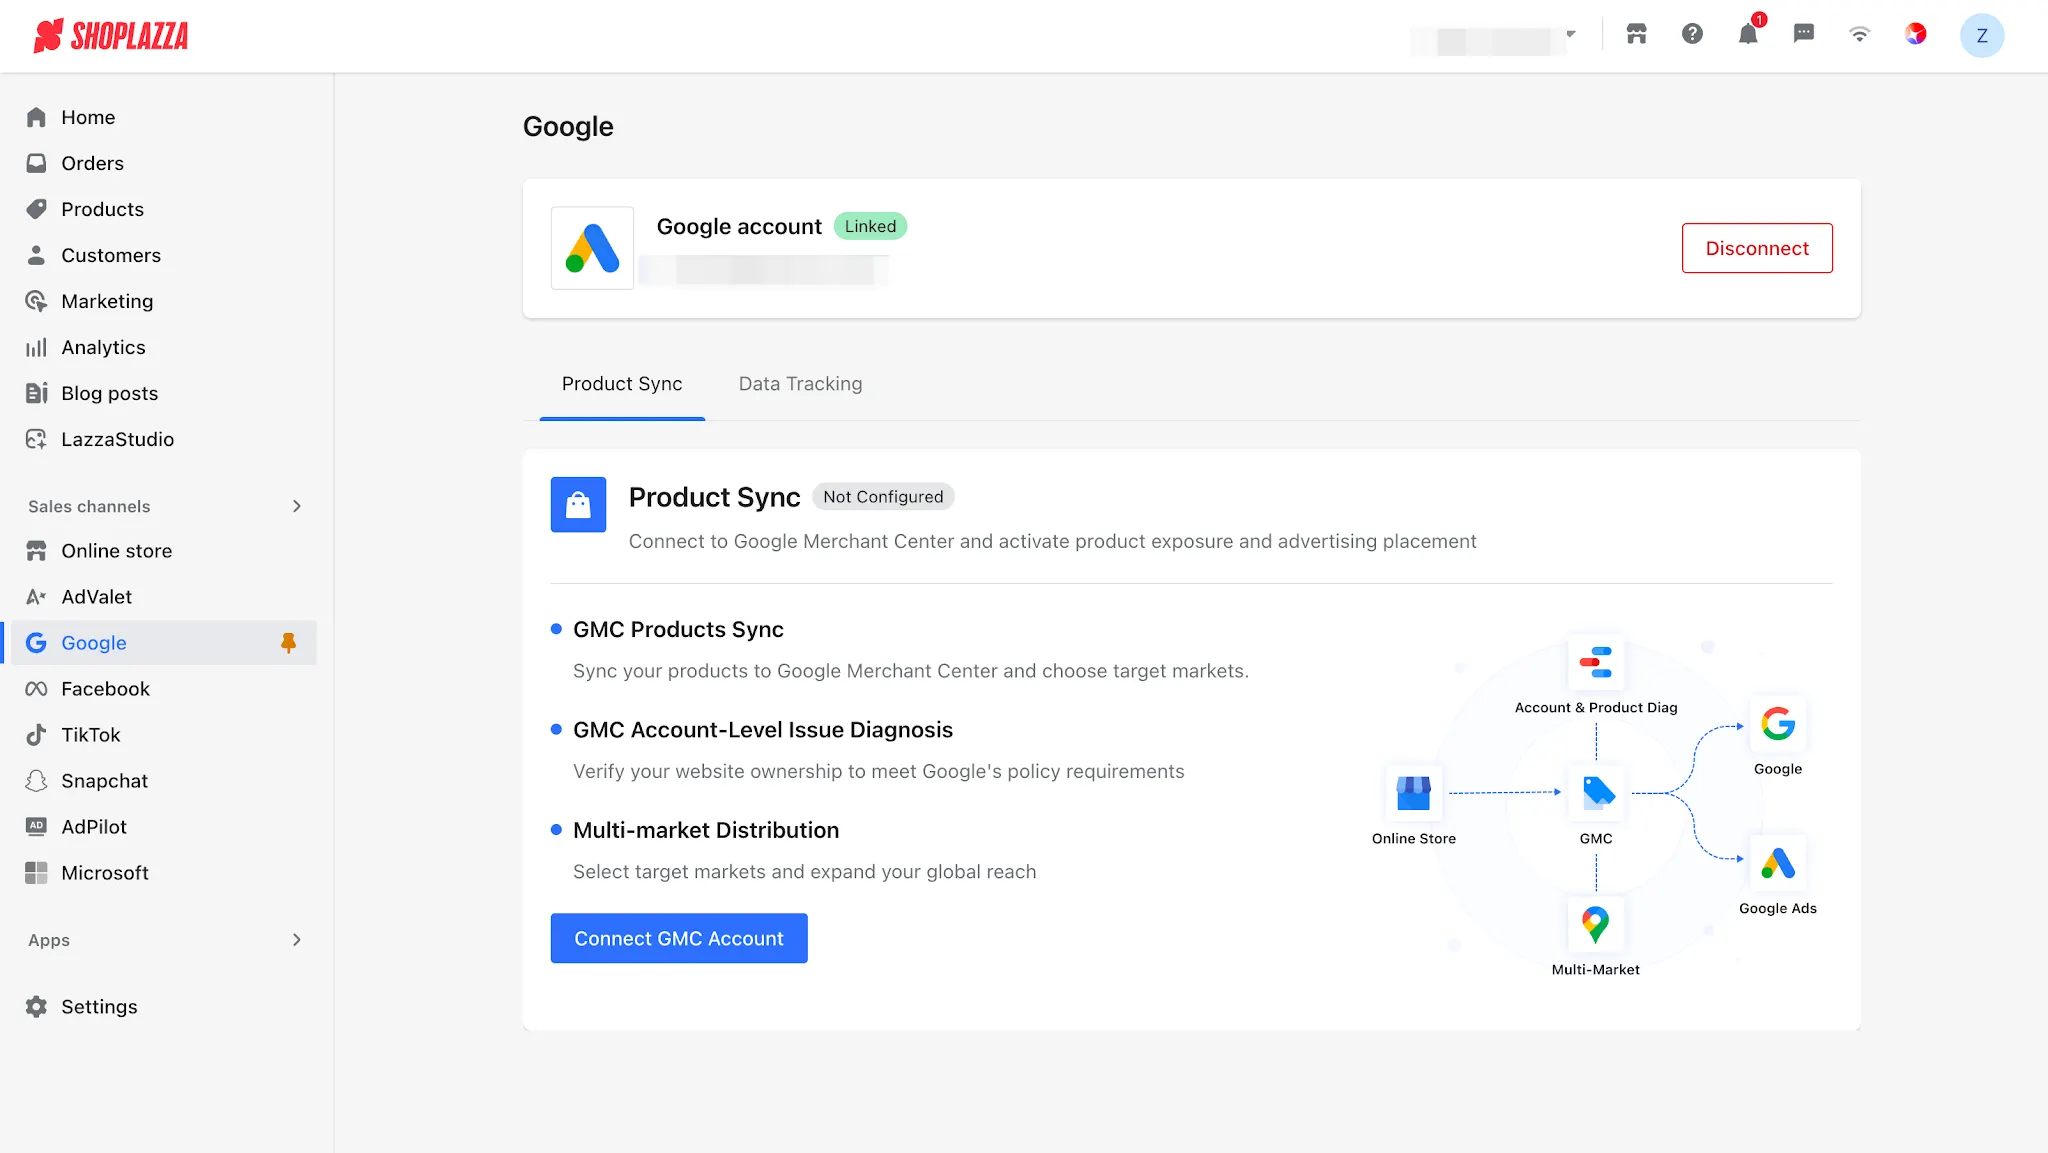
4. After authorization is successful, you will be automatically redirected to the Google channel homepage.
Note
If you don't have a Google account yet, click the Sign up now link at the bottom of the authorization page to create one.
Product Synchronization Settings
After authorization, complete the following setup steps in order to sync your products to Google Shopping.
Step 2: Connect Your Google Merchant Center Account
1. On the homepage, click Product Sync. Locate the GMC Account section and click Connect GMC Account.
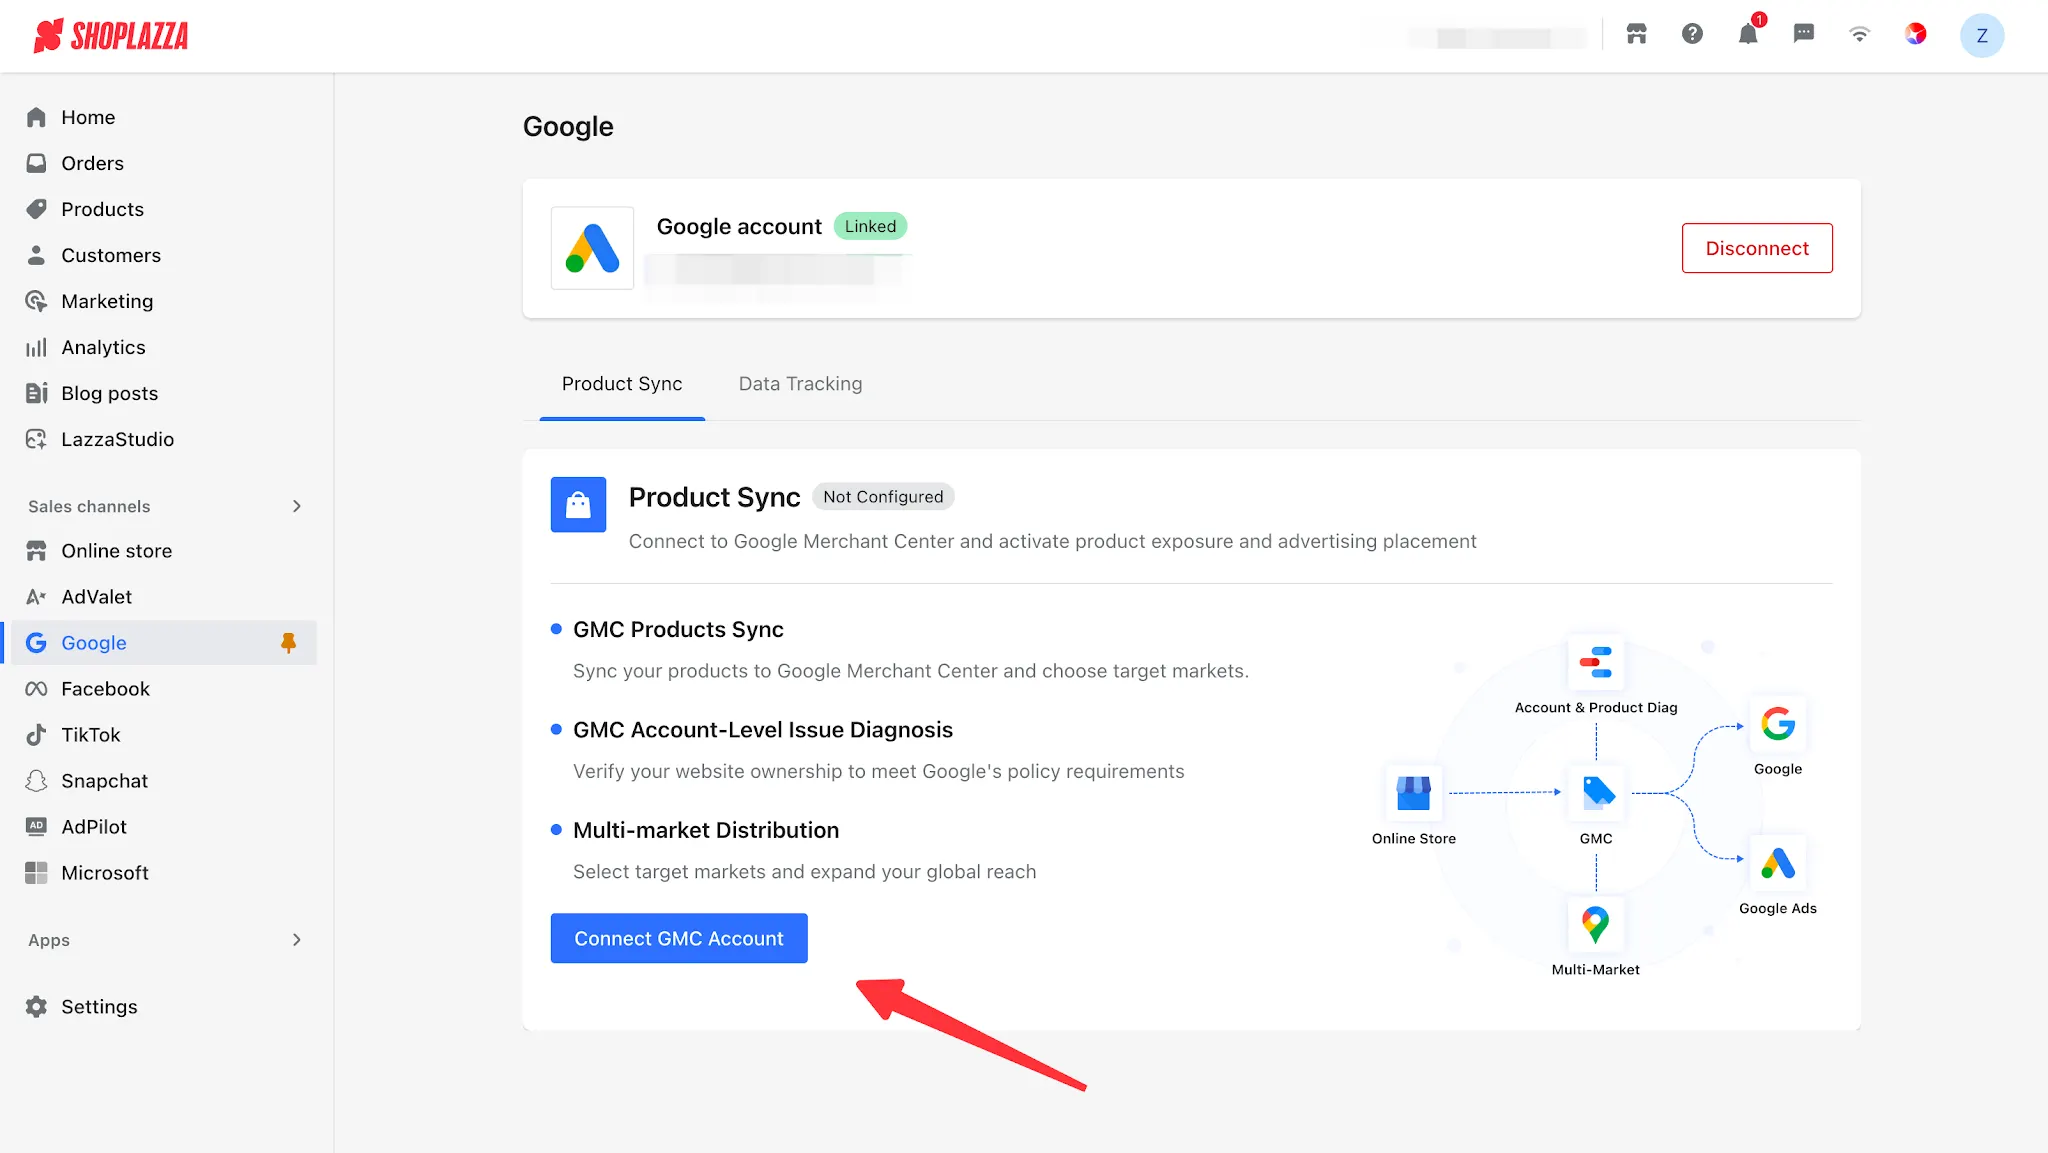
2. In the pop-up window, select the GMC account you want to connect, then click Confirm.
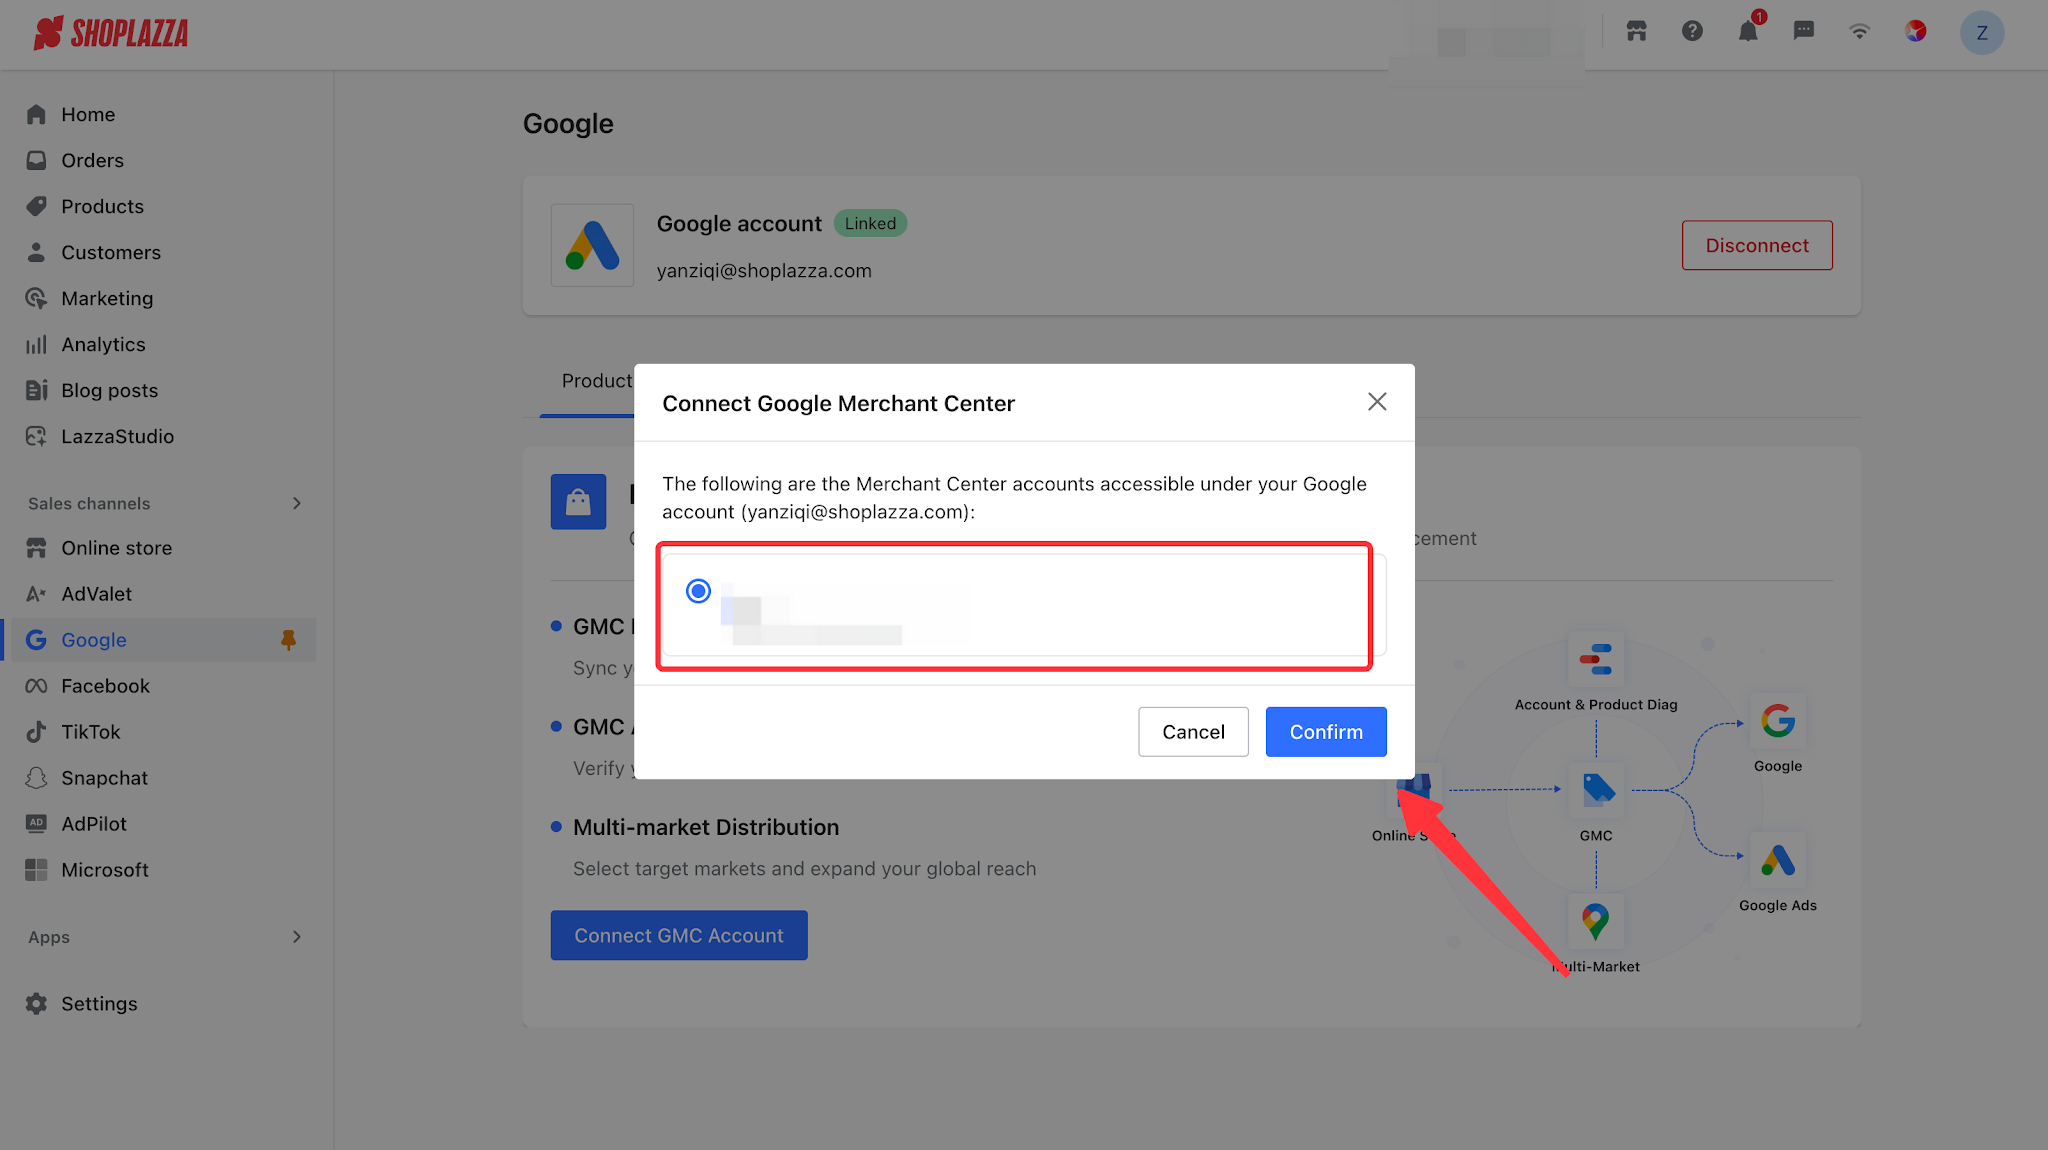
3. Once connected successfully, the GMC Account section will display the connected account name and ID.
Note
If no GMC accounts are available in the pop-up window, click the link to go to Google Merchant Center and create an account, then return to connect it.
Step 3: Verify Website Ownership
After connecting your GMC account, you need to claim ownership of your store domain in GMC before you can list your products.
1. In the Website Ownership Verification section, check your store domain and its verification status.
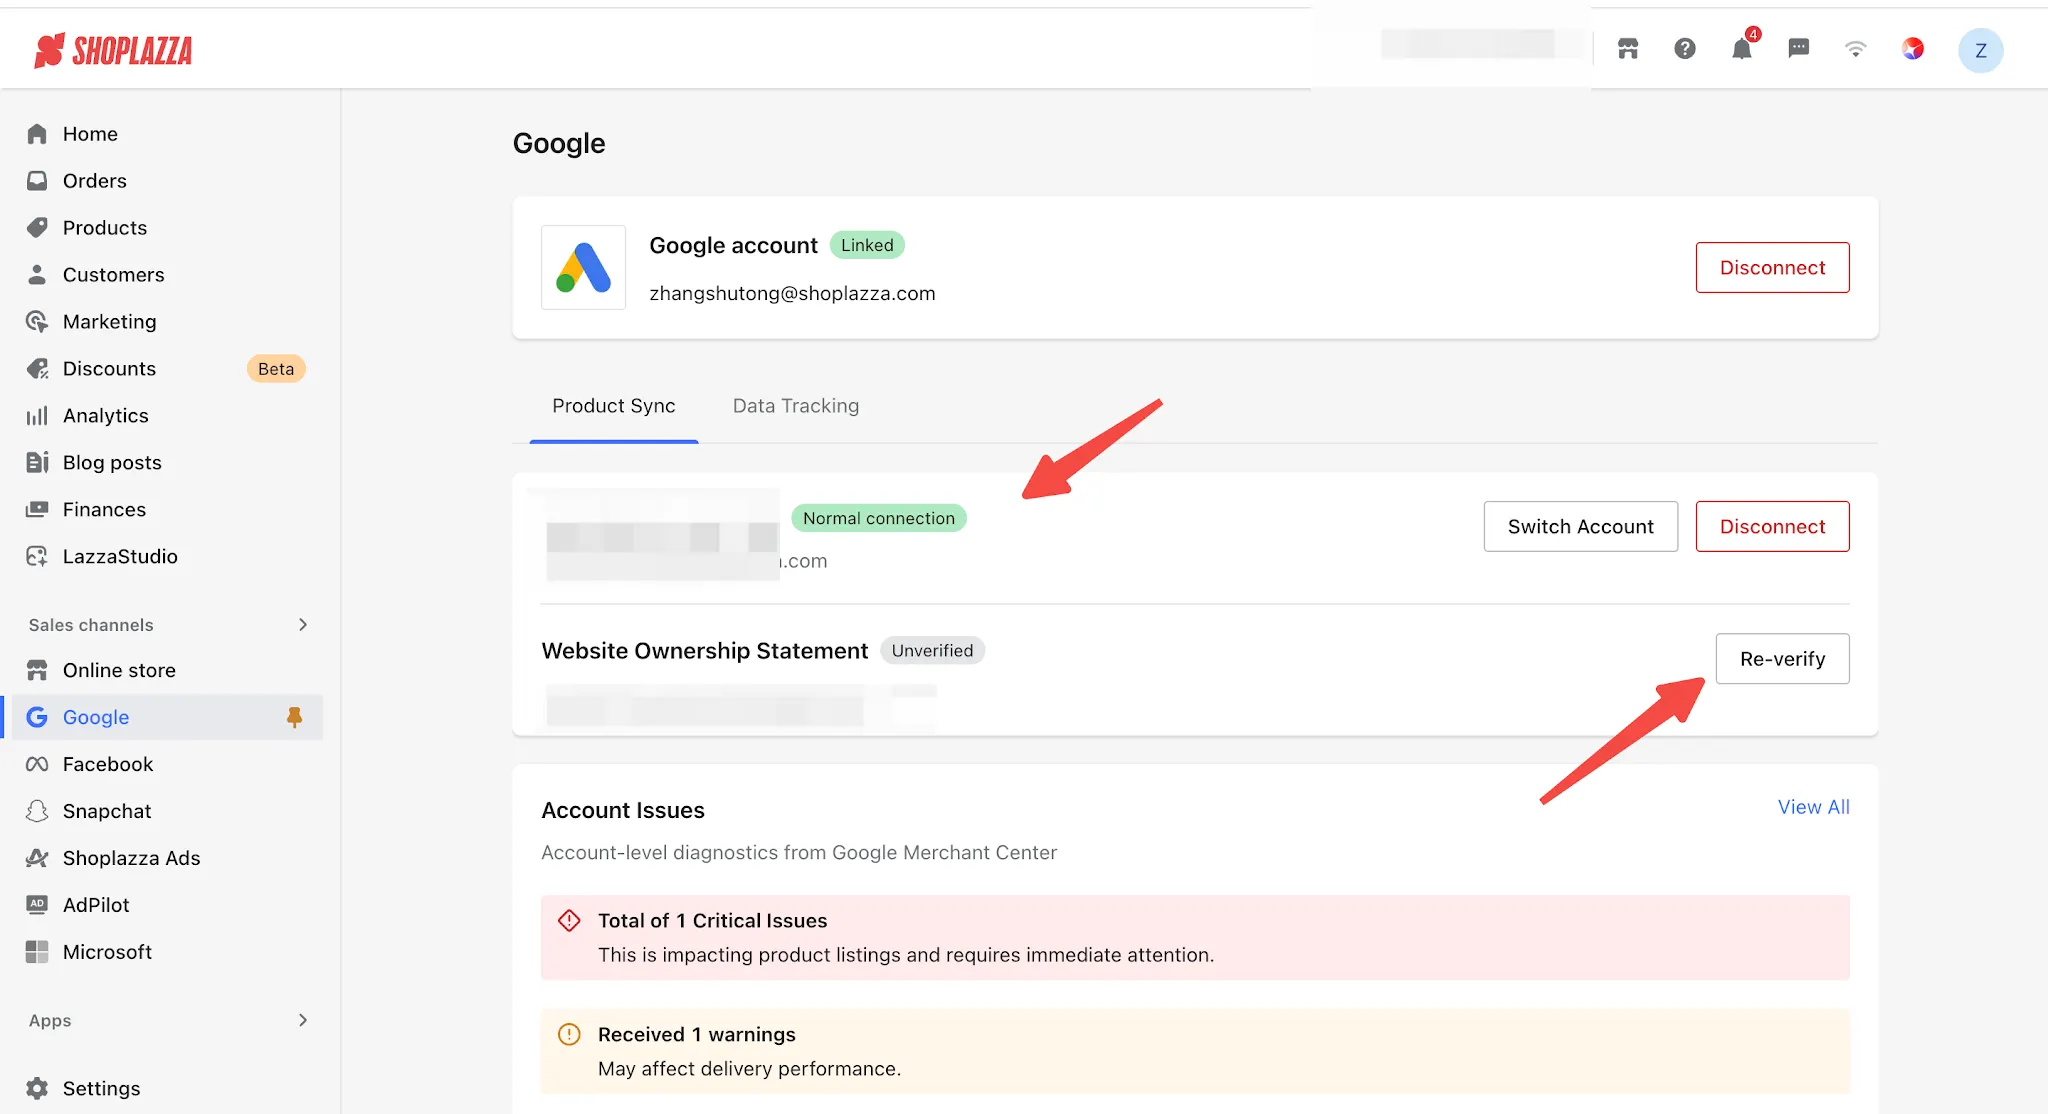
2. If the status shows Not Verified, click Verify Now to automatically complete the website ownership verification process.
3. Once verification is complete, the status will be updated to Verified.
Step 4: Configure Sync Settings (Target Markets)
Sync settings allow you to configure which country/region markets your products will be synced to.
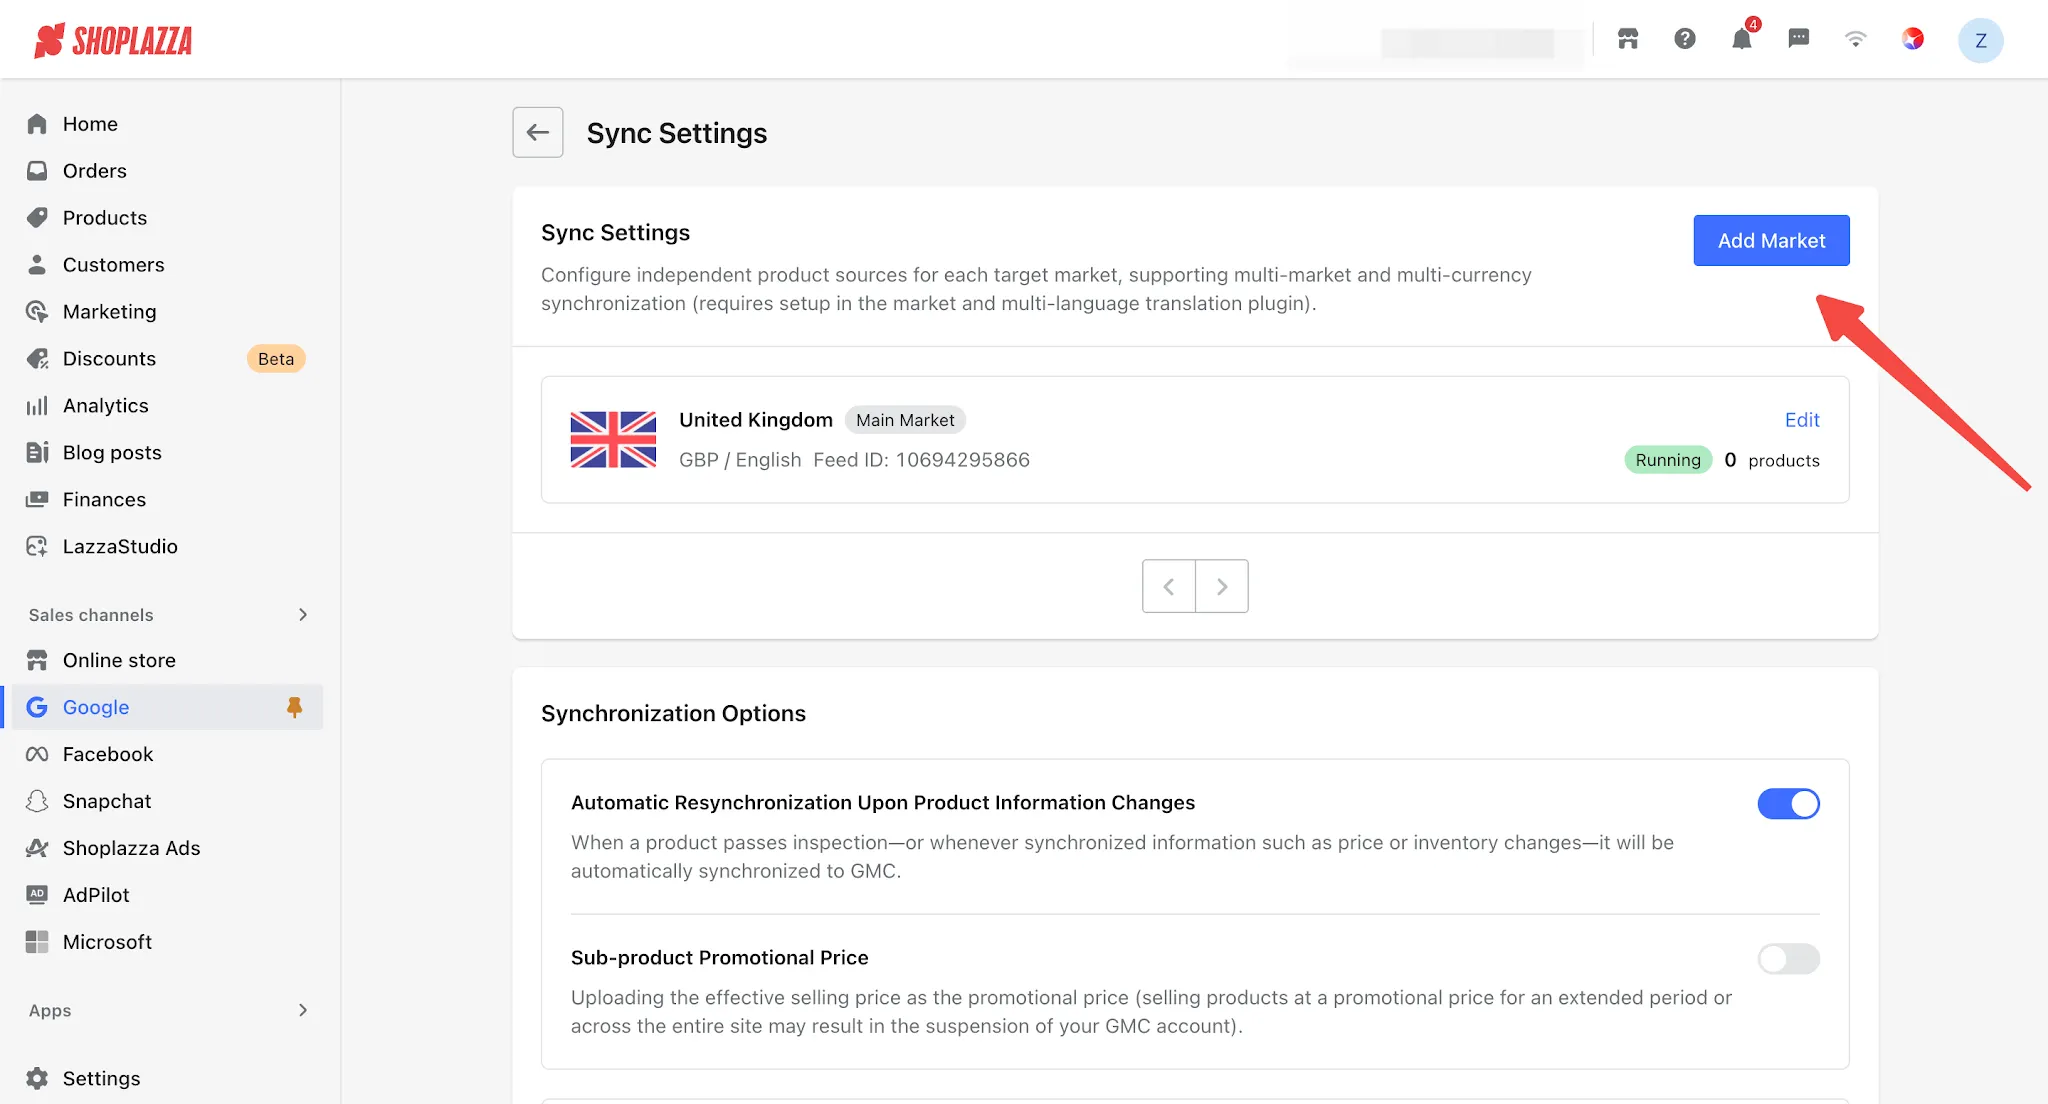
1. On the homepage, click Manage in the upper-right corner of the Sync Settings card to open the sync settings page.
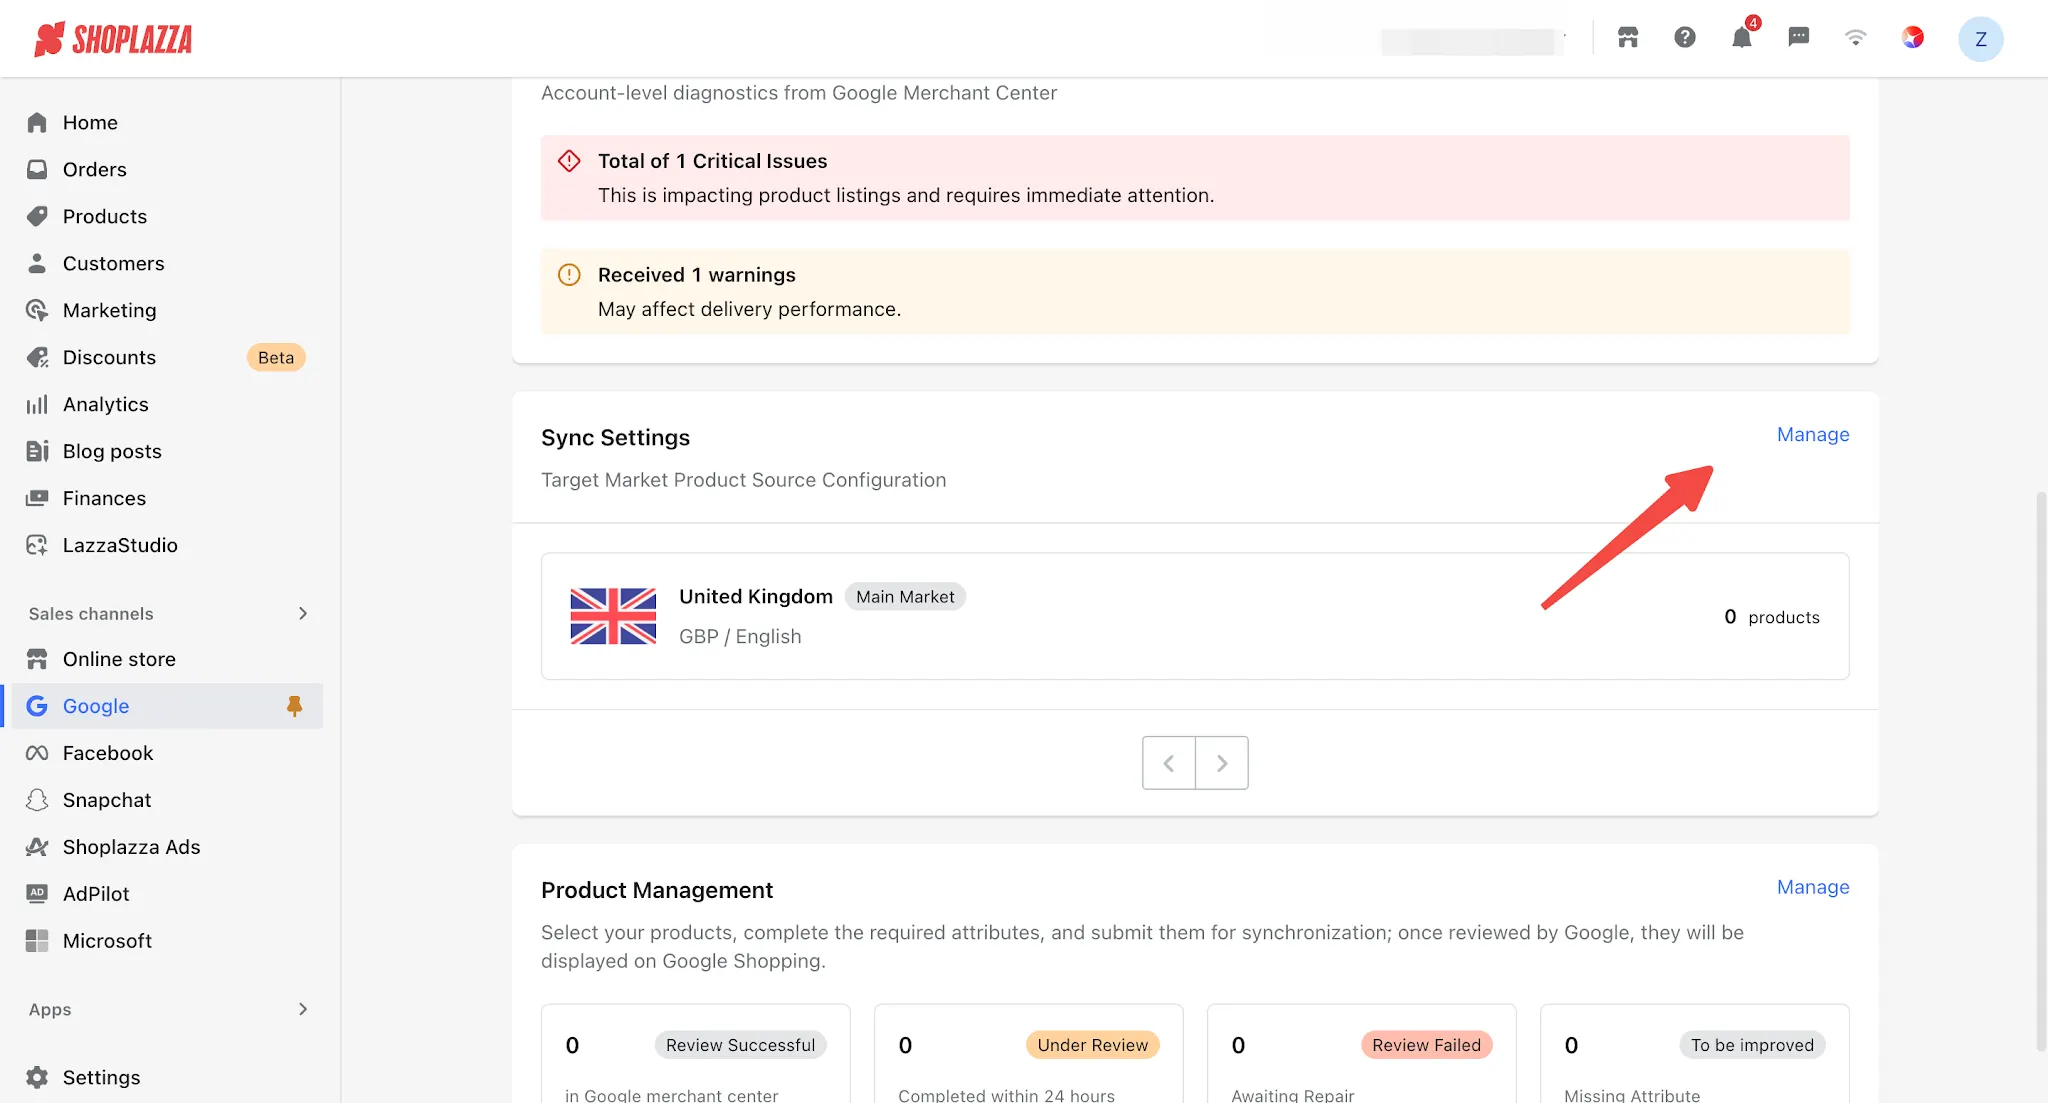
2. Your primary market (the same as your store’s primary market) is displayed automatically on the page. To add more markets, click Add Market.
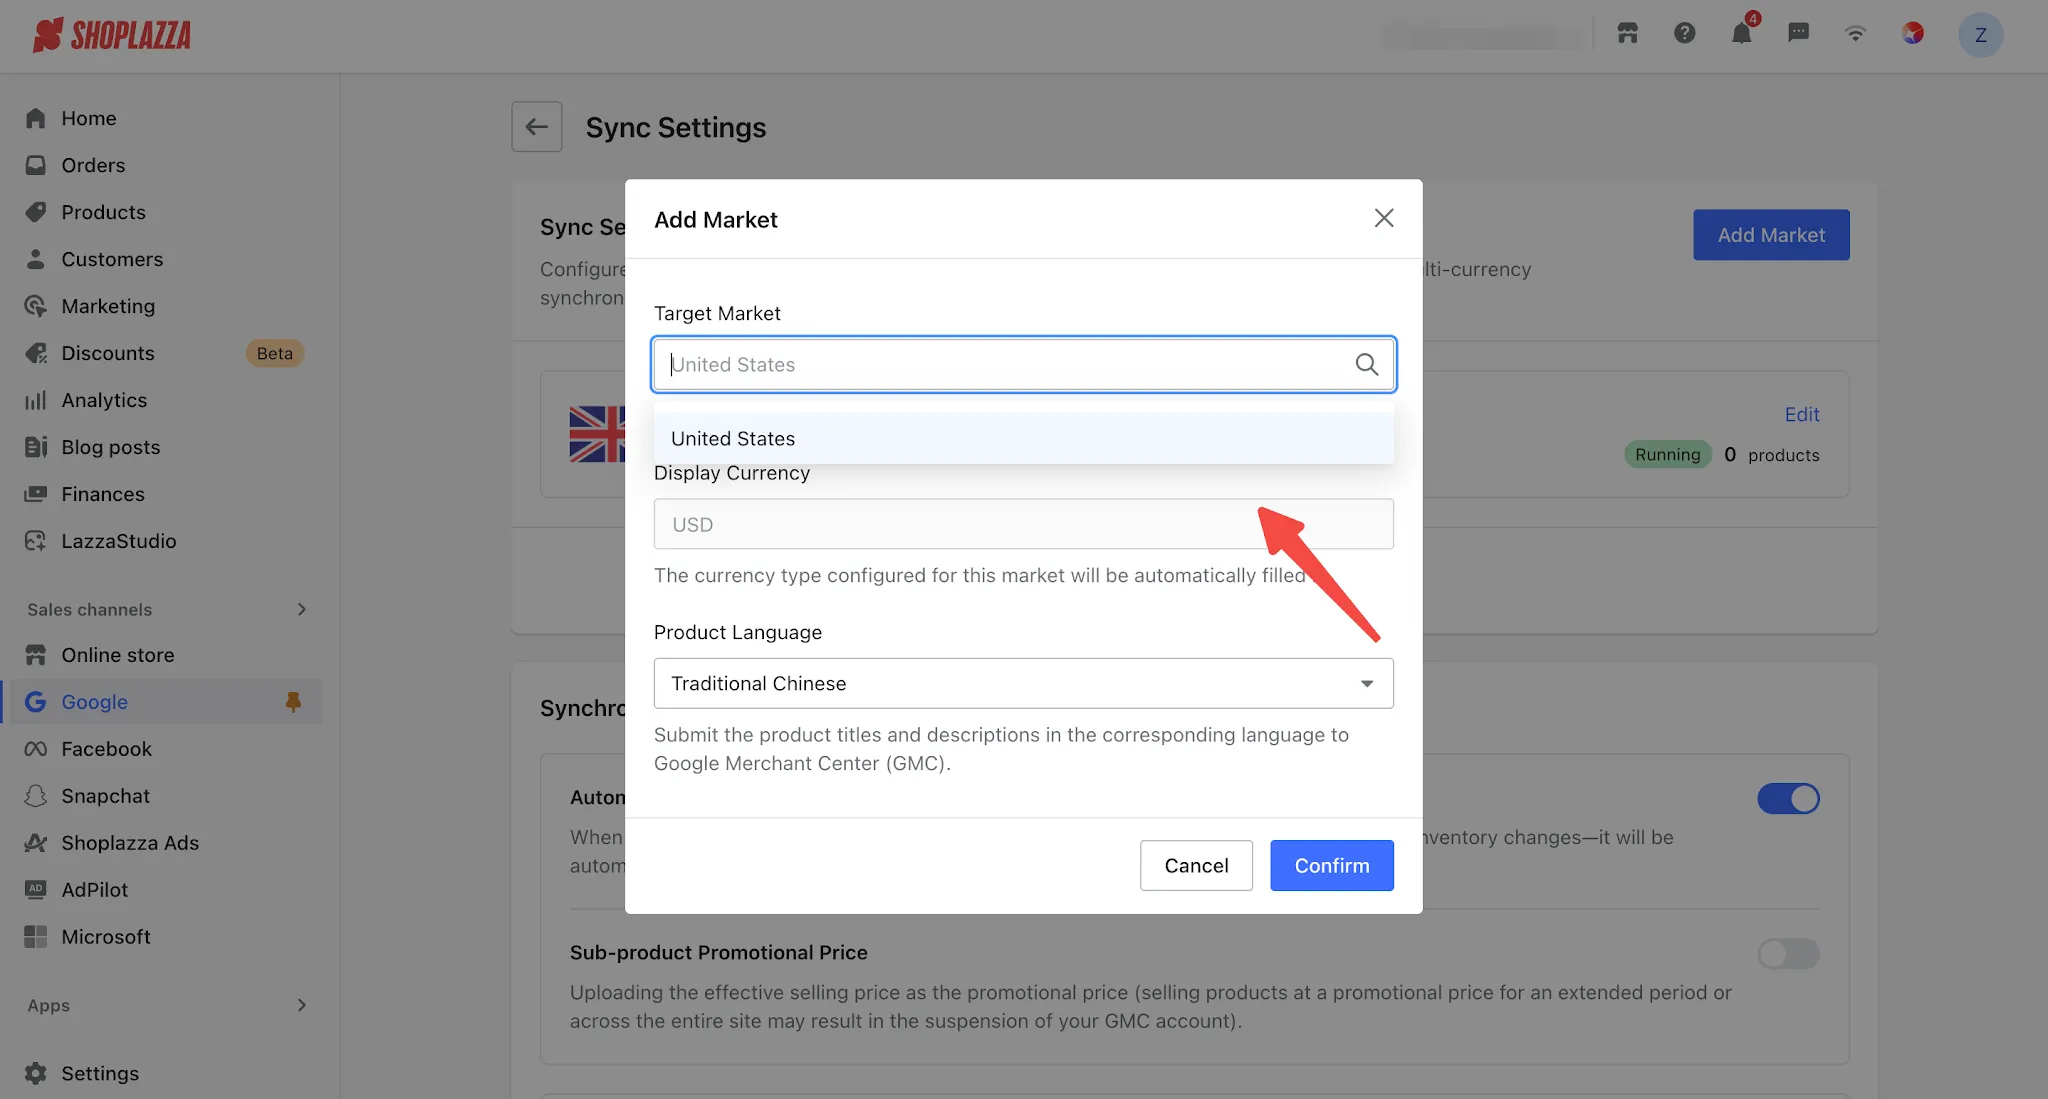
3. In the pop-up window, select the target market (country/region) and product language, then click Confirm.
Note
The currency is determined by the selected market settings and cannot be changed separately.
Note
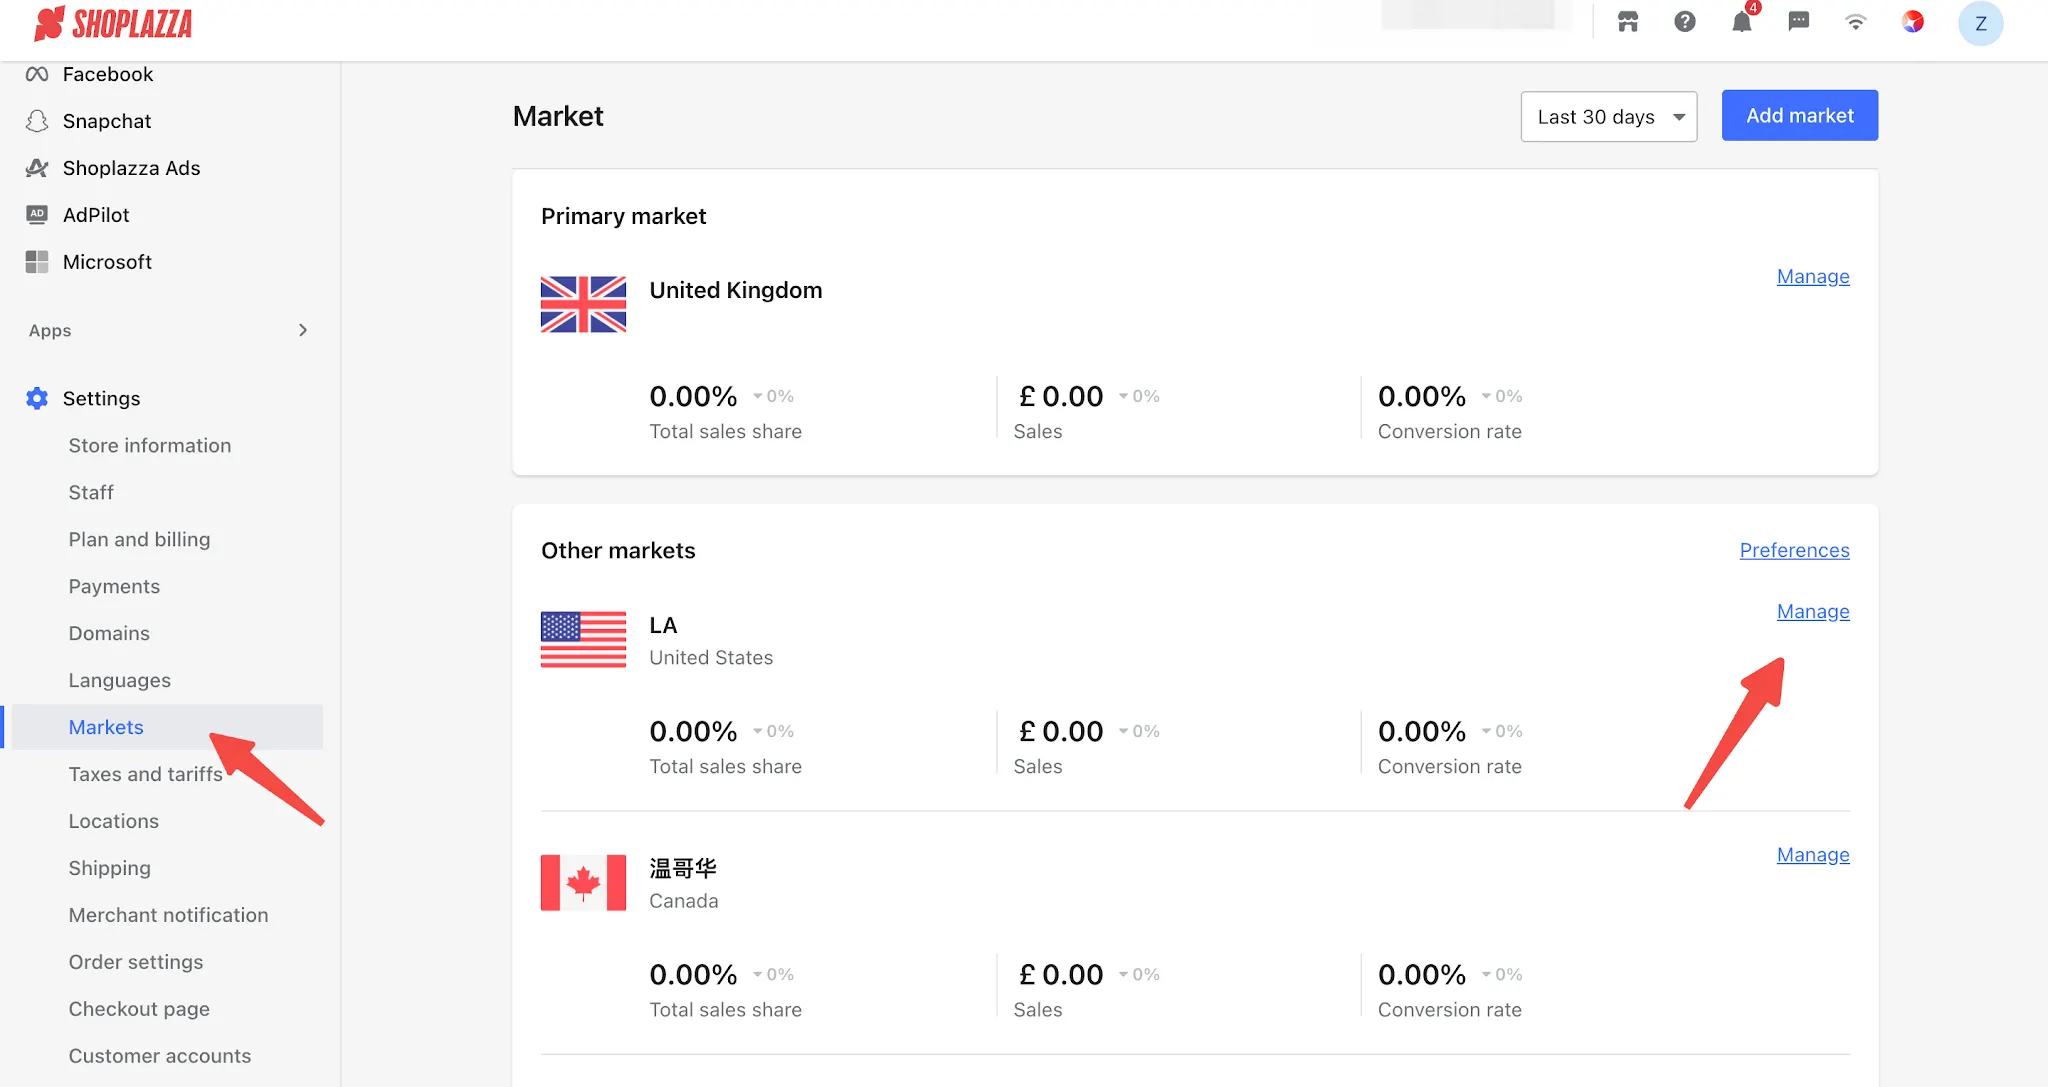
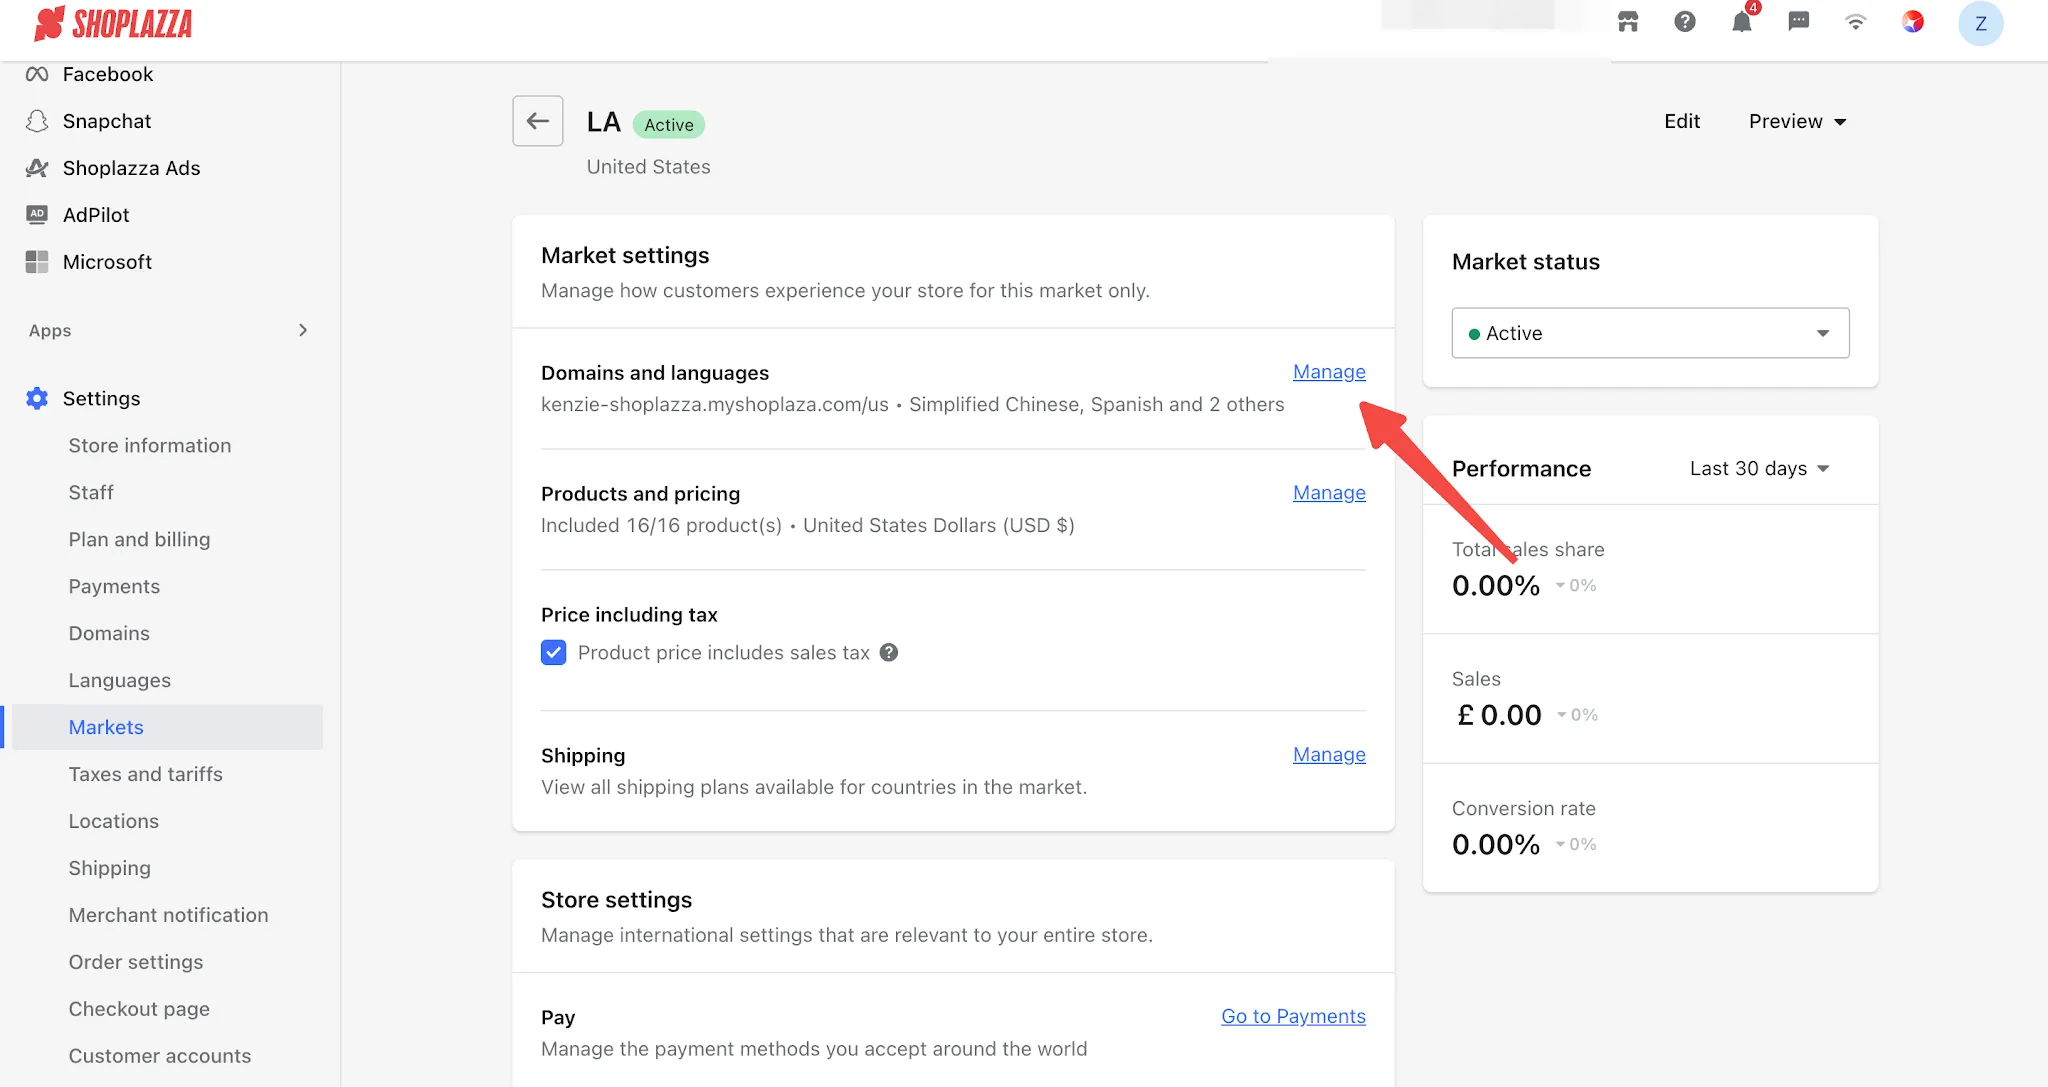
For multi-market configurations, you must set up subfolders in the Markets module. You must also translate the selected products into the chosen language using a multilingual translation app. Otherwise, the products will not be synced.
The steps to set up subfolders in the Markets module are as follows:
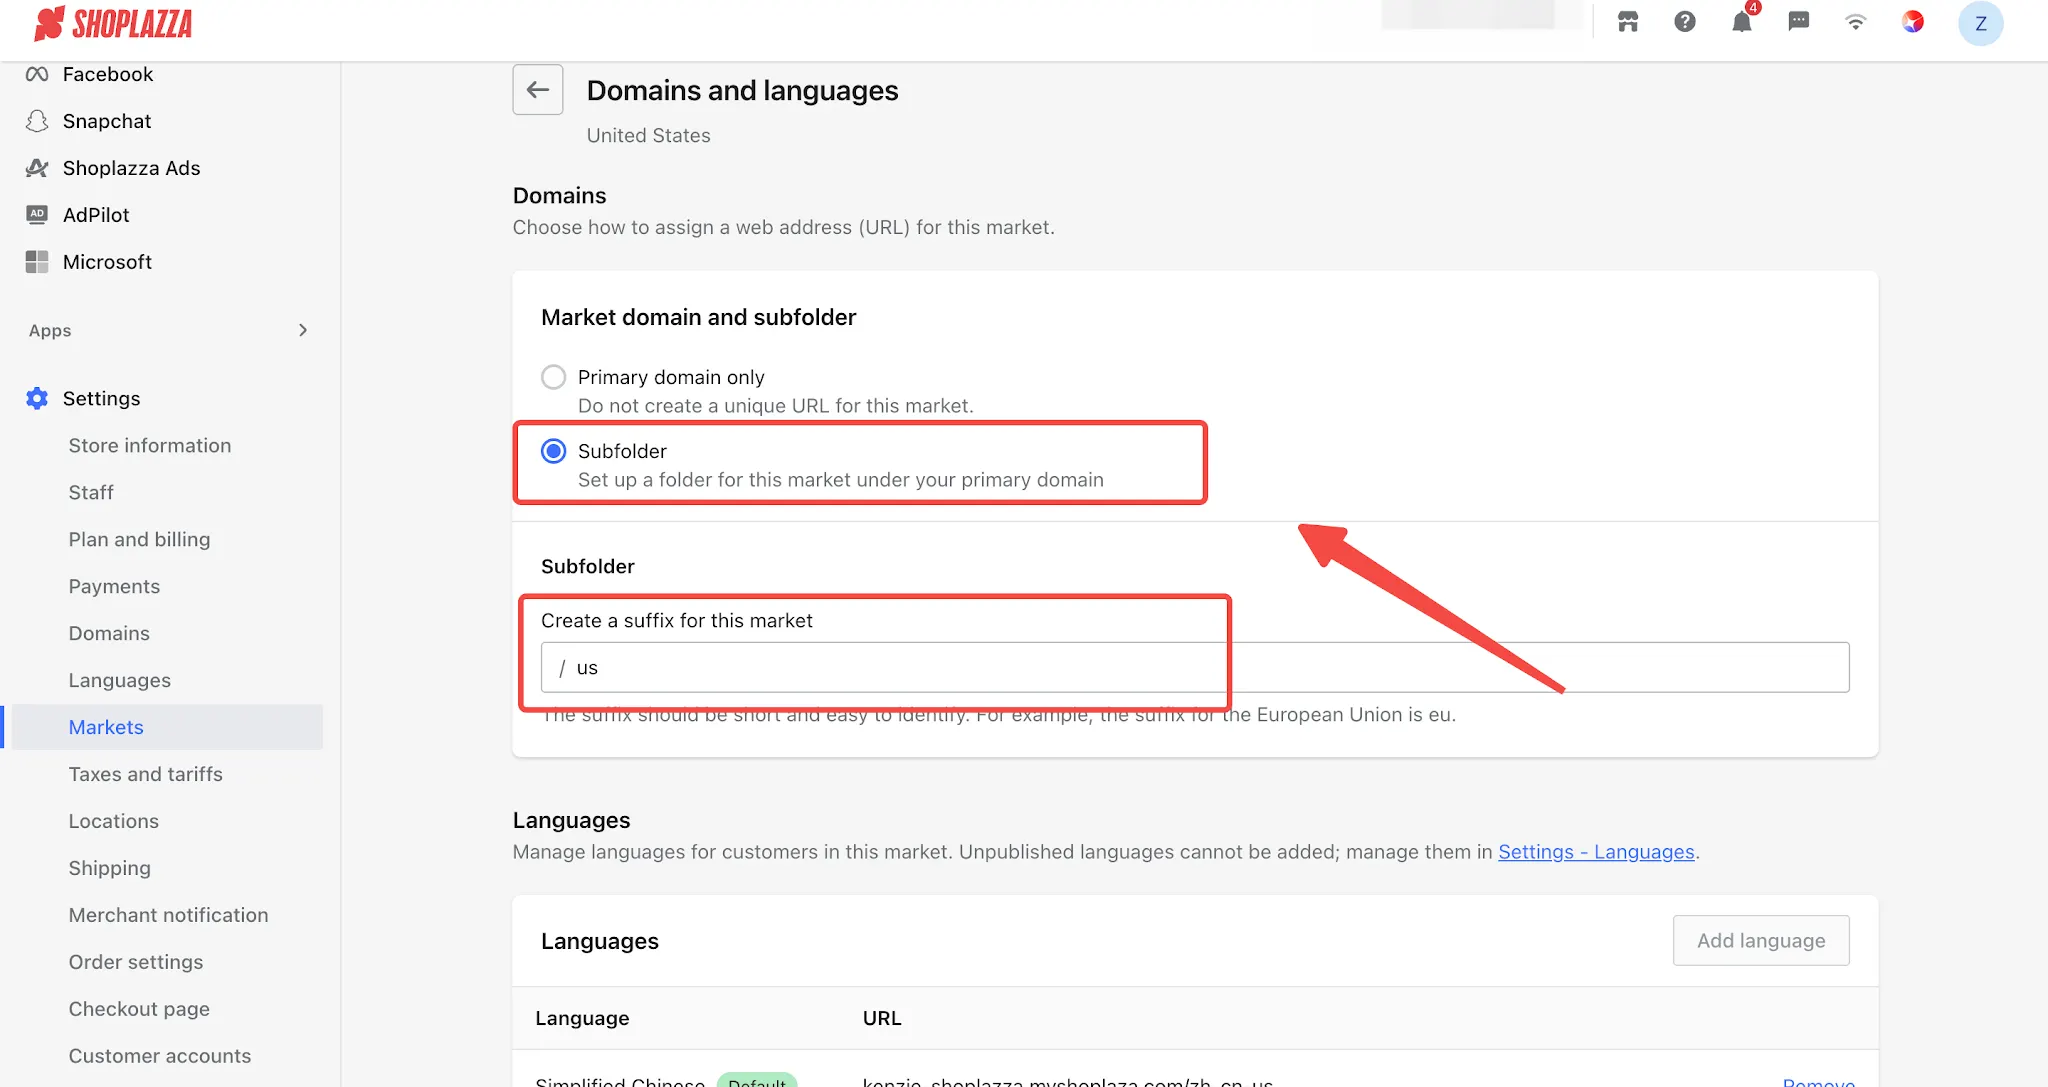
4. Enable or disable the following settings as needed under Sync Options:
- Automatic Upload: When enabled, products will be automatically synced to GMC once they pass validation, or when information such as the price or inventory of synced products changes. When disabled, products will not be automatically synced to GMC when they are updated or pass validation.
- Product Image Type: Choose whether to sync the main product image or variant images to GMC.
- Product Title Type: Choose whether to sync the product title or SEO title to GMC.
- Product Description Type: Choose whether to sync the product description or SEO description to GMC.
- Variant Promotional Price: When enabled, the actual selling price will be uploaded as the promotional price. (Selling products at promotional prices for an extended period or across the entire store may result in GMC account suspension.)
Note
After modifying any of the three settings—Product Image Type, Product Title Type, or Product Description Type—a full upload of all products will be automatically triggered after 10 minutes. You can continue making adjustments during this period. Once product syncing is triggered, these settings cannot be modified again for 2 hours. Please make changes with caution.
Product Management
Step 5: Add Products and Complete Product Attributes
After completing the sync settings, you need to manually add products to the Google channel and complete the attribute fields required by Google.
Add Products
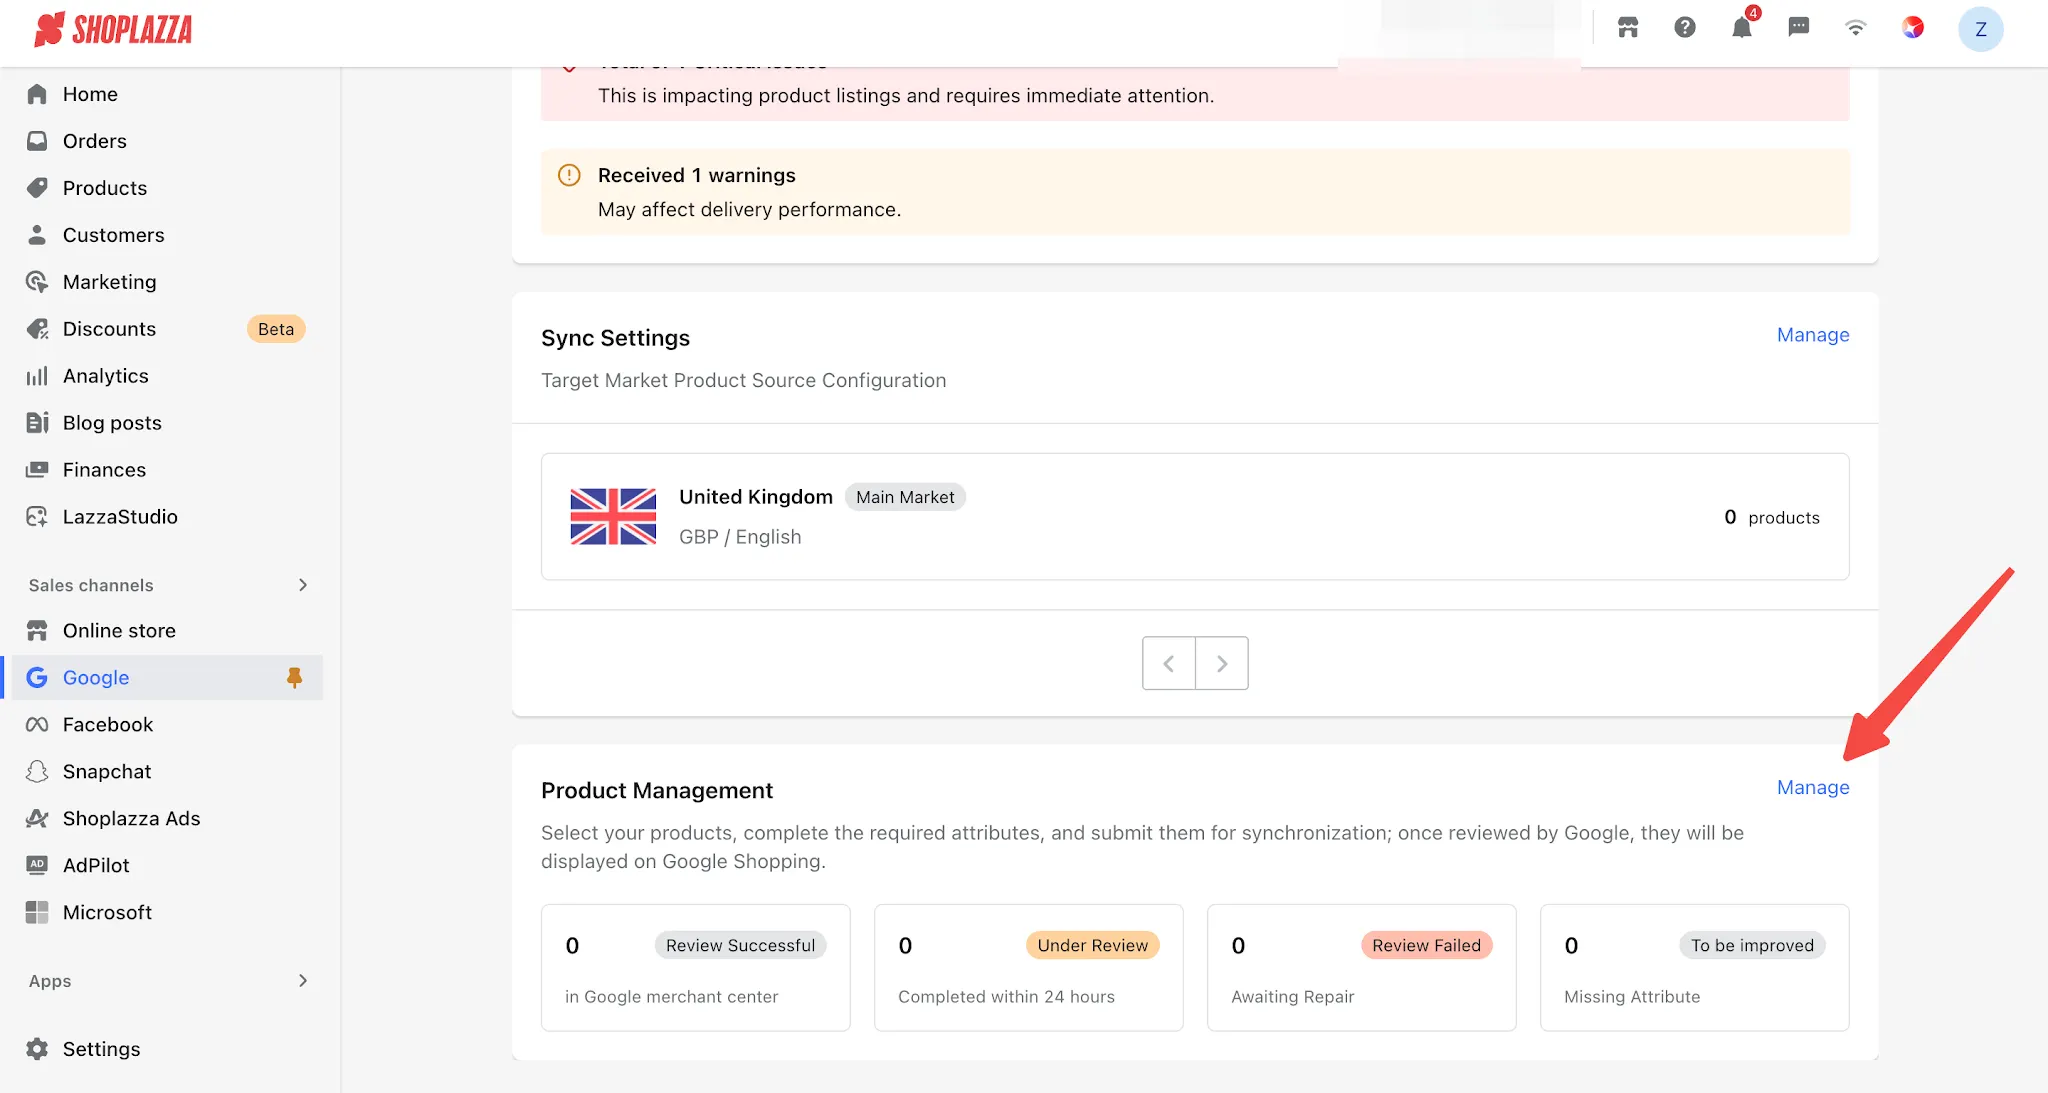
1. Go to the Product Management page and click Add Products.
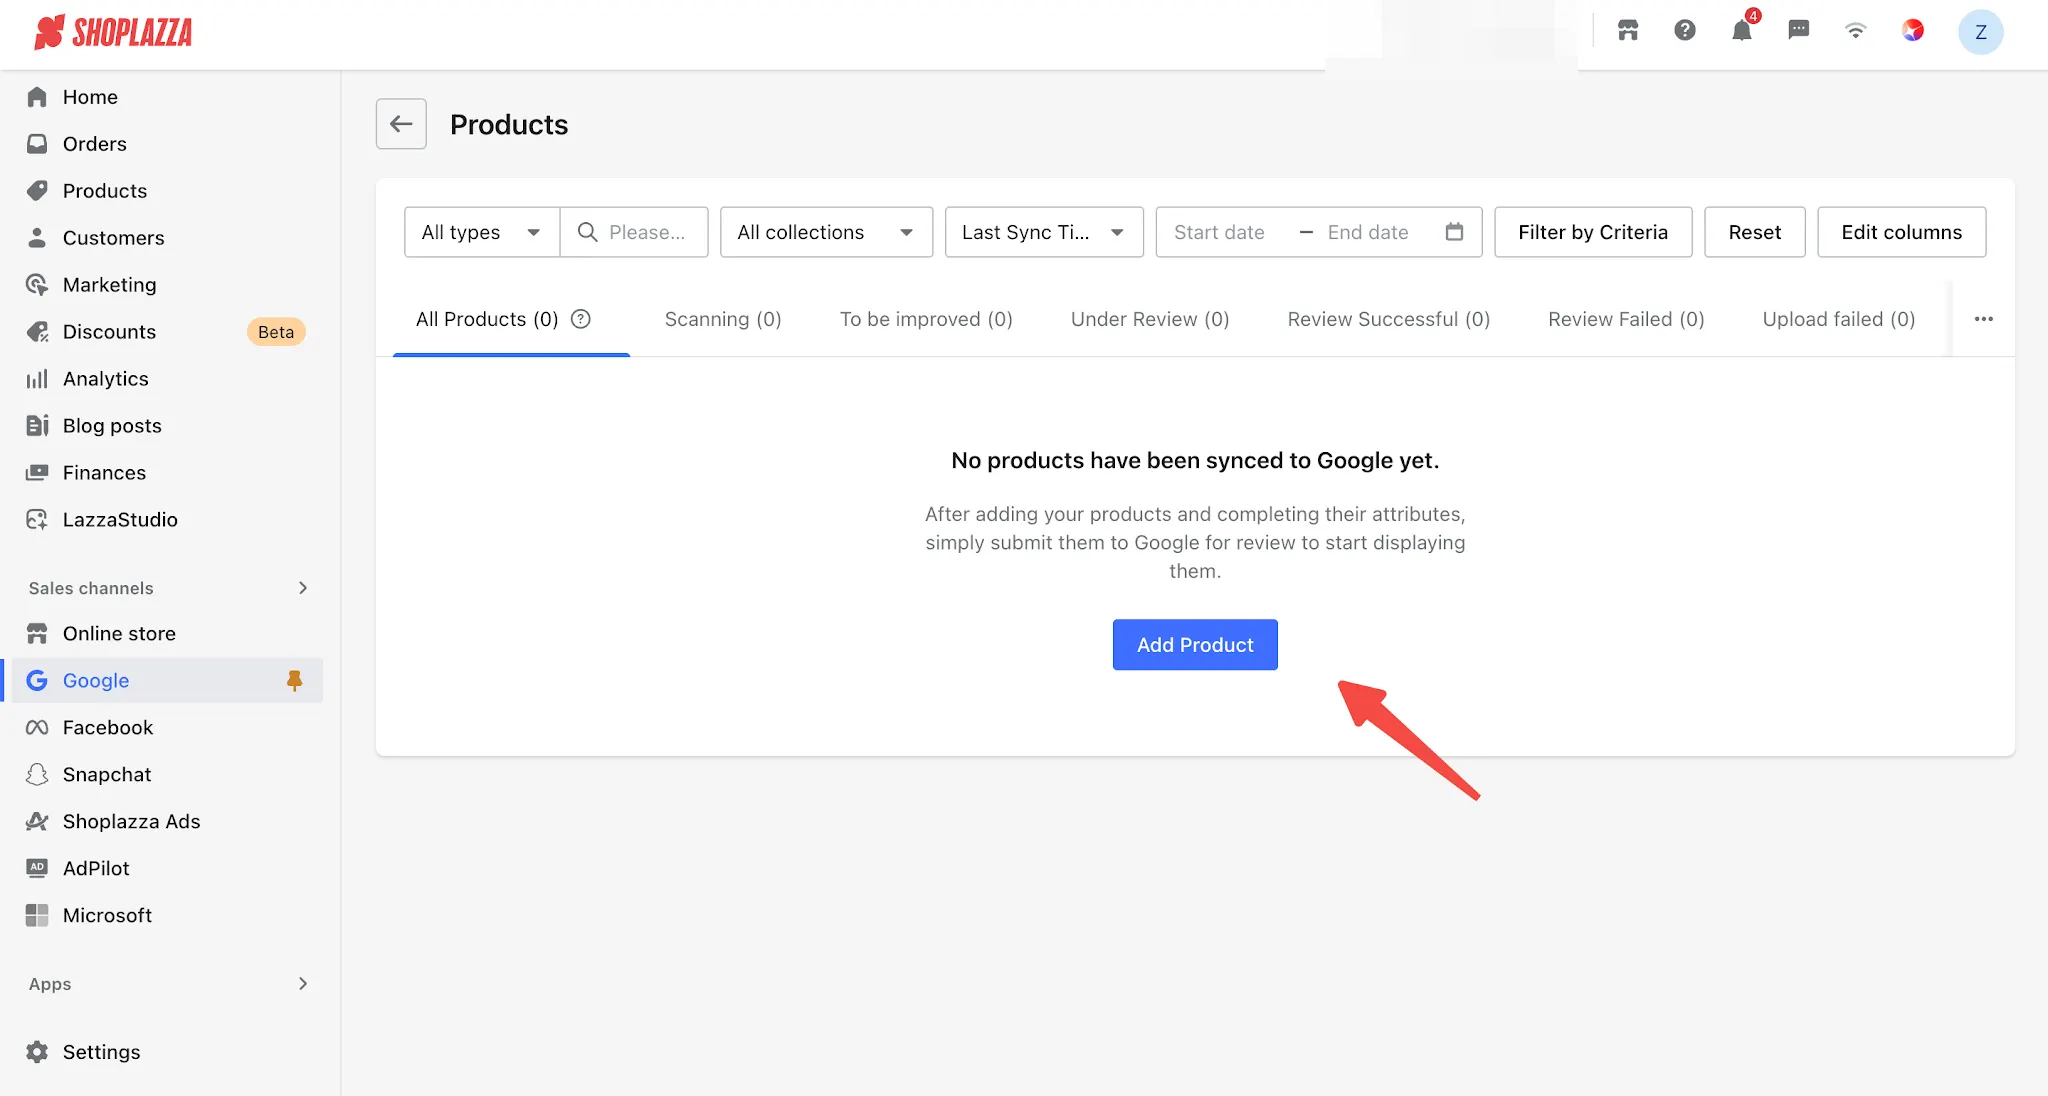
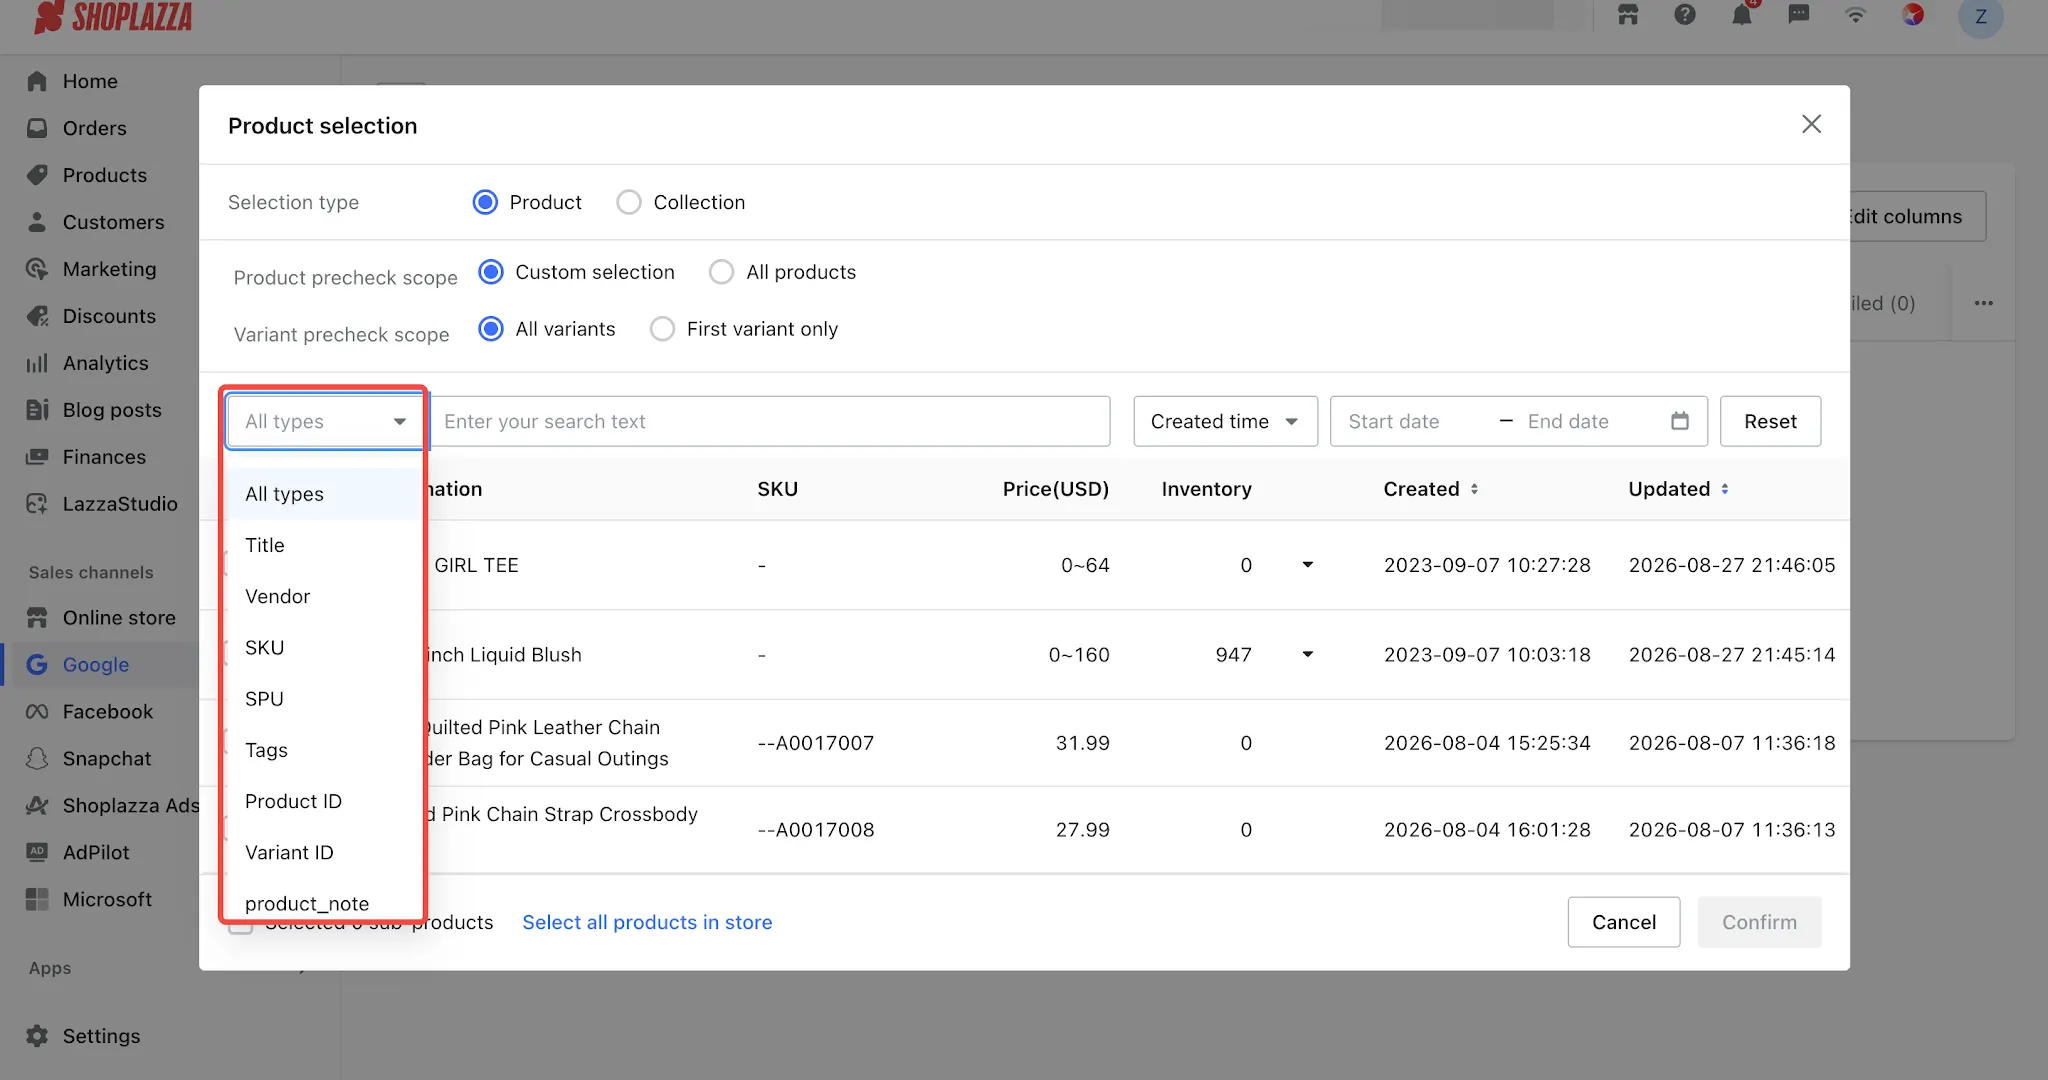
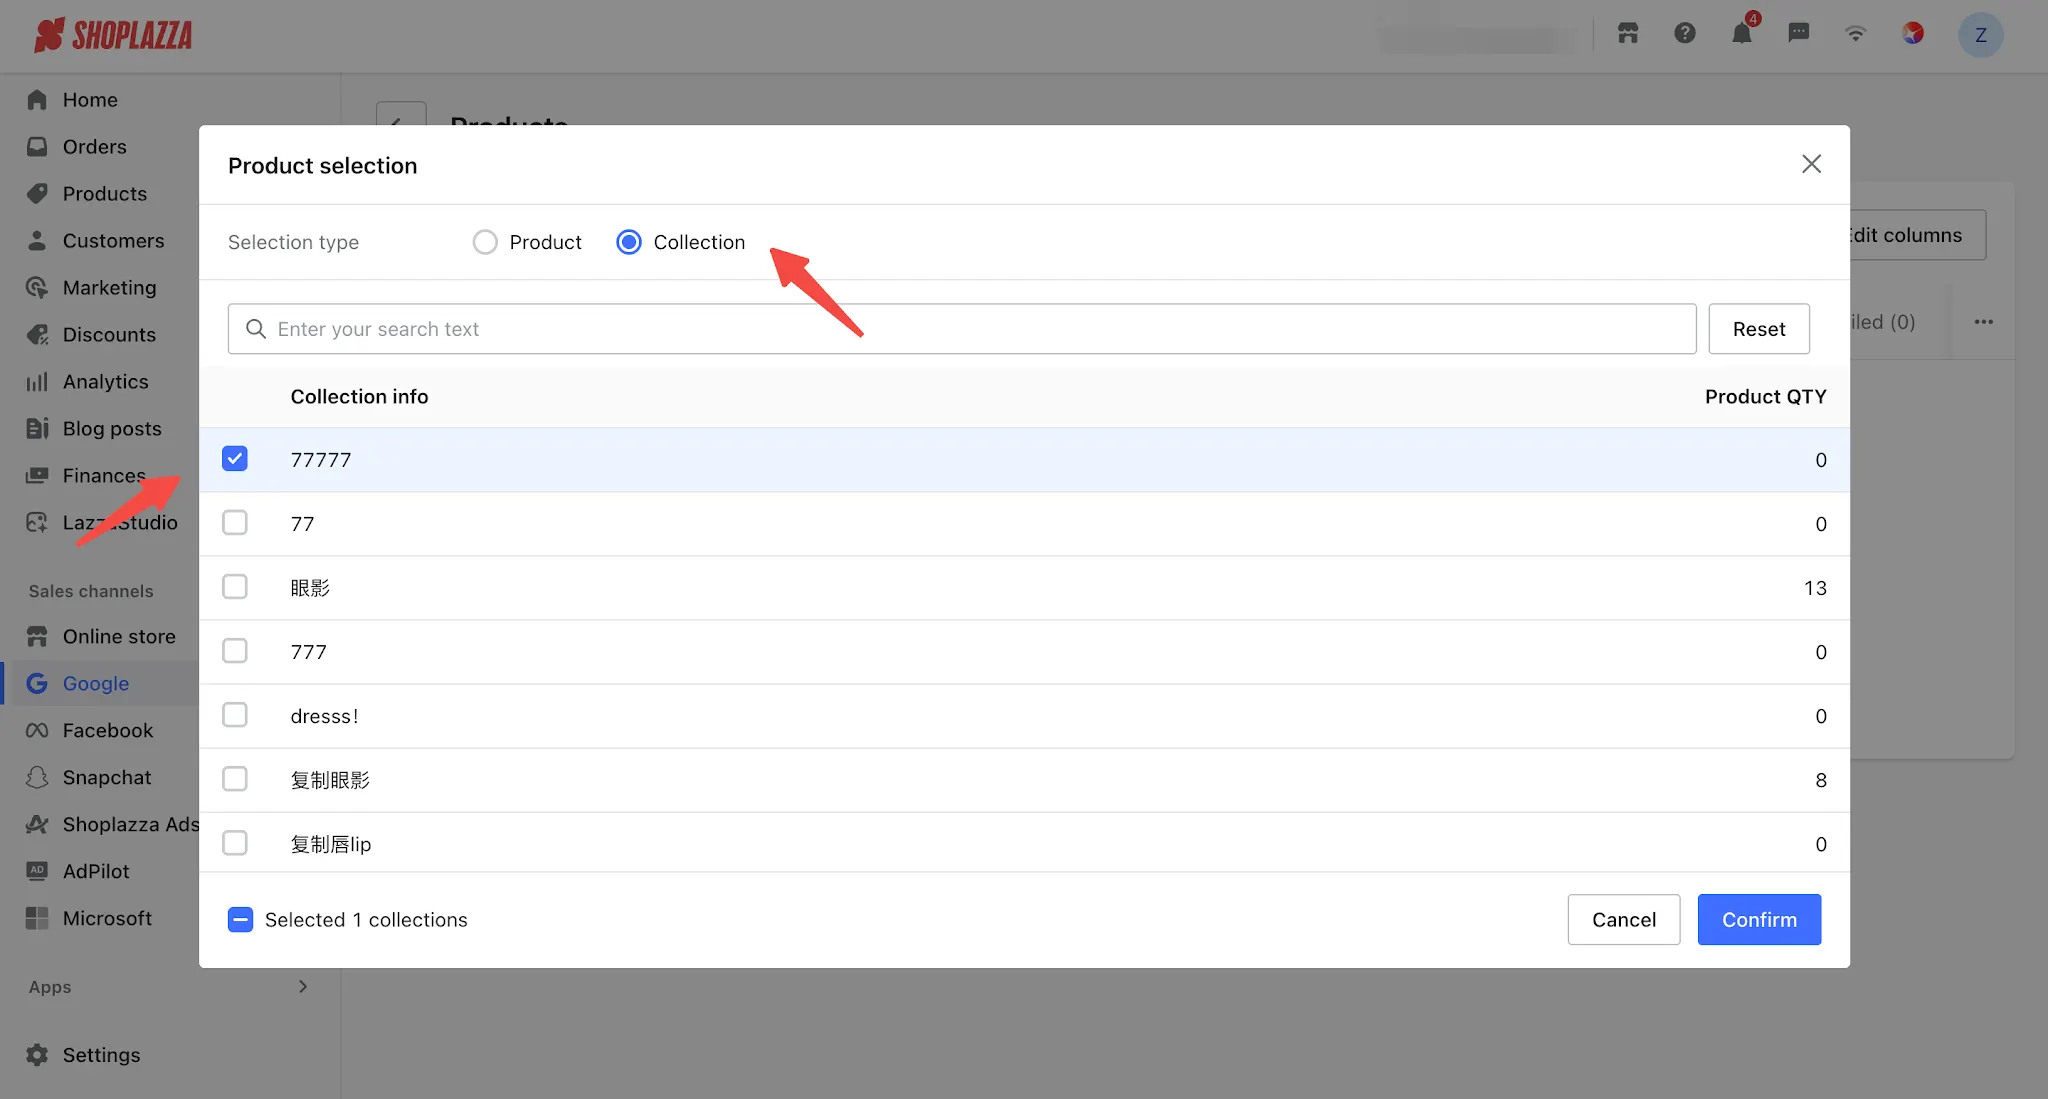
2. In the pop-up window, you can switch between the Products and Collections tabs to select products:
- Products: Expand an SPU and select the SKUs you want to sync individually. You can also click Select All Published Products in Store in the bottom-left corner to select all published products in your store at once. This section supports searches by product title, vendor name, SKU, SPU, tag, product ID, variant ID, and notes.
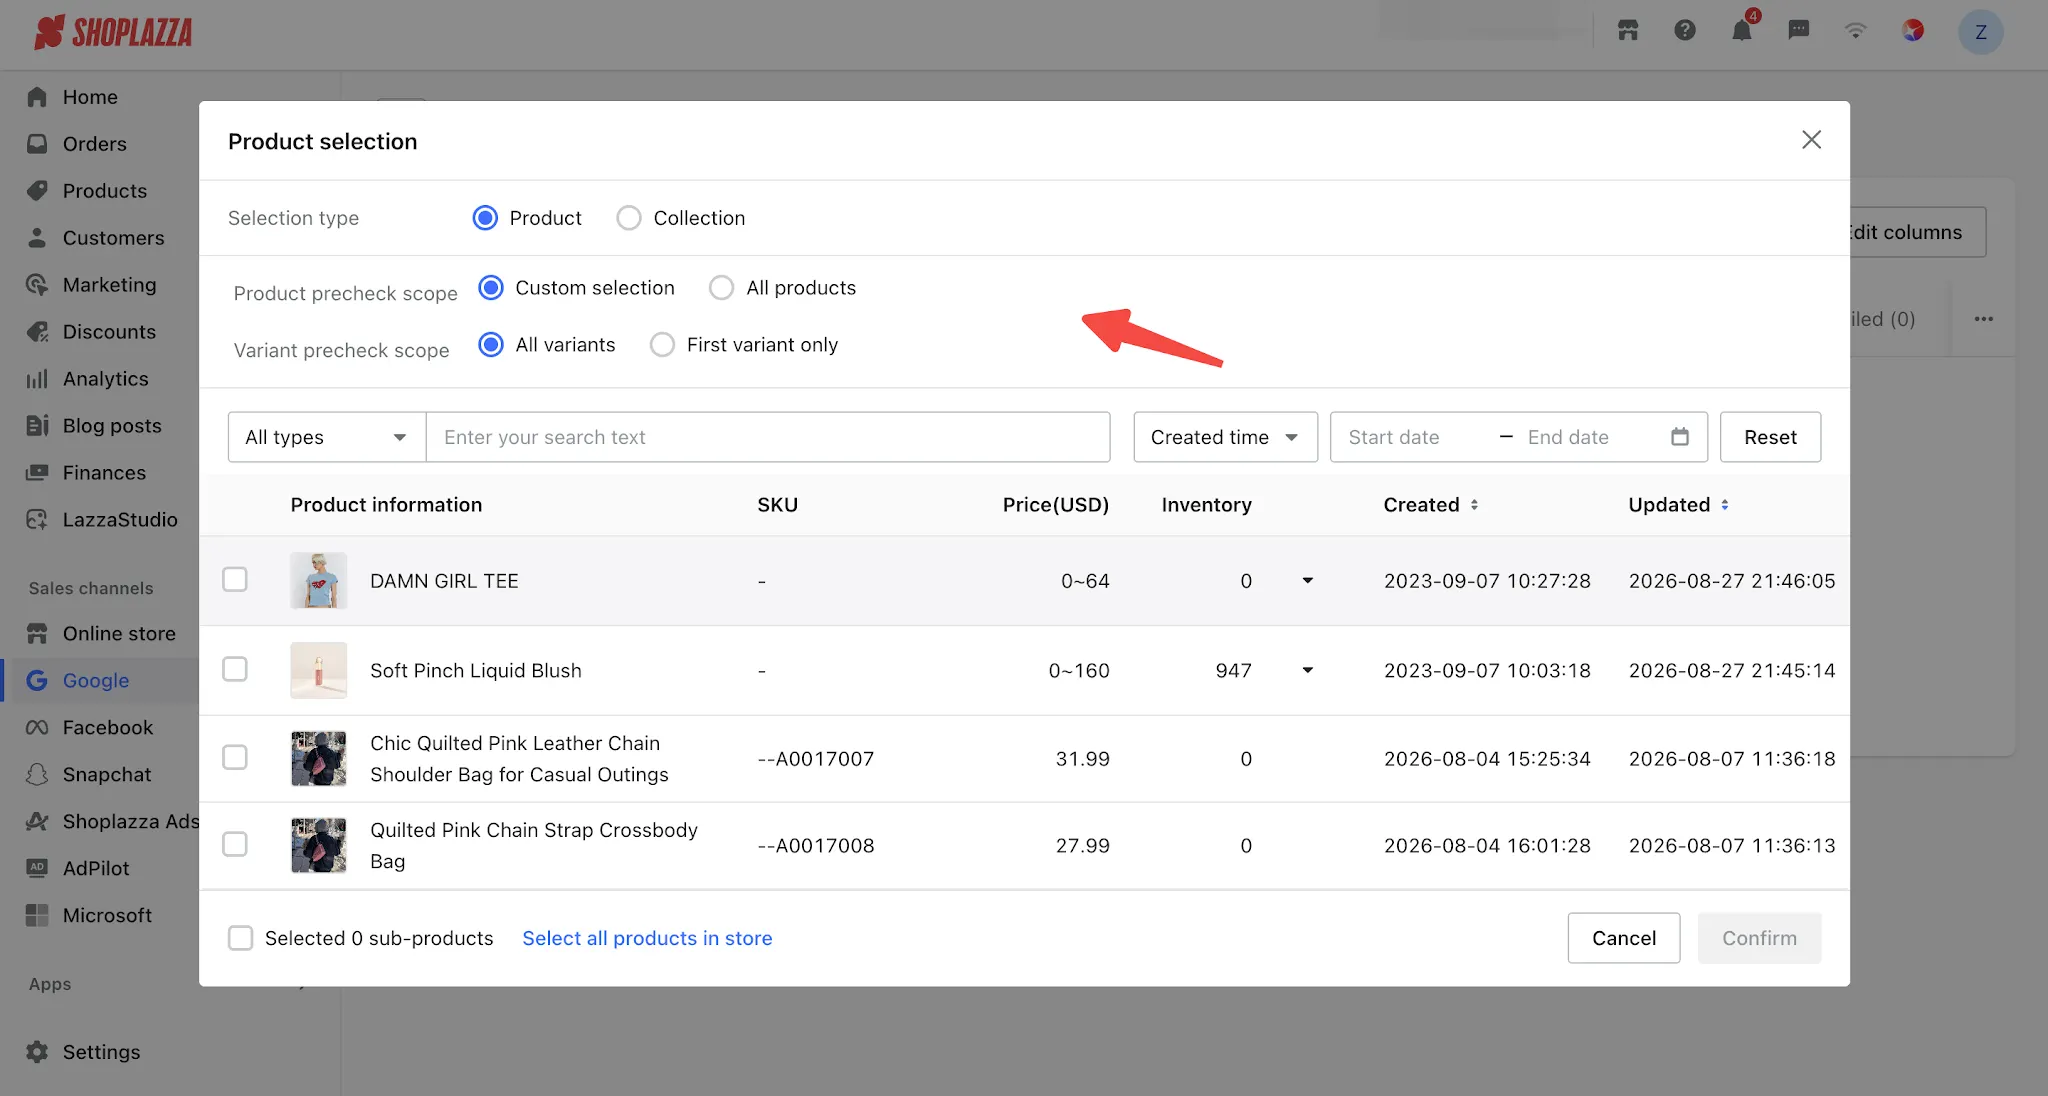
- Collections: Select an entire collection to bulk-add all products within that collection.
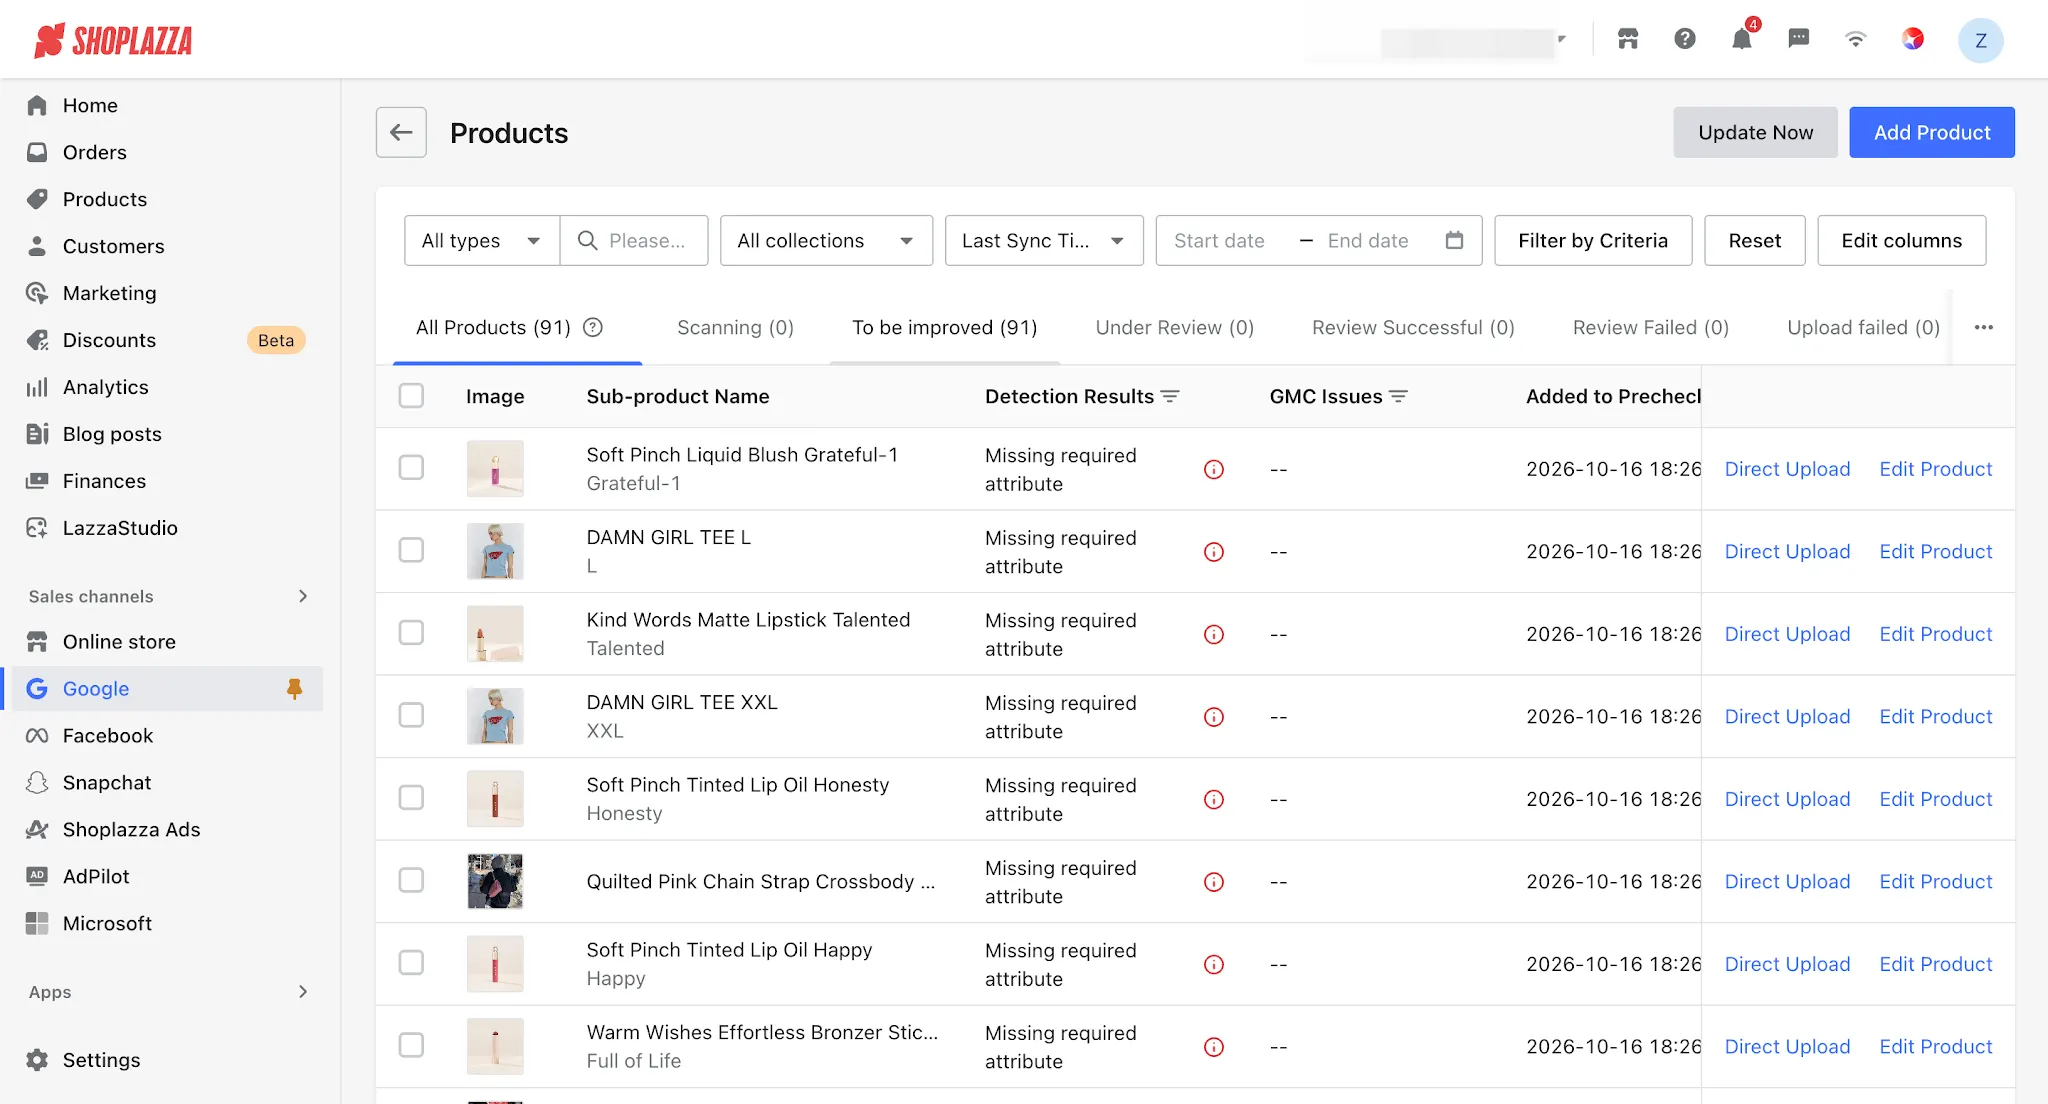
- After selecting the products, click Confirm to add them to the Product Management list.
Complete Product Attributes
After products are added, the system automatically checks the attribute completeness of each SKU. The validation results are divided into the following categories:
| Status | Description |
| Attributes Complete | All required fields have been filled in. The product will be uploaded to GMC directly. |
| Missing Required Attributes | Some required fields are missing. It is recommended to complete them before uploading. |
| Attributes Complete, Pending Upload | All required attributes are complete, and the product is waiting to be uploaded to GMC. |
Edit Individual Products
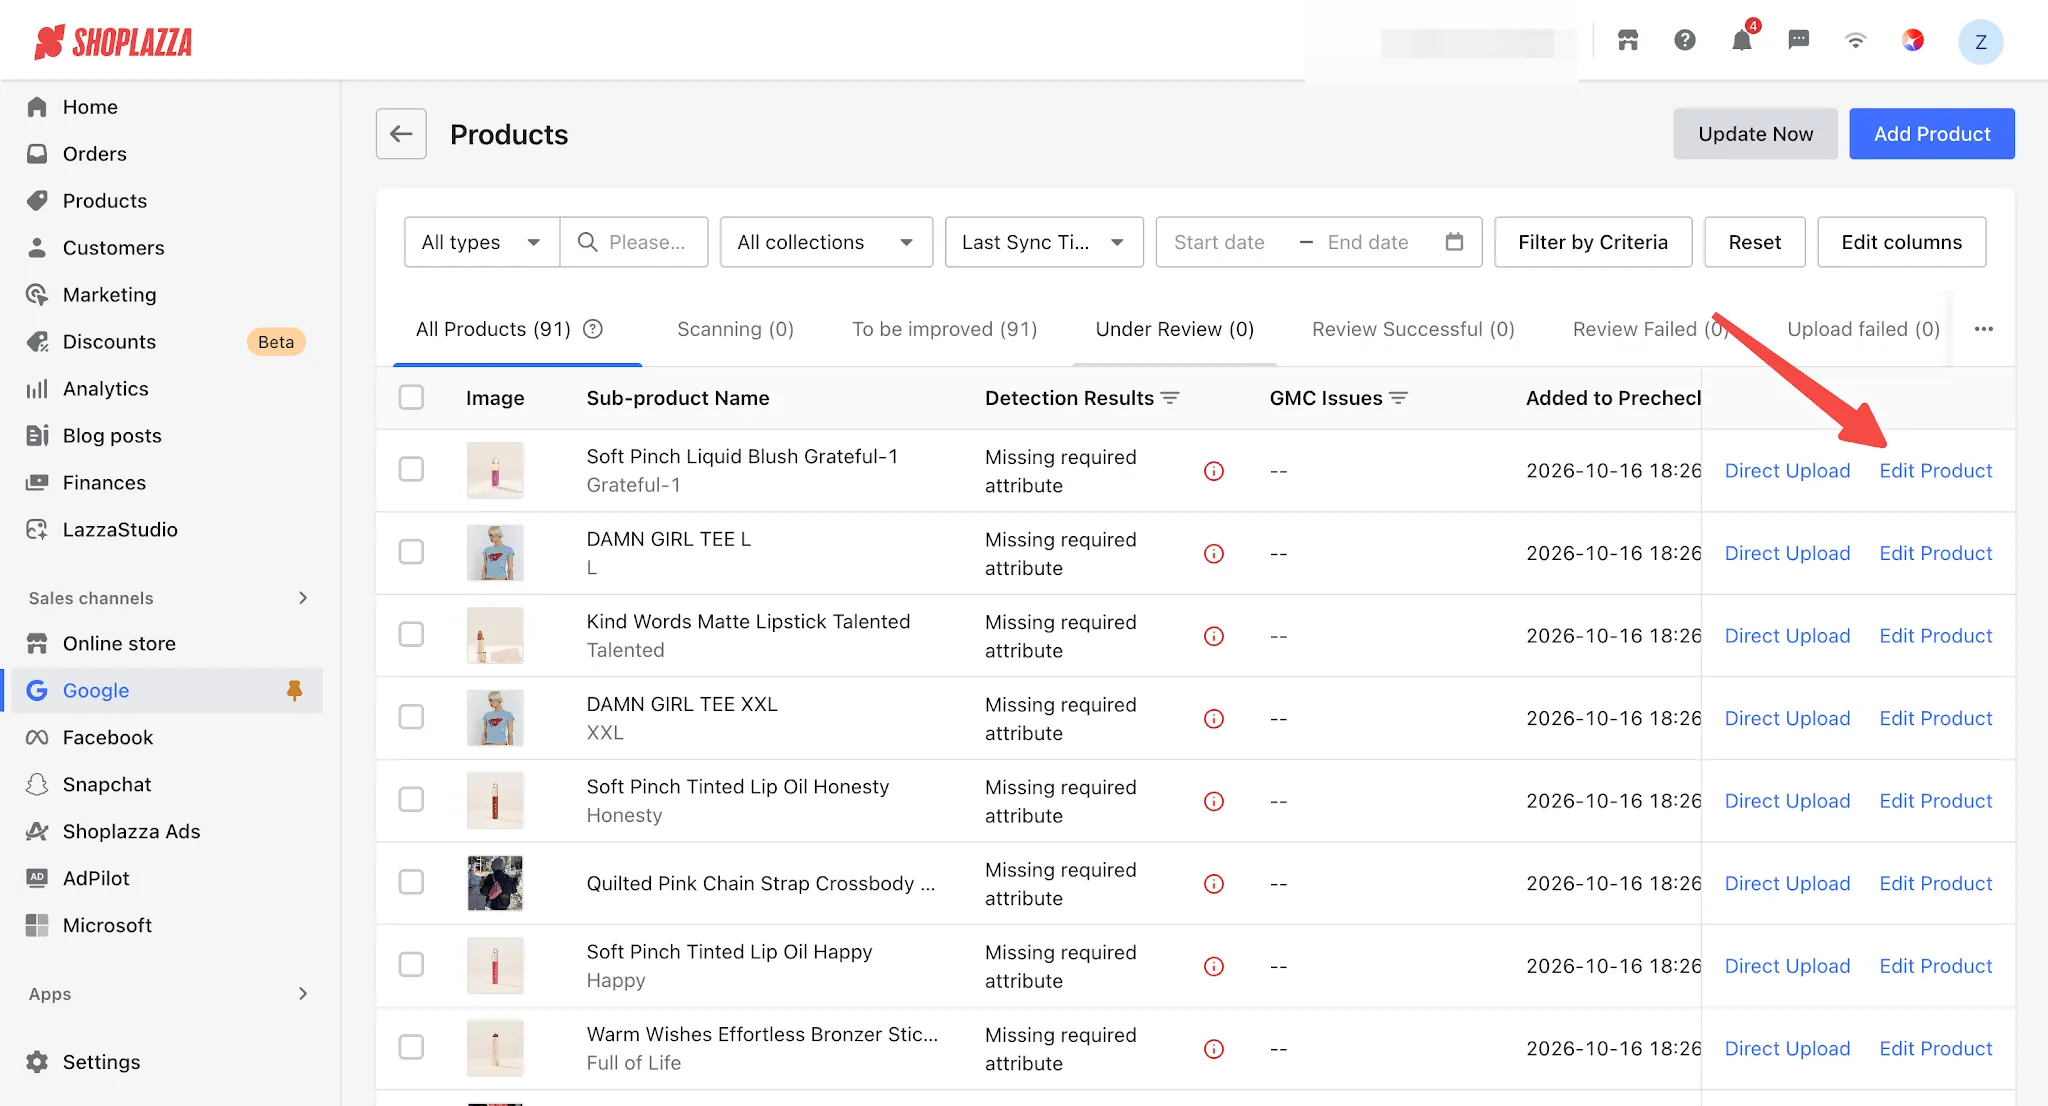
1. Find a product with the validation status Missing Required Attributes in the product list, then click Edit Attributes.
2. On the Attribute Editing page, complete the fields as prompted:
- Google Product Category: Select the most relevant category from Google's standard taxonomy.
- Product Type: Enter your custom product category path (e.g., “Men's Clothing > T-Shirts > Short Sleeve”).
- Brand: Enter the product's brand name.
- GTIN: Enter the product's Global Trade Item Number (e.g., EAN, UPC, or ISBN).
- MPN: Enter the manufacturer's part number (required if no GTIN is available).
- No Unique Product Identifier: Enable this option for custom-made or handmade products to skip GTIN/MPN validation.
- Gender: Male / Female / Unisex.
- Age Group: Newborn / Infant / Toddler / Kids / Adult.
- Color
- Size
- Size Type
- Size System
- Material
- Pattern
- Custom Label 0–4: Used to create custom product groups and configure bidding strategies in Google Ads.
- Additional Attributes: Adult, Multipack, Bundle, Shipping Label, Item Weight, and Unit Pricing Measure.
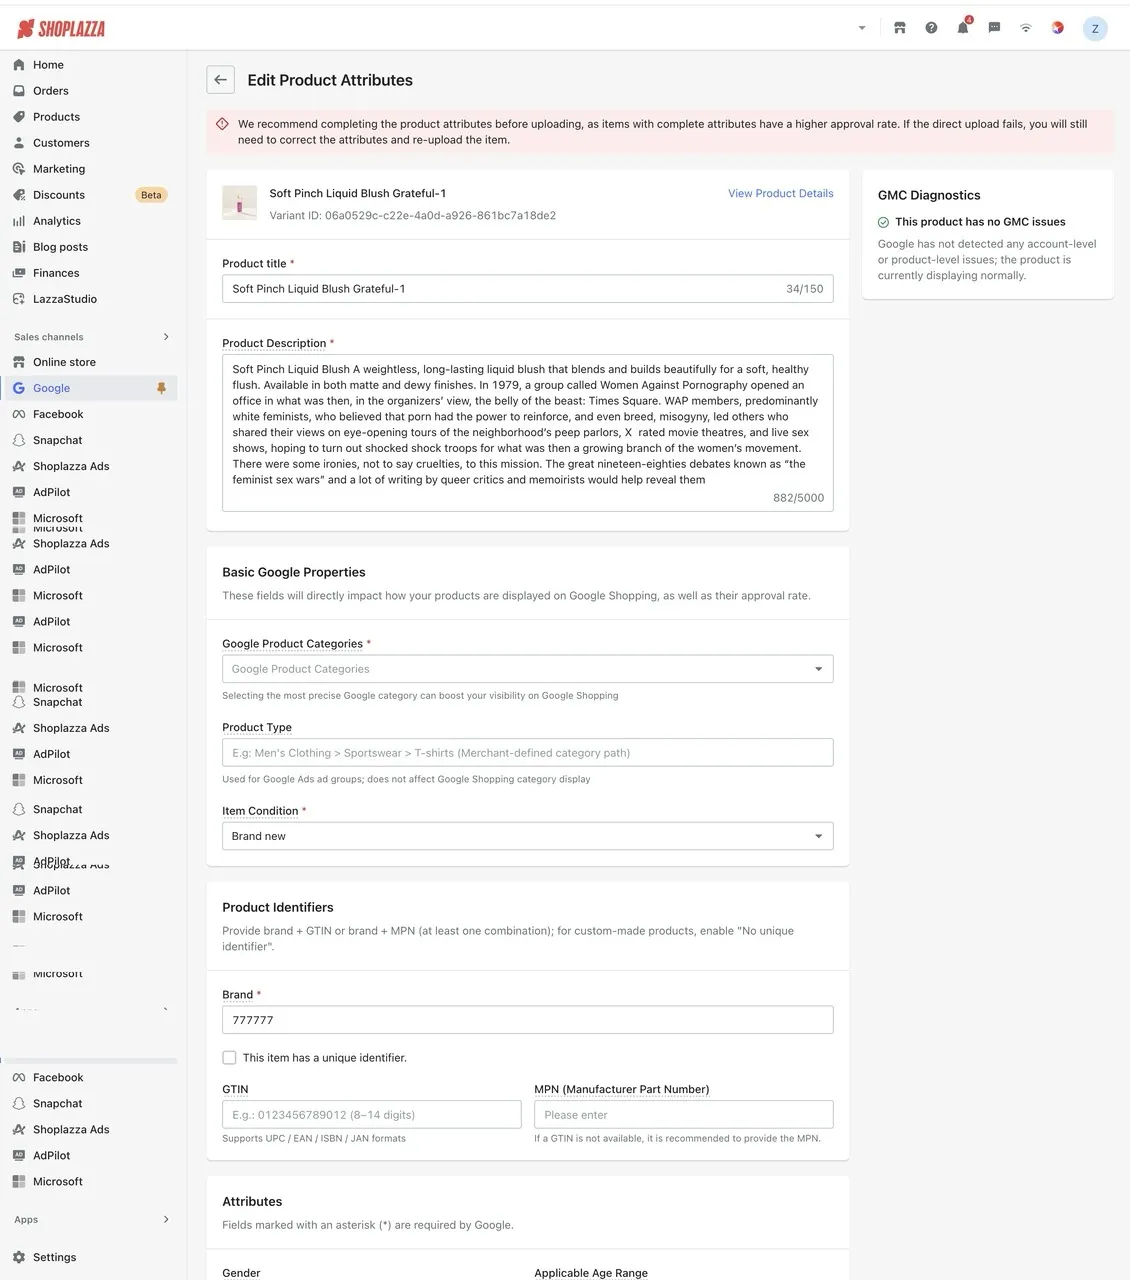
- Once all fields are completed, click Save. The system will rerun the attribute validation.
Bulk Editing
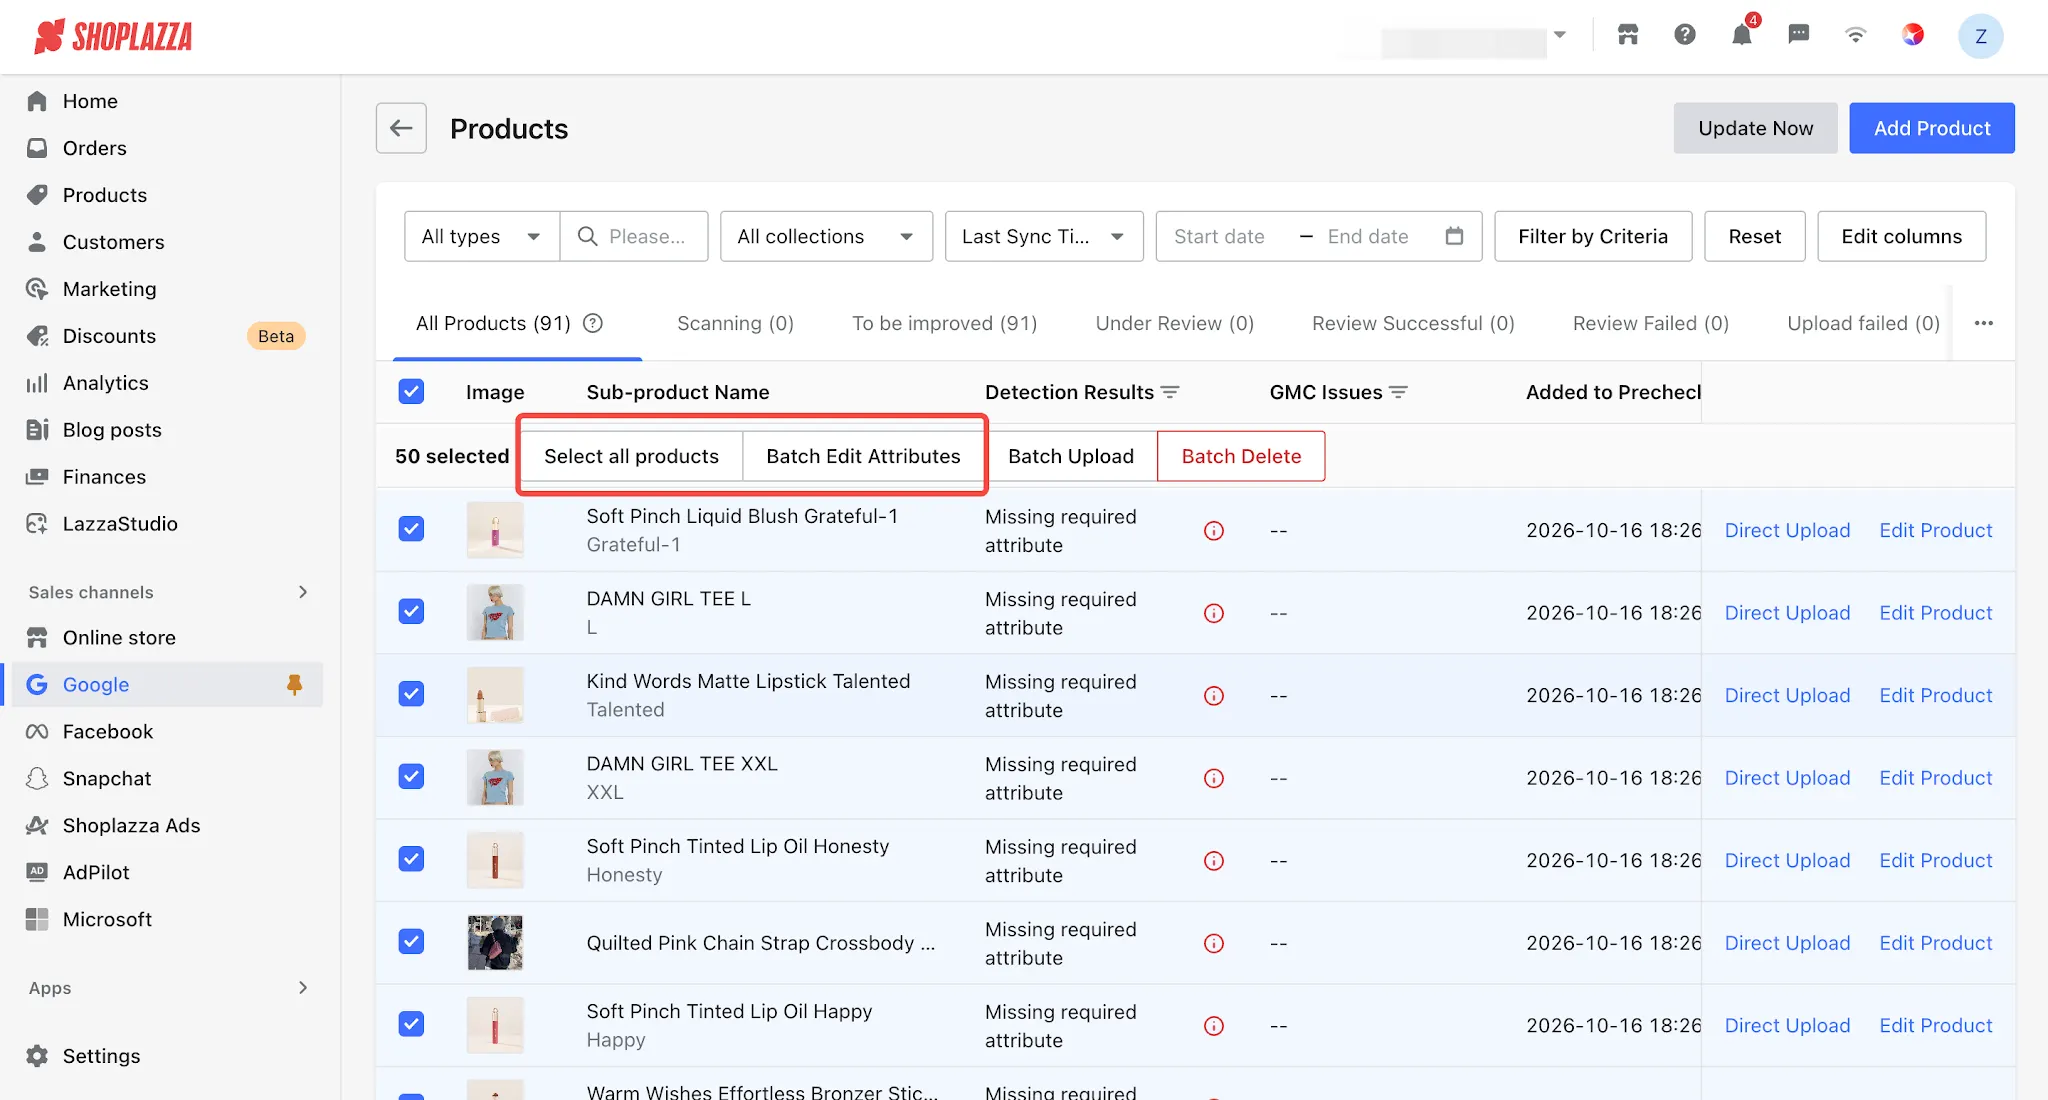
1. In the product list, select multiple products, then click Bulk Edit Attributes in the bulk actions toolbar at the top.
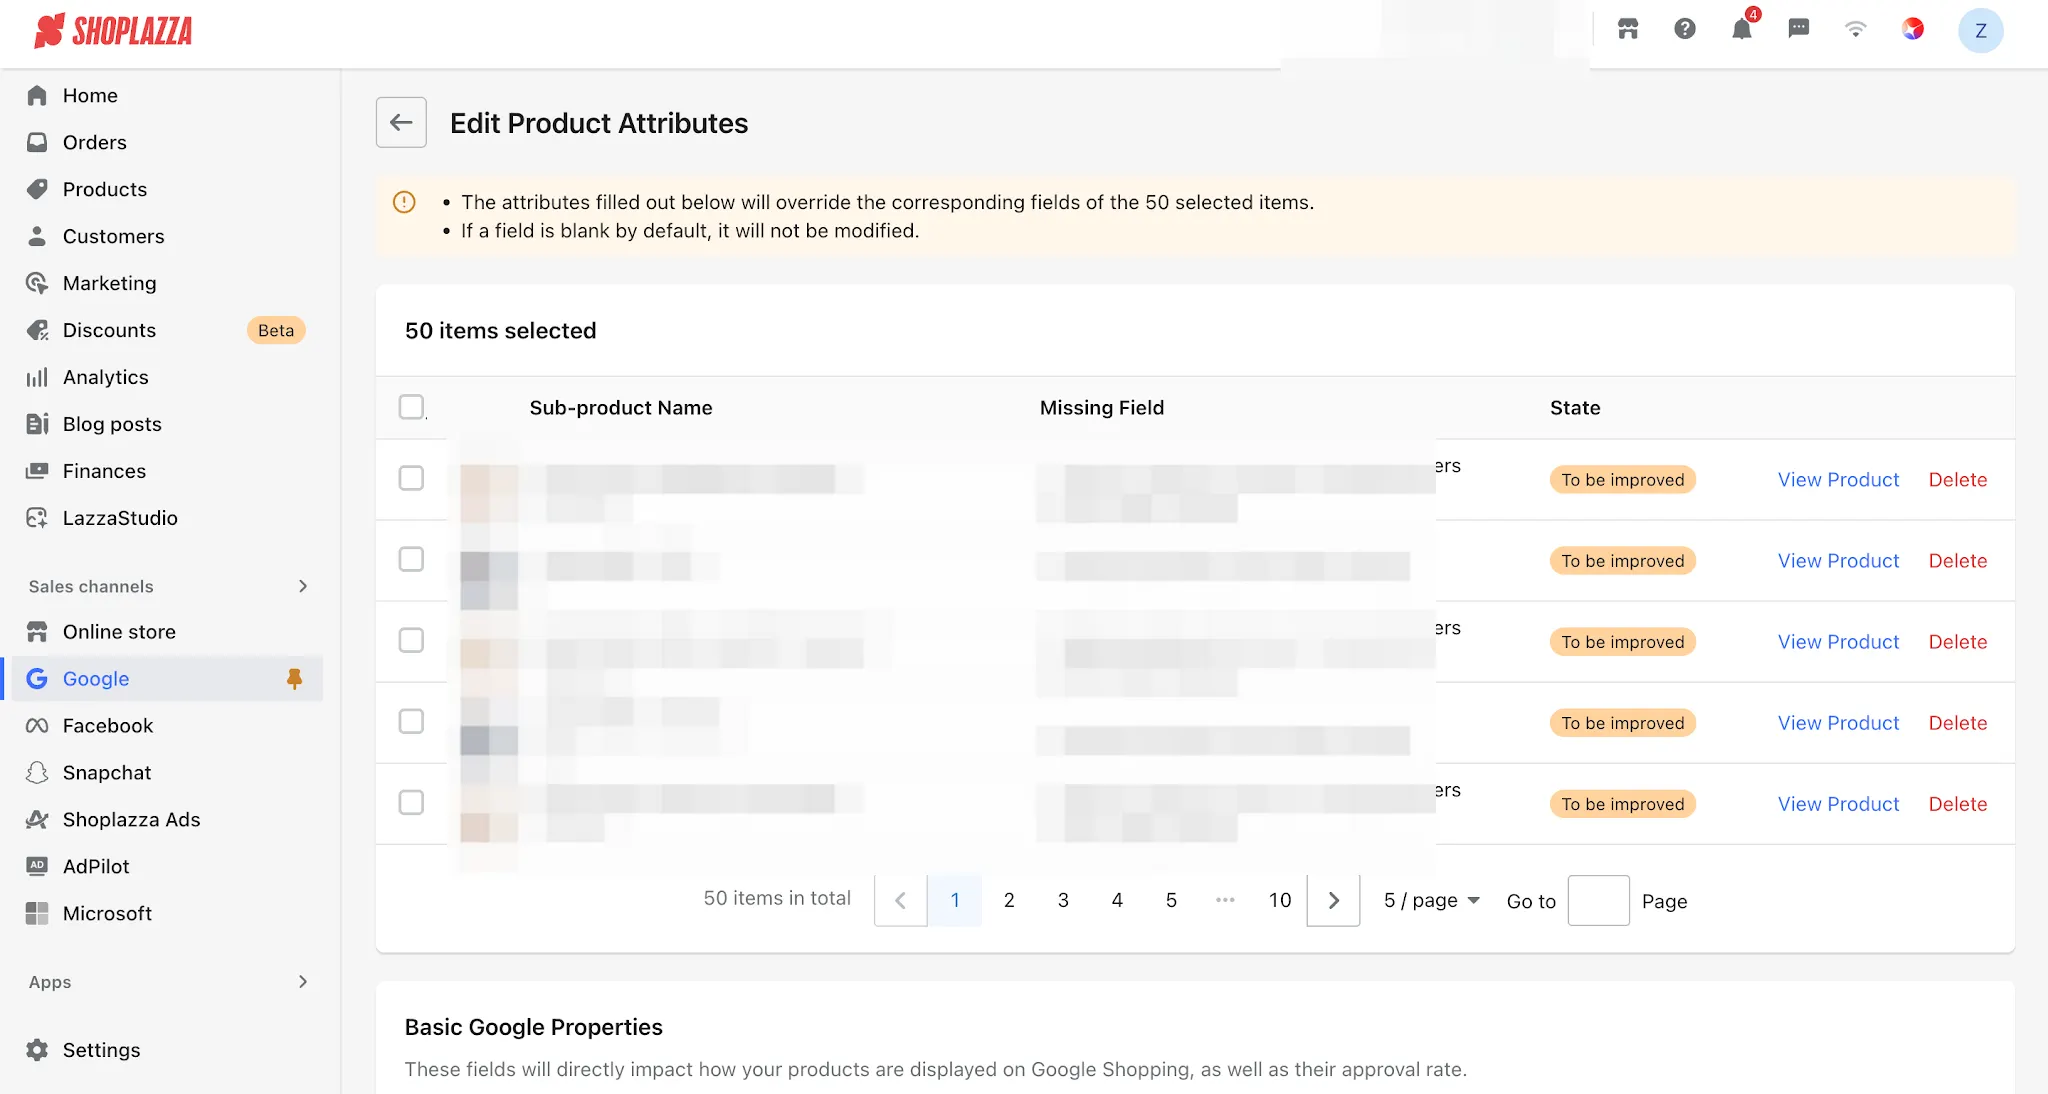
2. On the Bulk Edit page, any fields you fill in will overwrite the corresponding values for all selected products. Fields left blank will retain each product’s existing values. Please edit carefully.
3. Click Save to complete the bulk edit.
Step 6: Upload Products to GMC
1. If Automatic Upload is enabled, products with complete attributes will be automatically uploaded to GMC for review.
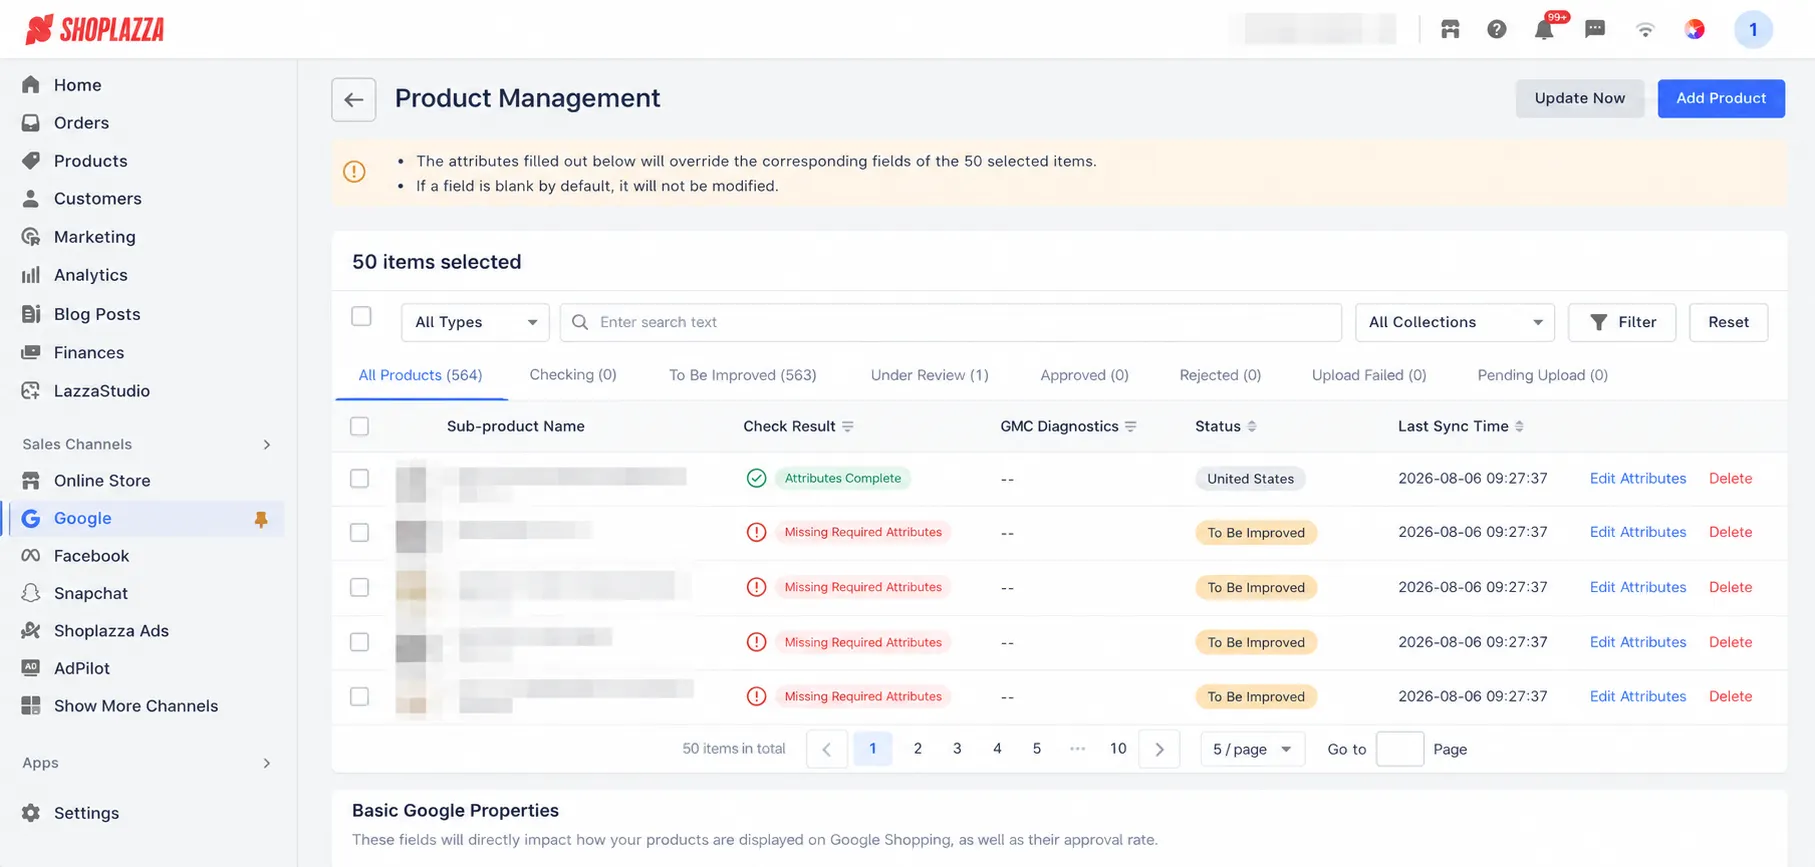
2. For products with incomplete attributes, click Upload or Bulk Upload. In the confirmation dialog, click Confirm to upload the products to GMC.
Note
We recommend completing all product attributes before uploading, as products with complete attributes have a higher approval rate. If a direct upload fails, you will still need to fix the missing attributes to pass GMC review.
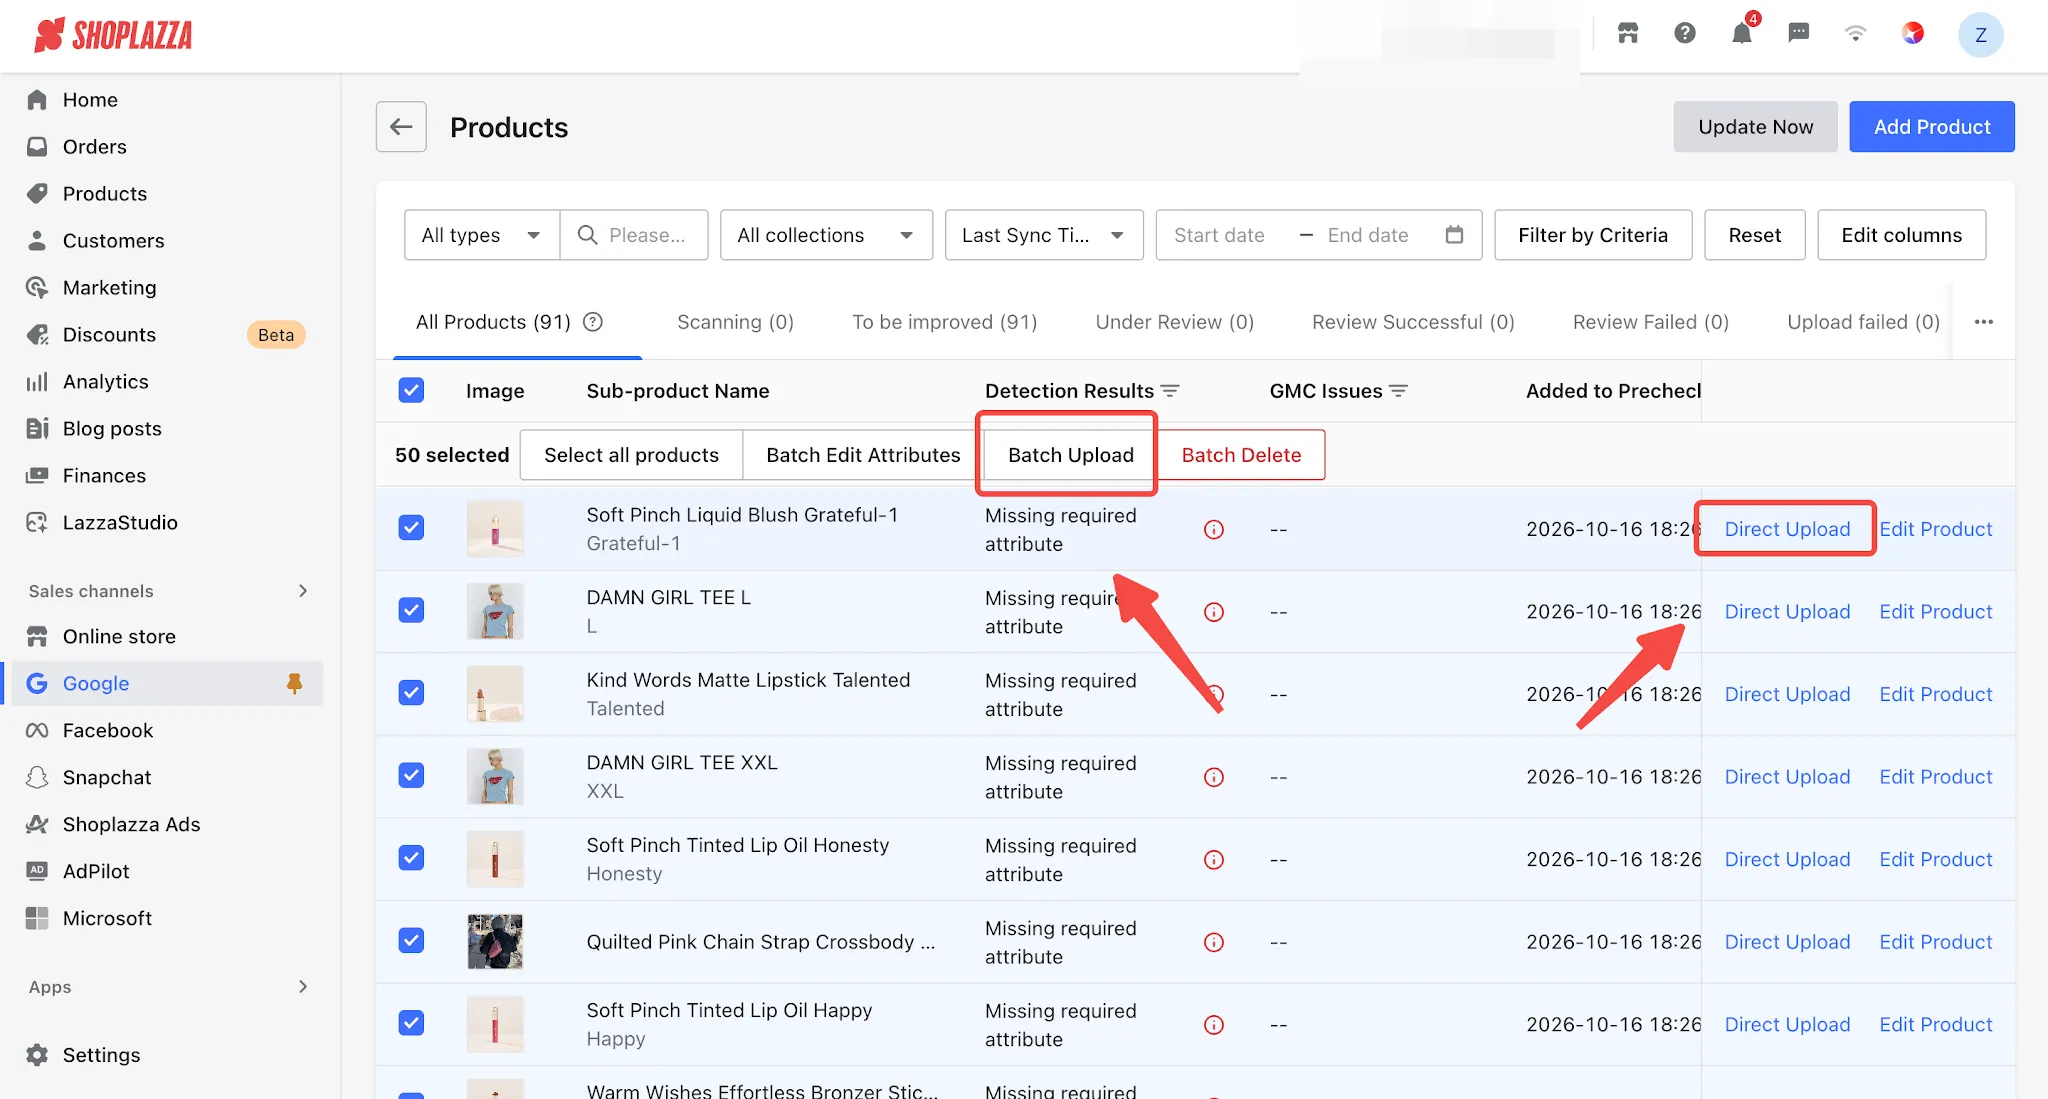
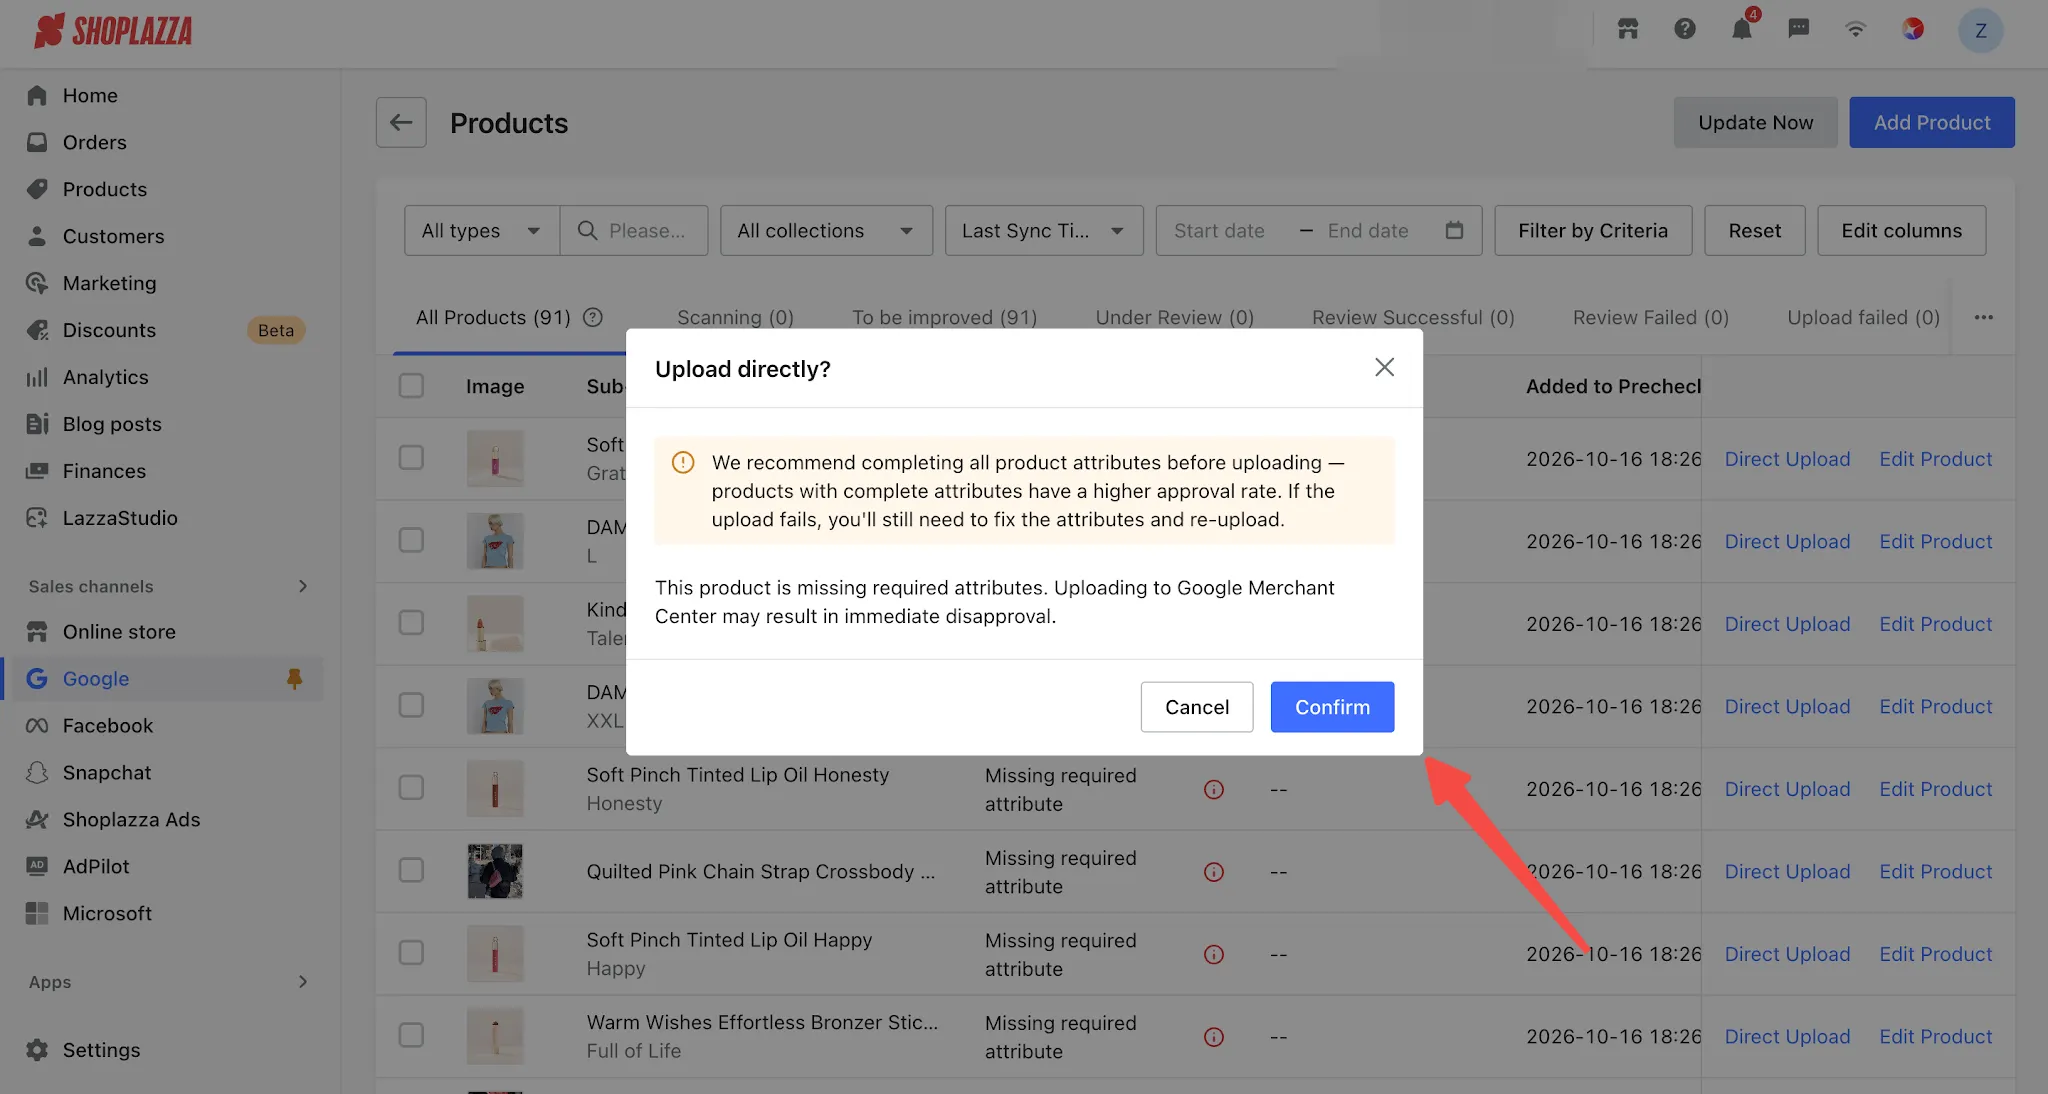
3. After uploading, the GMC Status column will display one of the following statuses:
| GMC Status | Description |
| Under Review | Google is reviewing the product. The review is expected to be completed within 24 hours. |
| Approved | The product has passed Google's review and can be displayed on Google Shopping. |
| Disapproved | Issues were detected. Fix the issues and re-upload the product. |
Note
For disapproved products, click Edit Attributes on the right side of the product row to open the individual product editing page. You can then view the specific reasons for disapproval in the GMC Diagnostics panel on the right and fix the issues.
View Account Diagnostics
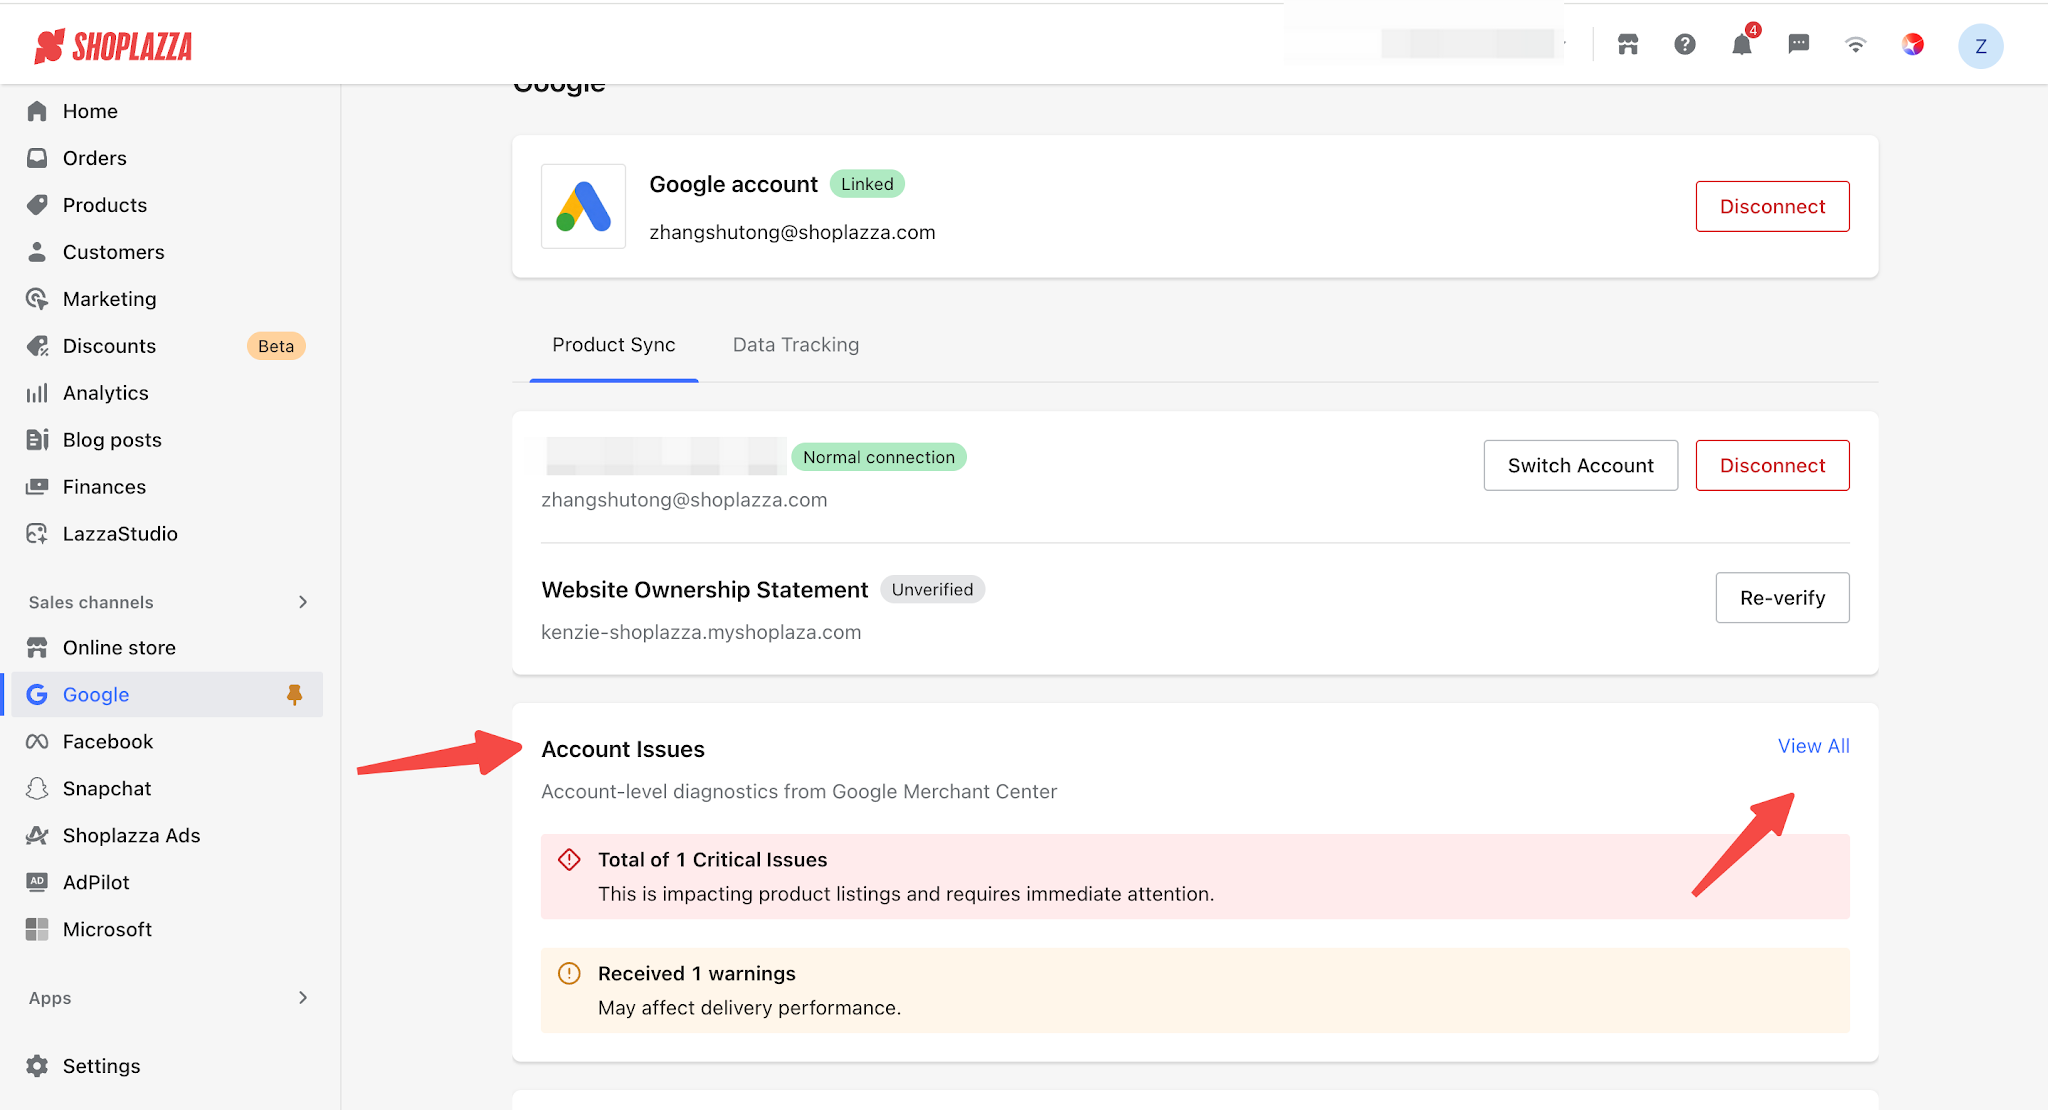
The Account Issues card on the homepage summarizes account-level diagnostic information returned by GMC (not product-level issues), such as policy violations and website claim issues.
1. Click View All in the upper-right corner of the card to open the Account Diagnostics page.
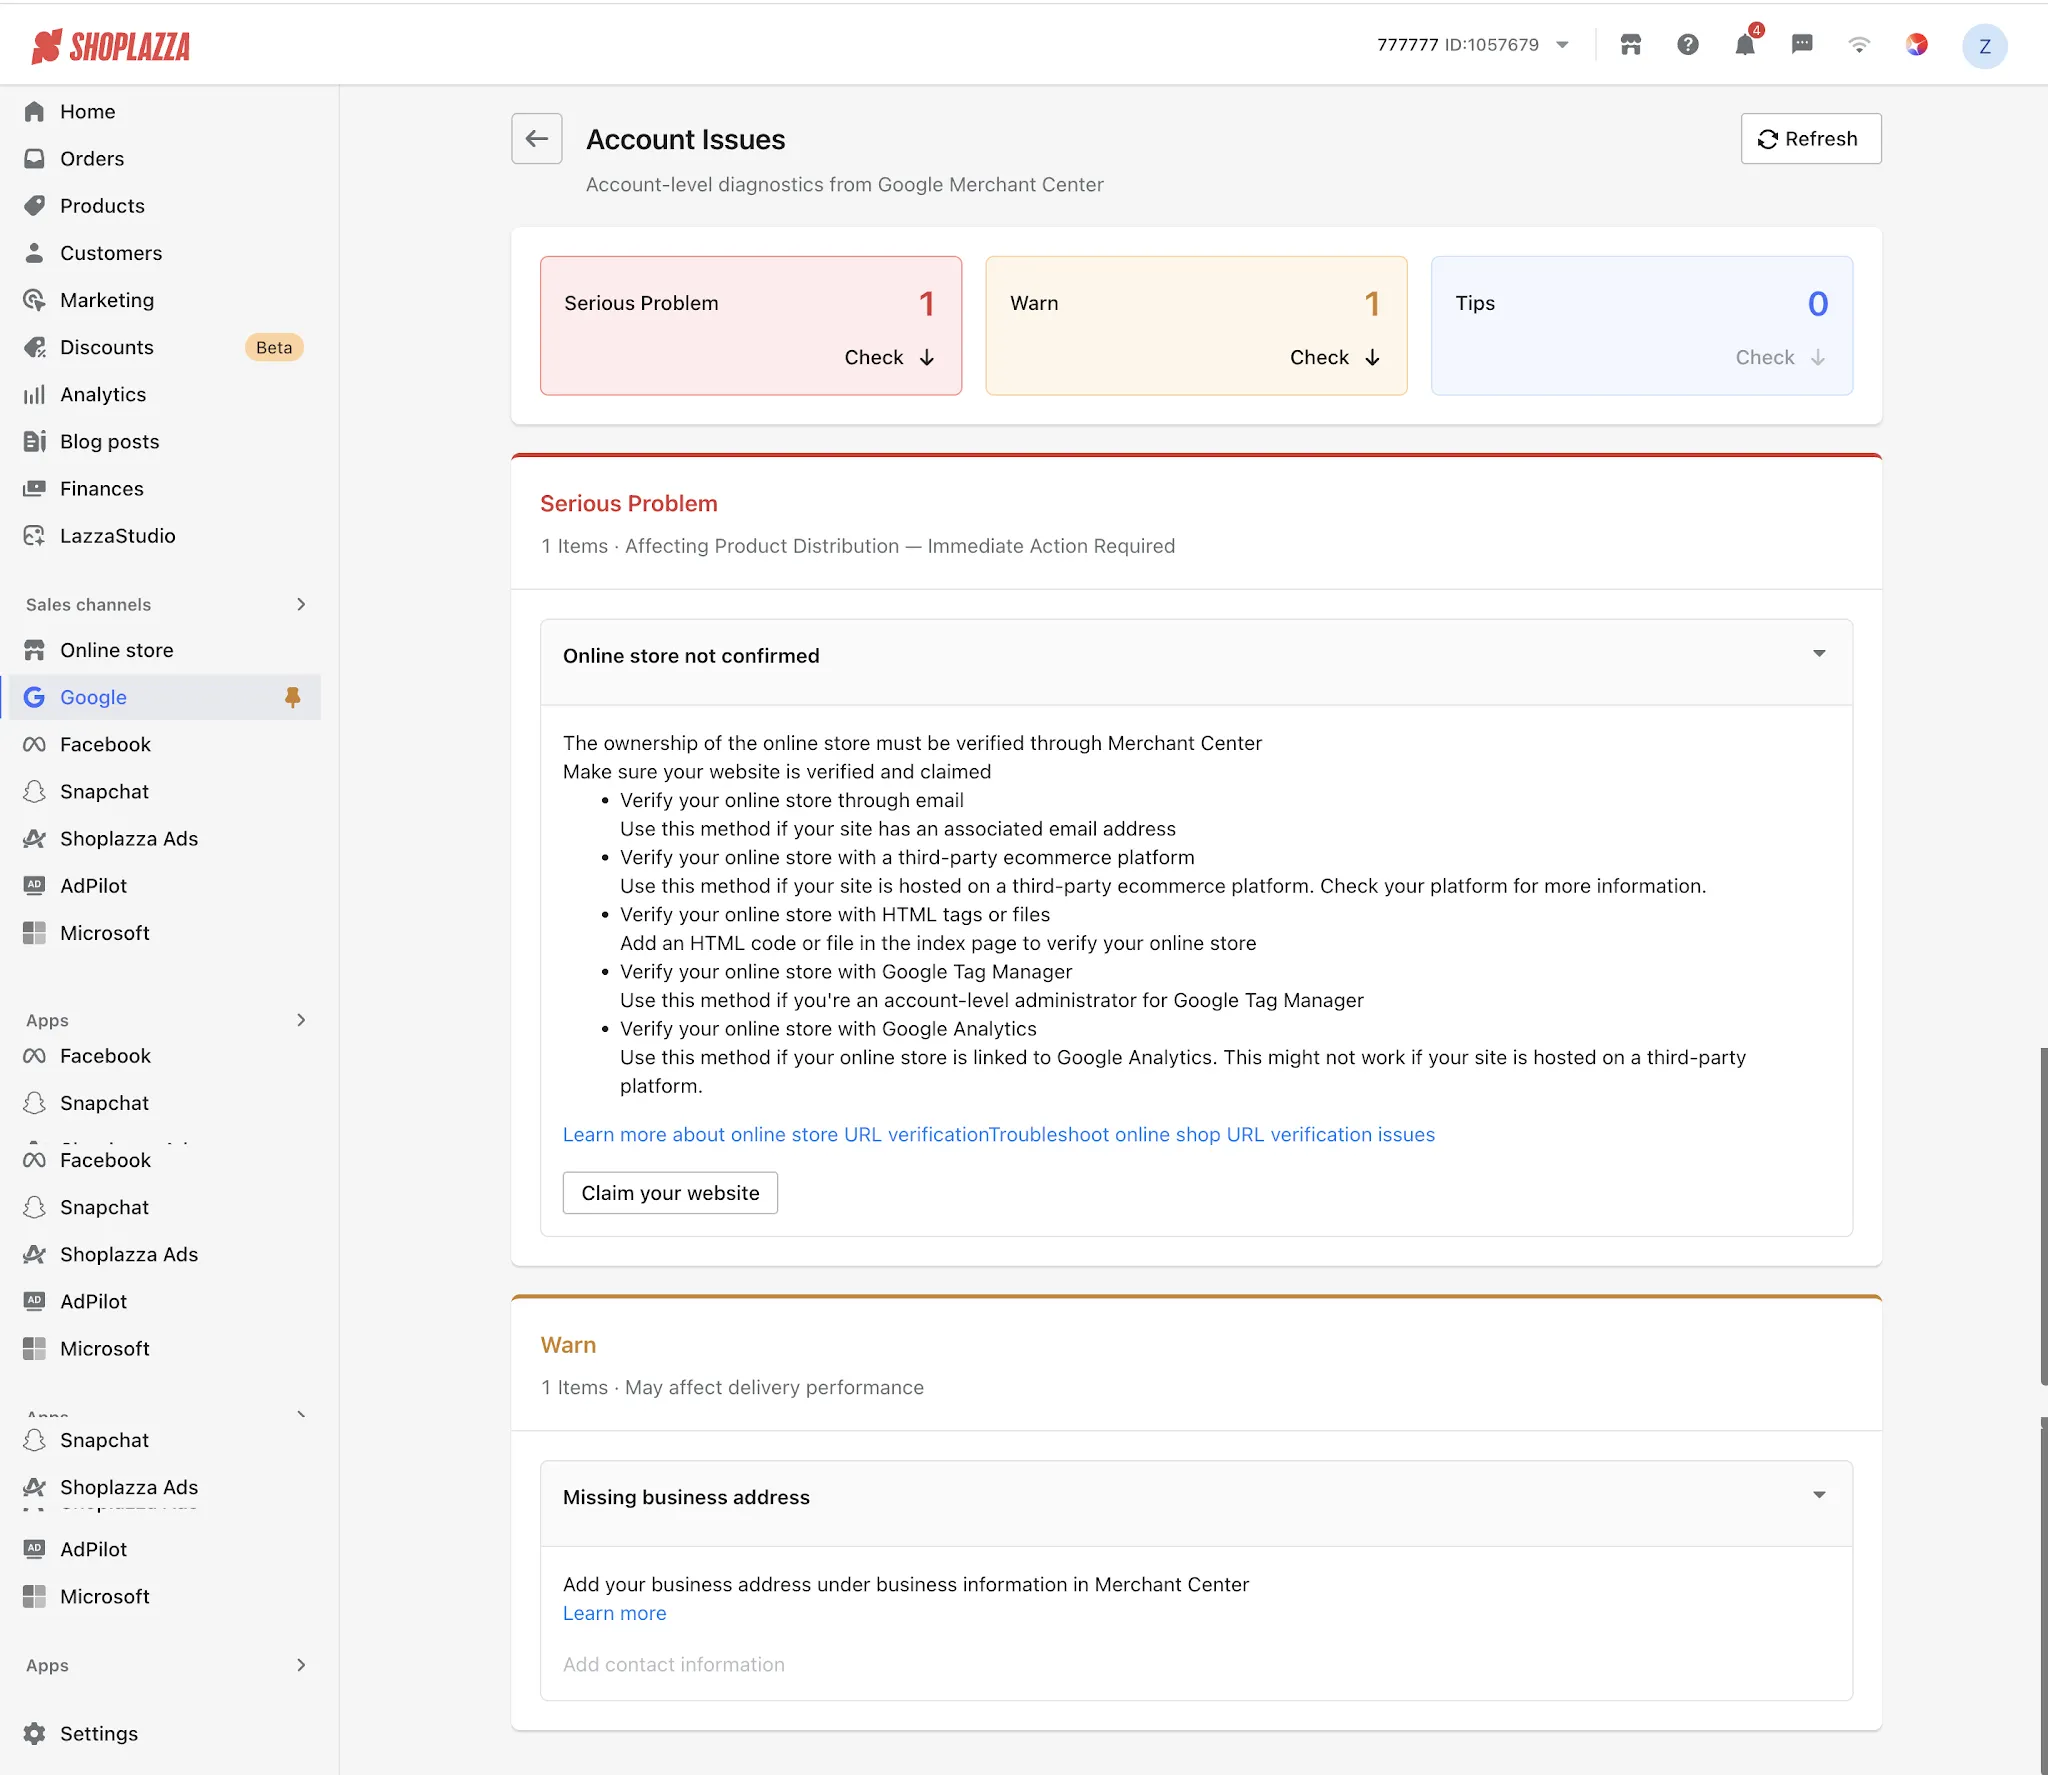
2. Issues are categorized by severity: Critical Issues (affect product visibility and require immediate action), Warnings (may affect campaign performance), and Recommendations (suggested optimizations that do not affect campaign delivery).
3. Click each issue to expand its details, then follow Google's recommended steps to resolve it. Some issues can be fixed directly in the app, while others require you to go to the GMC dashboard.
Tracking Configuration
Tracking configuration can be set up in parallel with product syncing.
Configure Google Analytics (GA4)
1. On the homepage, switch to Tracking and locate the Google Analytics section.
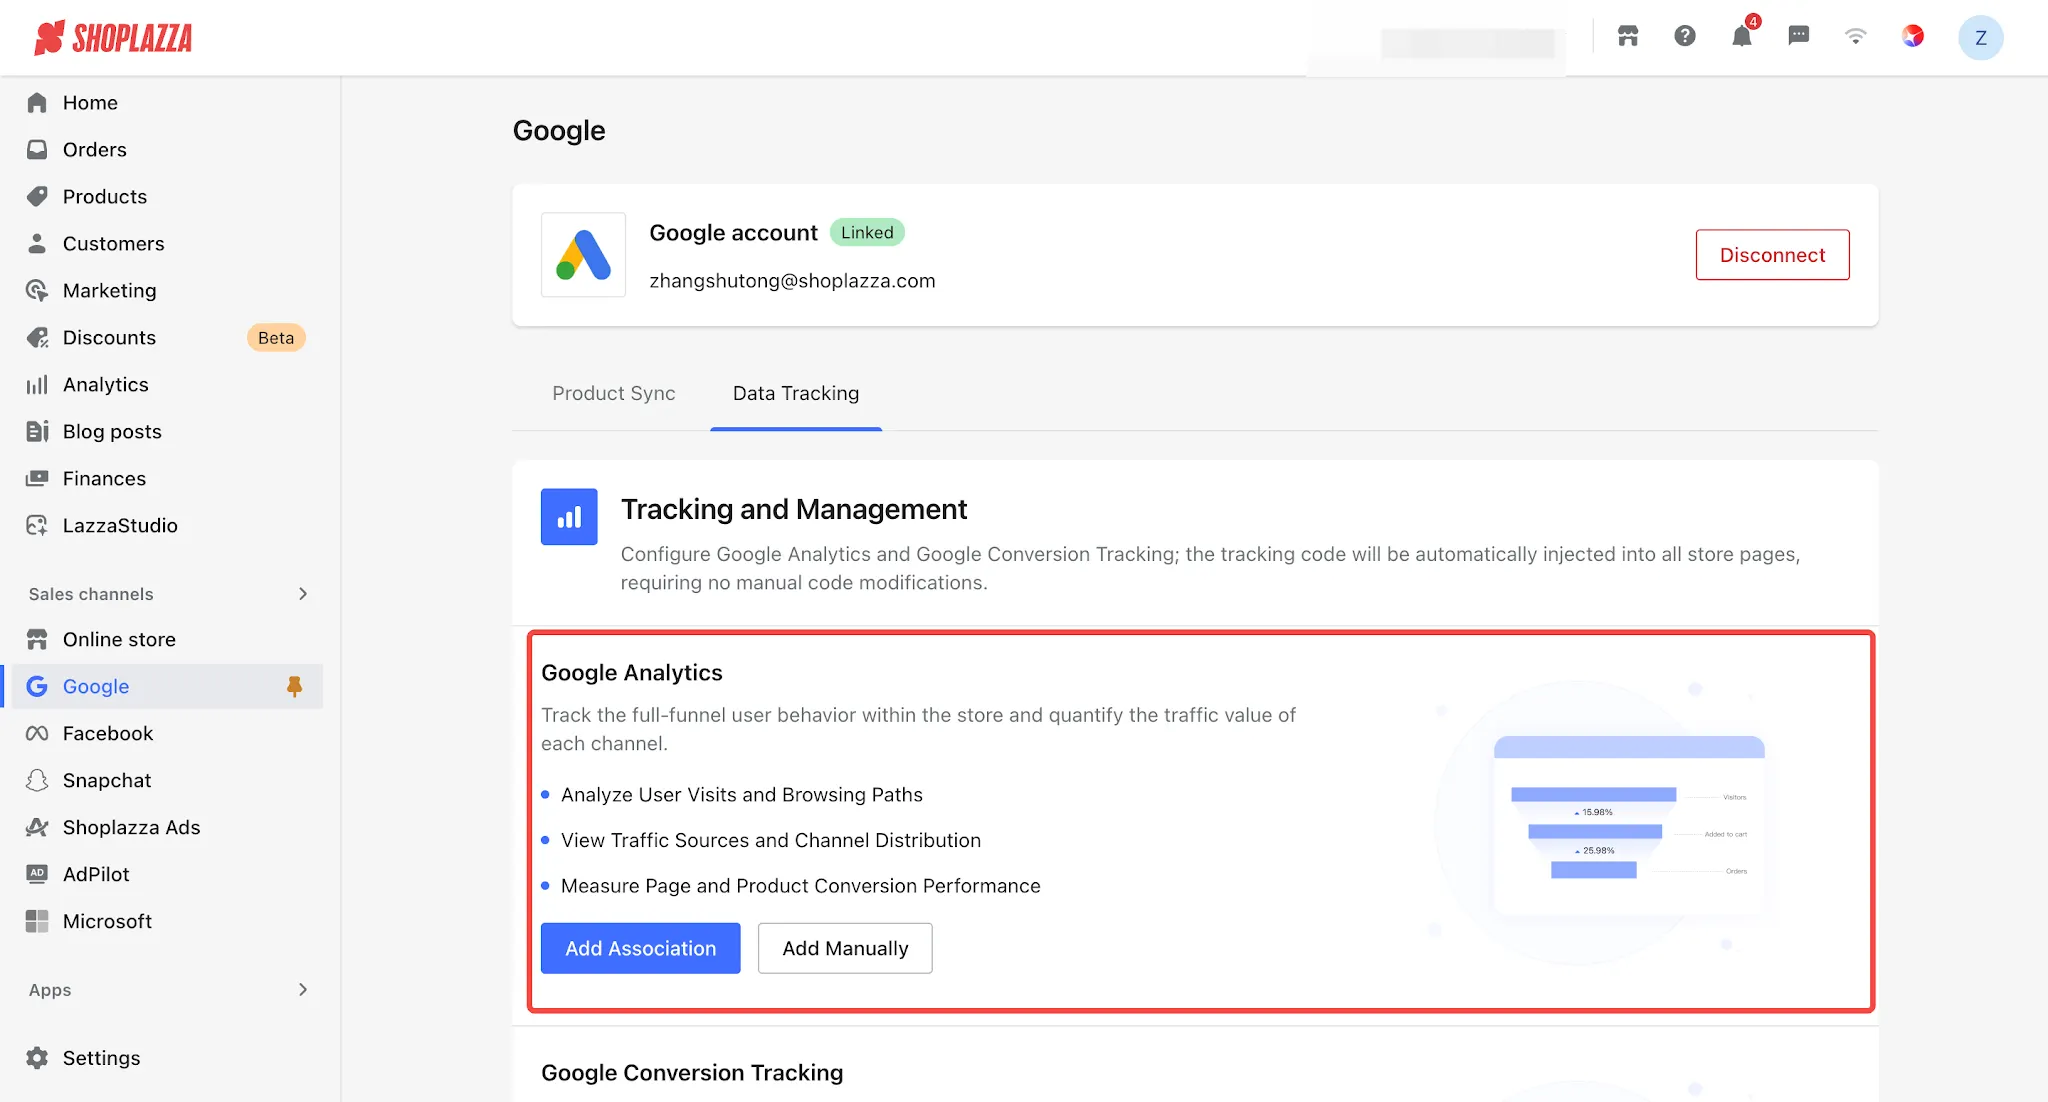
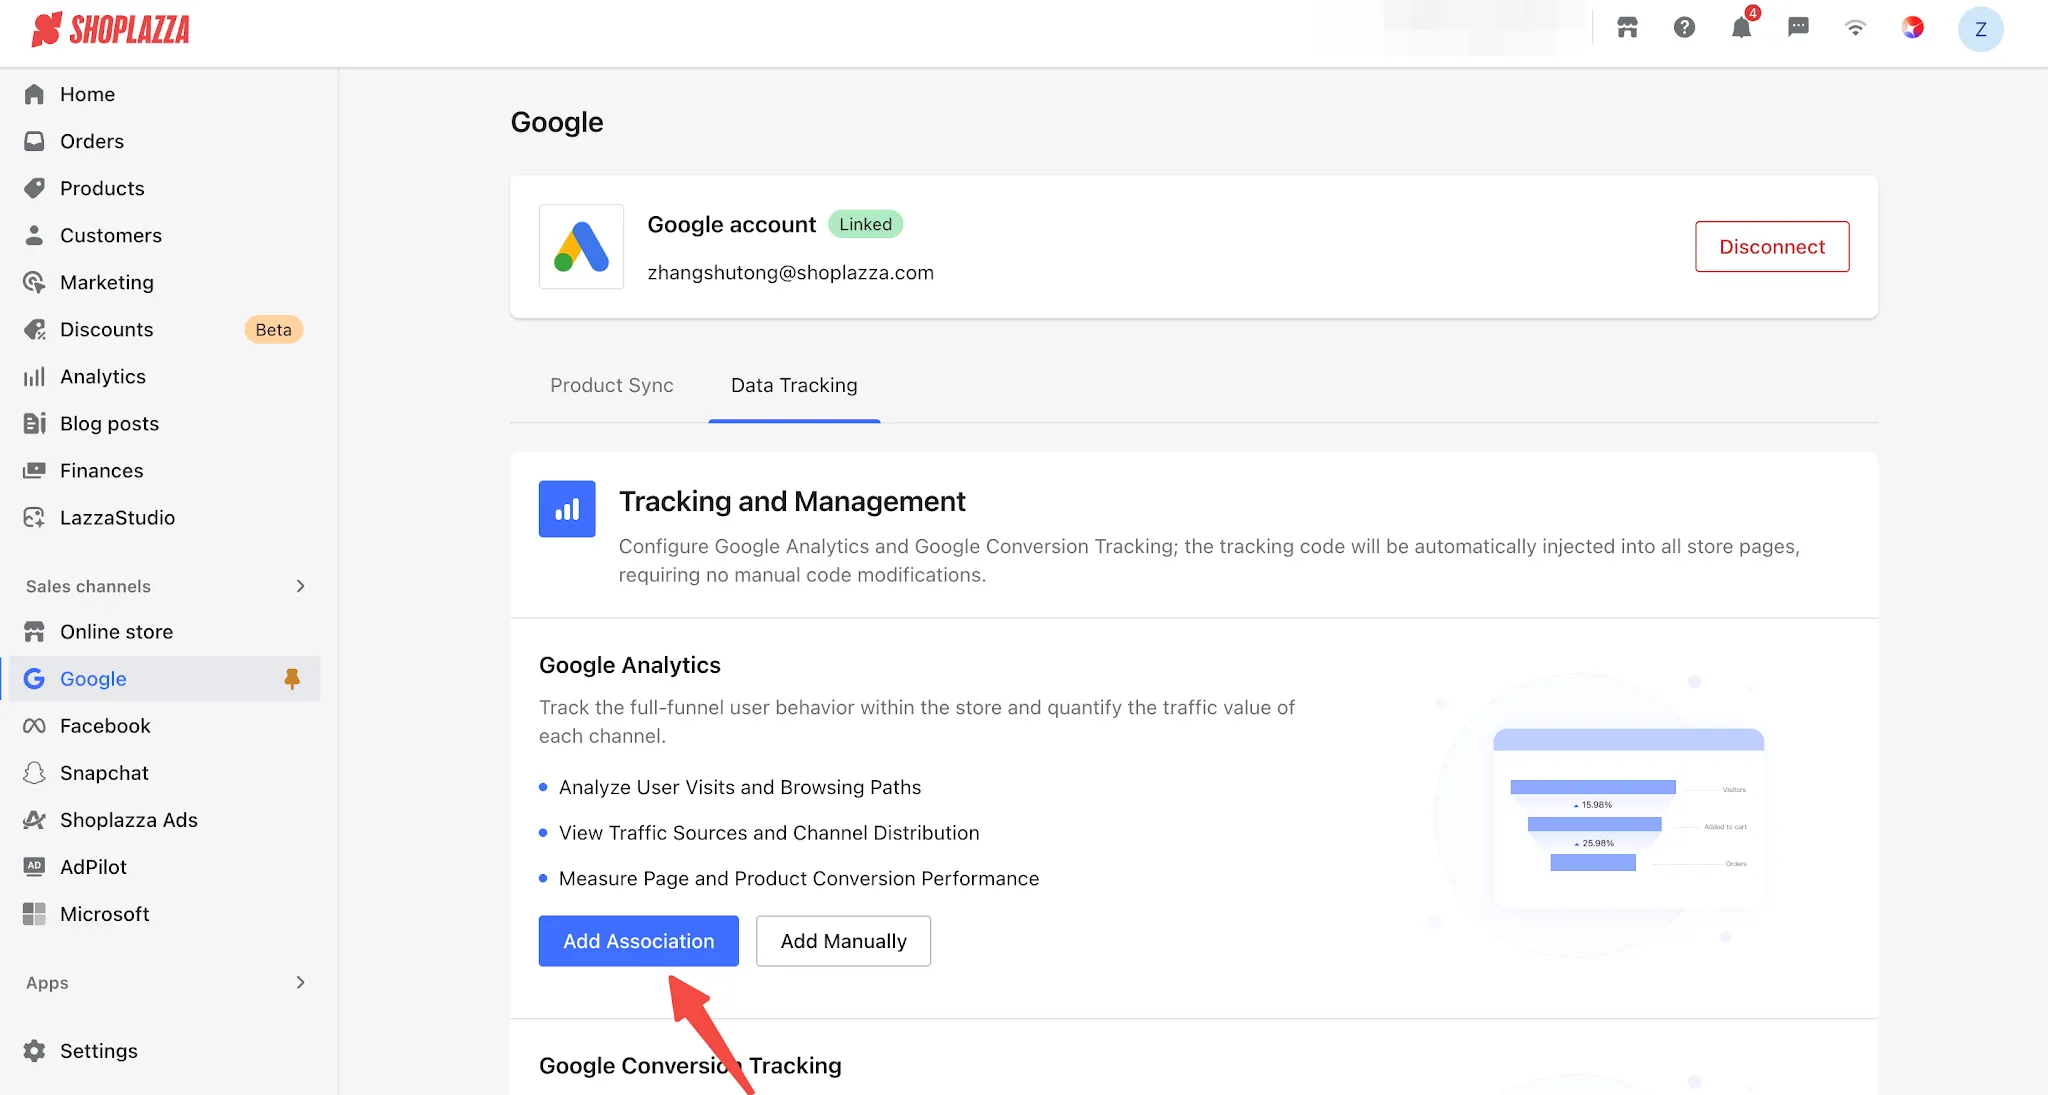
2. There are two ways to link GA4. Method 1: Add a New Connection (Recommended)
- Click Add Connection, then select the following in the pop-up window: Google Analytics account → Property → Data Stream.
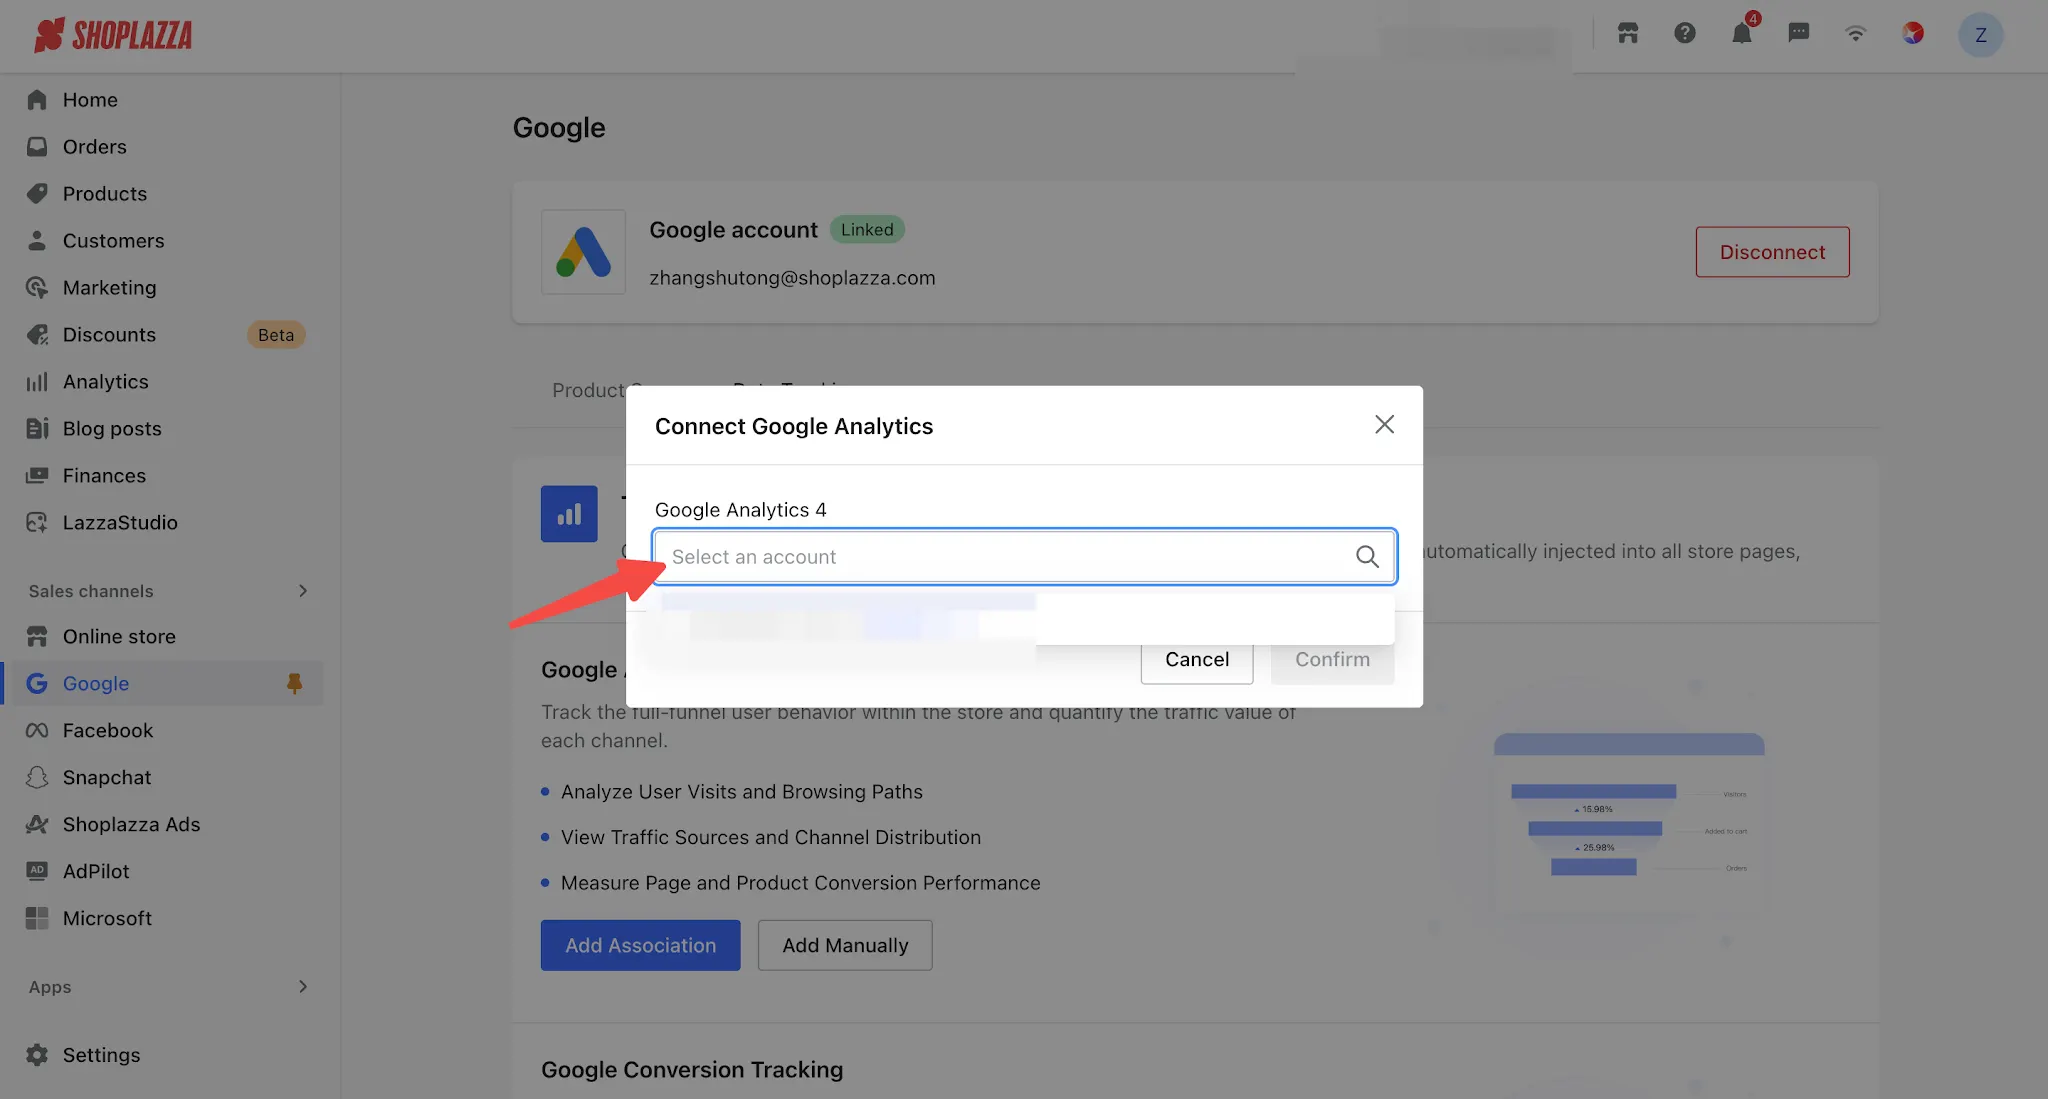
- If no data stream exists under the selected property, click Create Now to create one automatically.
- Click Confirm to complete the connection.
- You can also click Add Manually, enter your GA4 Measurement ID (starting with G-) in the pop-up window, and click Confirm to complete the setup.
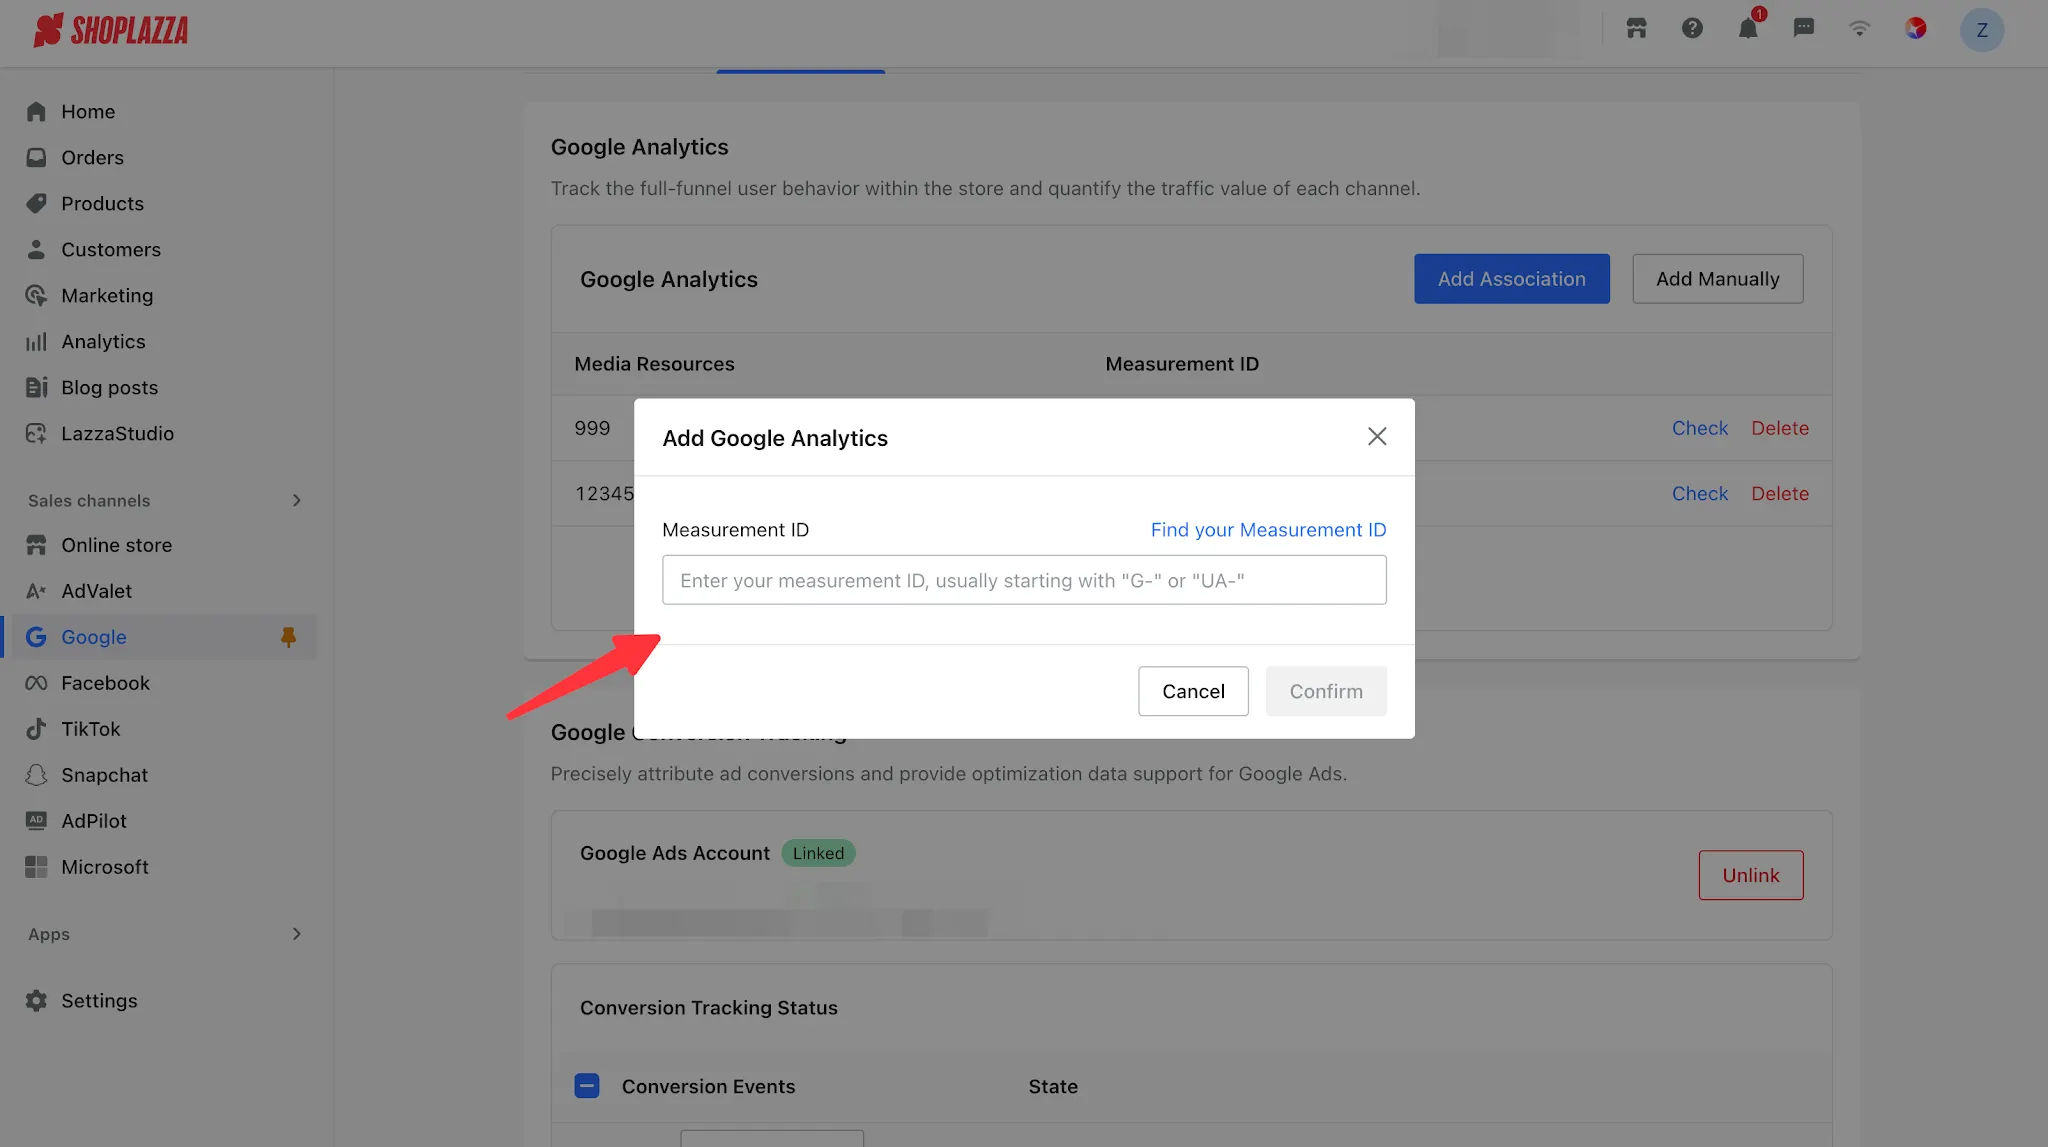
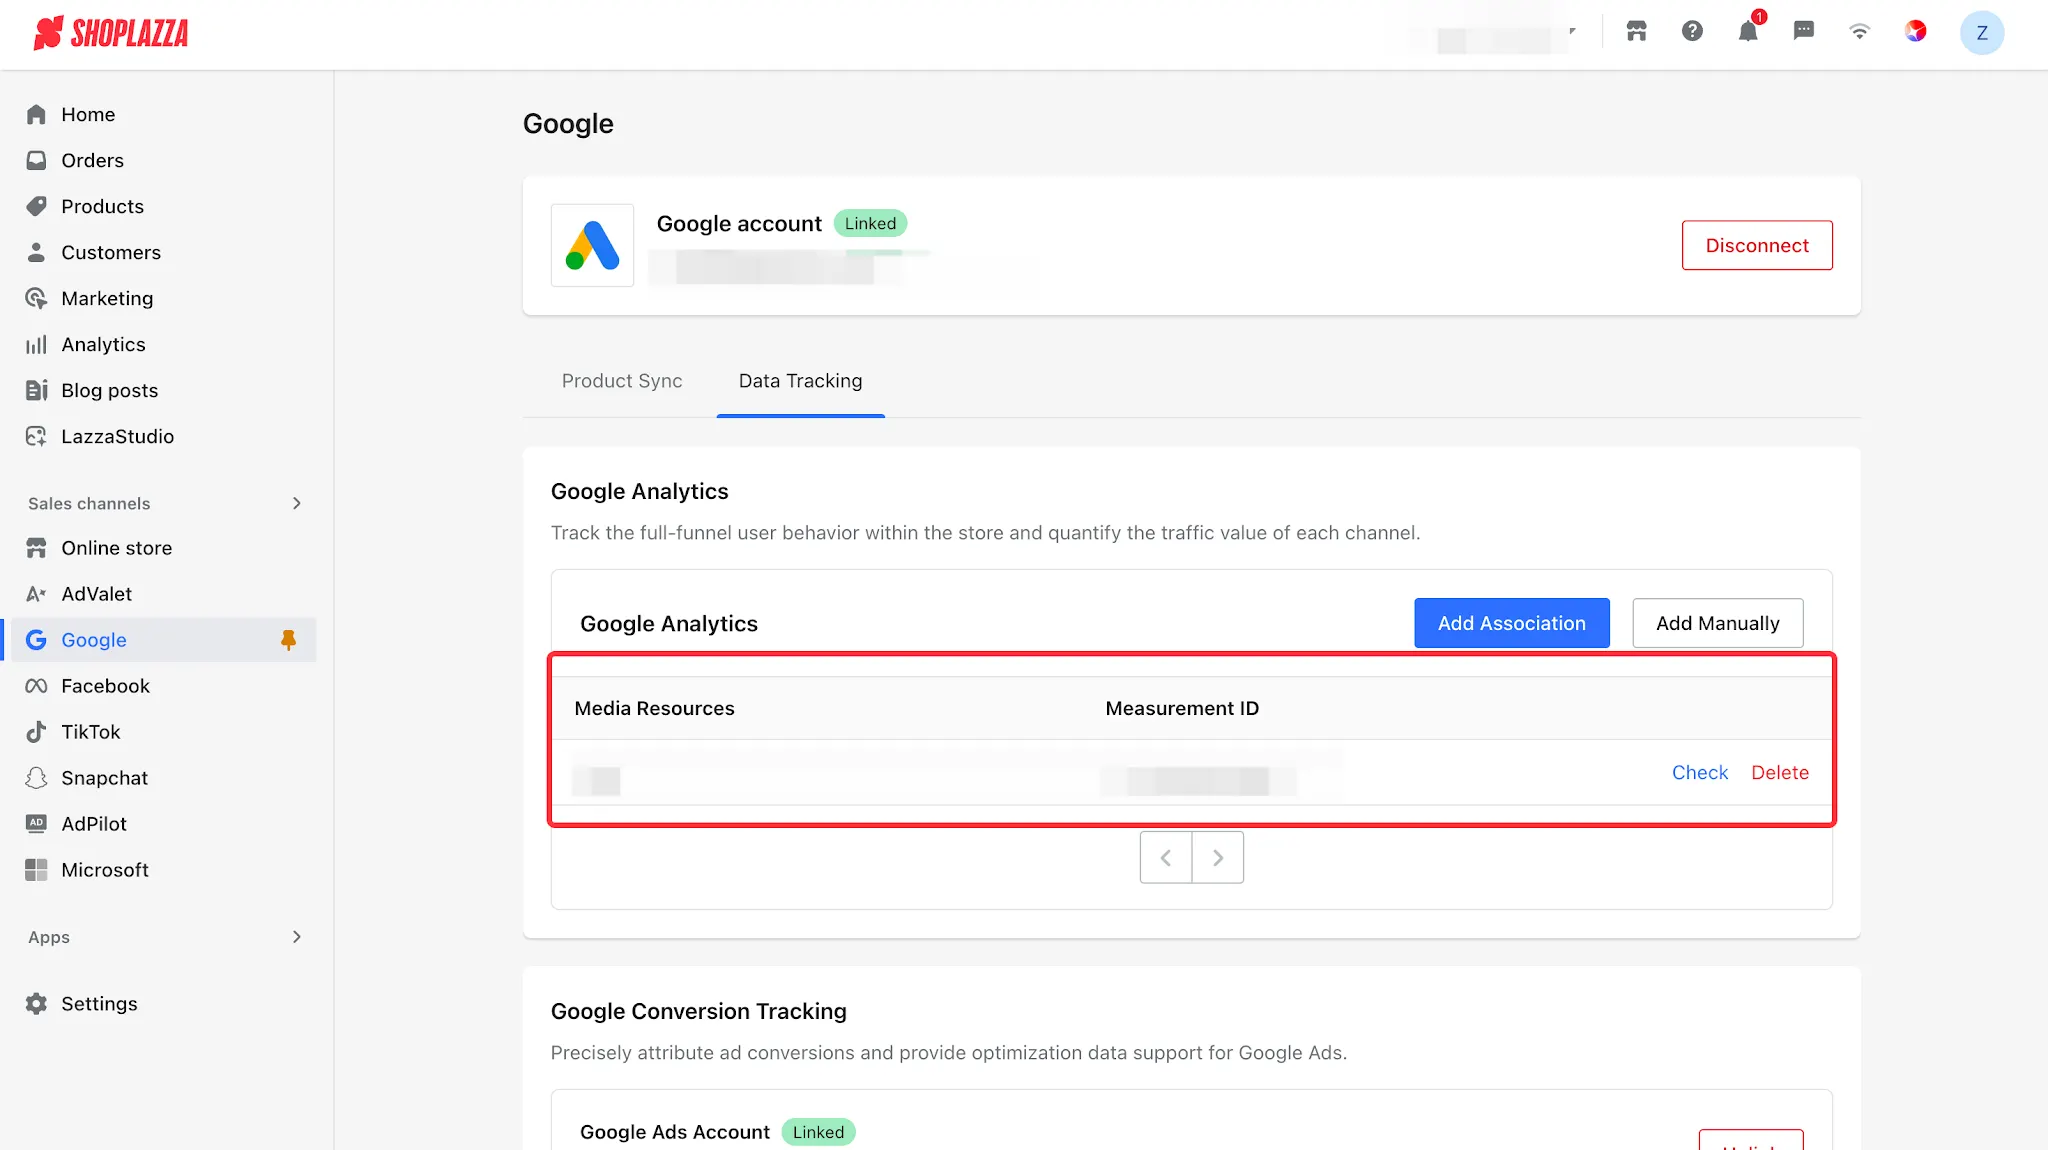
- Once connected successfully, the property name and Measurement ID will appear in the list, and the GA4 tracking code will be automatically injected into all pages of your store.
Configure Google Ads Conversion Tracking
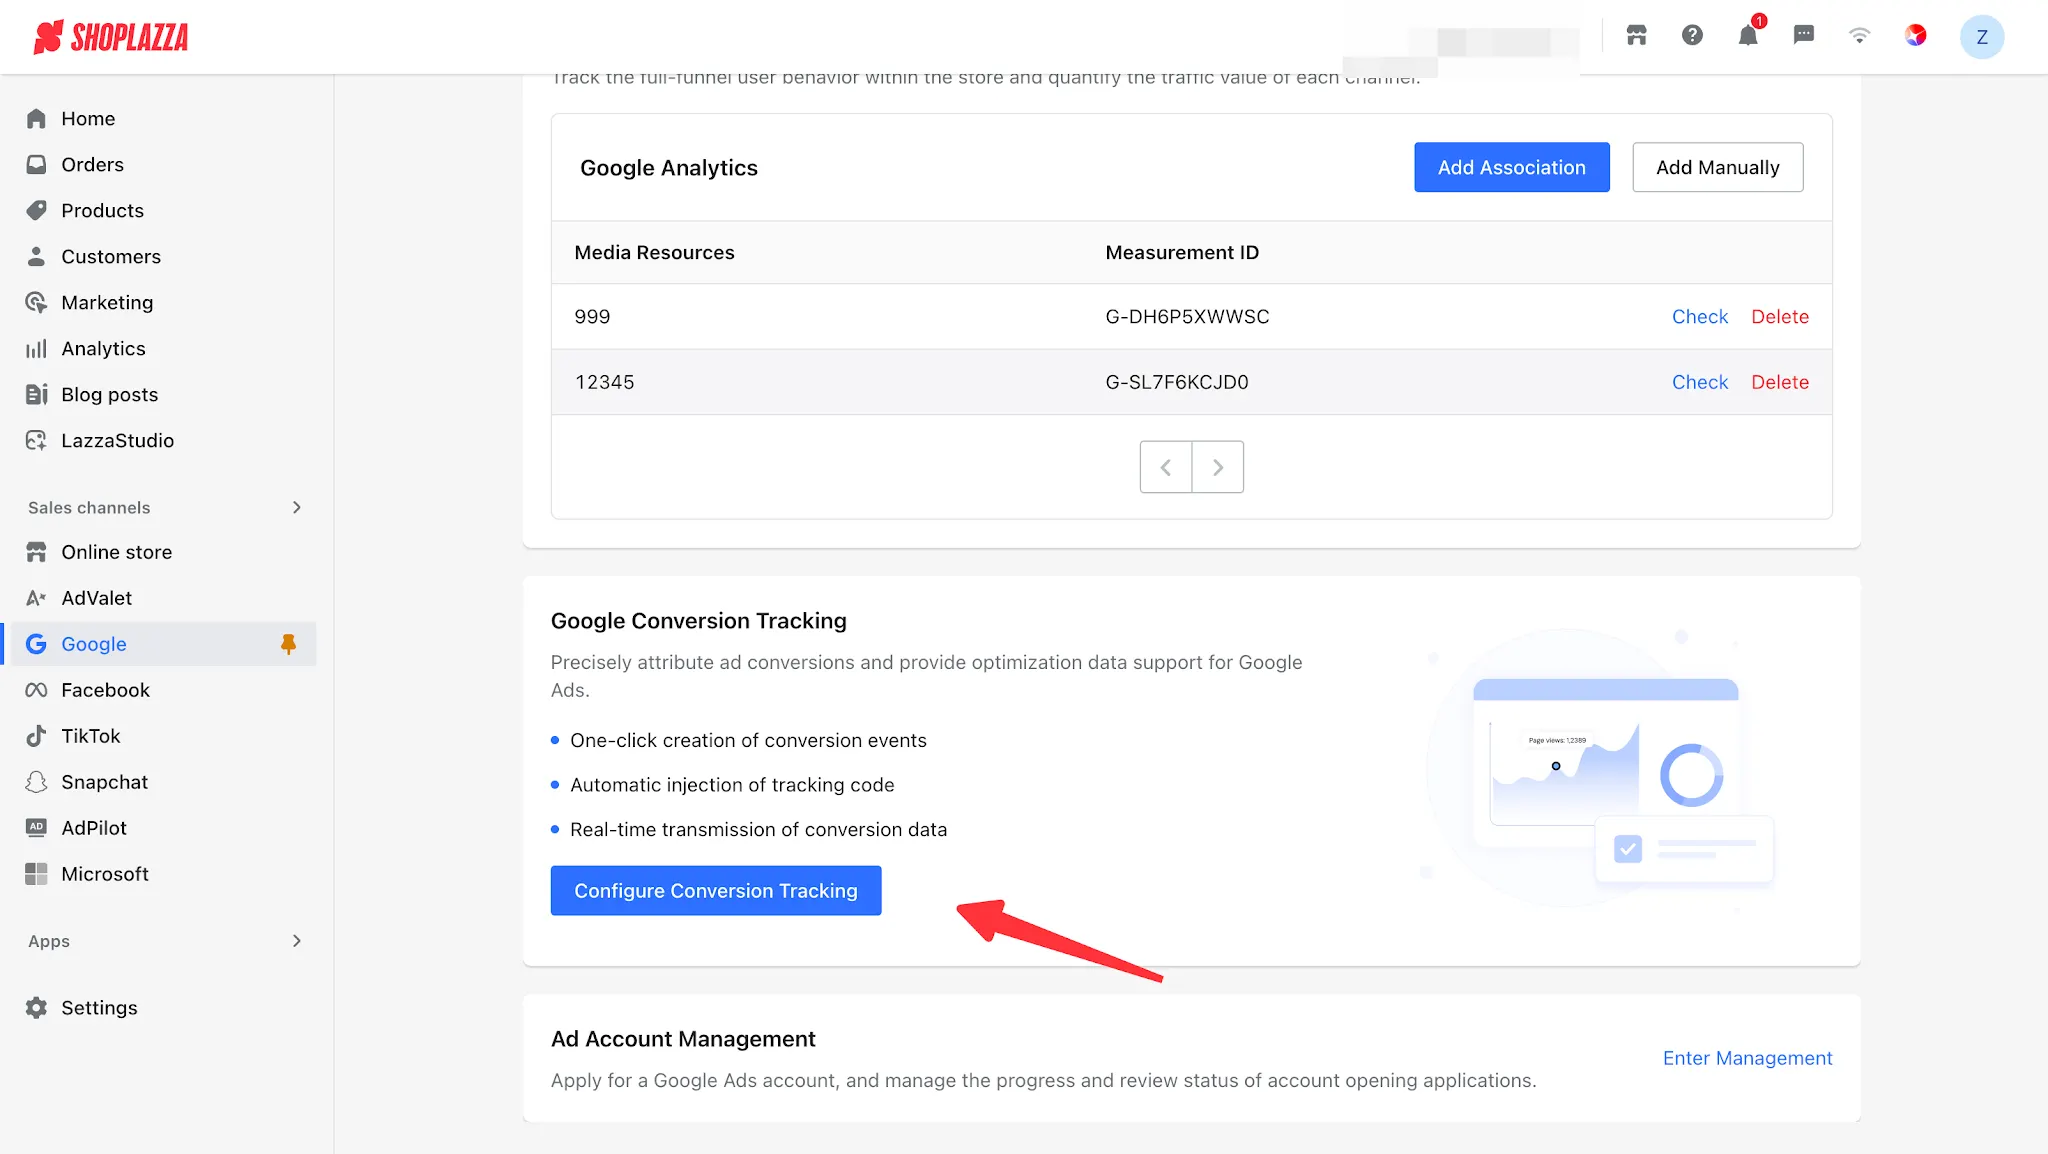
1. In the Google Conversion Tracking section, click Set Up Conversion Tracking.
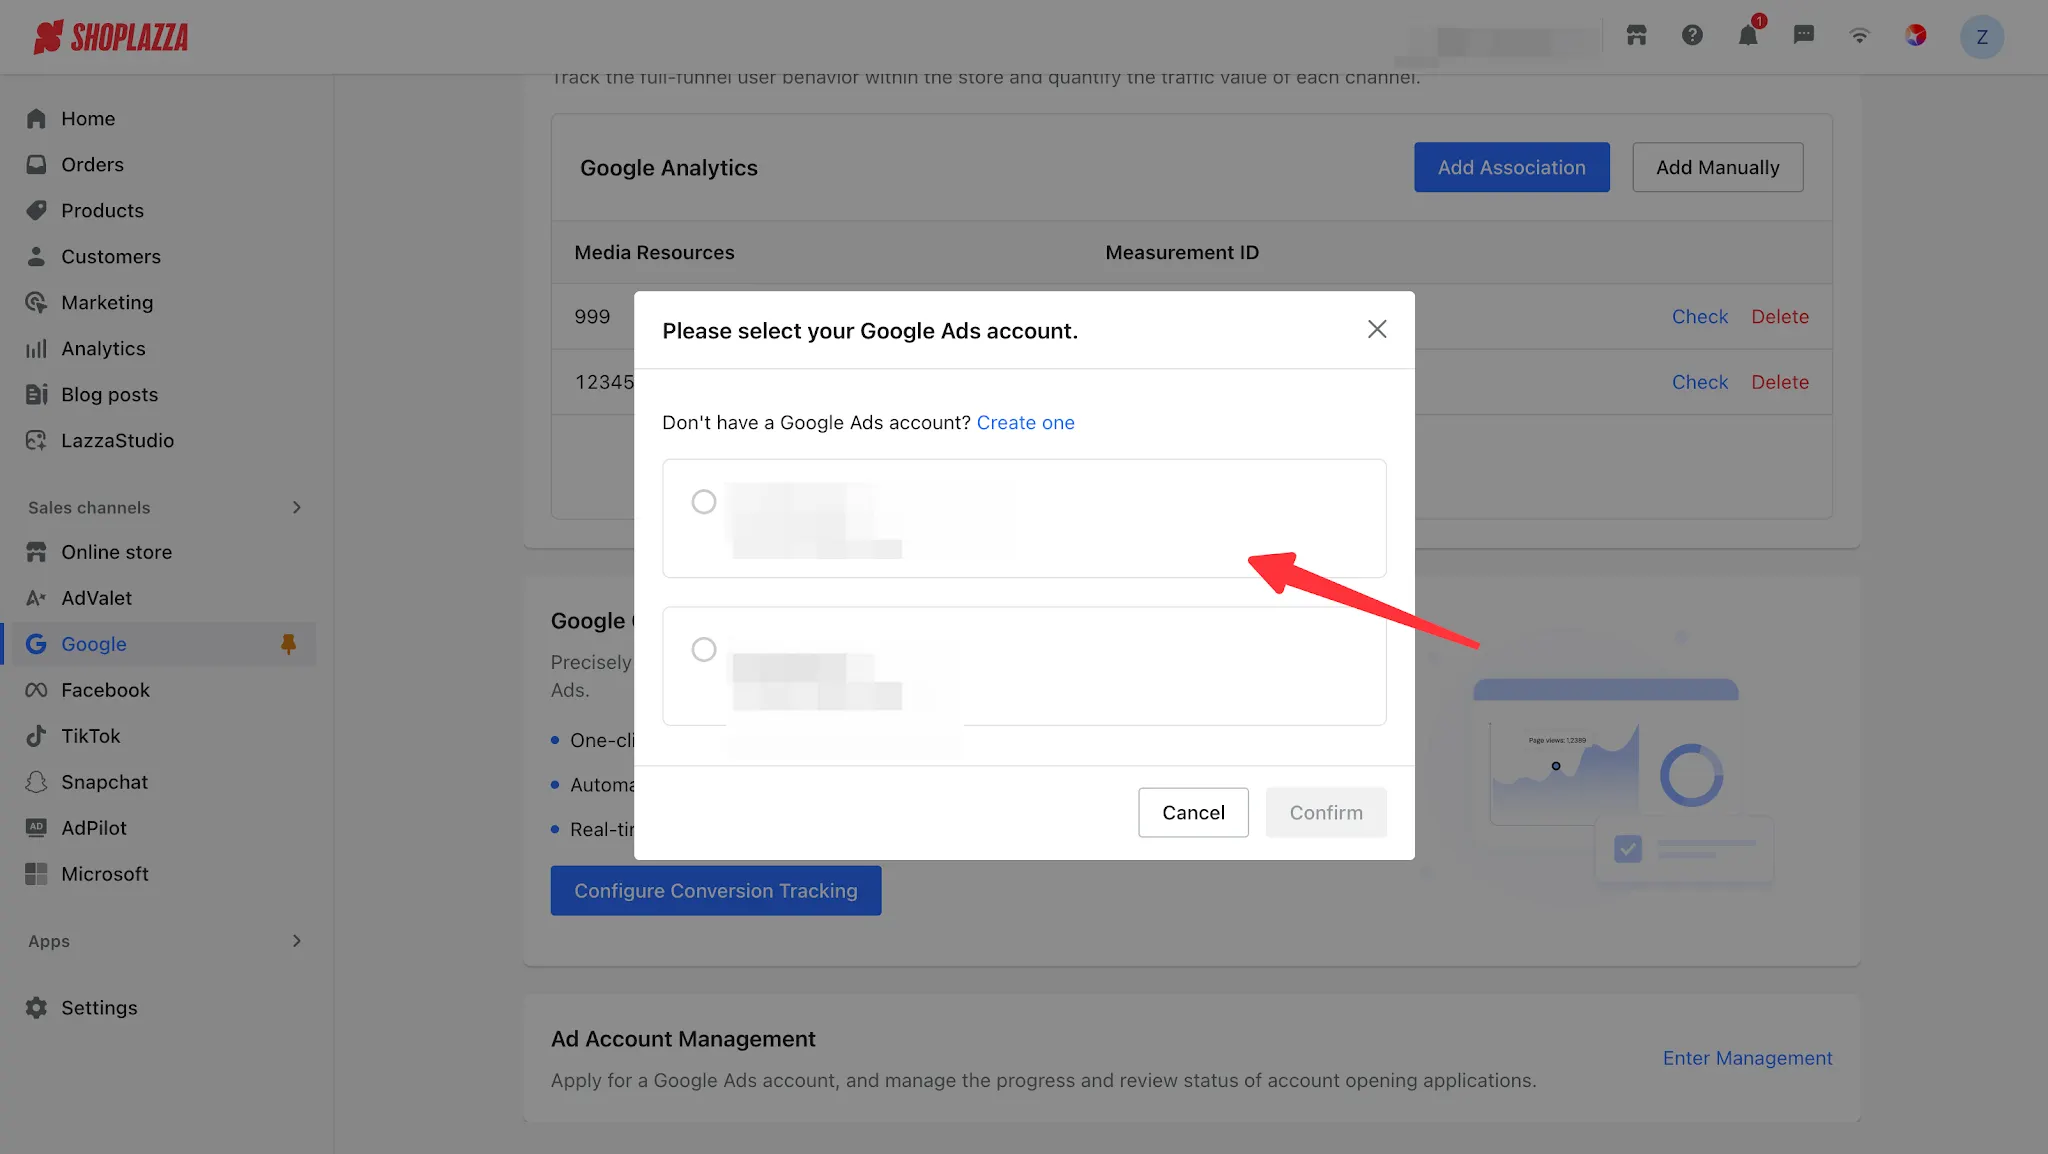
2. In the pop-up window, select the Google Ads account you want to link. If you select a manager account, you must also select the specific sub-account. Click Confirm to complete the setup.
3. After linking your Google Ads account, the system will display a list of conversion events that can be created.
| Event | Description |
| Page View (page_view) | A user visits any page. |
| View Item (view_item) | A user views a product details page. |
| Search (search) | A user searches within the store. |
| Add to Cart (add_to_cart) | A user adds a product to the cart. |
| Begin Checkout (begin_checkout) | A user enters the checkout process. |
| Add Payment Info (add_payment_info) | A user reaches the payment page. |
| Purchase (purchase) | A user completes a purchase. |
4. Select the conversion events you want to track. Events that have already been created cannot be selected again. Click Create Conversions.
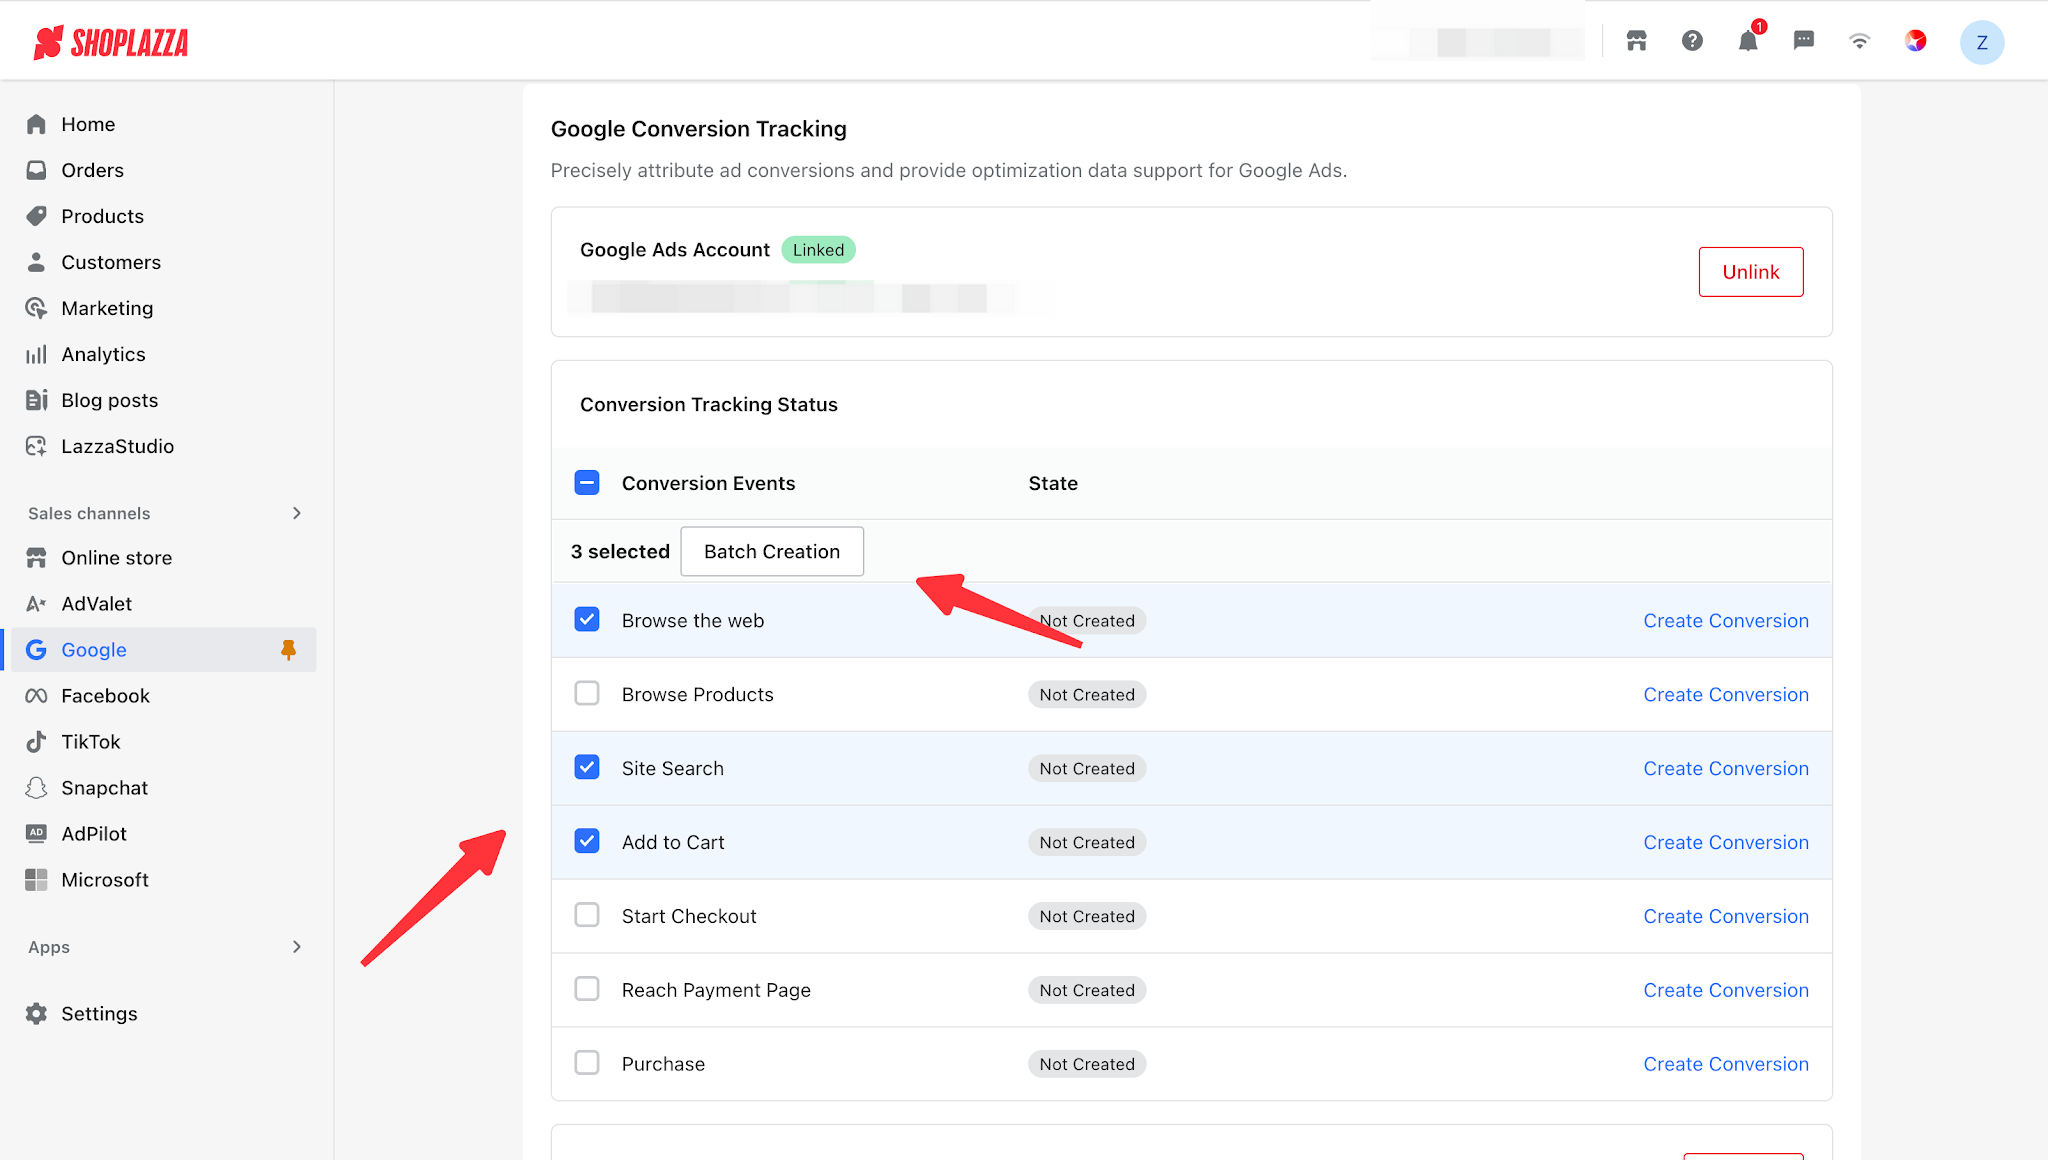
5. The confirmation dialog will display the events to be created and their associated Google Ads account. Click Confirm Creation.
6. Once created successfully, the conversion tracking code will be automatically injected into your store pages. No manual code installation is required.
FAQ
Q1: What should I do if a product is disapproved?
Go to the Product Management page and find the product with the GMC status Disapproved. Click Edit Attributes to open the editing page, then review the specific issue in the GMC Diagnostics panel on the right. Follow the instructions to fix the relevant attributes and re-upload the product.
Q2: How can I ensure product price changes are synced to GMC promptly?
Enable Automatic Upload under Sync Settings. When key product information, such as prices or titles, is updated, syncing will be triggered automatically. You can also click Update Now on the Product Management page to manually trigger a full sync.
Q3: What are the requirements for adding multiple target markets?
Each target market uses a separate product data source (Feed), and the system automatically generates a corresponding Feed ID. The currency follows the market settings and cannot be configured separately. The primary market can be edited but cannot be deleted. Non-primary markets can be deleted at any time. Once a market is deleted, its Feed will be removed from GMC, and the synced products will no longer be displayed.
Q4: How are Google Analytics and conversion tracking codes added to store pages?
After GA4 is linked or conversion events are created, Shoplazza automatically injects the corresponding tracking codes into all pages of your store. Merchants do not need to modify the theme code manually.
Q5: Which features will be discontinued after upgrading?
After upgrading to the new Google channel, the following legacy features will be discontinued: Audience Management, Performance Max Campaigns, Search Ads, Display Ads, Asset Management, and Best-Selling Products Reports. The upgrade process will not affect your existing linked GMC or advertising accounts.

Comments
Please sign in to leave a comment.