
The Page settings feature in Shoplazza gives you full control over how different types of discount campaigns appear throughout your online store . Whether it's a flash sale , spend-and-save promotion , or a discount code , you can adjust how these offers are displayed on product detail pages , shopping cart pages , and campaign landing pages —all from a single, streamlined interface.
Discount display coverage
Use the table below to understand which discount types support specific page placements and design elements:
| Promotion Type | Product Detail Page | Shopping Cart Page | Activity landing page |
| Flash Sales | Banner, countdown, custom label | Not supported | Poster, countdowns, product sales info |
| Amount Off | Tiered layout, rule text, visual block | Cart banner, tier display, custom messages | Countdown (real/simulated), rule text, product visuals |
| Nth Item Discount | Shared layout with Amount Off, supports multi-tier | Same as Amount Off | Countdown options, editable promotional text |
| Discount Codes | Auto-apply, expand/collapse list, dynamic text tags | Code recommendations, progress bar, clipboard auto-apply | Banners, countdowns, customized promotional content |
Note
Some advanced features require the latest theme versions (Nova theme series, Geek theme series, Hero theme series). See Theme-specific features for details.
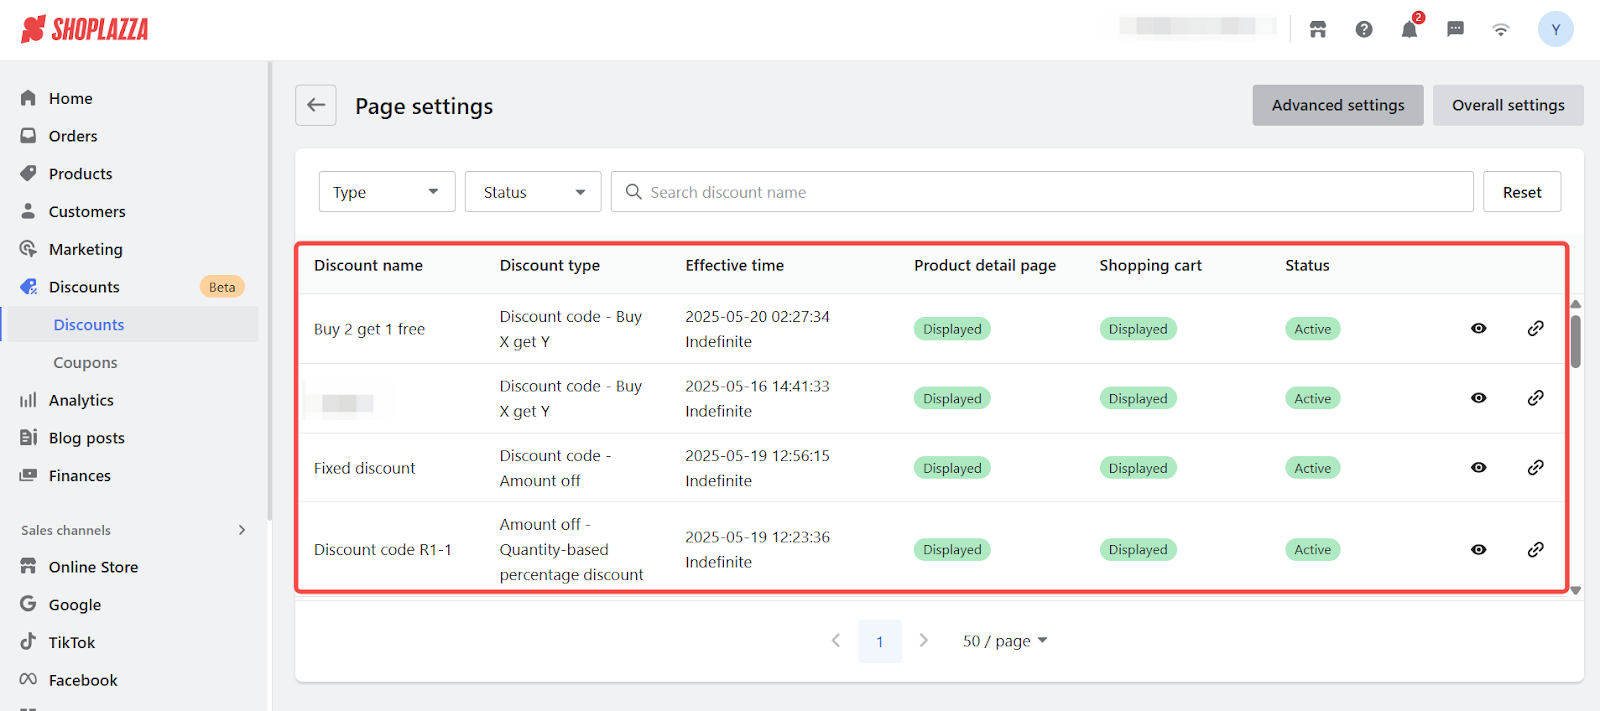
Accessing page settings
Access your Page settings in one of two ways:
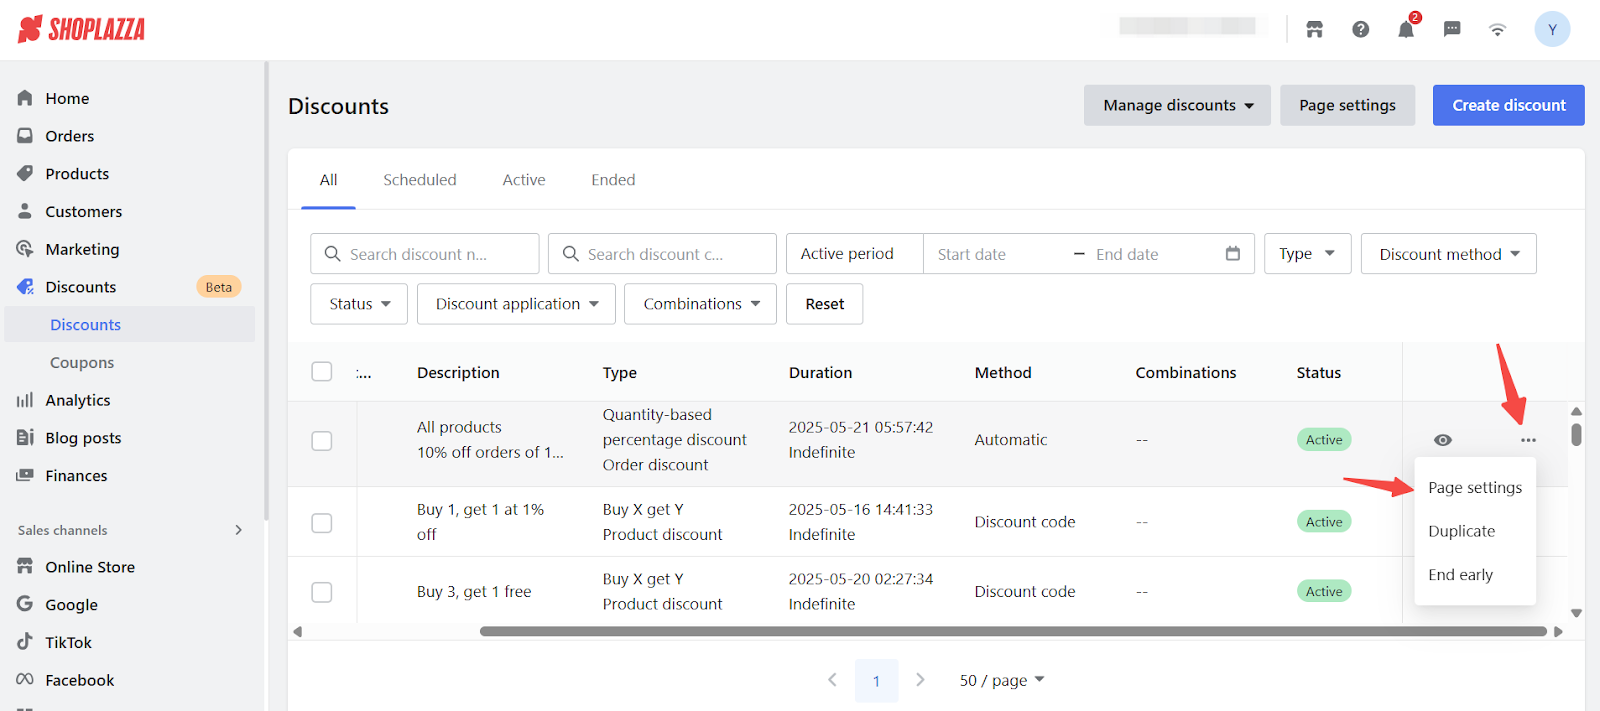
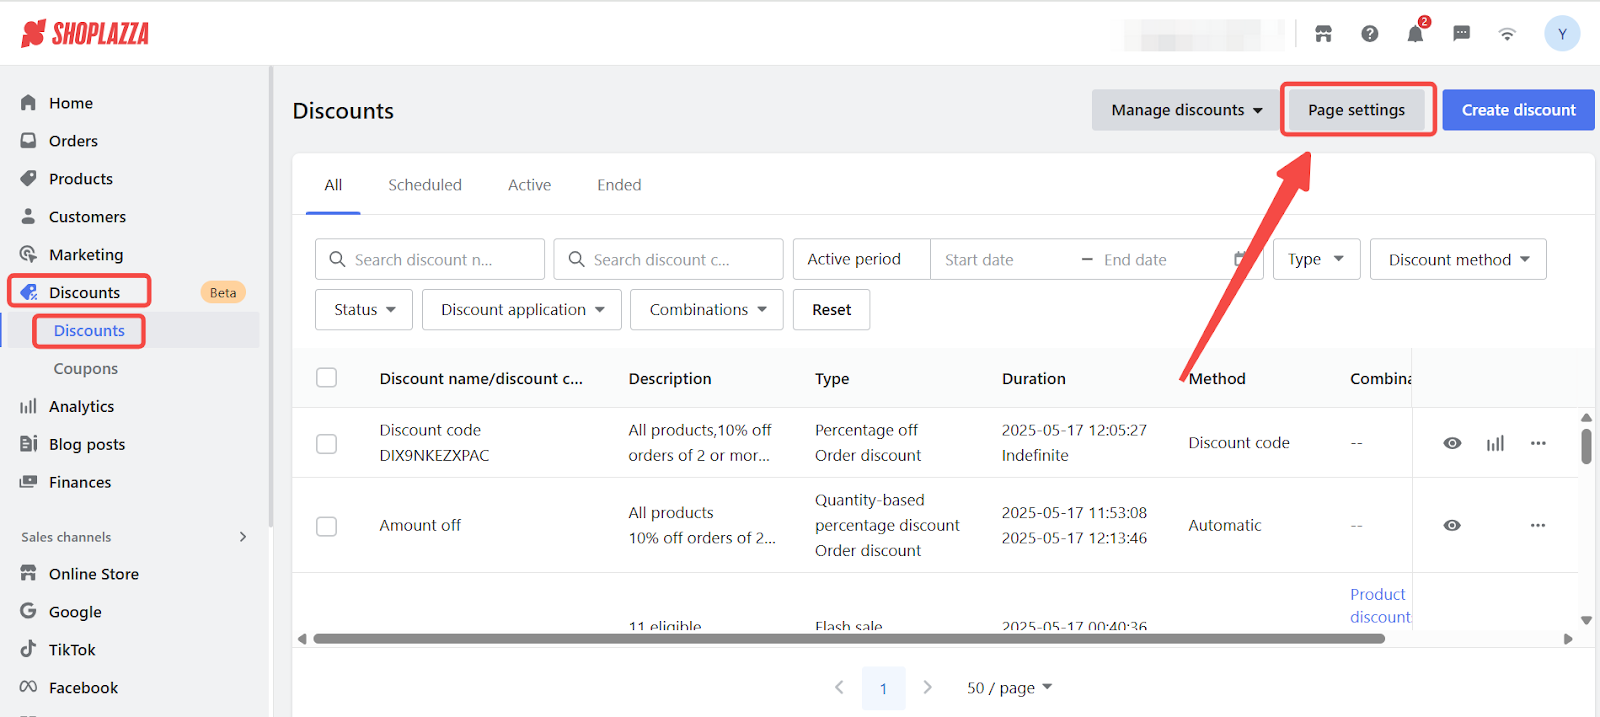
1. From the Discounts menu: Go to Shoplazza admin > Discounts > Discounts Page settings.

2. While editing a campaign: Click into Page settings during campaign setup


3. After saving your campaign: Use the right-side panel to customize how your discounts are shown on the storefront.
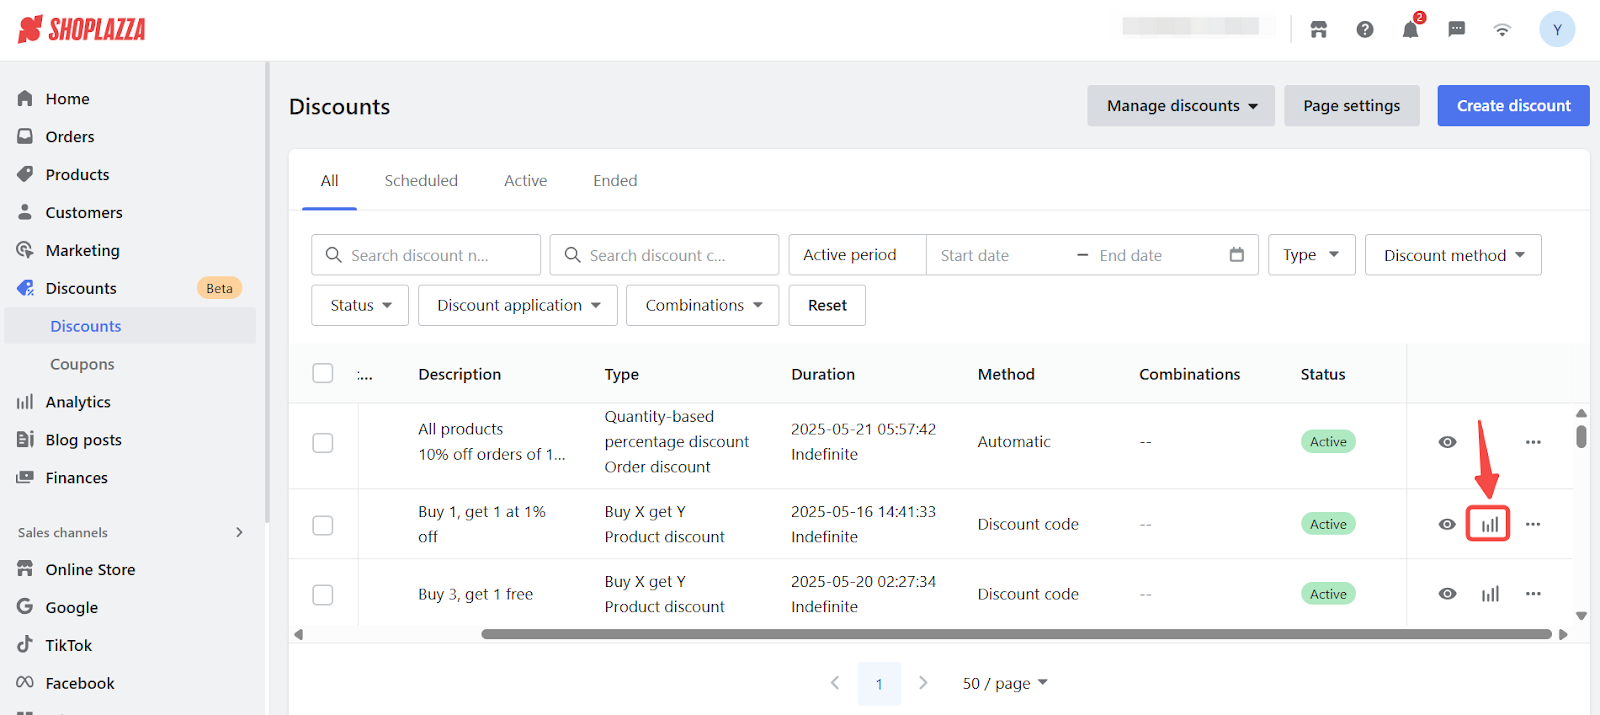
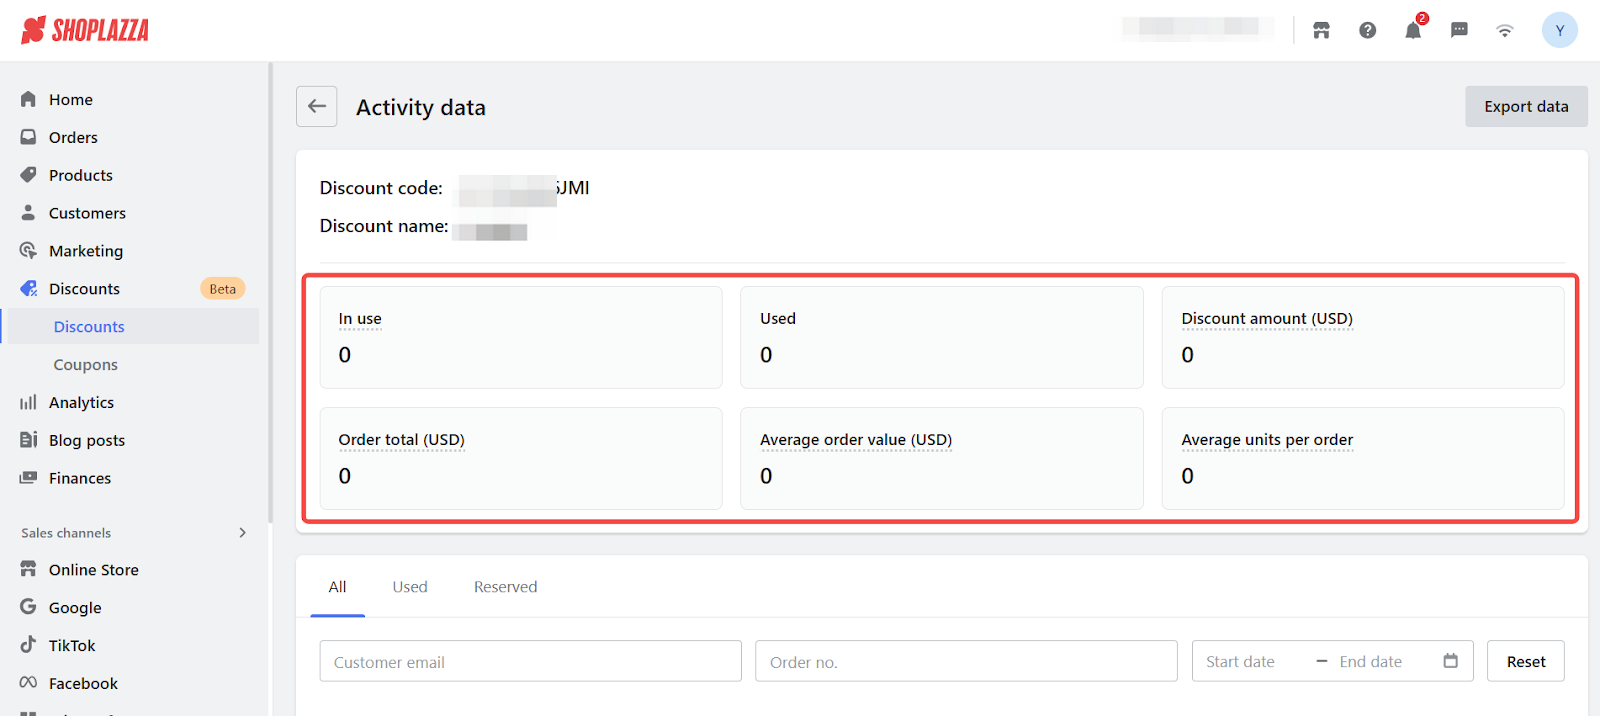
4. Track your discount performance using these metrics:
- Number of orders using the discount.
- GMV, average order value (AOV), and unique customers.
- Product-level sales data and remaining promotional inventory.
Automatic Discounts
Use this section to customize display rules for automatic promotions such as Flash sales, Amount off, and Nth item discount campaigns. These settings help you visually communicate active discounts and boost conversions across different storefront pages
Flash sales
Flash sales offer limited-time discounts to create urgency. Use these options to highlight the promotion clearly on your storefront and landing page.
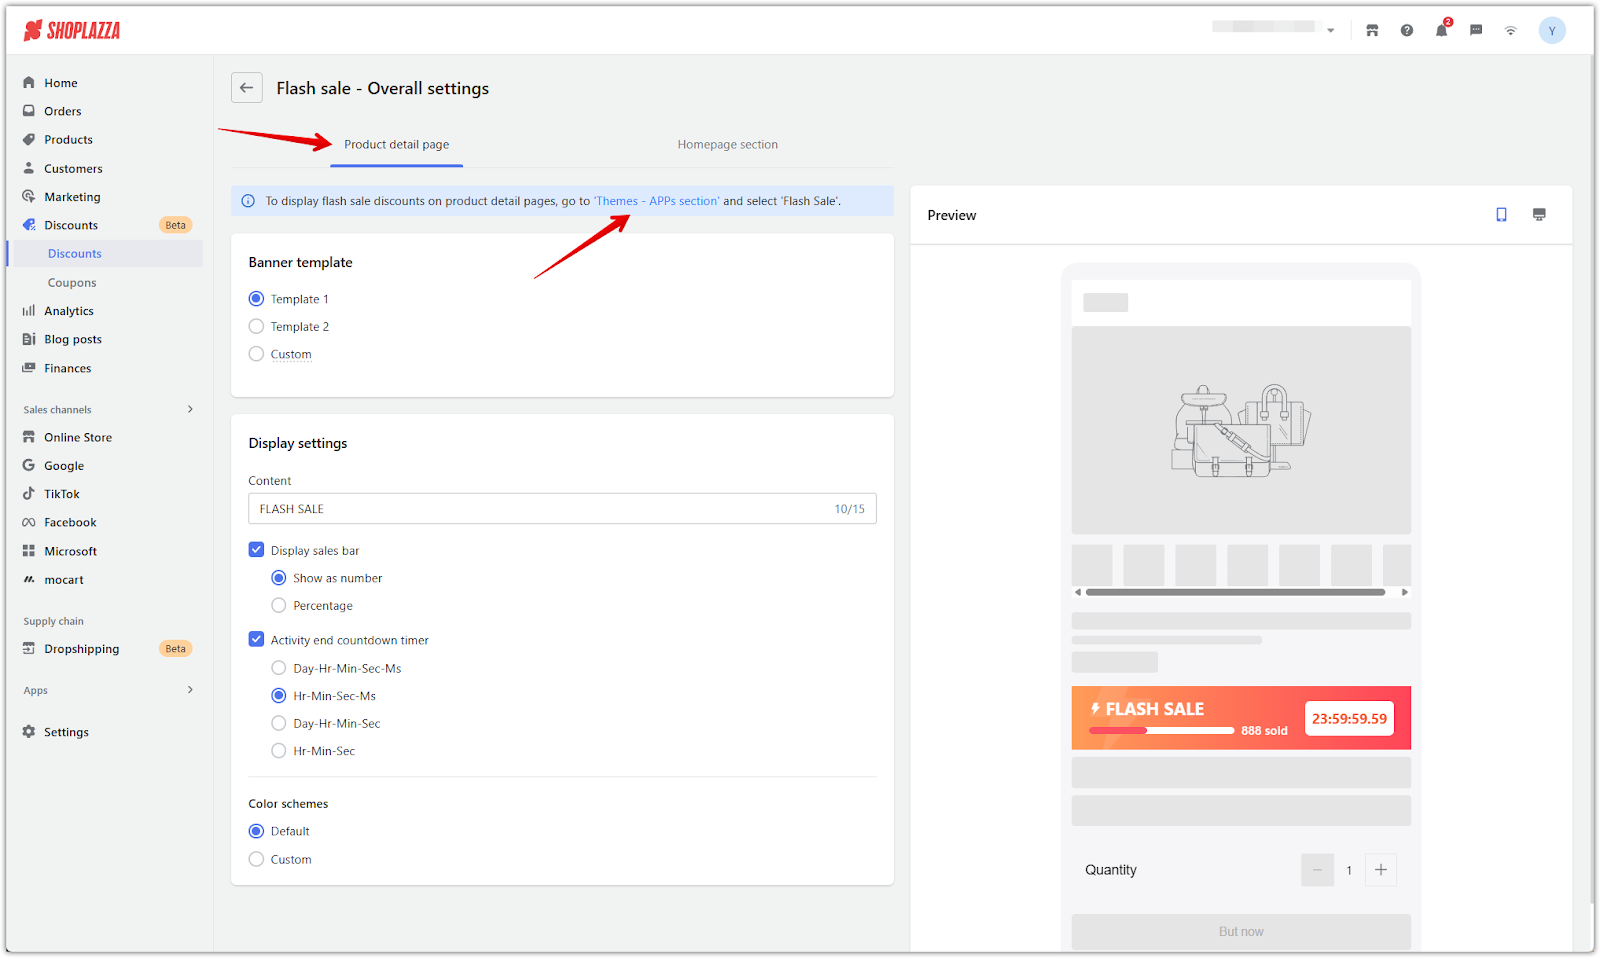
1. Product detail page: Configure how your flash sale appears on product listings.
- Enable discount toggle: Turn on Display flash sale discount.
- Choose layout: Select Template 1, Template 2, or Custom.
- Customize visual elements: Add a custom label (e.g., “FLASH SALE”), enable a progress bar, and select a timer format such as Hr–Min–Sec–Ms or Day–Hr–Min–Sec.
- Add redirect link: Insert a link to direct shoppers to the campaign landing page.

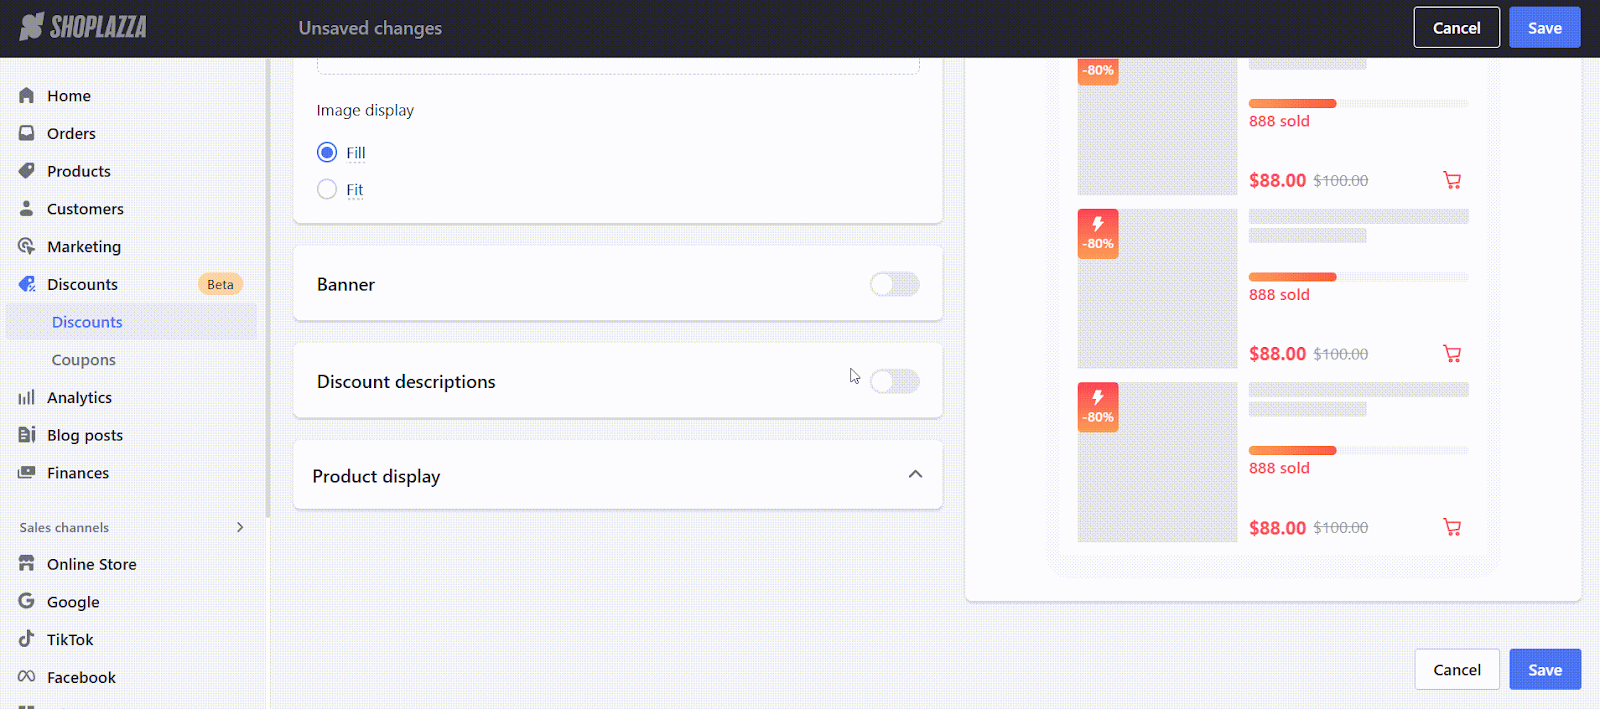
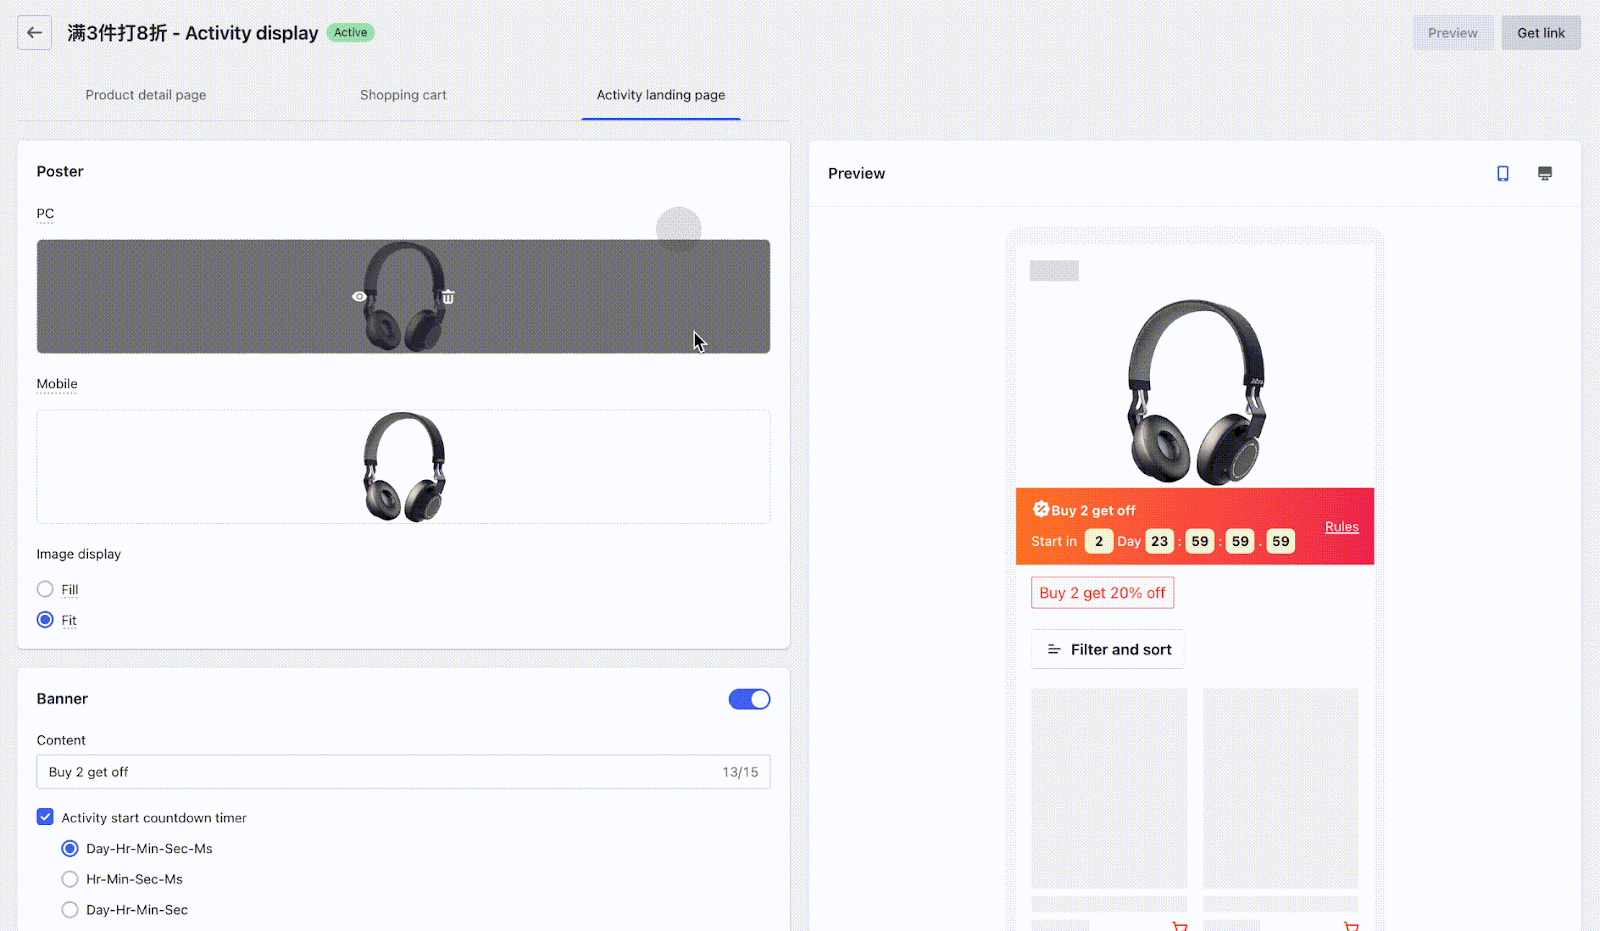
2. Activity landing page: Build out the dedicated landing experience for your sale.
- Upload campaign poster: Upload visuals for both desktop and mobile (recommended sizes shown in the upload panel).
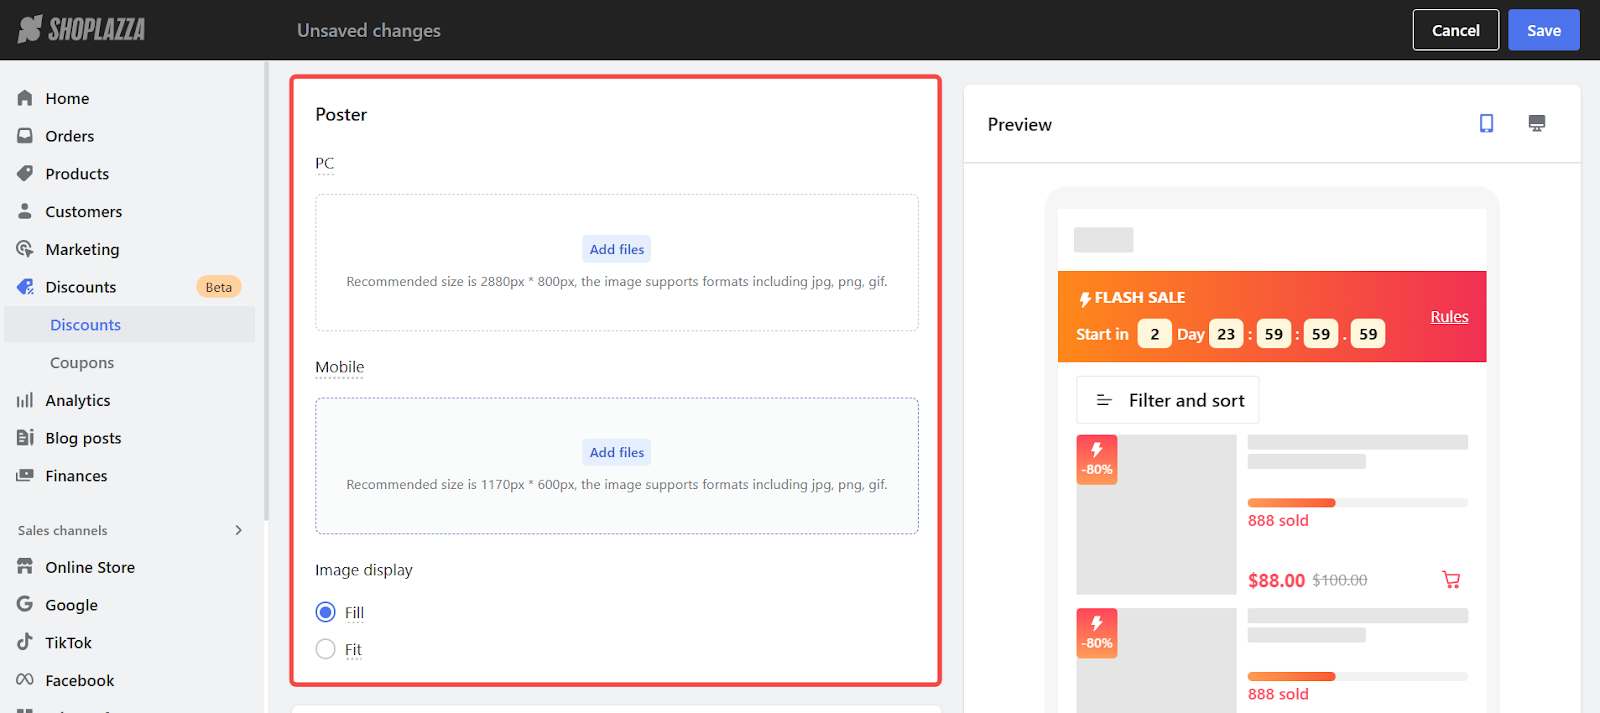
- Set countdown timers: Enable a start timer to build anticipation and an end timer to show remaining promotion time.

- Add descriptions: Show detailed promotional text for each product.

- Control product display: Adjust how pricing, sold volume, and other labels are displayed.
Note
Countdown timers only appear if the campaign has an end date. If the campaign is already live, the start countdown won’t display.
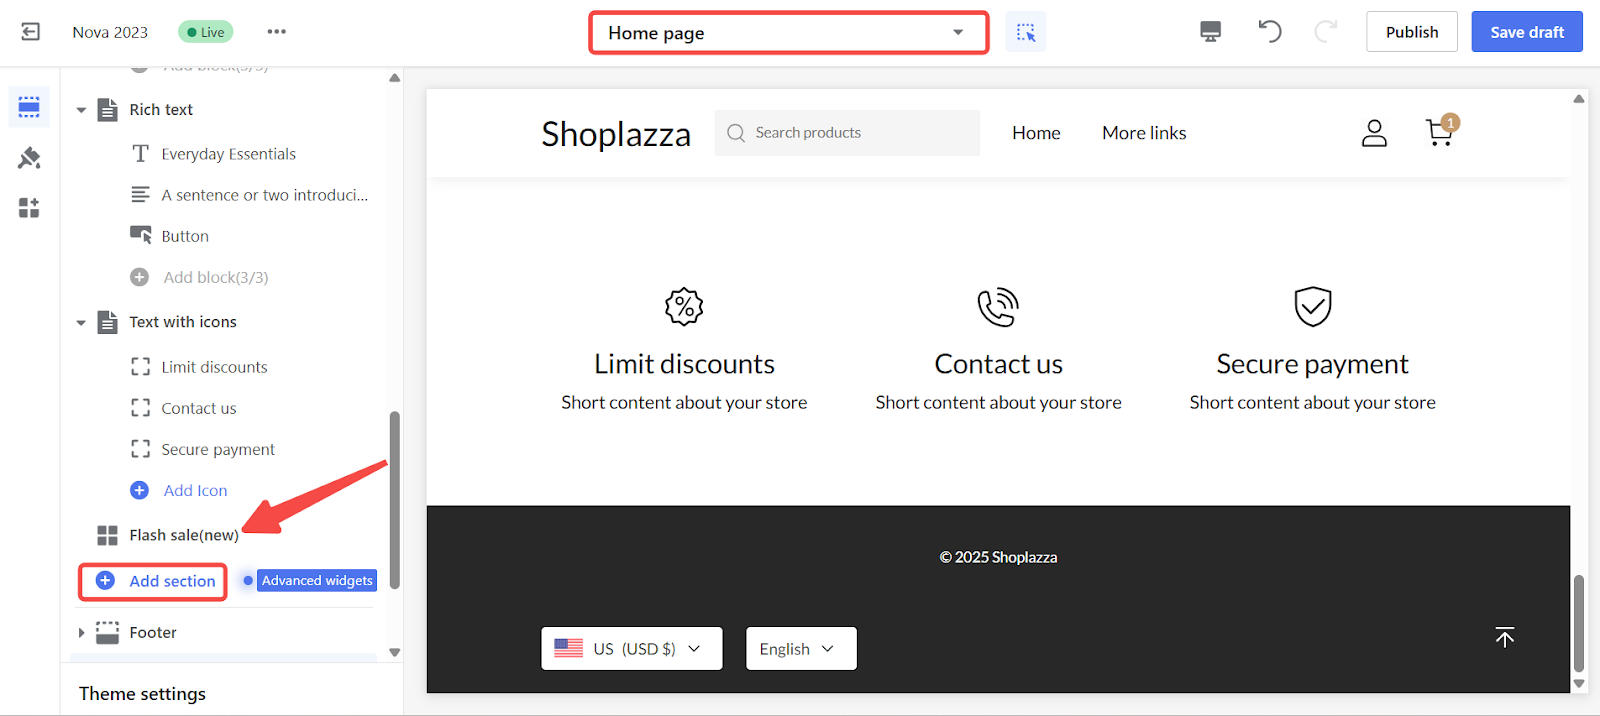
3. Theme integration: Apply flash sale blocks to your storefront using the theme editor.
- Open theme editor: From the Product detail page tab, click the Themes - Apps section link.
- Confirm block addition: Confirm the auto-added FLASHSALE(NEW) block when prompted.
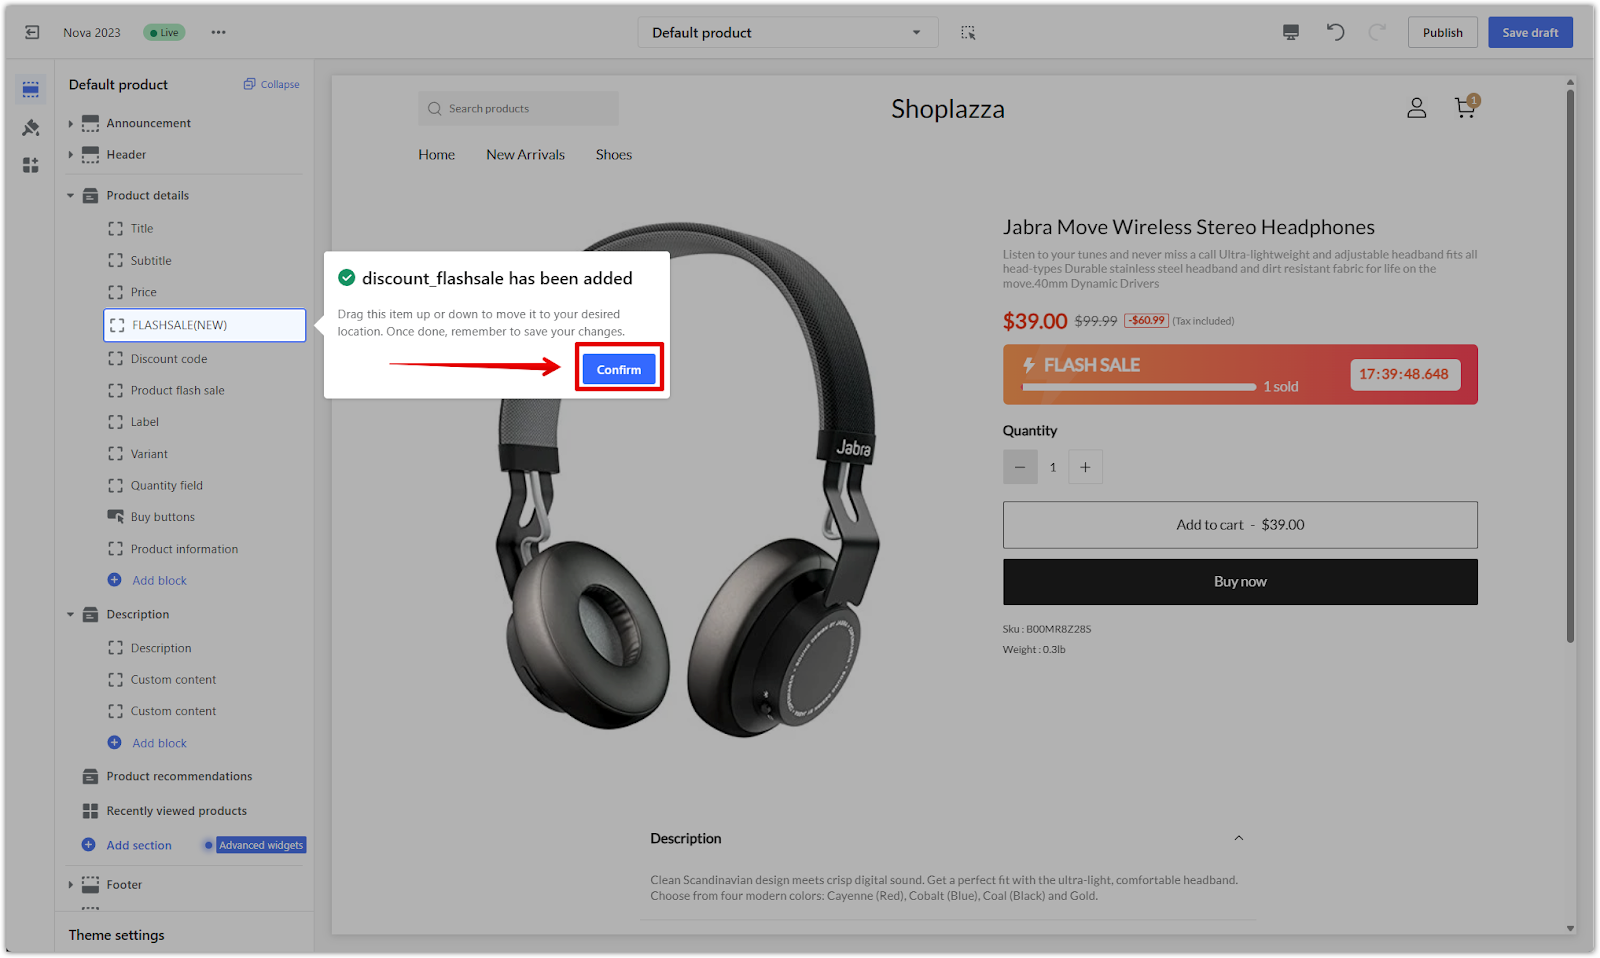
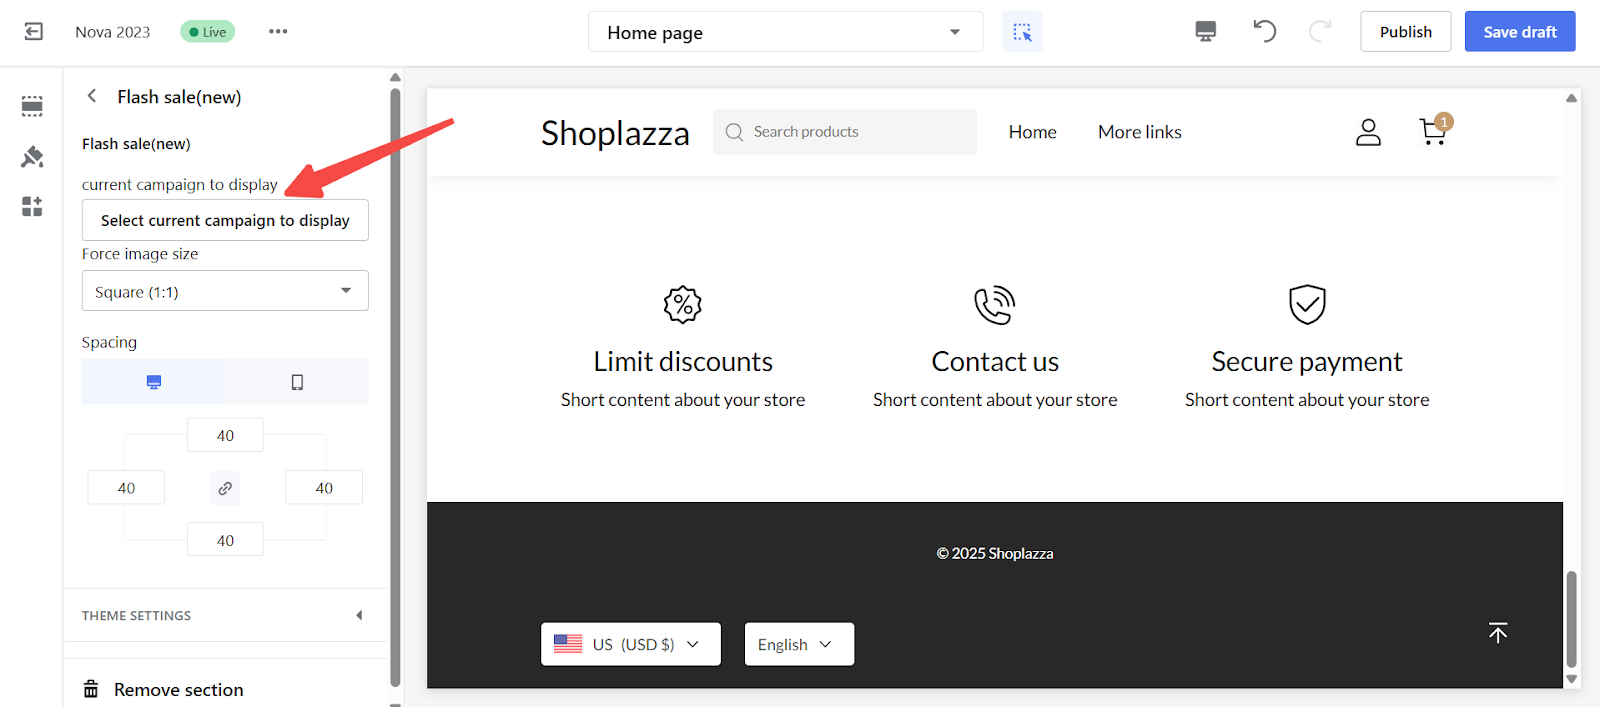
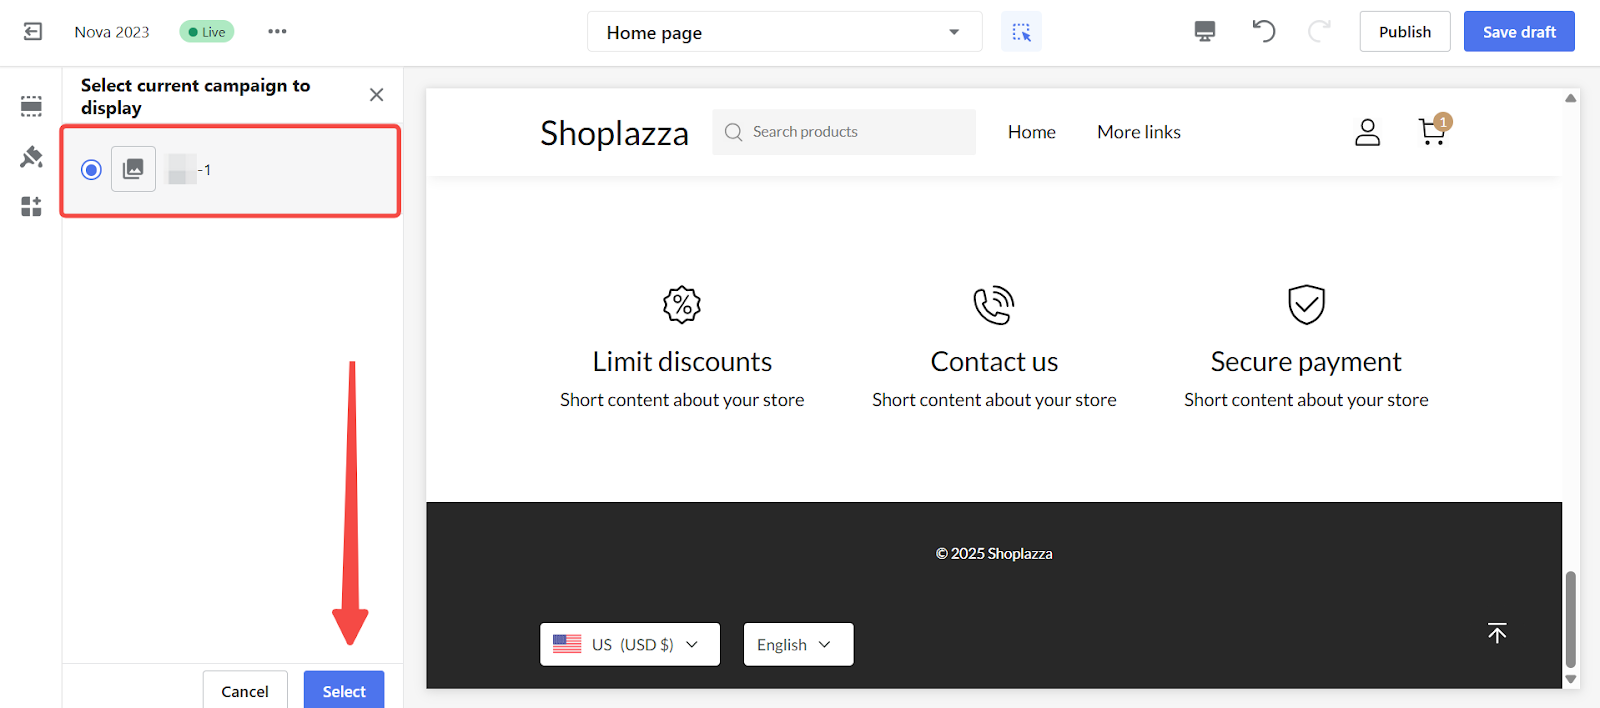
- Add to home page (optional): Switch to the Home page layout, click Add section, then select Flash sale (new) and choose a campaign to display.
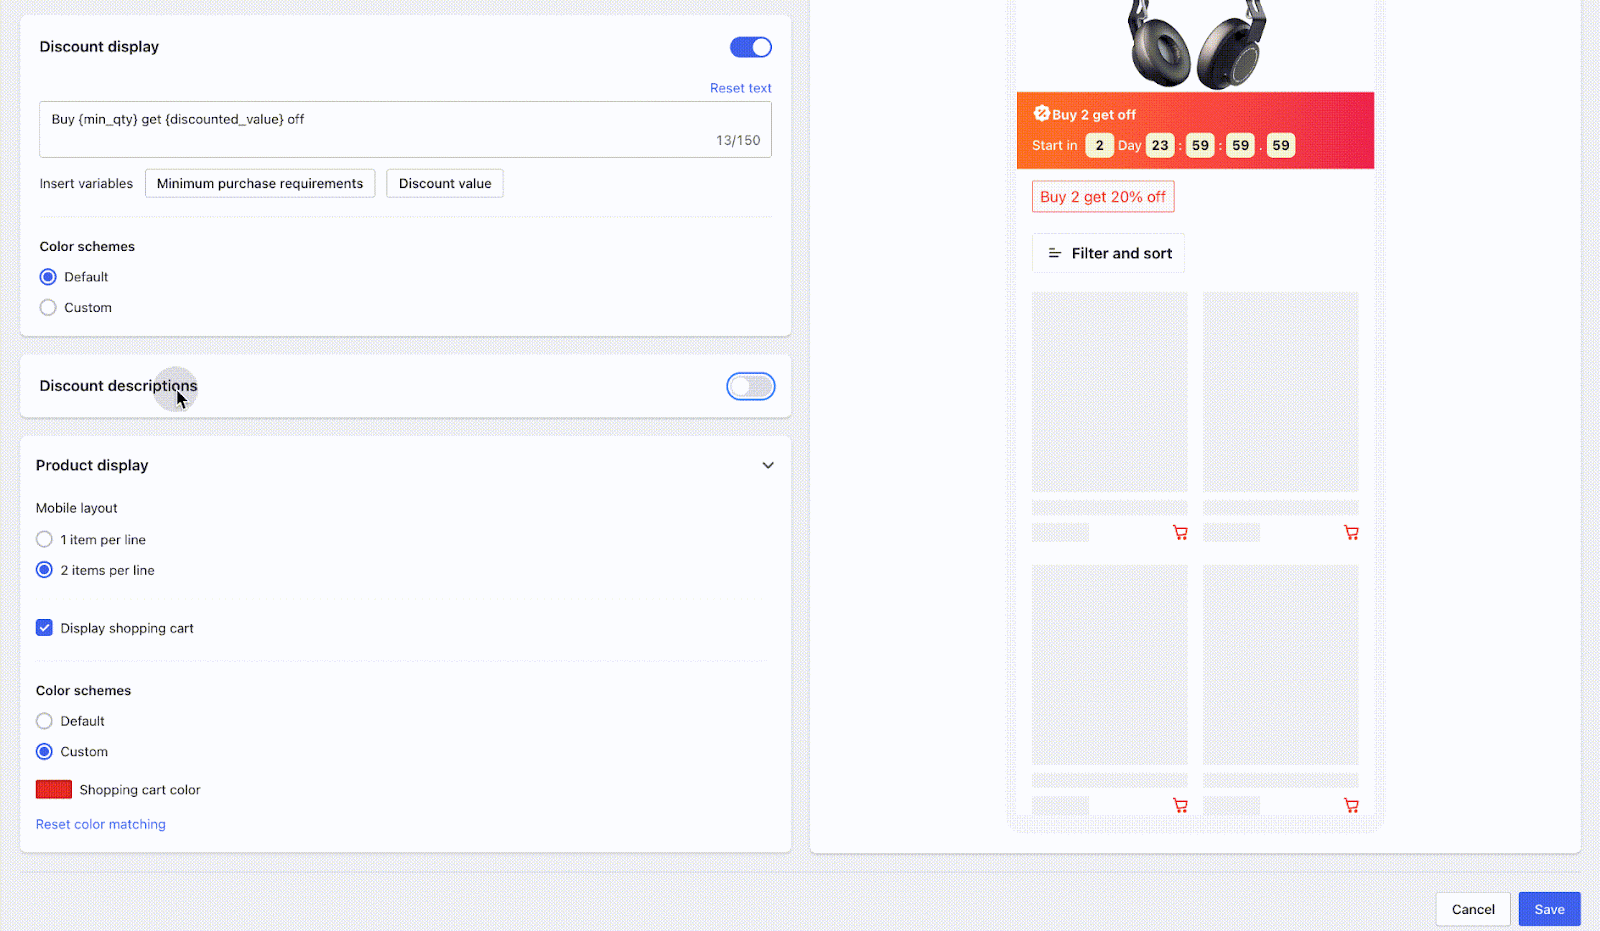
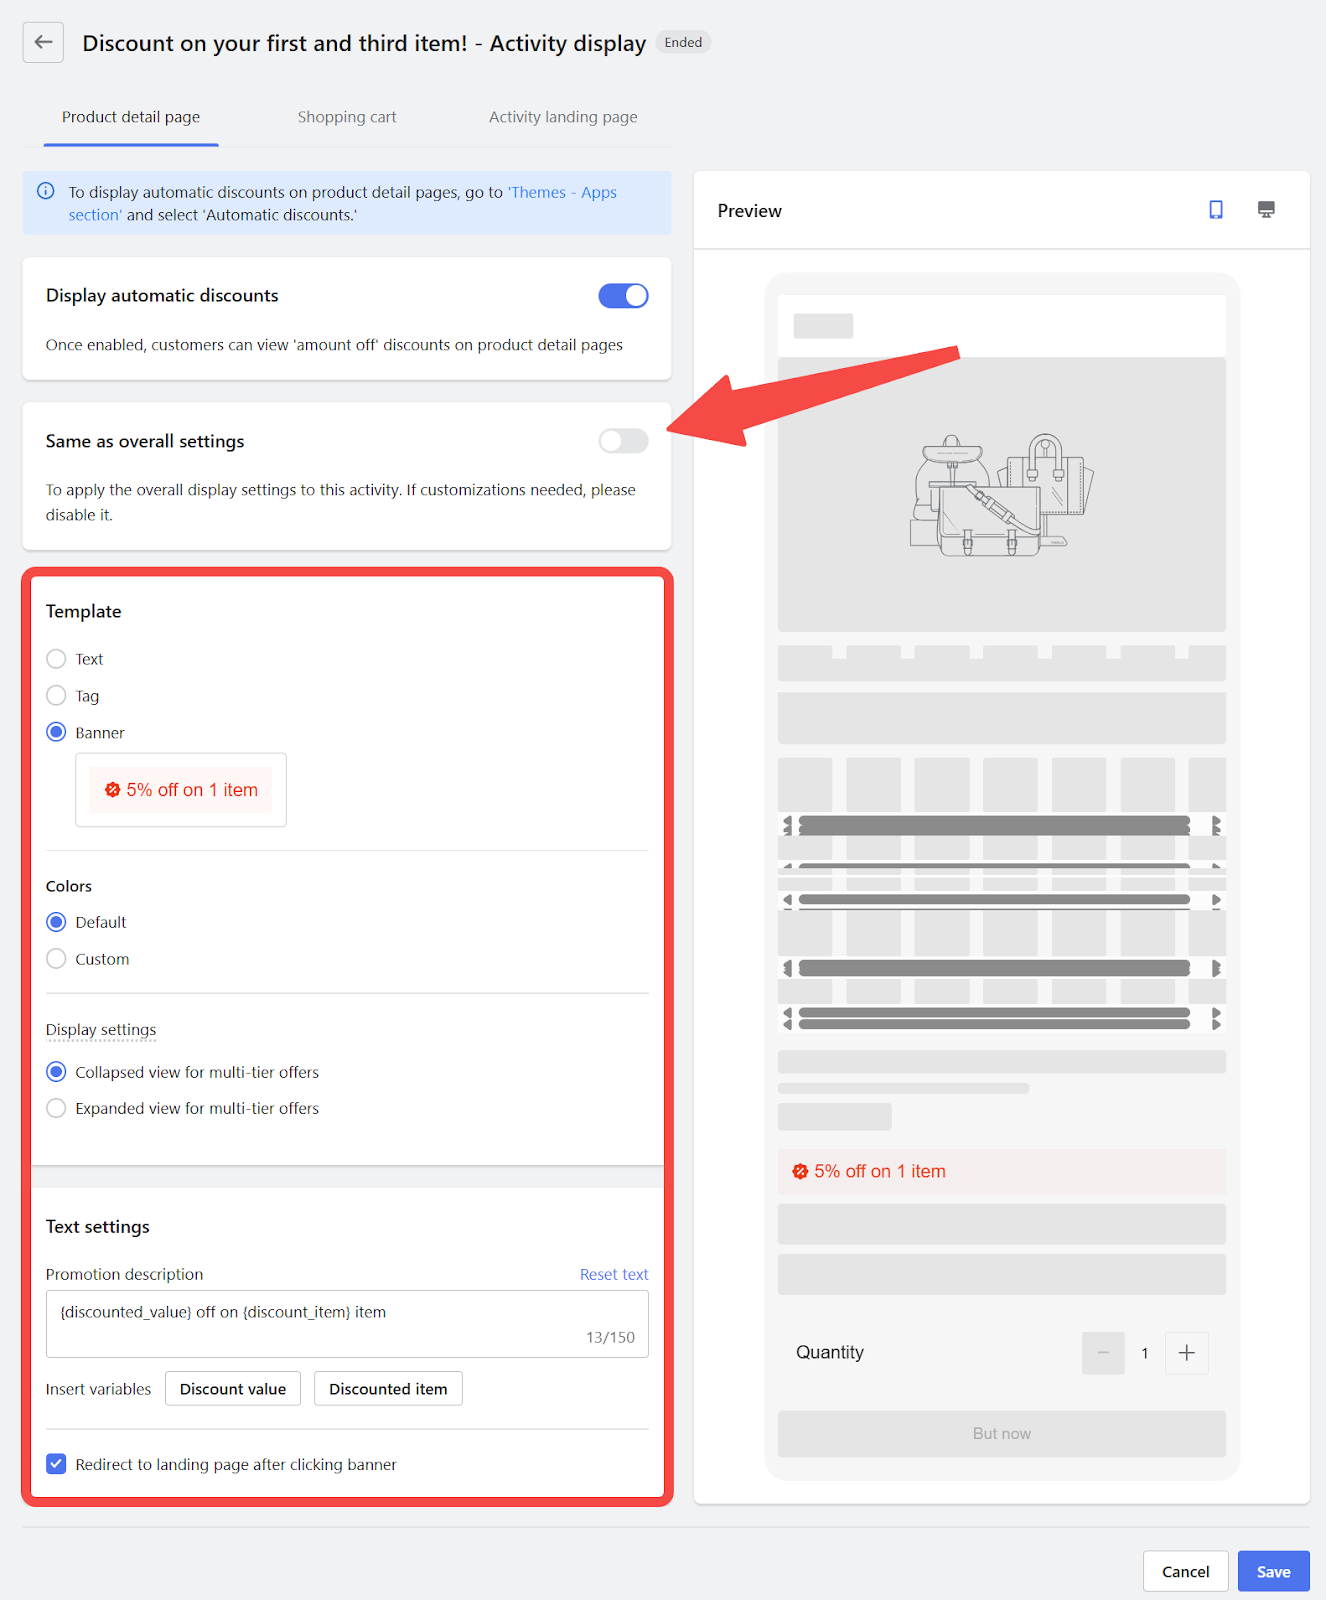
Amount Off
Amount off promotions apply a fixed or percentage discount once a spending threshold is met. Use Page settings to clearly communicate tiered offers and guide customers toward higher-value purchases.
1. Product detail page: Control how tiered discount rules appear on product listings.
- Set tier layout: Choose between Collapsed view (compact summary) or Expanded view (full rule display).

2. Shopping cart page: Display applicable discounts and encourage upsells.
- Customize cart display: Adjust how tiered offers and messages are shown to match your store’s branding.
- Use reset option: Click Reset text to restore default messaging if changes are no longer needed.

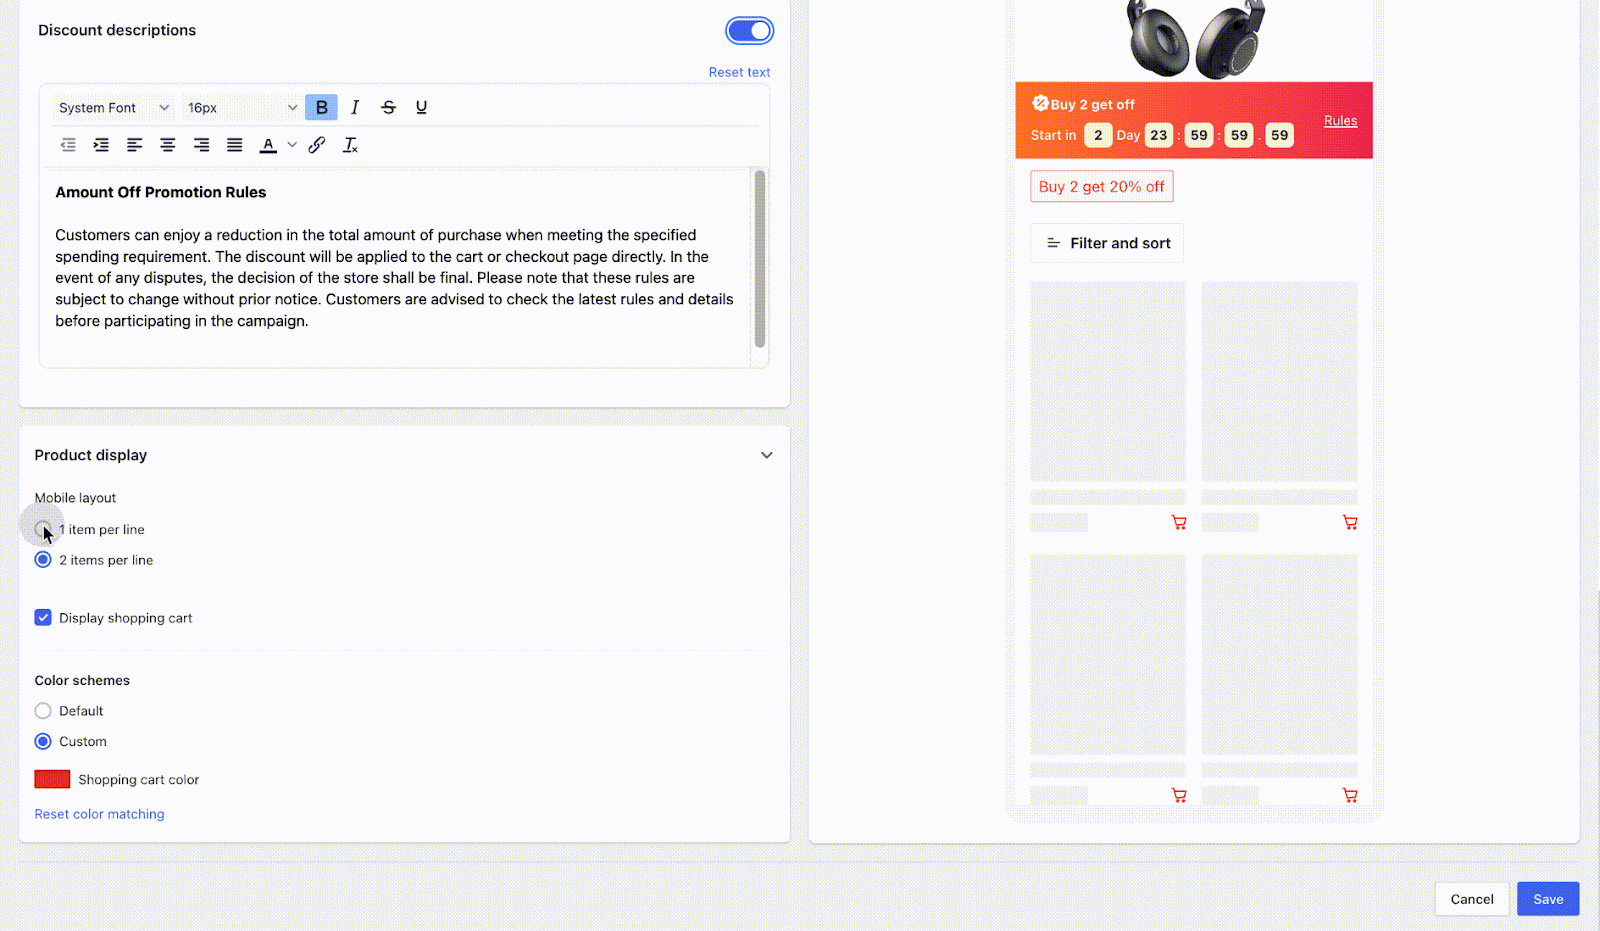
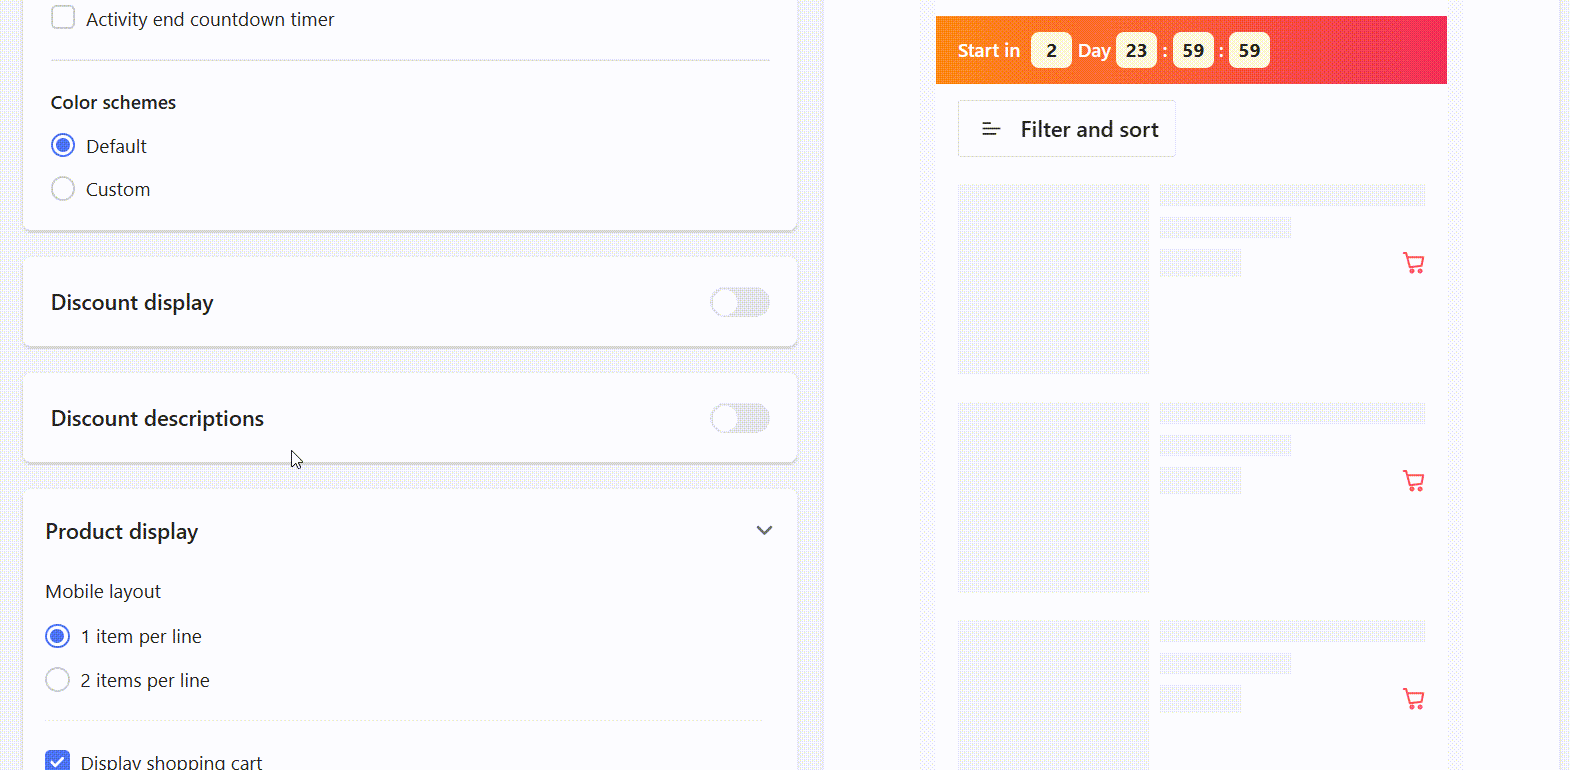
3. Activity landing page: Create a promotional overview that highlights the discount logic.
- Countdown setup: Enable a real or simulated countdown to drive urgency.
- Description settings: Auto-generate standard messaging, manually edit content, or click Reset text to revert.
- Display controls: Adjust product visuals, promotional tags, and layout preferences to support the campaign.
4. Theme integration: Embed discount visuals directly into your storefront.
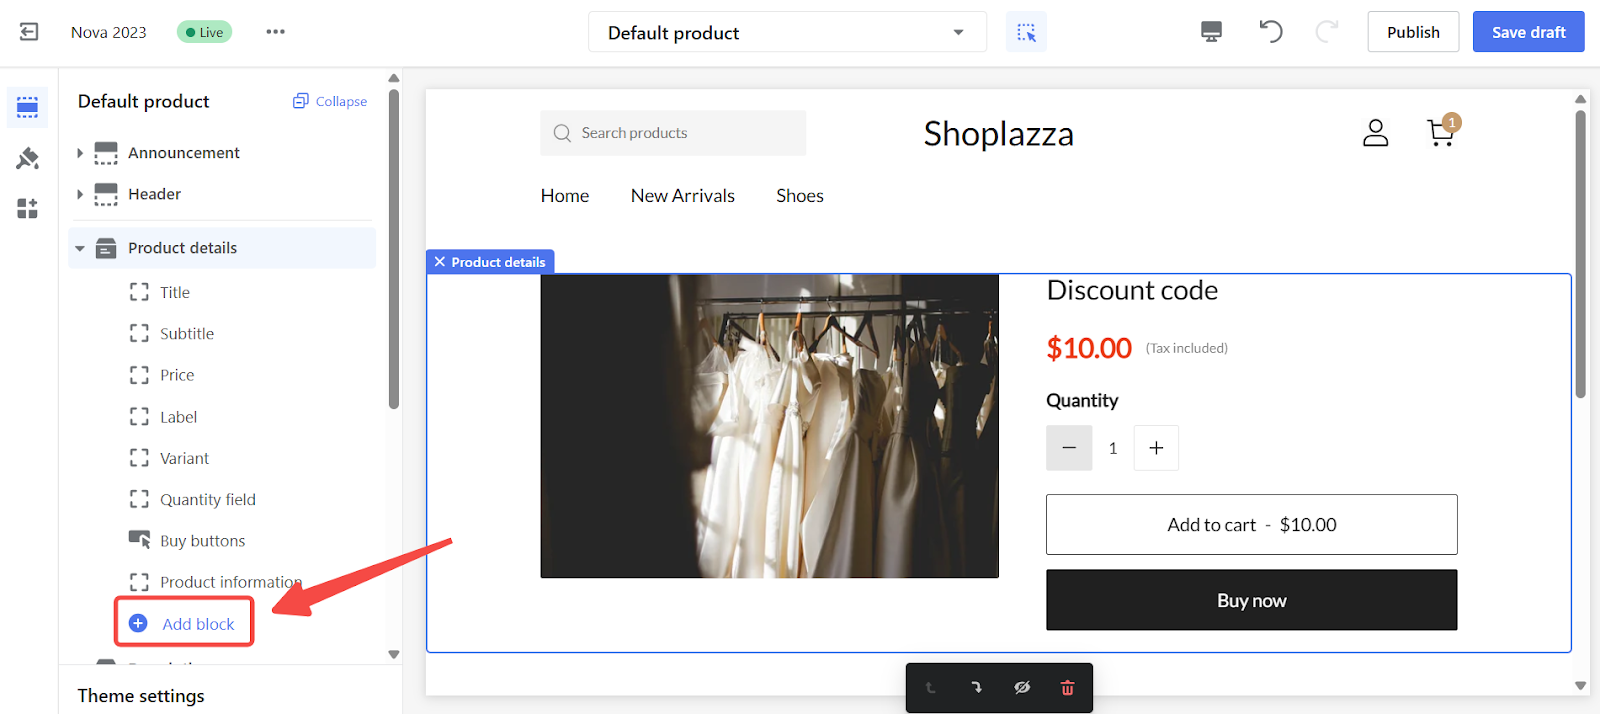
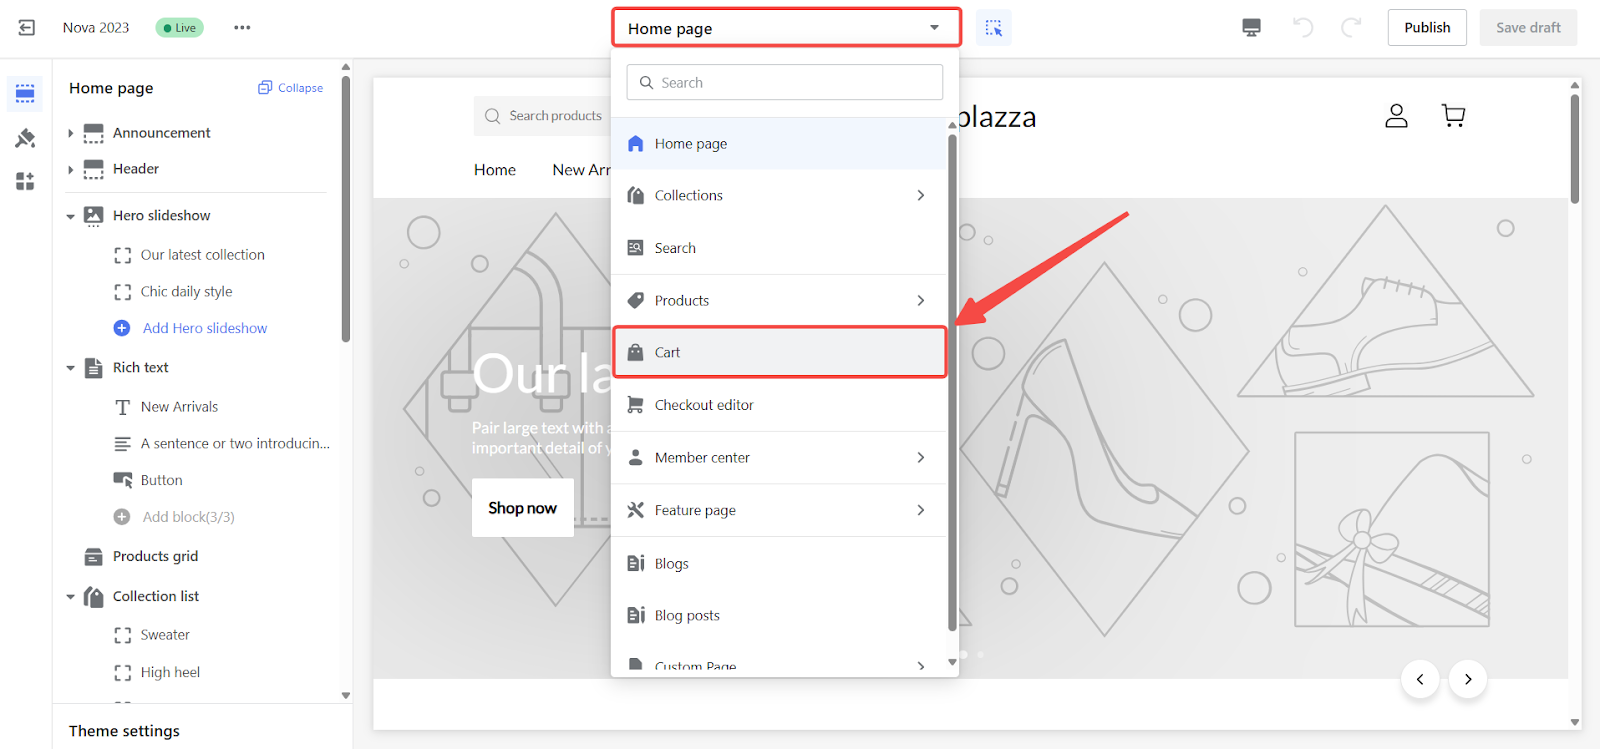
- Access theme editor: Click the Themes - Apps section link from the Product detail page tab.
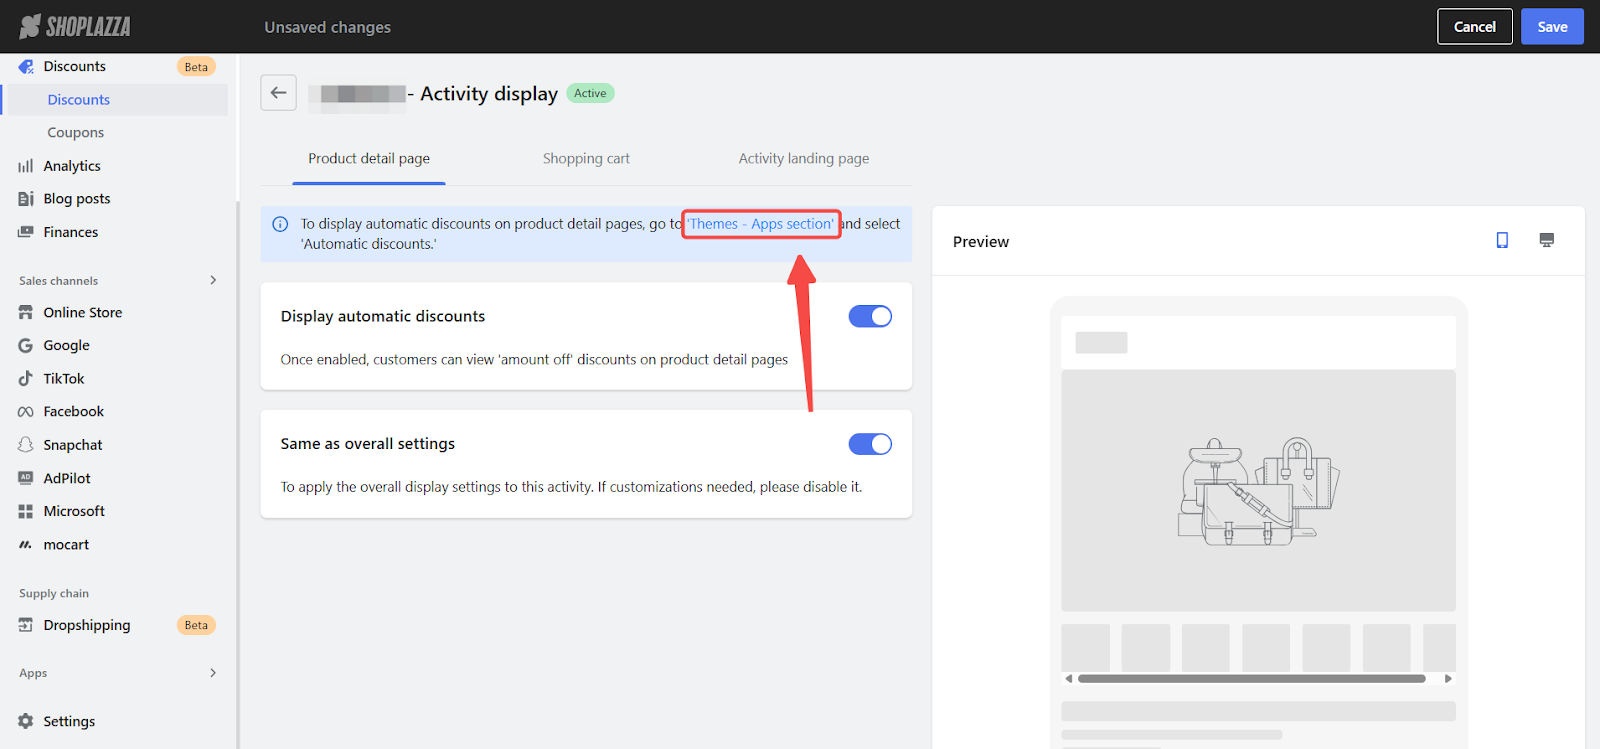
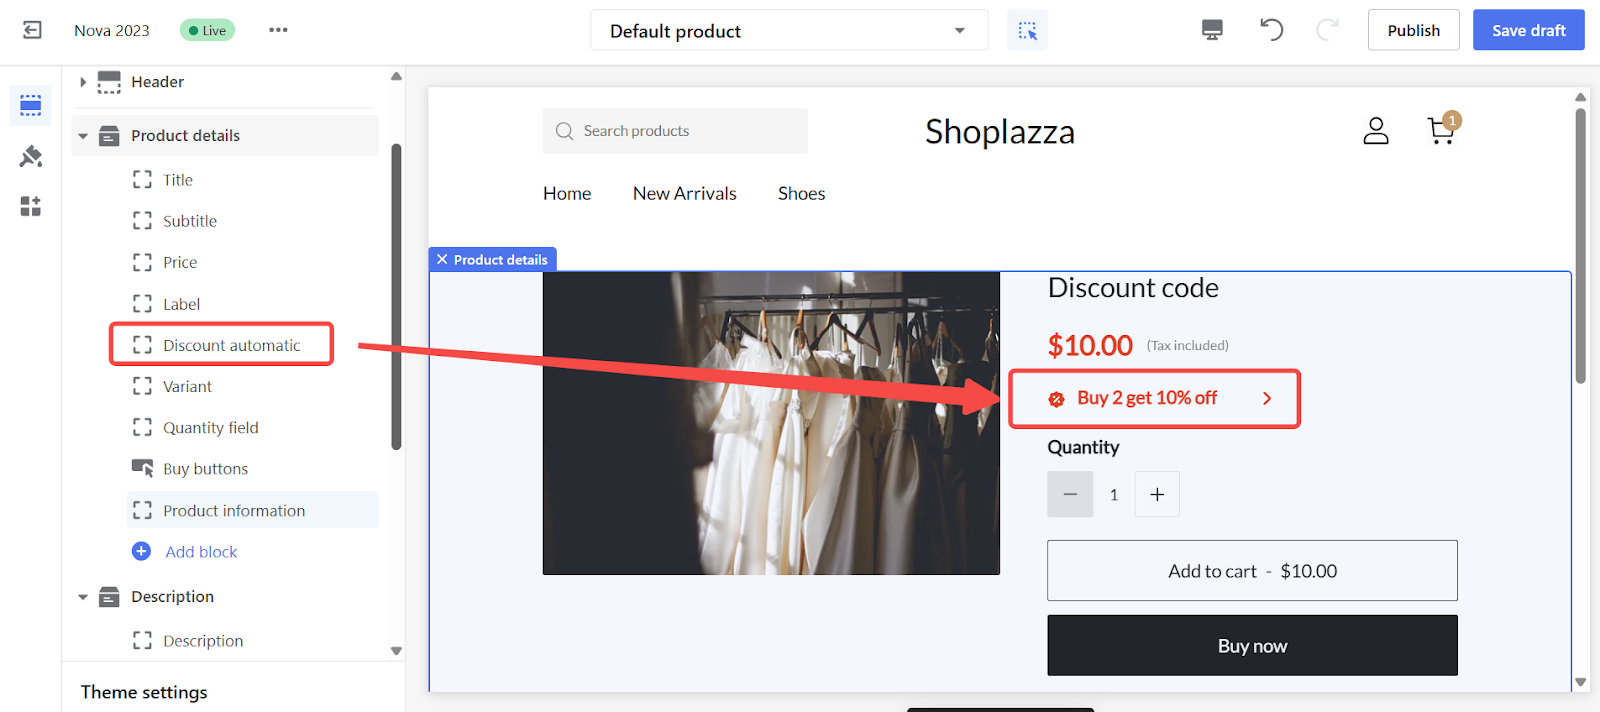
- Add product page block: Click Add block, then choose Discount automatic to insert the offer under product details.
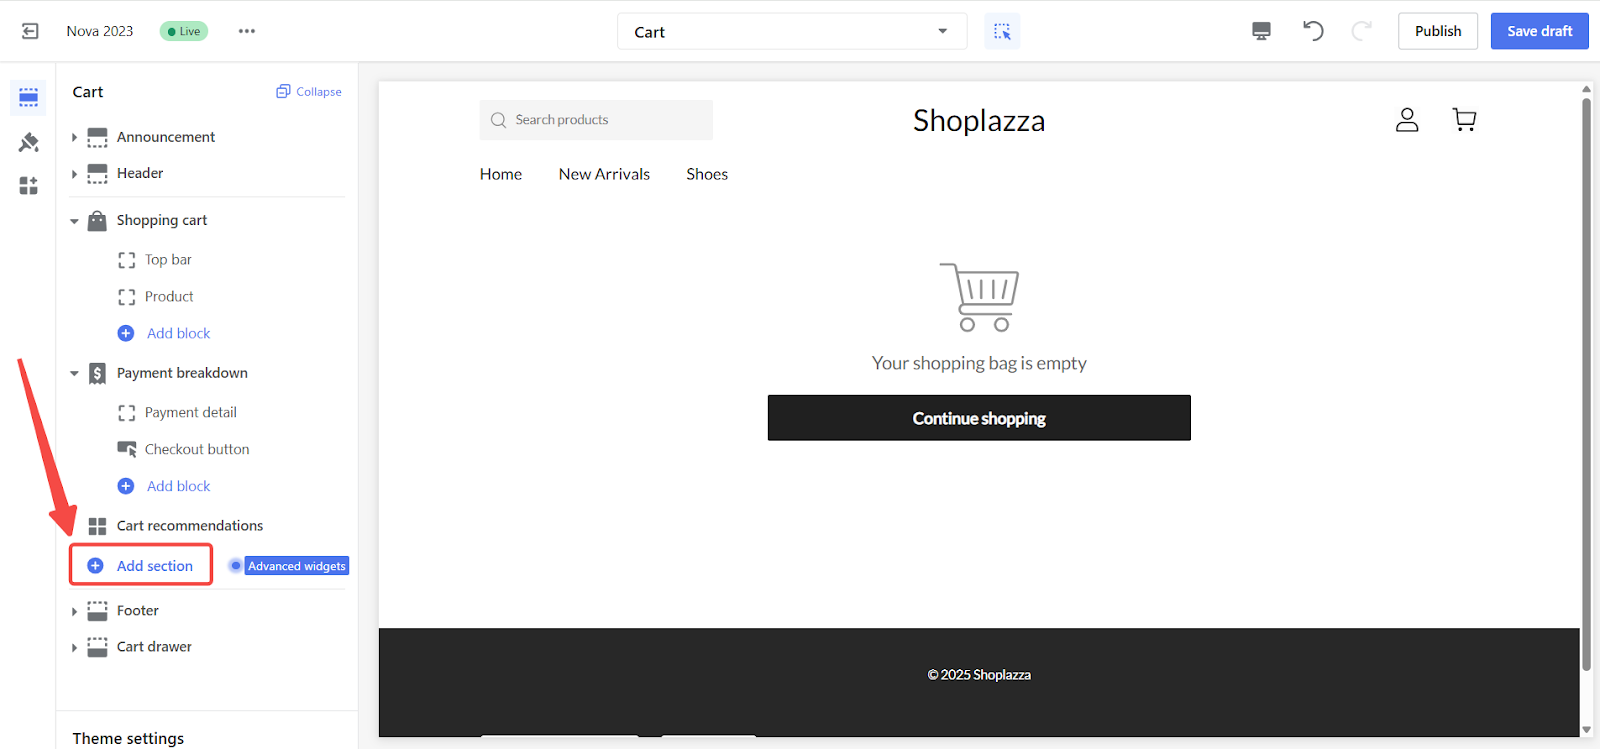
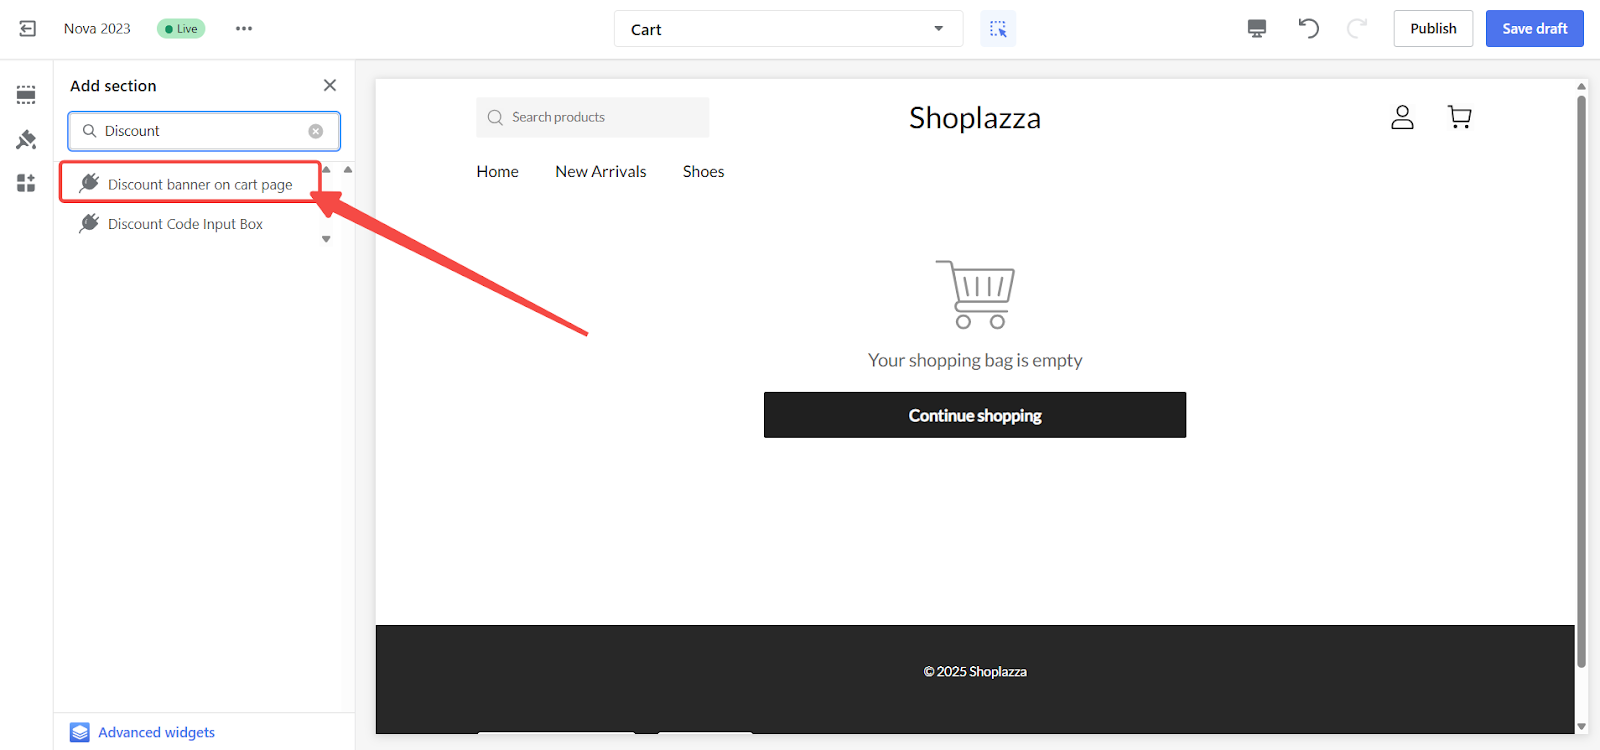
- Add cart page section: In the cart layout, click Add section, then select Discount banner on cart page to display real-time progress and tier prompts.
Nth Item Discount
Nth item discounts reward customers for purchasing in quantity, such as “Buy 3, get 1 free.” These offers share a similar setup to amount off discounts but with a focus on item count instead of order value.
1. Product detail page: Configure how tiered purchase offers appear next to eligible products.
- Set layout format: Choose between Collapsed or Expanded views to control how much detail is shown.
2. Shopping cart page: Reinforce the discount in the cart to increase conversion.
- Customize messaging: Tailor the appearance of tiered rules and encouragement messages.
- Use reset option: Revert to the original display by clicking Reset text.

3. Activity landing page: Showcase the logic and urgency of the campaign with visuals and text.
- Countdown timer: Activate a real or simulated countdown to highlight the promotion's time sensitivity.
- Discount details: Use auto-generated messaging, manually update content, or reset to default as needed.

- Enhanced visuals: Customize how products and promotions are visually displayed for clarity and appeal.
4. Theme integration: Nth item discounts use the same visual and layout logic as amount off. All theme editor settings and block placements mirror the Amount off configuration steps.
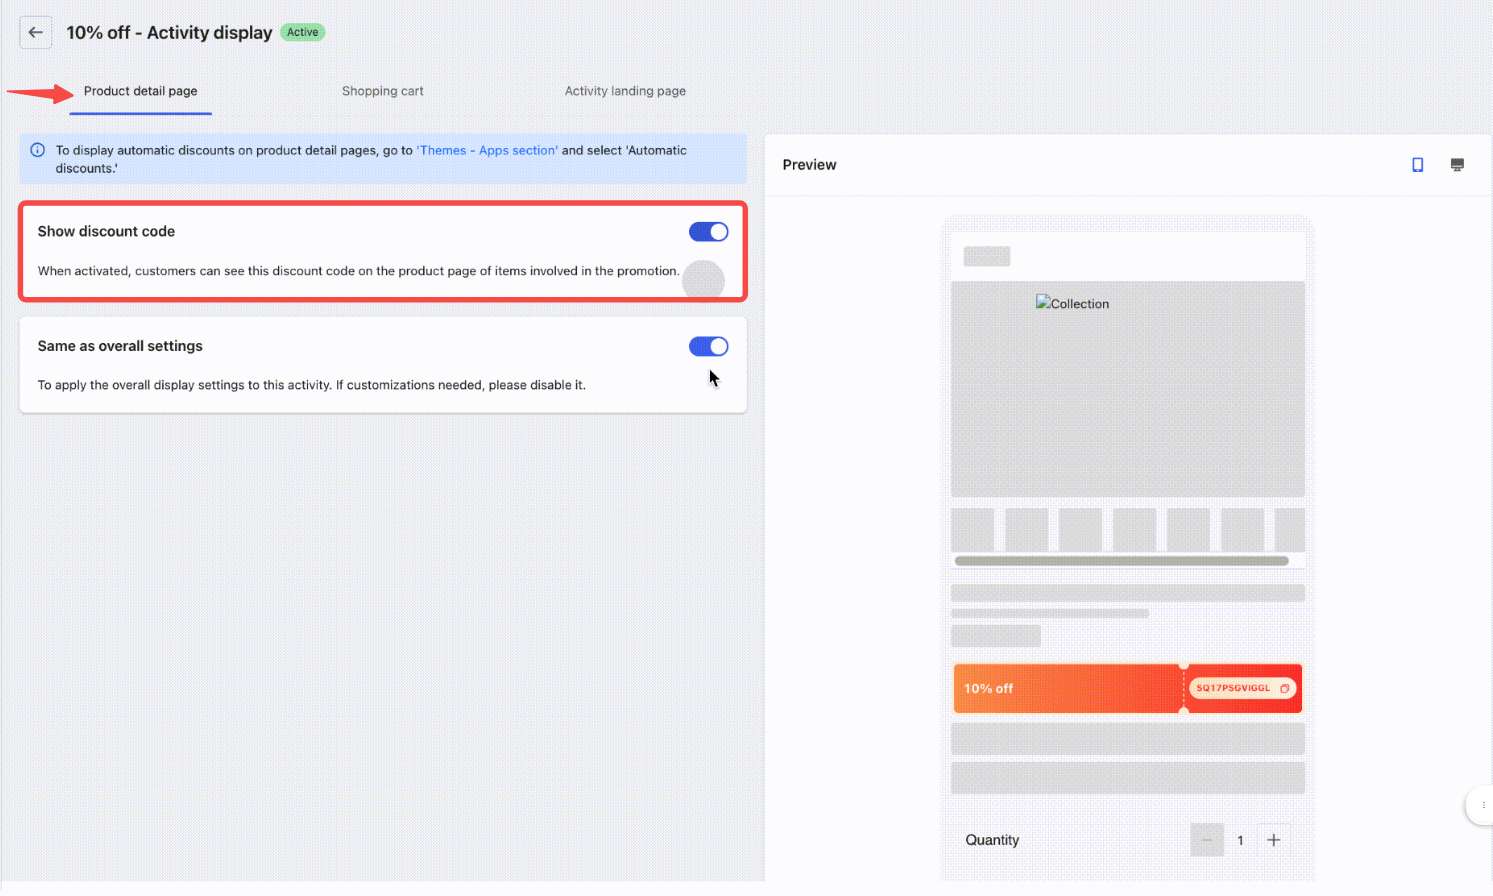
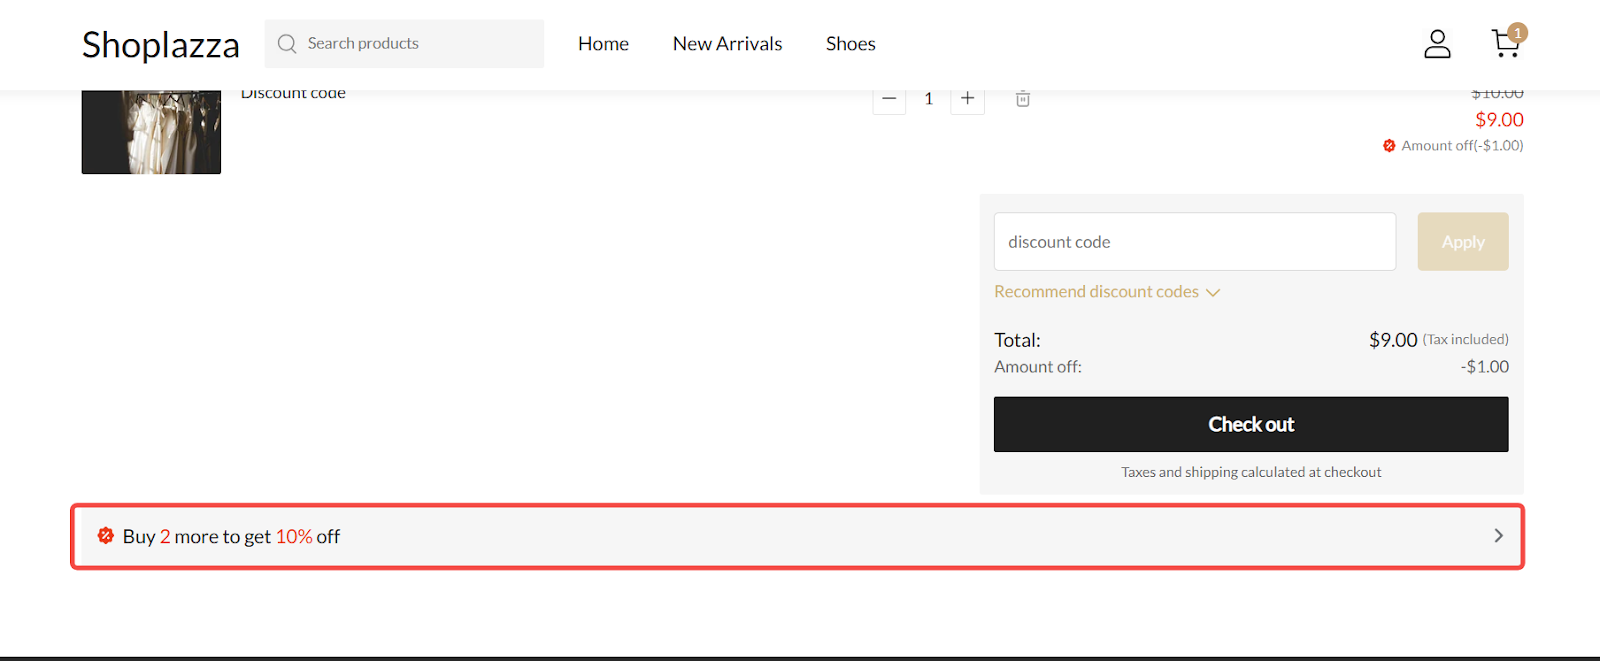
Discount codes
Discount codes offer flexible promotions such as percentage off, fixed value, free shipping, or Buy X Get Y. Use Page settings to display these offers throughout your storefront, making them more visible and easier for customers to apply.
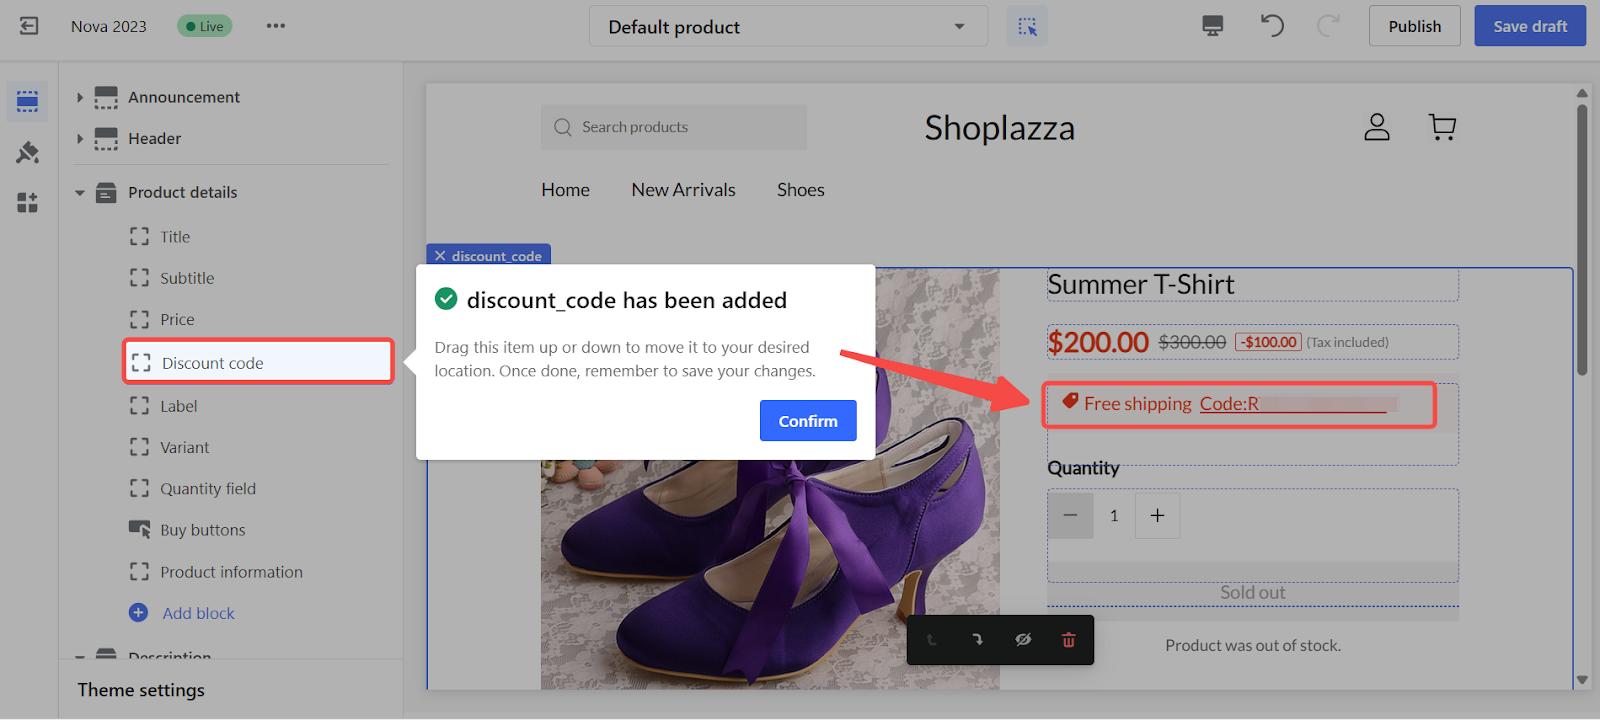
1. Product detail page: Highlight available codes next to eligible products.
- Toggle on display: Turn on Show discount code under the Product detail page tab to make the offer visible beside the product.
2. Shopping cart page: Remind customers about discounts before they check out.
- Cart discount display: Enable Show discounts code to show the promotion directly in the cart and encourage customers to apply it.

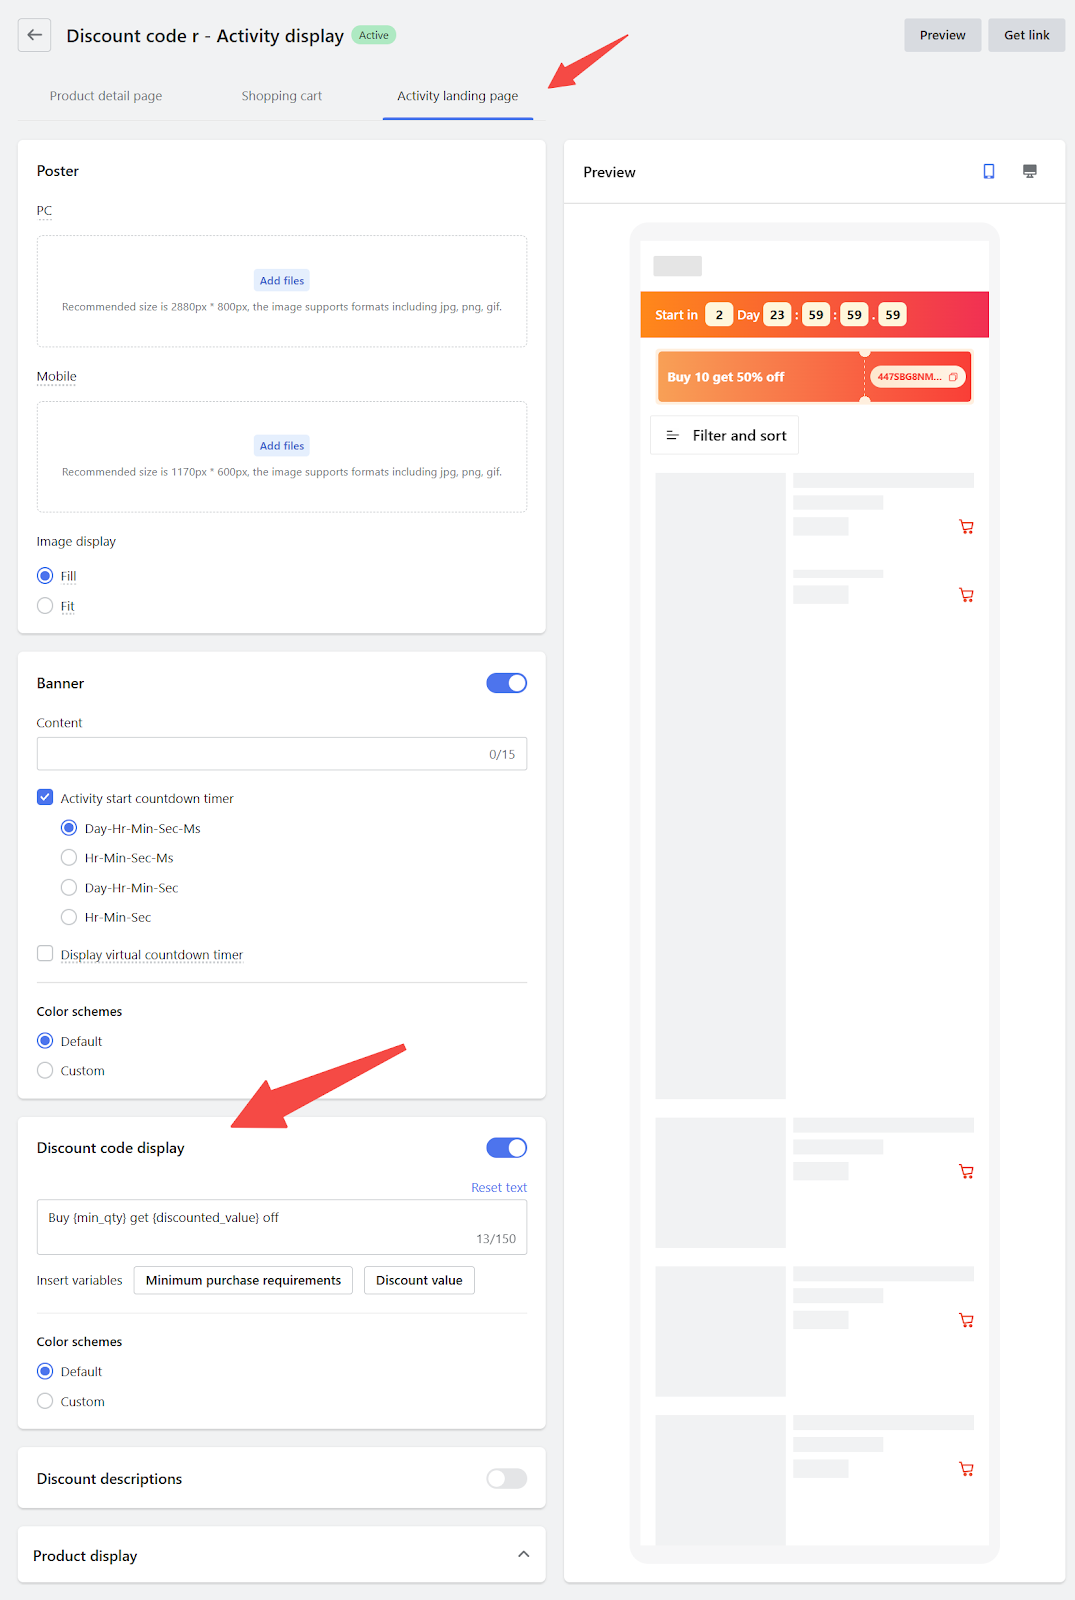
3. Activity landing page: Create a special campaign page that highlights your discount code offer.
- Upload visuals: Add images for both desktop and mobile to help the page stand out.
- Countdown setup: Turn on a timer to build urgency if your offer is time-sensitive.
- Customize promo text: Add or edit the description using tags like {discounted_value} and {discounted_item} to match the specific discount rules.
4. Theme integration: Add the discount code section directly to your storefront layout.
- Access theme editor: Click the Themes - Apps section link from the Product detail page tab.

- Confirm or adjust the block: The system will automatically include the discount block if it’s missing. You can move it to a different spot on the page if needed.
5. Multi-tier display (optional): Decide how to show more than one discount code on the product page.
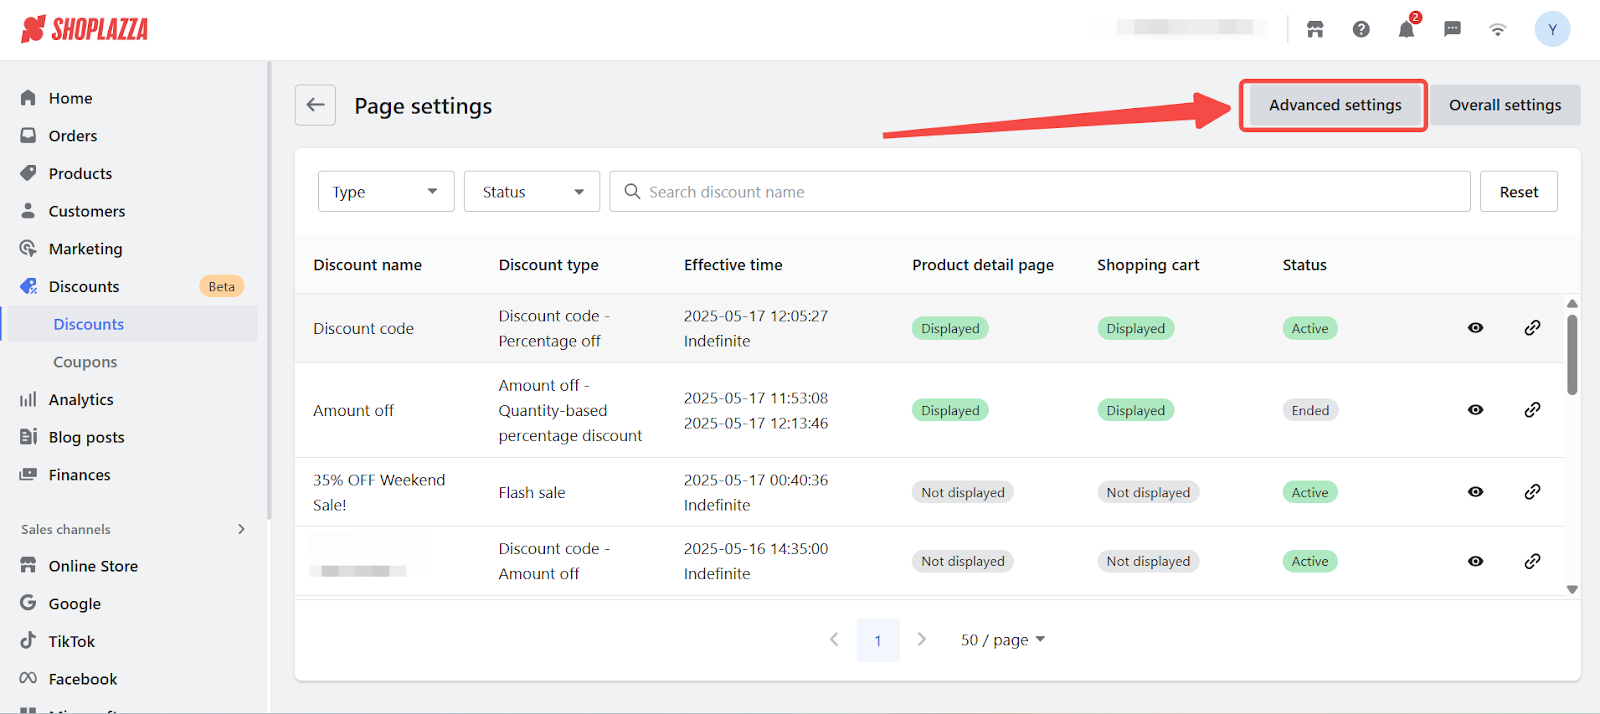
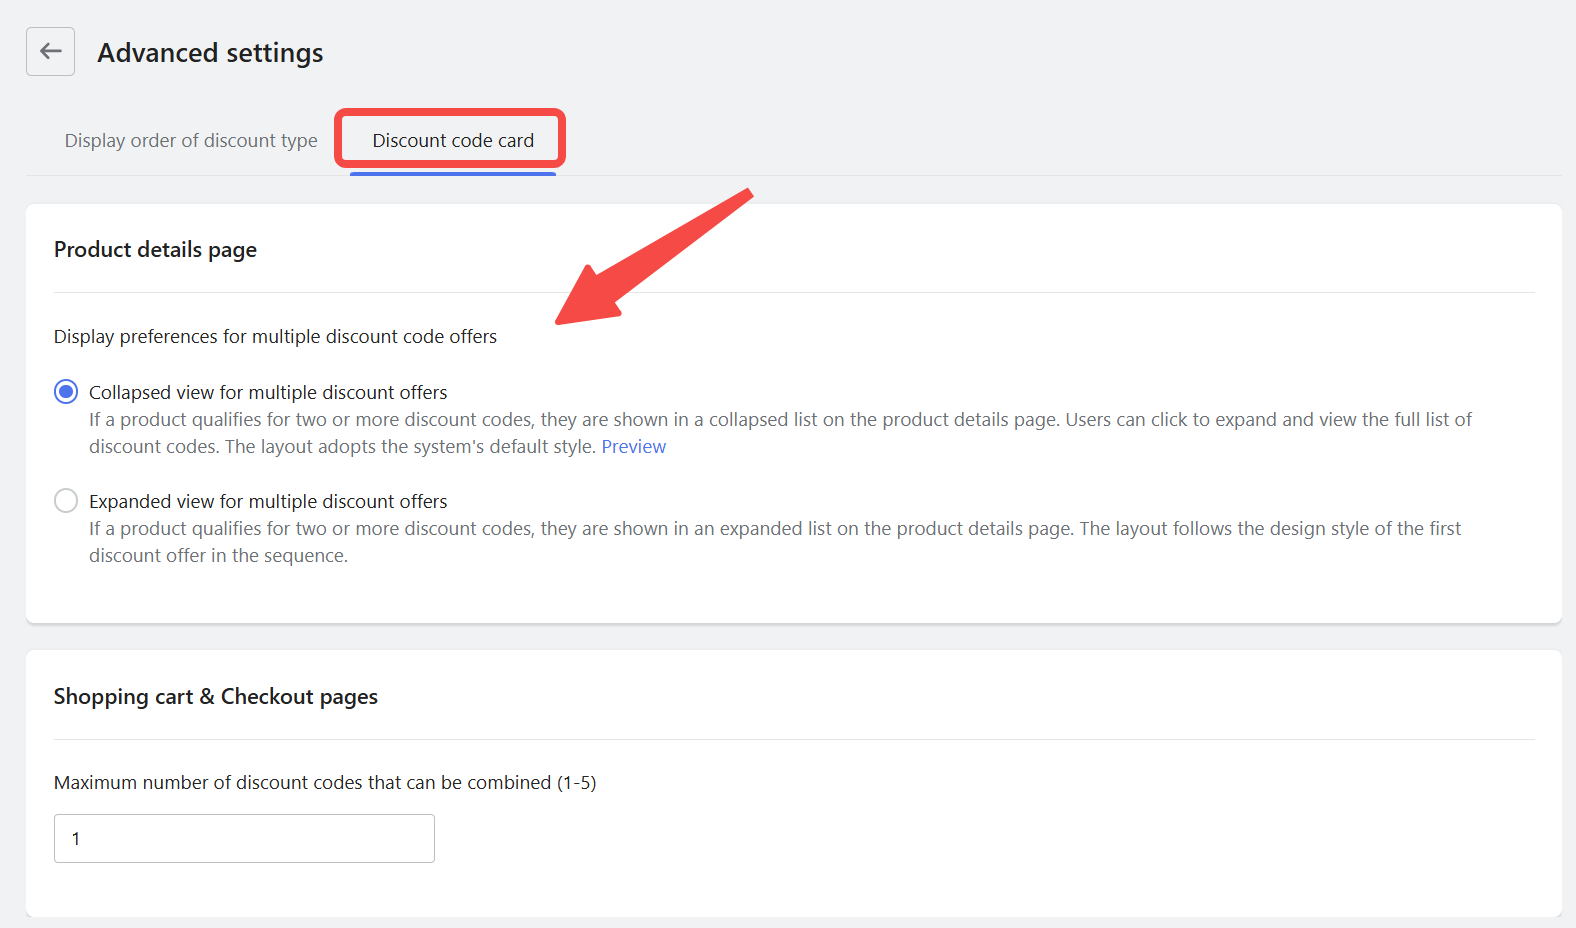
- Open settings: Go to Discounts > Page settings > Advanced settings > Discount code card.
-
Choose layout:
- Collapsed: Shows a simple list that expands when clicked. This keeps the page clean and easy to scan.
- Expanded: Shows all discount options at once, based on the first offer. This works well when you want everything clearly visible right away.
Configure multi-tier display layout (optional)
If your campaign offers multiple discount codes or tiers, you can customize how they appear on the product page.
- Open Discount code layout settings: Go to Discounts > Page settings > Advanced settings > Discount code card to customize how multiple discount offers appear on the Product Detail Page. Choose one of the following layout options:
Collapsed view (default):
- Displays a condensed list of available discount codes. Customers can expand the list to view full details. Recommended for a cleaner interface.
Expanded view:
- Shows all eligible discount codes in full. The layout follows the format of the first offer in the sequence. Recommended for campaigns where visibility of all offers is important.
Theme-specific features
Some discount display options are only available when you’re using the latest versions of supported themes like the Nova theme series, the Geek theme series, or the Hero theme series. These extra features help you show discount progress, recommend codes, or apply copied codes automatically.
1. Feature compatibility: The table below shows which features are available based on the discount type you’re using.
| Feature | Automatic Discounts (Flash Sales / Amount Off / Nth Item) | Discount Code (Percentage / Fixed / Buy X Get Y) | Free Shipping |
| Show recommended codes in cart | Not supported | Supported | Not supported |
| Display progress bar in cart | Supported | Supported | Not supported |
| Auto-apply clipboard discount codes | Not supported | Supported | Not supported |
Note
Free shipping codes can only be applied at checkout and do not support in-cart recommendation or progress display.
2. Recommended codes in the cart: Add a section to your cart page that suggests available codes your customer might want to use. This feature is available when you're using Nova2023 theme series, Geek theme series, or Hero theme series.
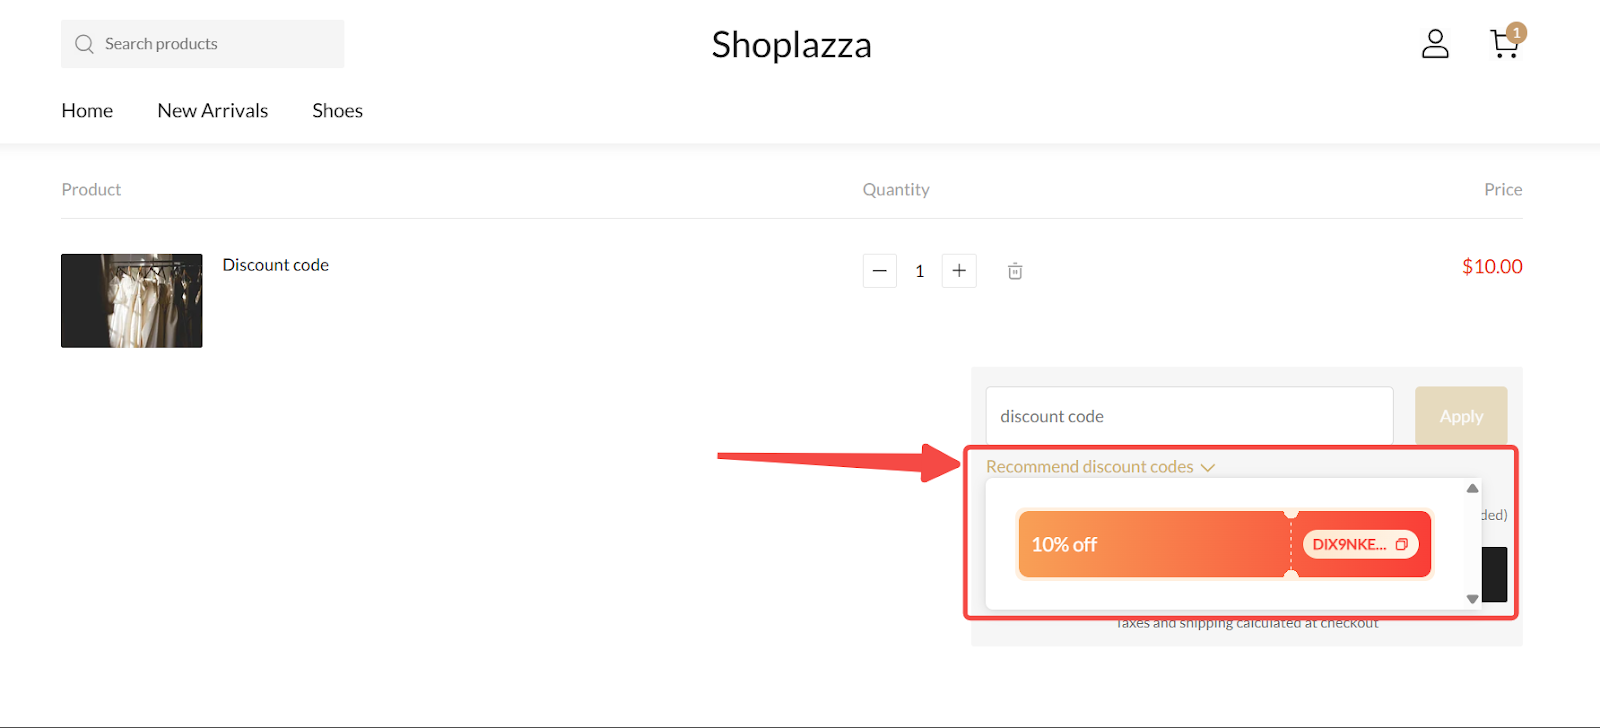
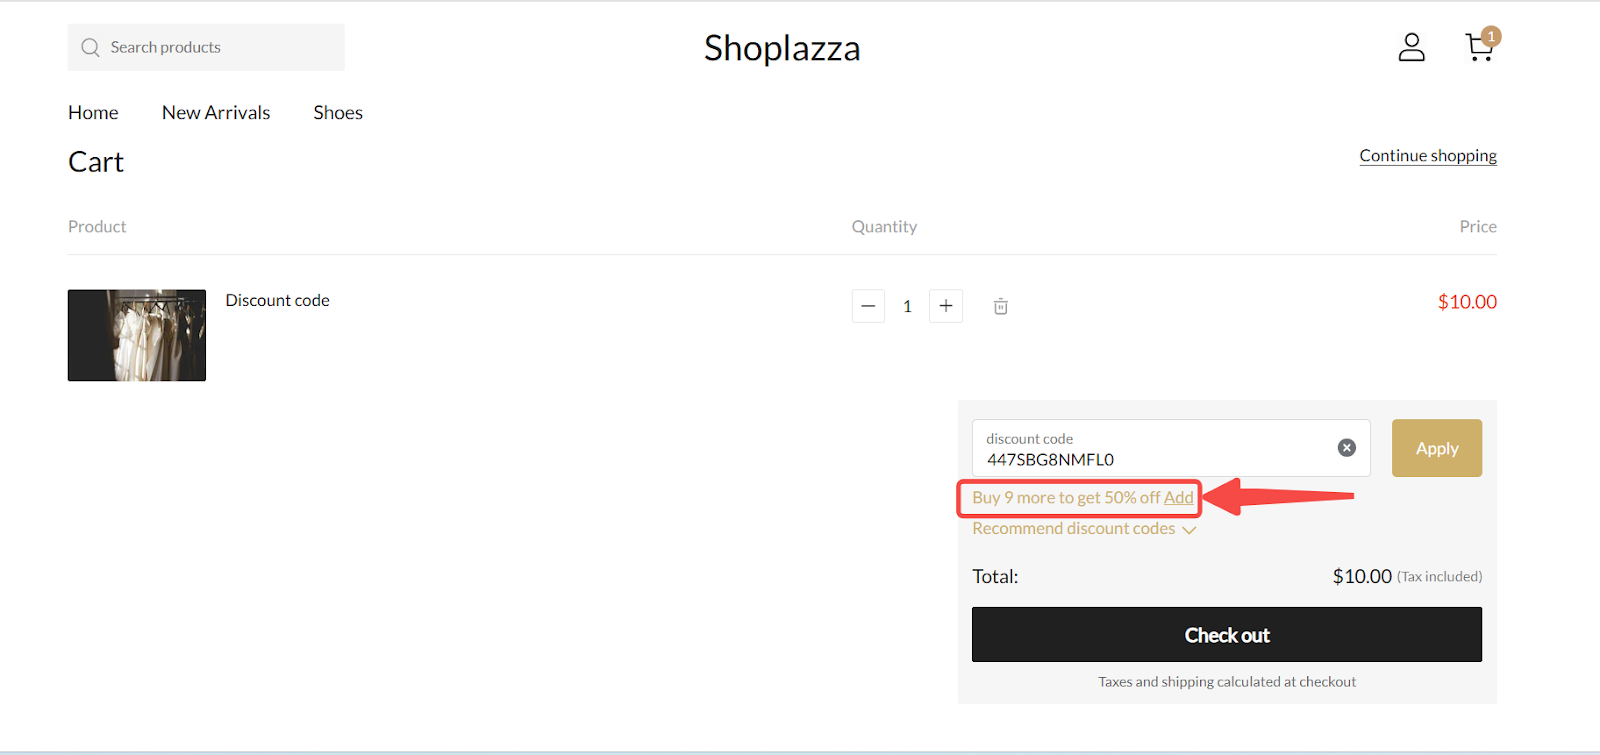
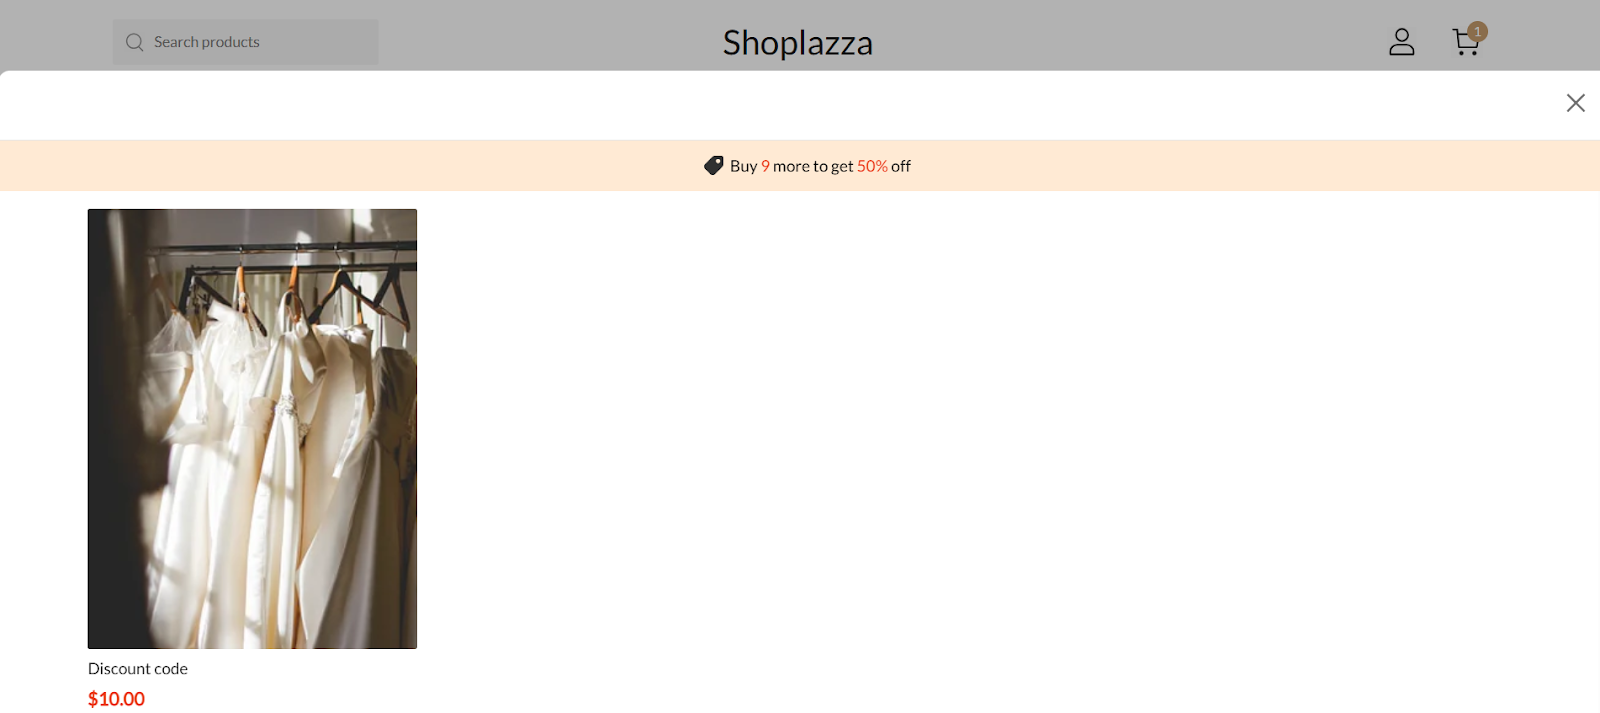
3. Progress bar in the cart: Show customers how close they are to qualifying for a discount.
- For discount codes, a message like “Buy 9 more to get 50% off” appears once the code is entered in the cart. This helps encourage additional purchases without showing a visual progress bar.
- For automatic discounts, you can display a similar message by adding the Discount banner on cart page section in your theme editor.

4. Auto-apply copied discount codes: If a customer copies a discount code before they reach the cart, it will be automatically filled in for them.
- This feature requires one of the following theme versions:
- Nova theme series: version 3.6.12 or later
- Geek theme series: version 3.2.7 or later
- Hero theme series: the latest version
Upgrade to the latest version of Nova, Geek, or Hero to access these features. To check your theme version or upgrade, go to Other Settings | Upgrading your theme.

Delivering clear, consistent discount messages helps build trust and drive conversions. Use Page settings to manage every discount visually and strategically, directly from your Shoplazza admin.


Comments
Please sign in to leave a comment.