
The flash sale discount tool gives you more flexibility and control when running time-sensitive promotions. With an improved setup flow and new pricing options, flash sales can help drive urgency and increase conversions across your store.
Setting up a flash sale
The basic setup for your flash sale includes naming the campaign, setting the schedule, and defining how it will appear to your customers. This section helps ensure the promotion is clear, time-bound, and easy to recognize on your storefront.
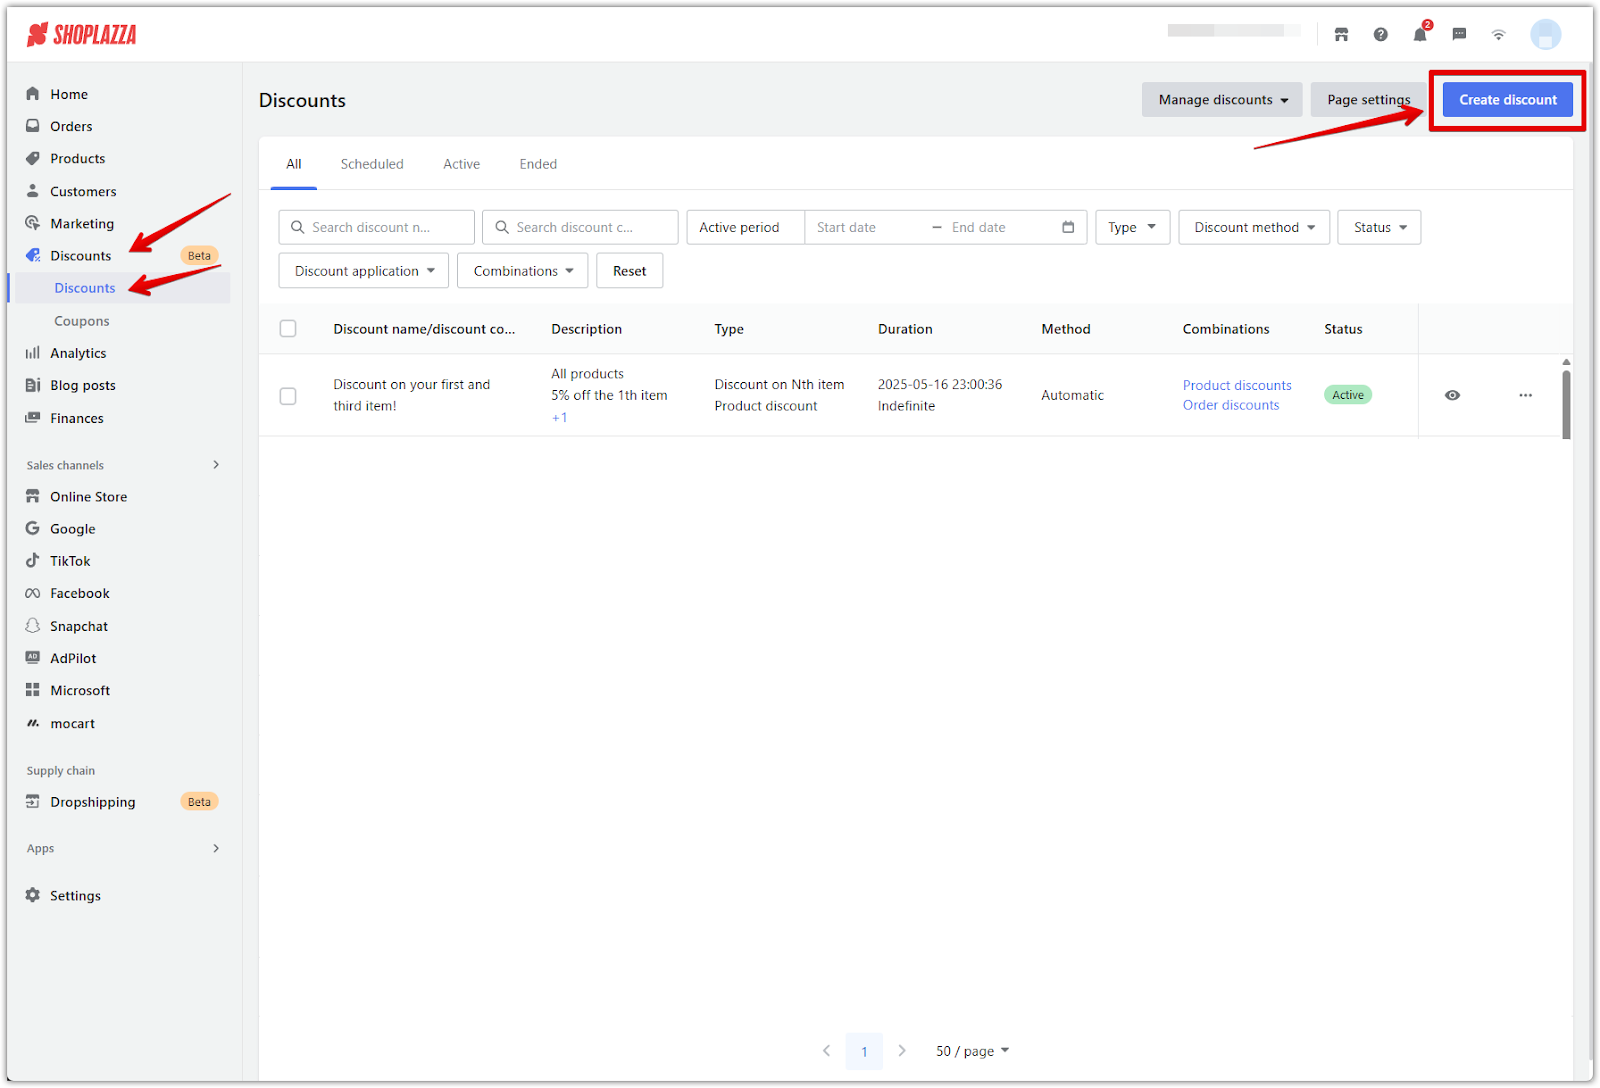
1. Go to the Discounts section: From your Shoplazza admin, navigate to Discounts > Discounts, then click Create discount.
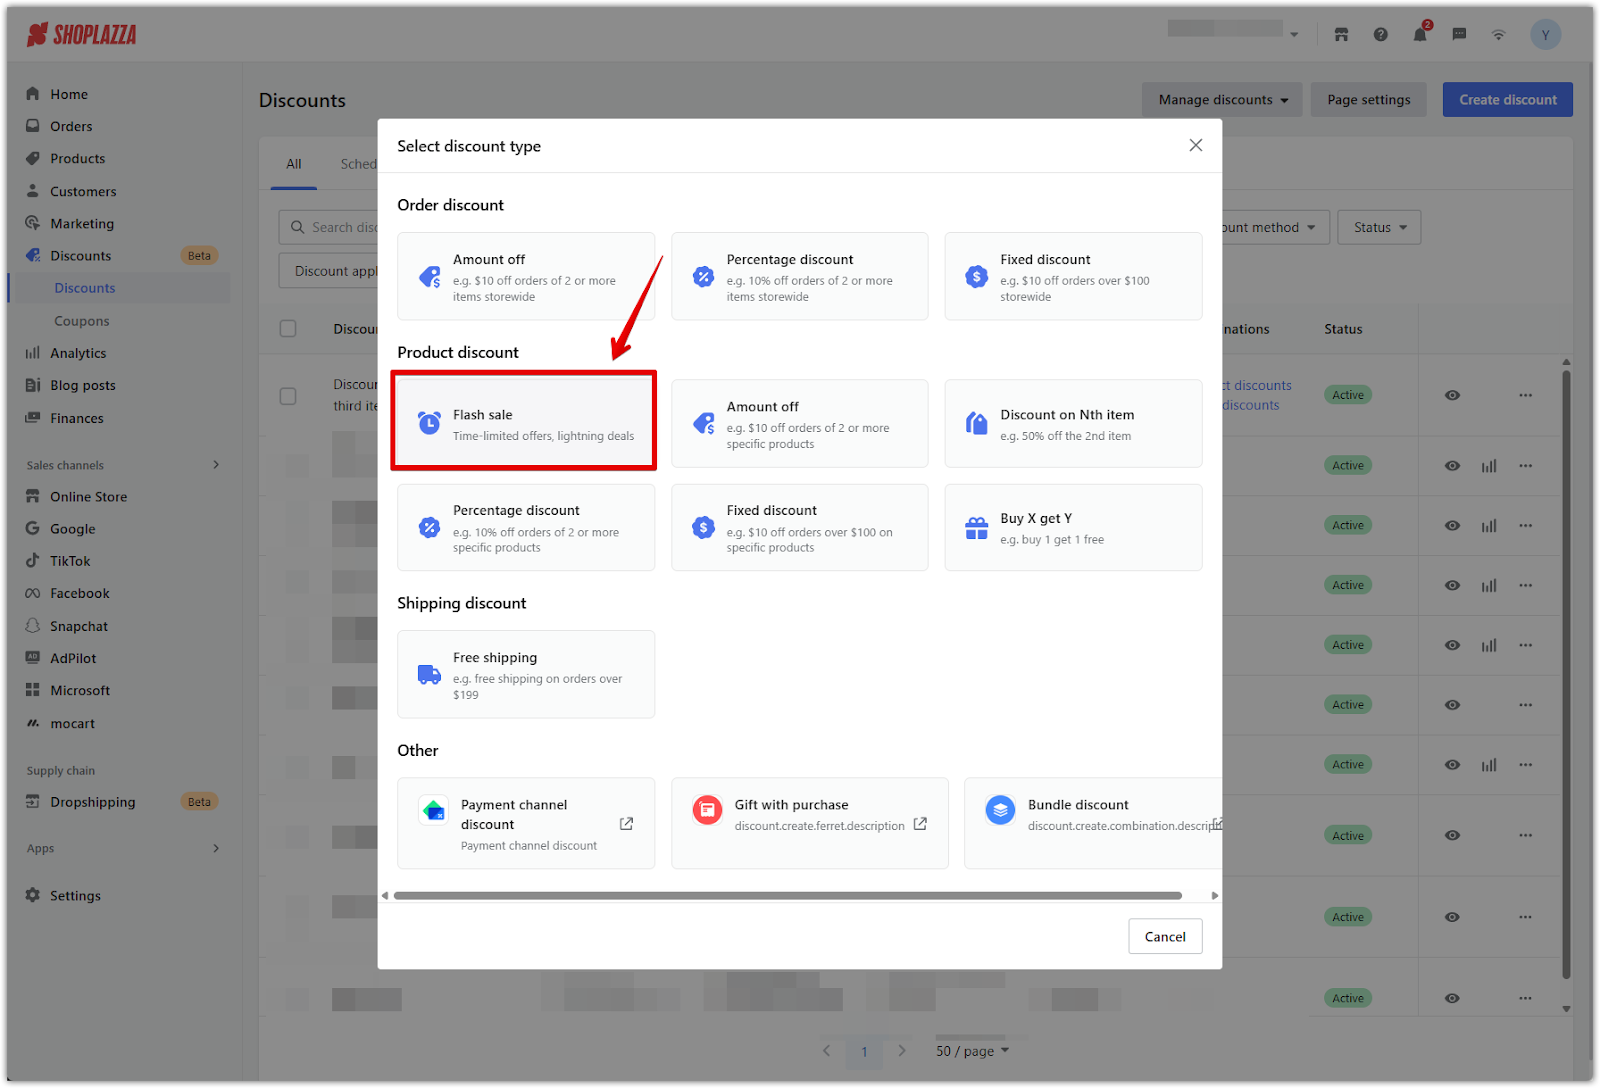
2. Select Flash sale: In the popup window, choose Flash sale to open the flash sale setup page.
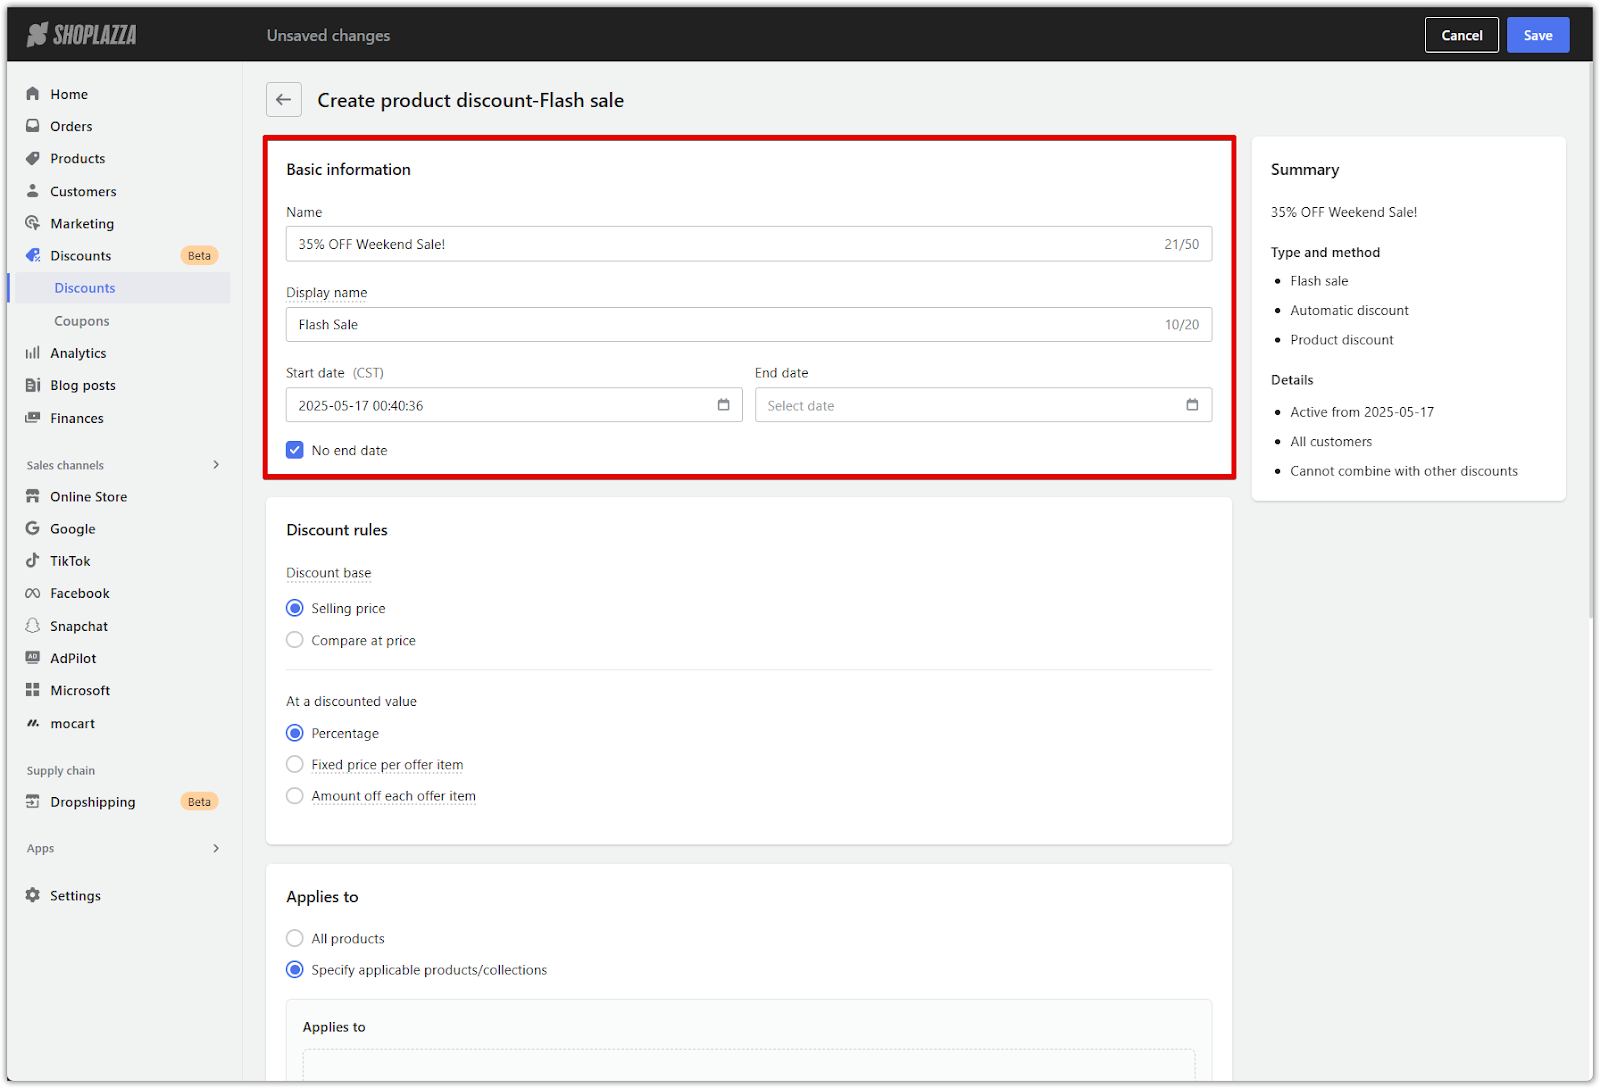
3. Enter the campaign details: Under the Basic information section, fill in the following:
- Name: This is the internal name for your campaign and will appear in your admin panel.
- Display name: This is the label customers will see at checkout to identify the flash sale.
- Start and end date: Define when the promotion begins and ends. The start time must be later than the current time and follows your store’s timezone. If you'd like the sale to run indefinitely, select No end date.
Note
The campaign summary on the right updates automatically based on what you enter here.
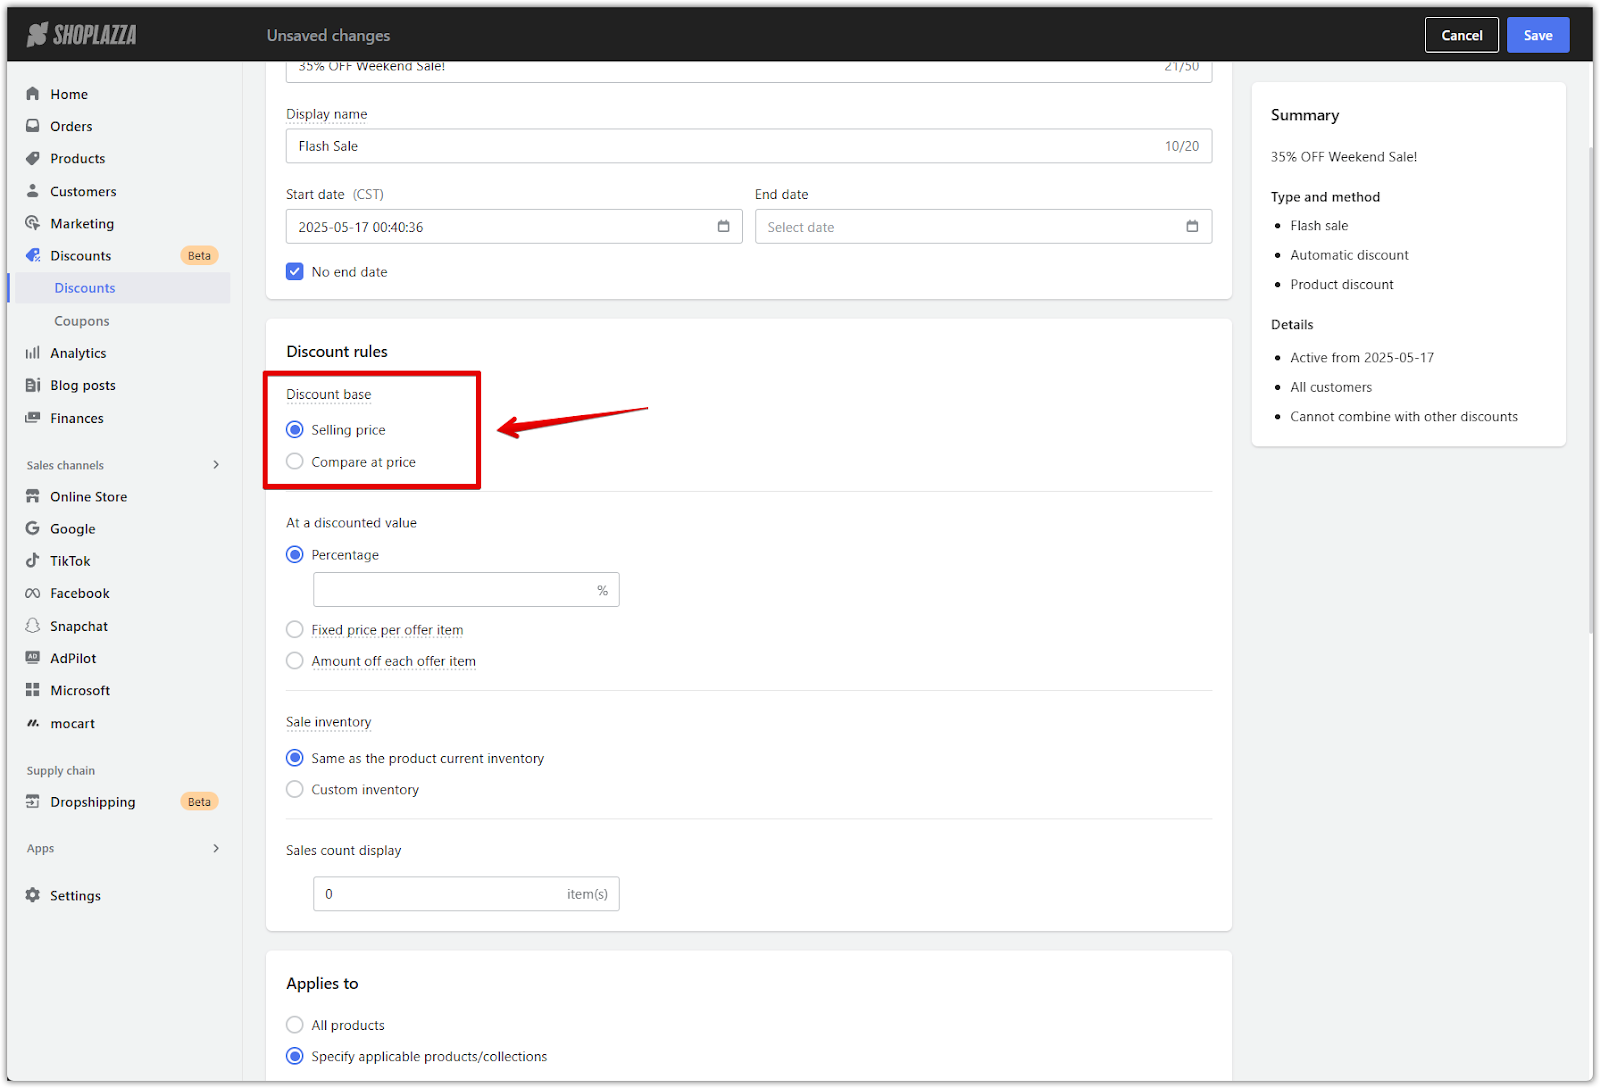
Discount rules
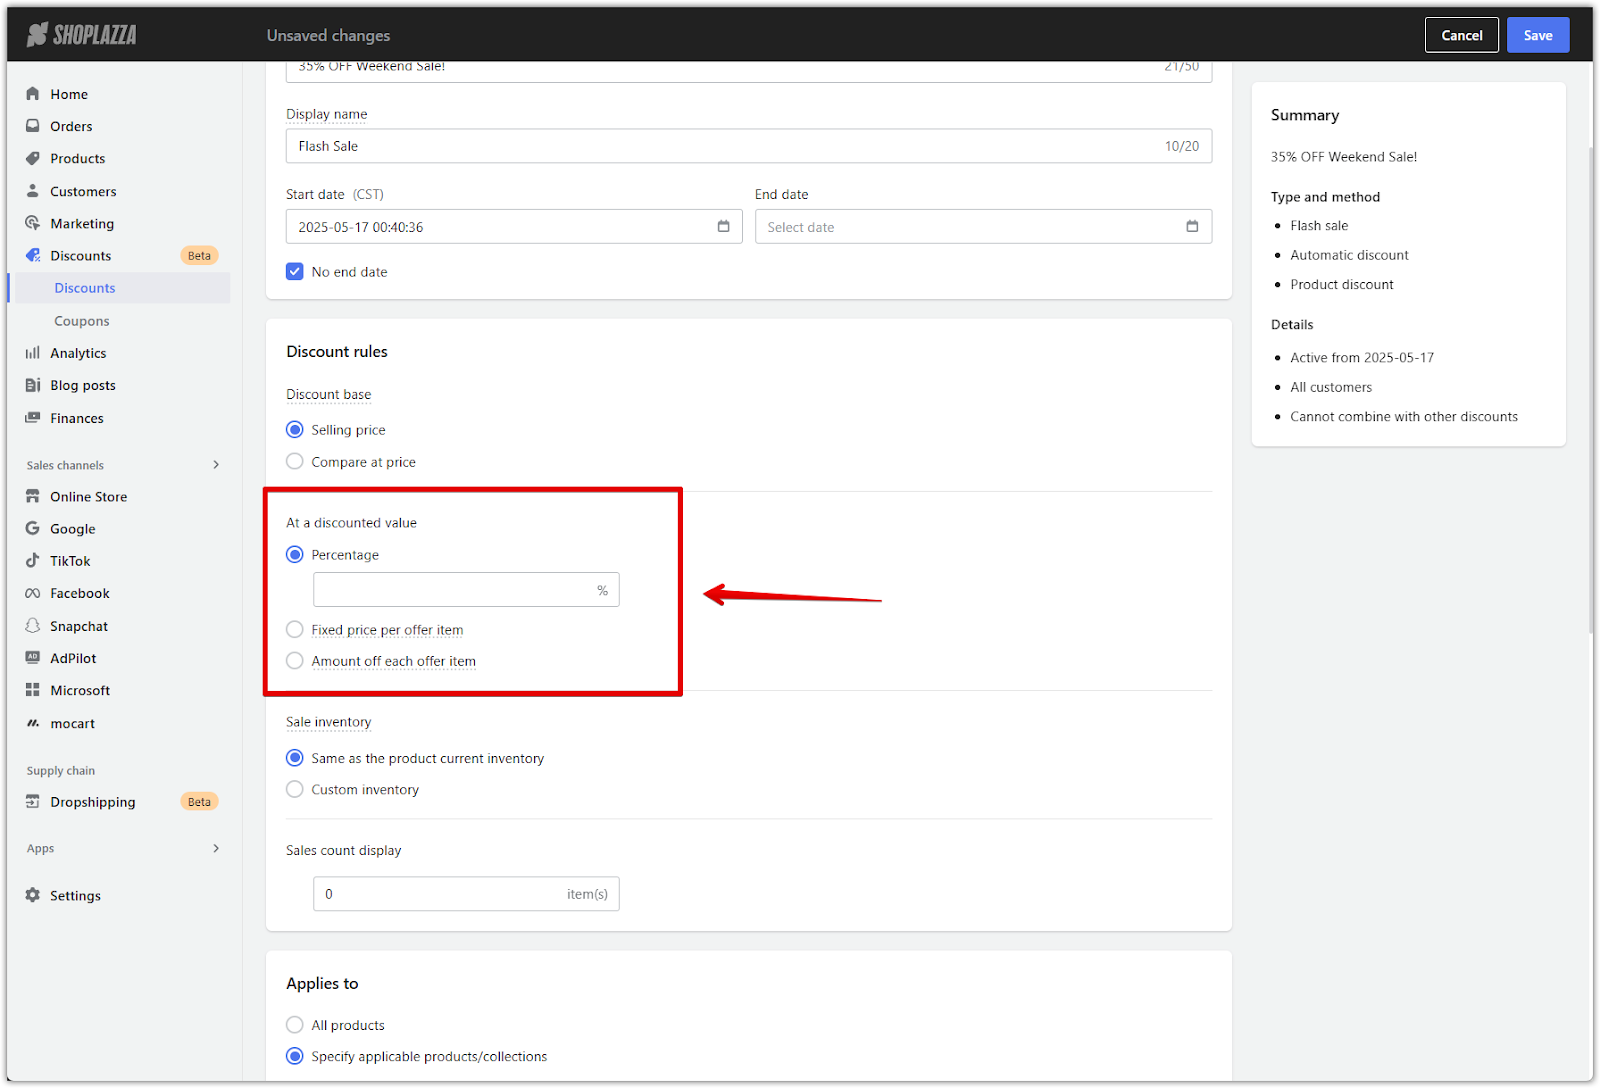
Set how your flash sale prices are calculated and applied. Choose whether the discount is based on the selling price or compare at price, and decide whether to apply values globally or customize them by product. To qualify, flash sale prices must be greater than 0 and lower than the selected base price.
1. Choose the discount base: Select whether the discount is calculated from the Selling price or the Compare at price. For example, if a product’s compare at price is $100 and the selling price is $80, then a 10% discount gives $90 using compare at price or $72 using selling price.
2. Select the discount type: Choose how the promotional price is calculated:
- Percentage: Apply a percentage discount to the base price.
- Fixed price per offer item: Set a specific price for each product. If the fixed price is equal to or higher than the base price, the discount will be ignored. For example, if the selling price is $5 and the fixed promo price is $5.99, no discount is applied.
- Amount off each offer item: Deduct a fixed amount from the base price. If the discount amount exceeds the base price, the discount is not applied. For example, if the selling price is $4.99 and the discount is $5, the product appears at $0 and is excluded.
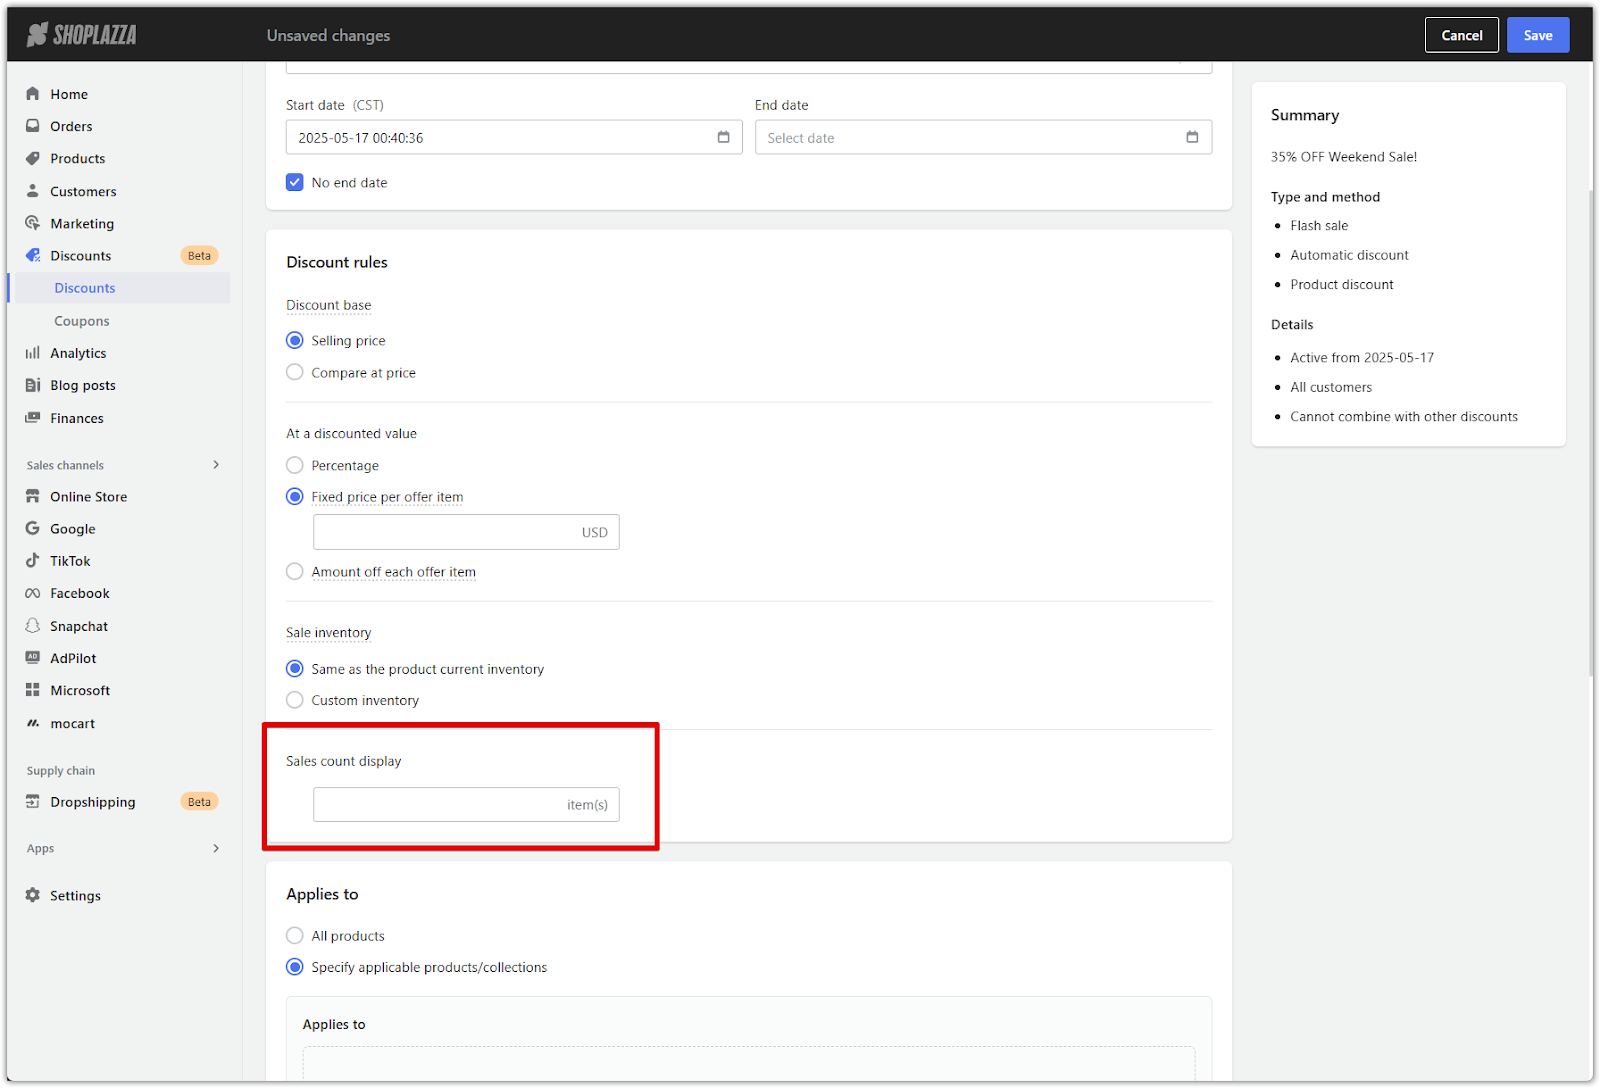
3. Set sale inventory: Choose how inventory is handled for the flash sale:
- Same as the product current inventory: Use the product’s existing stock levels.
- Custom inventory: Define a specific inventory amount that will be used during the sale.
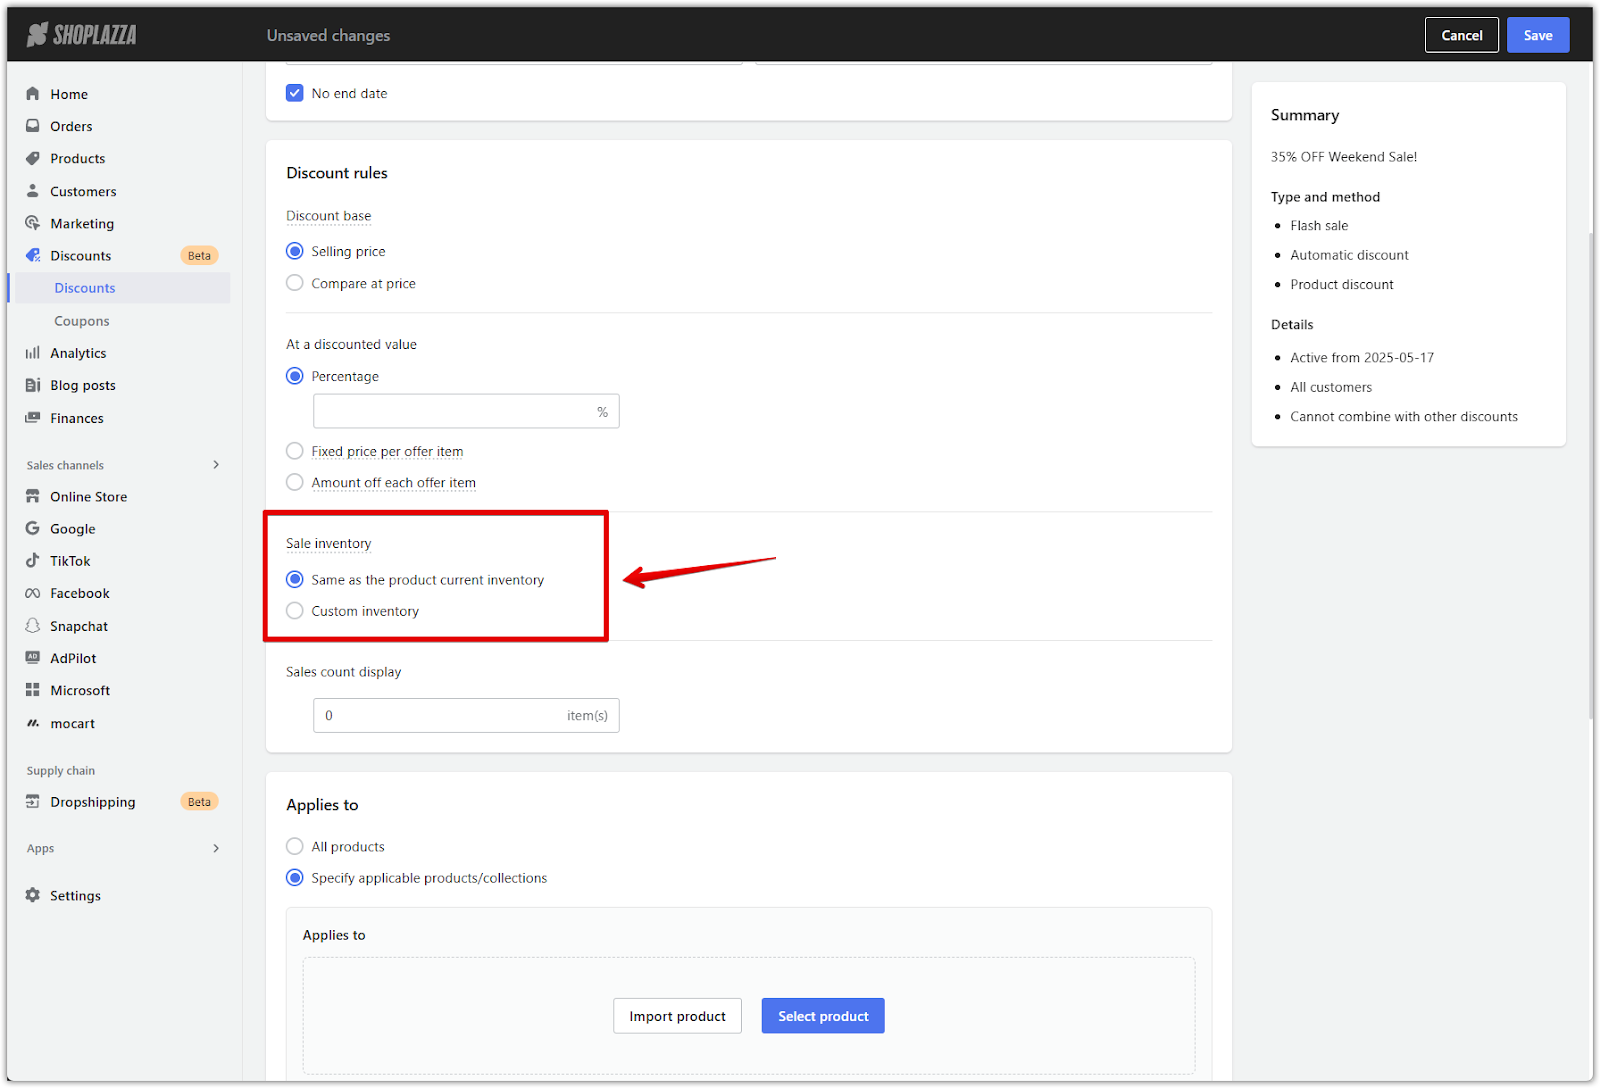
4. Set sales count display: Enter the number of items that will appear as the default sold count during the campaign. This number is shown on the product detail page to help create urgency and social proof.
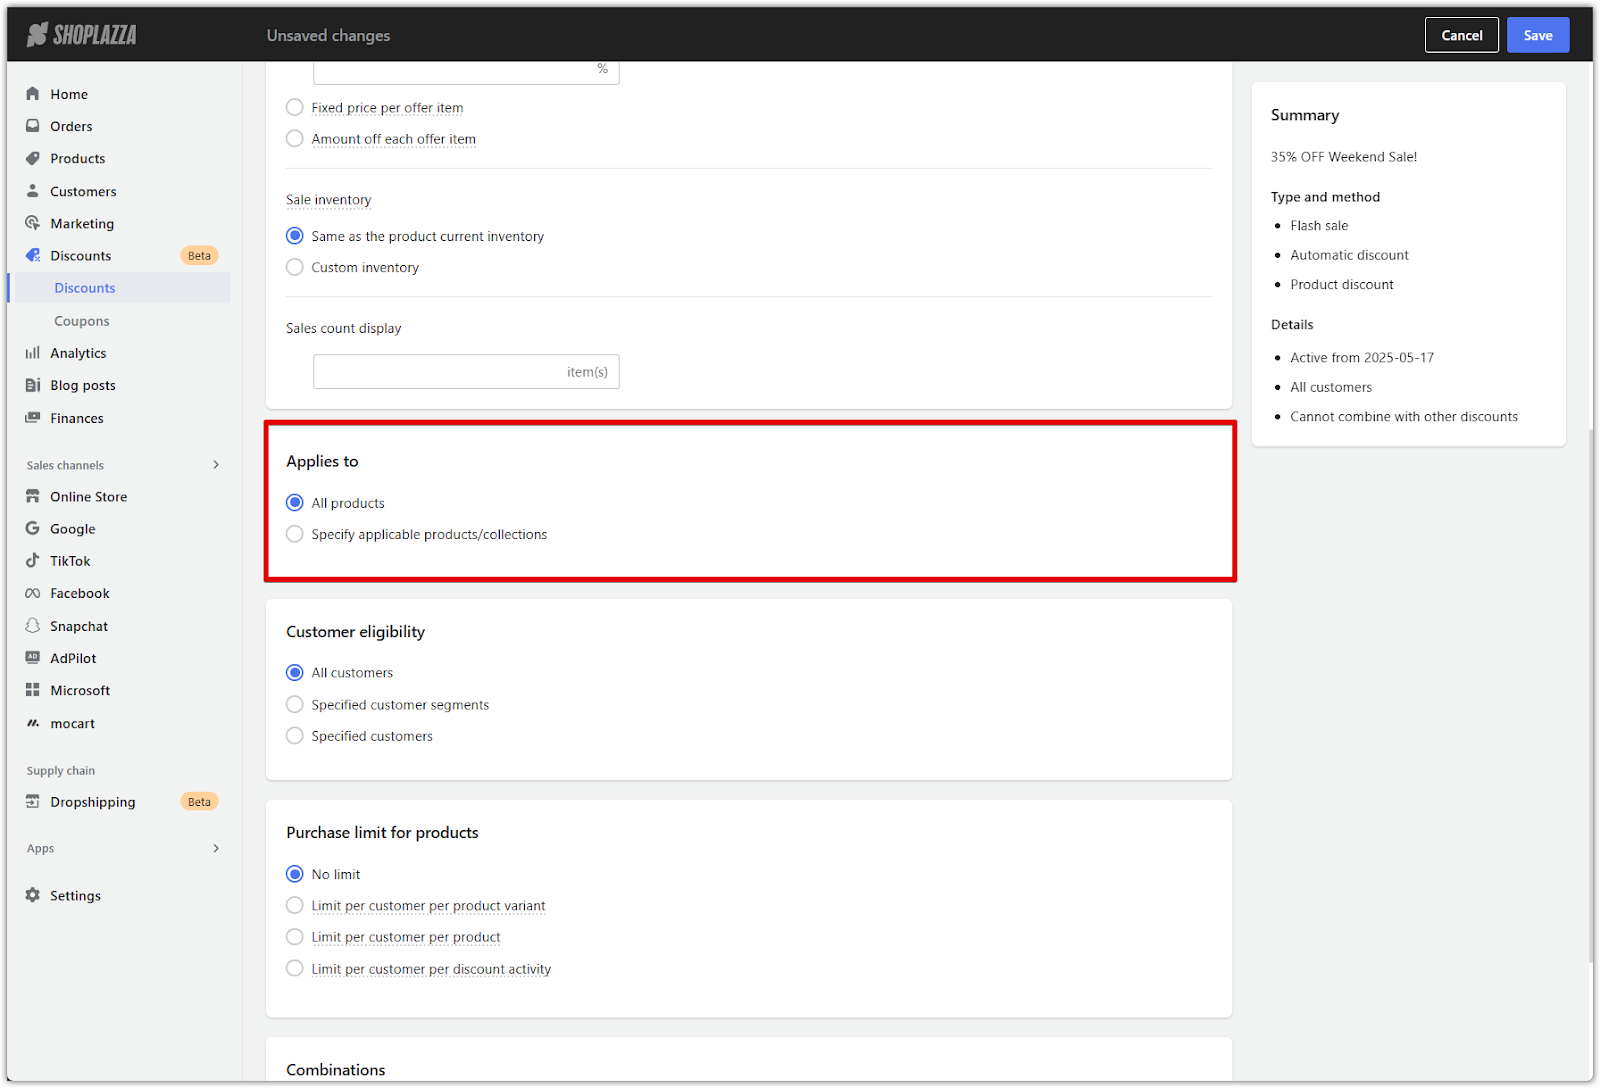
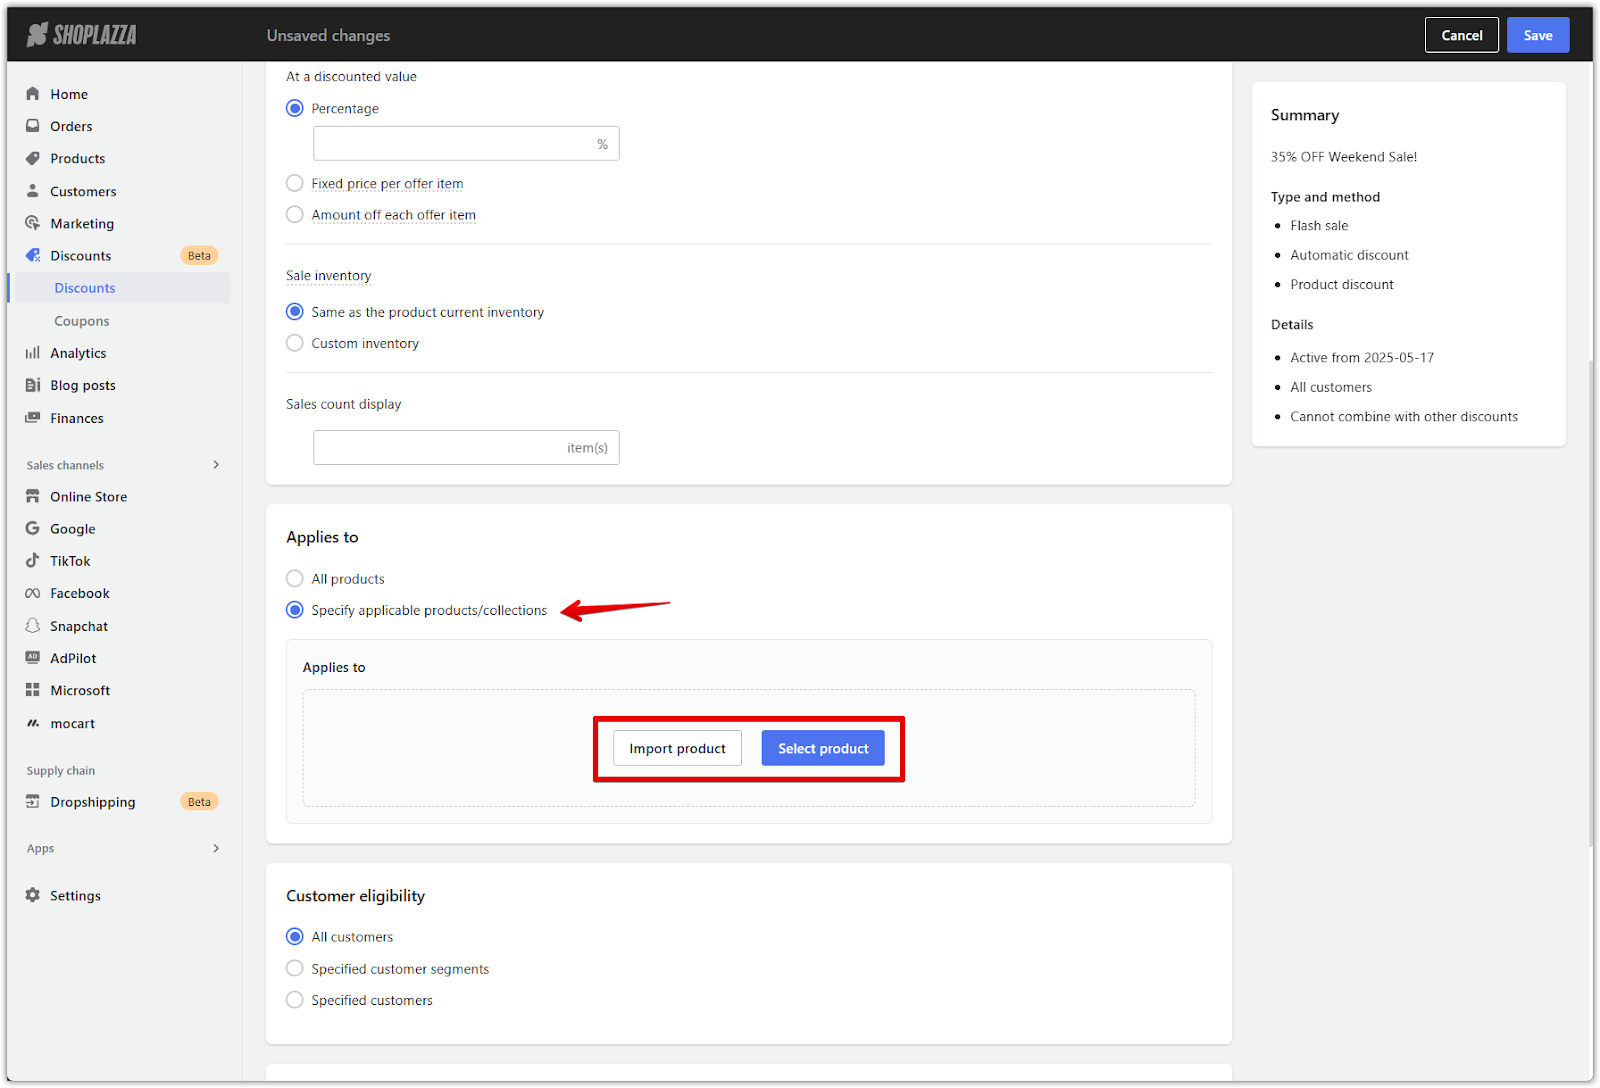
Applicable products
Choose whether the flash sale applies to your entire store or only to specific products or collections. Once individual products are selected, more advanced editing options become available.
1. Select the product scope: Under From selected products, choose one of the following:
- All products: Applies the discount across your entire store. This will be treated as an order-level discount.
- Specify applicable products/collections: Applies the discount only to selected SKUs or collections. This will be treated as a product-level discount.
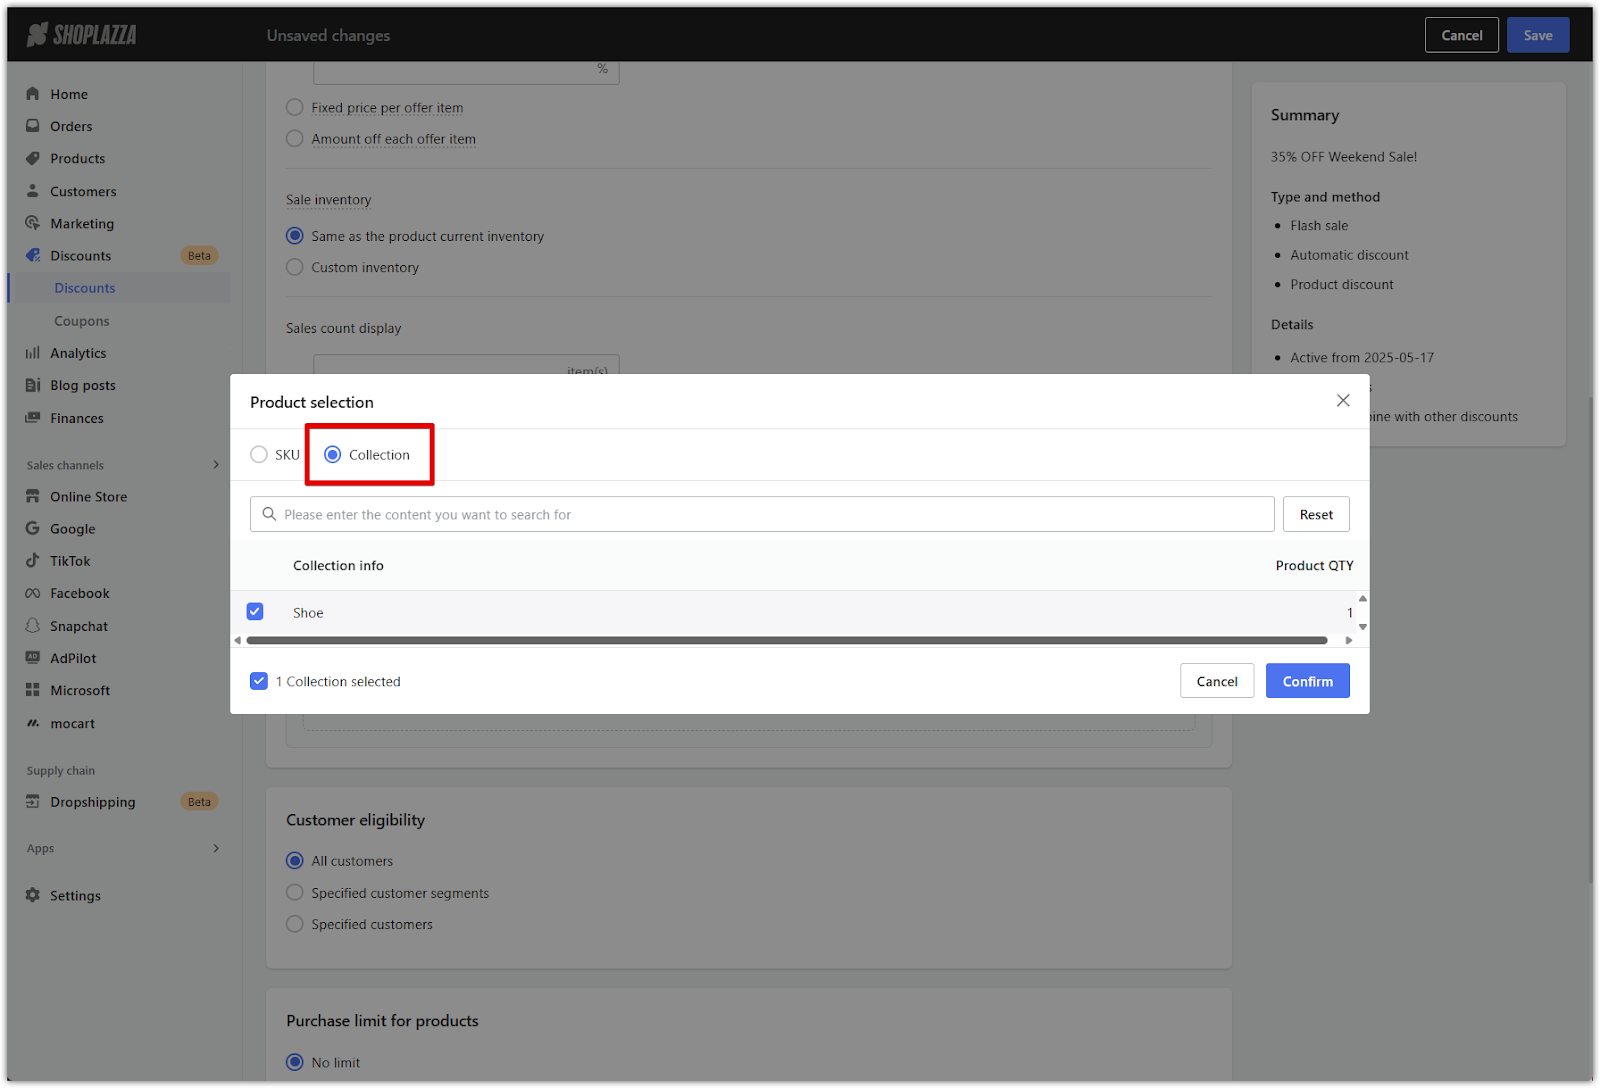
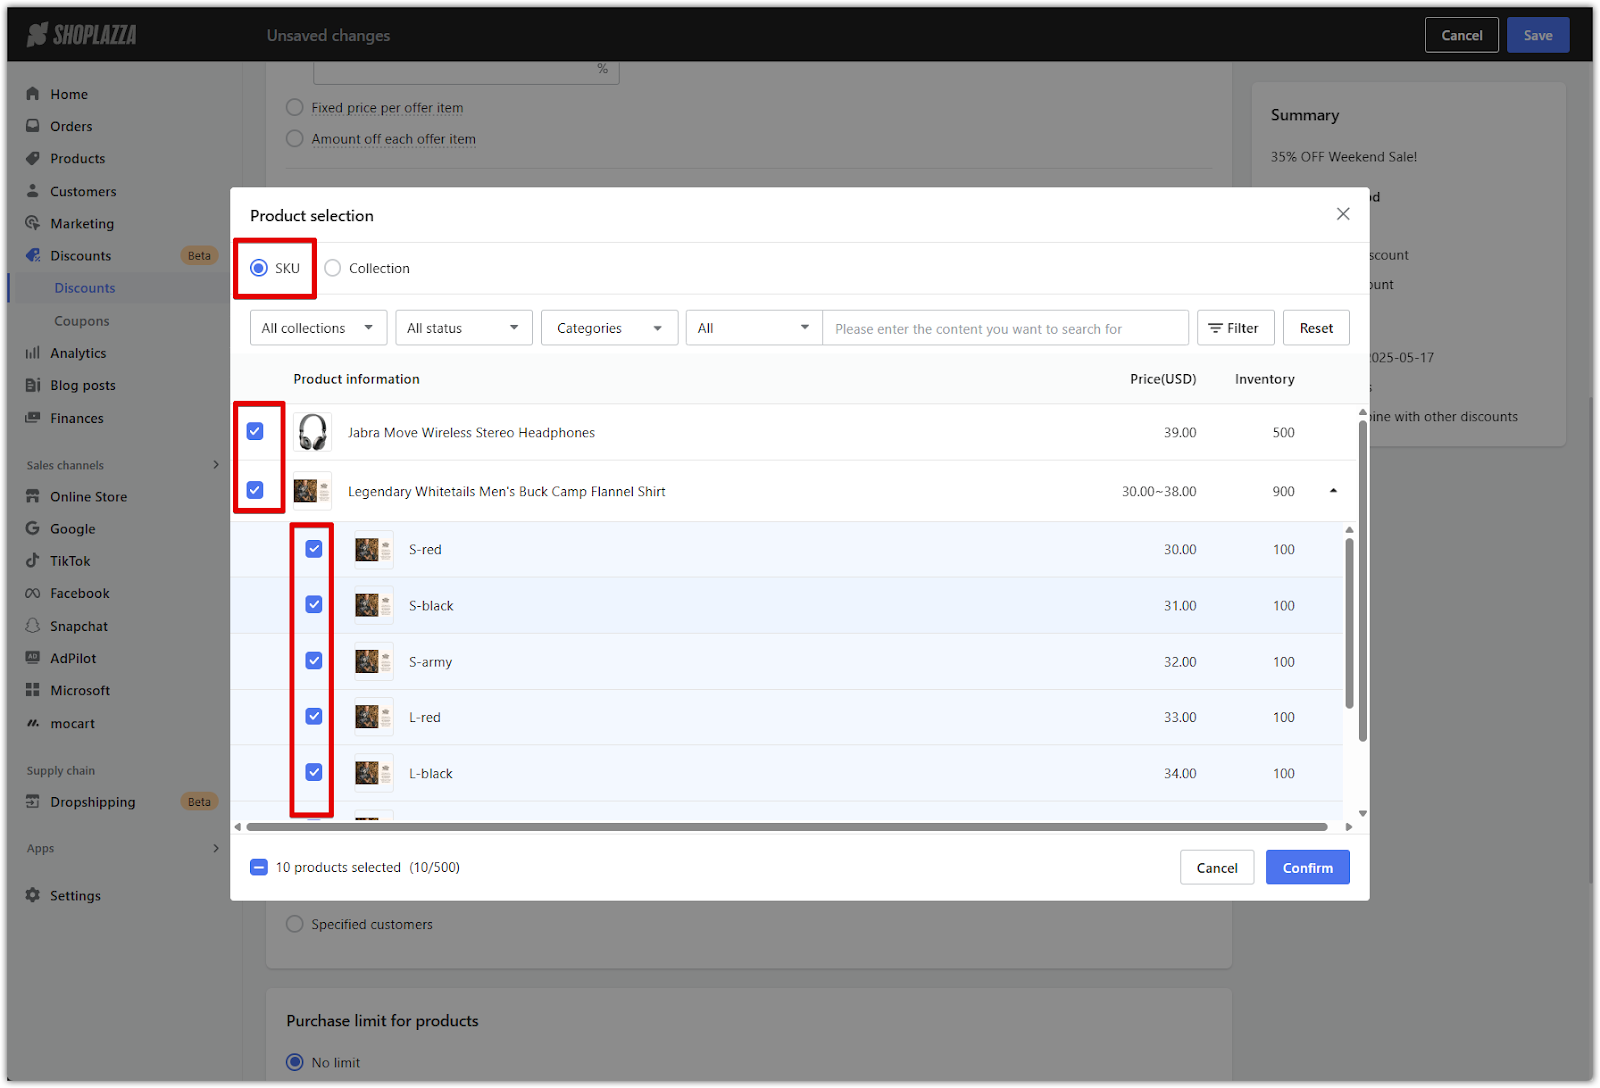
2. Add eligible items (if specifying applicable products/collections): If you've selected Specify applicable products/collections, choose which products to include in the campaign:
- Click Select product to choose specific SKUs.
- Click Import product to upload a product list in bulk.
- Choosing a collection automatically includes all products within that group. Any changes made to the collection will reflect in the flash sale automatically.
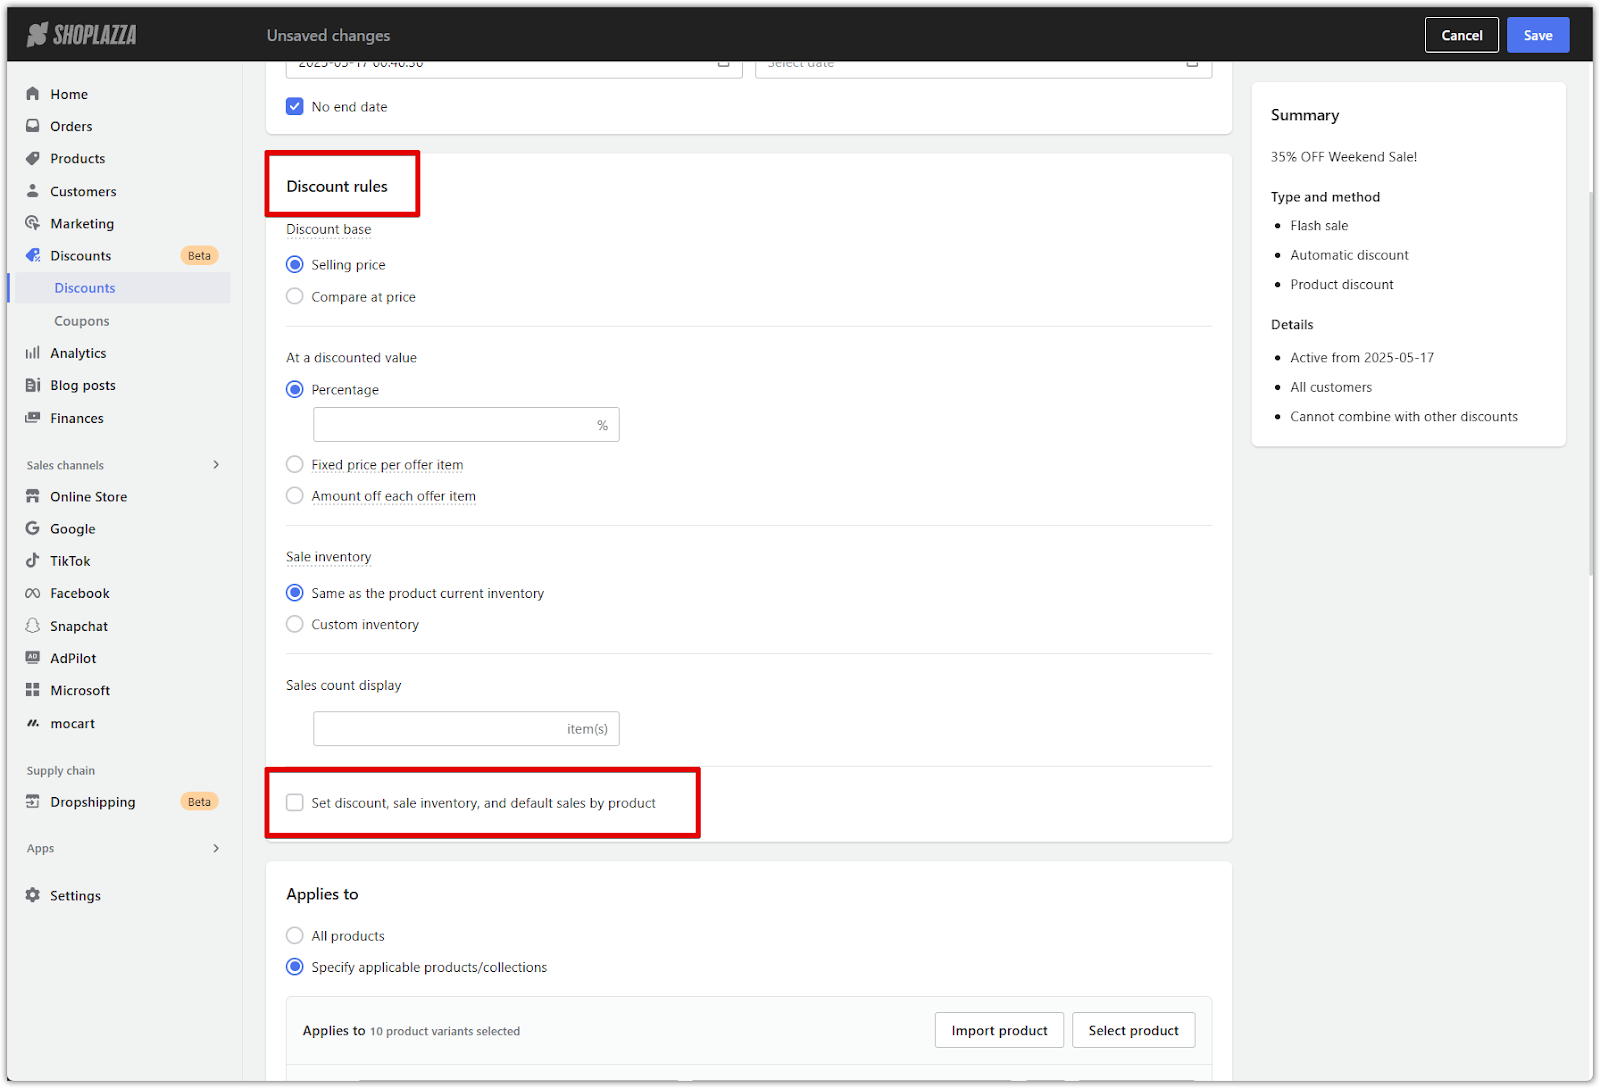
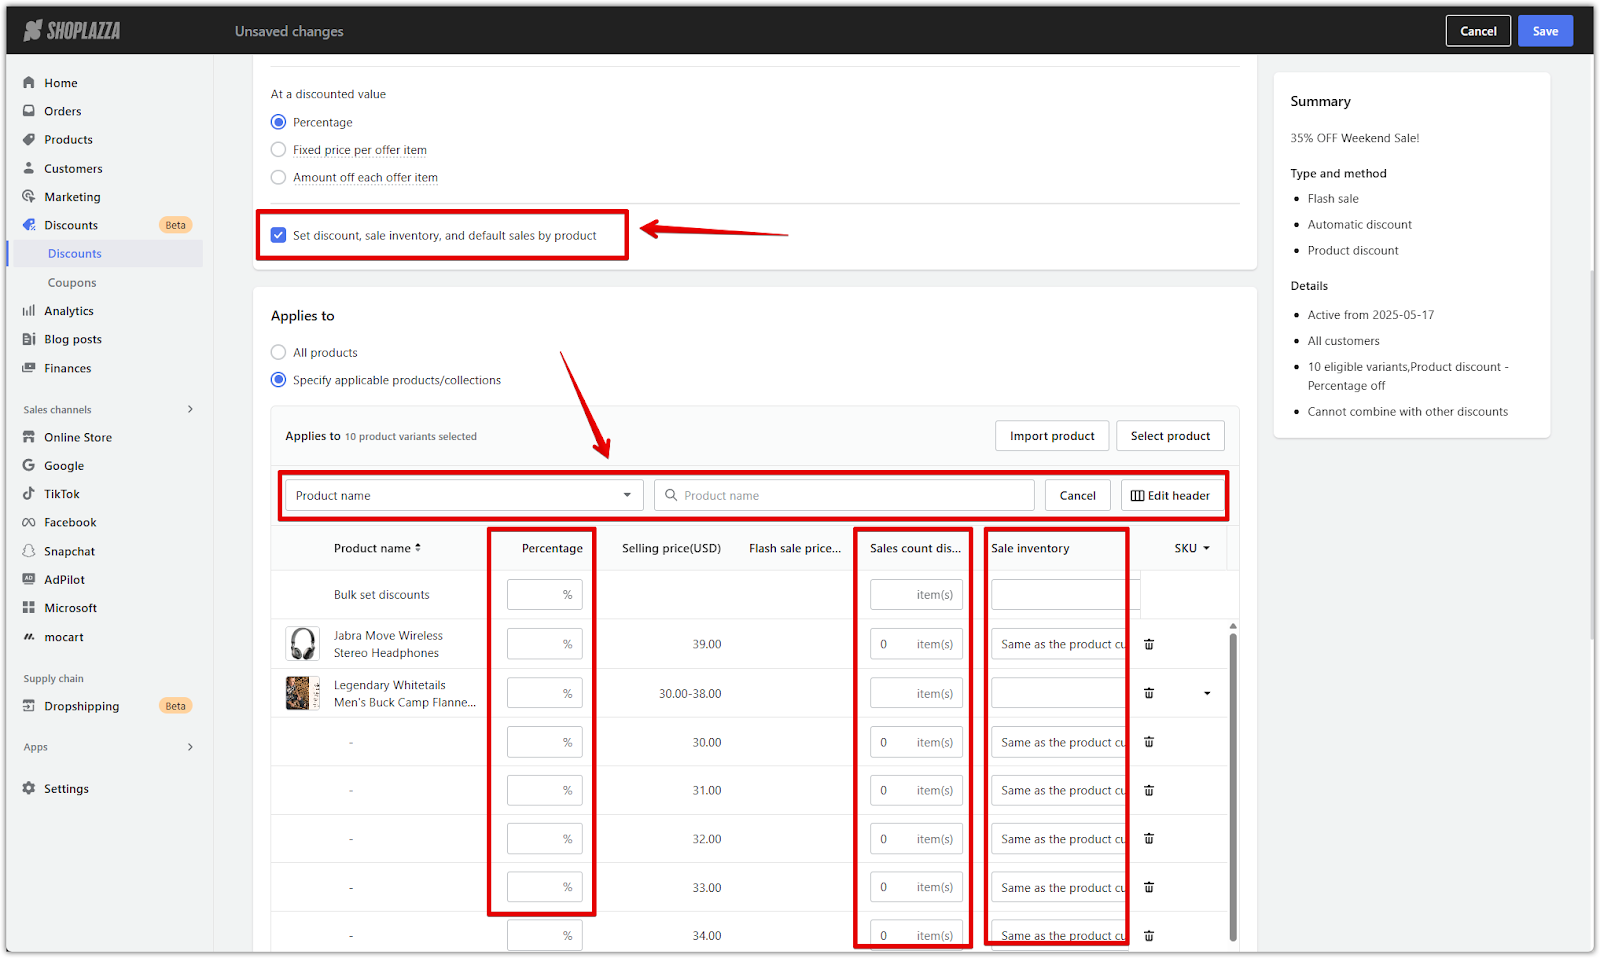
3. Enable product-level editing: After selecting individual SKUs (not just collections), a new checkbox will appear under the Discount rules section: Set discount, sale inventory, and default sales by product.
- When selected, each product in the list will have editable fields for flash sale price, sale inventory, and sales count display.
- When unselected, one global set of values applies to all included SKUs.
Note
If All products is selected, the option to set discounts by product will be disabled, and a single value will apply across all SKUs.
4. Use the product list editing tools:
Once products are added, use the product table to review and manage discount settings:
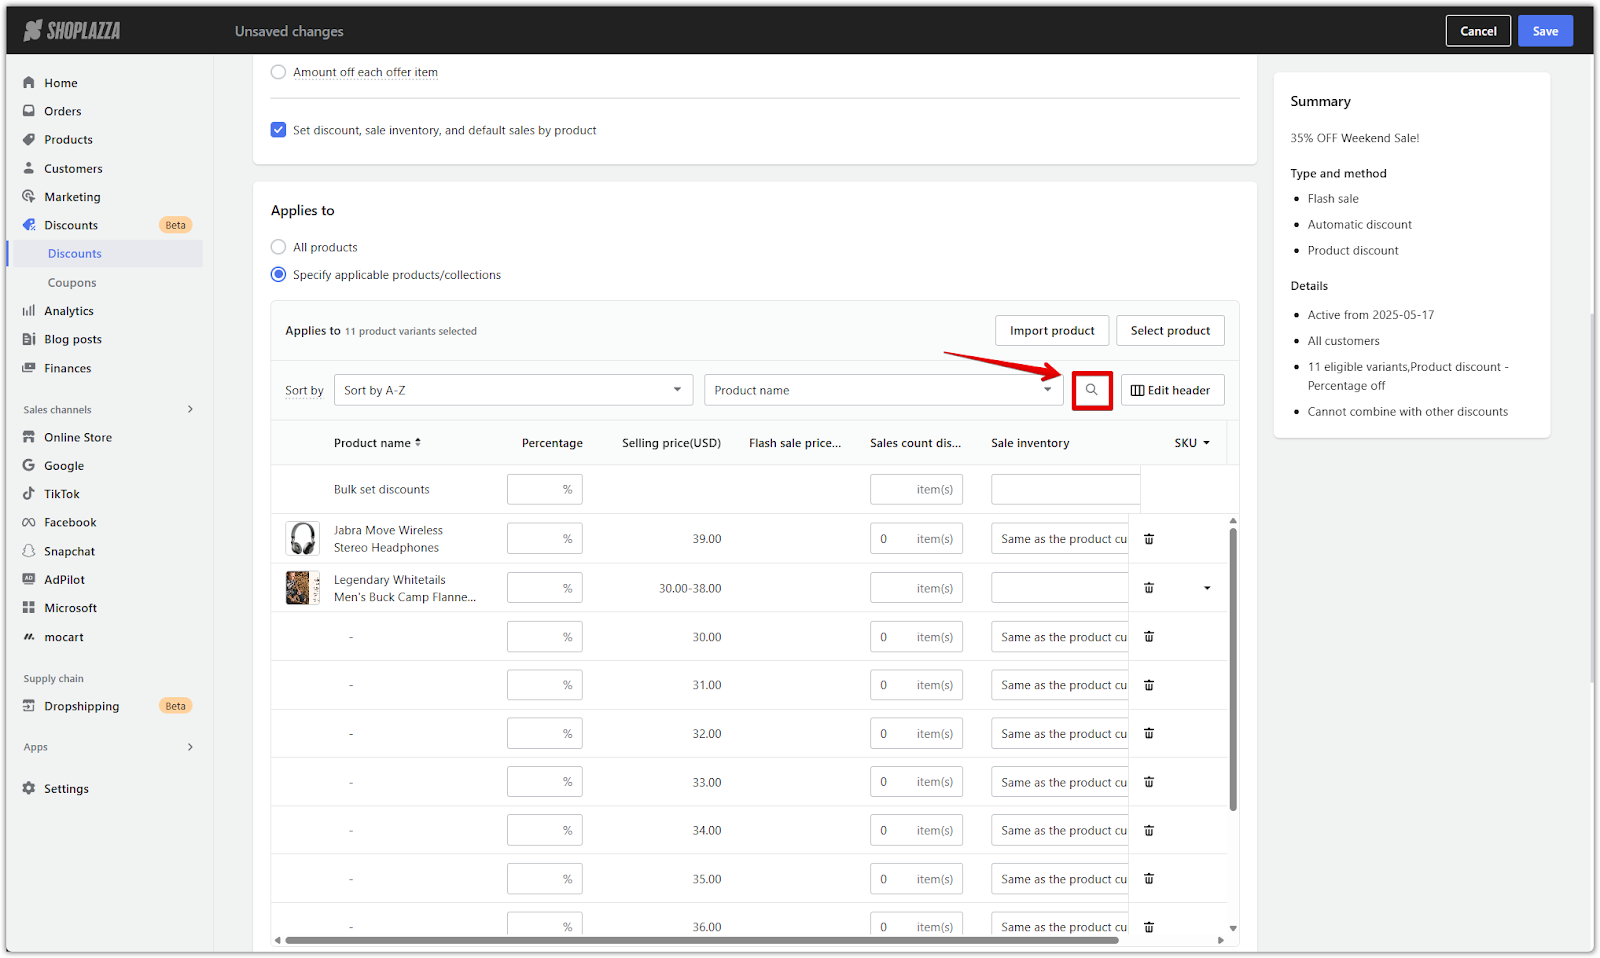
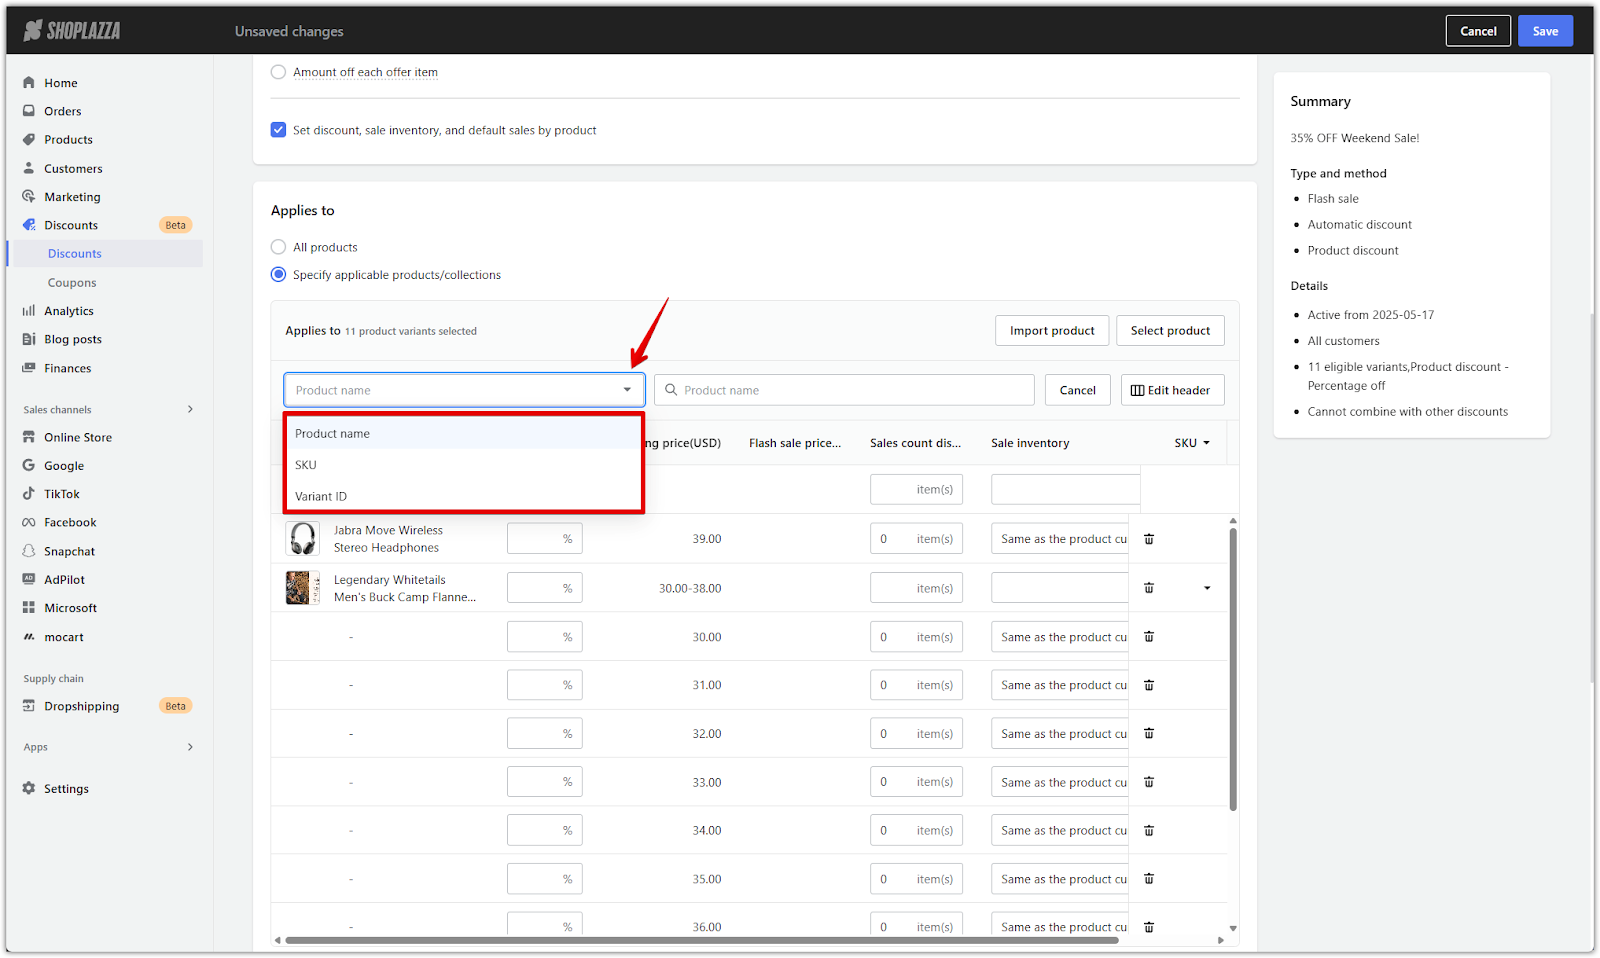
- Search bar: Find items by name, SKU, or variant ID.
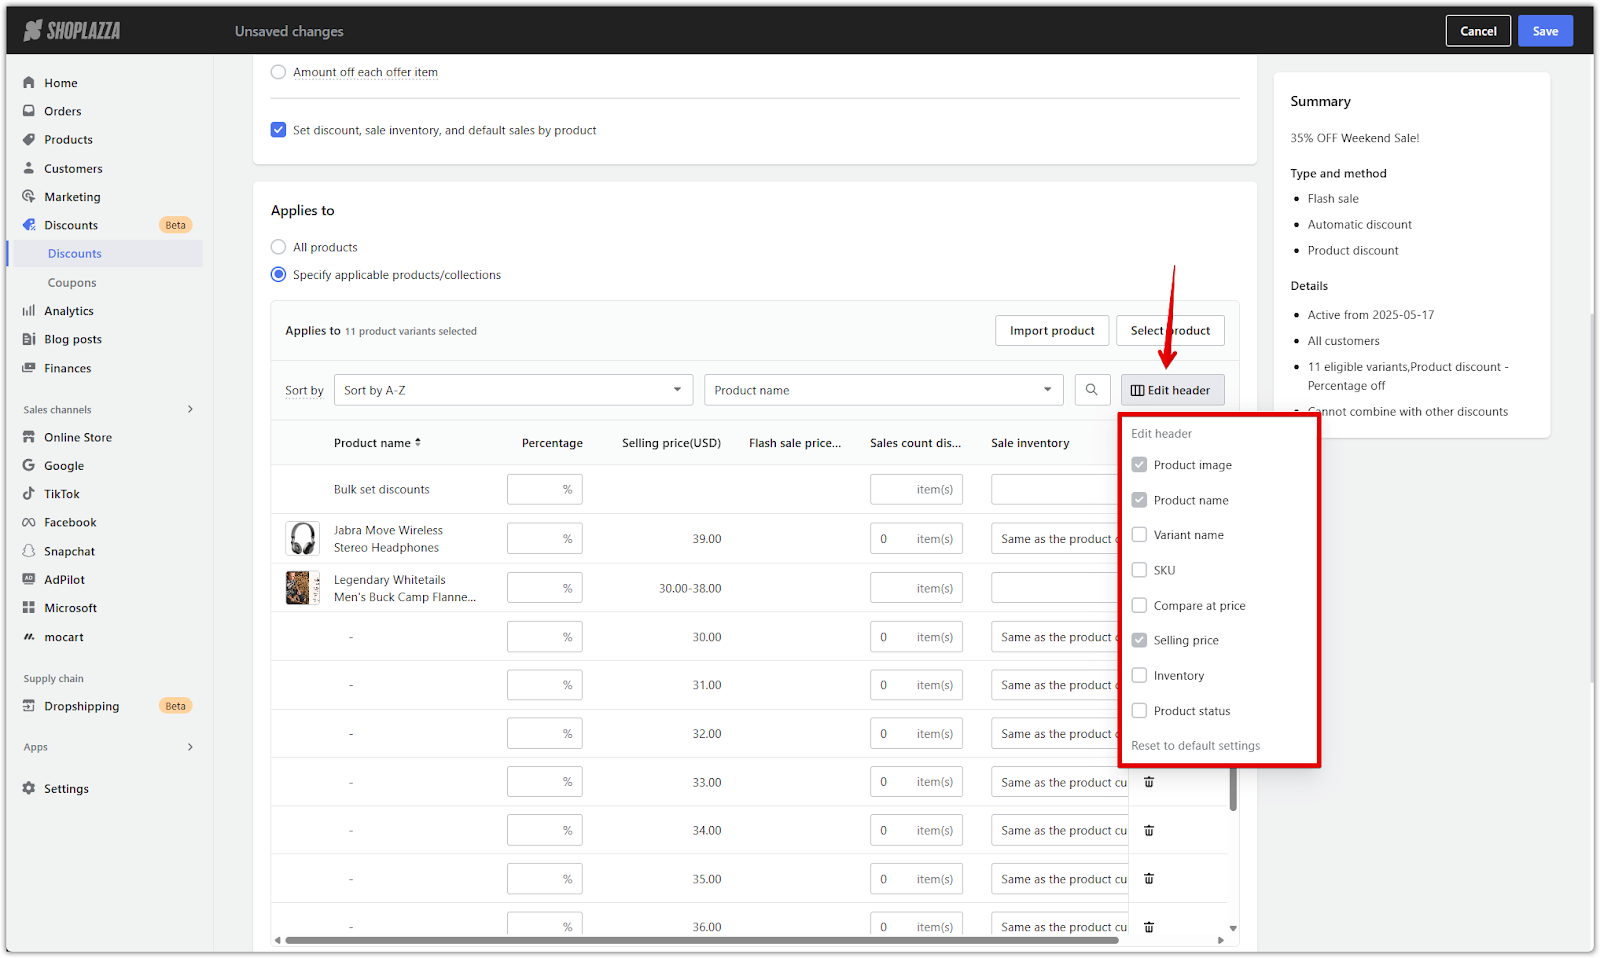
- Edit header: Choose which columns to show, such as flash sale price, compare at price, sales count display, or inventory.
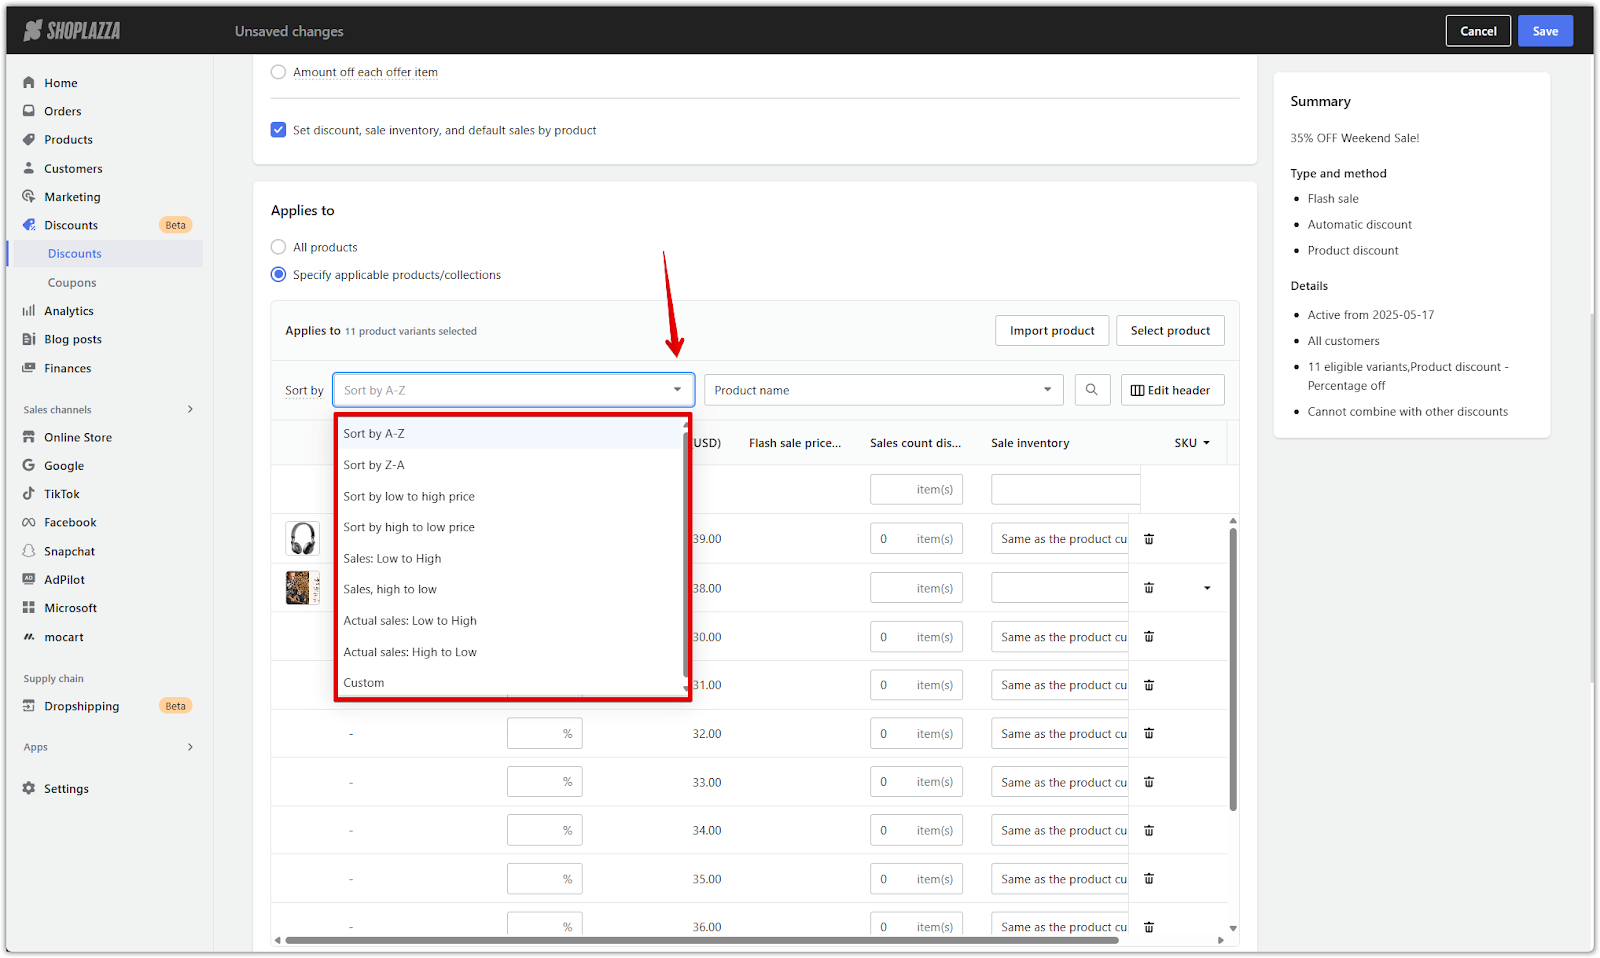
- Sort options:
- Sort by A–Z, Z–A, price, sales, or actual sales.
- Select Custom to manually drag and arrange products or pin items to the top. This affects the display order on the flash sale landing page and homepage banner.
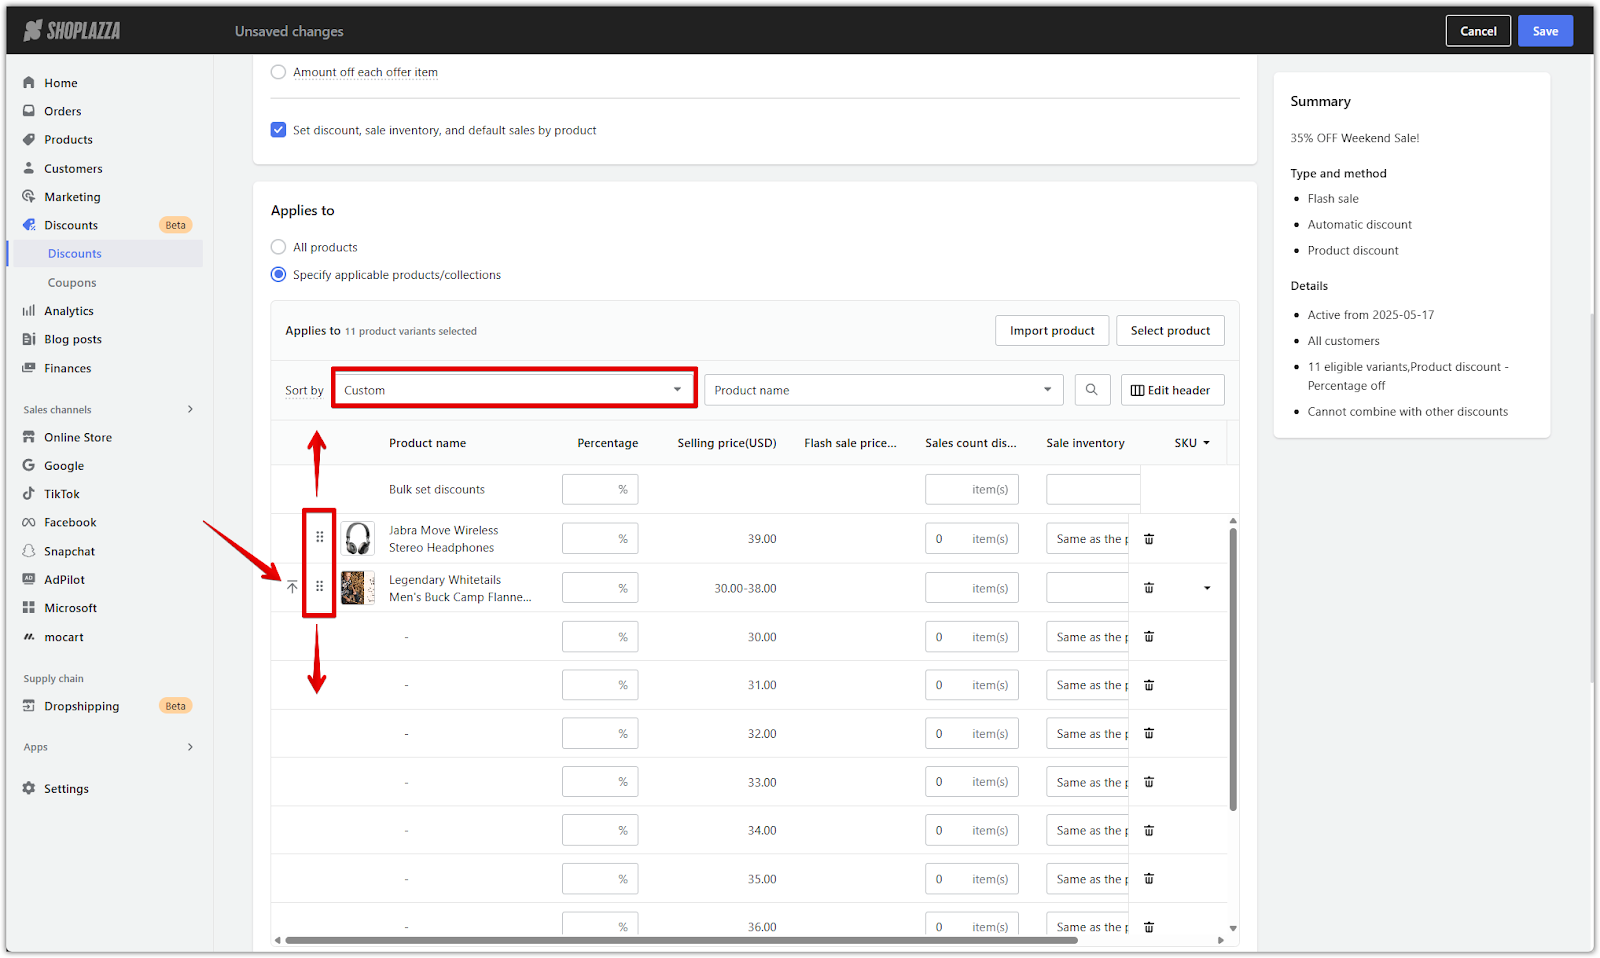
- Inline editing: For each product, directly edit:
- Flash sale price
- Sales count display
- Sale inventory: choose Same as the product current inventory or enter a Custom inventory value.
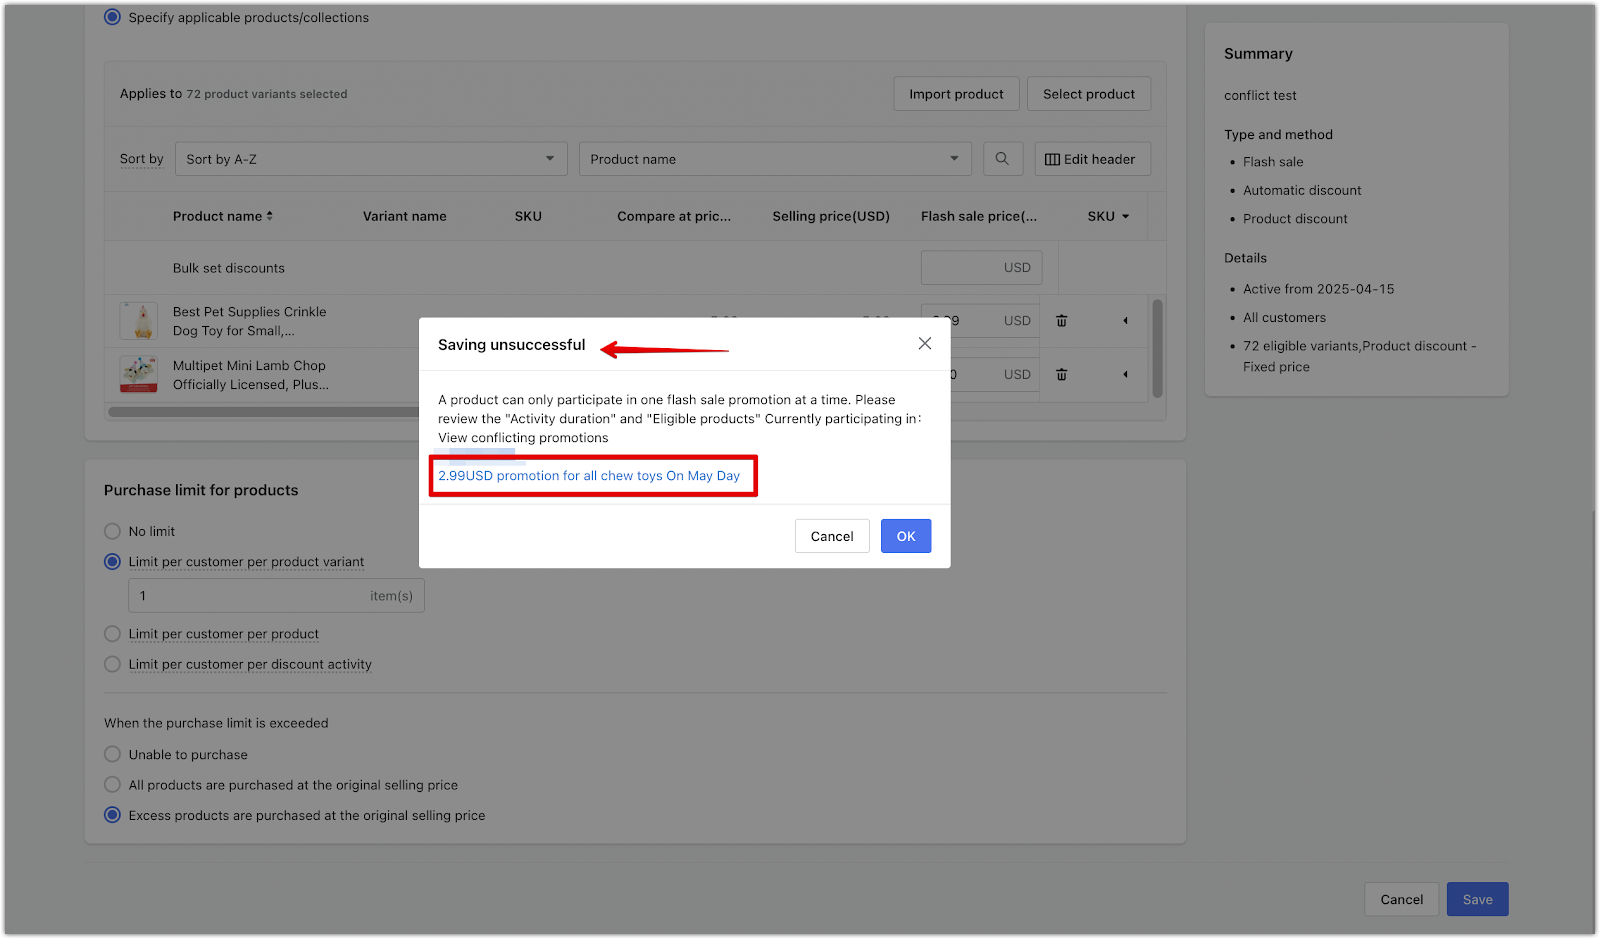
5. Check for conflicts: A product cannot participate in more than one active flash sale campaign at the same time. If a product is already part of another active flash sale, a warning will appear when saving. You’ll need to adjust the product selection or review the overlapping campaigns.
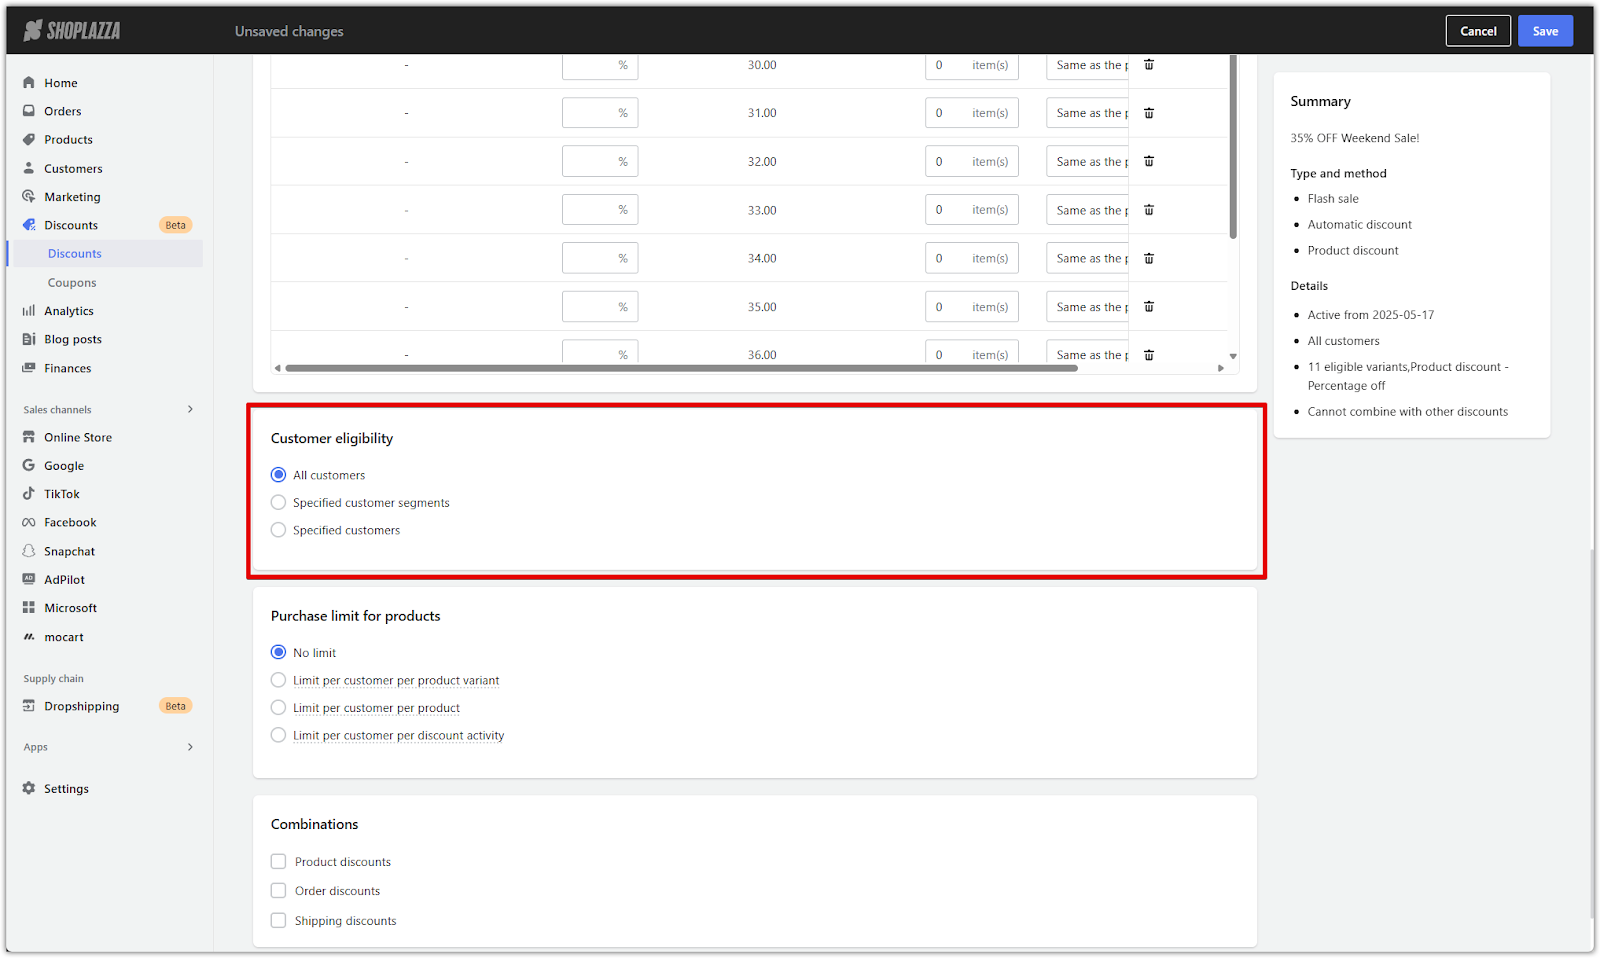
Customer eligibility
Decide who is allowed to access the flash sale. This allows for storewide promotions or more targeted campaigns for specific customers or segments. The selected audience will be the only group able to view and claim the flash sale pricing during the campaign.
1. Choose the eligible audience: Under Customer eligibility, select one of the following options:
- All customers: Make the discount available to everyone.
- Specified customer segments: Choose from predefined customer groups, such as loyalty tiers or purchase behavior segments.
- Specified customers: Manually select individual customer accounts to restrict access to a limited group.
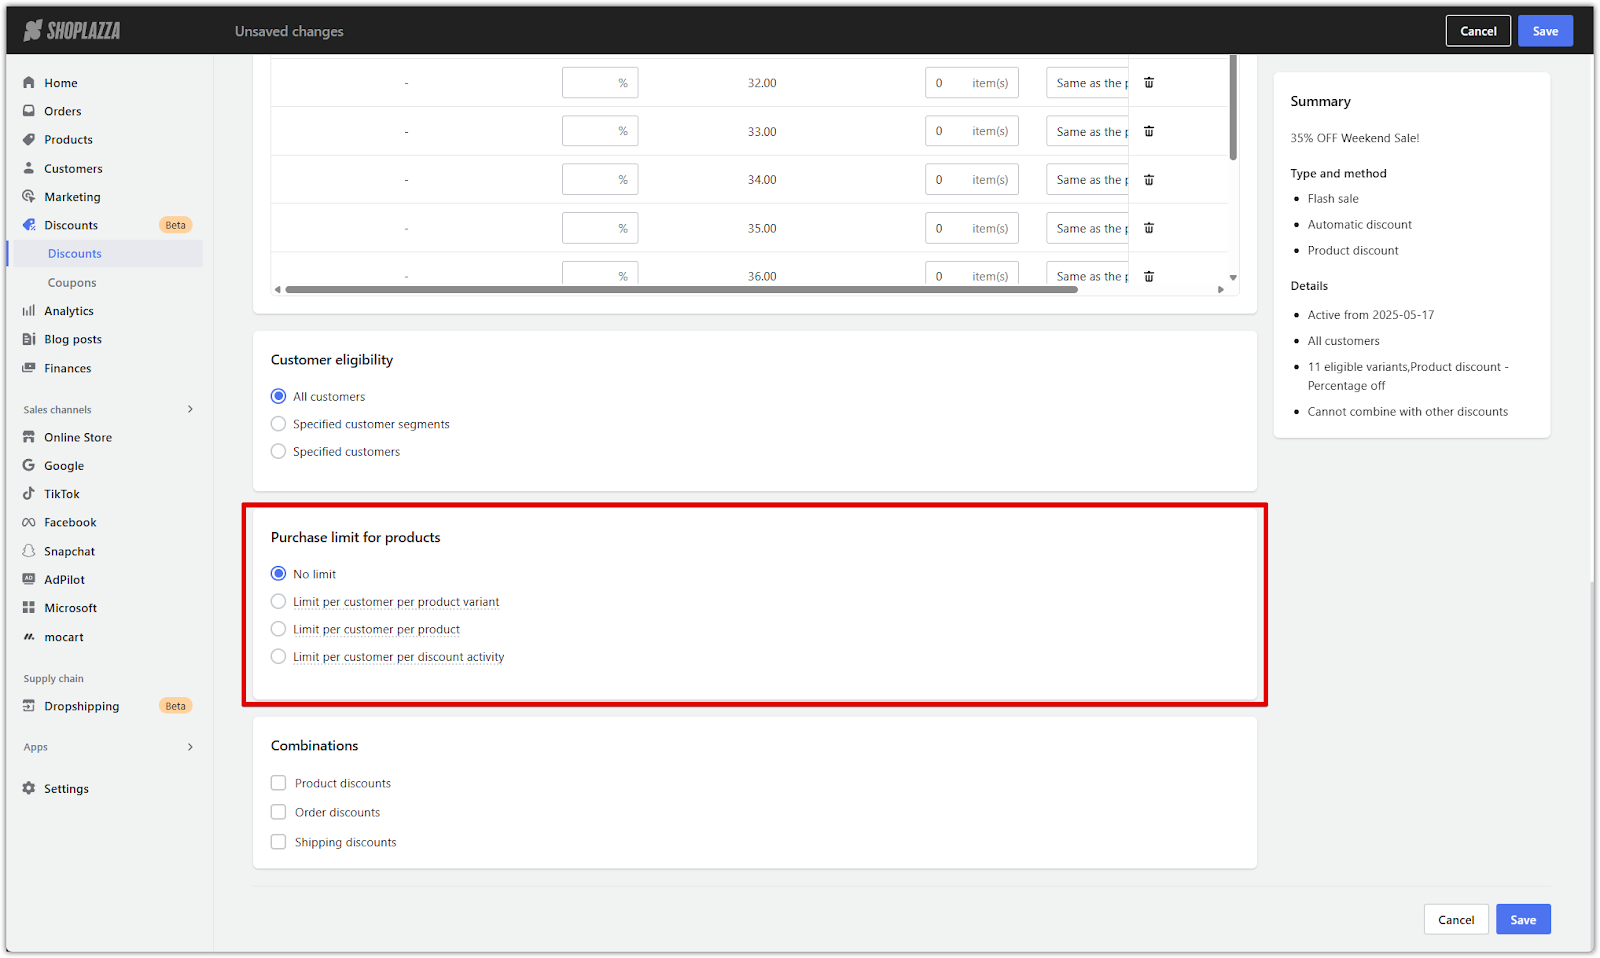
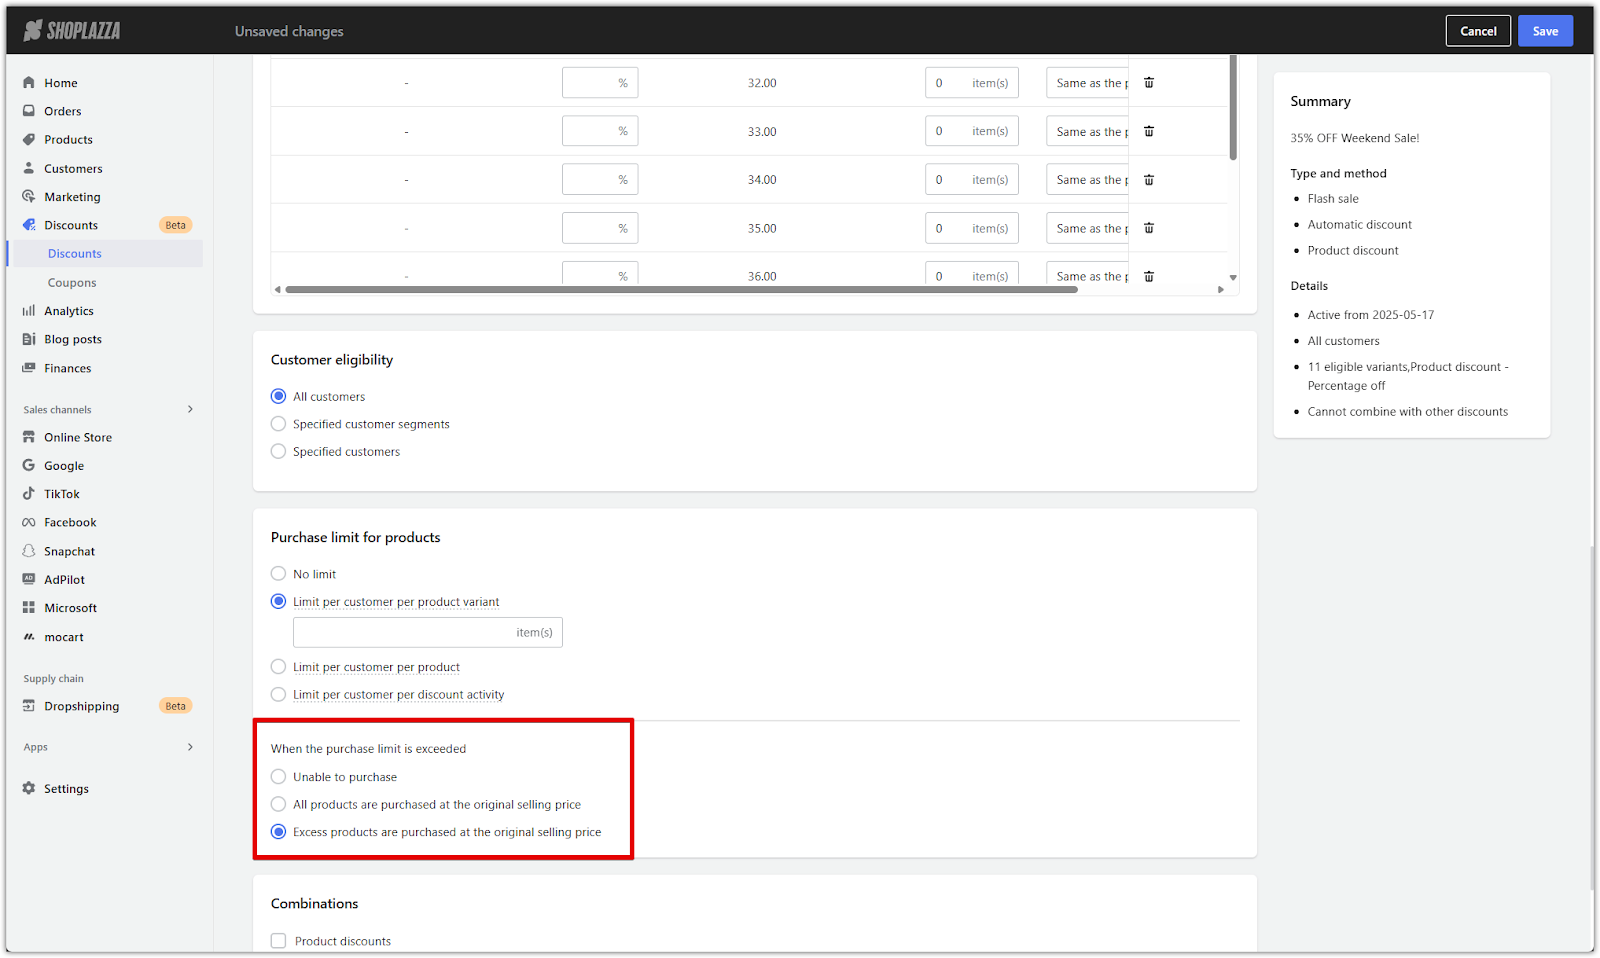
Purchase limit for products
Set a limit on how many discounted items each customer can purchase during the flash sale. This helps prevent stockpiling and controls how the promotion is distributed.
1. Choose the purchase limit type: Select how the limit should apply:
- No limit: No restrictions on quantity.
- Limit per customer per product variant (SKU): Restrict how many of each specific variant a customer can buy.
- Limit per customer per product (SPU): Apply the limit across all variants of the same product.
- Limit per customer per discount activity: Set a total cap on how many discounted items a customer can buy within this campaign.
2. Enter the quantity limit: When using any of the limit options above, enter the maximum number of units allowed per customer.
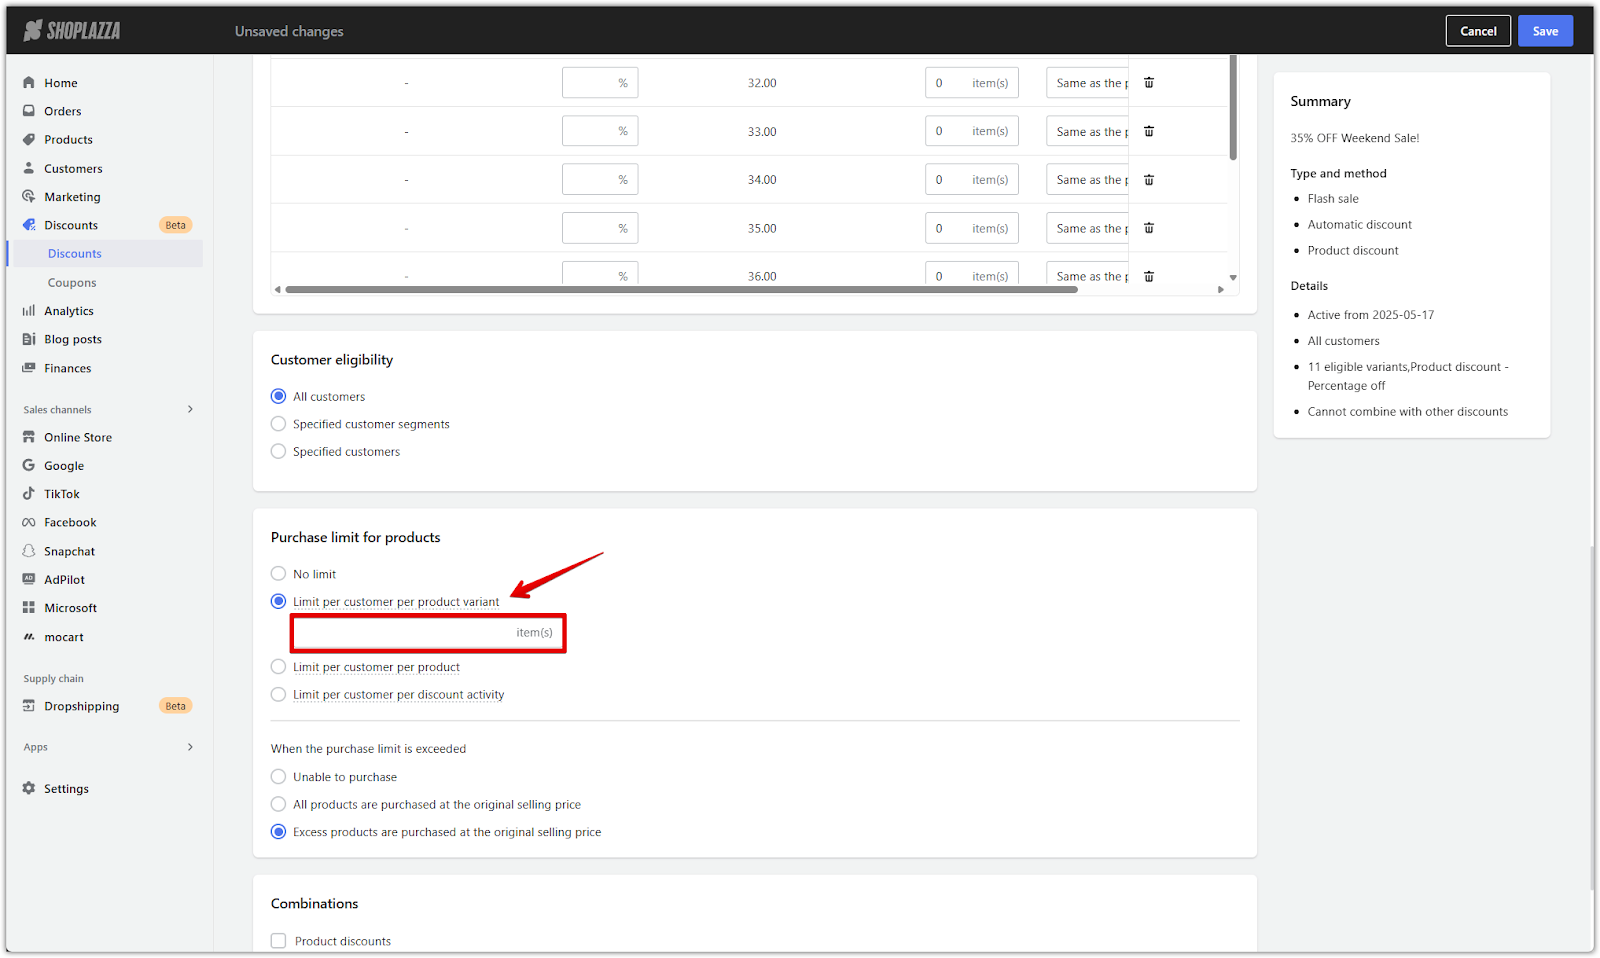
3. Set the behavior after the limit is reached: Choose how the system handles additional quantities beyond the limit:
- Unable to purchase: Prevents customers from buying more than the allowed quantity.
- All products are purchased at the original selling price: No discount is applied to any items if the quantity exceeds the limit.
- Excess products are purchased at the original selling price: Only items within the limit receive the discount; the rest are sold at full price.
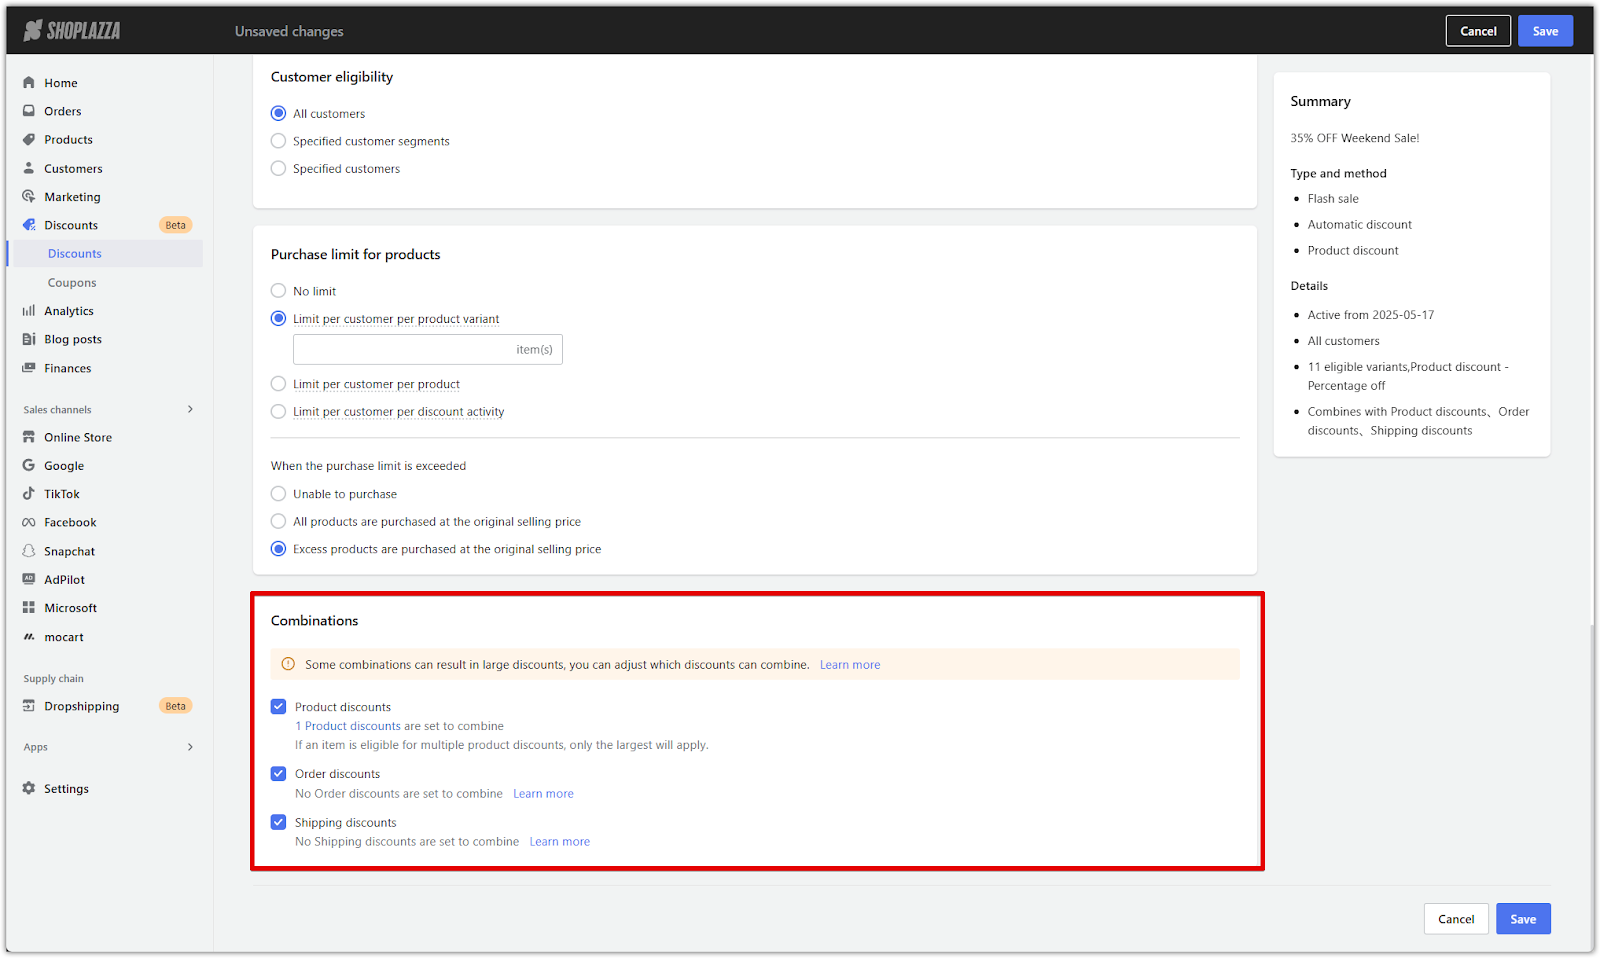
Combinations
Choose whether this flash sale discount can be combined with other automatic discounts. Combinations help you control how multiple promotions interact, ensuring customers receive the highest-value offer available.
When multiple discounts apply, the system automatically compares all eligible options and applies the one with the greatest total value. Product discounts are applied first, followed by order discounts. Shipping discounts apply only if they are compatible. Discount codes are calculated after they’re entered at checkout. Only one shipping discount can apply per order.
For combinations to work, each discount must have the other types selected in its combination settings. For example, to combine a product discount with an order discount, both types must be enabled in the respective campaigns.
A store can have up to 25 automatic discount activities active at the same time, including Flash sale, Amount off, and Discount on Nth item. Discounts created through the Gifts or Bundling app follow product discount rules but are excluded from optimal discount calculations. These app-based discounts may still combine with other offers if allowed.
1. Select which discounts can be combined: Use the checkboxes to allow or disable combinations with:
- Product discounts: Promotions that apply to individual items, such as flash sales or specific markdowns.
- Order discounts: Discounts applied to the cart total, like "$10 off orders over $100."
- Shipping discounts: Promotions that reduce or waive shipping costs, such as free shipping codes.
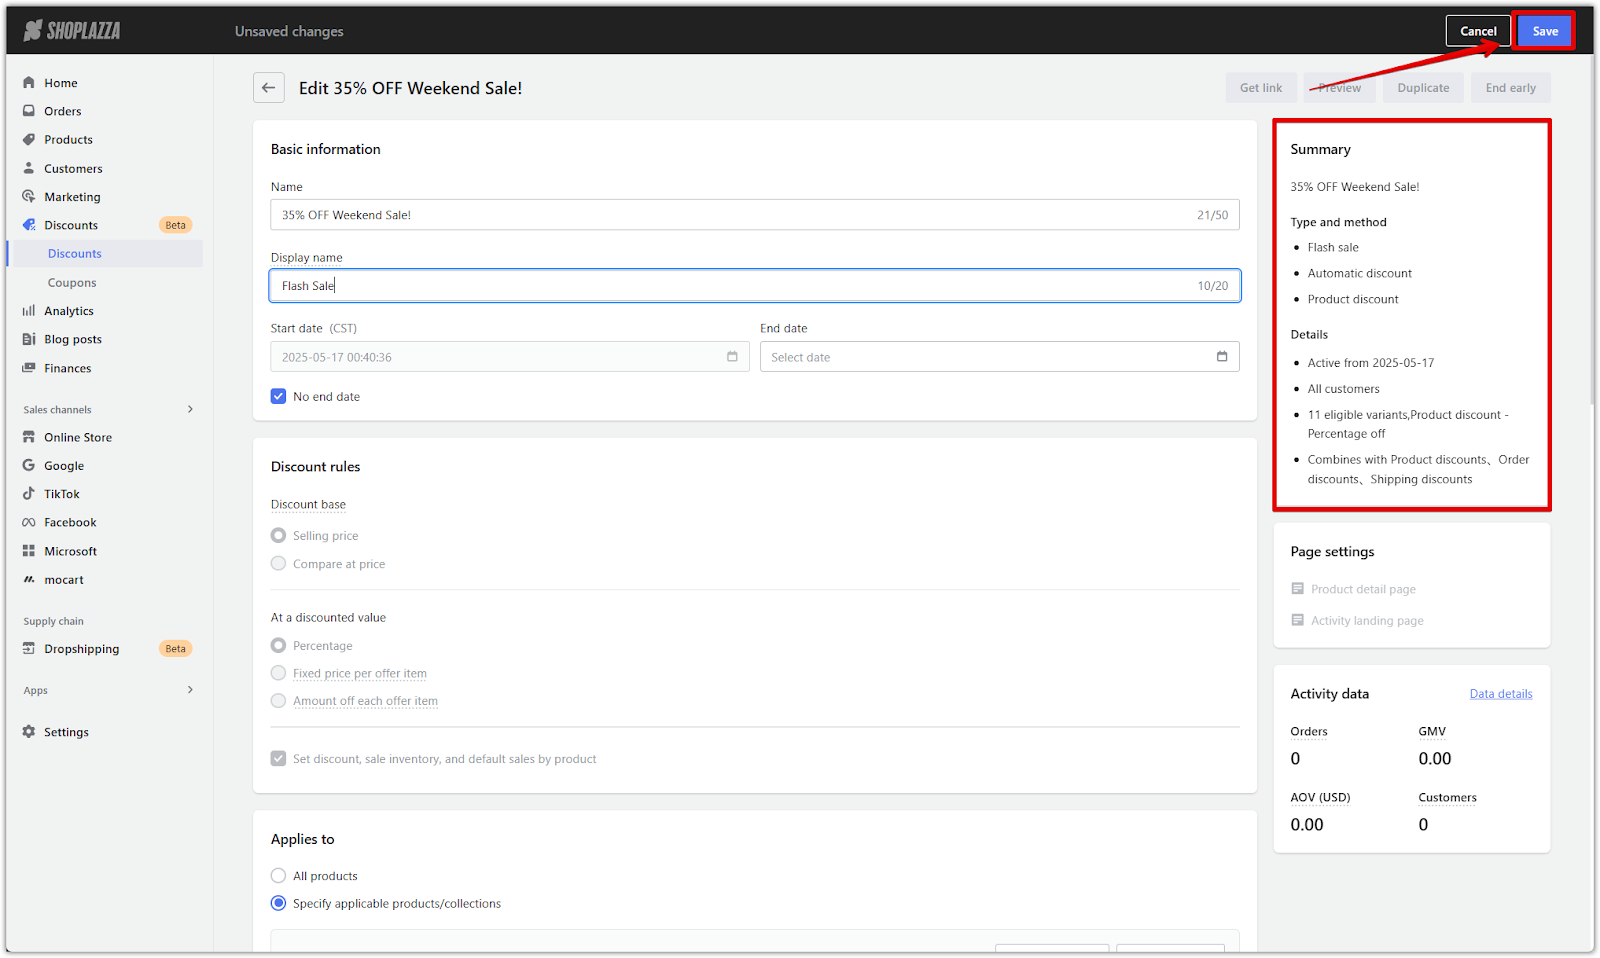
Review and save
After reviewing all discount rules, product eligibility, and combination settings, use the summary panel on the right to double-check your configuration. Click Save to finalize.
1. Review the summary: This panel shows key details such as:
- Discount type and method
- Start date
- Target customer group
- Eligible products
- Combination settings
Customize storefront display
Use the design tools in your admin to customize how the Flash sale promotion appears across product pages and the shopping cart. This includes both global design rules and campaign-specific adjustments, giving you full control over the look and feel of your campaign display.
Set up overall display settings for all Flash sale campaigns
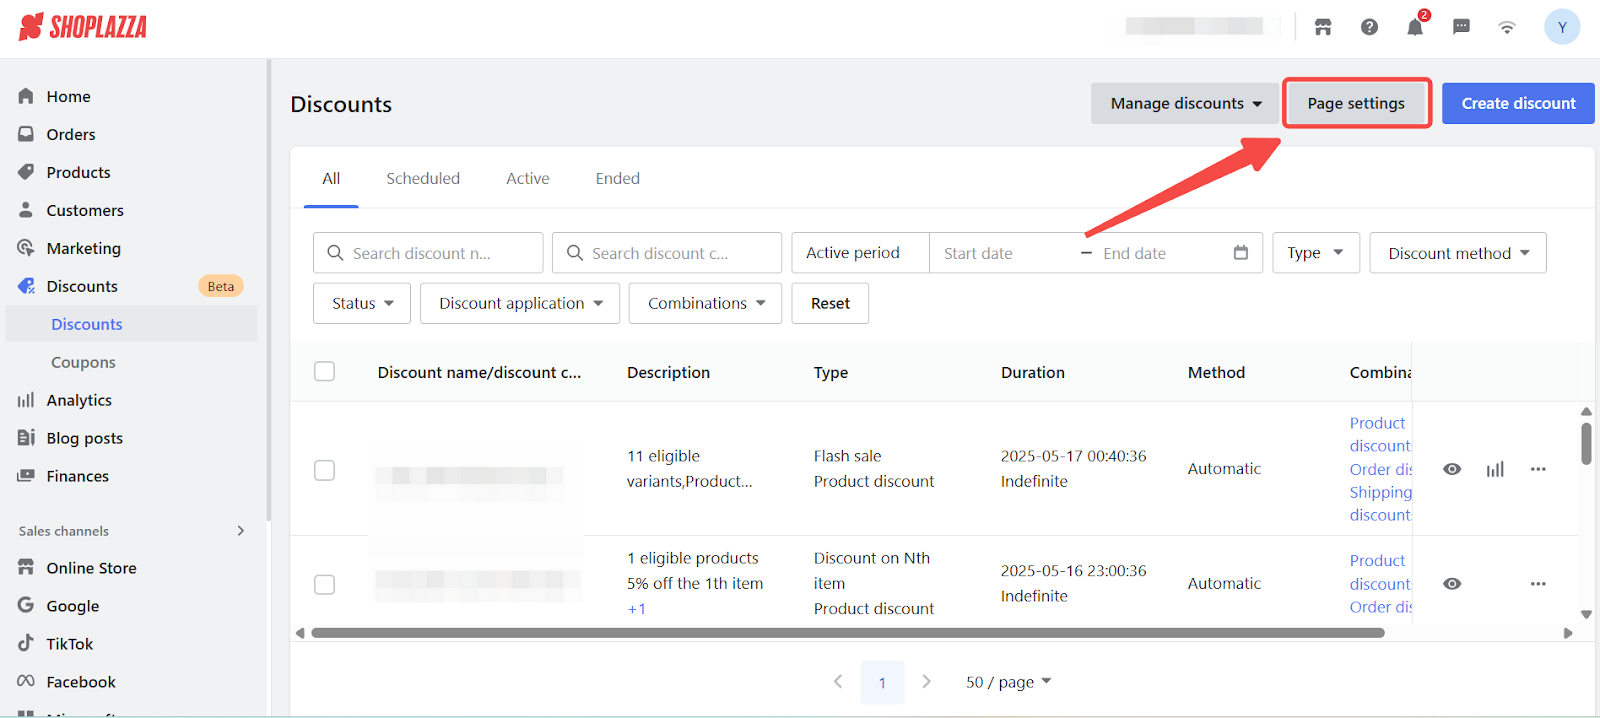
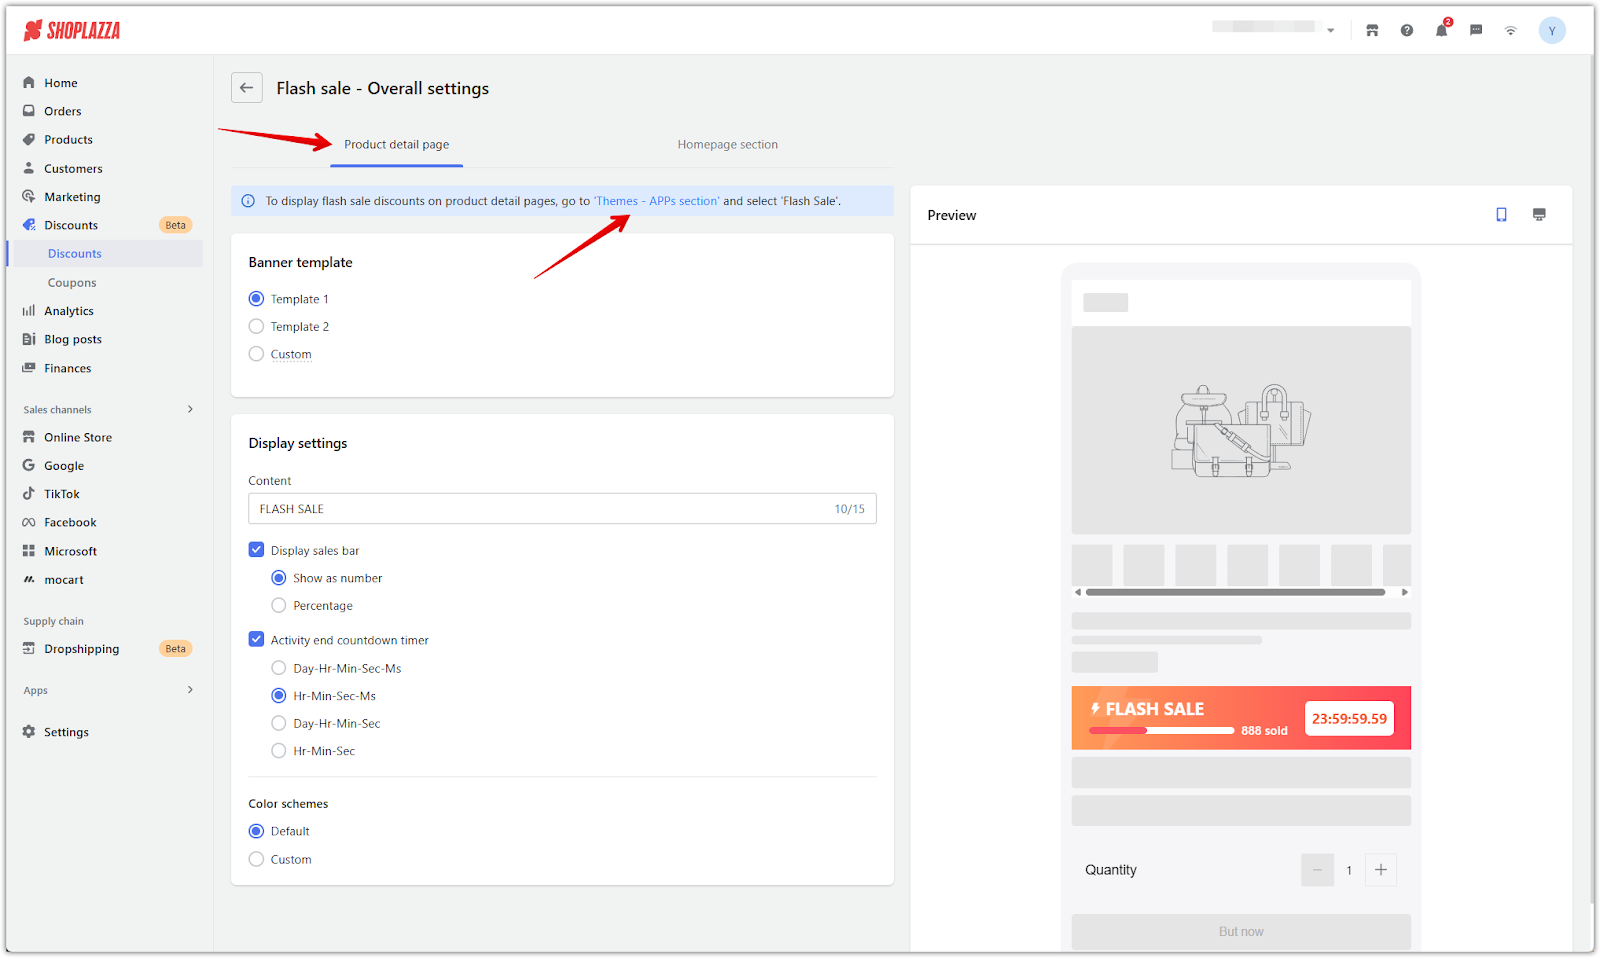
1. Go to Page settings: From the Discounts page in your admin, click Page settings in the top right corner to manage visual configurations for your promotions.
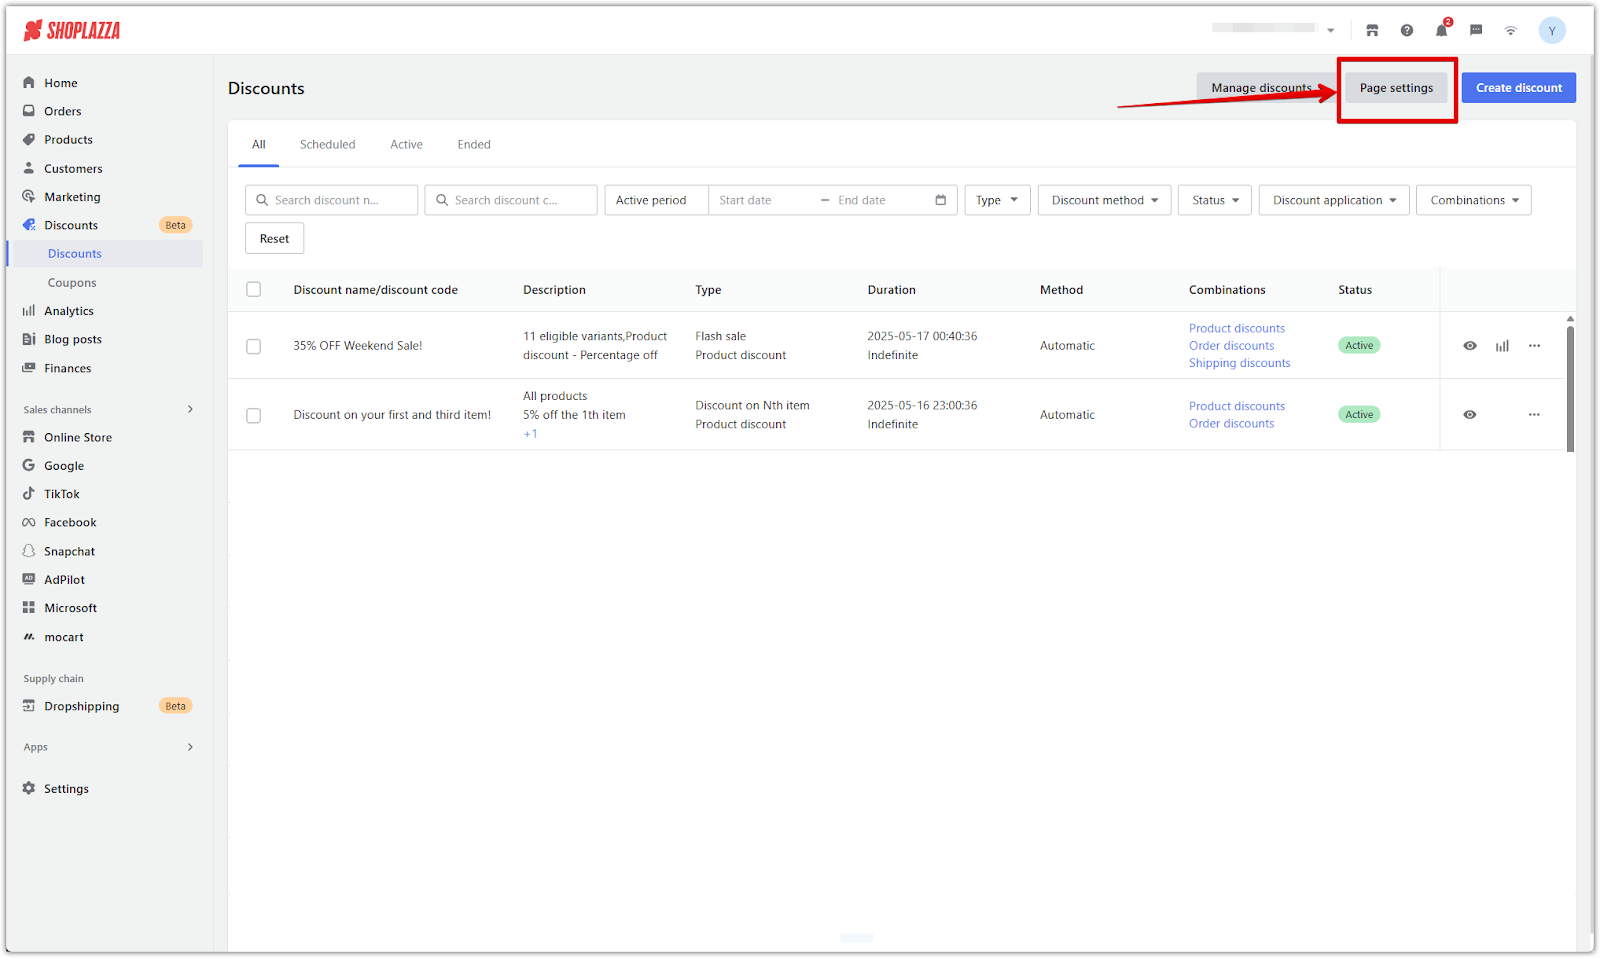
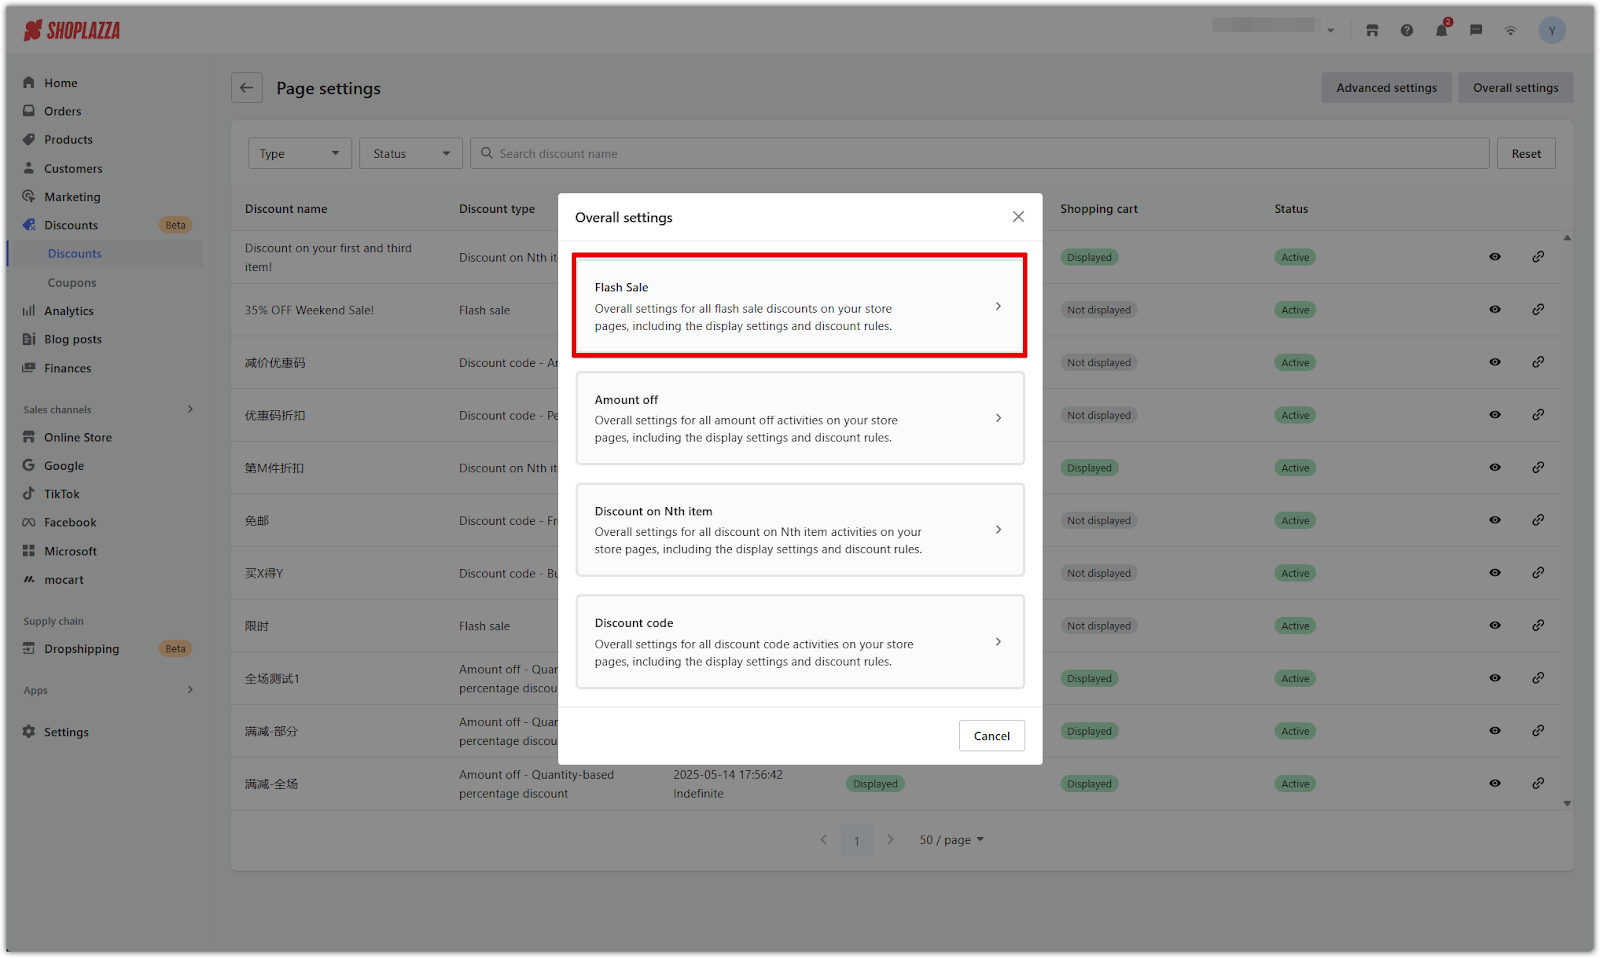
2. Open Overall settings: In the Page settings panel, click Overall settings in the upper right to access display rules for each discount type.

3. Select Flash Sale: In the list of available discount types, click Flash Sale to begin adjusting global settings for this type of promotion.
4. Configure product detail page display: Under the Product detail page tab:
- Choose a banner template (Template 1, Template 2, or Custom).
- Enter the promotional text content.
- Enable the sales bar, and show it as a number or percentage.
- Turn on the countdown timer, and select a time format (e.g. Hr–Min–Sec).
- Choose a default or custom color scheme.

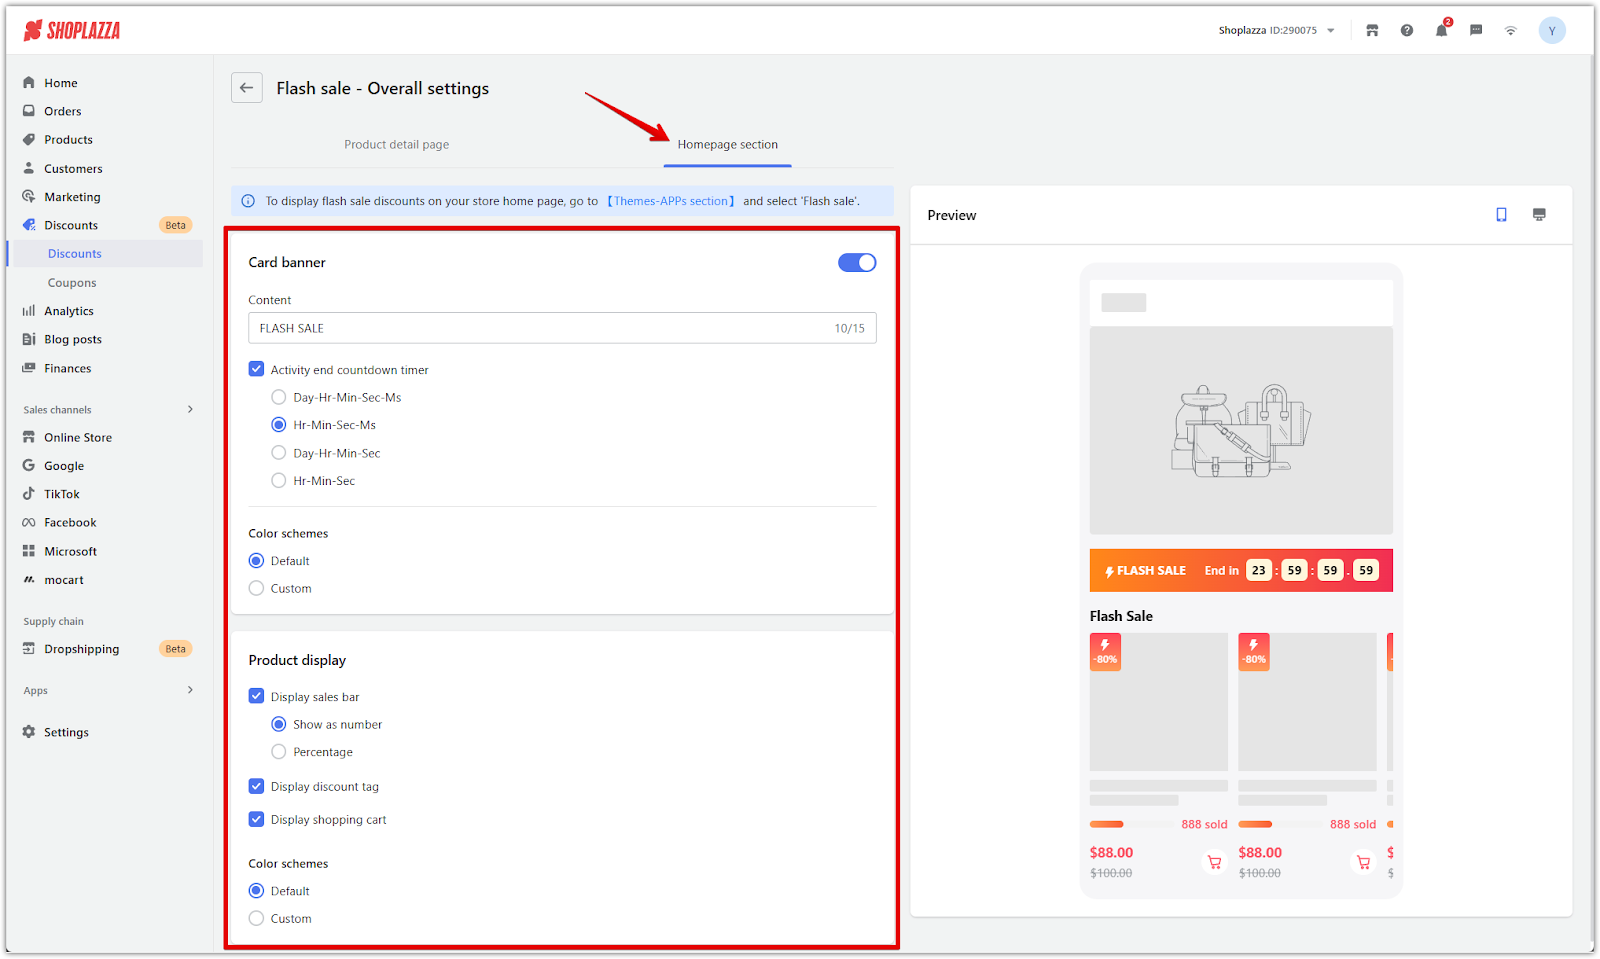
5. Customize activity landing page (optional): Under the Homepage section tab:
- Add a promotional label such as "FLASH SALE".
- Enable the countdown timer, and select the format.
- Choose a color scheme.
- Under Product display, turn on:
- Sales bar (by number or percentage).
- Discount tag.
- Shopping cart icon.
Configuring display settings for your campaign
After saving the campaign setup, configure how the discount is displayed on your store pages. This step ensures that the promotion appears correctly on the product detail page, and the activity landing page. These settings can be customized per campaign or inherit your overall display rules.
1. Open Page settings and select your campaign: Go to Discounts, then click Page settings in the upper-right corner of the screen. From the list, find the discount you just created and click into it to begin configuring the display.
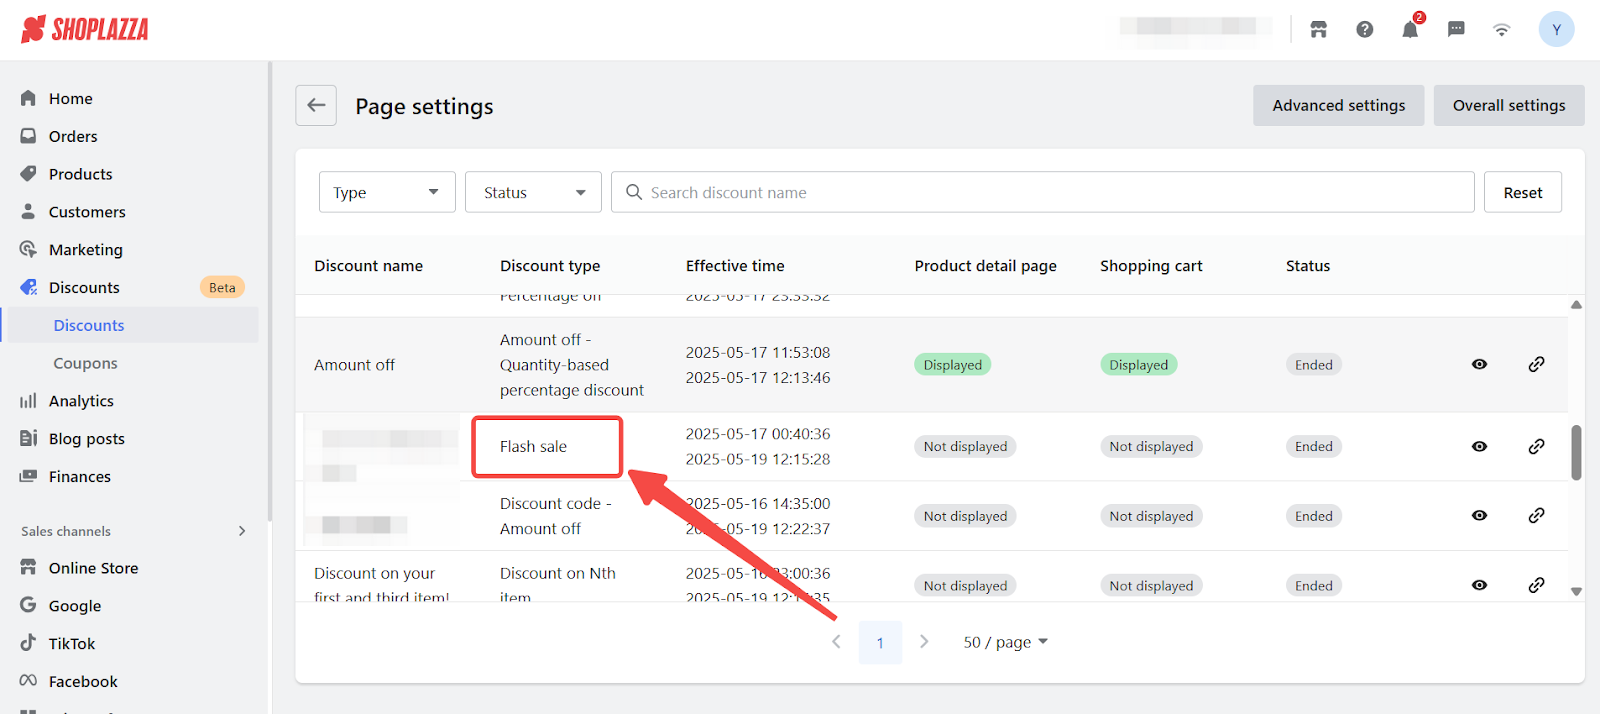
2. Adjust the display for each page: Configure how the discount appears on different storefront pages. Each page includes its own set of visual settings. You can enable features such as sales bars, countdown timers, and banner templates to create urgency and increase visibility. If you'd like to override the default design, turn off the Same as overall settings toggle.
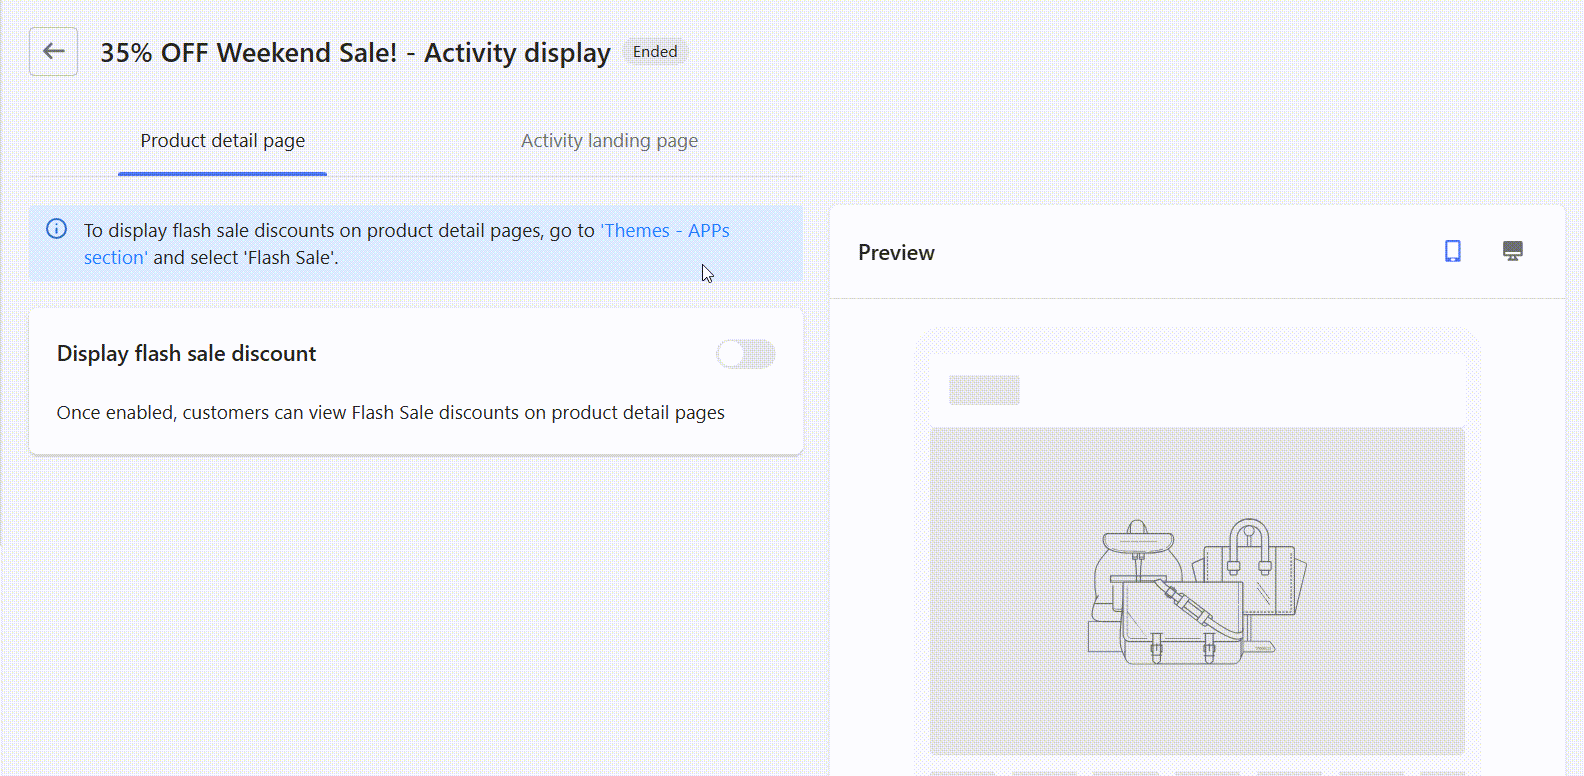
3. Product detail page
- Enable the Display flash sale discount switch to show the campaign banner directly on product detail pages.
- Choose a Banner template (Template 1, Template 2, or Custom) to control the visual layout.
- Under Display settings, customize the banner label (e.g., “FLASH SALE”), and enable elements such as the sales bar (displayed as a number or percentage) and a countdown timer to create urgency.
- Enable the countdown timer and select a format such as Hr–Min–Sec–Ms or Day–Hr–Min–Sec to show urgency.
- Optionally, enable redirect after clicking banner to send shoppers to the activity landing page.

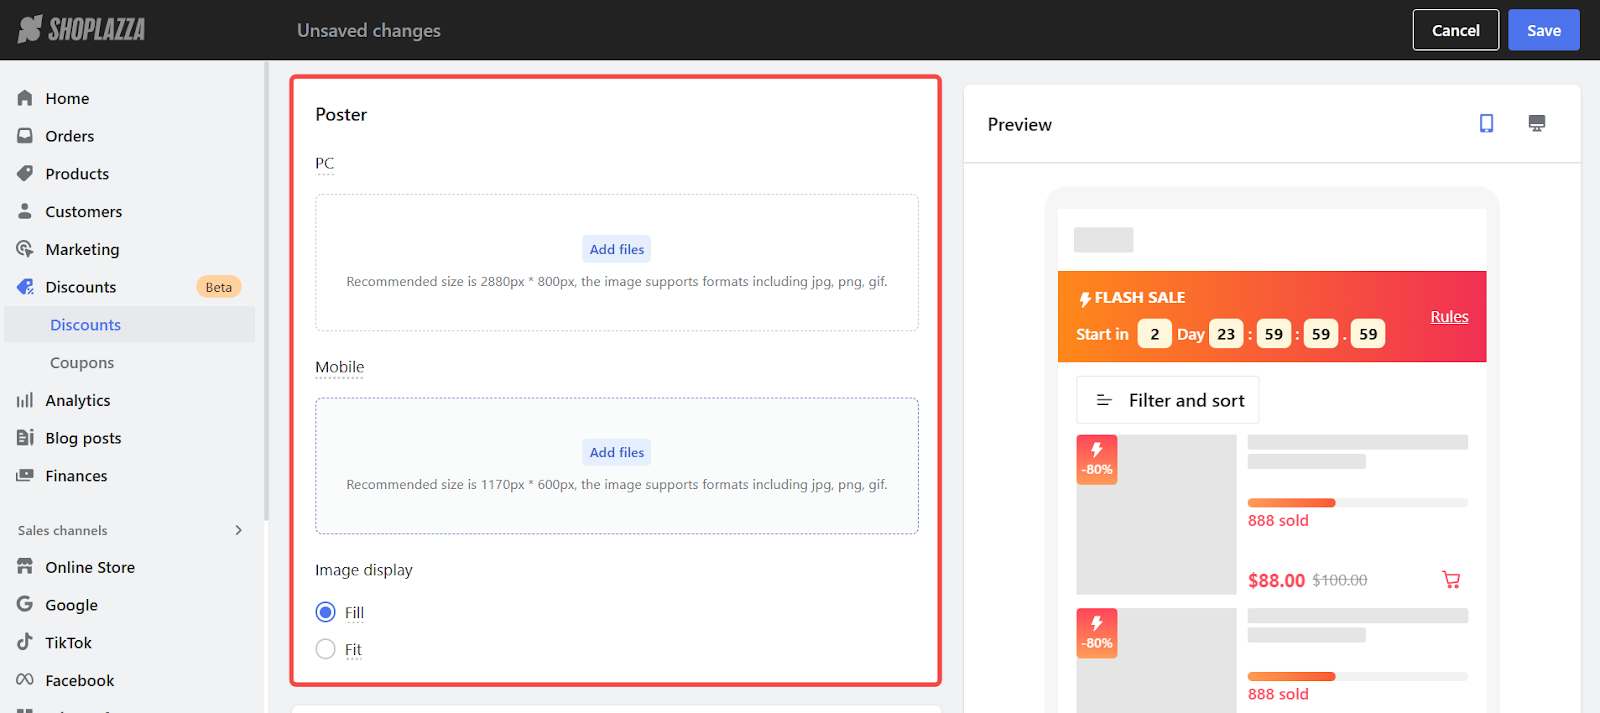
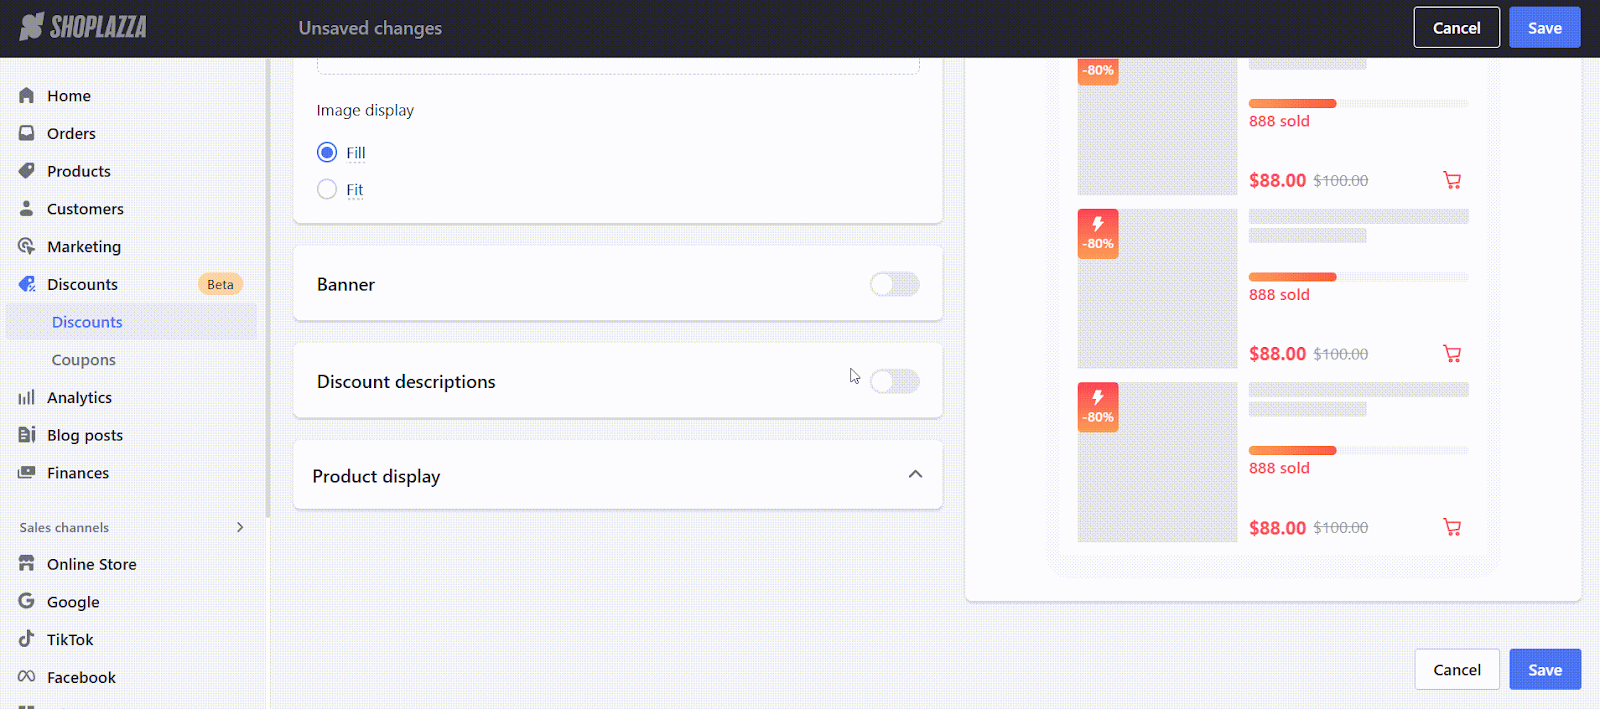
4. Activity landing page
- Upload a Poster image for desktop and mobile to showcase your campaign visuals (recommended sizes are shown in the upload panel).
- Enable the start countdown timer to build anticipation before the sale begins. Select your preferred display format.
- Enable the end countdown timer if you want to show time remaining during the promotion.
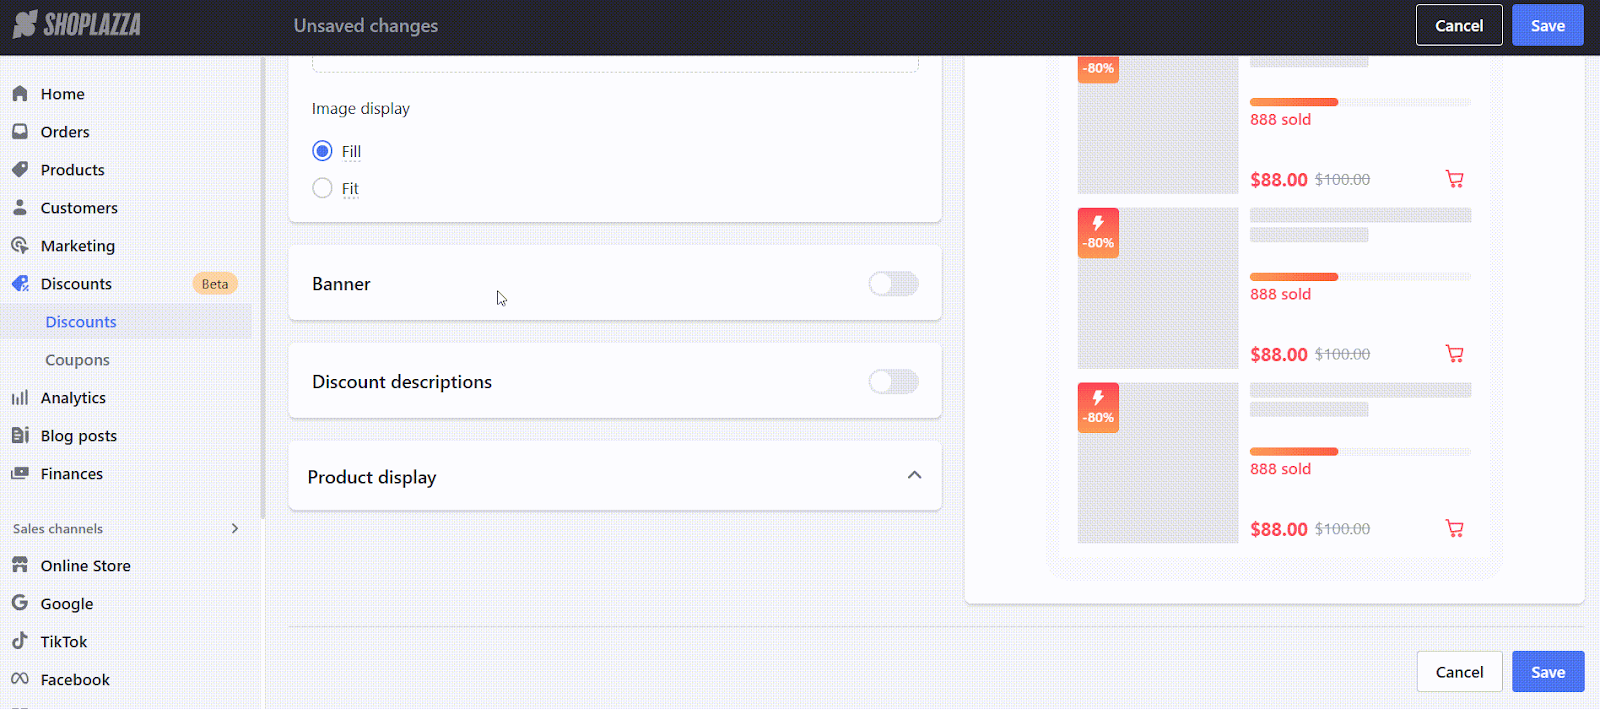
- Toggle on Discount descriptions if you'd like to show detailed text for each product’s promotion.

- Under Product display, you can also control how product details, pricing, and sales data appear (e.g., “888 sold”).
Note
- Countdown timers only appear if the campaign has an end date. For campaigns without an end date, no countdown will be shown.
- If the flash sale has already started, the start countdown will no longer display.
Display the discount in your store
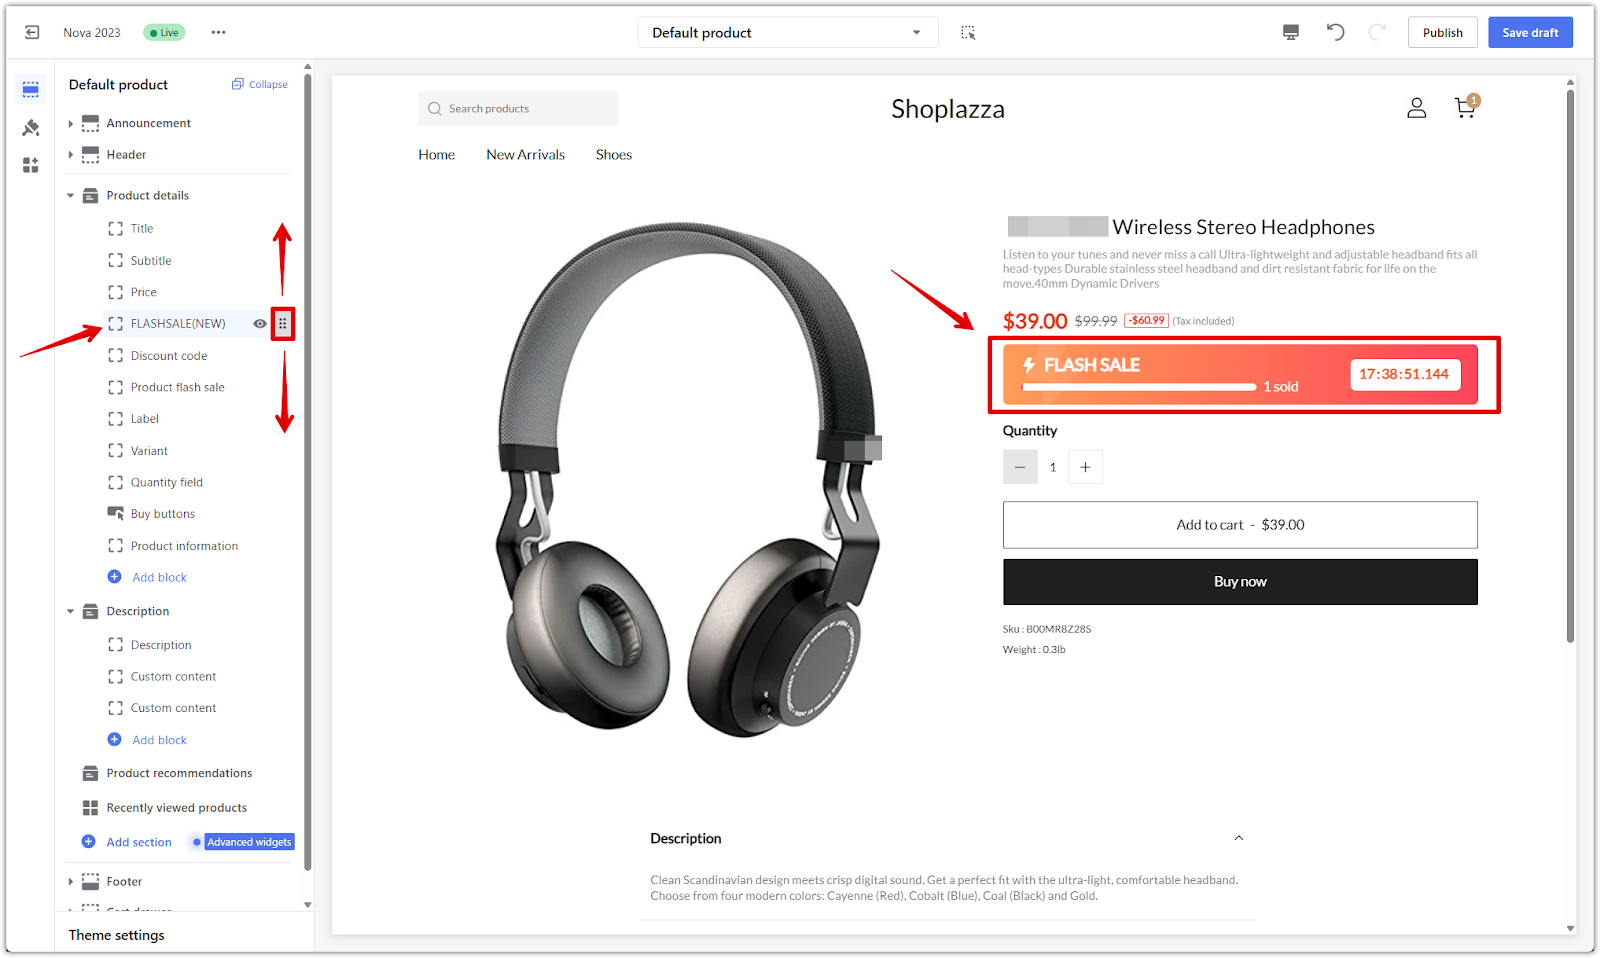
After configuring the design settings, add the FLASHSALE(NEW) block to your storefront so the discount appears on product detail pages. This is only supported on the default product page layout.
1. Access the theme editor: In the Product detail page tab, click the Themes - Apps section link to open the theme editor directly on the product layout.
2. Confirm the flash sale block: The FLASHSALE(NEW) block is added automatically. In the confirmation popup, click Confirm to proceed.
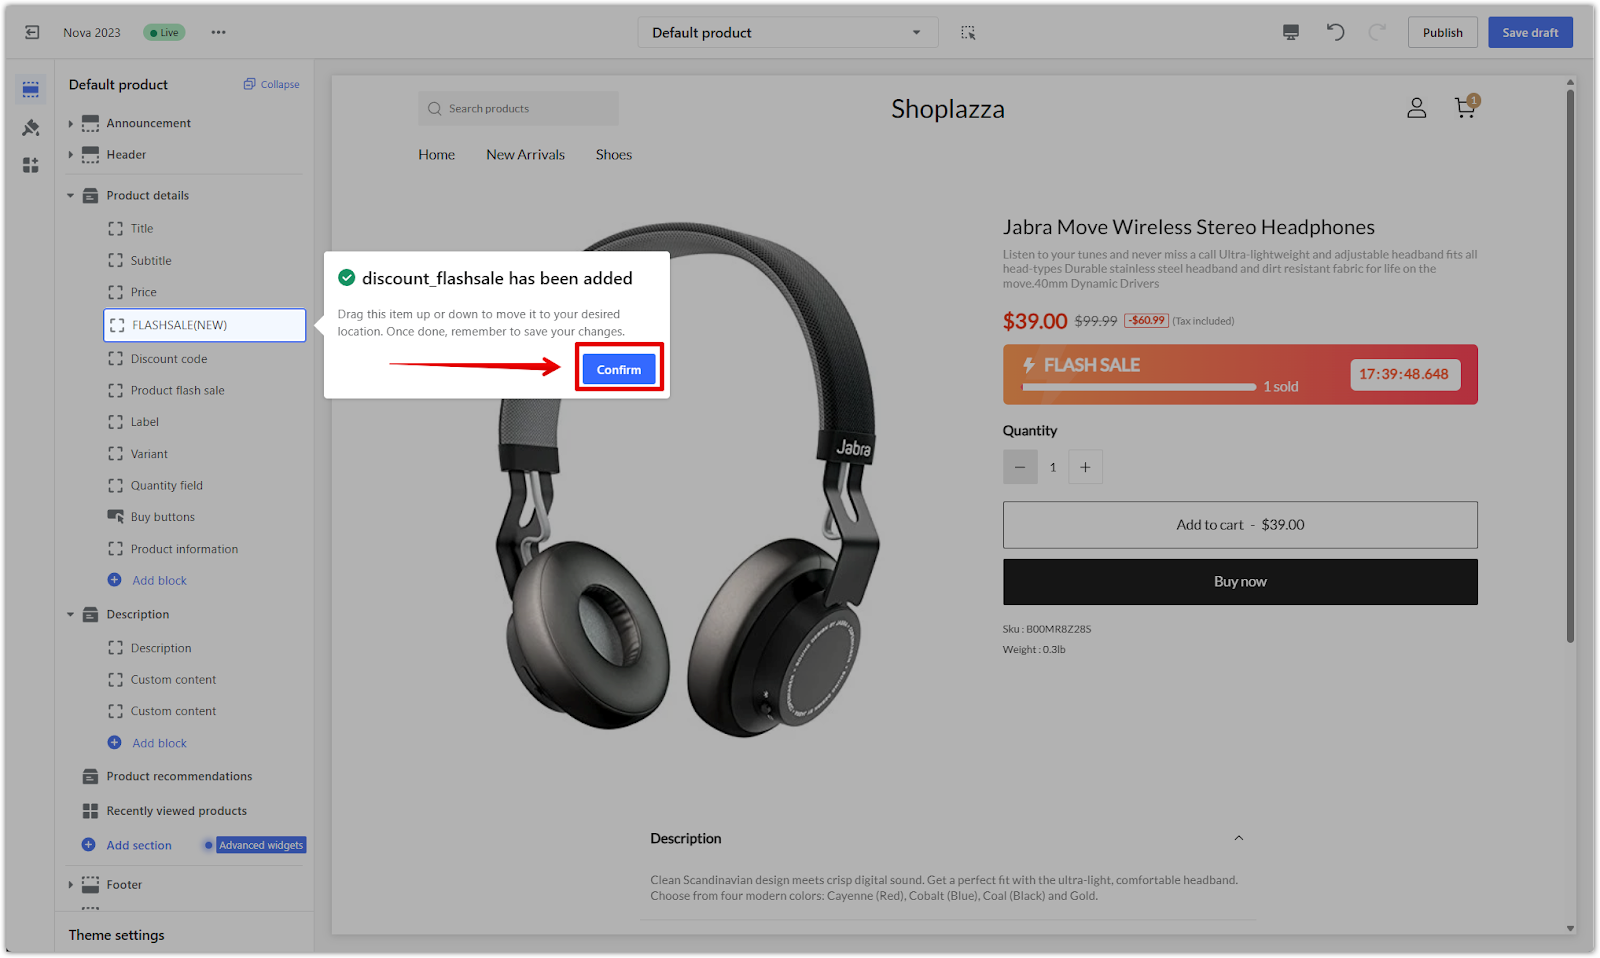
3. Reposition the block: Drag the block to your preferred position, such as beneath the price or above the purchase button. Use the preview to check both desktop and mobile views.
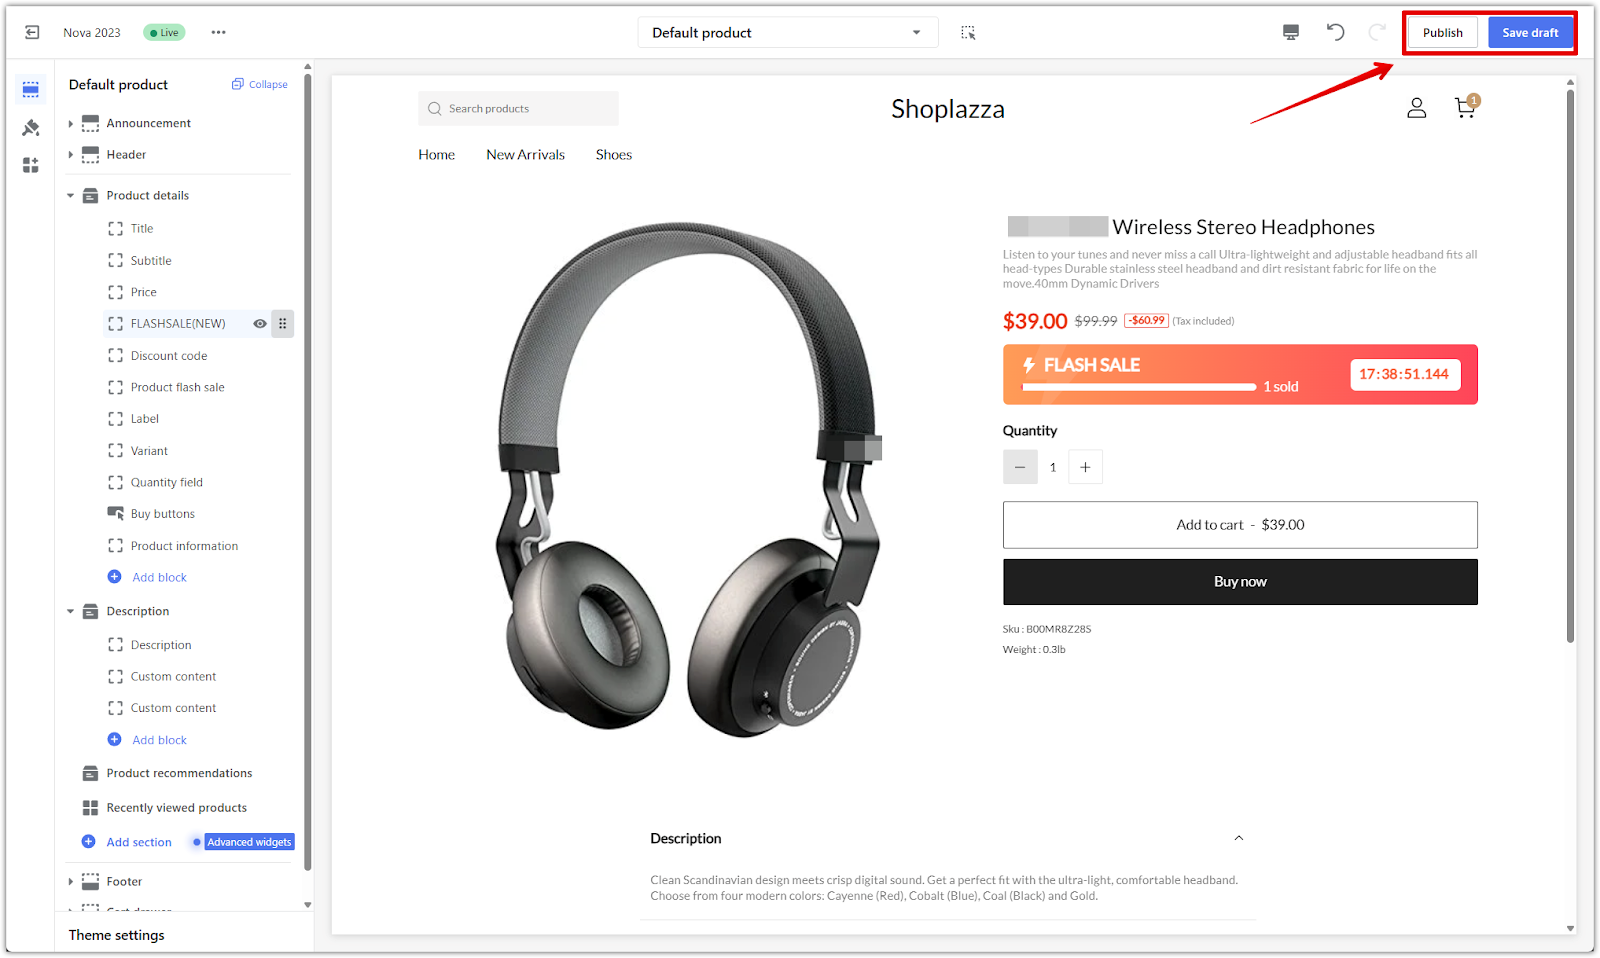
4. Publish or save your changes: Click Publish to apply the layout or Save draft if you’re not ready to go live.
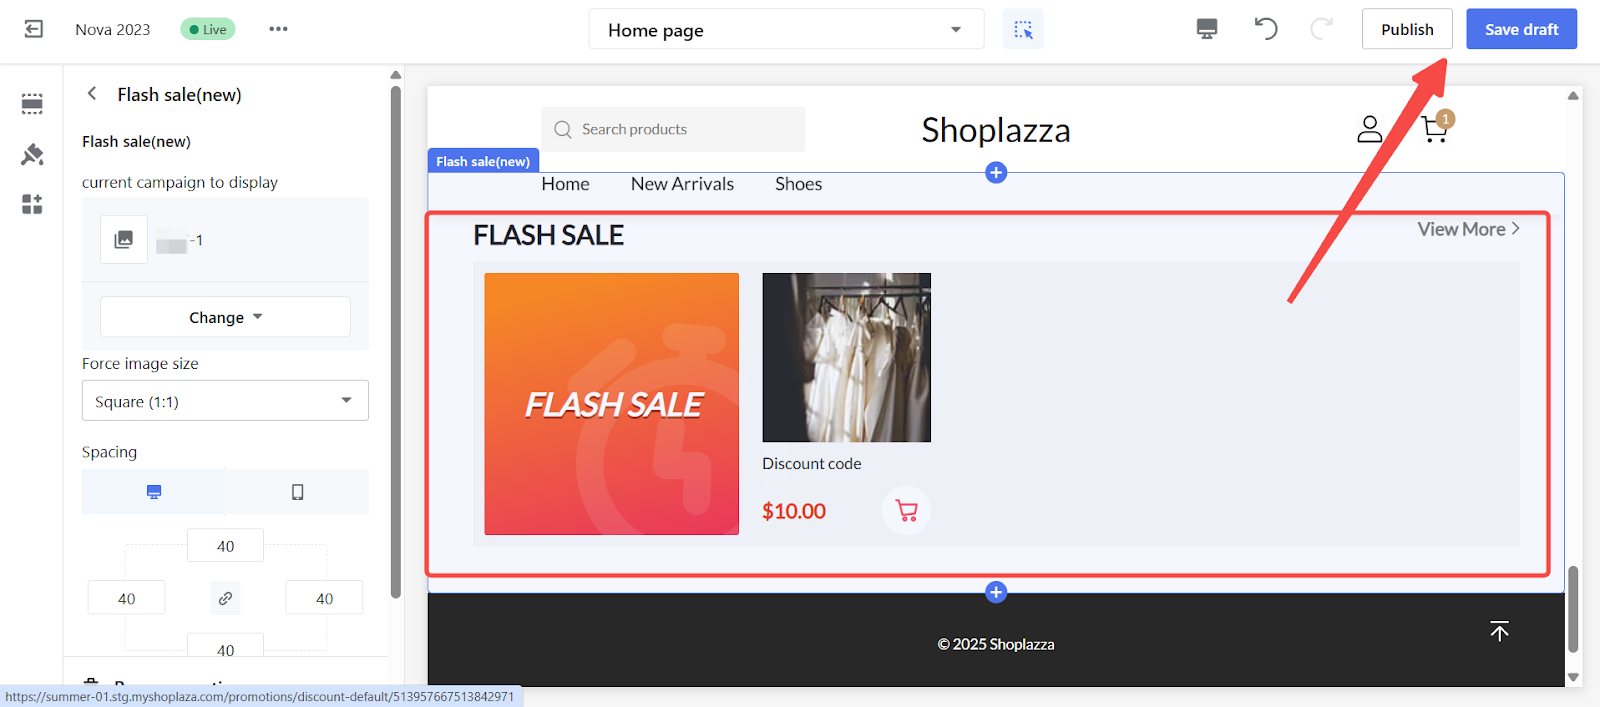
5. Add card to home page (optional): In the theme editor, switch to the Home page layout. Click Add section in the left-side panel, then select Flash sale (new).
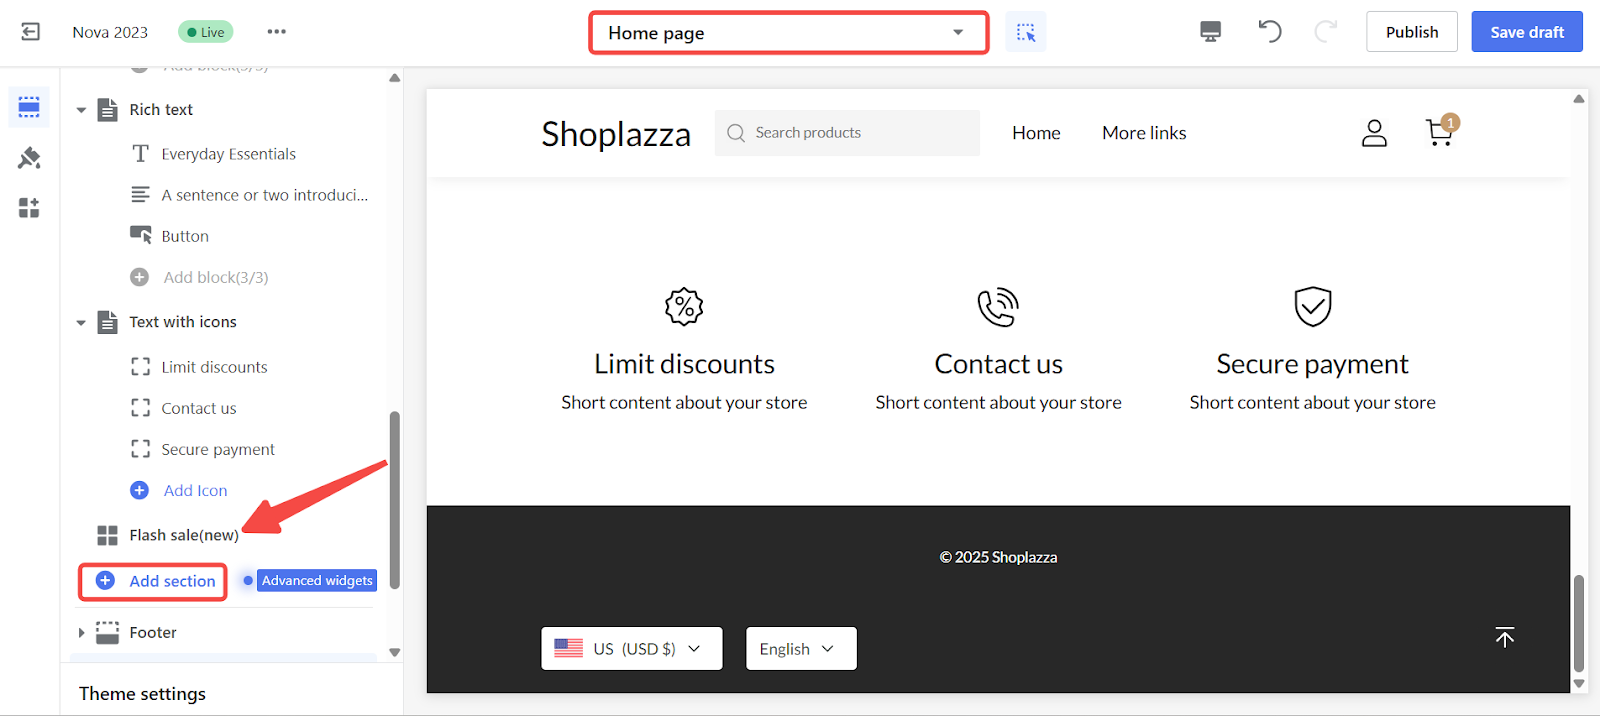
- On the Flash sale (new) page, click on Select current campaign to display.
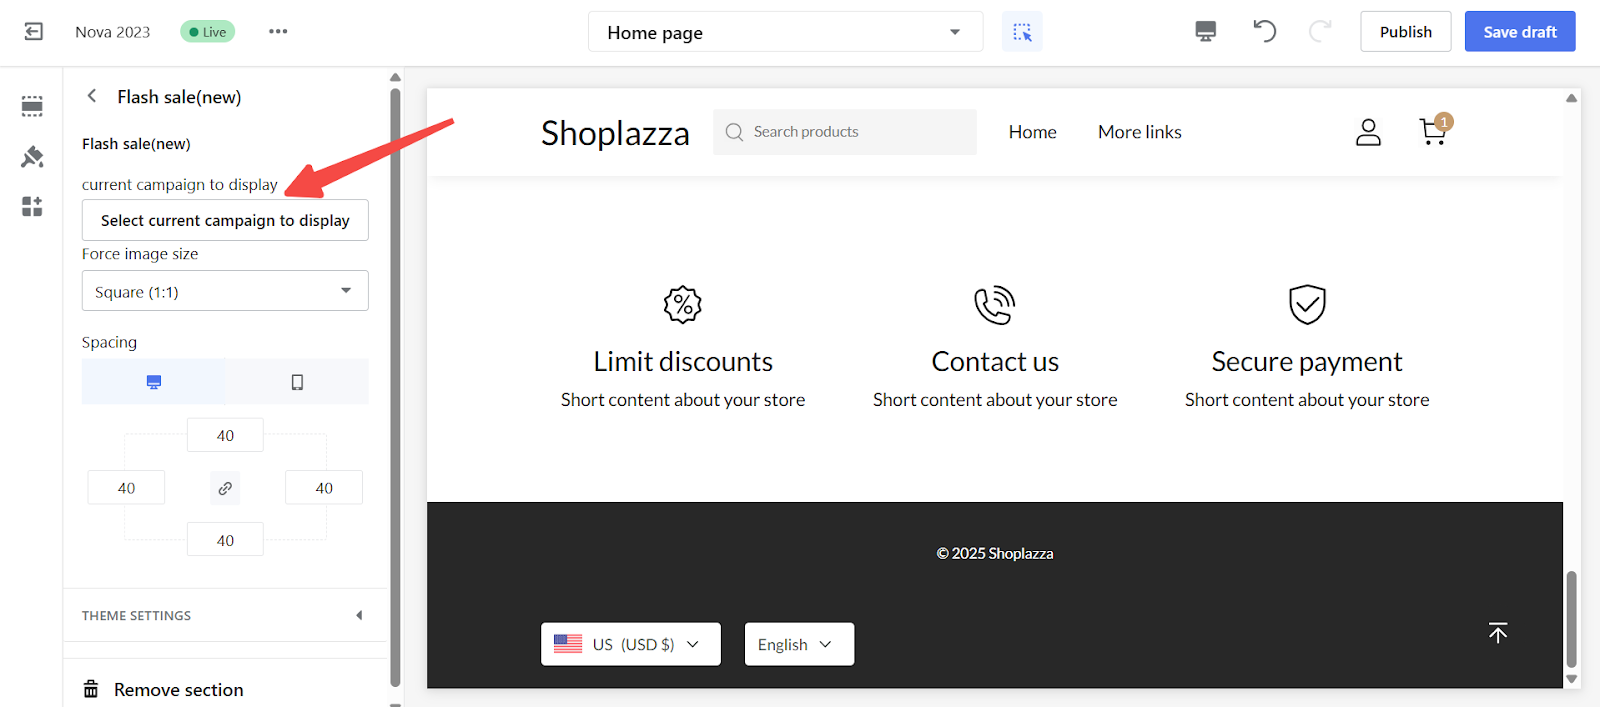
- Choose the promotion you want to display and click Select.

- A live preview will appear on the left side. When ready, click Publish to apply your changes.
Flash sales are a powerful way to drive urgency, reward targeted customers, and boost conversions in a short period of time. By setting clear rules, controlling visibility, and customizing the display with the flash sale block, you can run high-impact promotions that fit seamlessly into your storefront.


Comments
Please sign in to leave a comment.