
Offering a discount on a specific item in the cart is an effective way to drive larger purchases while maintaining full control over discount conditions. In the Shoplazza admin, this is referred to as Discount on Nth item, where “Nth” simply means the item’s position in the cart, such as the second or fifth item. This tool supports tiered promotions that apply targeted discounts based on the number of items in the cart and their position. It’s ideal for encouraging upsells and rewarding customers who purchase more, without applying discounts across the entire cart.
Creating the discount
Begin by setting up the promotion directly in your Shoplazza admin. This initial step involves selecting the right discount type and entering the basic details needed to launch the campaign. Selecting the correct discount type ensures that the rest of your configuration supports your promotional goals.
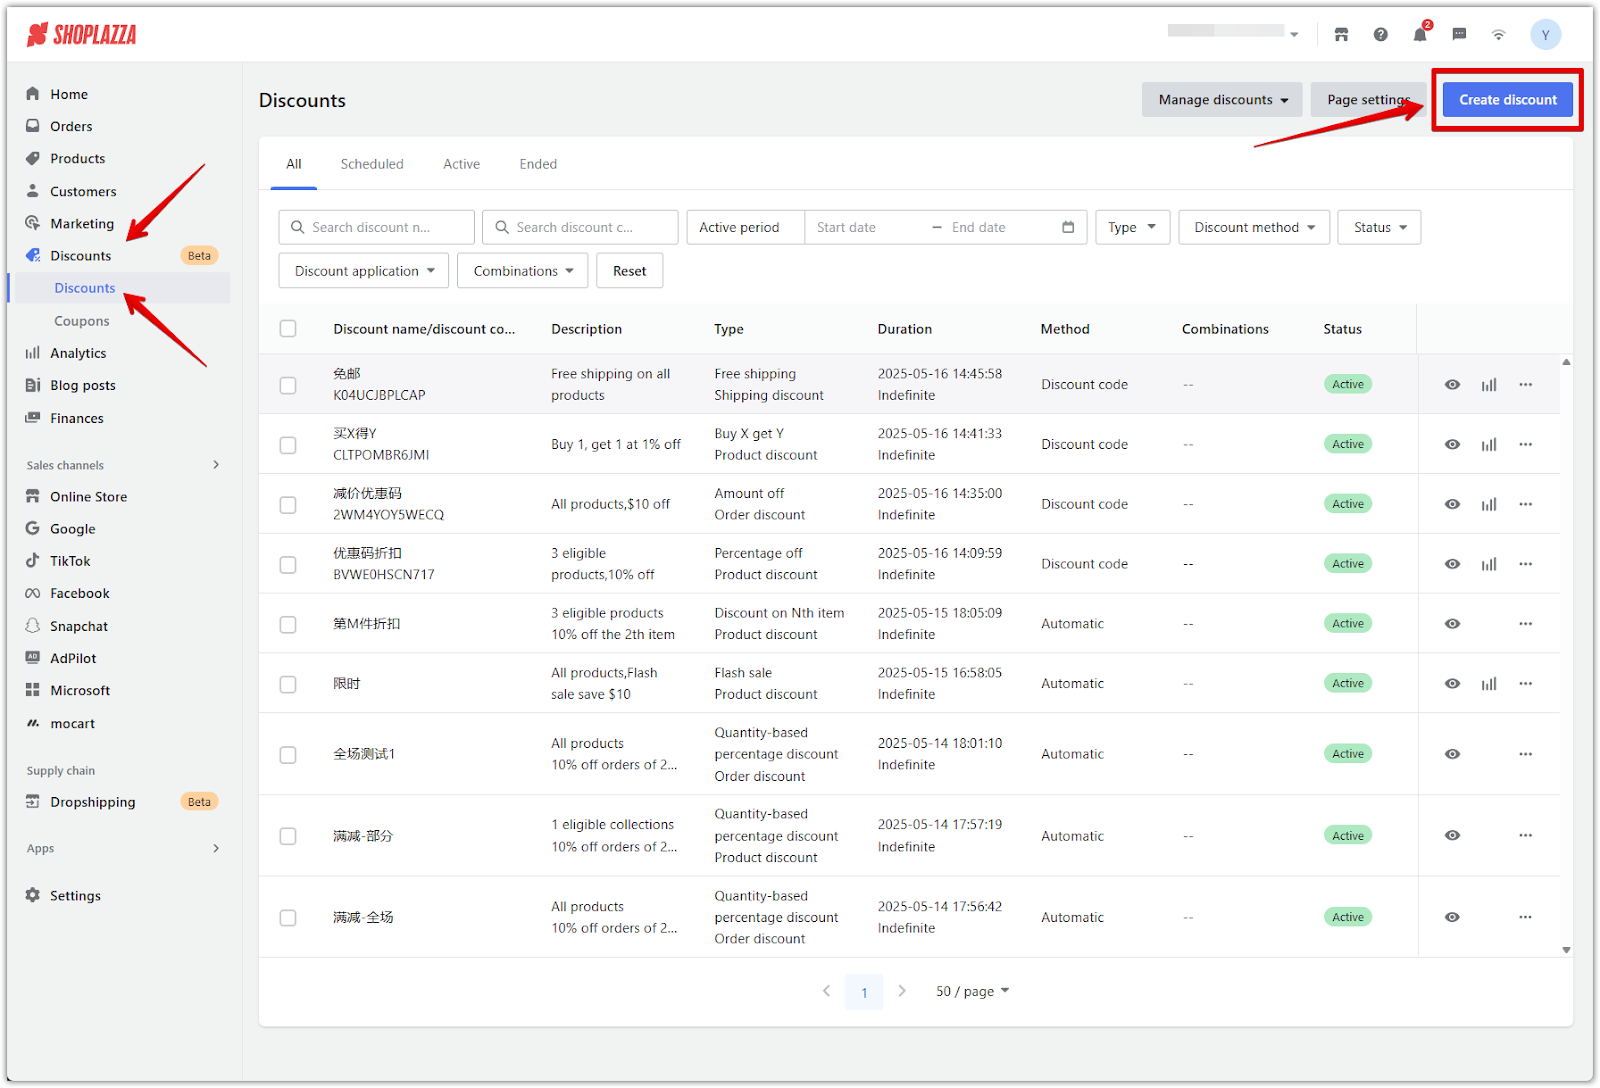
1. Access the discount setup page: From the Shoplazza admin, click Discounts in the left menu, then select Discounts. In the top-right corner, click Create discount to begin setting up your promotion.
2. Select “Discount on Nth item” as the discount type: A pop-up window will appear with a range of discount options. Under the Product discount section, choose Discount on Nth item. This option supports tiered promotions based on item position within a customer’s cart, such as offering 50 percent off the second item.

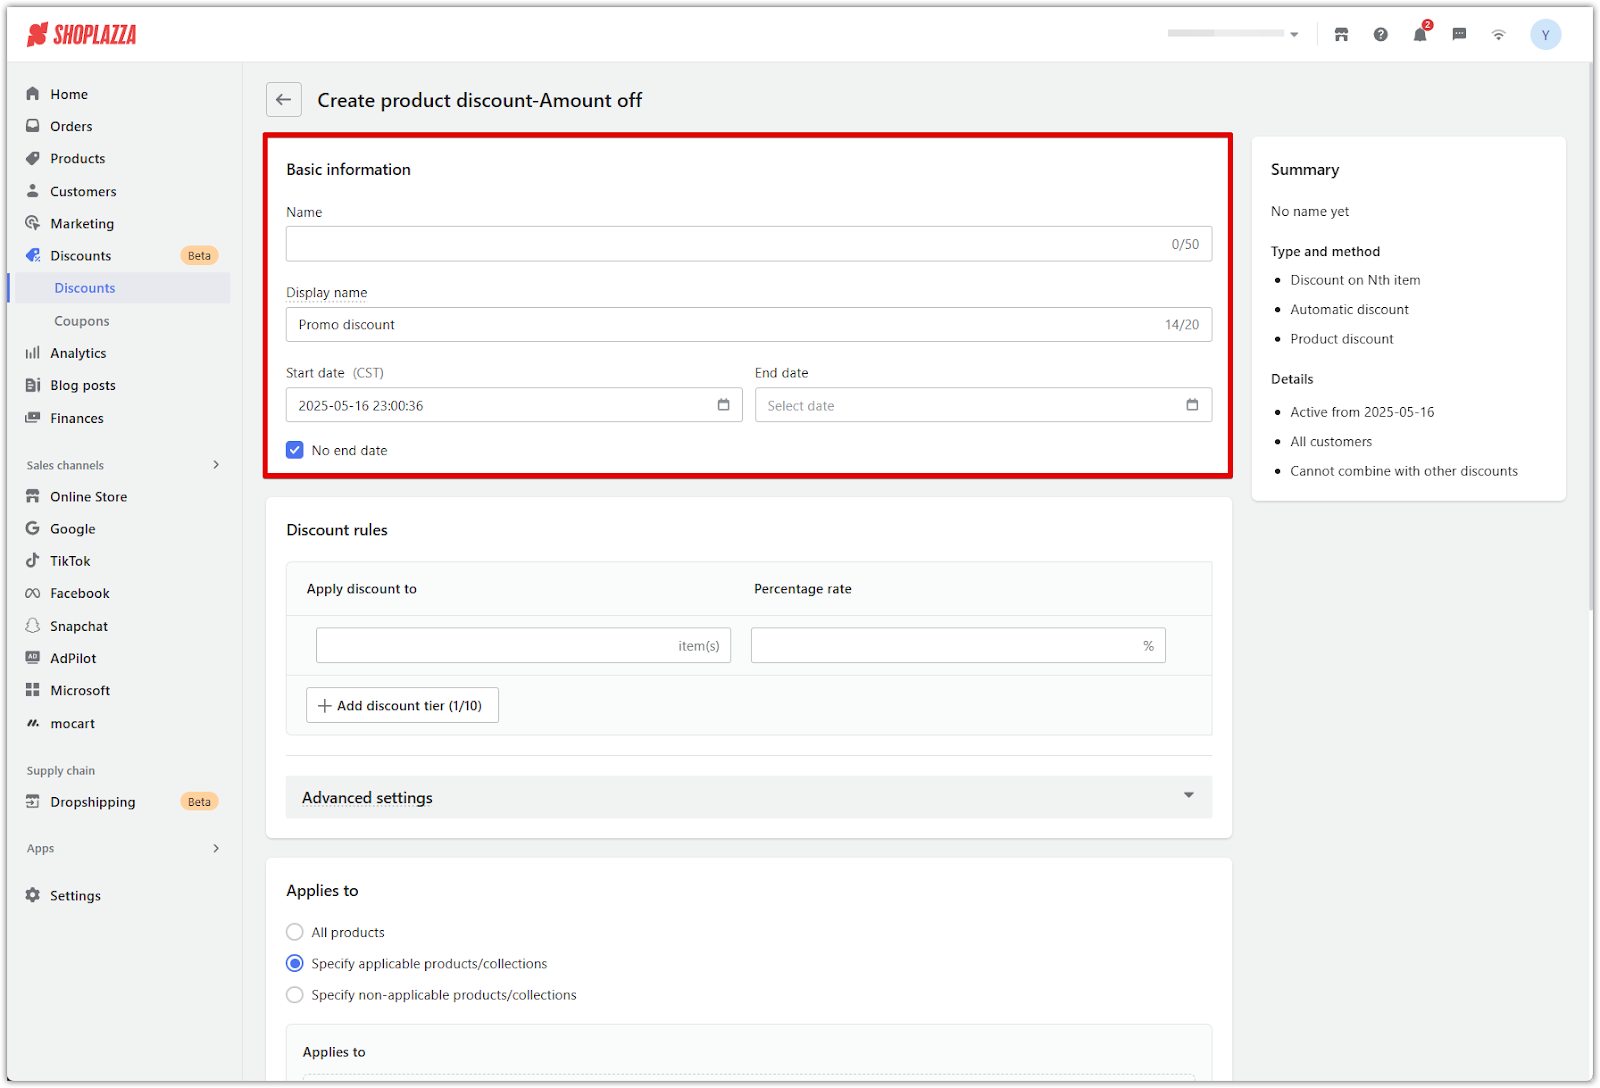
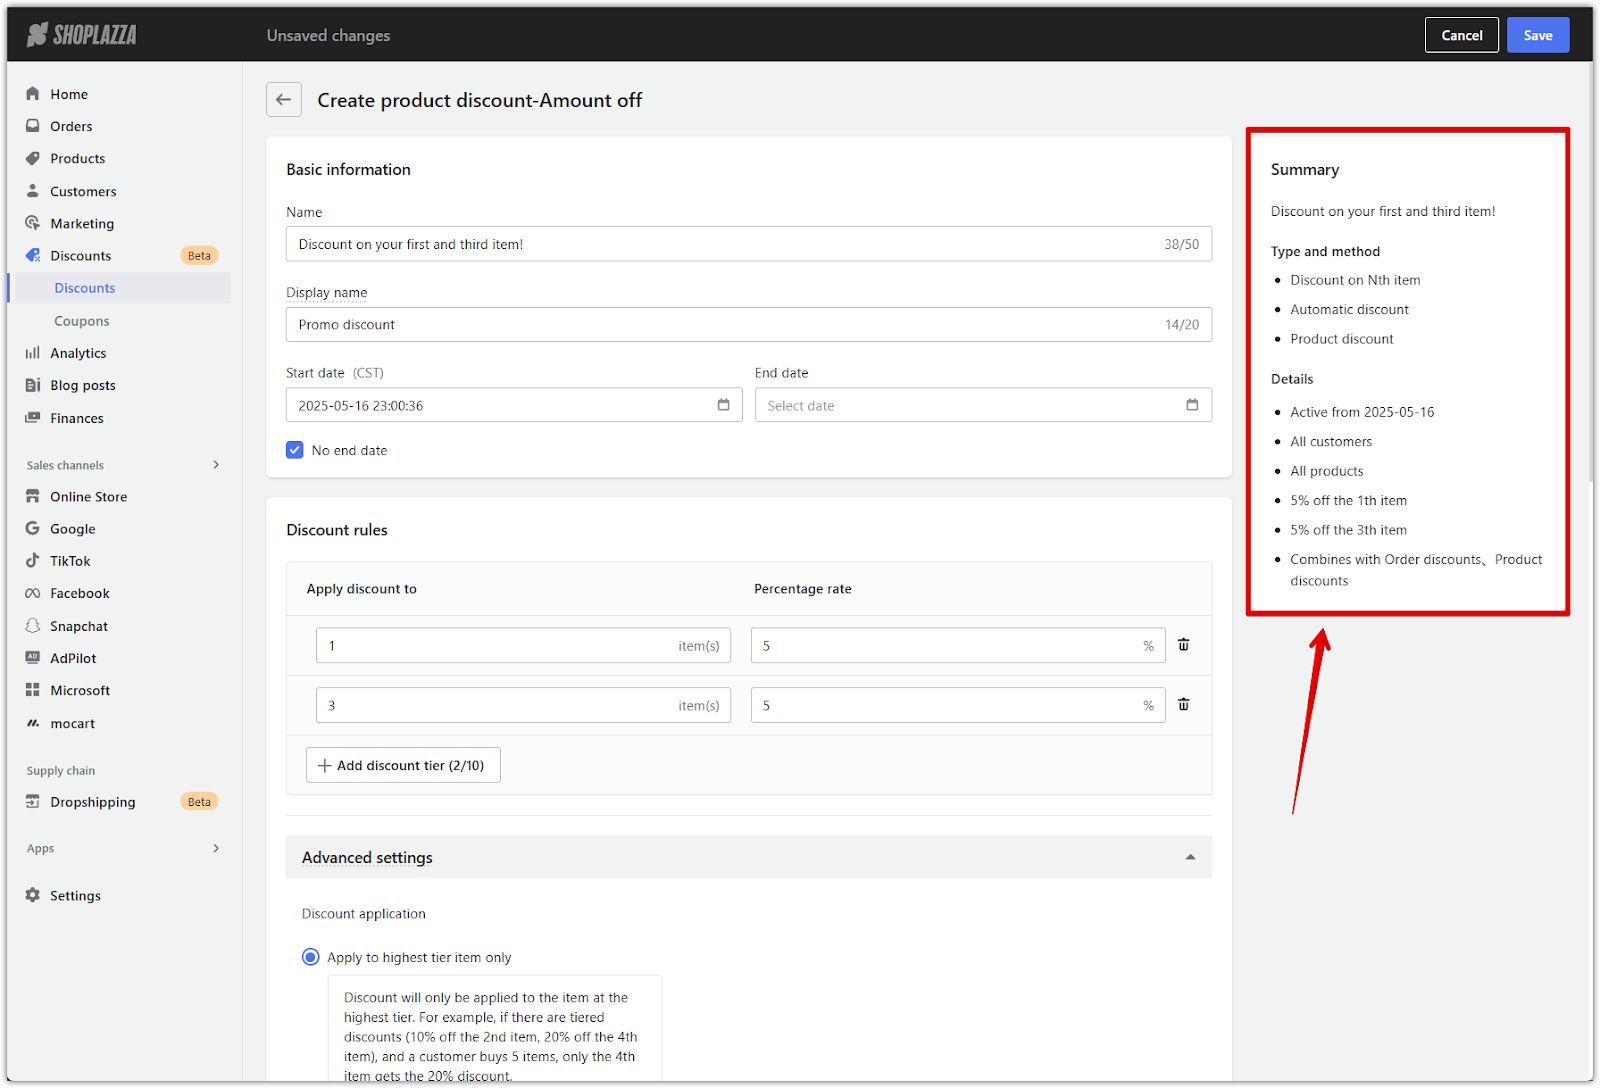
3. Fill in the basic information: Enter a name for internal use in the Name field. In the Display name field, type the promotional message that will be shown to customers during checkout. This is what appears on the Cart and Checkout pages to help customers understand the offer. Then, set the Start date for when the promotion begins, and either select an End date or check the No end date box if the promotion should run indefinitely.
Discount rules
Define how the discount applies to items in the cart. This section allows you to define which item receives the discount and whether to include multiple discount levels. Tier-based promotions like “20 percent off the second item” or “50 percent off the fifth” can be configured in a single campaign to encourage larger purchases without discounting every product.
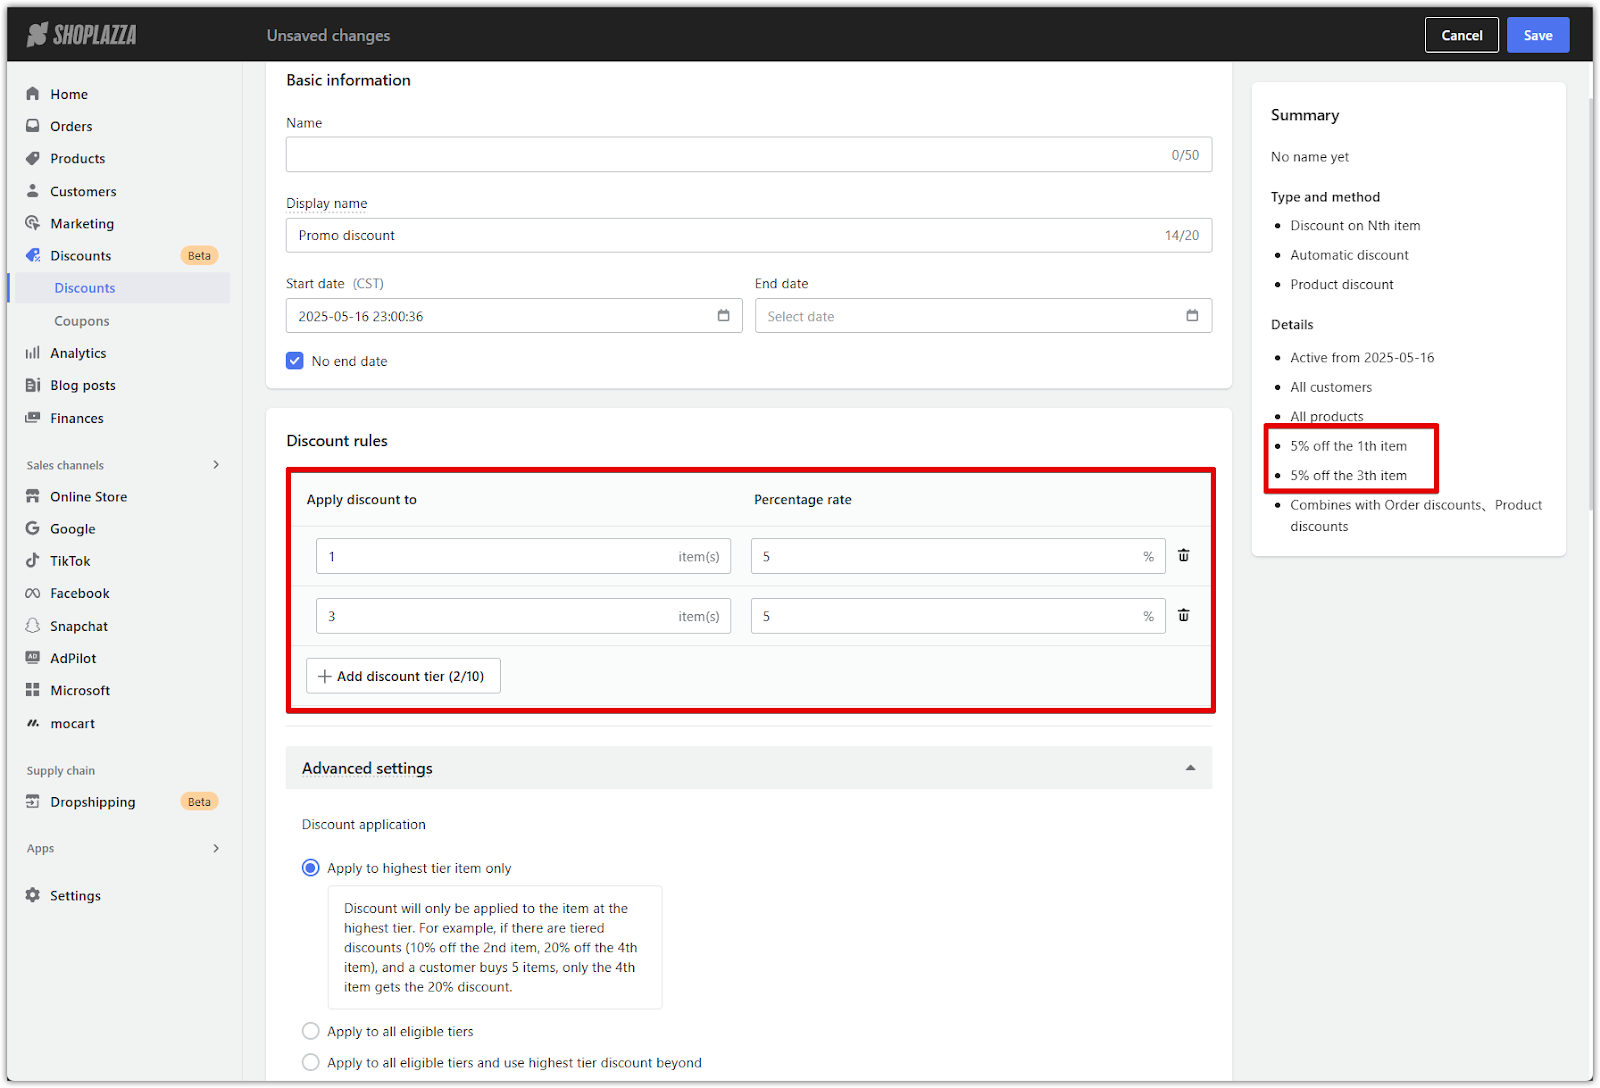
1. Set the item number for the discount: Choose which item in the order should receive the discount. For example, you might set up a rule that gives 30 percent off the third item in a customer's cart. You do not need to start from the first item.
Note
Only percentage-based discounts are supported. Fixed-amount discounts are not available for this promotion type. For example, you can set "25 percent off the fourth item," but not "5 dollars off the fourth item."
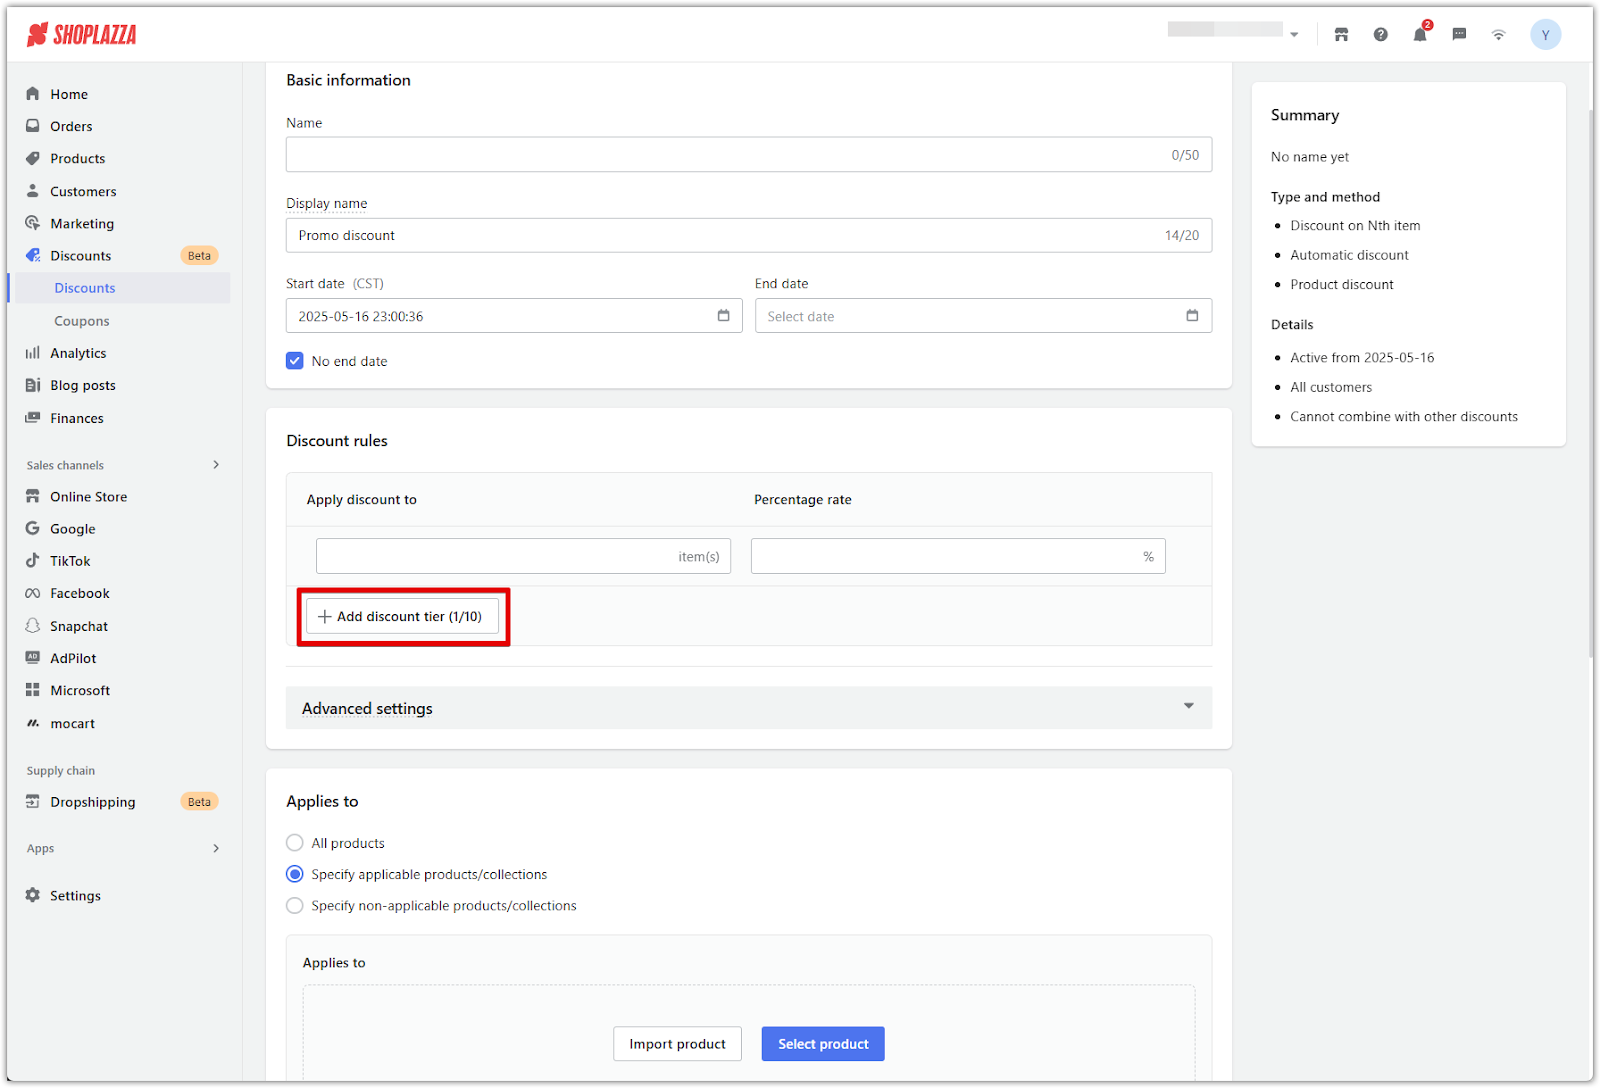
2. Create multiple discount tiers: You can add up to ten discount tiers in a single campaign. This allows you to create layered promotions such as giving 20 percent off the second item and 50 percent off the fifth item. Tiered discounts encourage customers to buy more by offering greater rewards at higher quantities.
Note
Automatic discount allocation: When multiple eligible items are in the cart, the system will automatically apply the highest eligible discount tier to the lowest-priced qualifying item. This prioritization helps you minimize your promotional spend while still offering value to your customers.
Advanced settings
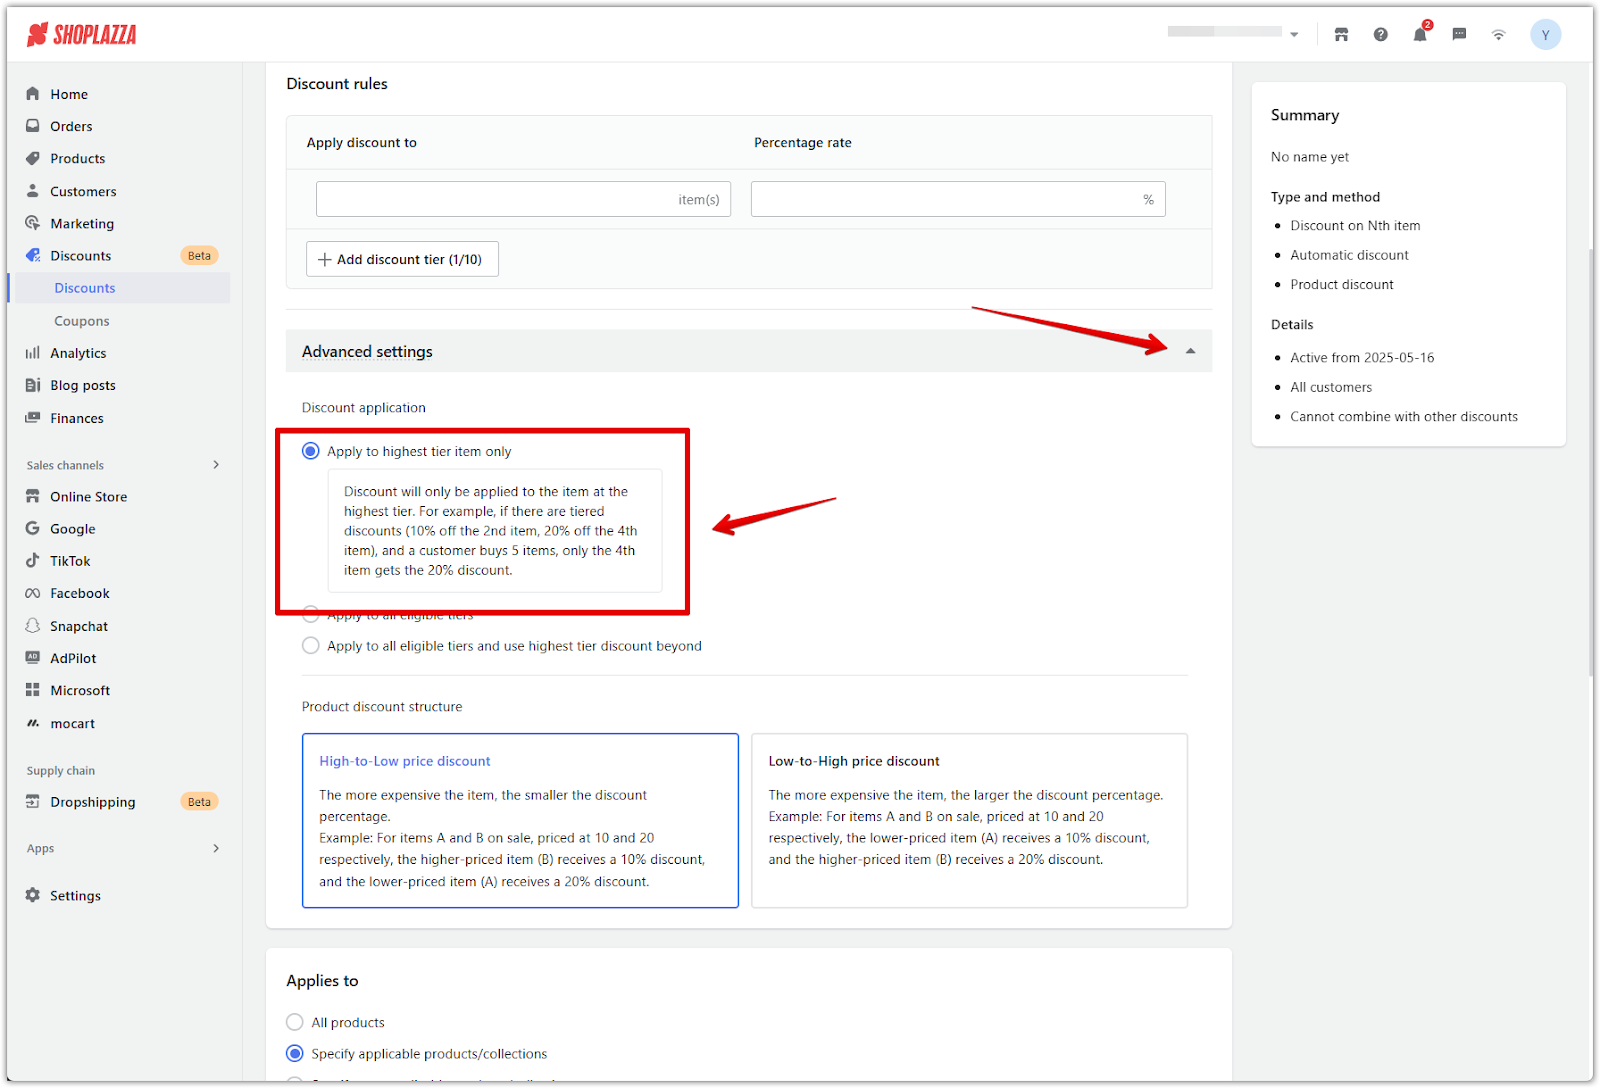
Fine-tune how the discount behaves when a customer qualifies for more than one tier. These settings determine whether multiple tiers are applied together or whether only the highest discount is used. Adjusting these options helps control the overall value of the promotion and align the discount behavior with your sales goals.
1. Apply to highest tier only: If this option is selected, only the highest qualifying discount will apply to the order. For example, if your campaign includes 10 percent off the second item and 20 percent off the fourth item, a customer who buys five items will only receive 20 percent off the fourth item.
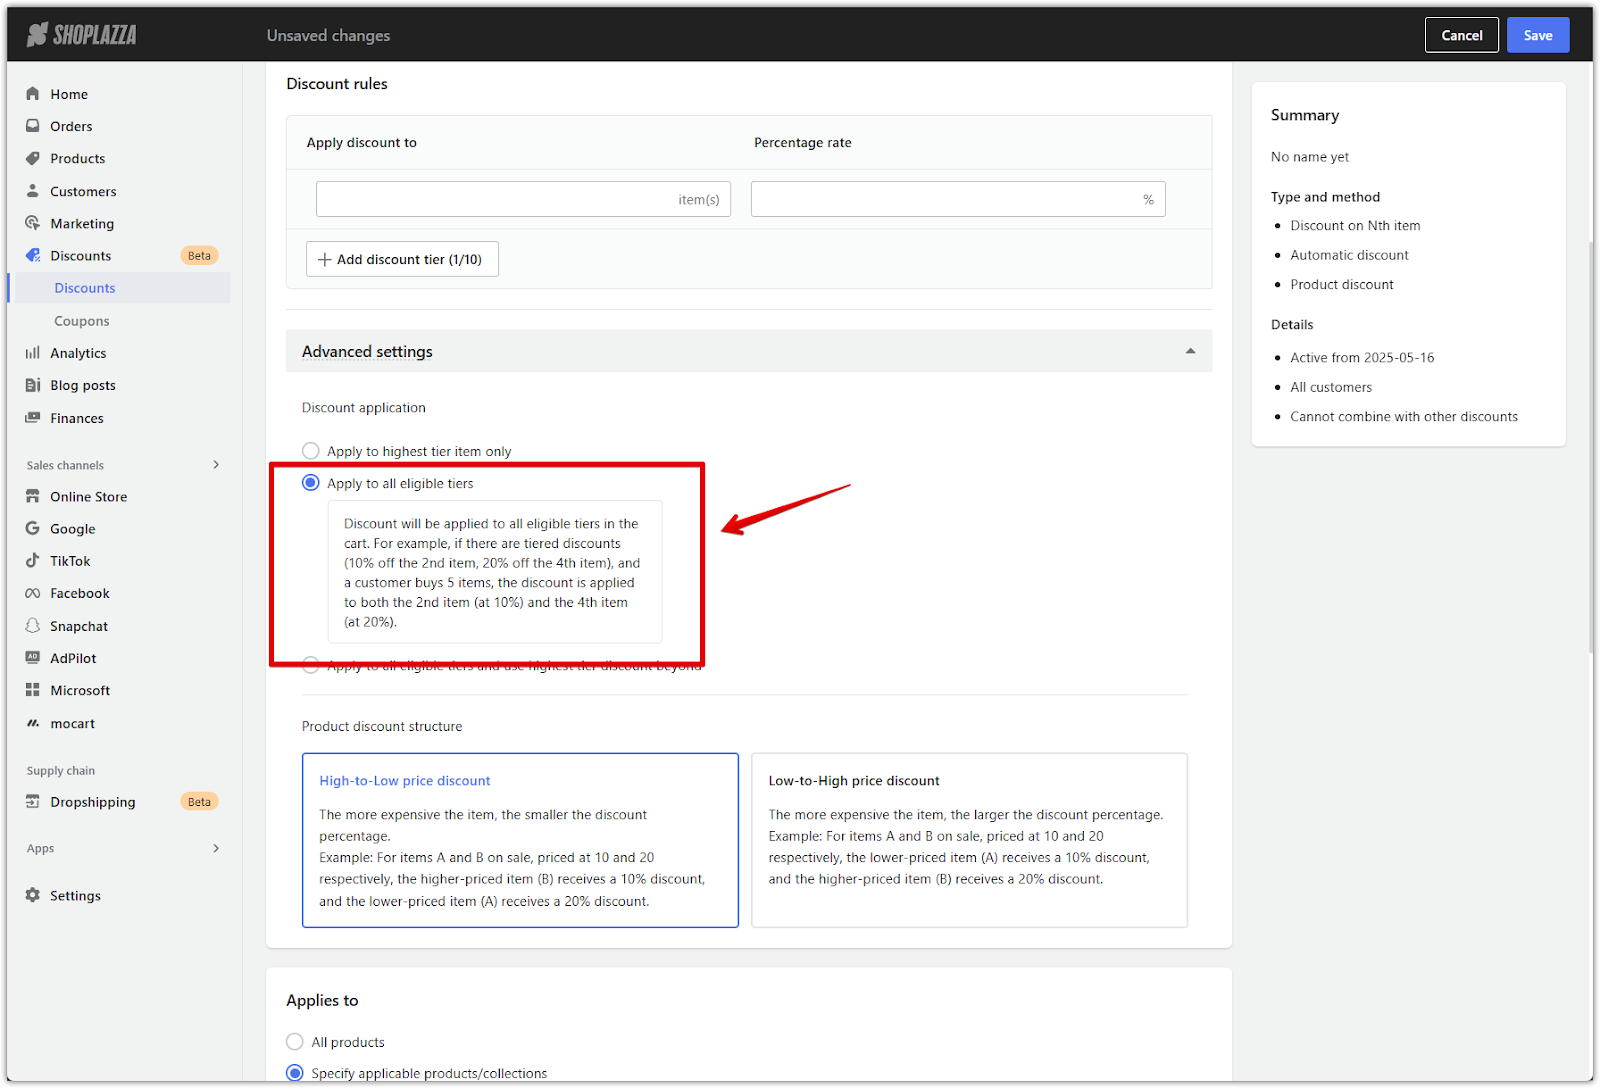
2. Apply to all eligible tiers: This option ensures that all qualifying discount tiers apply at the same time. Using the example above, the customer would receive 10 percent off the second item and 20 percent off the fourth item if they purchase enough items to meet both thresholds.
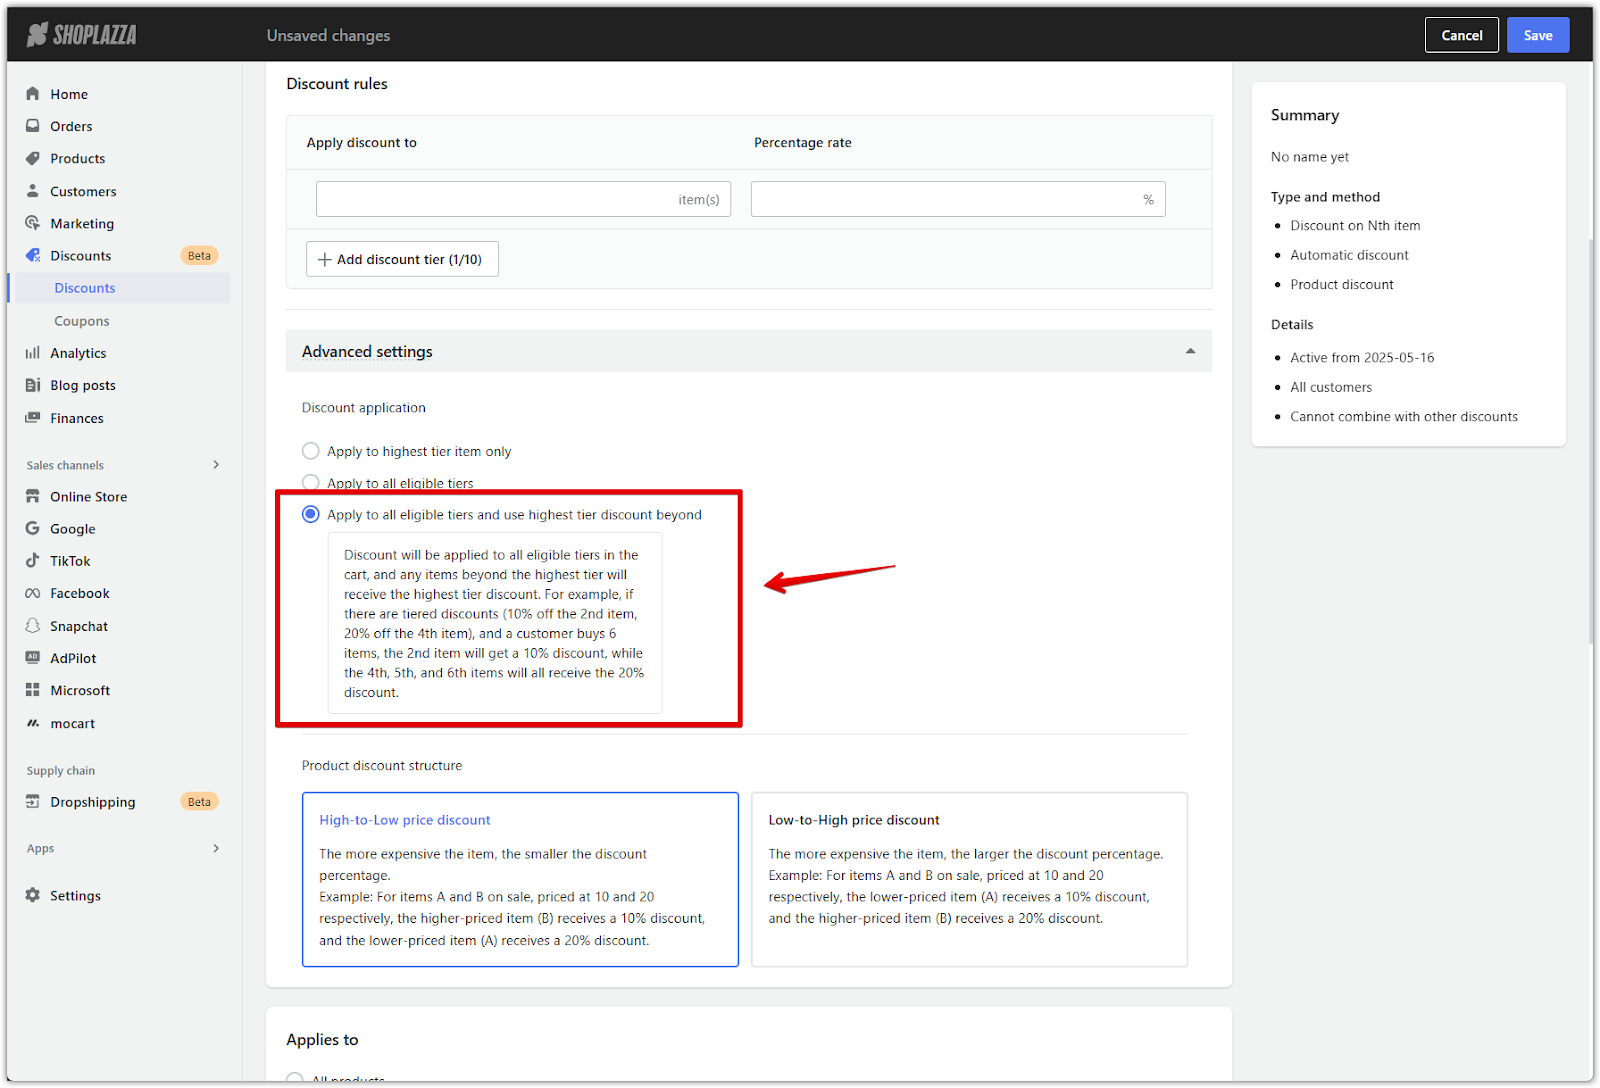
3. Apply to all tiers and use highest tier for extra items: This option applies each defined tier and extends the highest discount tier to any additional items beyond the last defined tier. For instance, a customer who qualifies for 10 percent off the second item and 20 percent off the fourth item would also receive 20 percent off the fifth item.
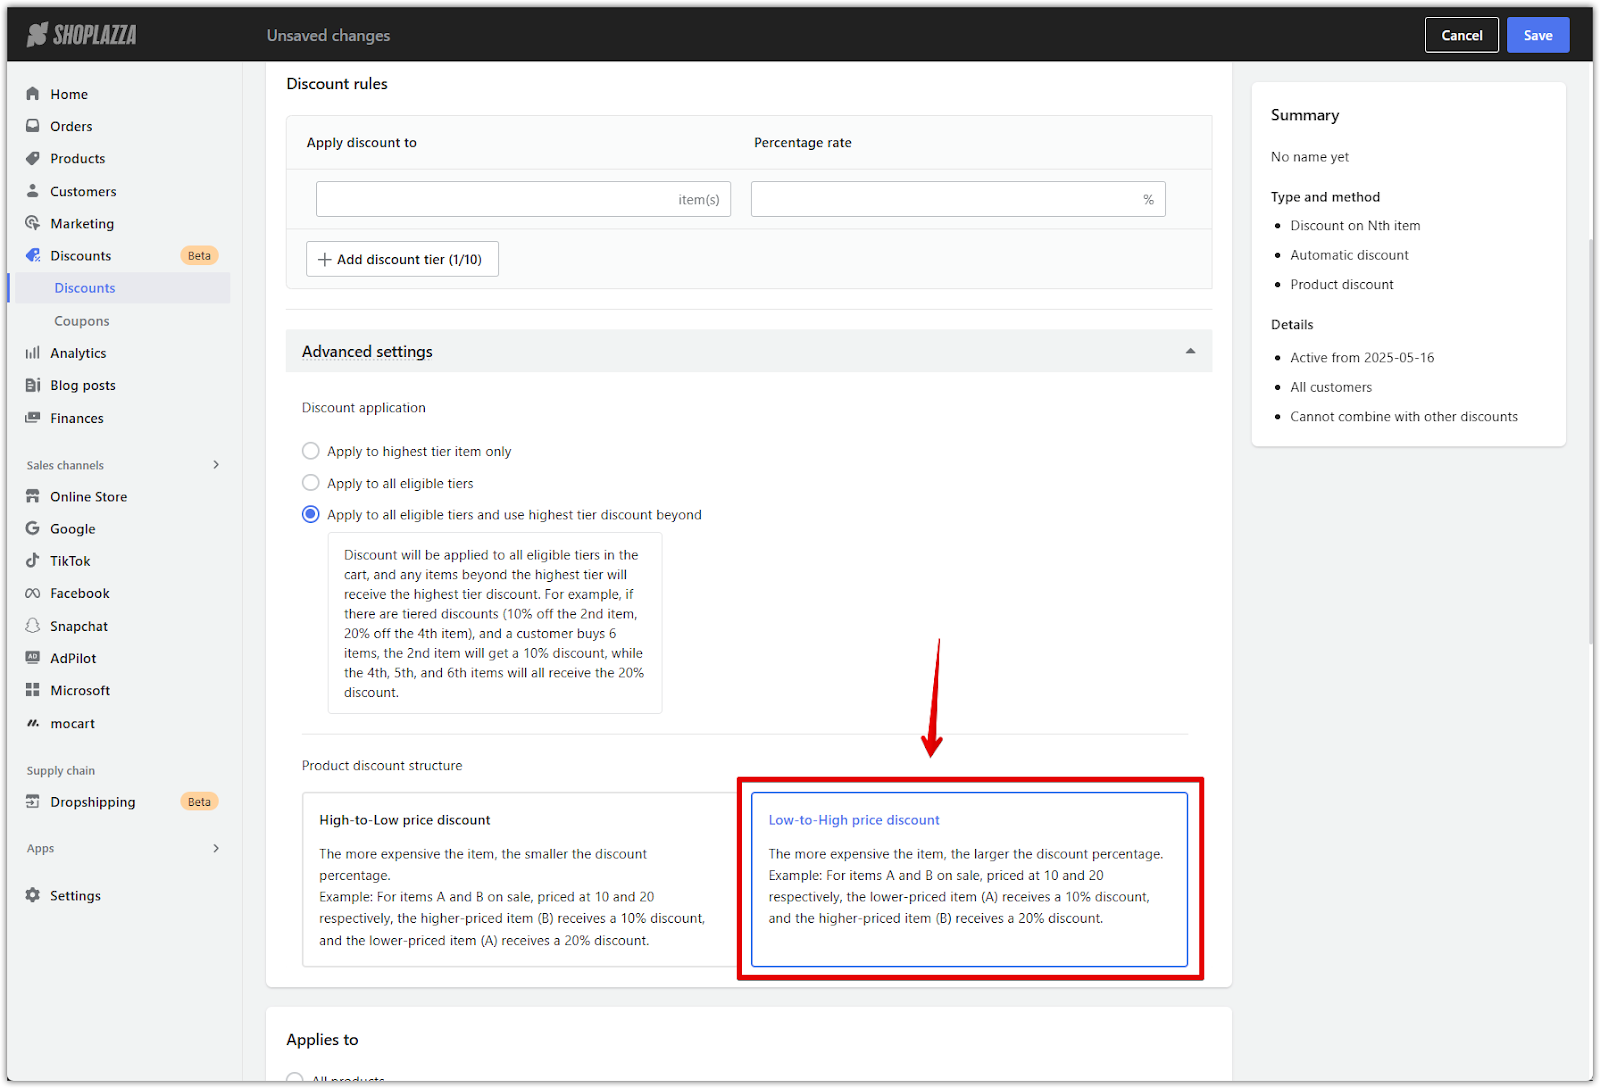
Product discount structure
Choose how the system applies discounts when there are multiple qualifying products at different price points. This setting controls the order in which discounts are assigned, helping you prioritize either cost efficiency for your store or maximum savings for your customers. The structure you select directly impacts the overall value of the promotion.
1. High-to-low price discount: The lowest discount rate is applied to the highest-priced item, and higher discount rates are applied to lower-priced items. For example, if Item A is priced at 10 dollars and Item B is priced at 20 dollars, and your setup gives 10 percent off the first item and 30 percent off the second, the 10 percent discount would be applied to the 20 dollar item and the 30 percent discount would be applied to the 10 dollar item. This results in total savings of 5 dollars and helps reduce overall discount costs for your store.
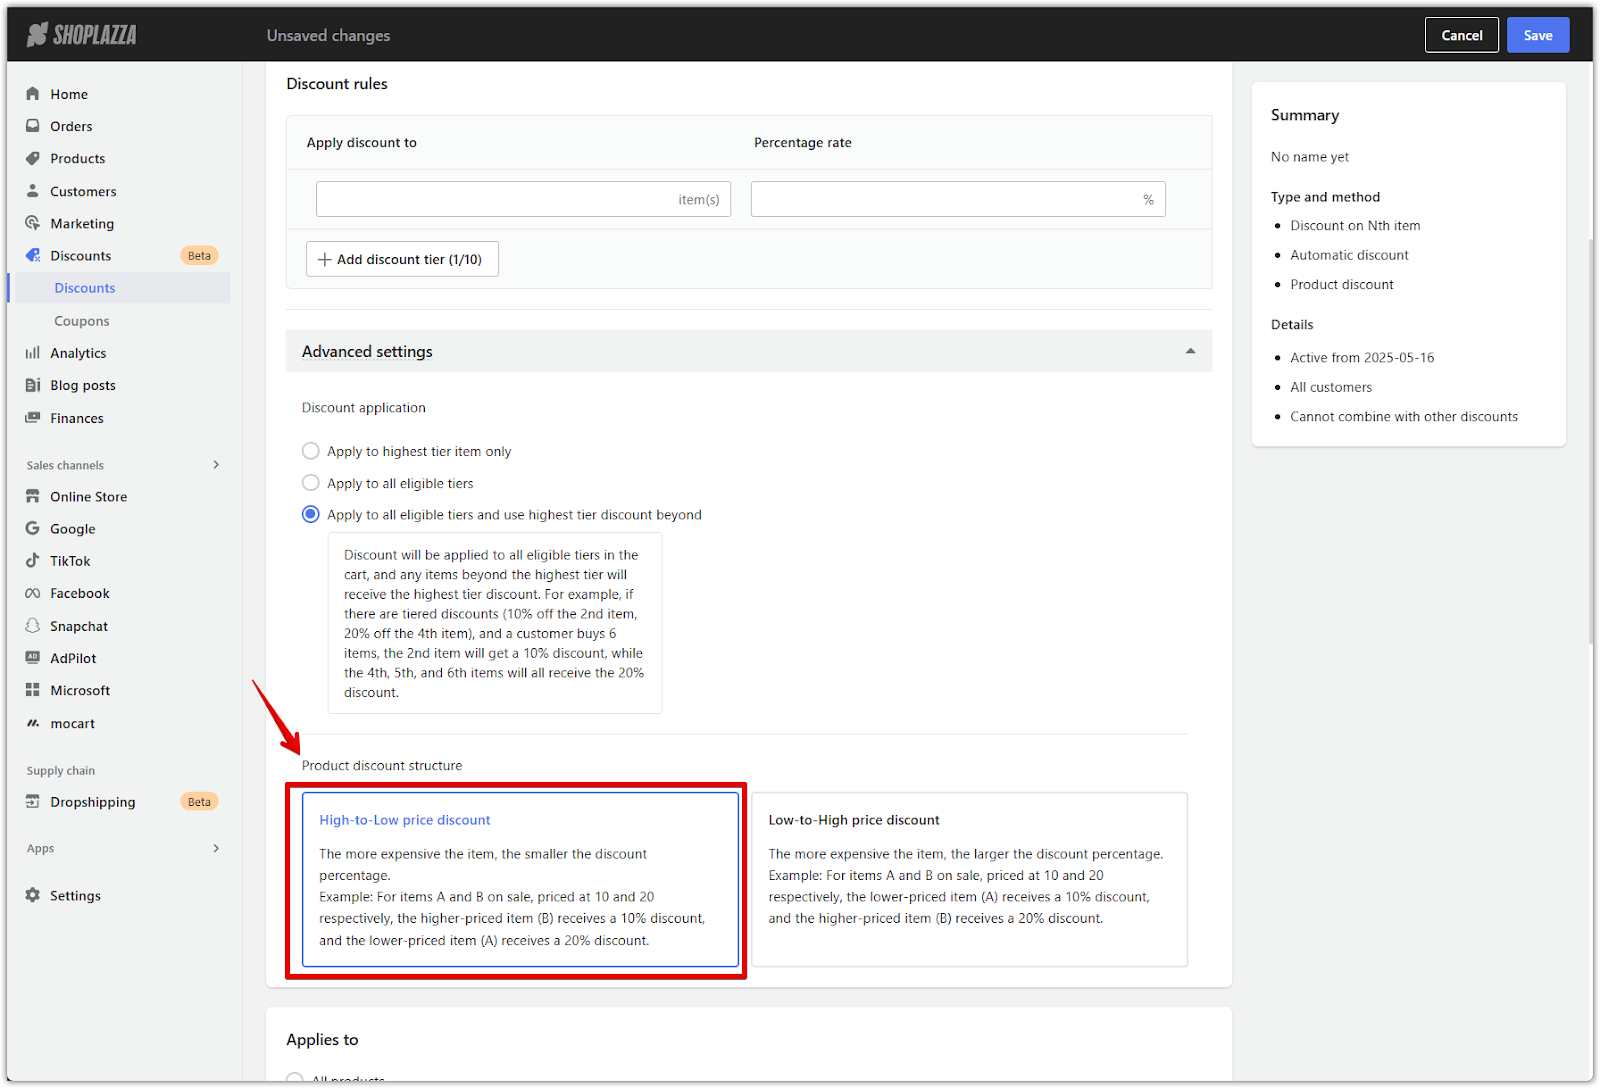
2. Low-to-high price discount: The lowest discount rate is applied to the lowest-priced item, and the higher rates are applied to more expensive items. In the same scenario, the 10 percent discount would be applied to the 10 dollar item and the 30 percent discount would be applied to the 20 dollar item, saving the customer 7 dollars in total. This method provides more value to the customer.
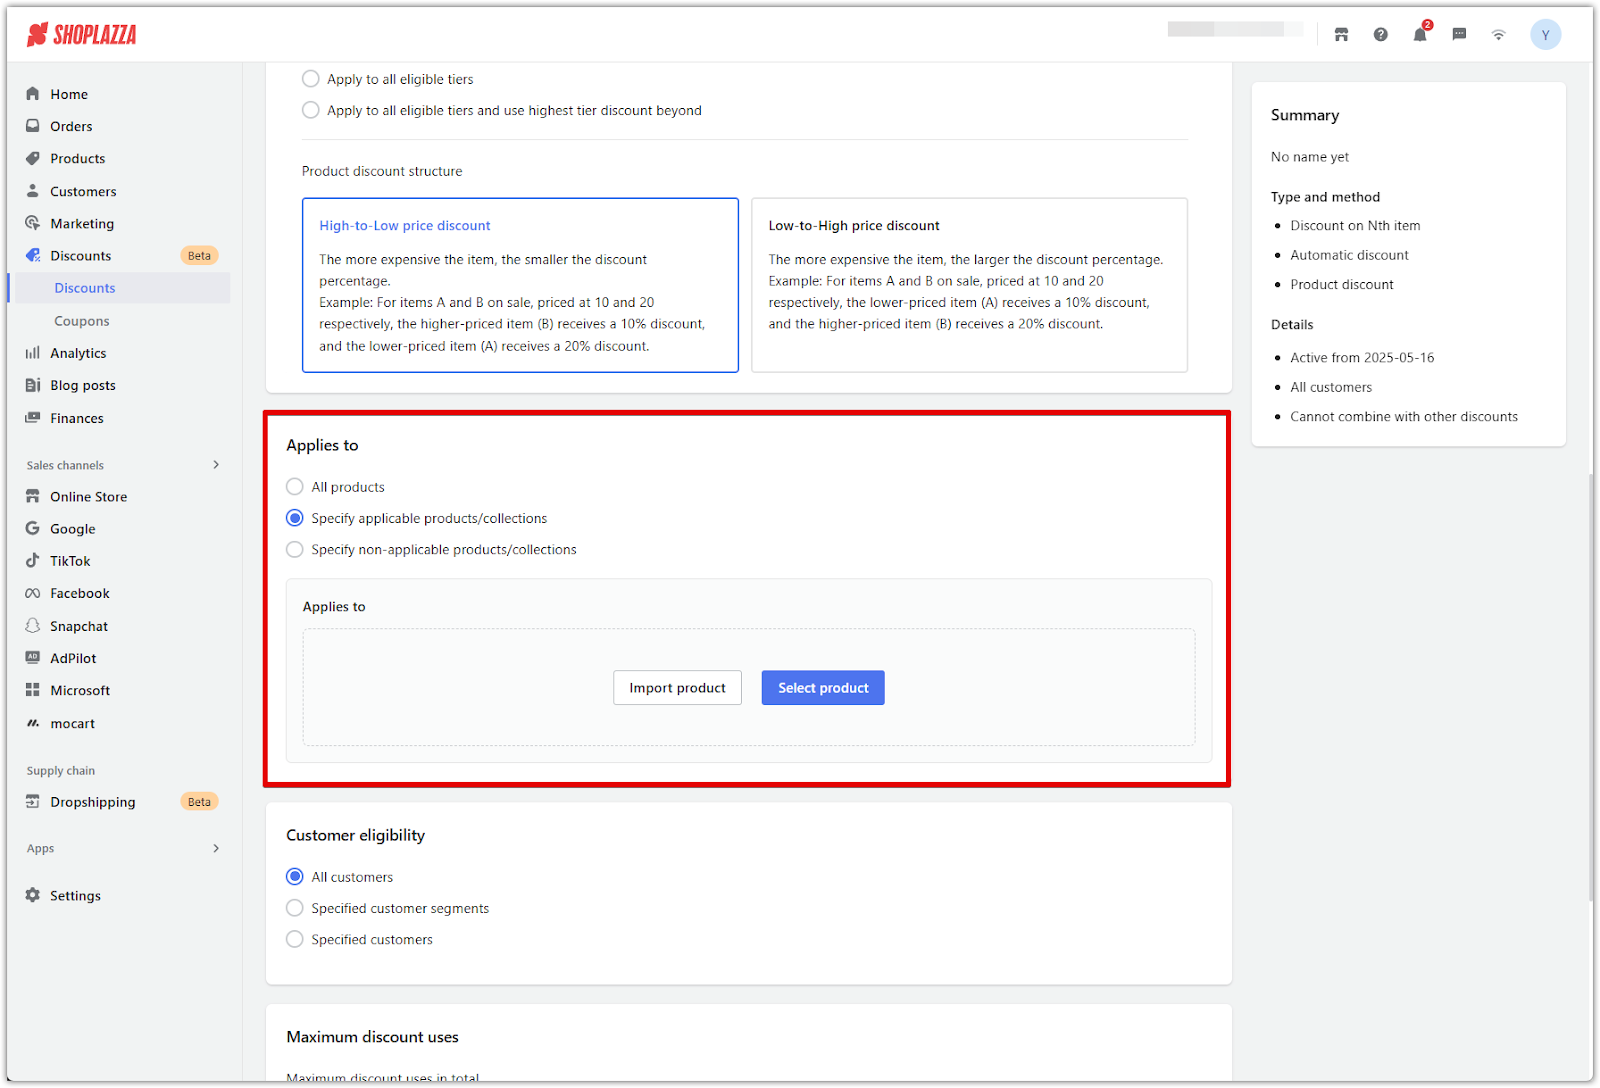
Applicable products
Select which products the discount should apply to and control how those products are displayed during the promotion. This setup helps tailor your campaign to match your marketing goals, whether you're promoting a specific collection or running a storewide event.
1. Choose which products the discount applies to: Select one of the following options to define the product scope. If either of the last two options is selected, additional tools appear for sorting and displaying products.
- Apply to all products: The discount applies to your entire store, making it ideal for broad sales events.
- Apply to specific products or collections: Limit the promotion to selected items or groups. A product list will appear, allowing for sorting, selection, and visual arrangement.
- Exclude specific products or collections: Keep the discount active on most products while excluding certain items, such as bestsellers, low-inventory SKUs, or protected brands.
2. Use sorting to organize how products are displayed: When working with a filtered product list, use the Sort by dropdown to arrange items by name, price, or sales data. This determines the display order on the landing page and homepage banner.
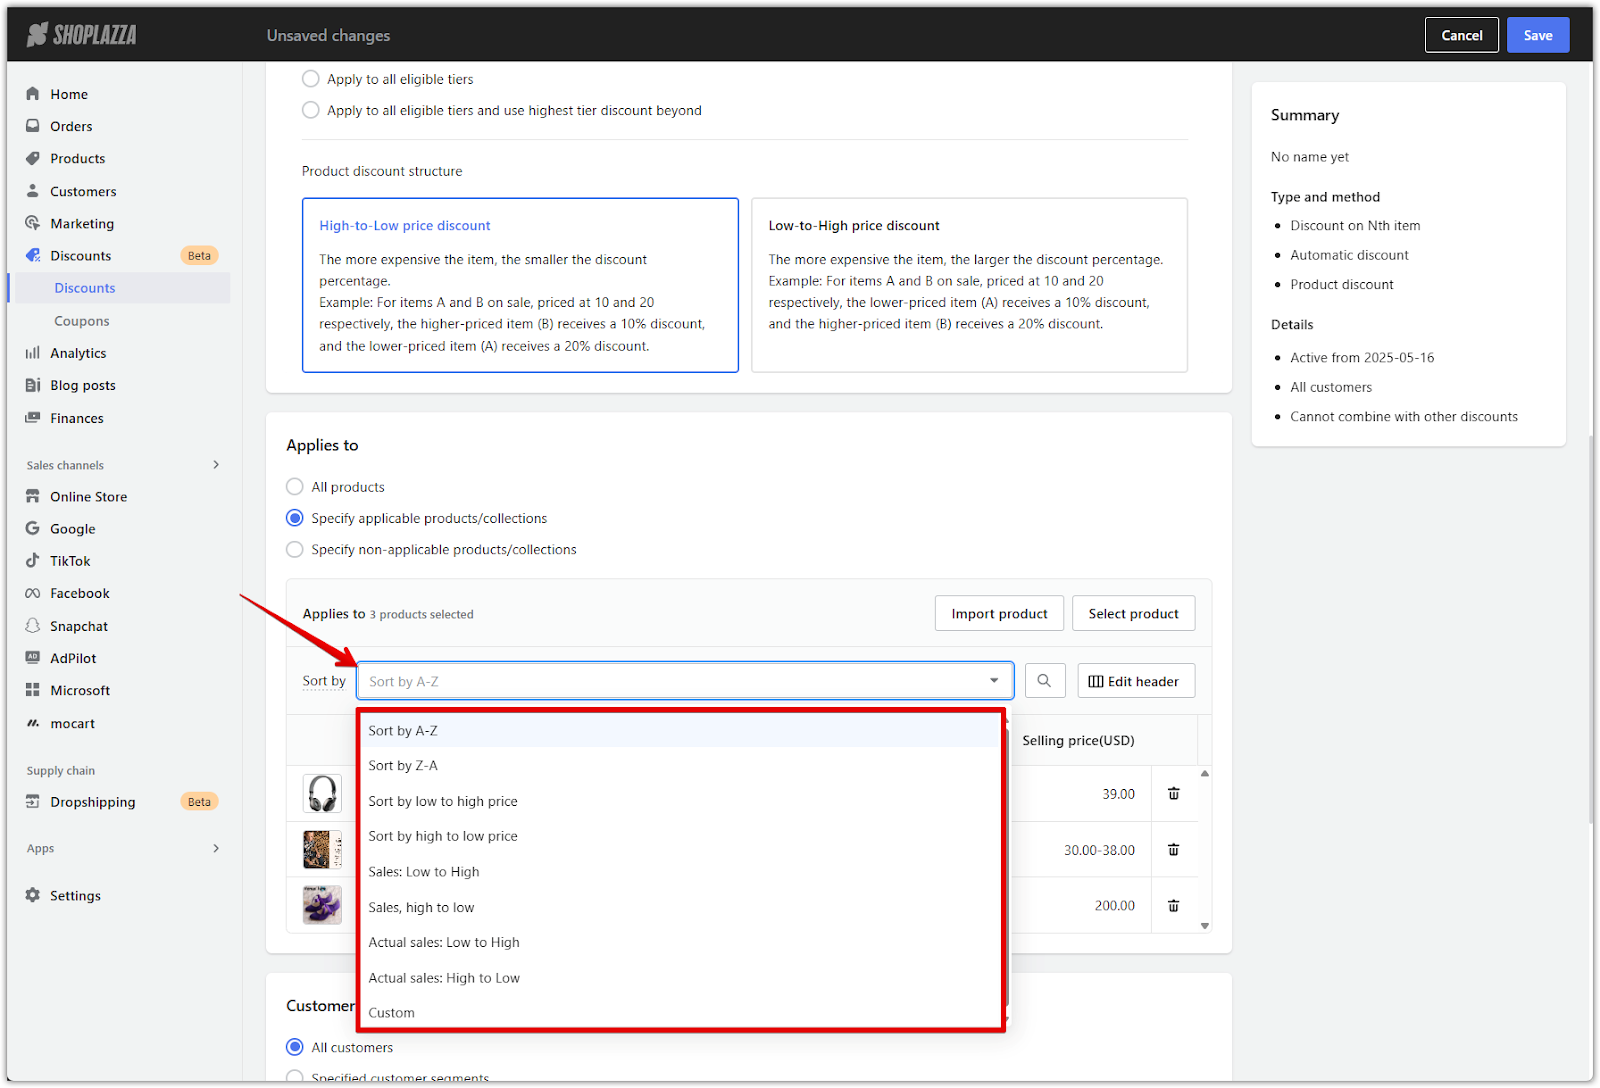
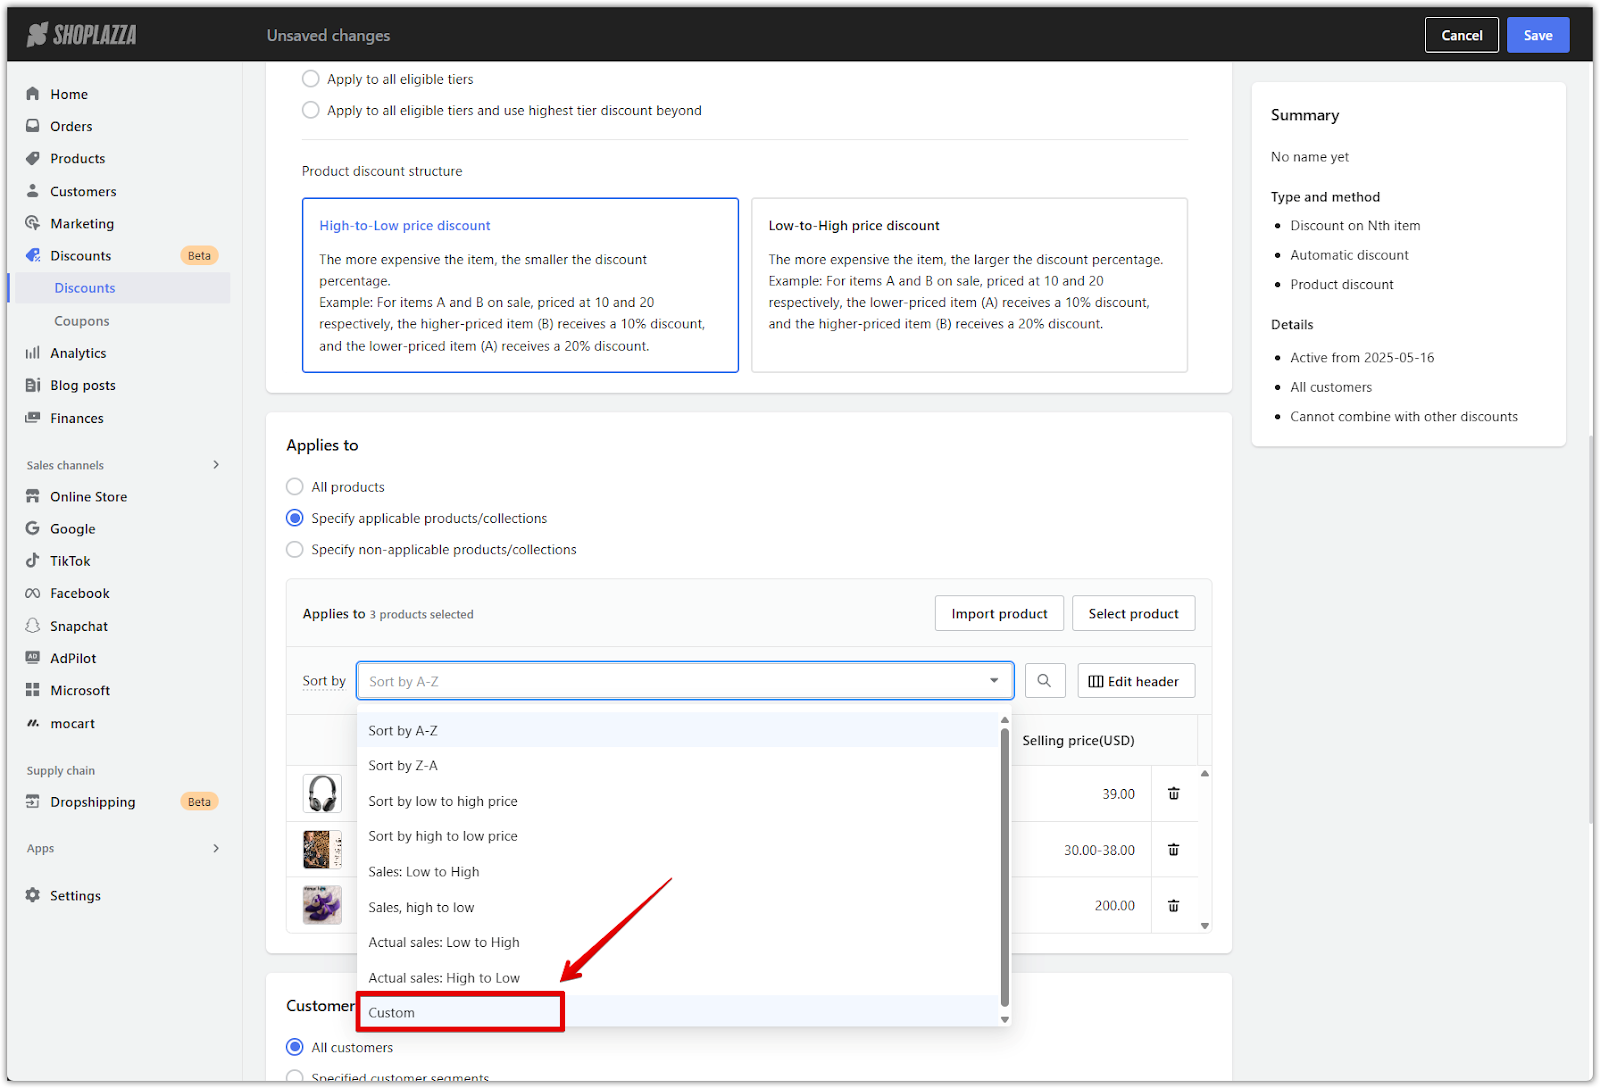
3. Select Custom to manually reorder items: Choosing Custom enables drag-and-drop functionality. This allows you to control which products appear first, helping you highlight key items and influence customer attention during the campaign.
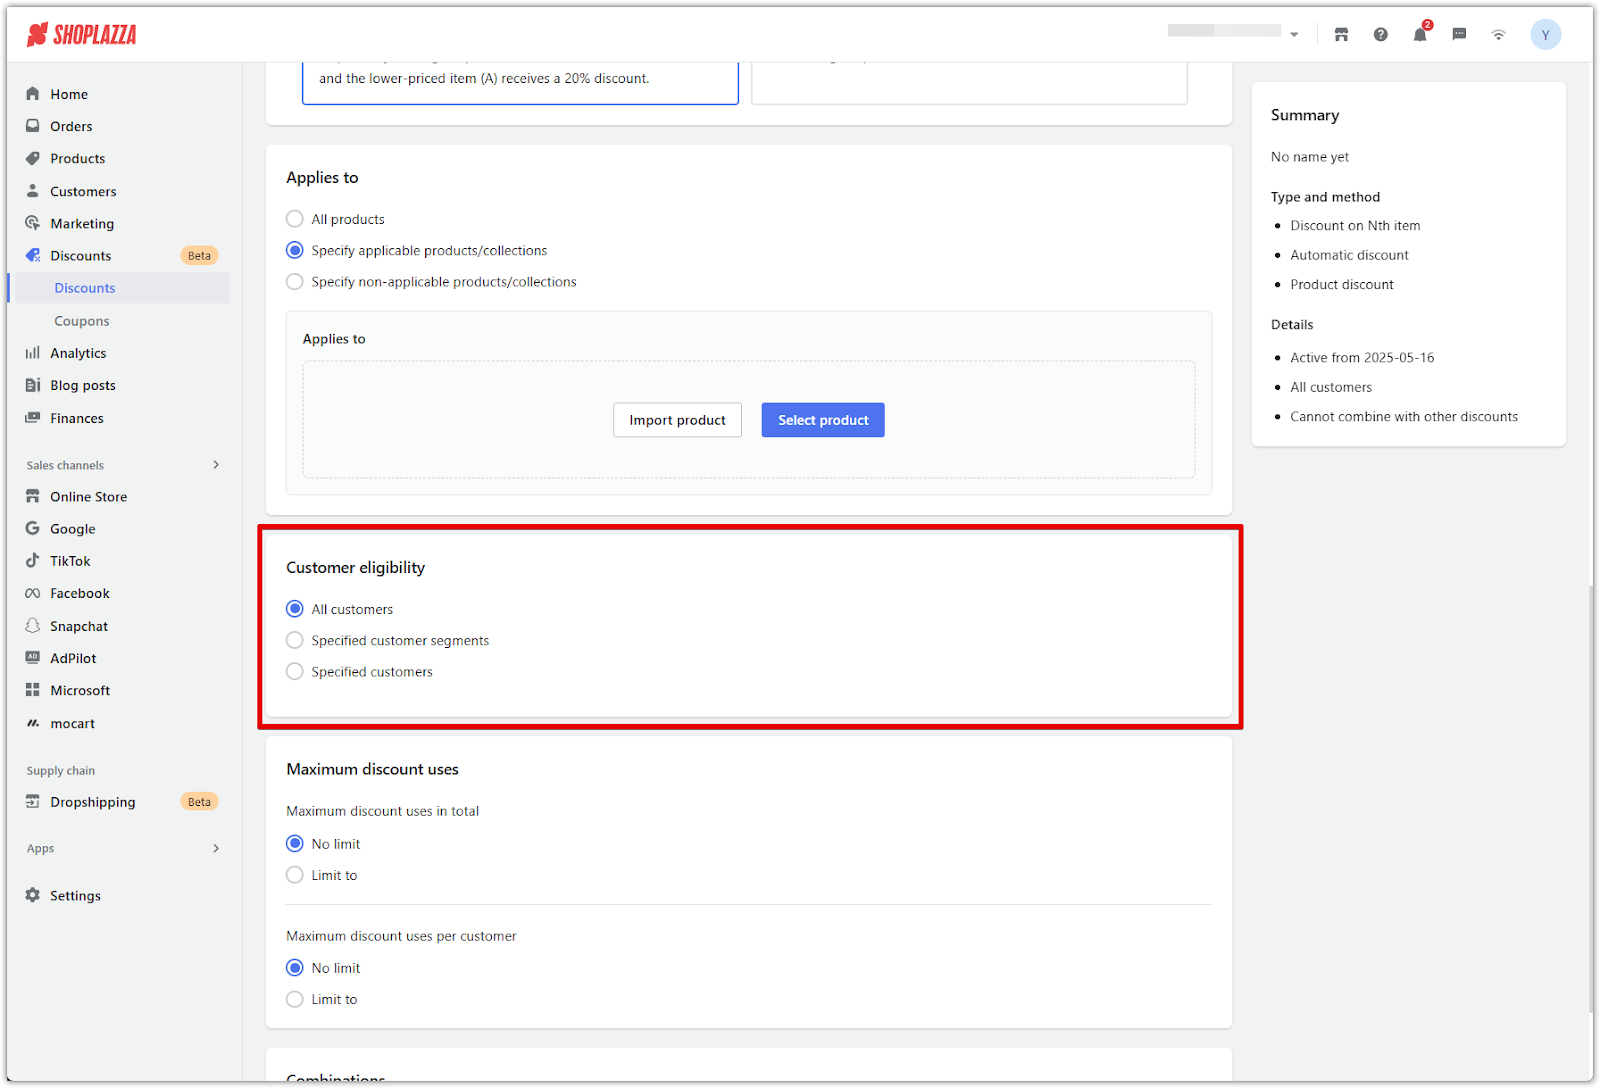
Customer eligibility
Use this section to define which customers are eligible for the discount.
Define who can access the promotion based on customer groups or individual selection. This setting allows the discount to be used in targeted campaigns, loyalty programs, or exclusive offers.
1. Select who is eligible for the discount: Choose from the available options depending on how widely the promotion should apply.
- All customers: Makes the discount available to everyone who visits the store. This is ideal for public sales or seasonal campaigns.
- Specified customer segments: Apply the discount to pre-defined customer groups, such as loyalty members, wholesale buyers, or customers who meet certain conditions.
- Specified customers: Manually select individual customers. This is useful for personal promotions, private offers, or invitations to high-value clients.
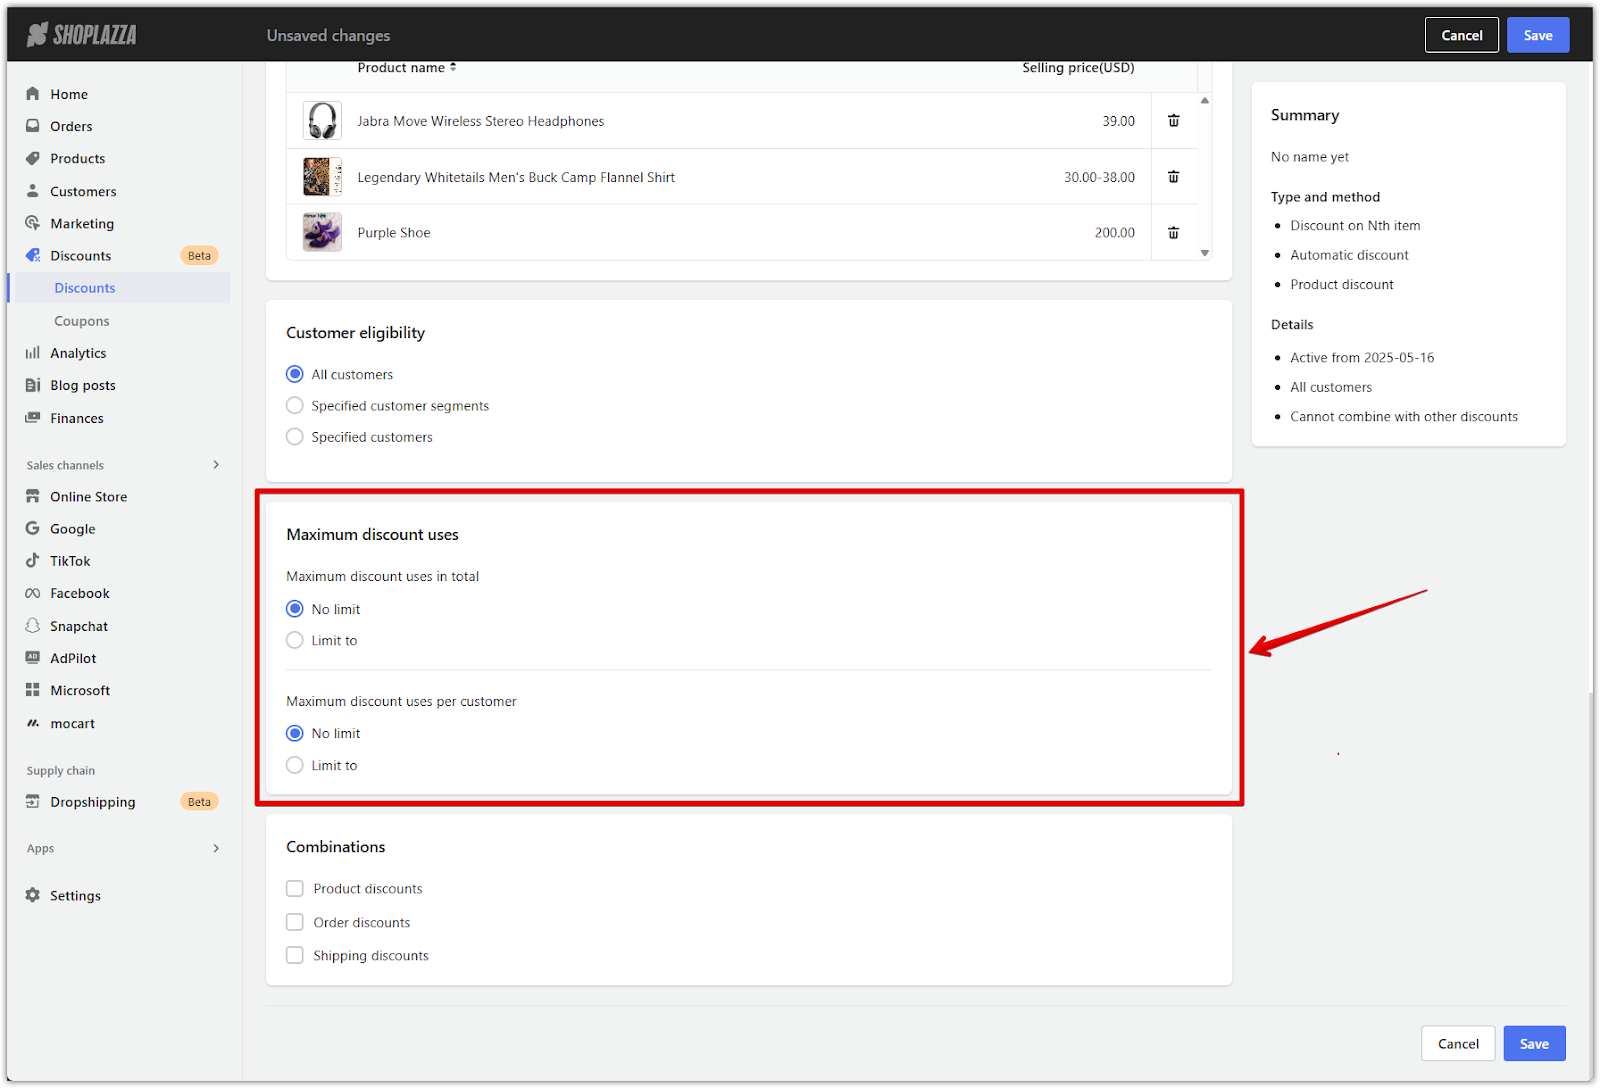
Maximum discount usage
Apply limits to control how many times the discount is used, both storewide and by individual customers. These settings help prevent overuse and maintain the integrity of your campaign.
1. Set usage limits to manage how the discount is applied: Choose whether to restrict the number of times the discount can be used in total and per customer.
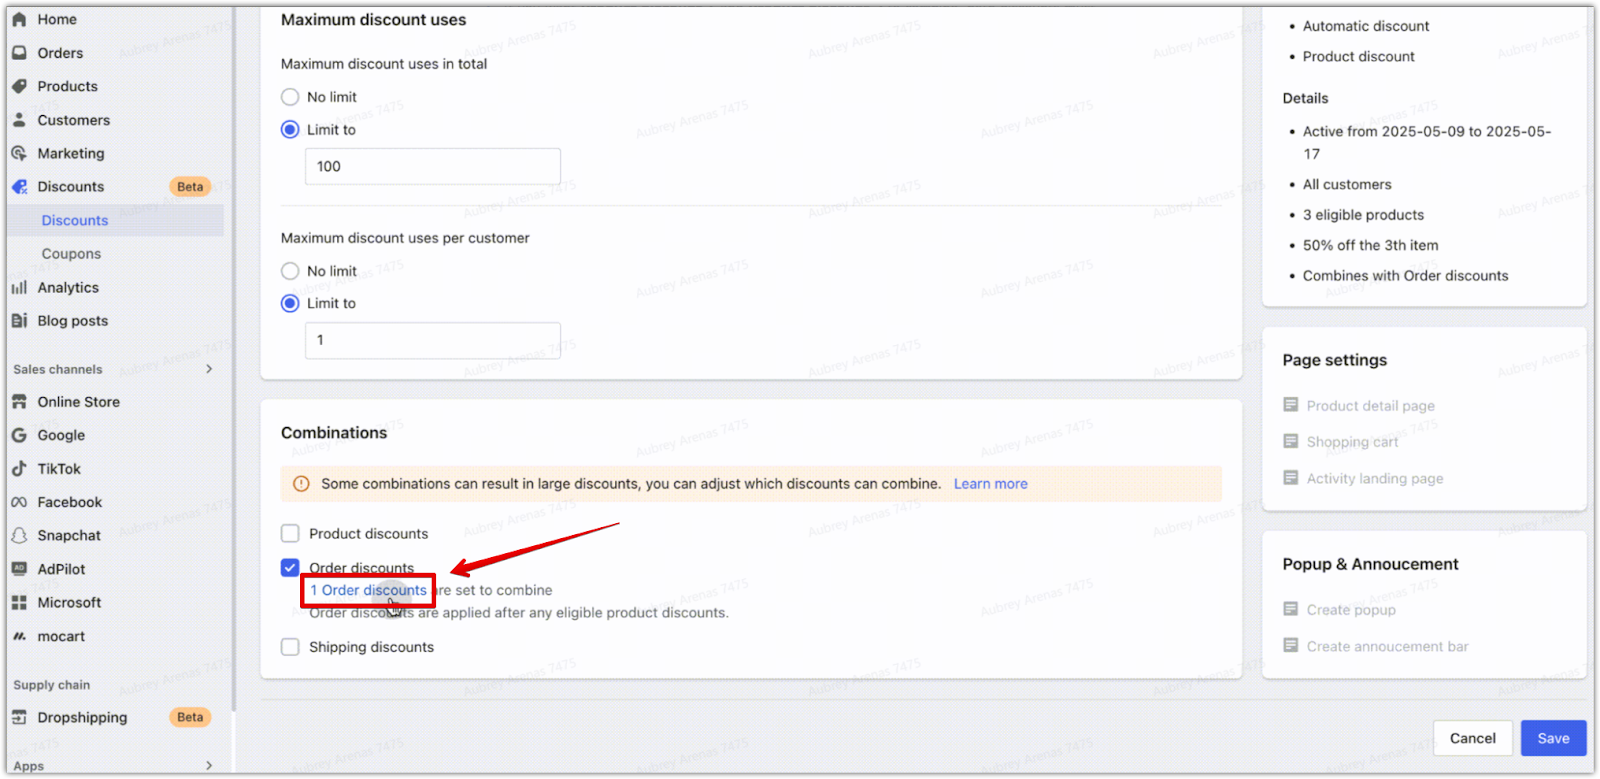
- Maximum discount uses in total: Select Limit to and enter a number to define the total number of times the discount may be used storewide. Leave it set to No limit to allow unlimited redemptions. Once the total number is reached, the promotion automatically becomes inactive.
- Maximum discount uses per customer: Use Limit to if each customer should only be allowed a specific number of redemptions. For example, when set to one use per customer, only one order will qualify for the discount, even if the customer places multiple orders with eligible items.
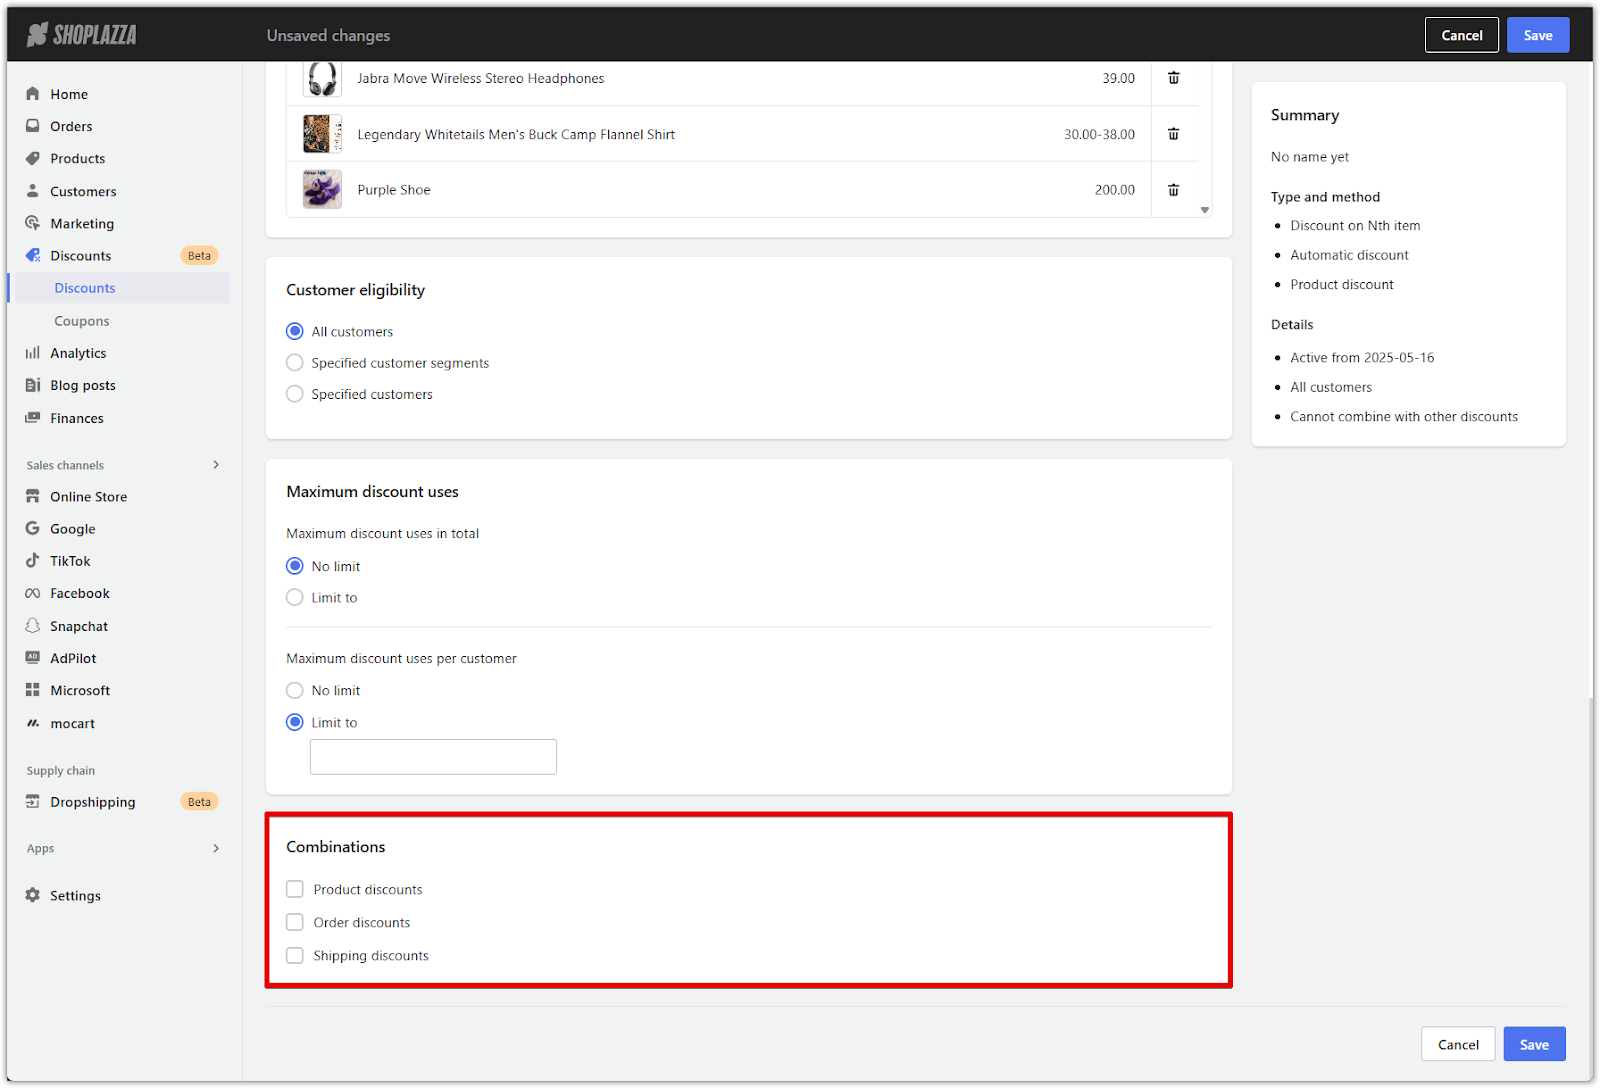
Combinations
Choose whether this flash sale discount can be combined with other automatic discounts. Combinations help you control how multiple promotions interact, ensuring customers receive the highest-value offer available.
When multiple discounts apply, the system automatically compares all eligible options and applies the one with the greatest total value. Product discounts are applied first, followed by order discounts. Shipping discounts apply only if they are compatible. Discount codes are calculated after they’re entered at checkout. Only one shipping discount can apply per order.
For combinations to work, each discount must have the other types selected in its combination settings. For example, to combine a product discount with an order discount, both types must be enabled in the respective campaigns.
A store can have up to 25 automatic discount activities active at the same time, including Flash sale, Amount off, and Discount on Nth item. Discounts created through the Gifts or Bundling app follow product discount rules but are excluded from optimal discount calculations. These app-based discounts may still combine with other offers if allowed.
1. Choose which discount types can be combined: Check the boxes for the discount types that should be allowed to work alongside this one.
- Product discounts: Allows this promotion to combine with other product-level discounts, such as percentage off or buy one get one offers.
- Order discounts: Allows this discount to work with promotions based on order value, such as "$10 off orders over $100."
- Shipping discounts: Allows this promotion to apply alongside free shipping or reduced-rate shipping campaigns.
2. Enable combinations in campaigns: For two discounts to be combined successfully, they must have the other’s type selected in their combination settings. For example, if a product discount is meant to combine with an order discount, both campaigns need to have the corresponding boxes checked.
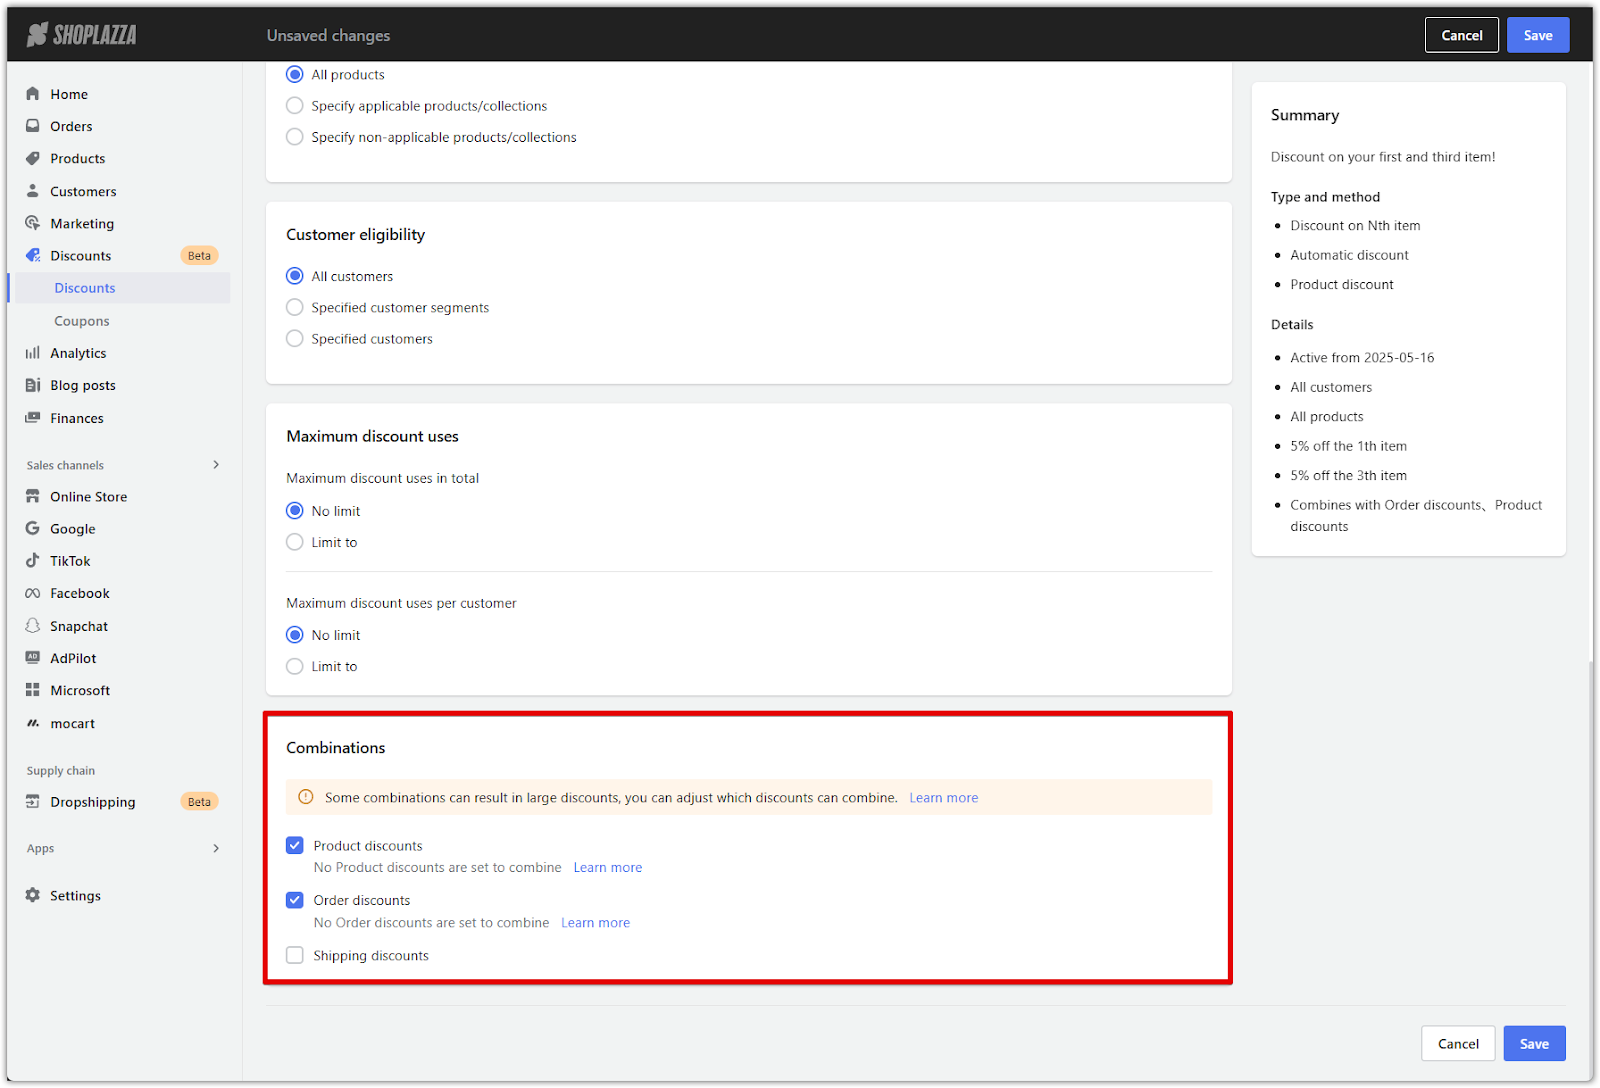
3. Review eligible combinations before saving: Once the settings are selected, the system displays how many other discounts currently meet the combination criteria. Click to view and confirm which active campaigns will work with this one.
Review and save
Before finalizing the promotion, take a moment to review all the configured settings using the Summary panel on the right side of the screen. This panel provides a quick snapshot of your discount setup, making it easy to confirm that everything is accurate before activation.
- Check the key details: The summary shows your discount name, type, and method, along with important rules such as who the promotion applies to, which items are included, how the discount tiers are structured, and whether combinations are enabled.
- Confirm tier accuracy and eligibility: Review the item positions and discount percentages listed under Details to ensure that they reflect your intended offer. If anything looks off, return to the corresponding section in the setup to make changes.
- Click Save to activate the discount: Once everything is confirmed, click Save in the top-right corner. The promotion will go live according to the schedule you defined and will follow all the behavior configured during setup.
Customize storefront display
Decide how your Discount on Nth Item will be displayed to customers across your storefront. You can apply overall settings rules for all Nth Item campaigns, or customize the appearance for an individual campaign.
Set up overall display settings for Discount on Nth Item campaigns
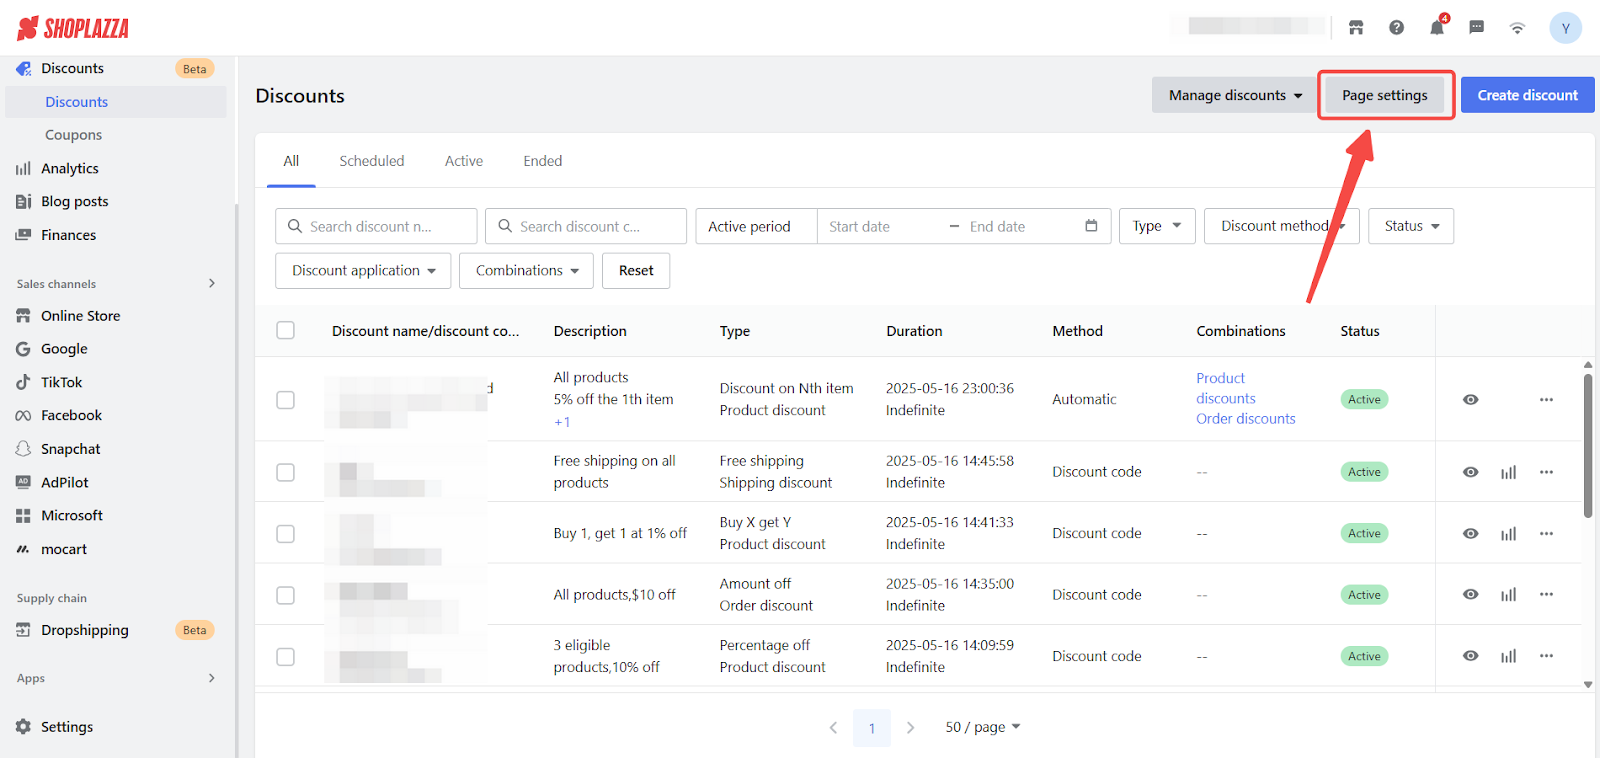
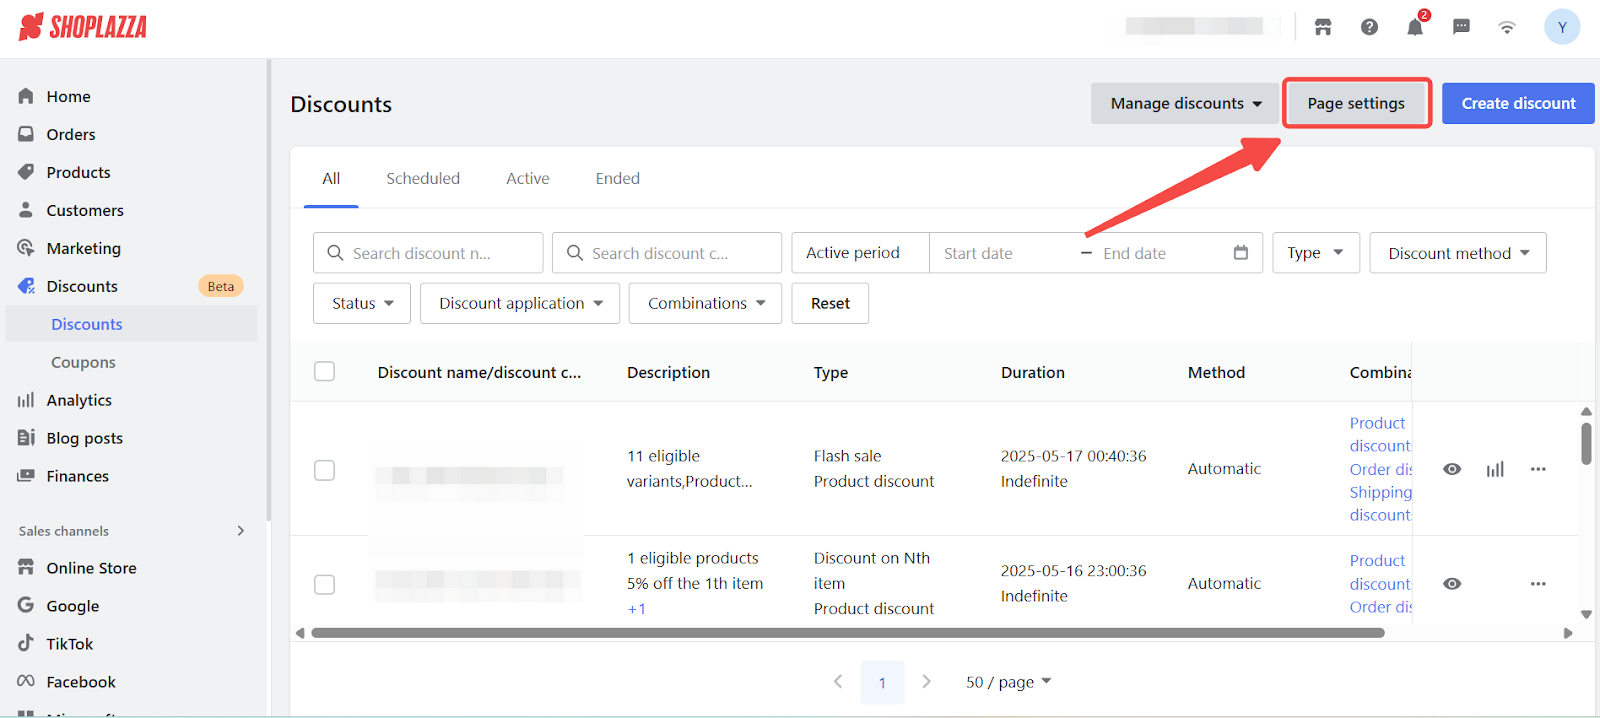
1. Access your display settings: Go to the Discounts page in your admin and click Page settings in the top-right corner.
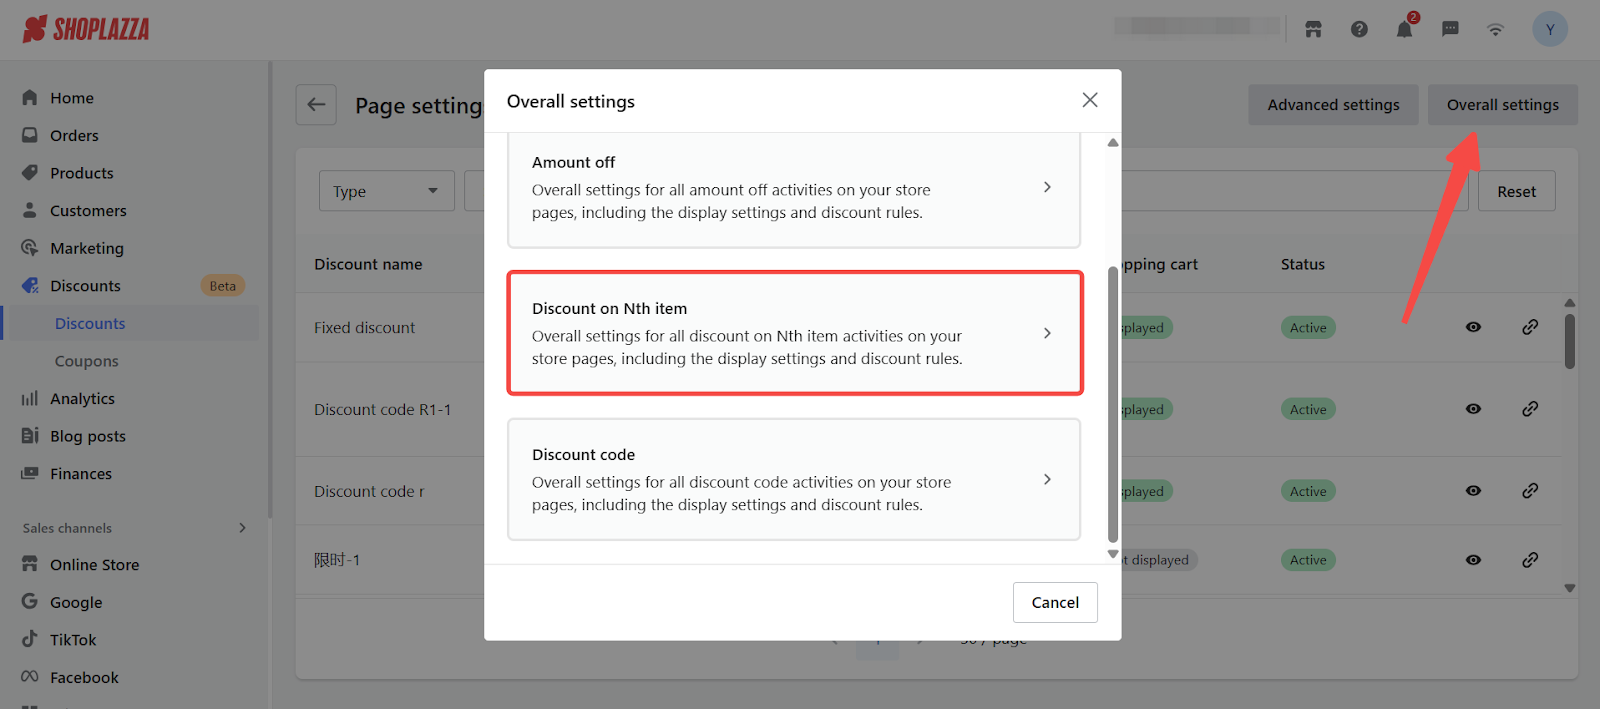
2. Open overall Discount on Nth item settings: Click the Overall settings tab, then select Discount on Nth item to access the default display settings for this discount type.
3. Customize the visual appearance:
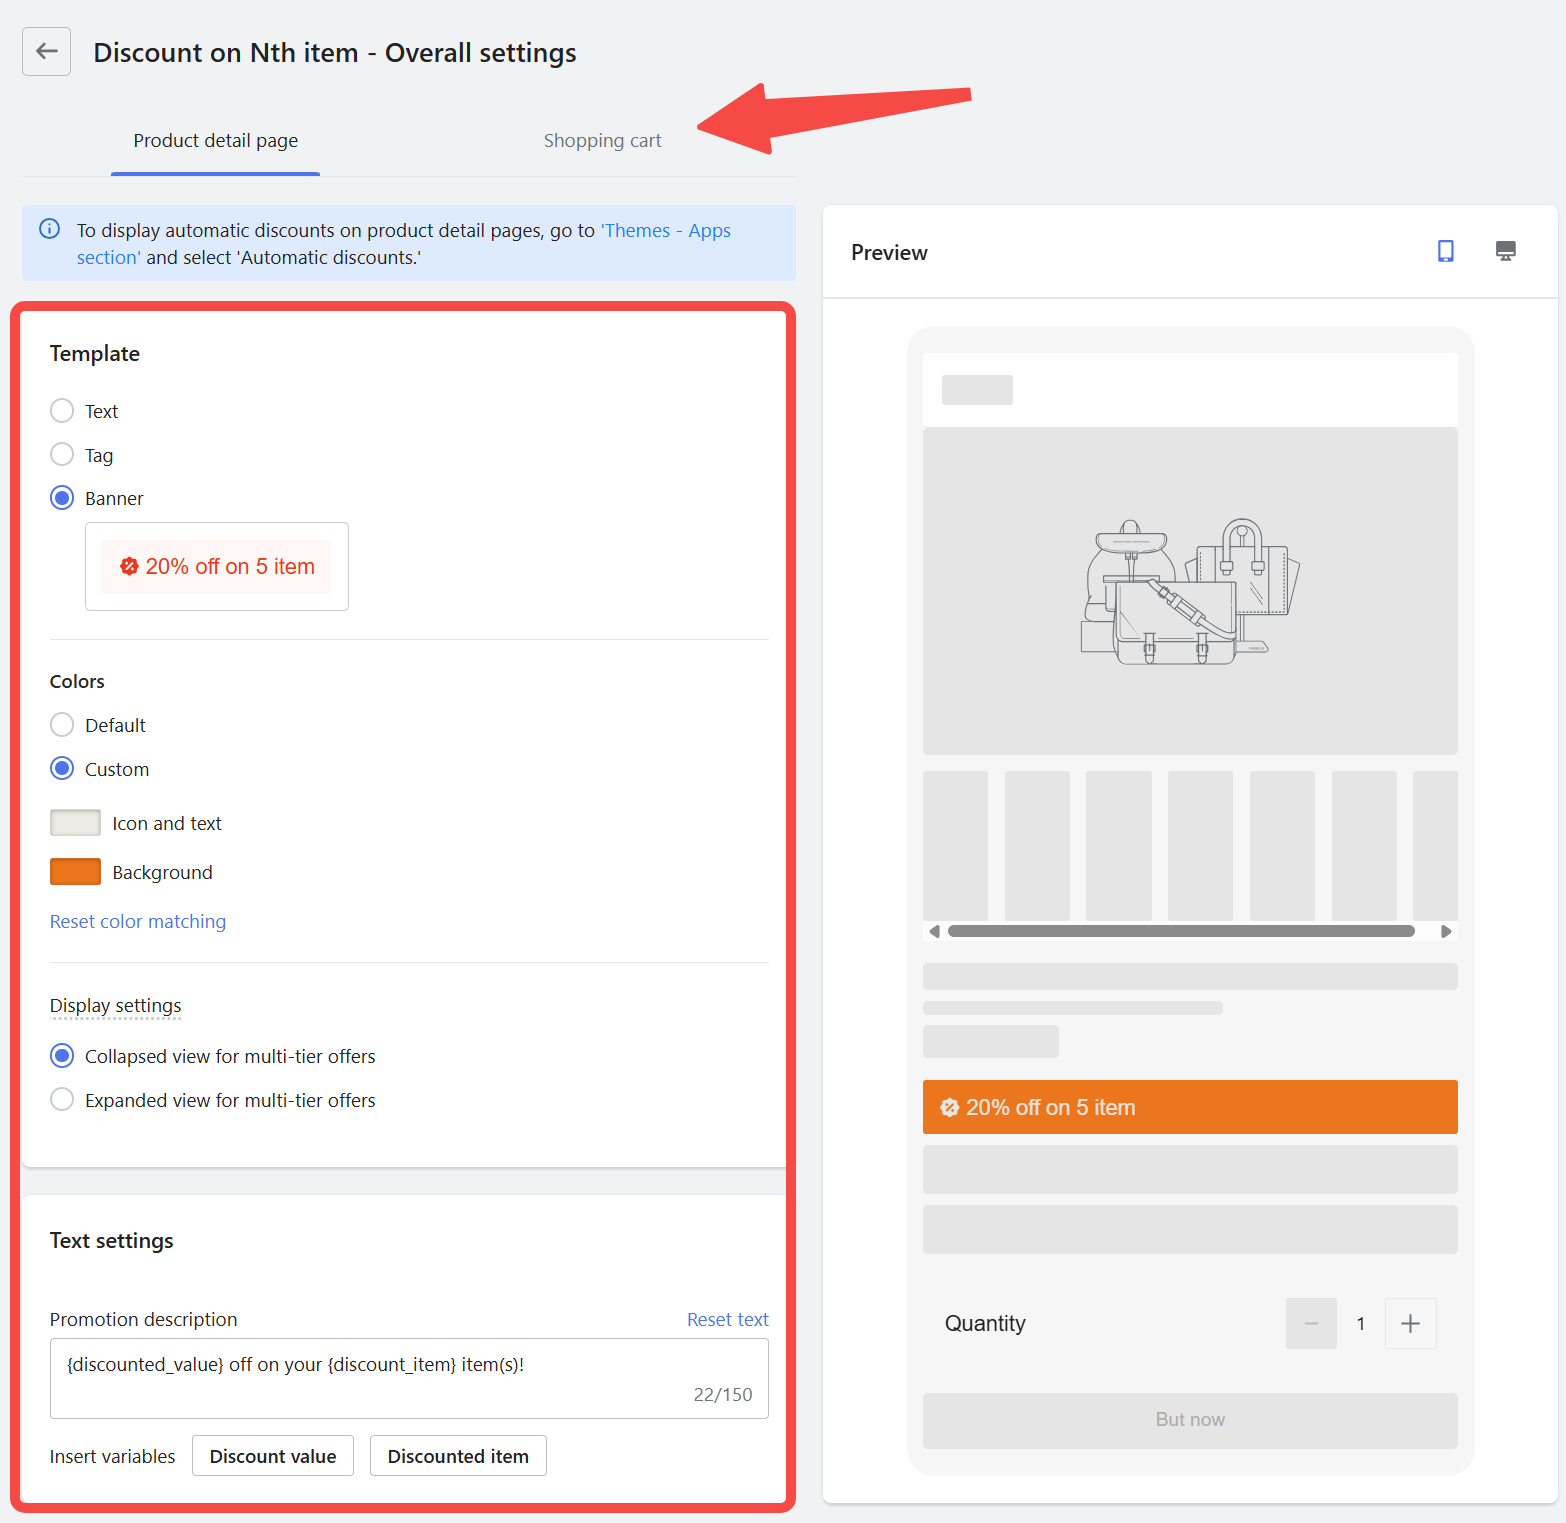
Use the settings panel to control how the Discount on Nth Item promotion appears on the Product detail page and in the Shopping cart tab.
You can:
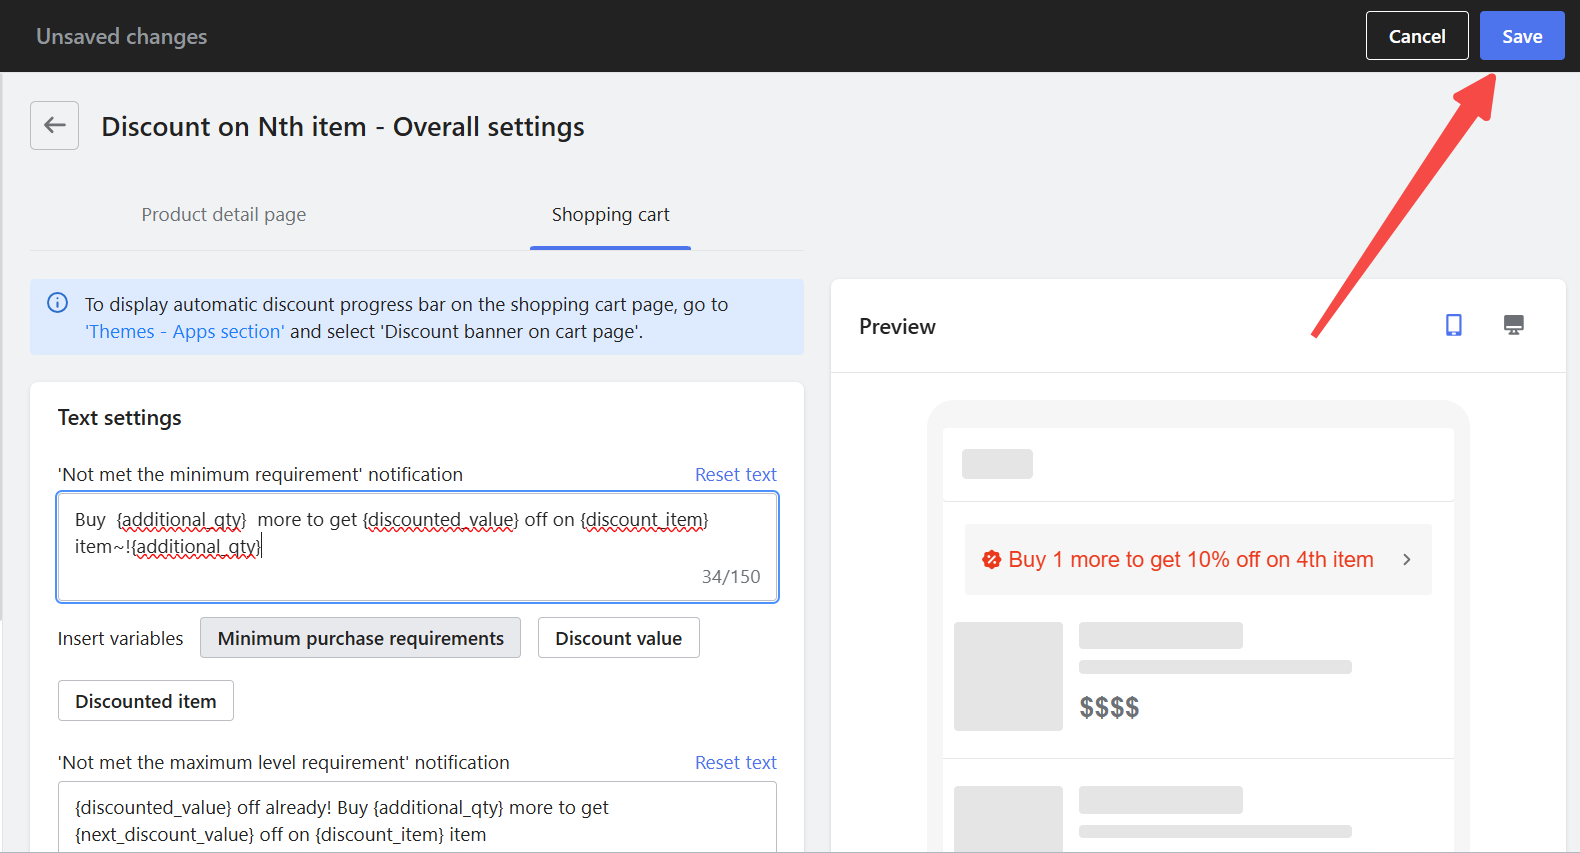
- Switch between the Product detail page and Shopping cart tabs to configure each layout independently.
- Choose your display format: Text, Tag, or Banner.
- Select your color style: use the Default theme or define Custom colors for icon, text, and background.
- Choose how to display multi-tier offers: either a Collapsed view or Expanded view.
- Customize the promotion description using text variables like {discounted_value} and {discounted_item} to automatically show dynamic values.
- Preview your settings instantly on the right to see how they will appear to customers.
4. Save your settings: Click Save to apply these overall settings to all “Discount on Nth item” campaigns.
Configuring display settings for your campaign
After saving the campaign setup, configure how the discount is displayed on your store pages. This step ensures that the promotion appears correctly on the product detail page, the shopping cart page, and the activity landing page. These settings can be customized per campaign or inherit your overall display rules.
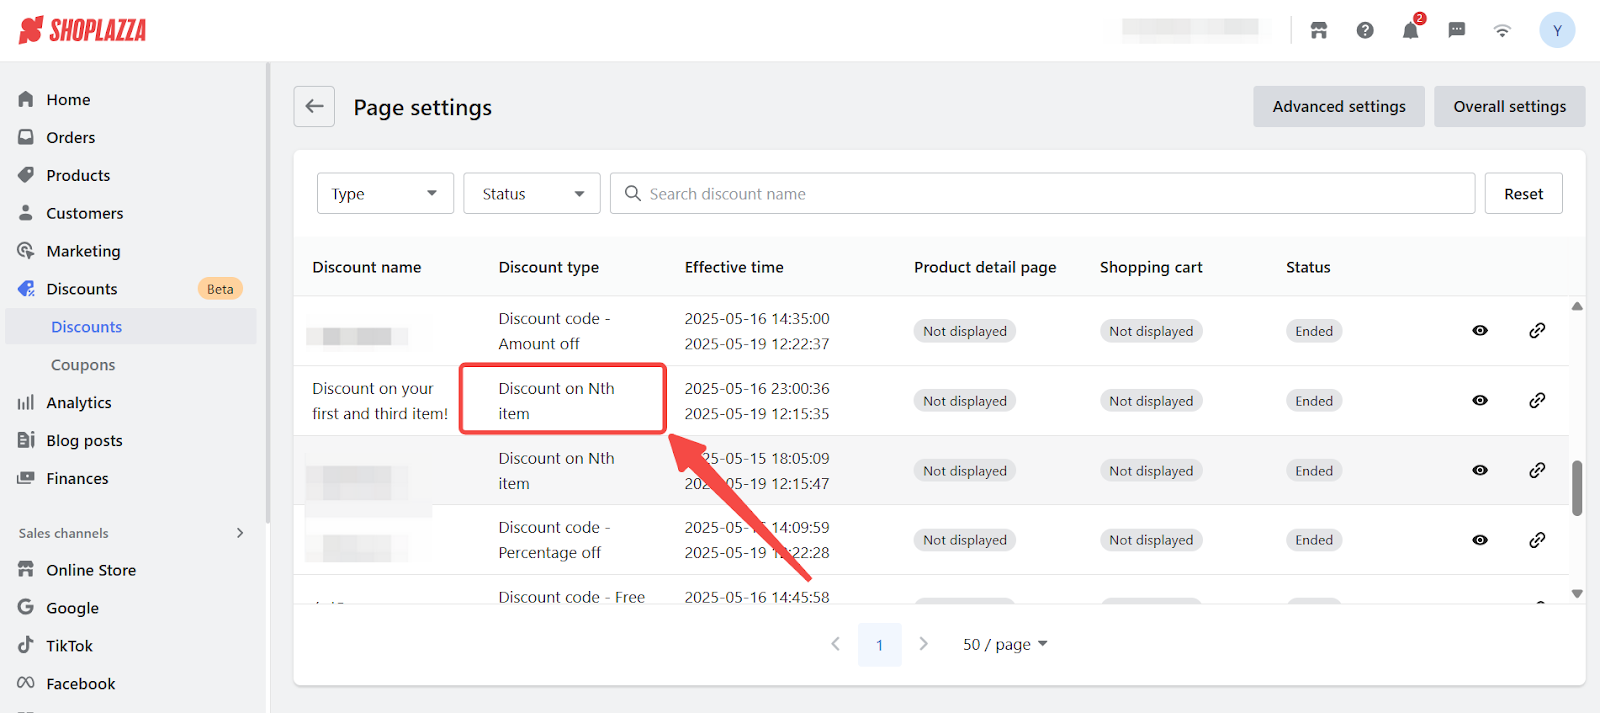
1. Open Page settings and select your campaign: Go to Discounts, then click Page settings in the upper-right corner of the screen. From the list, find the discount you just created and click into it to begin configuring the display.
2. Adjust the display for each page: Configure how the discount appears on the following pages. Each page offers its own display settings. You can customize the tier layout on the product detail page, the discount label on the cart page, and the countdown timer on the activity landing page. If you want to override the overall display settings and customize this campaign independently, disable the Same as overall settings toggle.
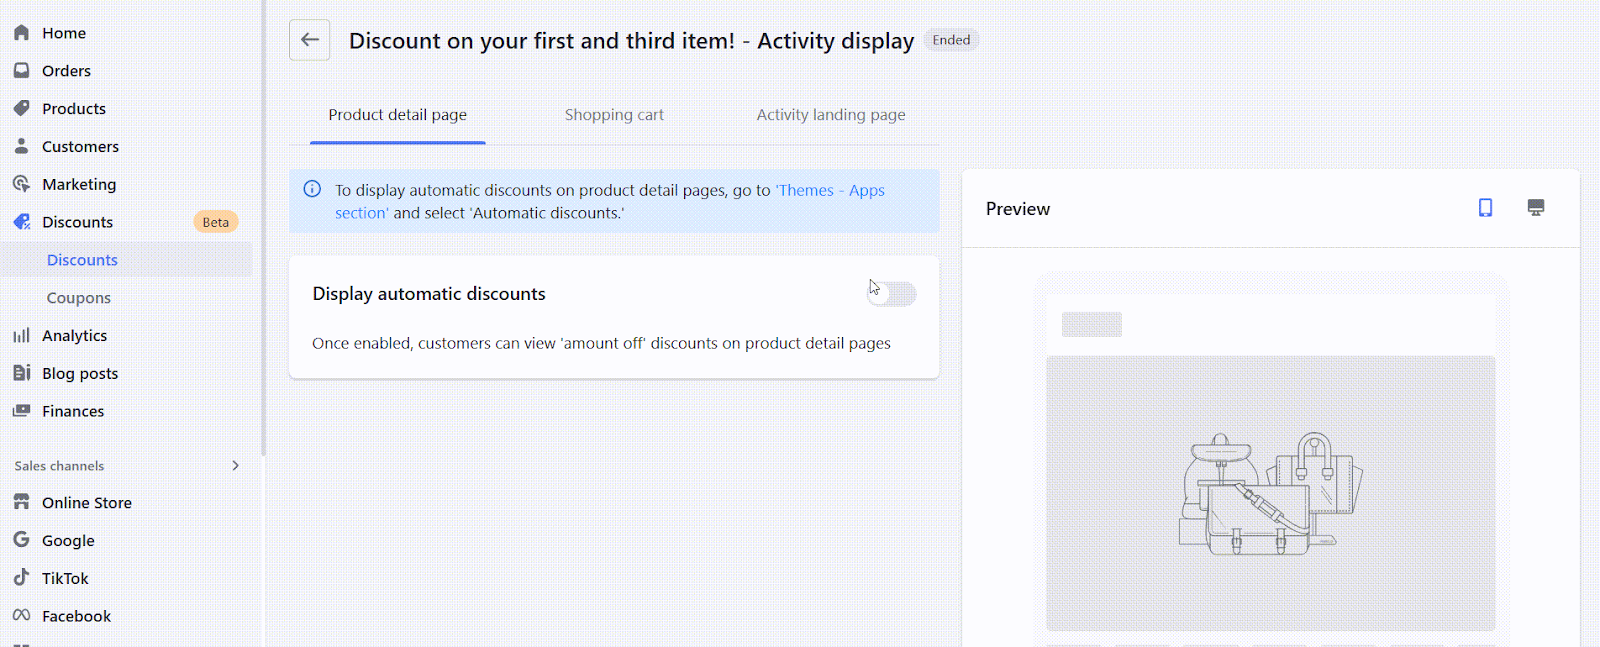
3. Product detail page
- Set how multi-tier offers are displayed: choose between Collapsed or Expanded layout.
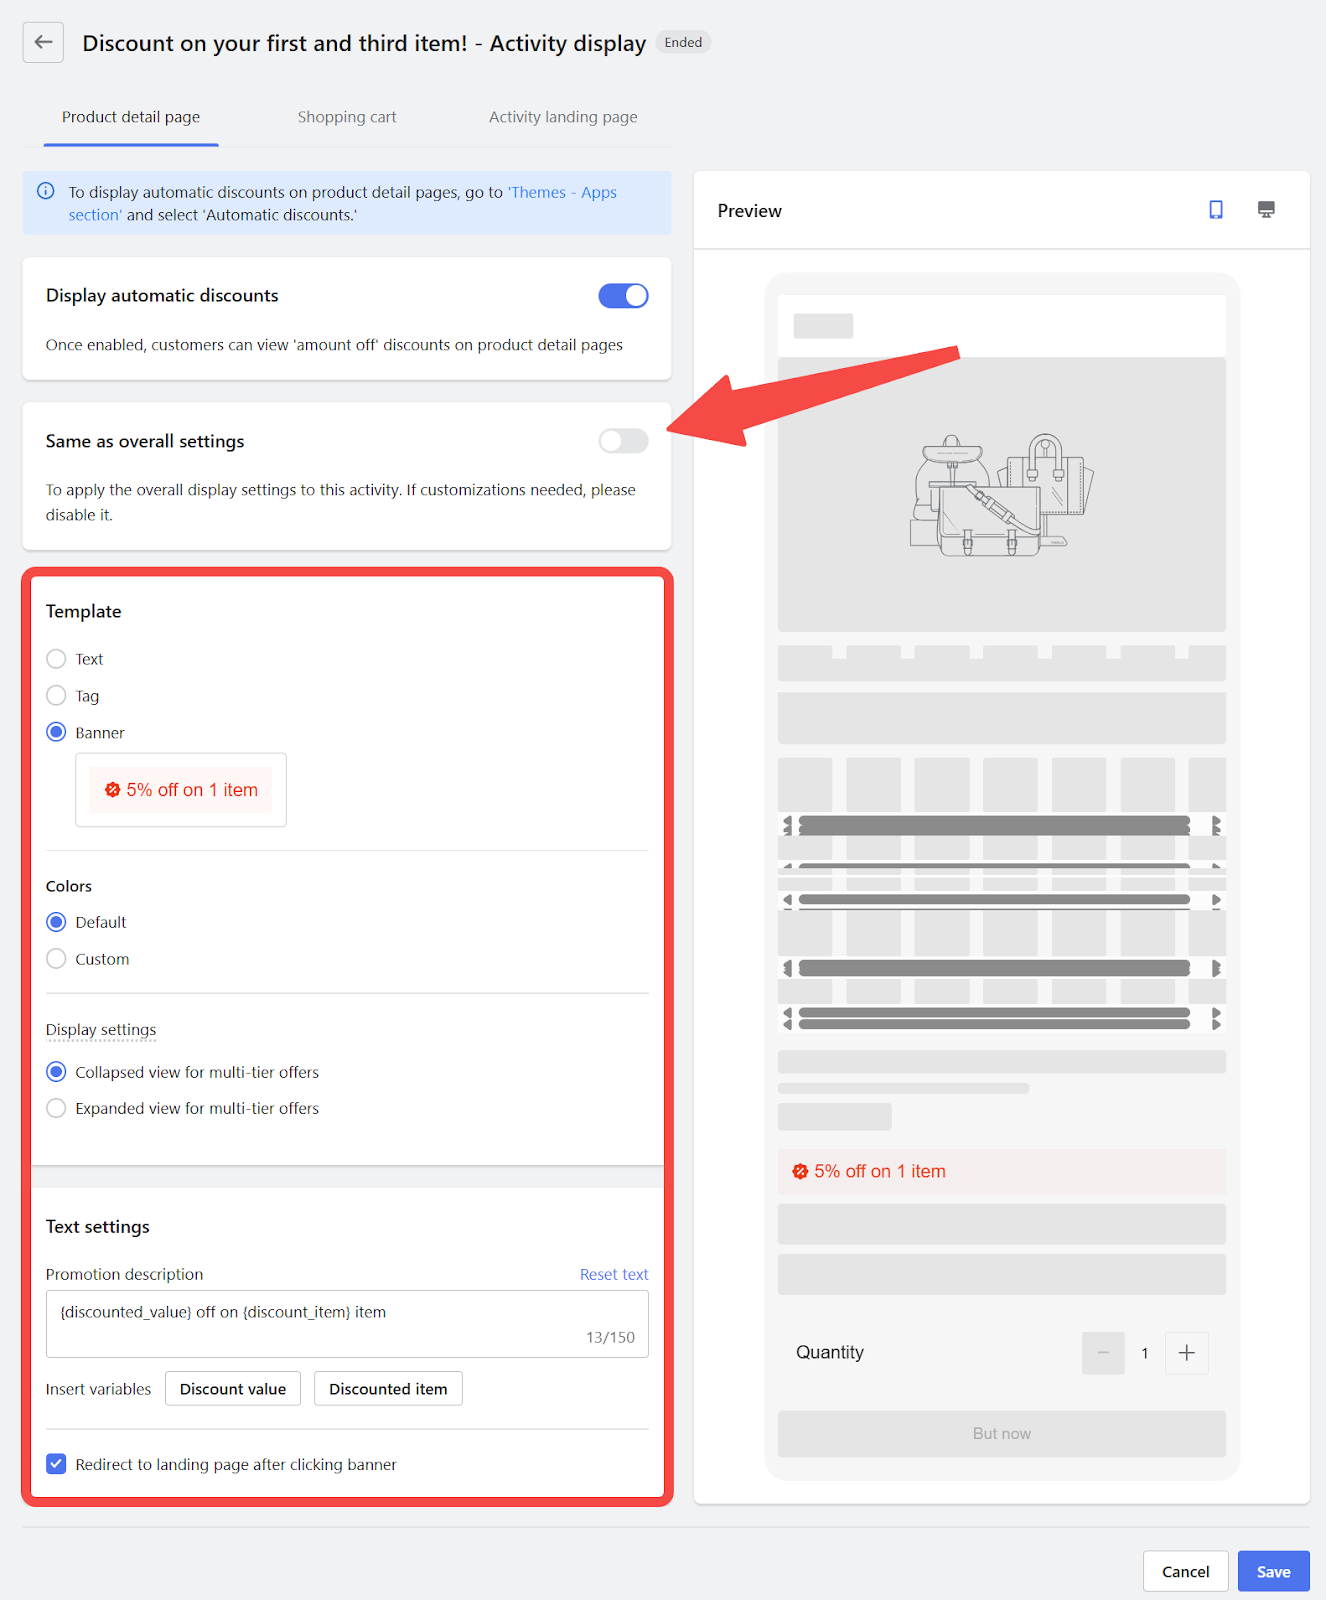
4. Shopping Cart Page
- Customize how discount tiers are presented in the cart.
- Use the Reset text option to revert to the default messaging.

5. Activity Landing Page
- Enable or disable the countdown timer. For campaigns without an end date, you can set a simulated countdown.
- Configure the discount description:
- Auto-generate the default text
- Manually edit the content as needed
- Click Reset text to restore the default version

- Access enhanced product display settings for additional customization.
Display the discount in your store
After saving your campaign, enable the display settings and connect them to your storefront using the theme editor. This ensures customers see the promotion directly on product and cart pages.
Note
The Discount automatic and Discount banner on cart page components are shared with Amount off campaigns. You only need to install them once per page.
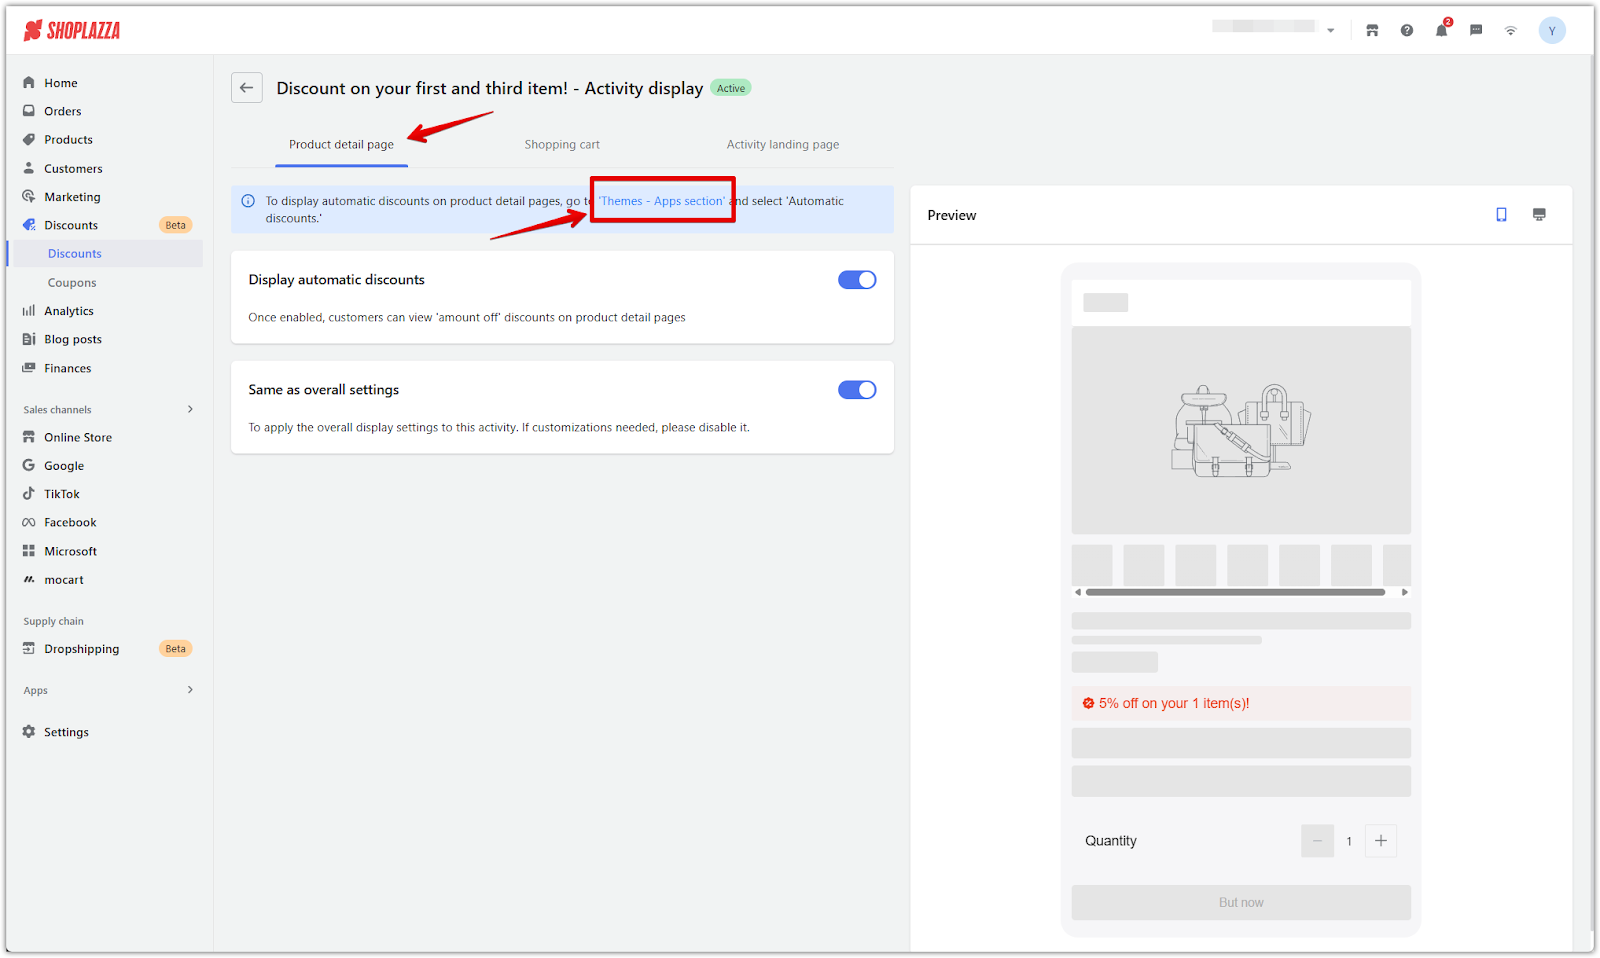
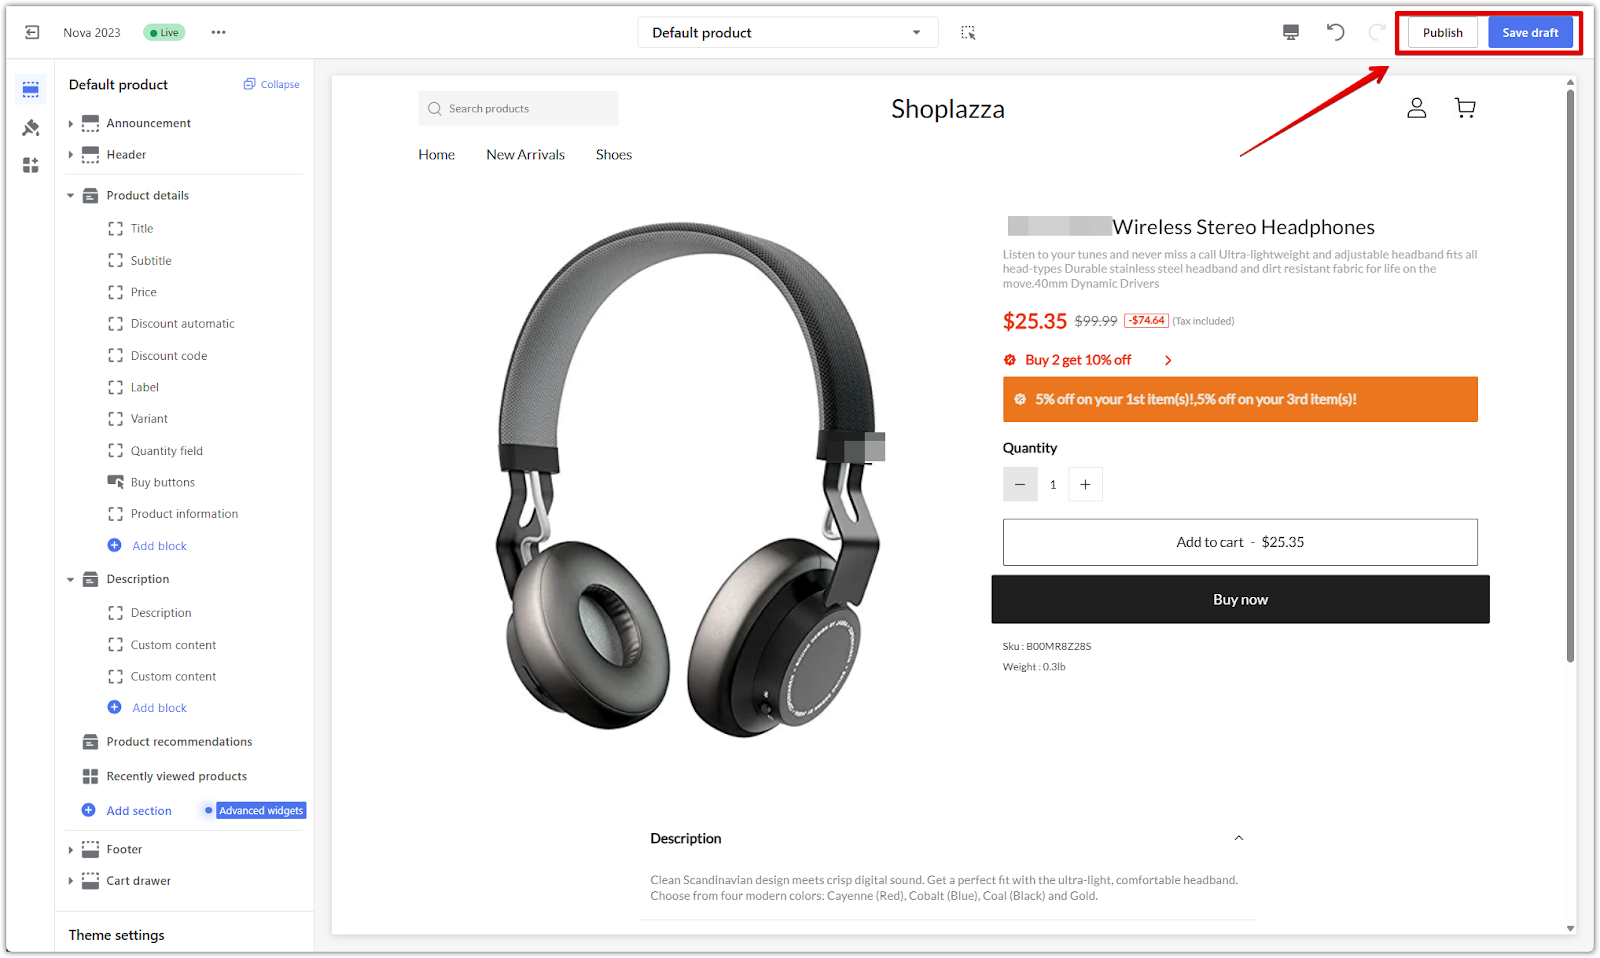
1. Access theme editor: Go back and click the Product detail page tab, then click the Themes - Apps section link. This opens the theme editor directly on your store’s default product page layout.
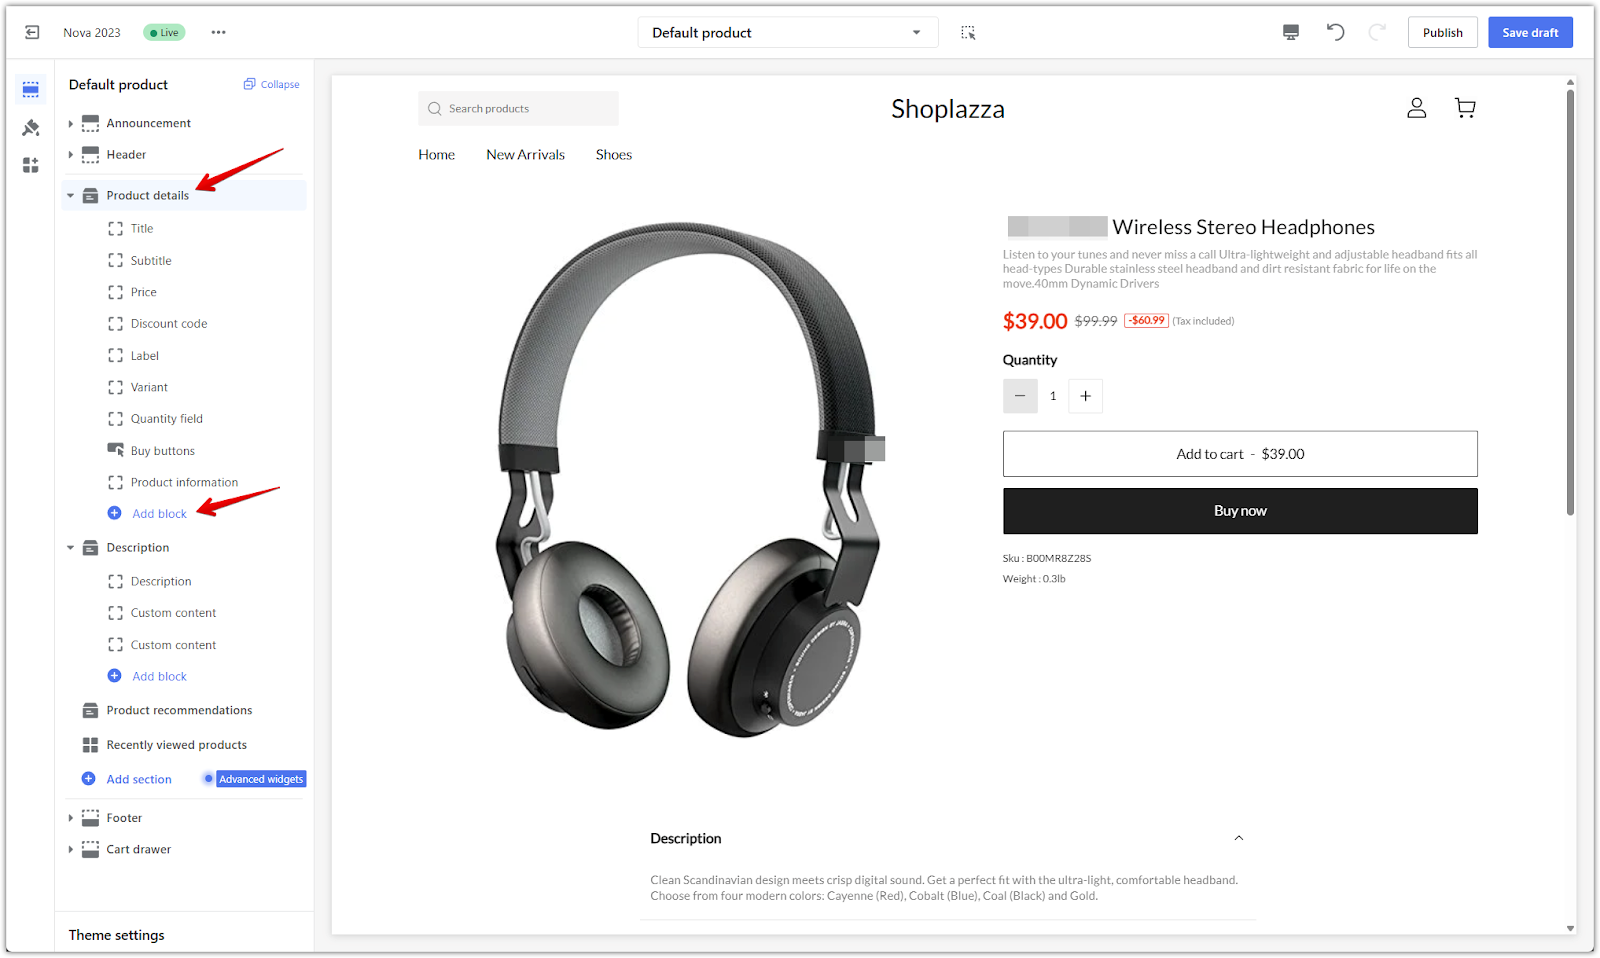
2. Click Add block: In the Product details section of the left-side layout editor, click Add block to open the available options.
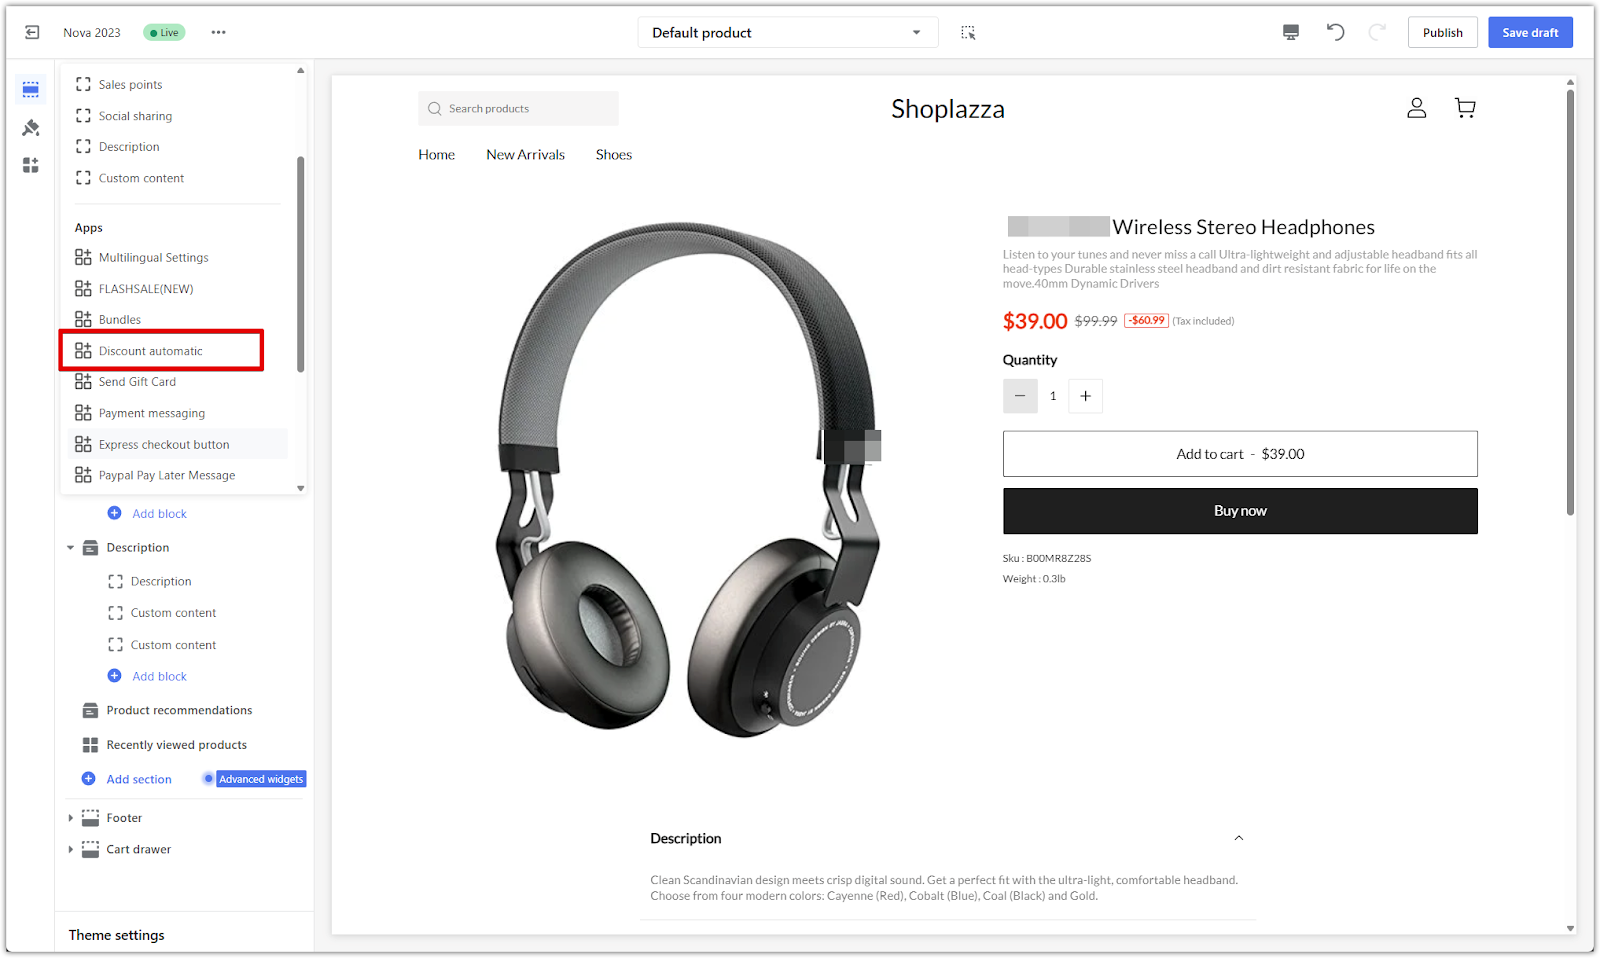
3. Select Discount automatic: Choose Discount automatic from the list to insert the discount card into your product page layout.
4. Position the block: Drag the new block to your desired location, such as between the price and the buy button. Use the preview panel to check how the banner appears on both desktop and mobile views.
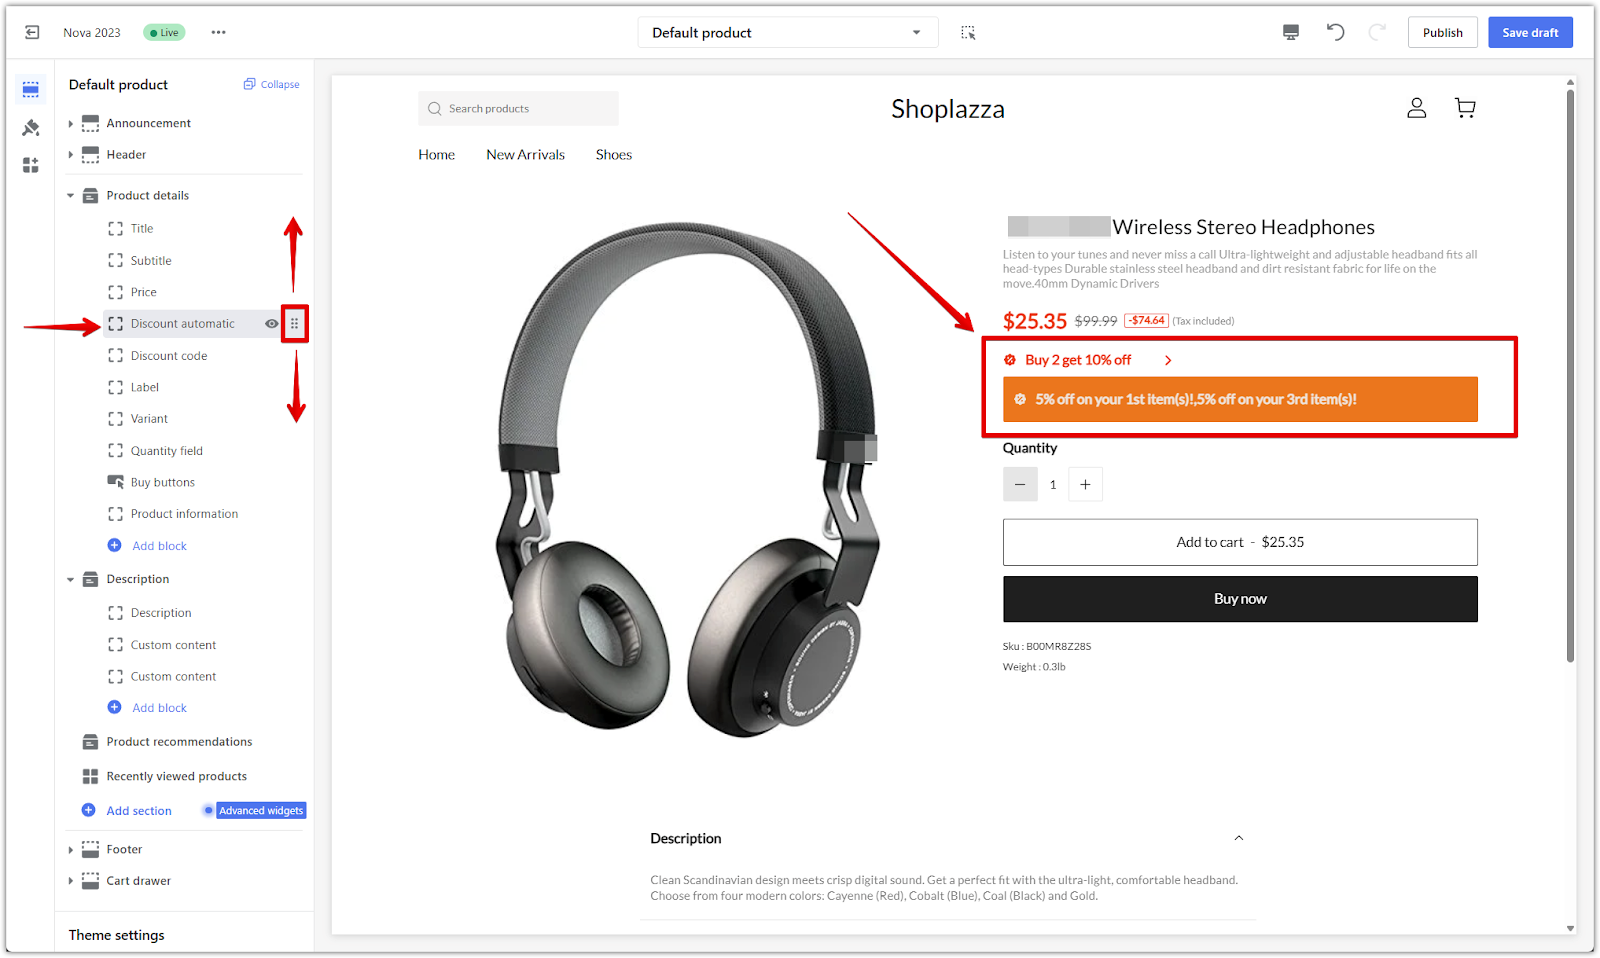
5. Publish or save your changes: Once the layout looks right, click Publish to apply changes or Save draft if you’re not ready to go live.
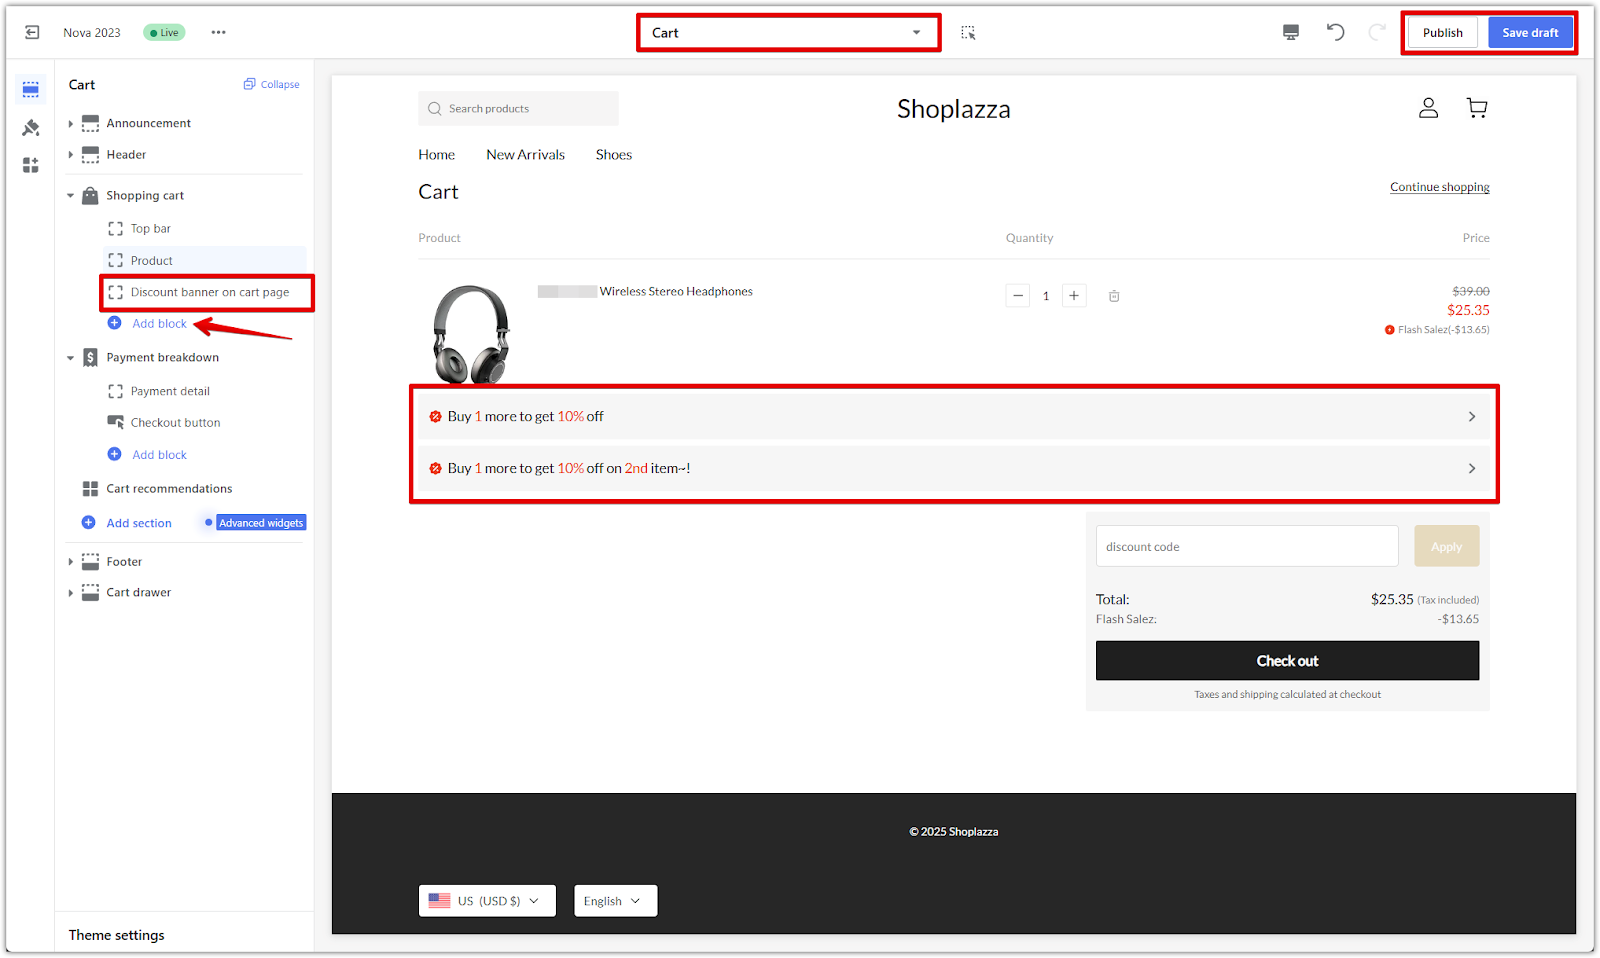
6. Add banner to cart page (optional): In the theme editor, switch to the Cart page layout. Under the Shopping cart section, click Add block and select Discount banner on cart page and click Publish to confirm your changes.
Setting up a Discount on Nth item promotion brings flexibility to your pricing strategy and adds clear incentives for larger purchases. With full control over display settings, customer eligibility, and promotional rules, this tool helps create engaging campaigns that convert. Activate the discount, tailor the layout to your store, and guide shoppers toward higher-value checkouts.


Comments
Please sign in to leave a comment.