AppLovin is a powerful mobile marketing platform that enables businesses to track user interactions and optimize ad performance. By integrating AppLovin Pixel with Shoplazza, you can gather essential data on customer behavior, measure conversions, and improve your advertising strategy. This guide will walk you through the setup process to ensure accurate event tracking.
Important notes before you begin
Before getting started, review these key points:
- AppLovin Pixel follows the AXON Pixel setup via Google Tag Manager .
- The script examples provided are for reference only. Contact AppLovin support to get the correct event key and implementation details for your account.
- This integration involves inserting JavaScript into your storefront. If you are not familiar with code, consider hiring a developer or consulting a technical expert to avoid potential conflicts or errors.
- If your pixel is not tracking properly, verify the setup with AppLovin support.
- If display issues occur after installation, the script may be incompatible with your theme. Remove the code and seek technical assistance.
Prerequisites and setup
To use AppLovin Pixel, you’ll need to install the Custom code app in your Shoplazza admin. By default, pixels can be installed on all store pages except the checkout page. To enable checkout tracking, contact Shoplazza support and request access.
1. Install the Custom code app: Go to your Shoplazza admin, visit the App Store, and install the Custom code app.
2. Enable checkout tracking: If you want to track events on the checkout page, contact Shoplazza support to activate this feature.
Understanding the custom code app
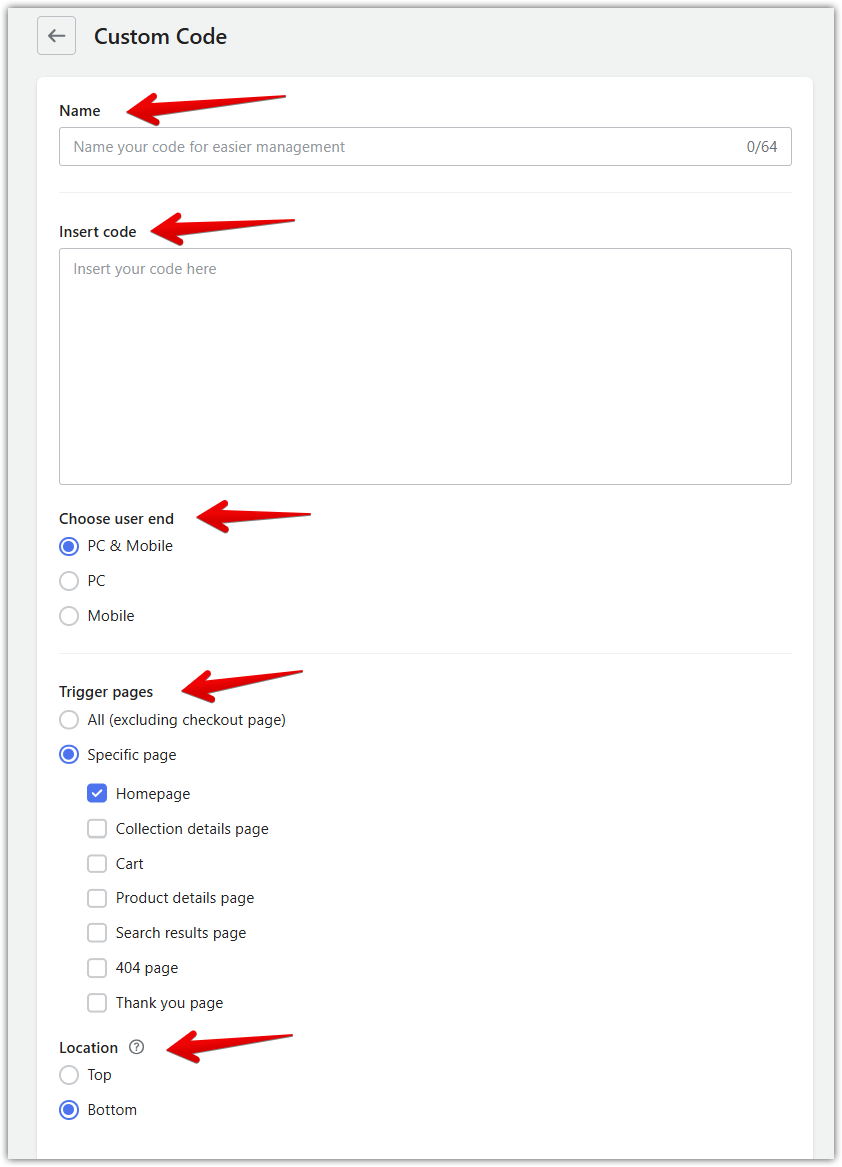
Once you have installed the Custom code app, follow these steps to add the AppLovin Pixel and configure its settings:
- Enter a name: Provide a recognizable name for your pixel setup to manage it easily.
- Insert code: Copy and paste your AppLovin Pixel script into the provided field.
- Choose user end: Select whether the pixel should be applied to PC & Mobile, PC only, or Mobile only.
- Select trigger pages: Choose where the pixel should be activated. If you need it on specific pages, select Specific page and check the relevant options.
- Location: Choose Top or Bottom to determine where the script runs within the page.

Adding the base AppLovin Pixel to your store
This section shows you how to install the core AppLovin Pixel script, which is required for initializing tracking functionality across your store pages. The base code should be added through the Custom code app and configured to run globally, so it can support all subsequent tracking events.
The base script initializes the AppLovin Pixel and allows it to start tracking data on your store.
- Go to the Custom code app and click Add custom code.
- Enter a recognizable name for your pixel setup.
- Paste the following script and replace «YOUR_EVENT_KEY» with the event key from your AppLovin account.
- Configure the settings:
- User end: PC & Mobile
- Trigger pages: All pages
- Location: Header
<script>
  var AXON_EVENT_KEY="«your_event_key»";
  !function(e,r){var t=["https://s.axon.ai/pixel.js","https://res4.applovin.com/p/l/loader.iife.js"];if(!e.axon){var a=e.axon=function(){a.performOperation?a.performOperation.apply(a,arguments):a.operationQueue.push(arguments)};a.operationQueue=[],a.ts=Date.now(),a.eventKey=AXON_EVENT_KEY;for(var n=r.getElementsByTagName("script")[0],o=0;o<t.length;o++){var i=r.createElement("script");i.async=!0,i.src=t[o],n.parentNode.insertBefore(i,n)}}}(window,document);

  axon("init");
</script>
Tracking key user actions
AppLovin Pixel allows you to track specific customer actions on your store, helping you gather detailed behavioral data for more effective marketing optimization. In this section, you'll learn how to set up tracking for key events like page views, product views, add-to-cart actions, checkout initiation, and completed purchases.
To collect more detailed behavioral data, use the following tracking codes for specific user actions.
Track PageViews
Records when a visitor loads a page on your site.
- Choose user end: PC & Mobile
- Trigger pages: All pages
- Location: Footer
<script>
  axon("track", 'page_view');
</script>
Note
For the following event tracking codes, replace the placeholder "XXXX" in "item_category_id" with the actual category ID of your product. Refer to the category IDs for more details.
Track ViewContent
Captures when a visitor views a specific product page.
- Choose user end: PC & Mobile
- Trigger pages: All pages
- Location: Footer
<script> try {


    document.addEventListener("dj.viewContent", function(e) {
        const detail = e.detail;
      console.log(detail);
if(!detail. selected.id) return;
        axon("track", "view_item", {
            currency: window.C_SETTINGS.currency_code,
            items: [{
               image_url:'https:'+detail.product.image.src,
item_variant_id:detail. selected.id ,
                price: detail.product.price,
                item_id: detail.product.id,
price:detail.product.price,
                item_name: detail.product.title,
                quantity: 1,
                item_category_id: 1604
            }]
        });
    });


 } catch(e){  }</script>
Track Add to Cart actions
Triggers when a visitor adds a product to their shopping cart.
- Choose user end: PC & Mobile
- Trigger pages: All pages
- Location: Footer
<script> try {
const getProductInfo = (id) => {
  return fetch(`/api/products/${id}`, {
    method: 'get',
    headers: {
      'Content-Type': 'application/json'
    }
  })
    .then((response) => response.json())
    .then((data) => {
      return data.data.product.image.src;
    });
};

    document.addEventListener("dj.addToCart", async function(e) {
        const detail = e.detail;
const product_image_url = await getProductInfo(detail.product_id);
    console.log(detail);
        axon("track", "add_to_cart", {
            currency: window.C_SETTINGS.currency_code,
            items: [{
                image_url:product_image_url ? window.location.protocol + product_image_url : '',
                item_variant_id:detail.variant_id,
                price: detail.item_price,
                item_id: detail.product_id,
                item_name: detail.name,
                'quantity': detail.quantity,
                item_category_id: 1604,
            }]
        });
    });


 } catch(e){  }</script>
Track Initiate Checkout
Fires when a user starts the checkout process.
- Choose user end: PC & Mobile
- Trigger pages: Checkout page (requires support activation)
- Location: Footer
<script type="text/javascript"> try {
function trackCheckout() {
    if (!location.href.includes('/checkout')) return;
    let attempts = 0;

    const check = () => {
        attempts++;
        const products = CheckoutAPI ? CheckoutAPI.summary.getUiProductList() : [];
        if (products.length > 0) {
            const total = products.reduce((sum, item) =>
                sum + (item.price || 0) * (item.quantity || 0), 0);console.log('track begin');
            axon("track", 'begin_checkout', {
                currency: window.C_SETTINGS.currency_code,
                value: total,
                items: products.map(item => ({
                    item_id: item.id,
                    item_variant_id: item.variantId,
                    price: item.price,
                    quantity: item.quantity,
                    item_name: item.productTitle,
                    item_category_id: 187,
 image_url:'https:'+item.coverUrl
                }))
            });
        }
        else if (attempts < 50) {
            setTimeout(check, 100);
        }
    };
    check();
}
if (document.readyState === 'complete') {
    trackCheckout();
} else {
    window.addEventListener('load', trackCheckout);
} } catch(e){  }</script>
Track Purchases
Registers when a user successfully places an order.
- Choose user end: PC & Mobile
- Trigger pages: Thank you page
- Location: Footer
<script> try { console.log('1',window.ORDER);
  axon('track', 'purchase', {
    'currency': window.ORDER.currency_code,
    'value': window.ORDER.prices.total_price,
    'transaction_id': window.ORDER.id,
shipping:window.ORDER.shipping_total,
tax:window.ORDER. tax_total,
user_id:window.ORDER.customer.user_id,
      items: window.ORDER.line_items.map(function (item) {
          return {
           item_variant_id:item.variant_id,
           item_id: item.id,
            price: item.price,
            quantity: item.quantity,
            item_name:  item. product_title,
item_category_id:1604,
            image_url: 'https:' + item.image.src
          }
        })
});
 } catch(e){ }</script>
Verifying your pixel setup
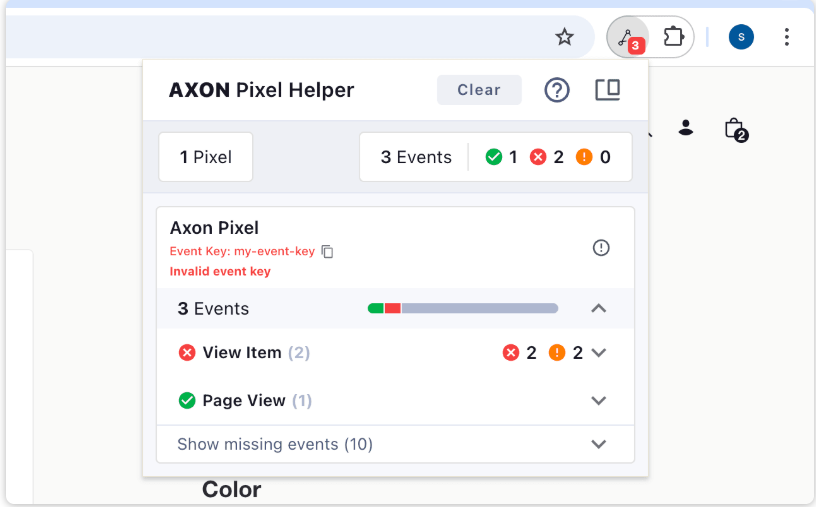
Use the AXON Pixel Helper to verify that your pixel is correctly installed and reporting data.
- Green: Events have been successfully recorded.
- Amber: Some parameters are missing, but tracking is functional.
- Red: The event is not reporting—double-check your implementation.
If tracking isn’t working as expected, contact AppLovin support for assistance.

Integrating AppLovin Pixel with your Shoplazza store provides valuable insights into customer behavior and advertising effectiveness. These tools help you fine-tune your marketing campaigns and improve your return on investment.


Comments
Please sign in to leave a comment.