The Sales Funnel is a user-friendly e-commerce tool that focuses on grassroots marketing. It promotes products through user-driven sharing, like blog posts and press releases, to build interest and trust. This marketing approach encourages purchases and converts users into customers, making the process straightforward and manageable for you.
This tool allows businesses to promote products on any platform, including popular ones like Google, Facebook, TikTok, and Instagram, as well as niche platforms like YY and news outlets.
In e-commerce, it’s useful for testing new products and boosting trending sales. Gathering feedback and analyzing conversion rates, you can identify high-performing products and continuously scale promotions for better returns.
It offers a comprehensive all-in-one solution: page creation, payment processing, store management, and link integration, all handled in one system. This eliminates inefficiencies caused by using multiple platforms and keeps all your data in one place for easy analysis, providing you with a secure and well-equipped platform for your e-commerce needs.
Product highlights
From custom page-building features to detailed analytics and integrated management, this tool equips you with the resources to run successful marketing campaigns and improve conversions.
- Three sales funnel options: Choose from single-page purchase, quick two-step purchase, or standard three-step purchase funnel types. Each option offers a unique approach to engaging customers and can be selected based on the complexity of your product and the buying behavior of your target audience.
- Custom page builder: Drag and drop elements like text, images, videos, and buttons to design your ideal page layout.
- Comprehensive data tracking: Get detailed analytics on each funnel’s performance, from ad delivery to customer conversion.
- Integrated e-commerce backend: Manage orders, products, payments, shipping, customers, marketing, and data seamlessly in one system.
Installation method
Access it directly from the app store or follow the steps below to install it through your Shoplazza admin.
1. Visit the app store through your Shoplazza admin by clicking Apps and navigating to the app store in the top-right corner.
2. Search for “Sales Funnel” and select it to access the app page.
3. Click Add App and then Install App to complete the installation.
Preparation before use
Get everything set up for a seamless experience. Learn how to manage markets, create marketing campaigns, customize checkout forms, and set up domain names to prepare your funnel for customers.
1. Overview of the process: This tool lets you sell products by sharing engaging pages on ad platforms. These pages build interest and trust through storytelling, leading to purchases. It’s ideal for testing new products or driving long-term sales growth.
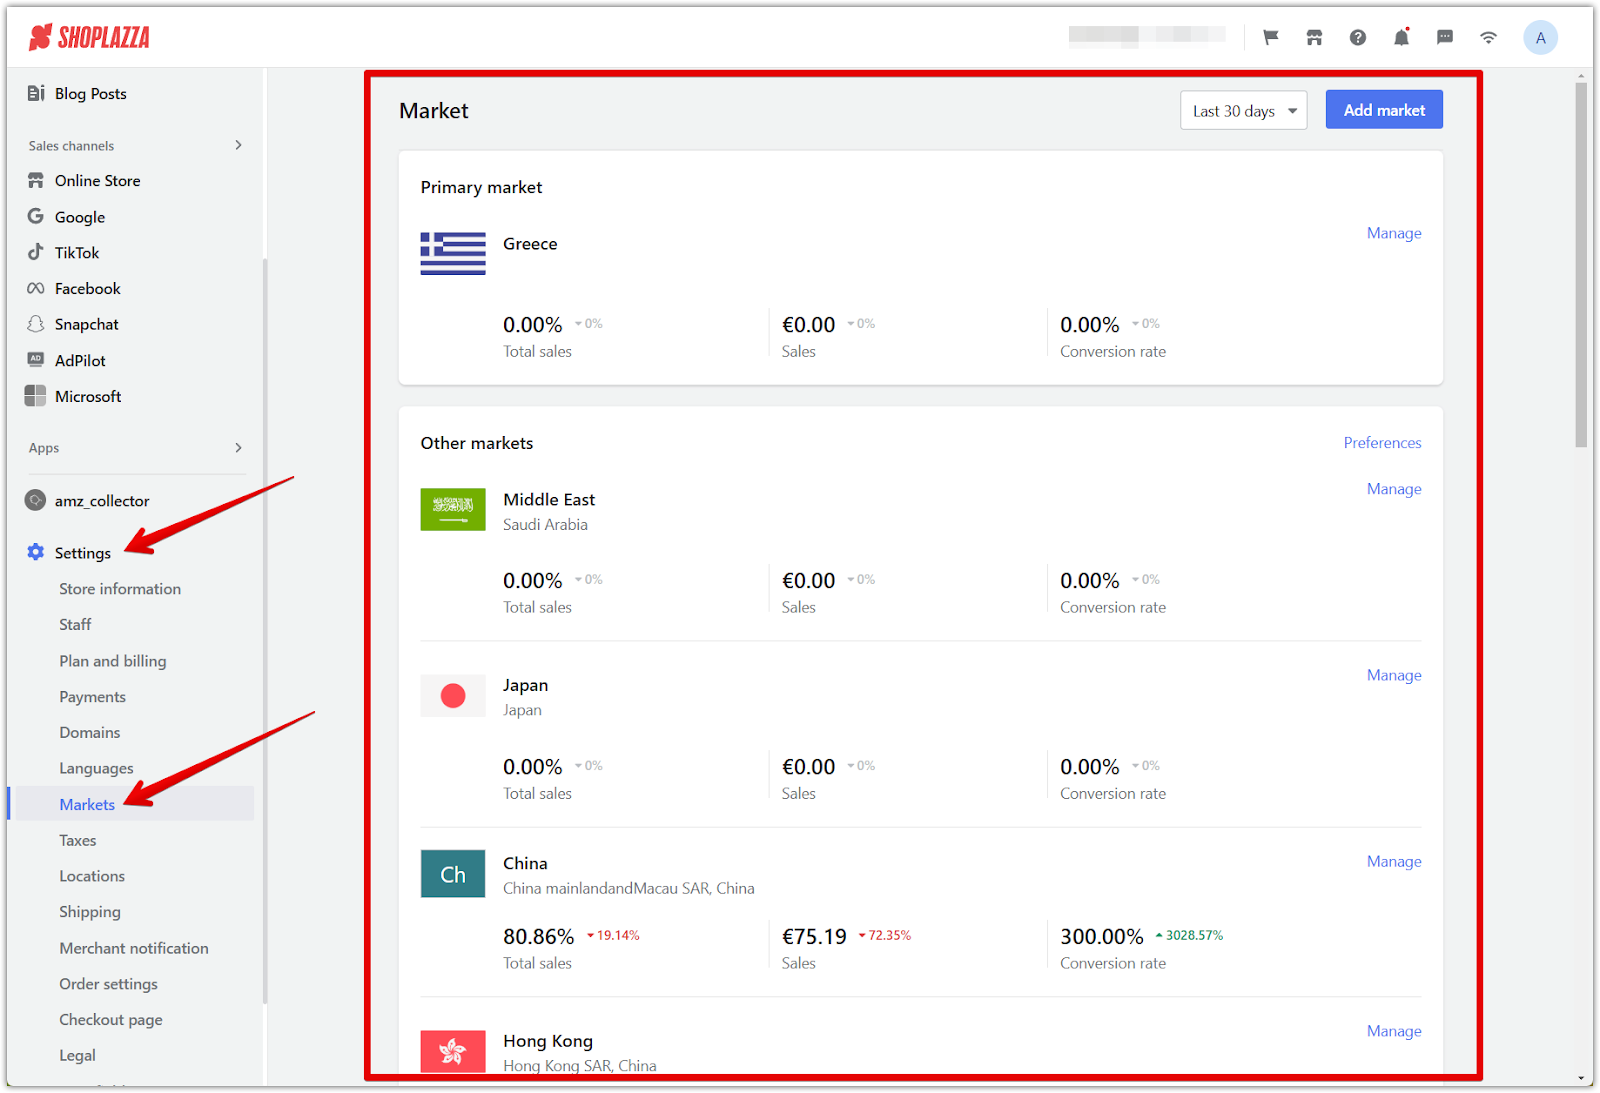
2. Manage markets: You can set up multiple markets in your Shoplazza store admin to sell products in different regions with customized pricing and market-specific information. The Sales Funnel tool can automatically detect a user’s location based on their IP address and direct them to the correct market. Users are directed to the main one if no specific market is set.
3. Create a marketing campaign: Before building a funnel, create a marketing campaign to apply for discounts or promotions. Choose how the offer appears, select products, and create deals like “10% off for 2 items” or “20% off for 3 items” to boost conversions.
4. Create custom checkout forms: Design different checkout forms for each market. Assign a form to a specific funnel so customers see the appropriate checkout form based on their region.
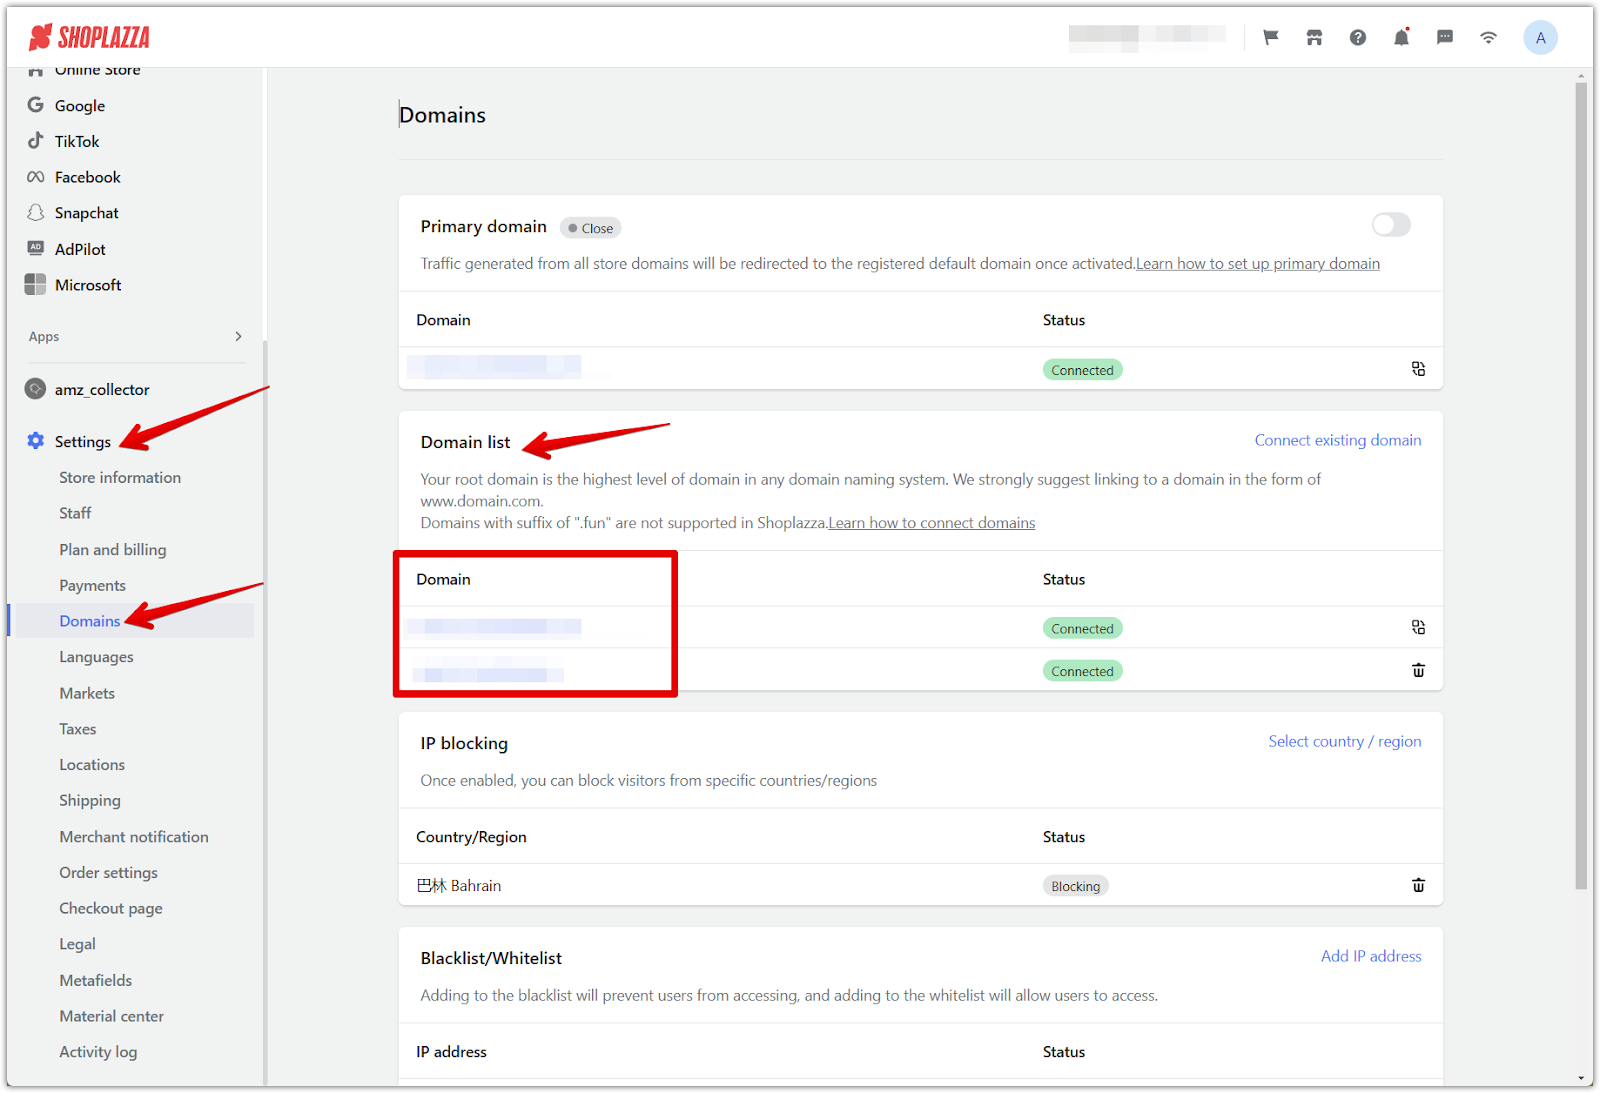
5. Set up a domain: Each funnel requires a domain for proper access. The domain is automatically synced with your Shoplazza store admin. Select the desired domain while creating the funnel.
Creating and managing funnels
Set up and personalize your sales funnel to meet your business goals. Follow these steps to create funnels, add products, customize pages, and assign checkout forms. You’ll also learn how to generate delivery URLs for promotion.
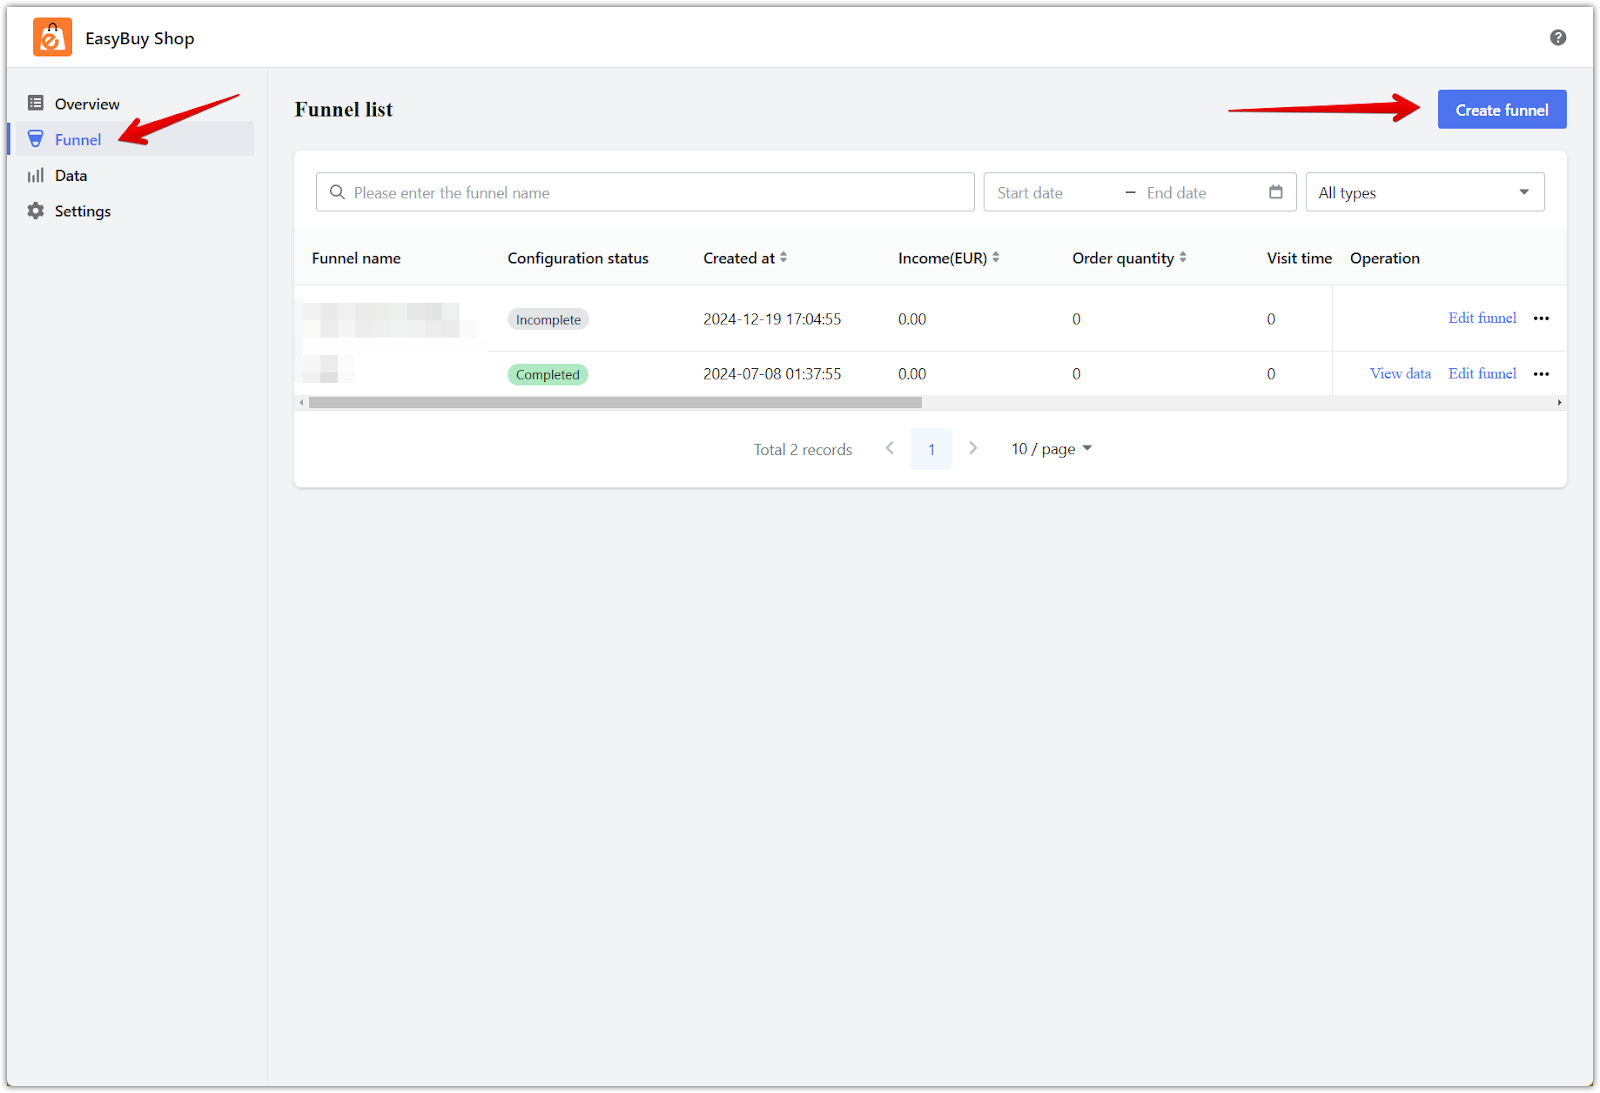
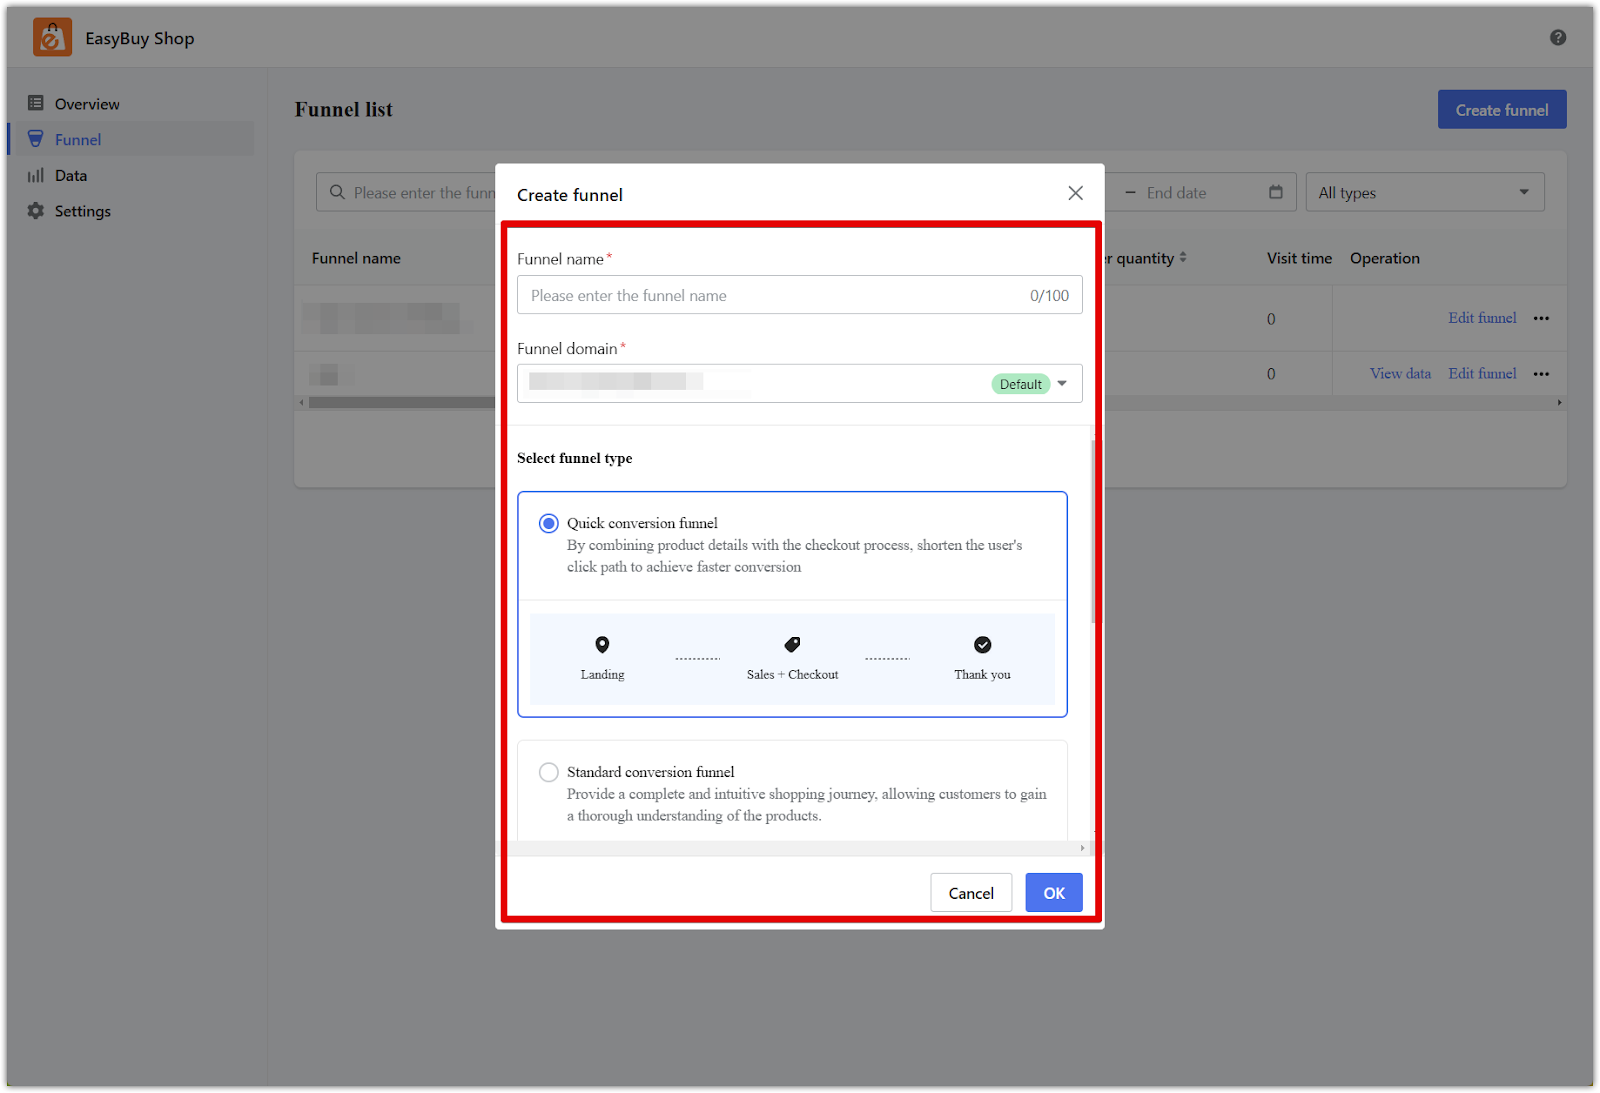
1. Create a funnel: Go to Sales Funnel > Funnel > Create Funnel, name it, and select the domain and funnel type. Once created, you can customize and edit the funnel by creating funnel steps, choosing a checkout form, and setting up the delivery URL.
2. Page decoration: Click Decorate now to open the theme editor page and enhance your funnel pages with engaging designs.
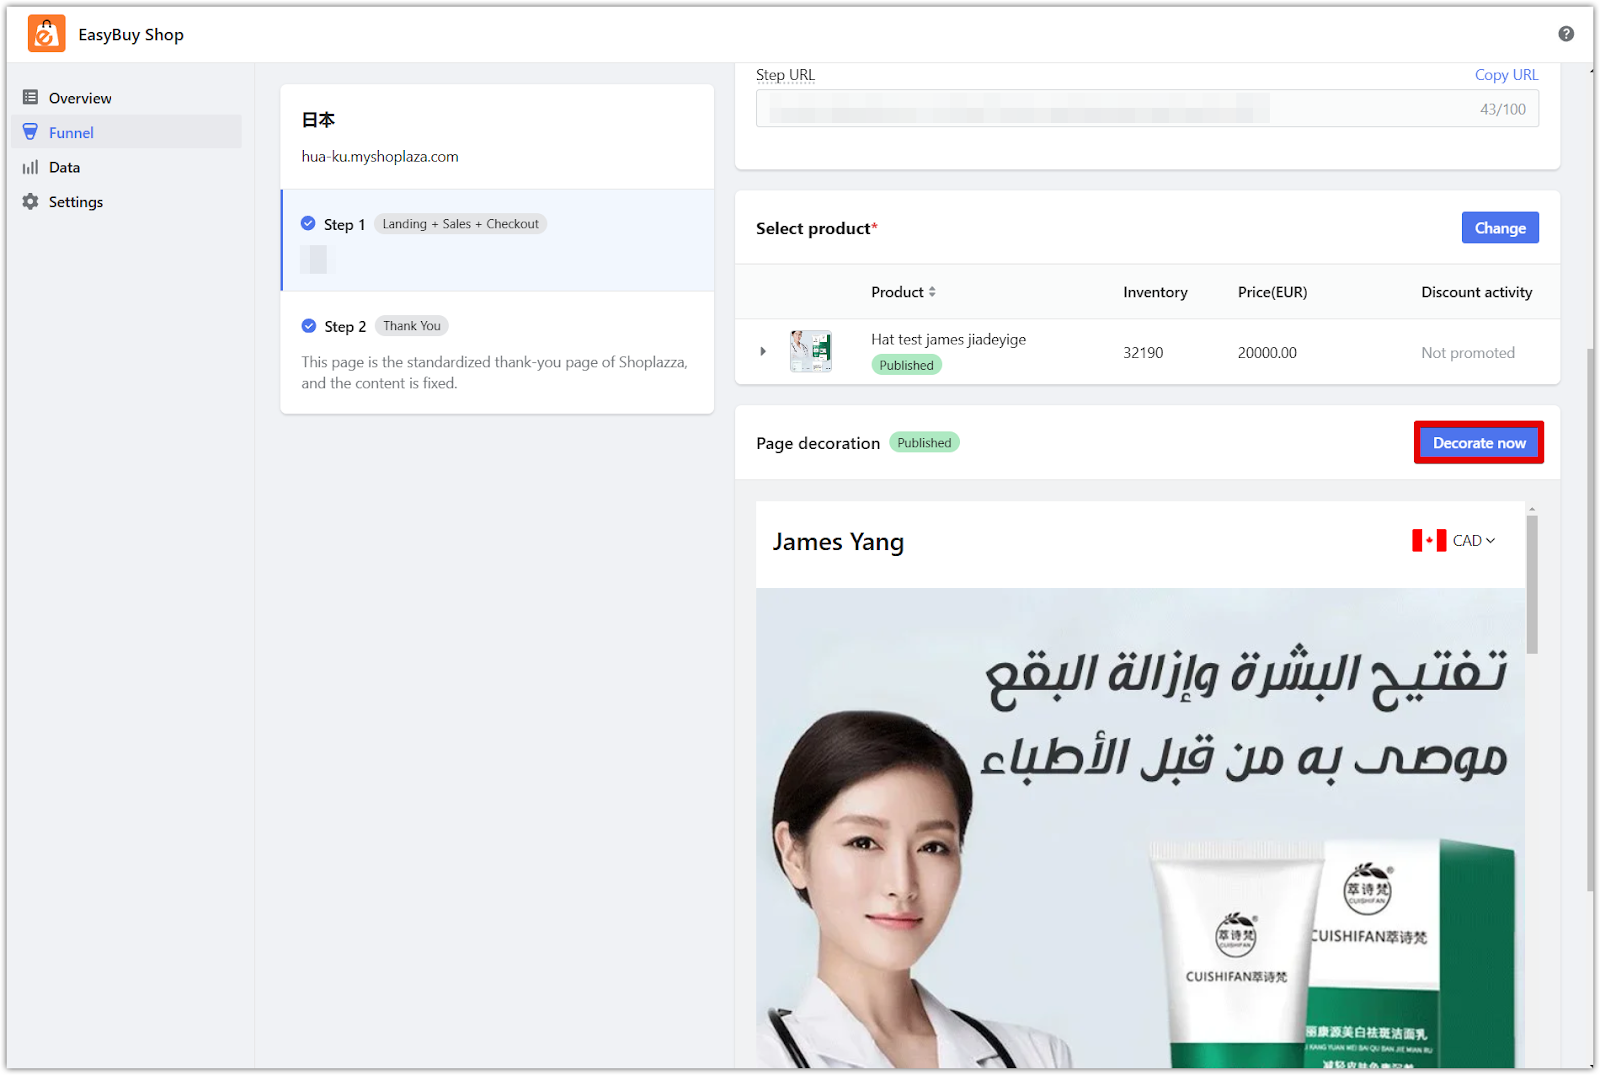
- Use Sales Funnel cards and Advanced Widgets to create a professional, visually appealing layout. Add and customize elements to match your brand and captivate your audience.
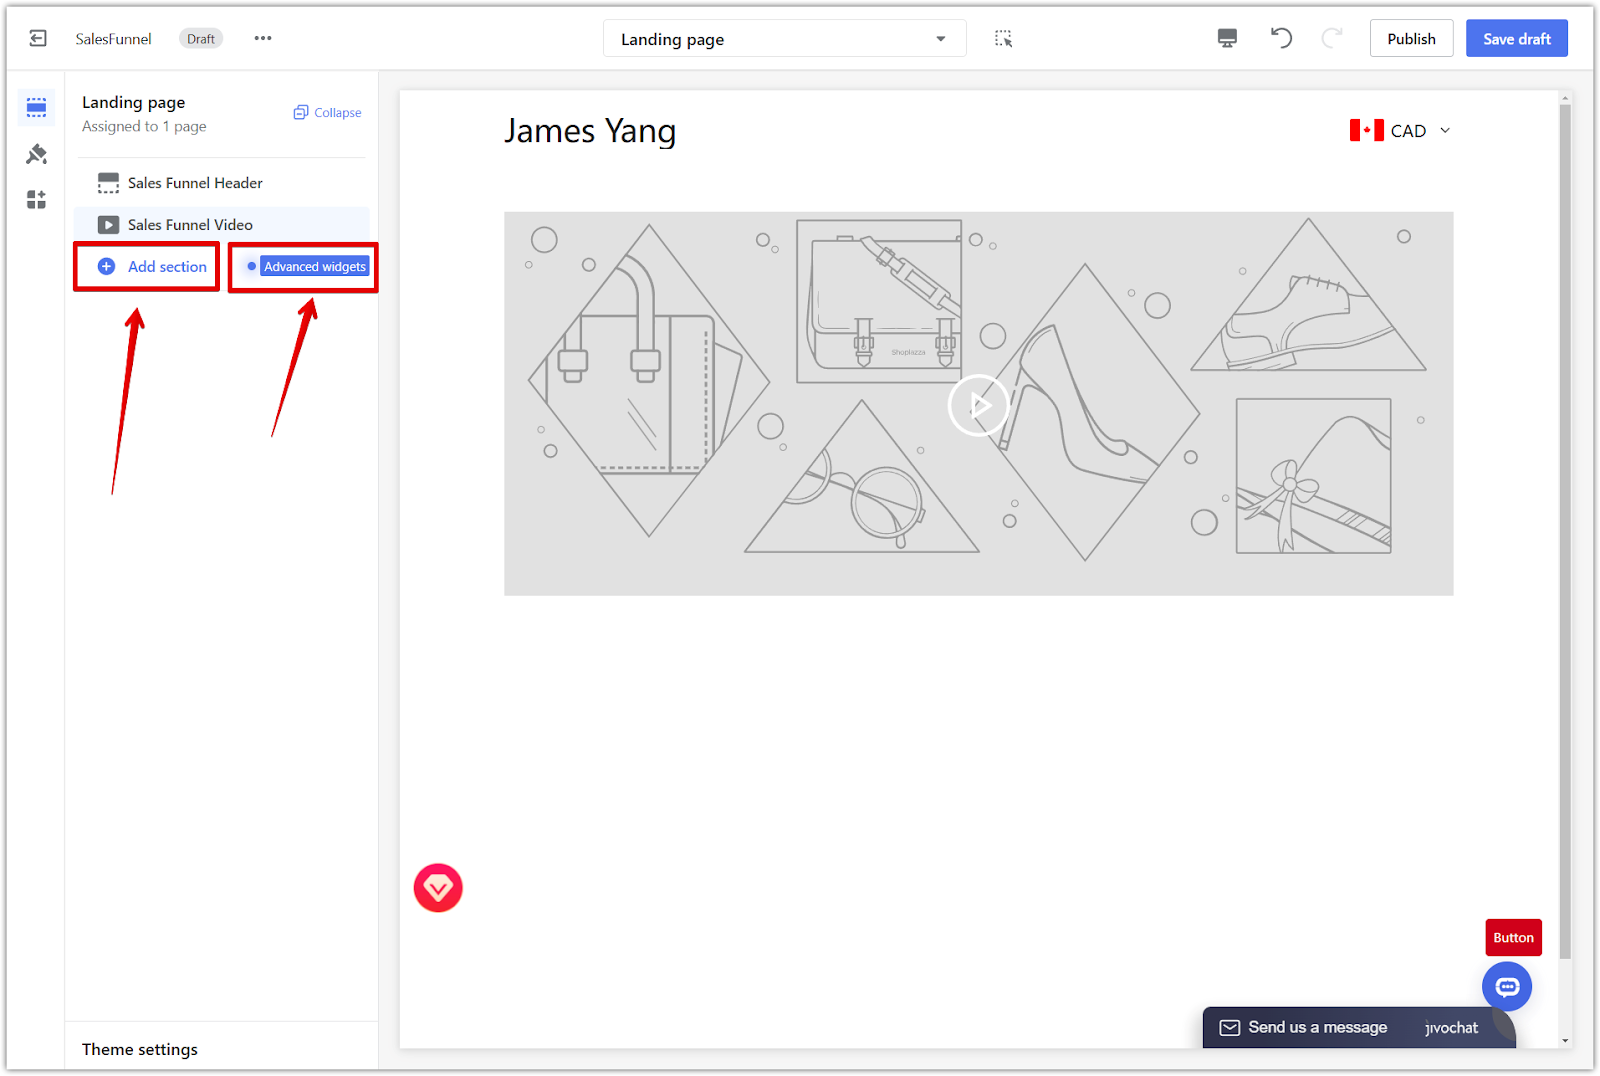
3. Customize pages: Add and arrange elements on the funnel pages using Sales Funnel cards or Advanced widgets. Choose from various elements to enhance your pages, including videos, graphics, customer testimonials, rich text, logo displays, and policy terms. Customize the layout and content to match your brand and create a unique experience.
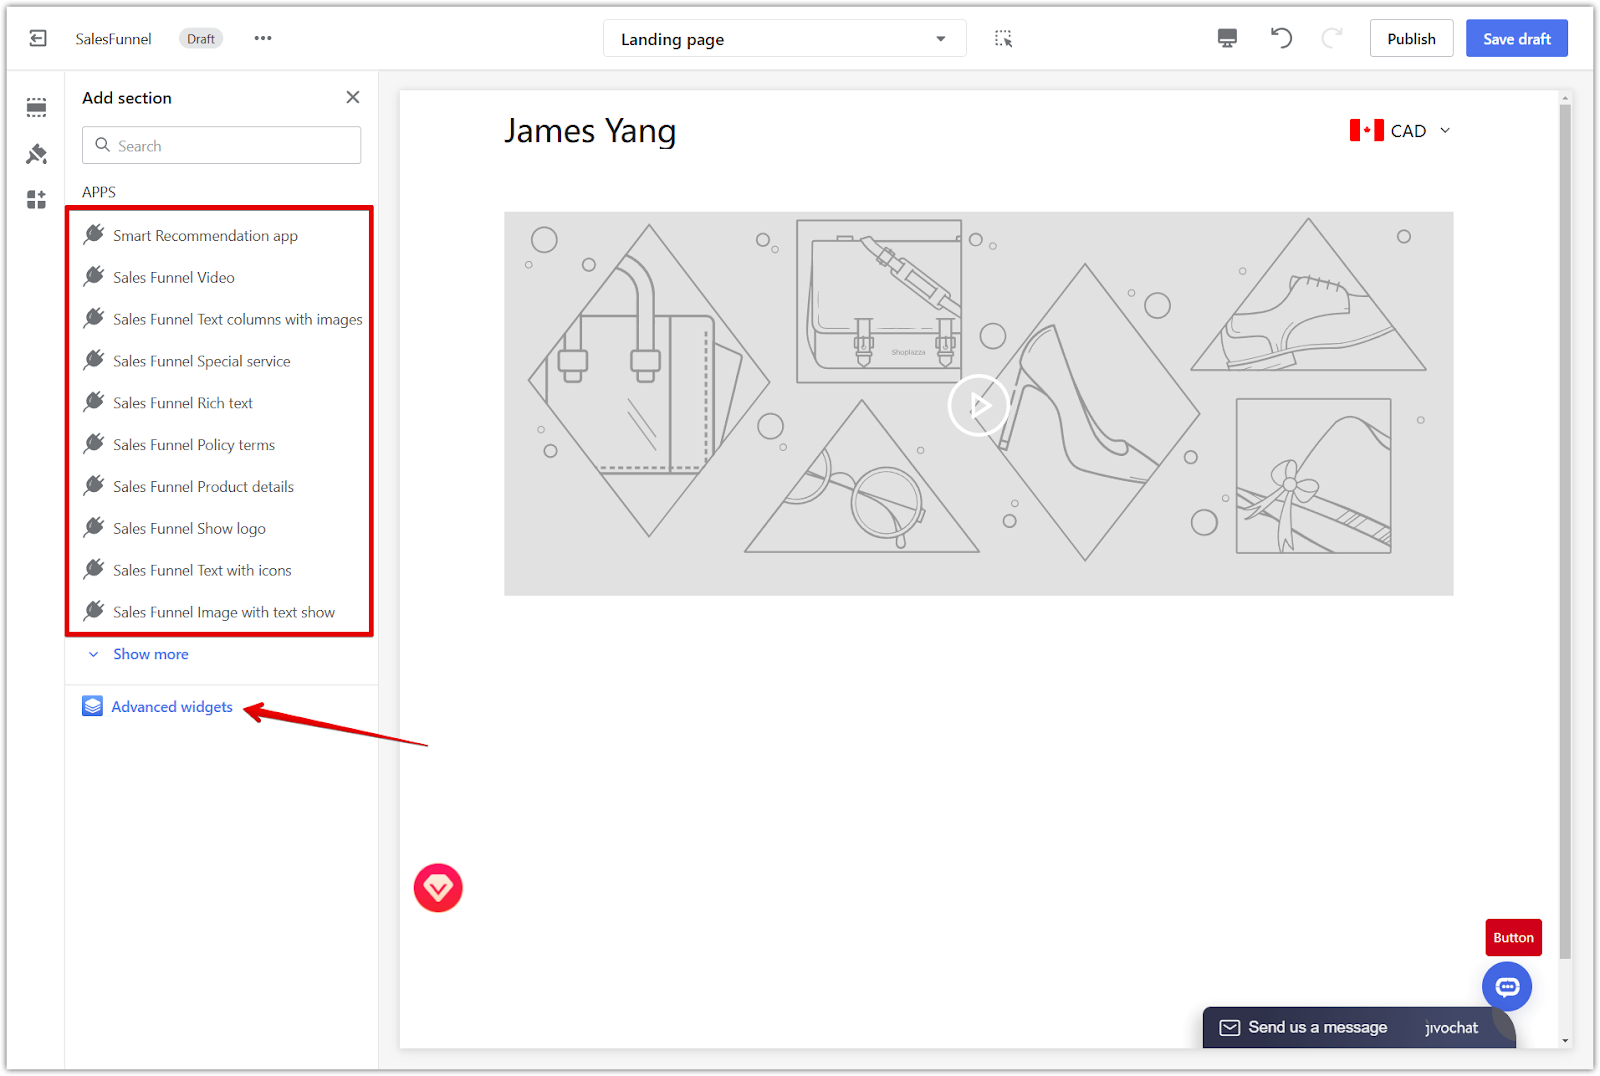
Advanced Widgets
Advanced widgets take customization to the next level. They allow you to design unique layouts and page elements, including titles, text, pictures, videos, buttons, and links. These widgets are highly customizable and can be used to create engaging and interactive pages that align with your brand's style and messaging.
How to use Advanced Widgets
1. Click Add Section, then select Advanced Widgets.
2. Choose an option like Image with Text or Video, and enter the widget editing page.
3. Customize your layout and content as needed.

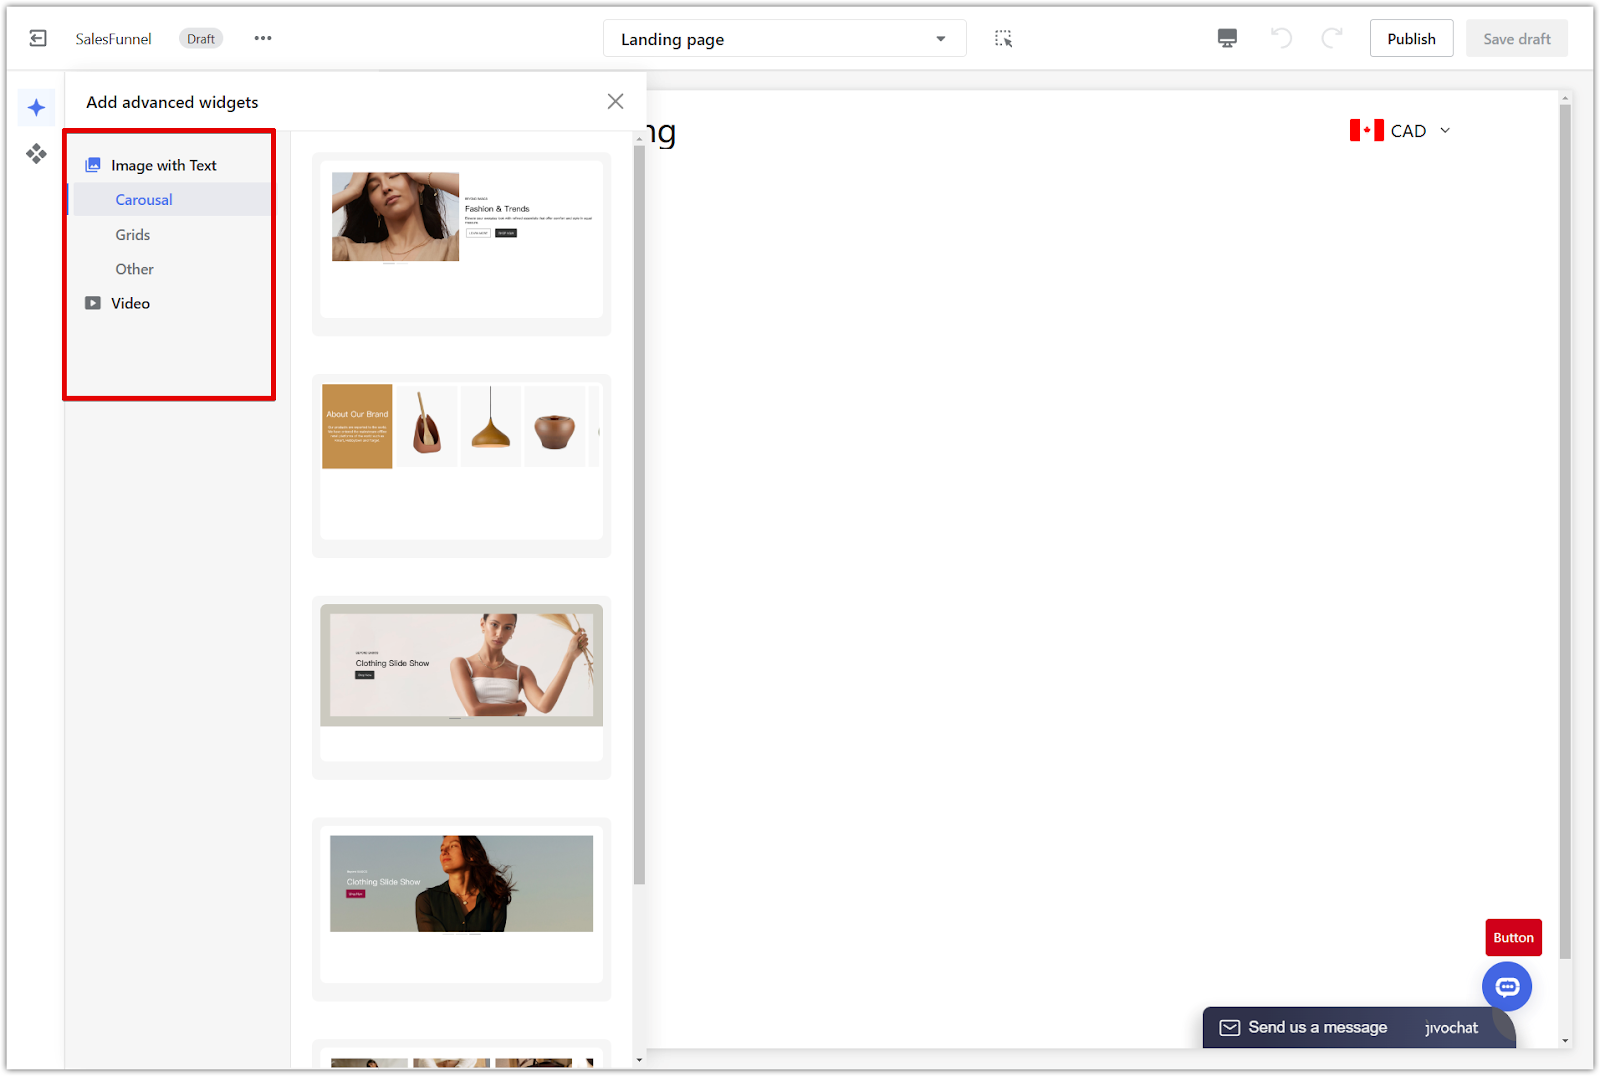
Editing Advanced Widgets
To edit an Advanced Widget, follow these steps to customize its layout and elements:
Select a container type:
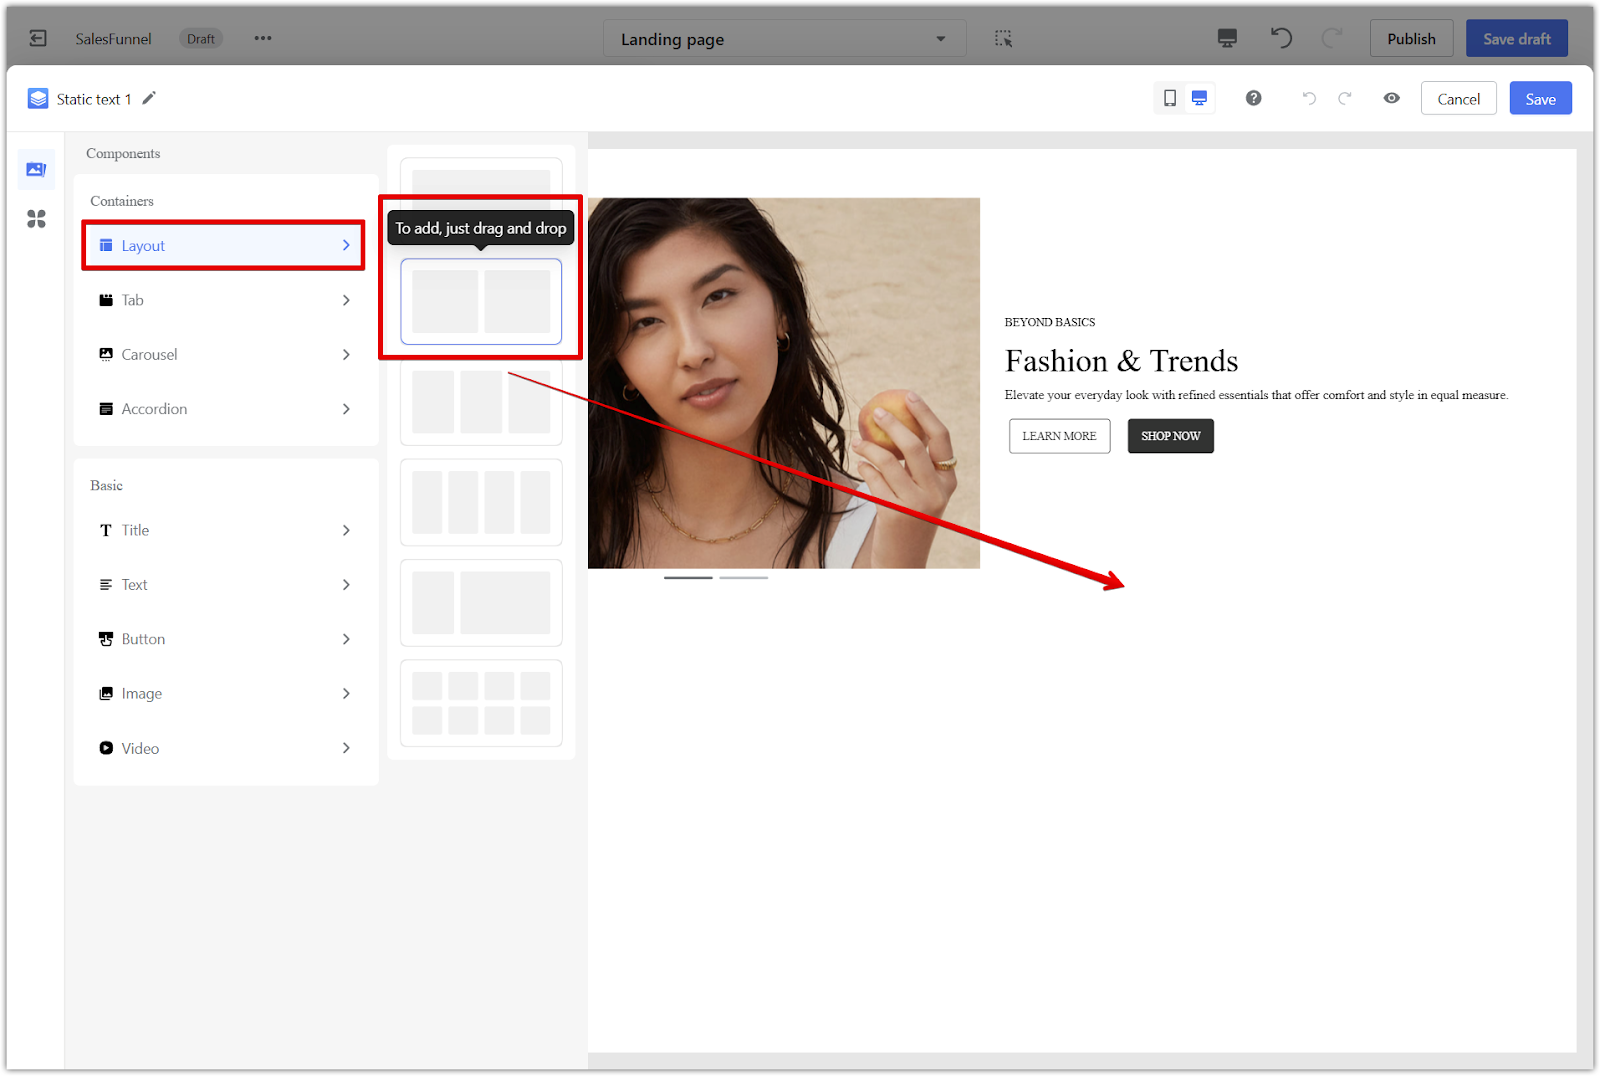
1. You can choose from four container types: Layout, Tab, Carousel, and Accordion. The layout container offers six options, including 1-column, 2-column, 3-column, and 4-column structures.
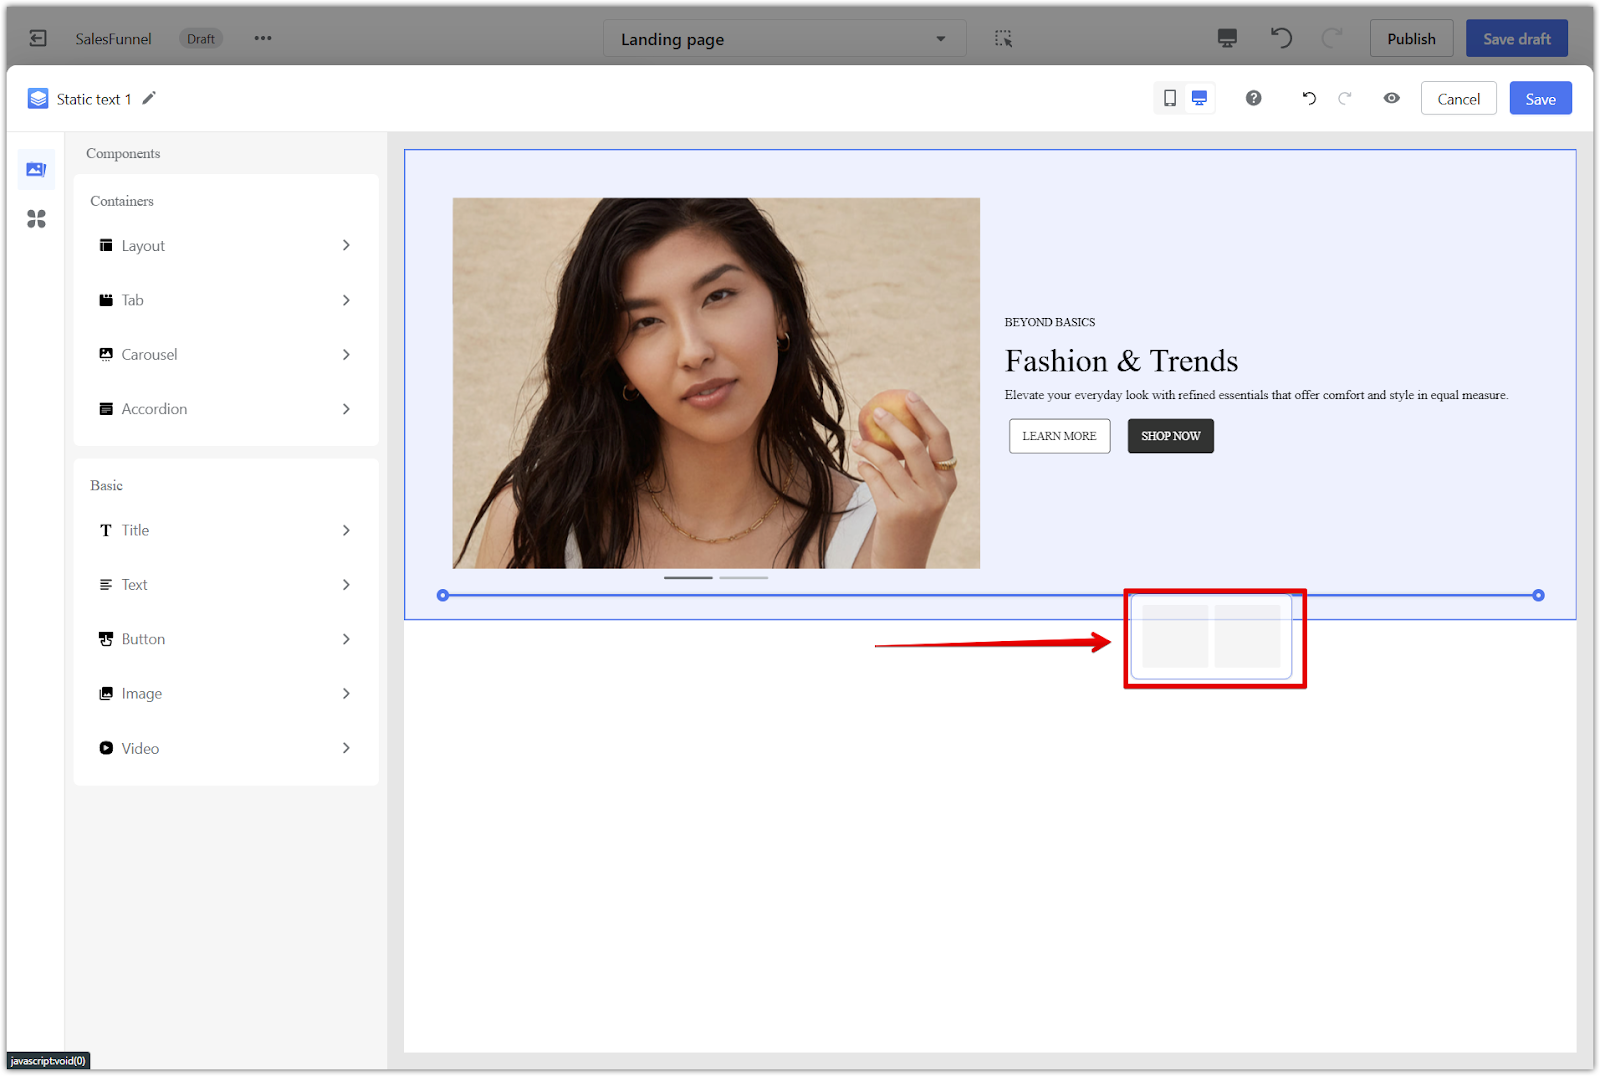
- To apply a layout, click Layout, then drag and drop your chosen structure onto the canvas on the right. The same process applies to other container types.

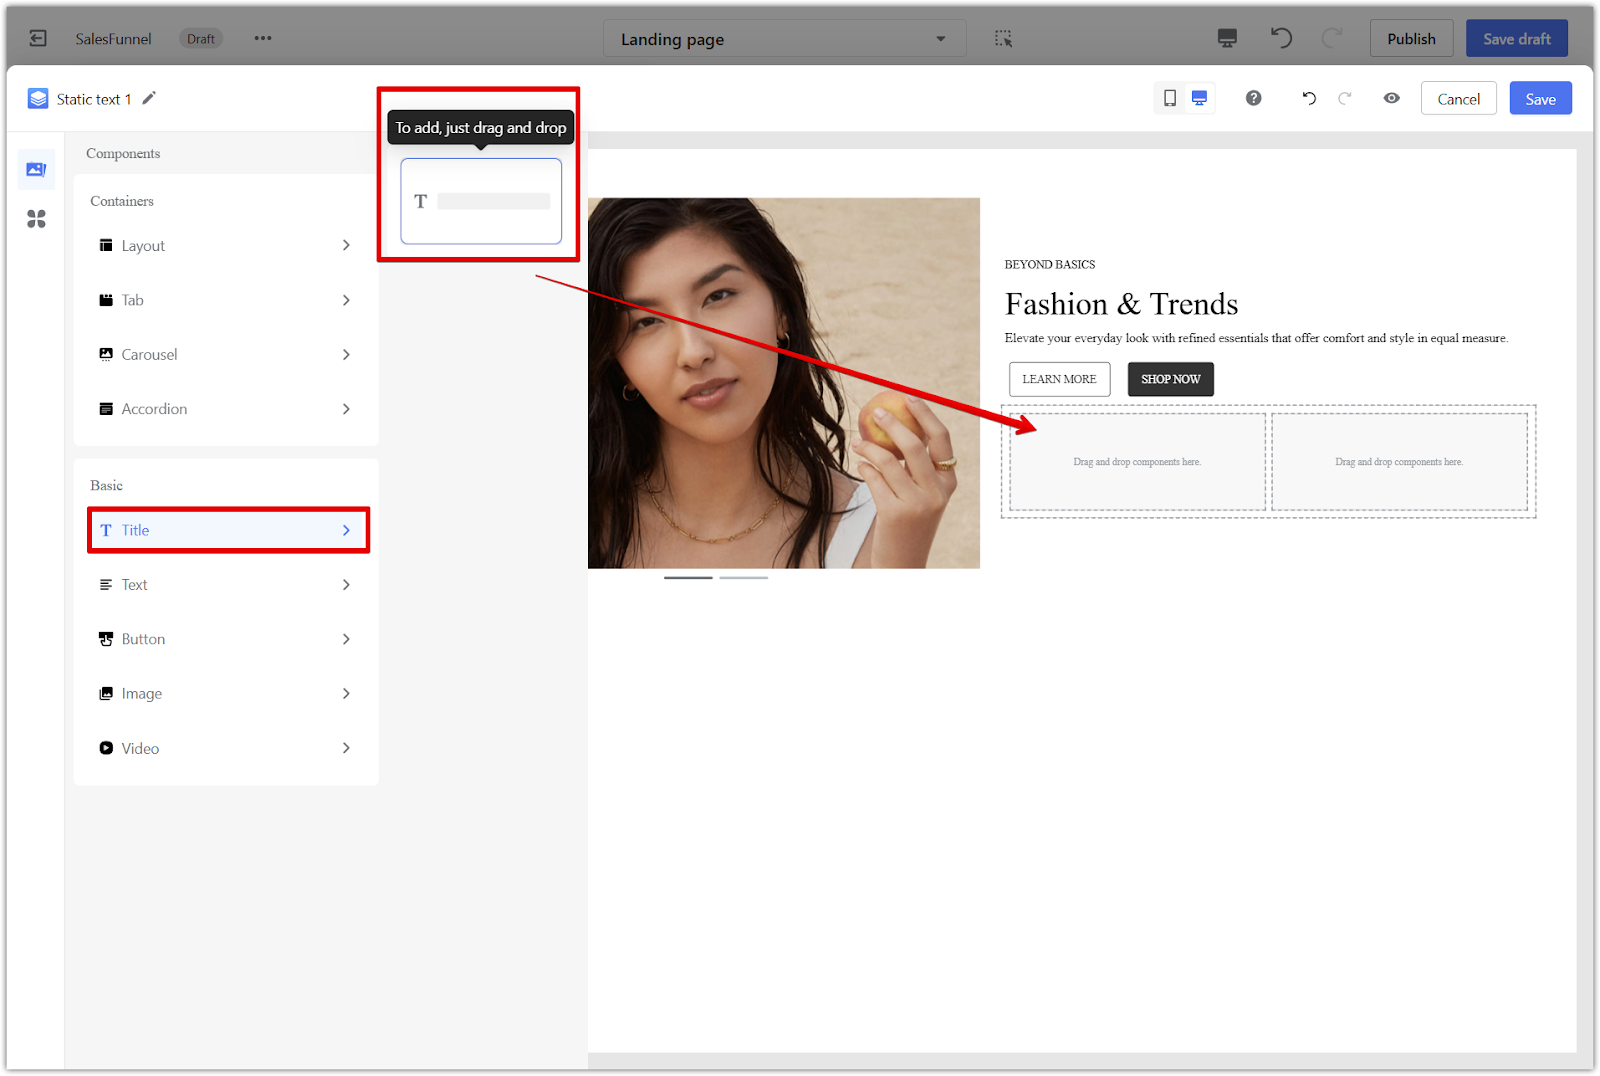
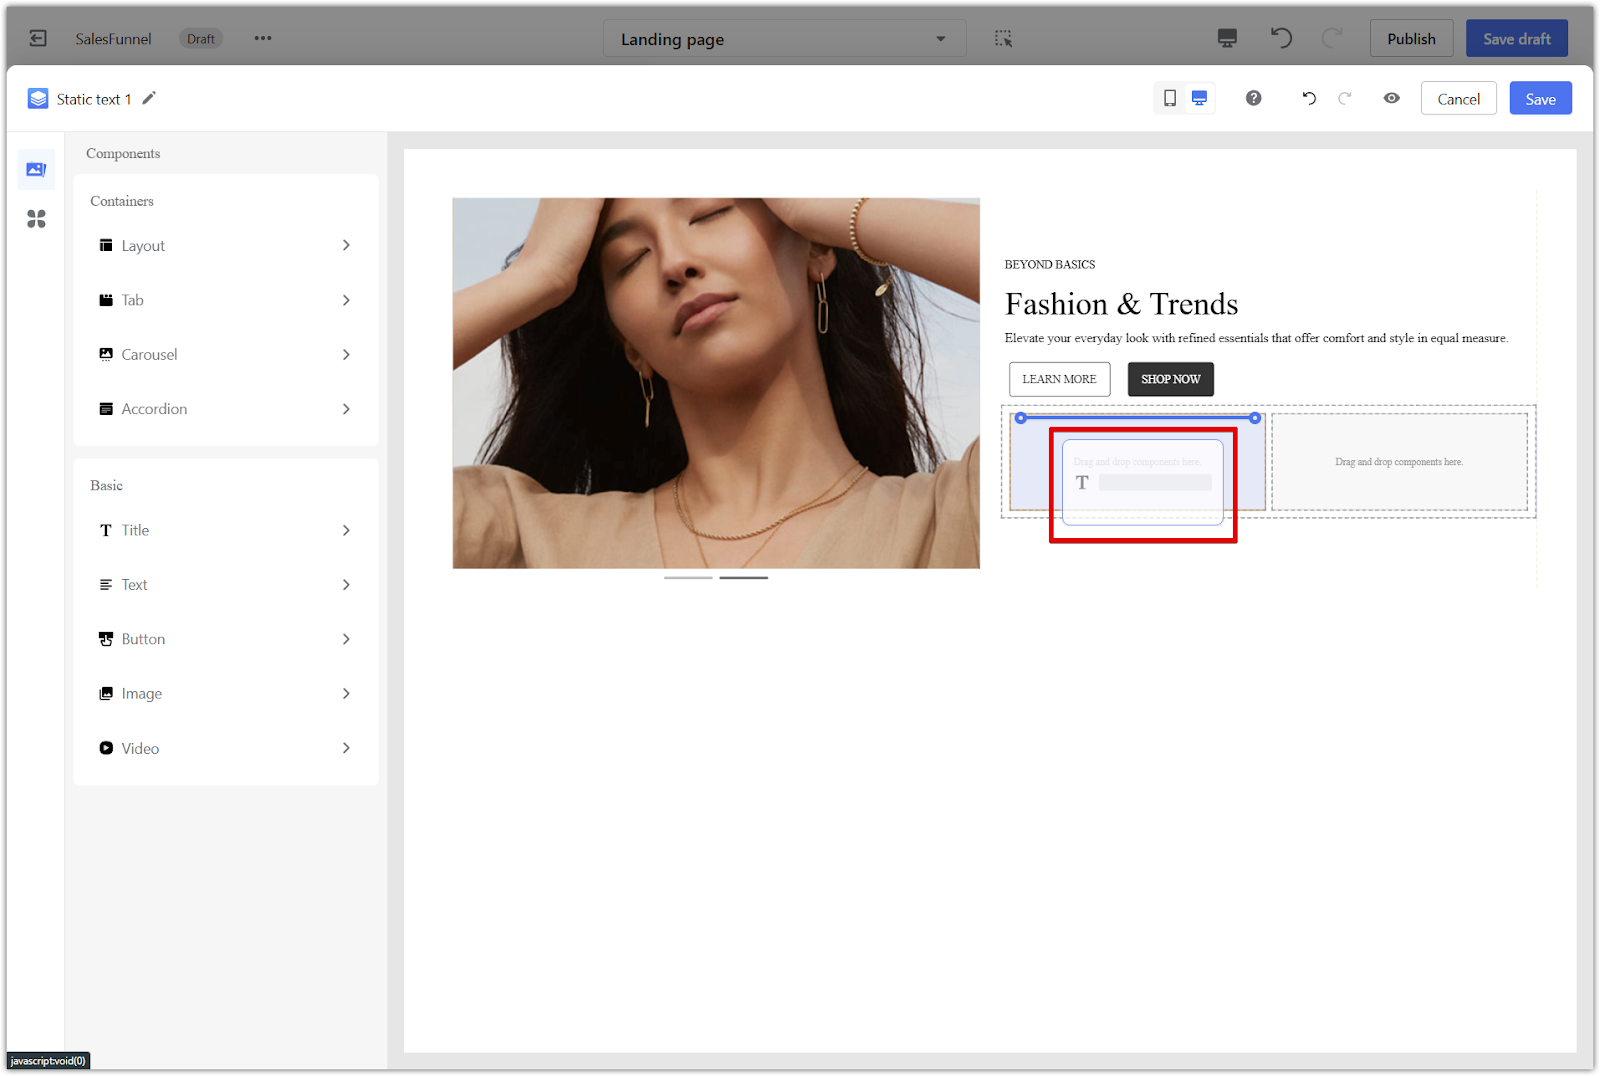
2. Add and arrange elements: Once the layout is set, select the elements you want to include. Five core elements are available: title, paragraph, button, picture, and video. Drag and place your chosen elements into the layout.
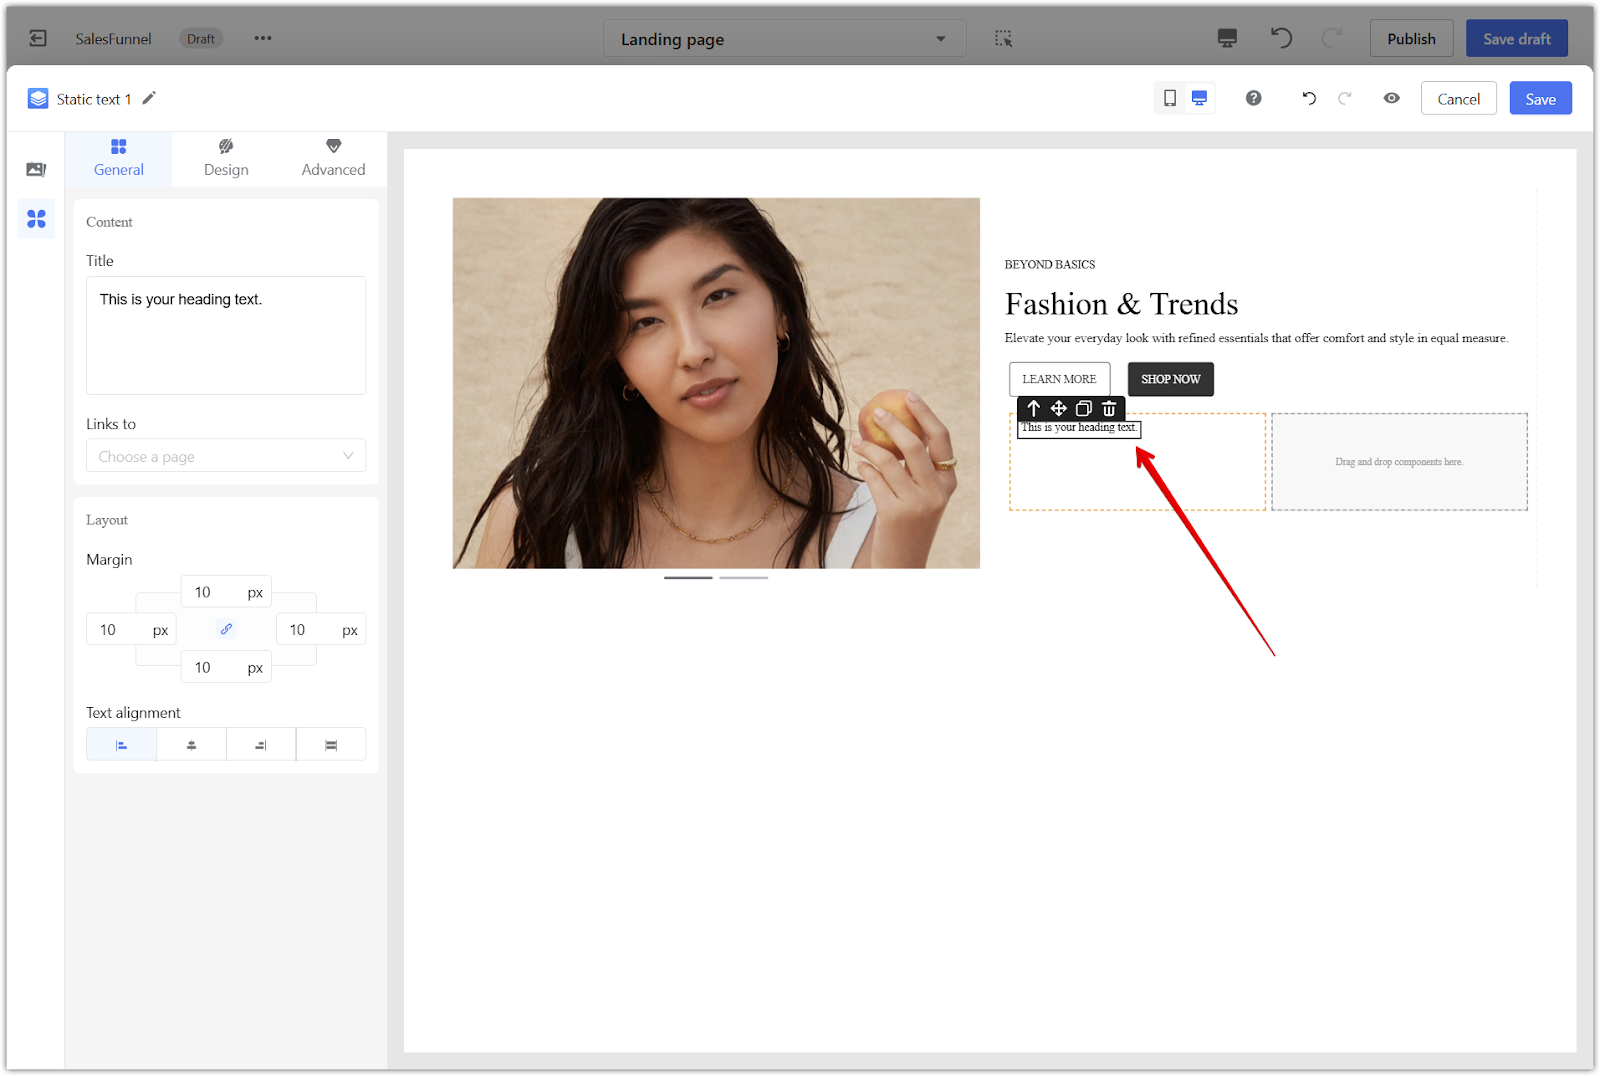
3. Customize styles and content: Adjust the element's content and style, such as margins, jump links, and overall design. Each element can be tailored to fit your brand's visual and functional needs.
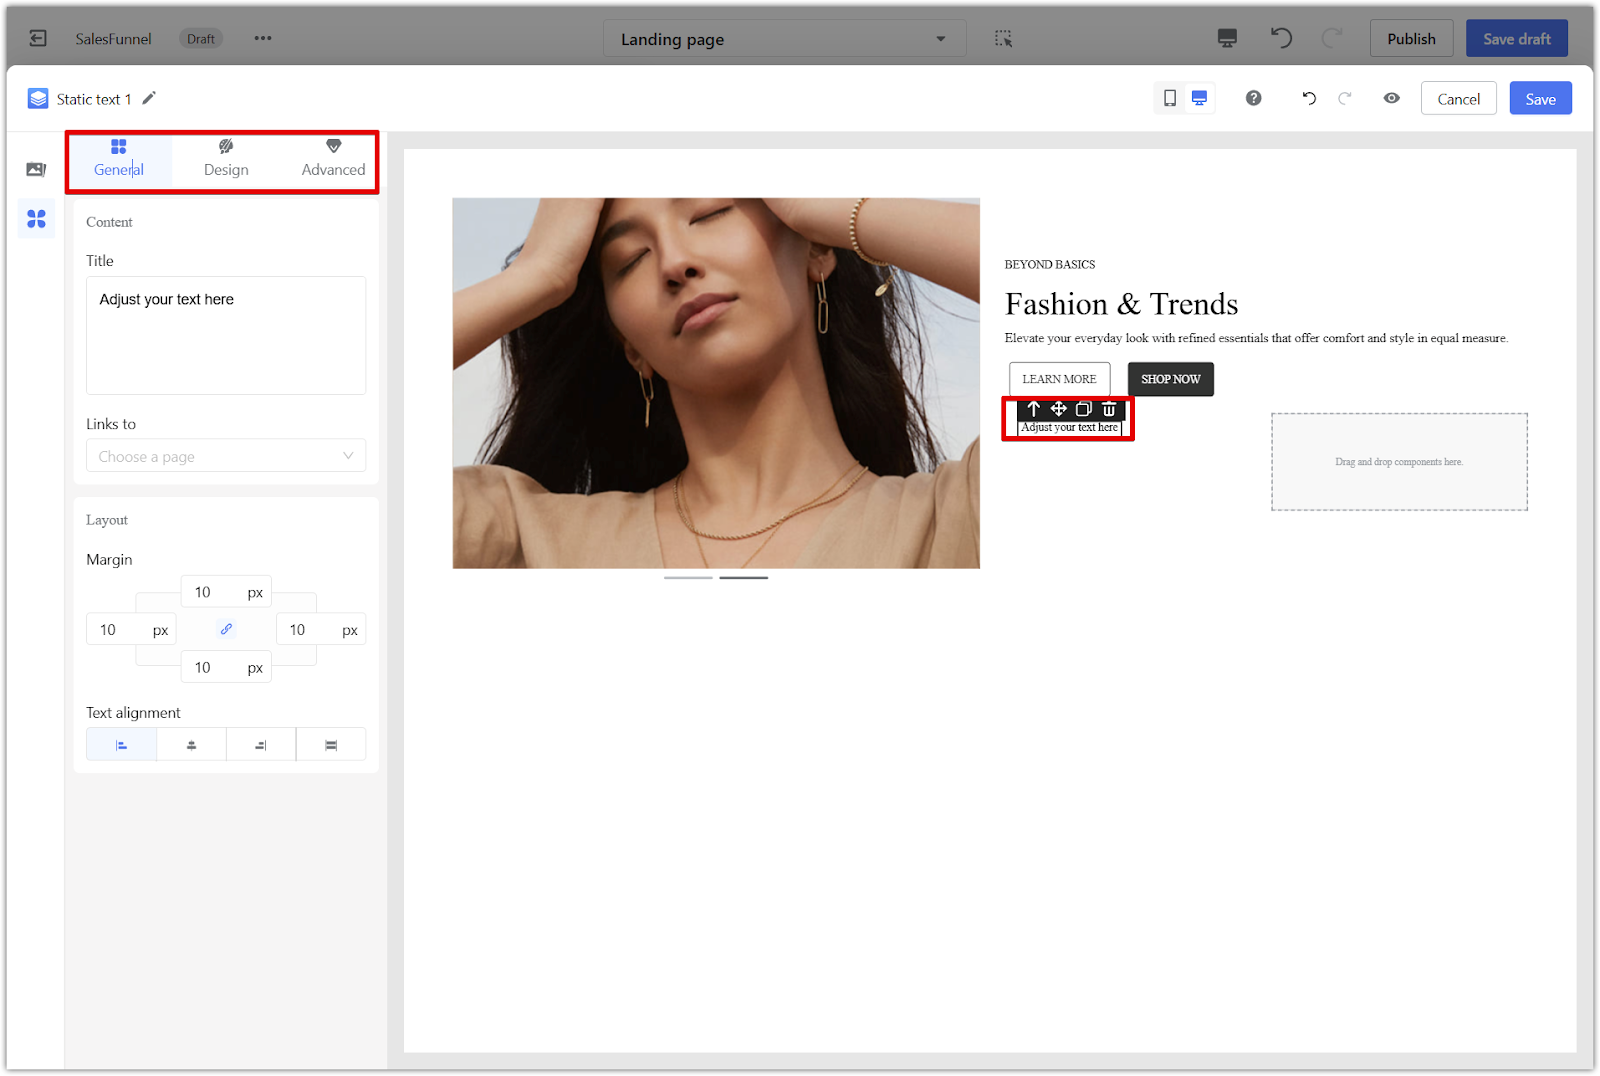
4. Save and publish: After finalizing your widget, click Save to preserve your changes. If you’re still working on it, use Save Draft or click Publish to apply the widget to your page.

Selecting a product
Select the product for your funnel by adding a single featured product directly to the Sales+Checkout page. Each funnel is designed to focus on one product.

Note
- Products can only be added to the Sales page, not other funnel pages.
- Each funnel supports only one product at a time.
- To feature different products, create a separate funnel for each product.
Selecting a Checkout form
Assign a checkout form based on your customers’ locations. To set up checkout forms for each country, go to the Settings tab within the funnel you’re working on, then navigate to Country and Checkout Form and click Edit Checkout Form. From here:
- Select a country and assign the appropriate checkout form.
- For example: Customers in the United States will use Checkout Form A, while customers in Germany will use Checkout Form B.
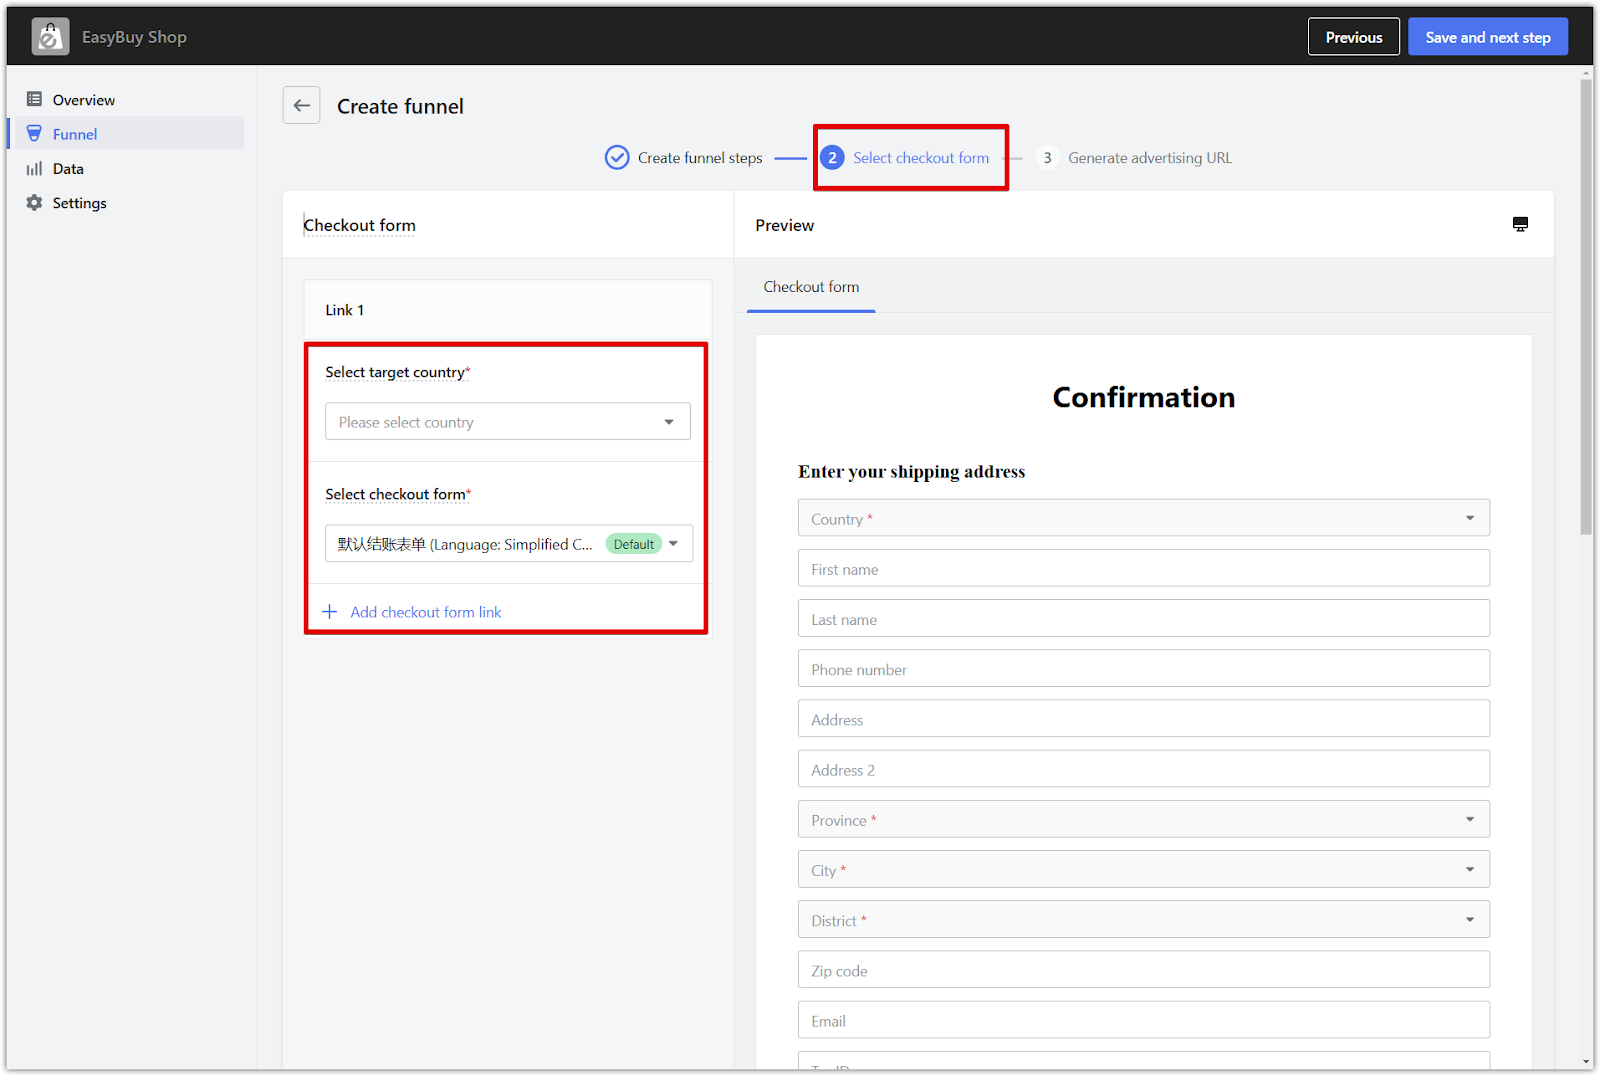
When customers visit from a specific country, the system will automatically display the assigned checkout form for their location.
Generating an advertising URL
Make your funnel accessible by creating a delivery URL. From here, follow these steps:
1. Choose a domain name and add UTM parameters (optional): Use the drop-down menu to select a domain name for the funnel. Multiple domain names are supported. If needed, include tracking parameters to monitor the funnel's performance.

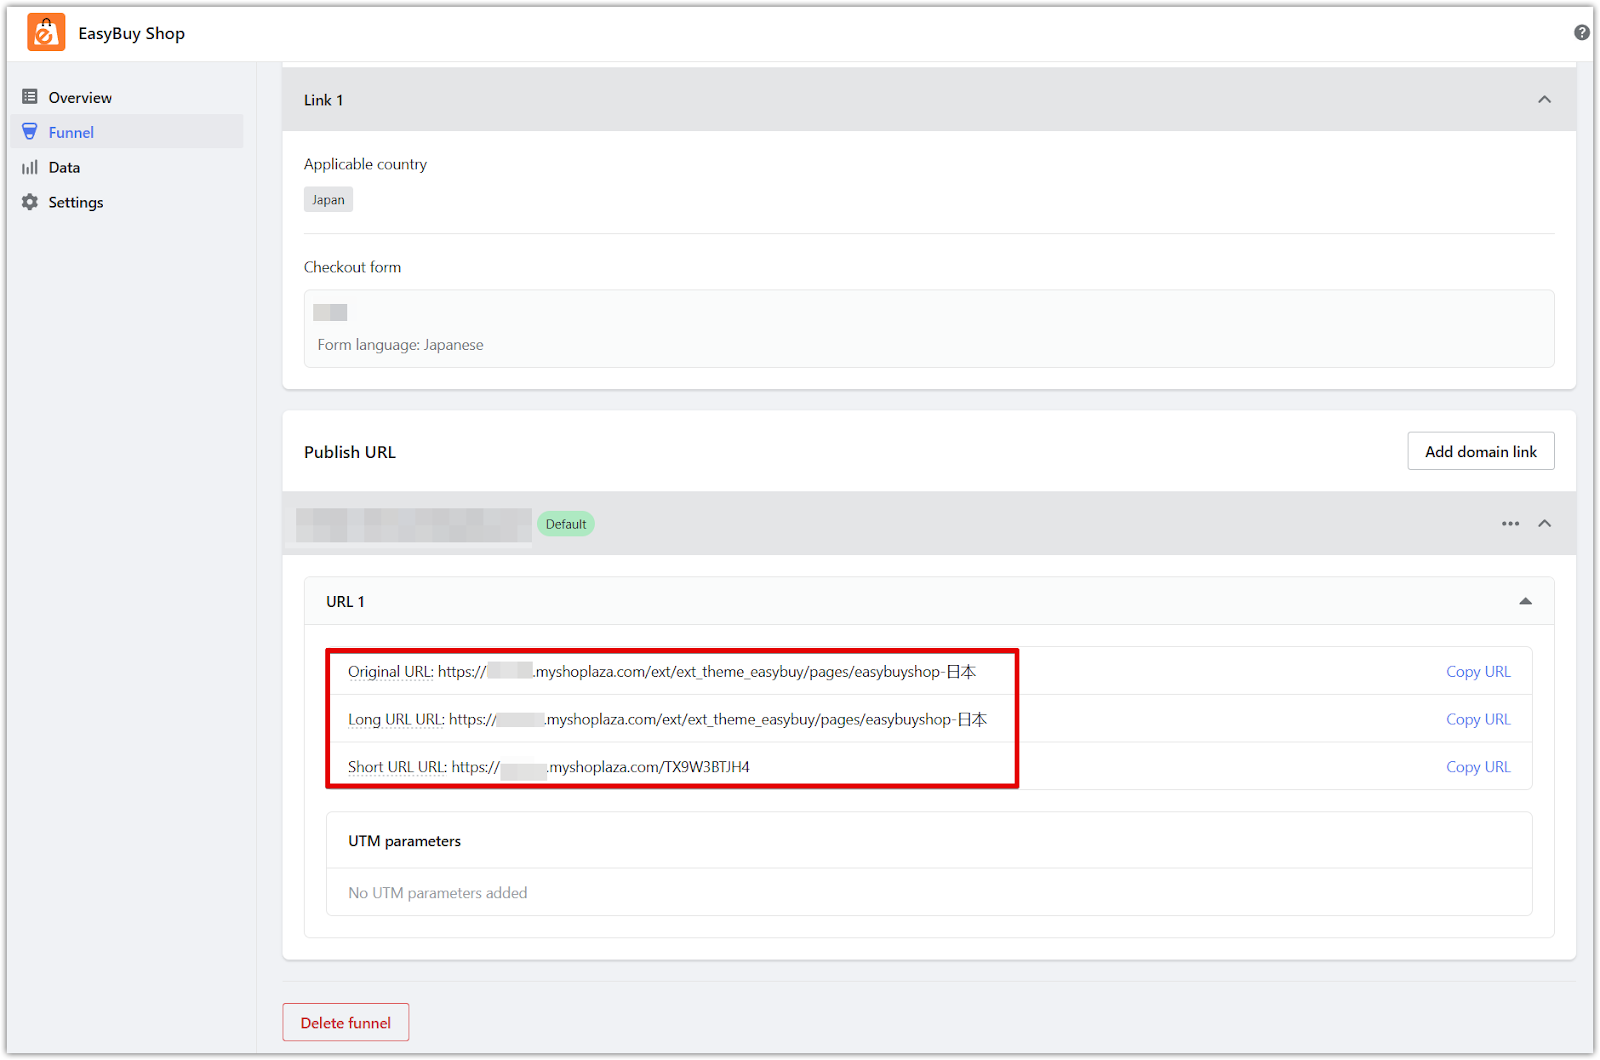
The system will generate three types of URLs:
- Original URL: A basic URL generated by the domain name without UTM parameters. It can be accessed directly.
- Long URL: Includes UTM parameters for tracking, which is ideal for monitoring performance.
- Short URL: A simplified version of the long URL for easy sharing. It redirects to the long URL.
While all three URLs can be used, the long URL is recommended for its tracking capabilities.
Switching between pages
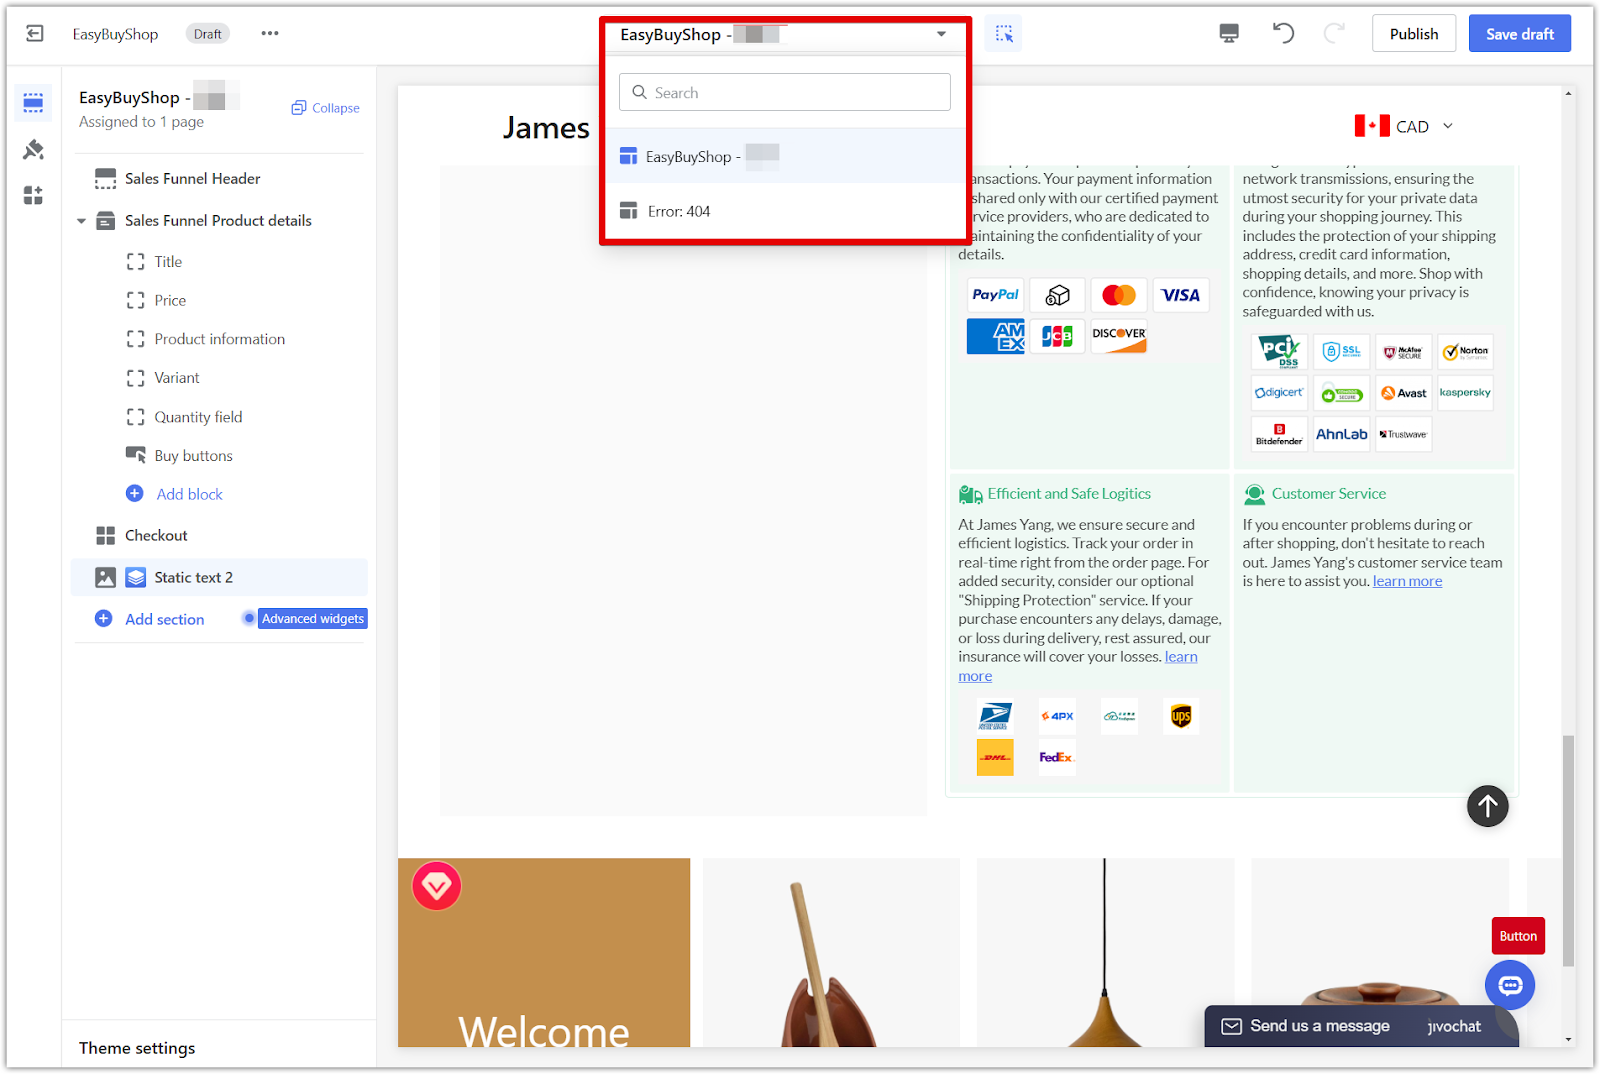
You can customize multiple pages in your funnel seamlessly by switching between them directly in the theme editor. This eliminates the need to return to the main funnel page, allowing you to design and maintain consistency across all pages efficiently.
Viewing funnel orders
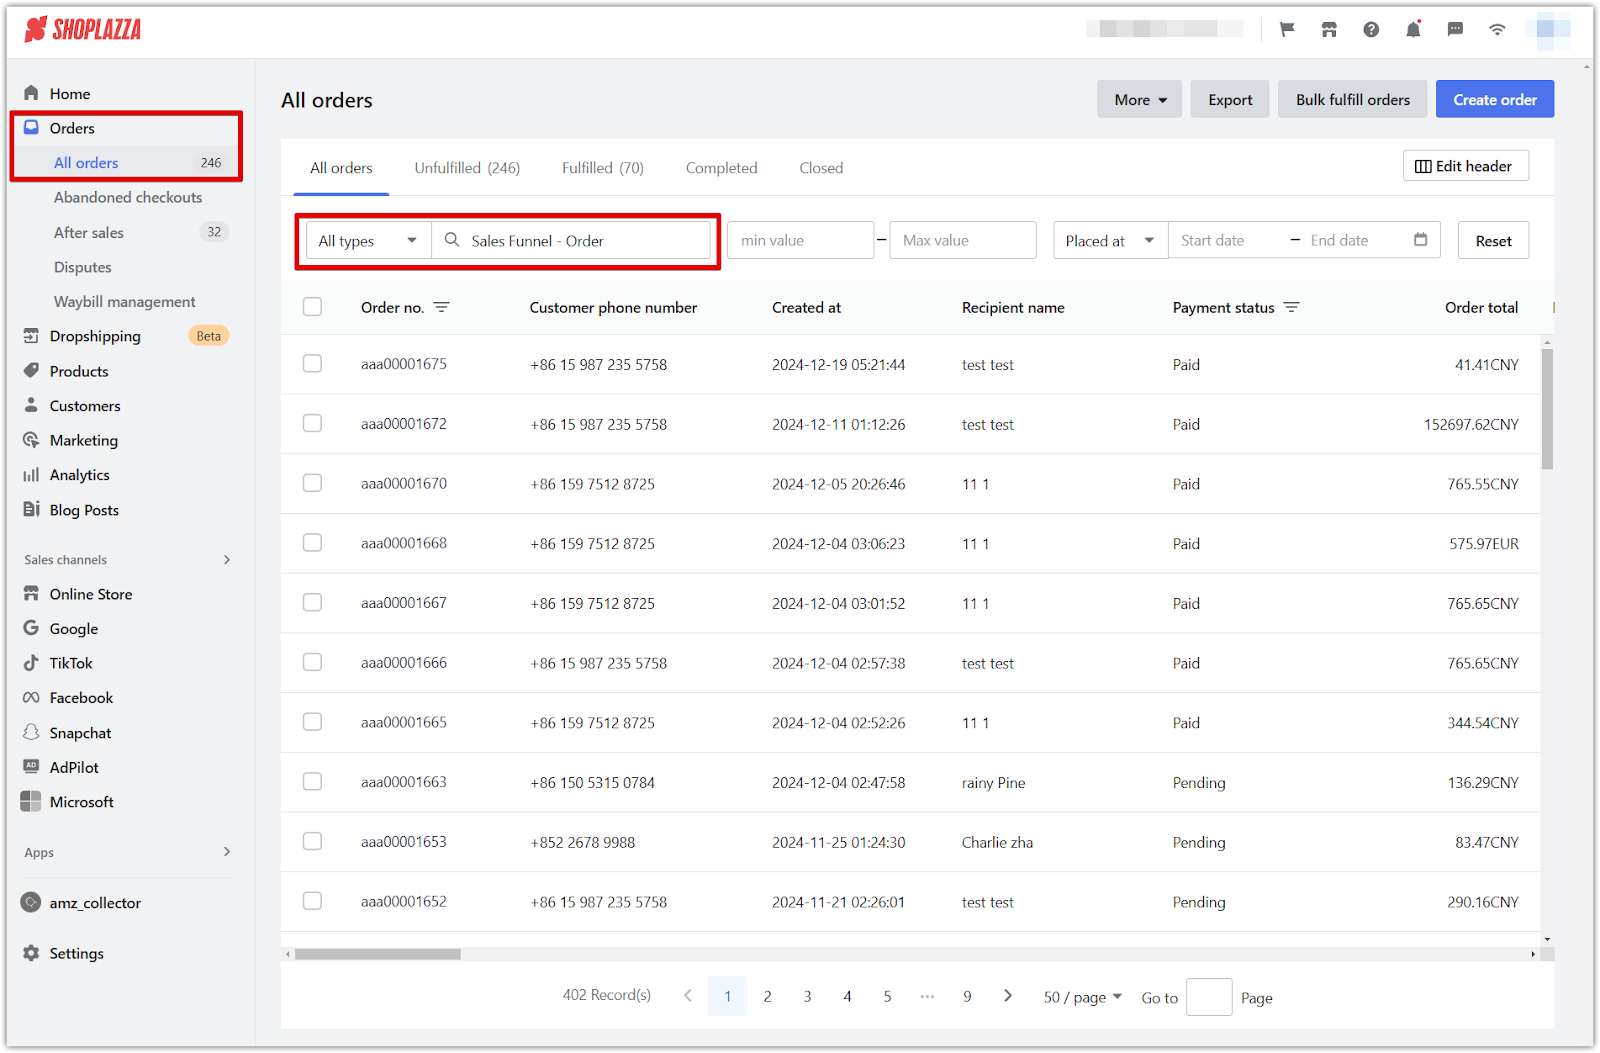
Easily manage orders generated through your funnel by tracking those labeled as Sales Funnel - Order in the Shoplazza store admin. These labels let you streamline order tracking and use admin features like shipping and order management.
To filter and view these orders, follow these steps:
1. Log in to your Shoplazza admin > Orders. Enter Sales Funnel - Order in the search bar to display all orders generated through the sales funnel.
Viewing orders in the Sales Funnel App
To view orders generated by a specific funnel, follow these steps:
1. Open the Sales Funnel app.
2. Navigate to Funnel and locate the desired funnel.
3. Click Edit Funnel.
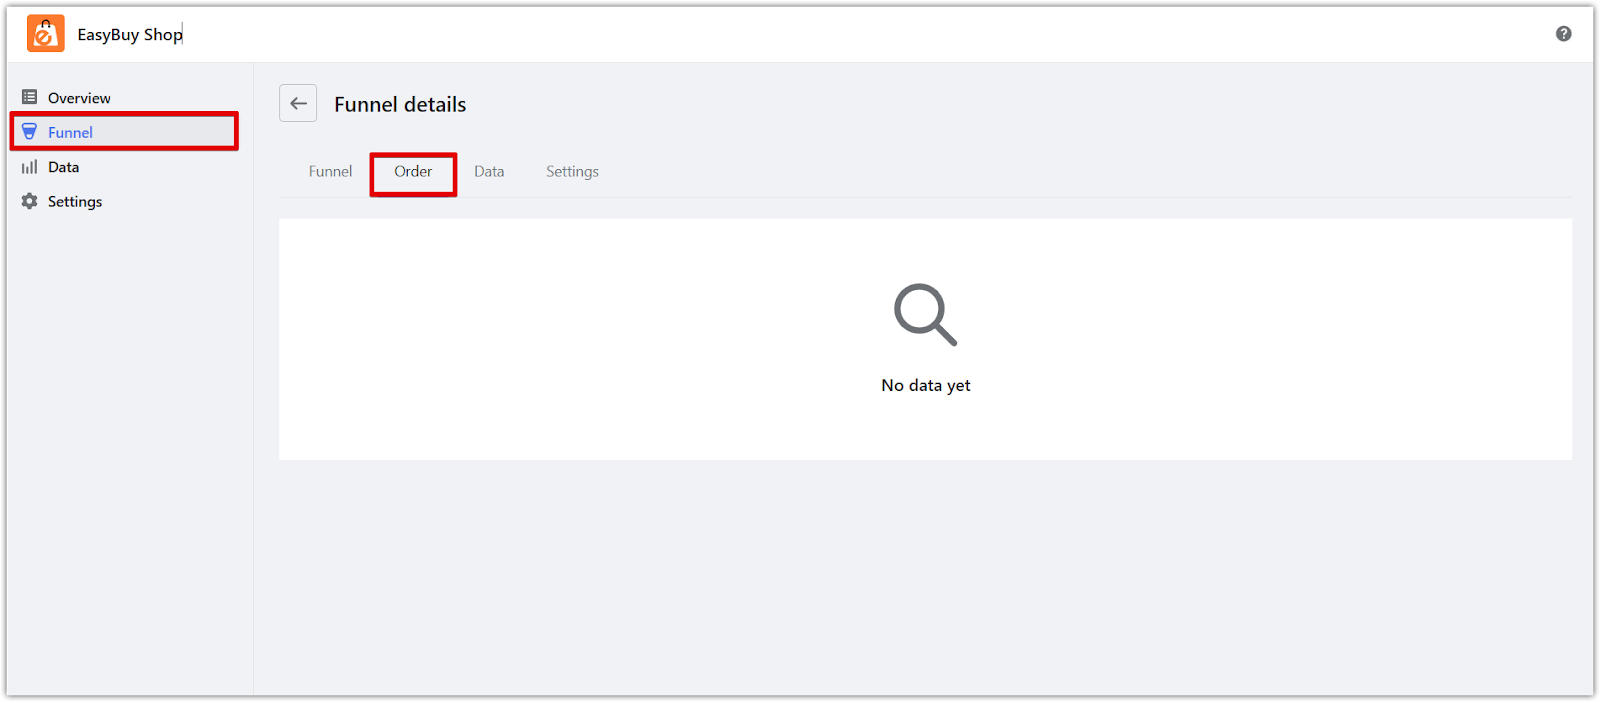
4. Go to the Order tab to view all orders associated with that funnel.
While you can view orders within the app, full order management is handled through the Shoplazza store admin Order Module.
Viewing single funnel data
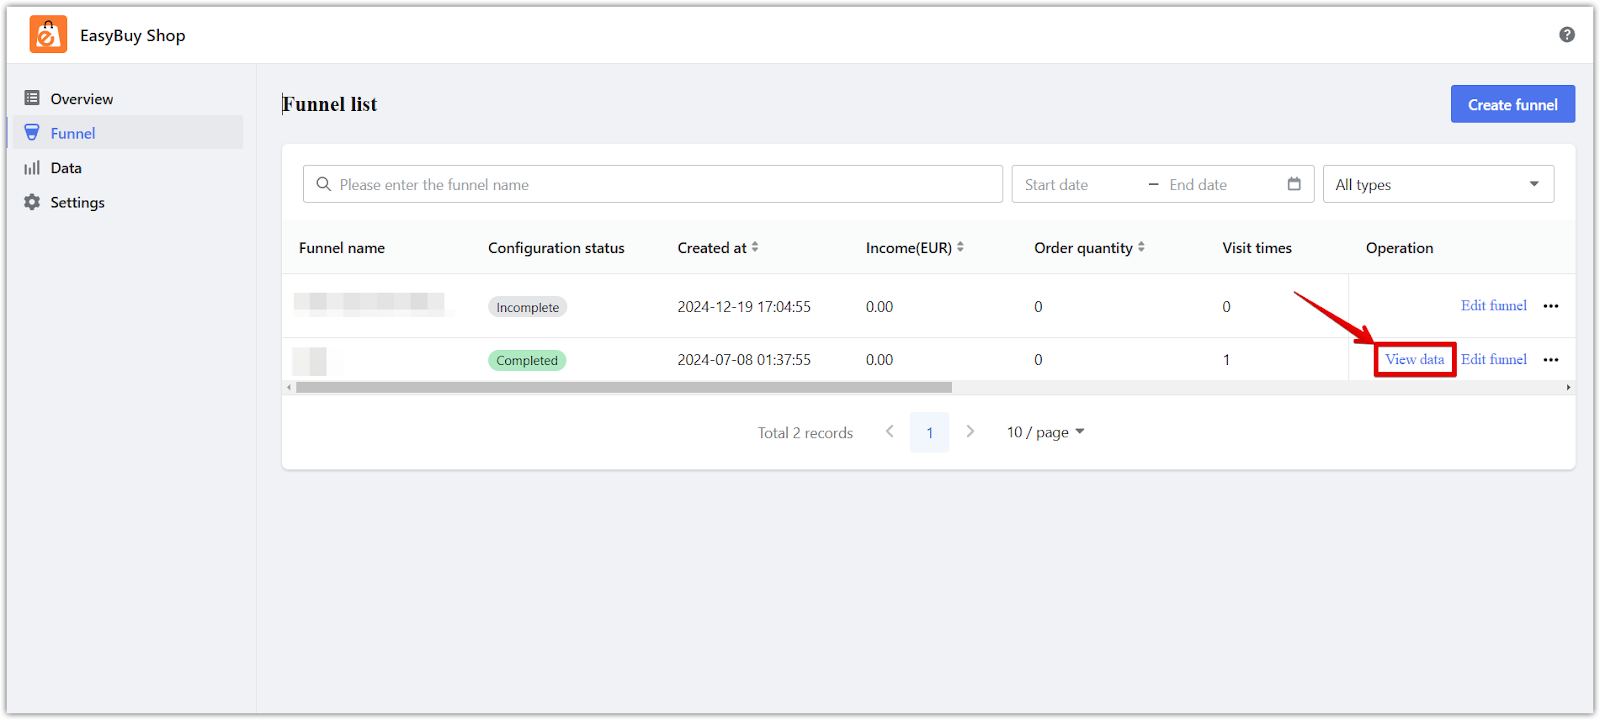
Analyze detailed performance metrics for individual funnels, including total sales, conversion rates, order volume, visiting users, and detailed breakdowns of the conversion funnel, checkout form performance, and funnel page performance. These metrics align with the data available in the overall funnel data module, offering a comprehensive view of each funnel's performance.
Editing single funnel details
Edit the details of a single funnel to update settings like basic information, checkout forms, and delivery URLs. This allows for secondary adjustments to refine your funnel as needed.

Previewing your funnel
After creating a funnel, preview it to check the page design and ensure all page links work as intended.
1. Click the "..." menu in the funnel list and select Preview.
2. Use the eye icon on the Funnel Create & Edit page.
This ensures everything looks and functions correctly before publishing.

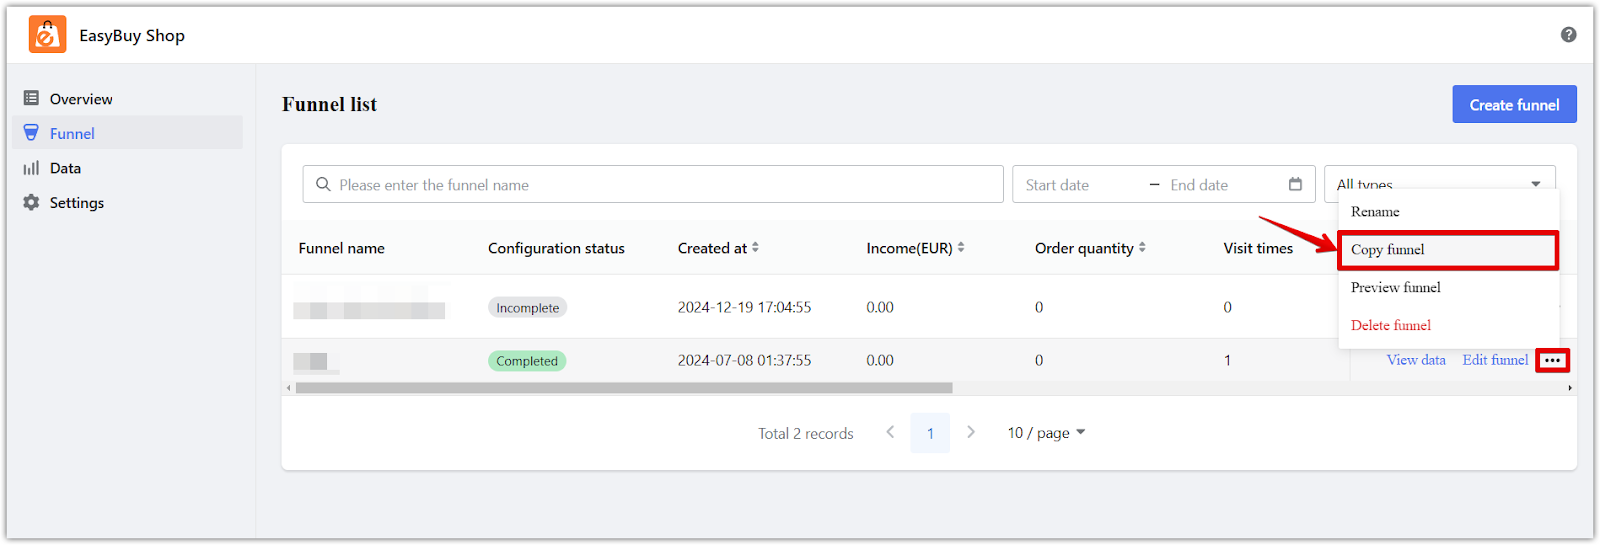
Copying a funnel
The funnel copy feature saves time by allowing you to quickly duplicate an existing funnel, including its page decorations and products, with a new delivery URL automatically generated.
To copy a funnel:
1. Click the "..." menu in the funnel list.
2. Select Copy to duplicate the funnel.
This feature streamlines your workflow and enhances efficiency.
Setting up a marketing campaign
Create targeted promotional campaigns to boost sales for your funnel. You can choose from various marketing methods, including offering discounts for multiple products or setting up combination purchases. First, navigate to the Sales Funnel App > Settings > Discount Activity and click Create Activity. Then, follow the steps below to set up your campaign effectively:
1. Select a Promotional strategy: Choose how you want to promote your products in the funnel store. If you choose not to apply any marketing effects, the product's original content will be used by default.
2. Use "Multiple SKUs purchased under a single SPU": If you want to offer a combination purchase, select this option. This allows you to set up discounts and purchase methods for multiple SKUs under a single product unit (SPU).
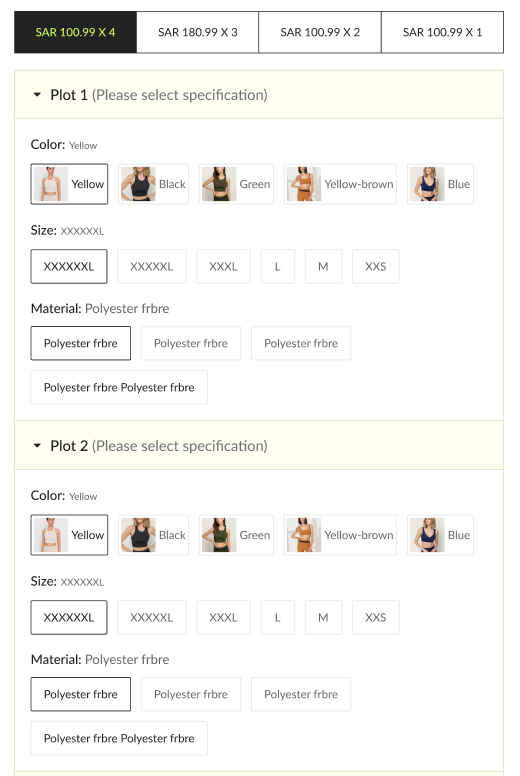
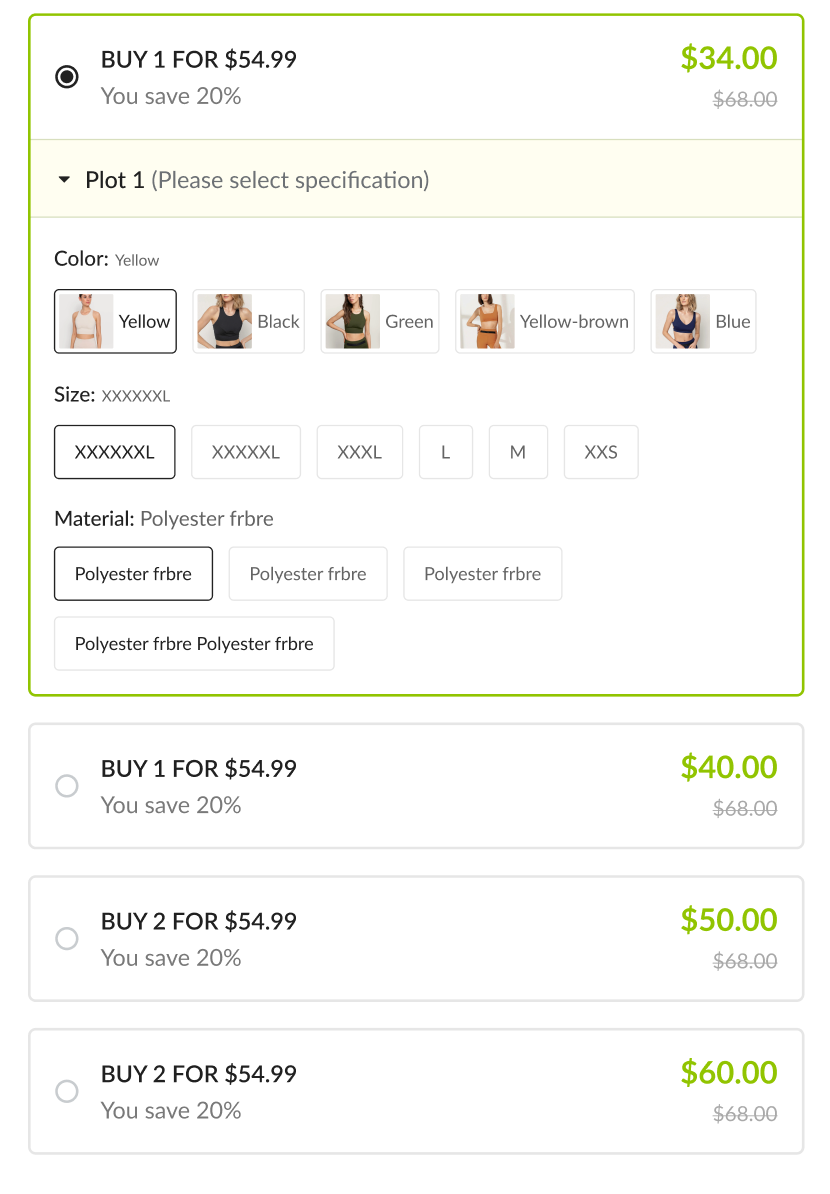
3. Select a single SPU to purchase multiple SKUs: In this mode, you can choose from two template effects. Pick the one that best suits your campaign's needs to apply the discount and purchasing method to the selected SKUs.
This setup helps you create effective promotional campaigns to drive sales through combination offers and discounts.
Setting the discount type
Choose a discount method for your funnel products, including percentage-based discounts, fixed amounts, or no discounts. Here's how each option works:
1. Discount: Select a percentage discount to apply to the product price. This discount will be reflected in all markets in your store’s admin. After setting the discount, the product will be sold at a reduced price.
2. Fixed Discount: Set a fixed discount amount for the product. The discount is based on the price in the main market, and in other markets, it is converted according to the exchange rate between the markets. The product will then be sold at a discounted price.
3. No Discount: If you choose this option, no discount is applied, and the product will be sold at the original price.
Template 1 vs. Template 2:
- Template 1 applies discounts and fixed reductions to individual products.
- Template 2 applies discounts and fixed reductions to the total price of the products in the cart.

Note
Template 1 and Template 2 calculate discounts slightly differently. Here’s how each template applies the discount pricing.
Template 1: Discount applied to a single product (SKU)
- What it does: The discount is applied to the lowest-priced product when a customer buys multiple units.
- Example:
- Product A has SKUs priced at $10, $15, and $20. You offer a $5 discount when purchasing 2 units.
- The calculation is: $10 x 2 = $20.
- After applying the $5 discount: $20 - $5 = $15.
- The price per unit is $15 ÷ 2 = $7.50.
- Final price: The customer pays $7.50 per unit, totaling $15.
Template 2: Discount applied to the total price of multiple SKUs
- What it does: The discount is applied to the total price of selected products.
- Example:
- Product A has SKUs priced at $10, $15, and $20. You offer a $5 discount for 2 units.
- The calculation is: $10 + $15 = $25.
- After applying the $5 discount: $25 - $5 = $20.
- The price per unit is $20 ÷ 2 = $10.
- Final price: The customer pays $10 per unit, totaling $20.
Key Difference:
- Template 1: The discount is applied per unit, resulting in a lower unit price.
- Template 2: The discount is applied to the total price, leading to a higher unit price.
Setting up the checkout form
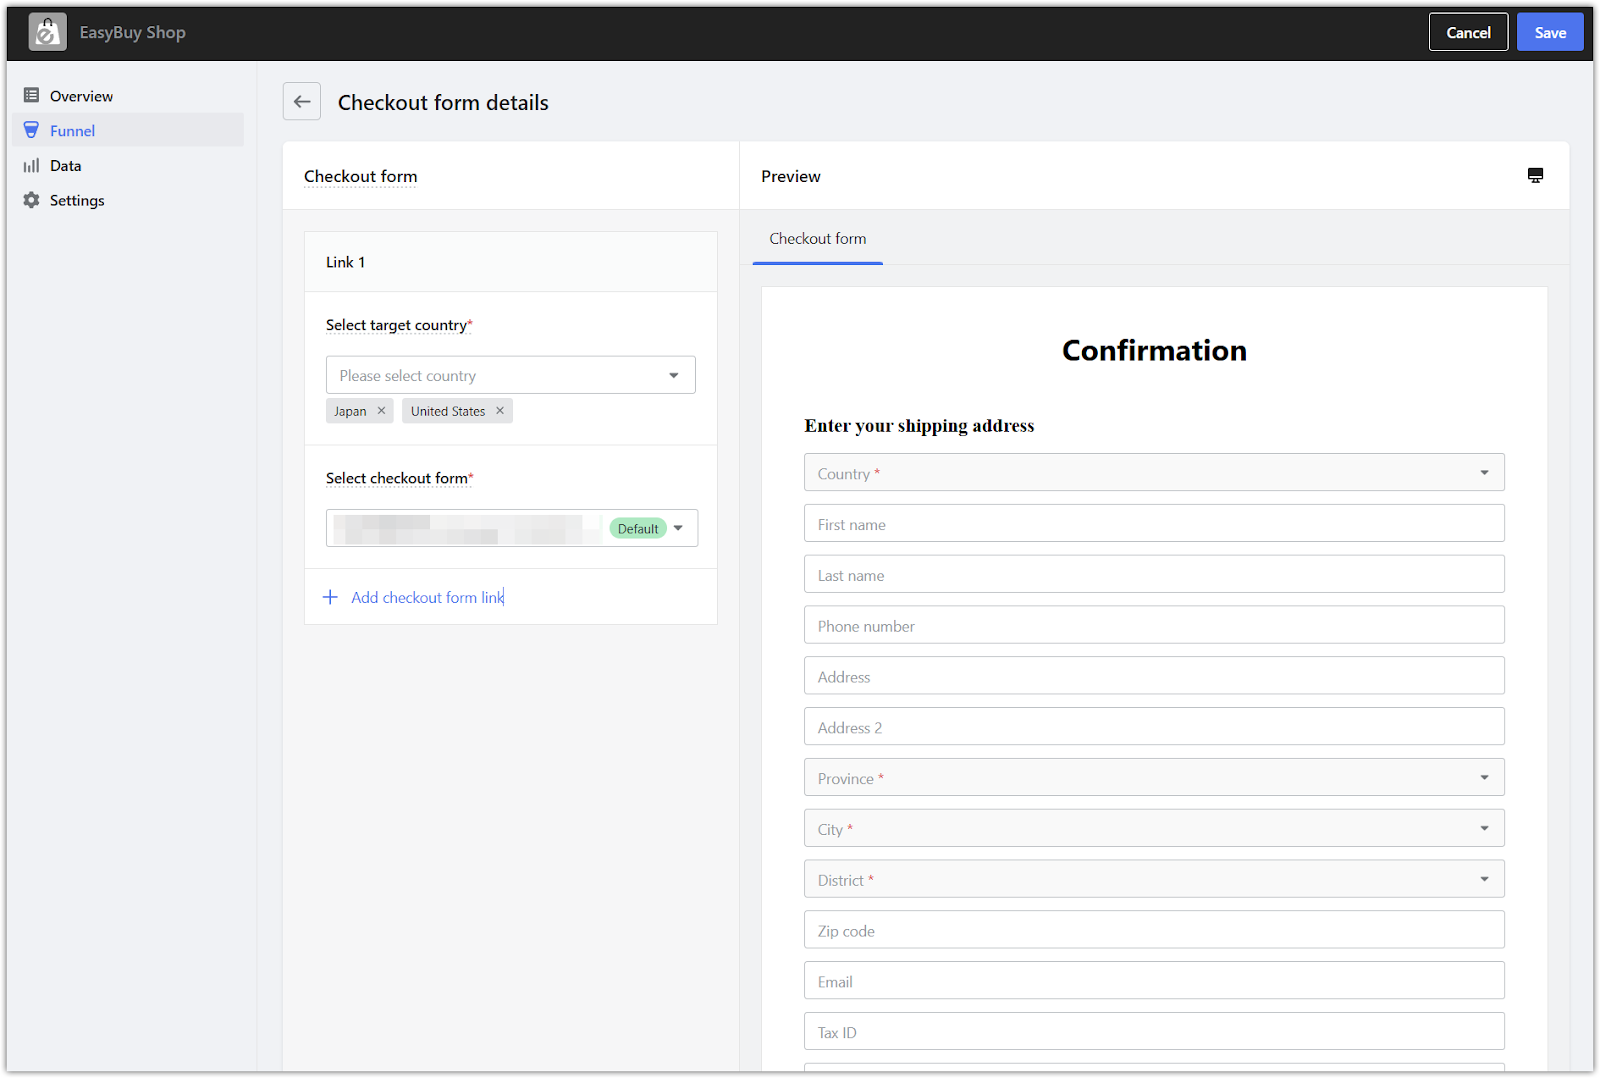
To set up the checkout form, navigate to the Sales Funnel App > Funnel > Edit Funnel for the desired funnel. Then go to the Settings Tab and find the Country & Checkout Form section. Click Edit Checkout Form and follow the steps below:
1. Select the country: Choose which country or countries the checkout form will apply to. Multiple countries can be selected.
2. Add a checkout form: Add a checkout form to your store and set different forms for different countries. This helps you expand your global market reach.
3. Country data: The country options are based on your store's multi-market setup, and the checkout form is chosen from the list created in the previous step.
4. Selection limitations: While multiple countries can be selected, you can only assign one checkout form per country and the same form cannot be repeated.
This setup allows you to customize the checkout experience for different regions.
Data overview
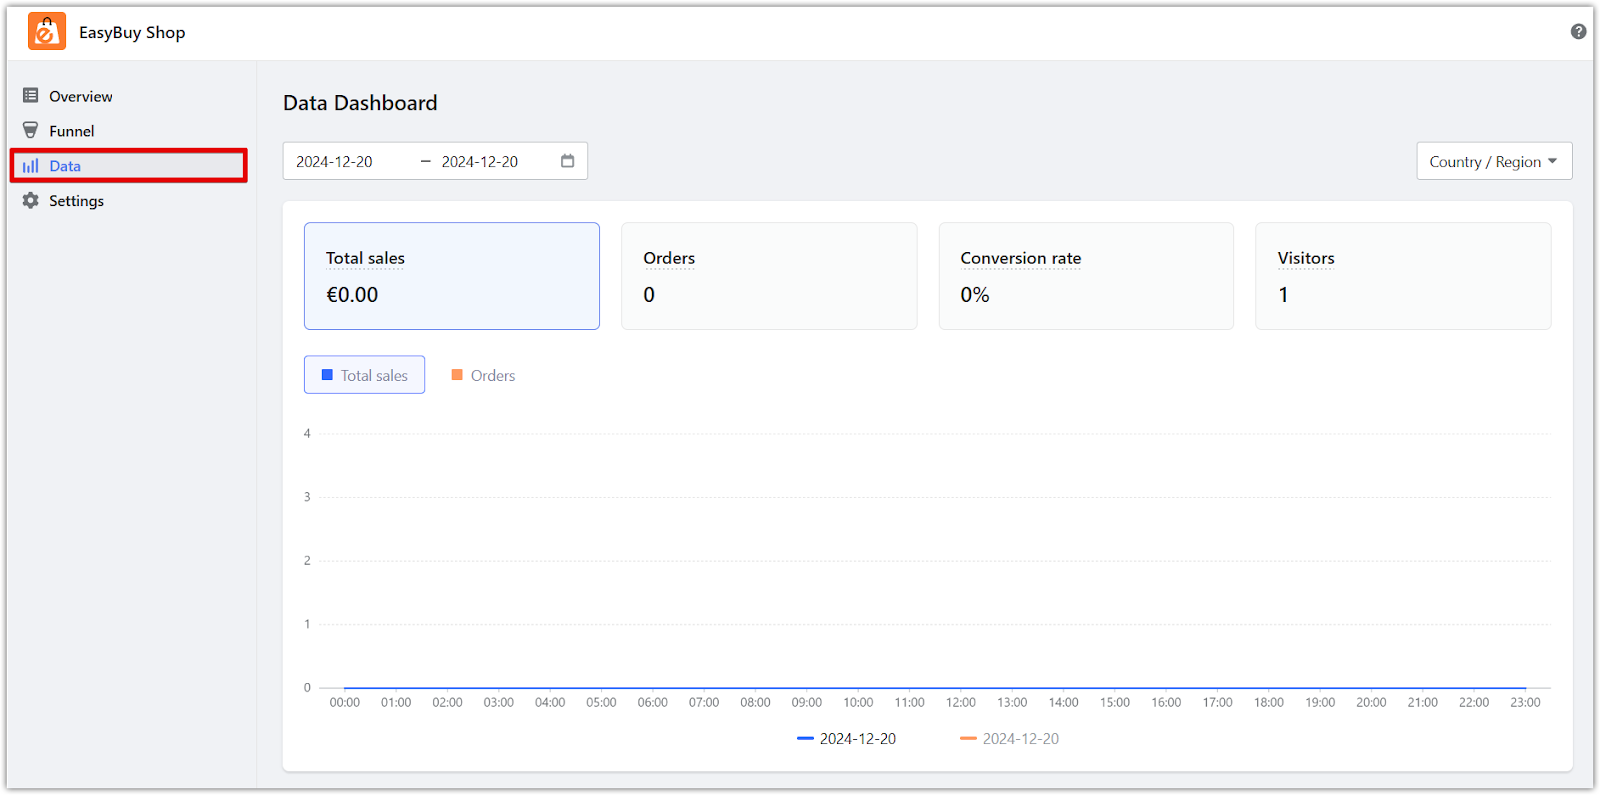
The Data Dashboard allows you to use data to evaluate business performance and answer key questions like, "How is the store performing?" and "What is the conversion rate?" All of this can be found in the Dashboard.
To get a quick overview of your business activities, navigate to the Sales Funnel App > Data. The top section will summarize key metrics, such as total sales, unique orders, number of visitors, conversion rate, and more.
Conversion funnel
The funnel data tracks six key indicators, including the number of unique visitors, selected products, unique completed orders, conversion rate, and more. You can also view the performance of each step in the checkout form, helping you understand how customers progress through the funnel.

The conversion funnel data is further broken down into six elements, including country, UTM, store, and more. This gives you a clearer overview of your business performance and helps you refine your strategies. You can also access additional insights in the Data Dashboard, such as average order price, channel order data, and country-specific order distribution.
Frequently asked questions
This section covers details like why the data is split into sections and how to configure the “Accept terms and conditions” field in your checkout forms.
Q: Why is the data split into “conversion funnel” and “checkout form performance”?
A: This split helps analyze the user journey and how customers interact with checkout forms.
Q: How do I set the “Accept terms and conditions” field?
A: Create a custom page with your terms, copy the link, and insert it into the “Description content” field of the checkout form.


Comments
Please sign in to leave a comment.