Offering bulk discounts is a great way to attract customers and increase sales for your online store. Bulk discounts, like "Buy X, Get Y Free," provide flexibility in structuring promotions, whether offering free items or setting percentage discounts. For example, a "Buy 2, Get the lowest priced item 50% Off" deal is a flexible option that appeals to a broader audience. In this guide, we’ll walk you through setting up a bulk discount campaign with different discount options, how to configure the rules, and how to set up your promotional page.
Setting up bulk discounts
To begin, install the Discount with Purchase app and follow the steps below to create and manage your bulk discount campaign.
Installing the Discount with Purchase App
To get started, you’ll need to install the Discount with Purchase App and follow the steps below to create and manage your bulk discount campaign.
1. Navigate to the App Store: From your Online store Admin > Apps, click Visit App Store.
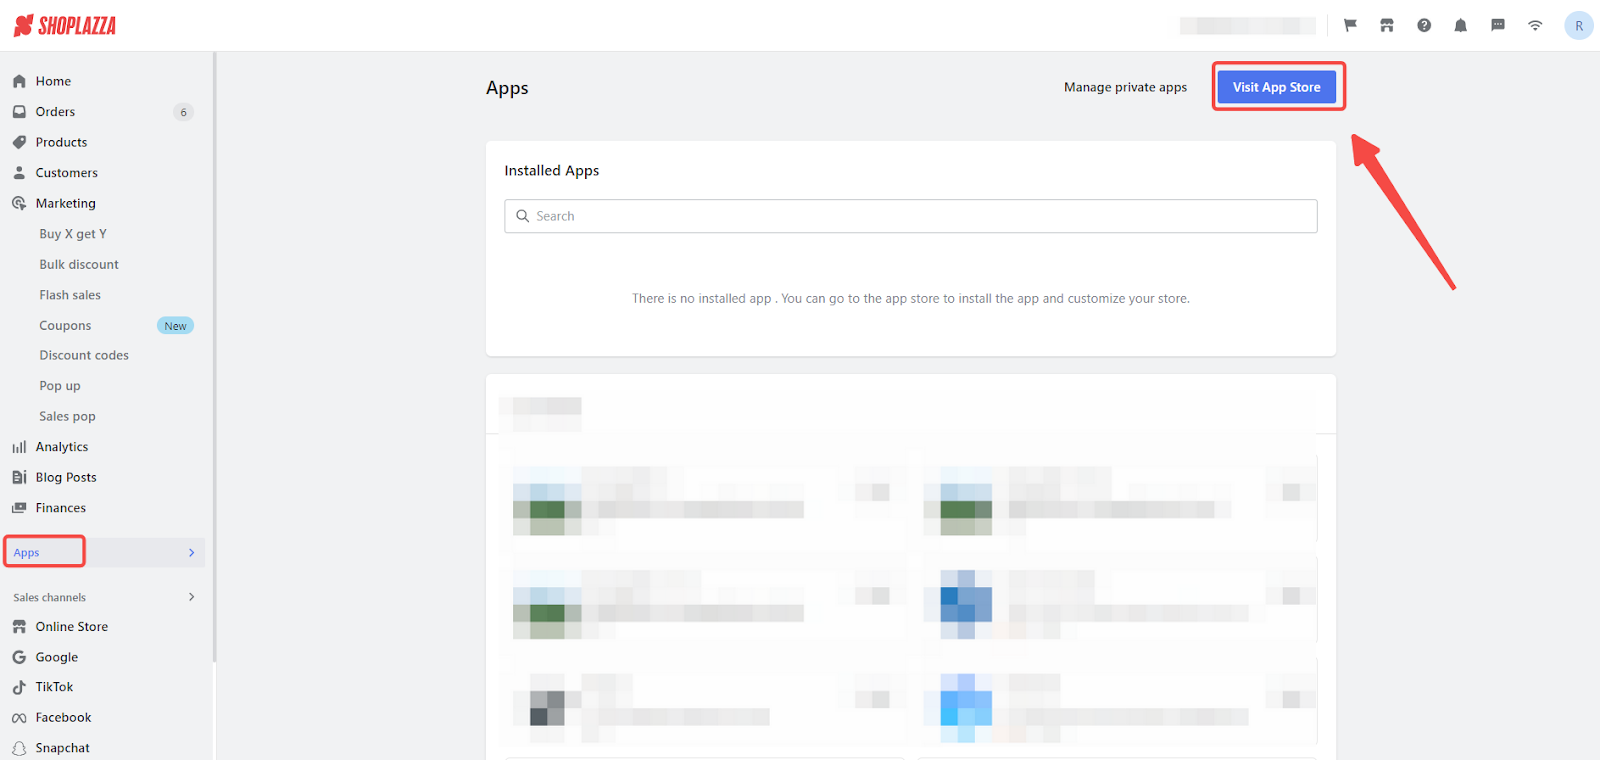
2. Add the app: Use the search bar to find Discount with Purchase , then click Add app to install it.

3. Complete the installation: Click the Install app to finish adding it to your store.
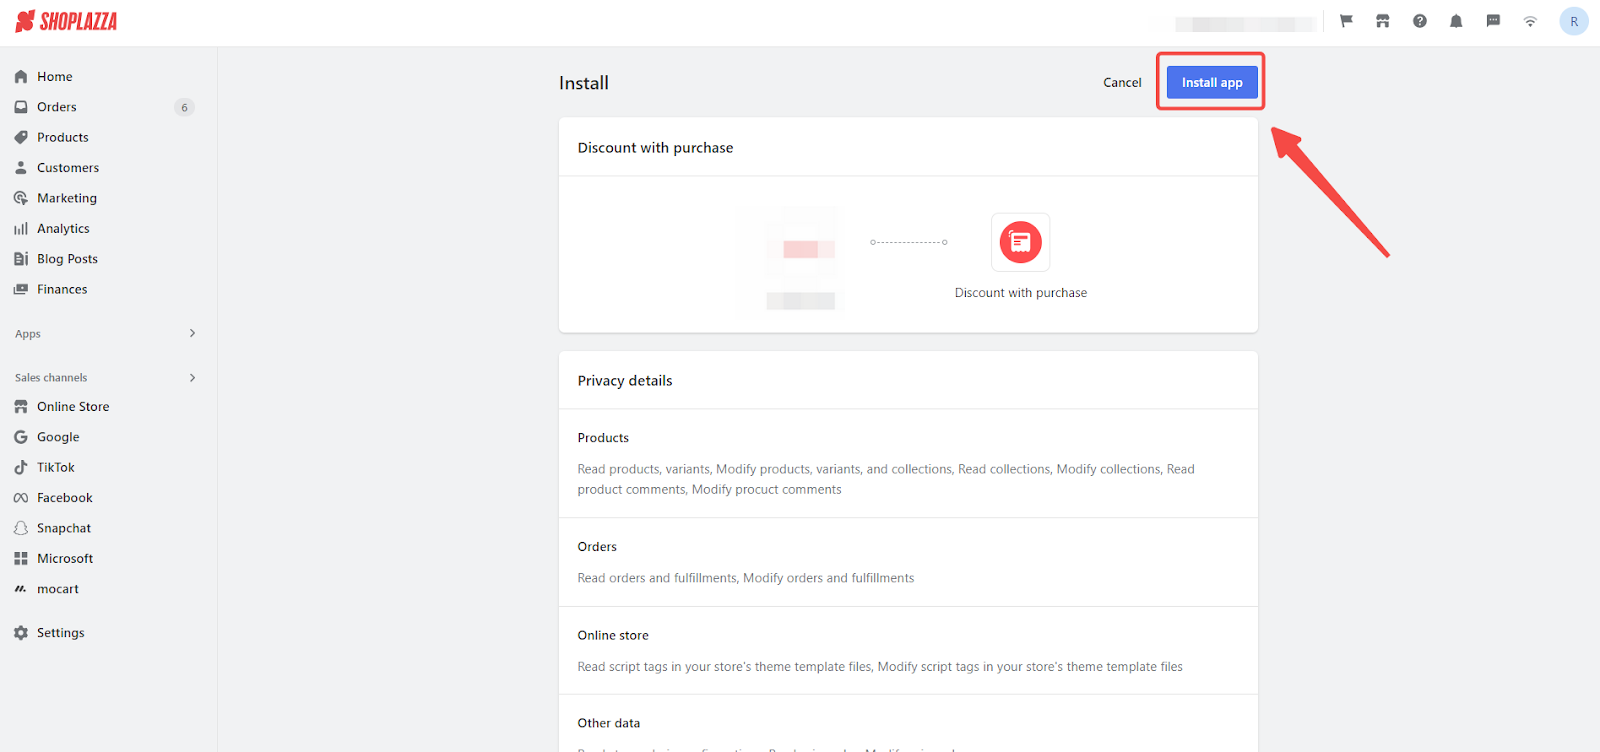
Create a new discount activity
The Create activity page is where you begin setting up your bulk discount campaign. This section allows you to input key details such as the promotion's name, duration, and applicable products. You’ll also configure the structure of your promotion here, laying the groundwork for how the discount will function across your store.
1. Start a new campaign: From your Online Store Admin > Apps > Discount with Purchase, click the Bulk discount section, then New Activity to begin creating your discount promotion.
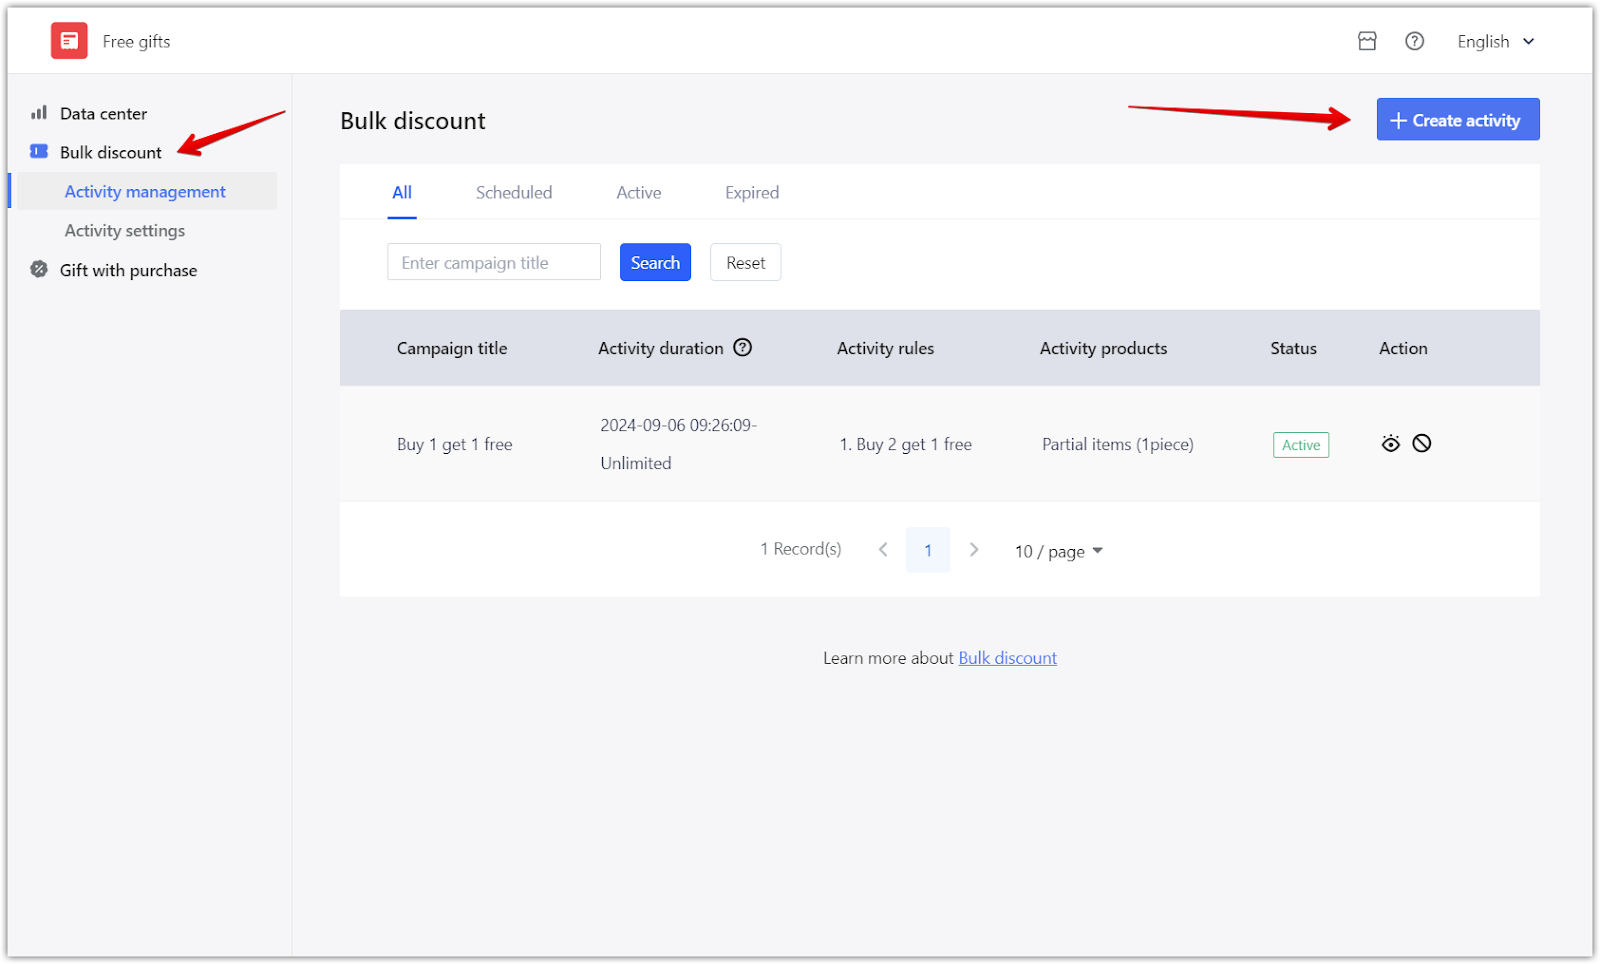
Create activity page
1. Define campaign details: Name your campaign and choose whether to set a specific timeframe or let it run long-term. Be sure the schedule is aligned with your store’s time zone.
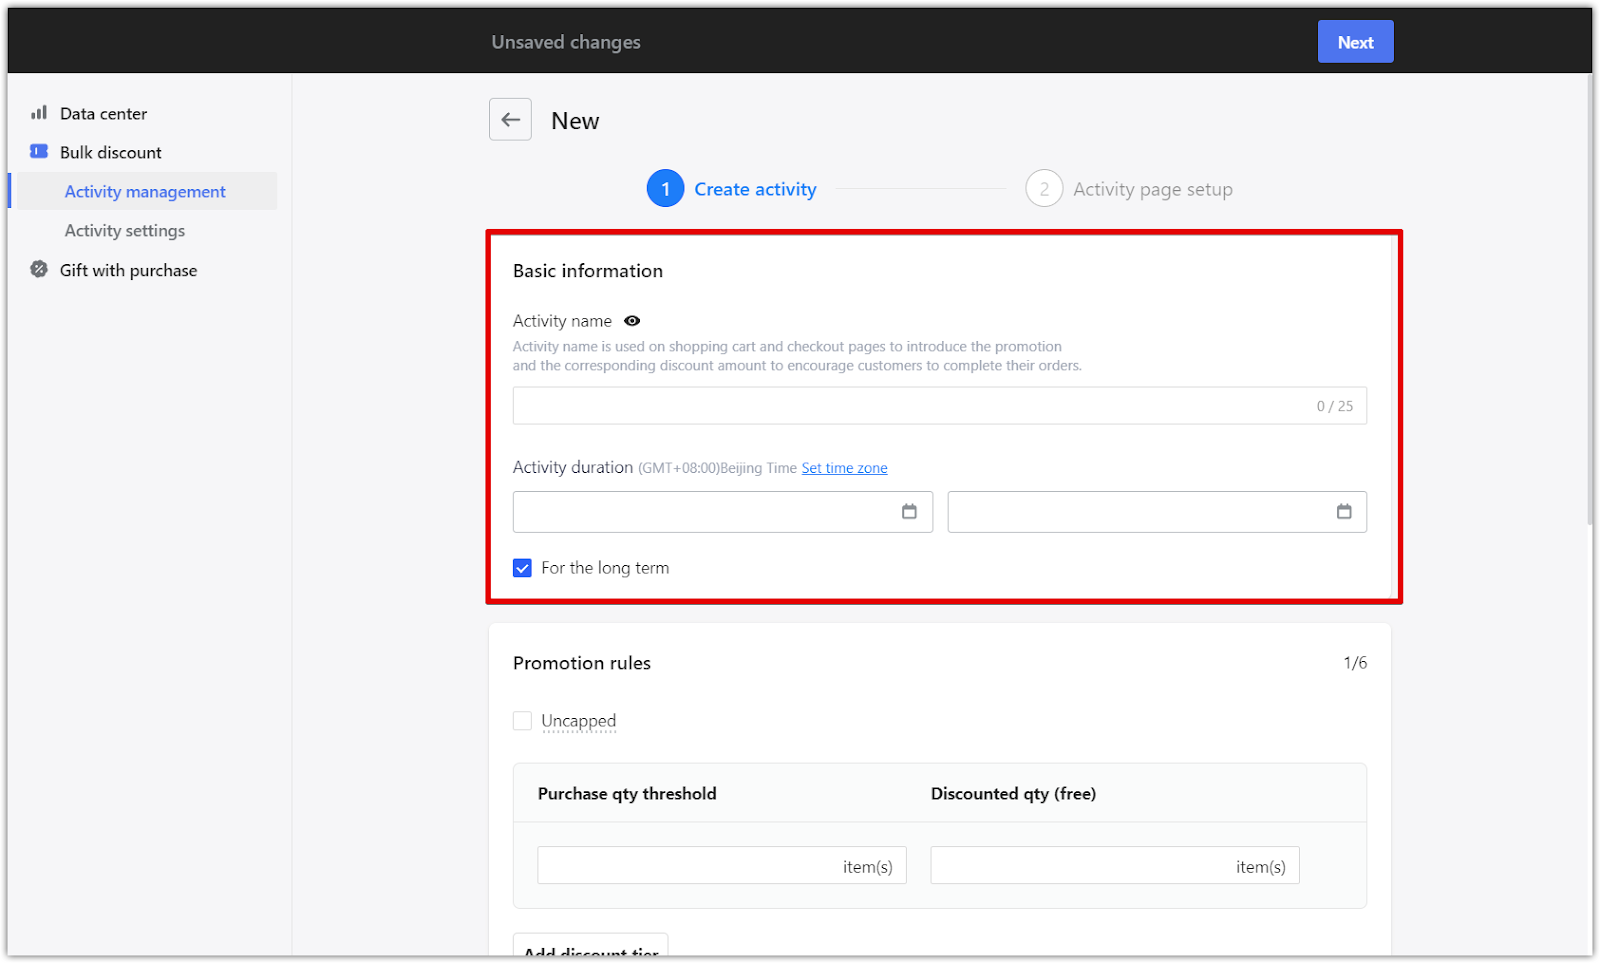
Setting up discount rules
The Set up discount rules section allows you to define the specifics of your promotion. You can choose between capped or uncapped discounts, create multiple discount tiers, and configure how the promotion applies to different products. This flexibility lets you tailor the promotion to fit your business goals and maximize customer engagement.
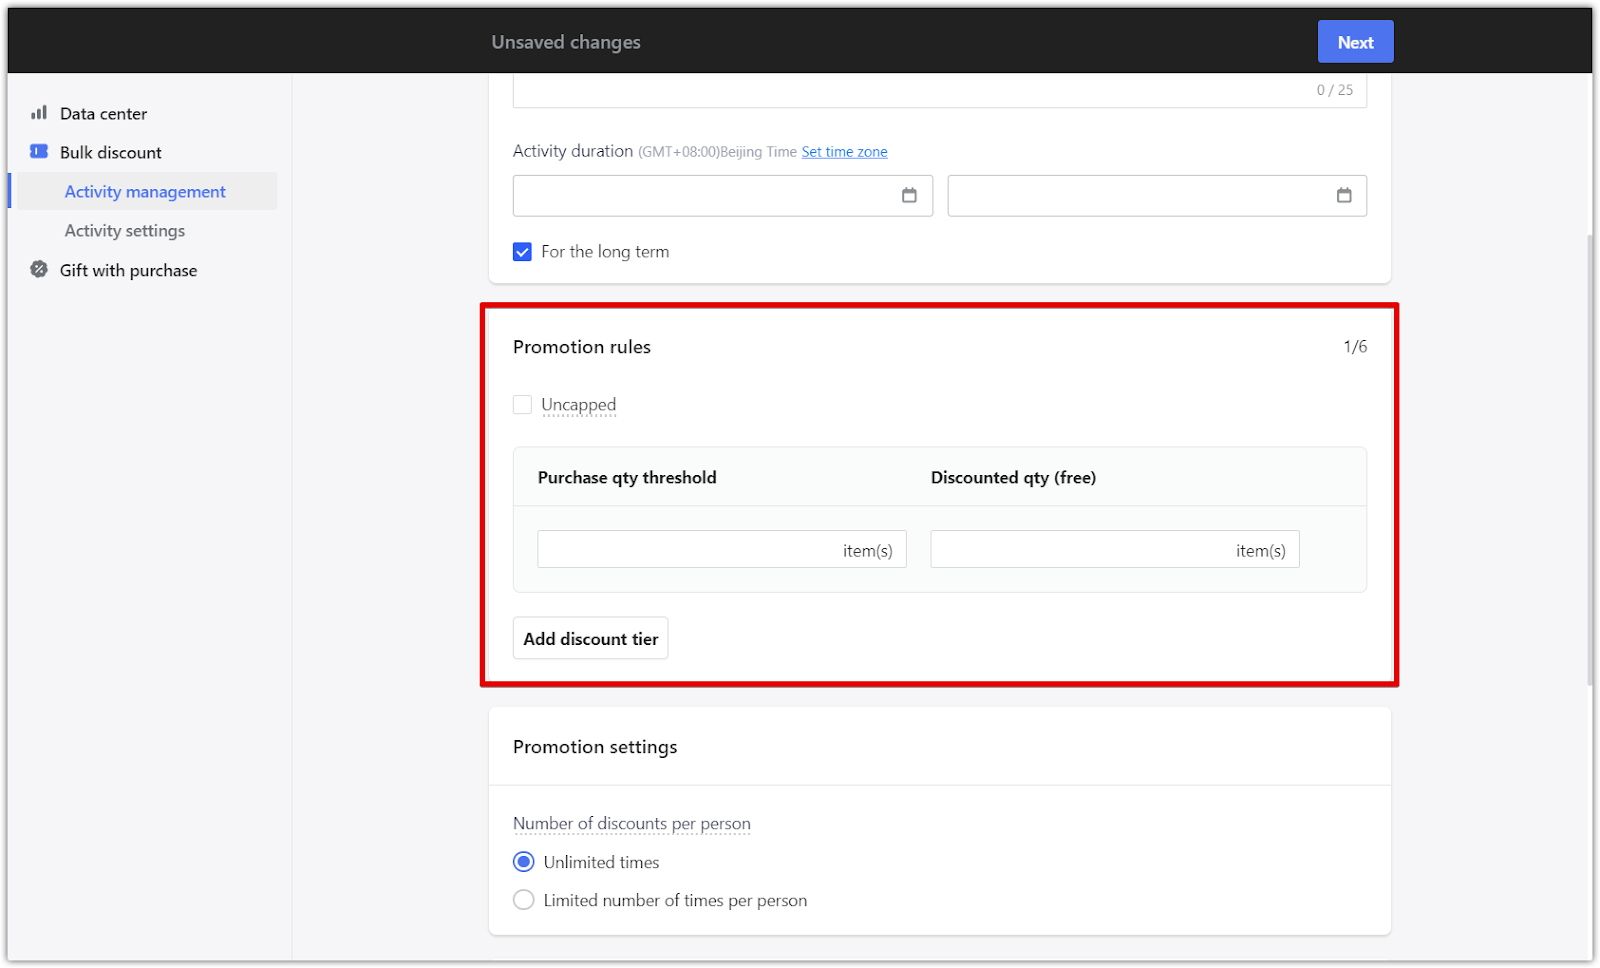
1. Create preferential rules: Decide how customers will receive discounts:
- Uncapped offers: This option allows customers to receive multiple discounts in a single transaction. For example, if a customer purchases three items, the lowest-priced item will be free. If they purchase six items, the two lowest-priced items will be free, and so on. This option encourages larger purchases by rewarding customers with more free or discounted items as they buy more.
- Capped offers: This is the default option when "Uncapped" is not selected. It limits the discount to just one item per transaction, no matter how many items the customer purchases. For example, if a customer buys six items, only the lowest-priced item will be free or discounted.
- Multiple tiers: To set up discounts based on purchase quantity, click Add discount tier. This allows you to offer rewards that increase with larger purchases. For example, you can set it up so that "Buy 3, Get 1 Free" and "Buy 5, Get 2 Free" encourage customers to buy more for better discounts.
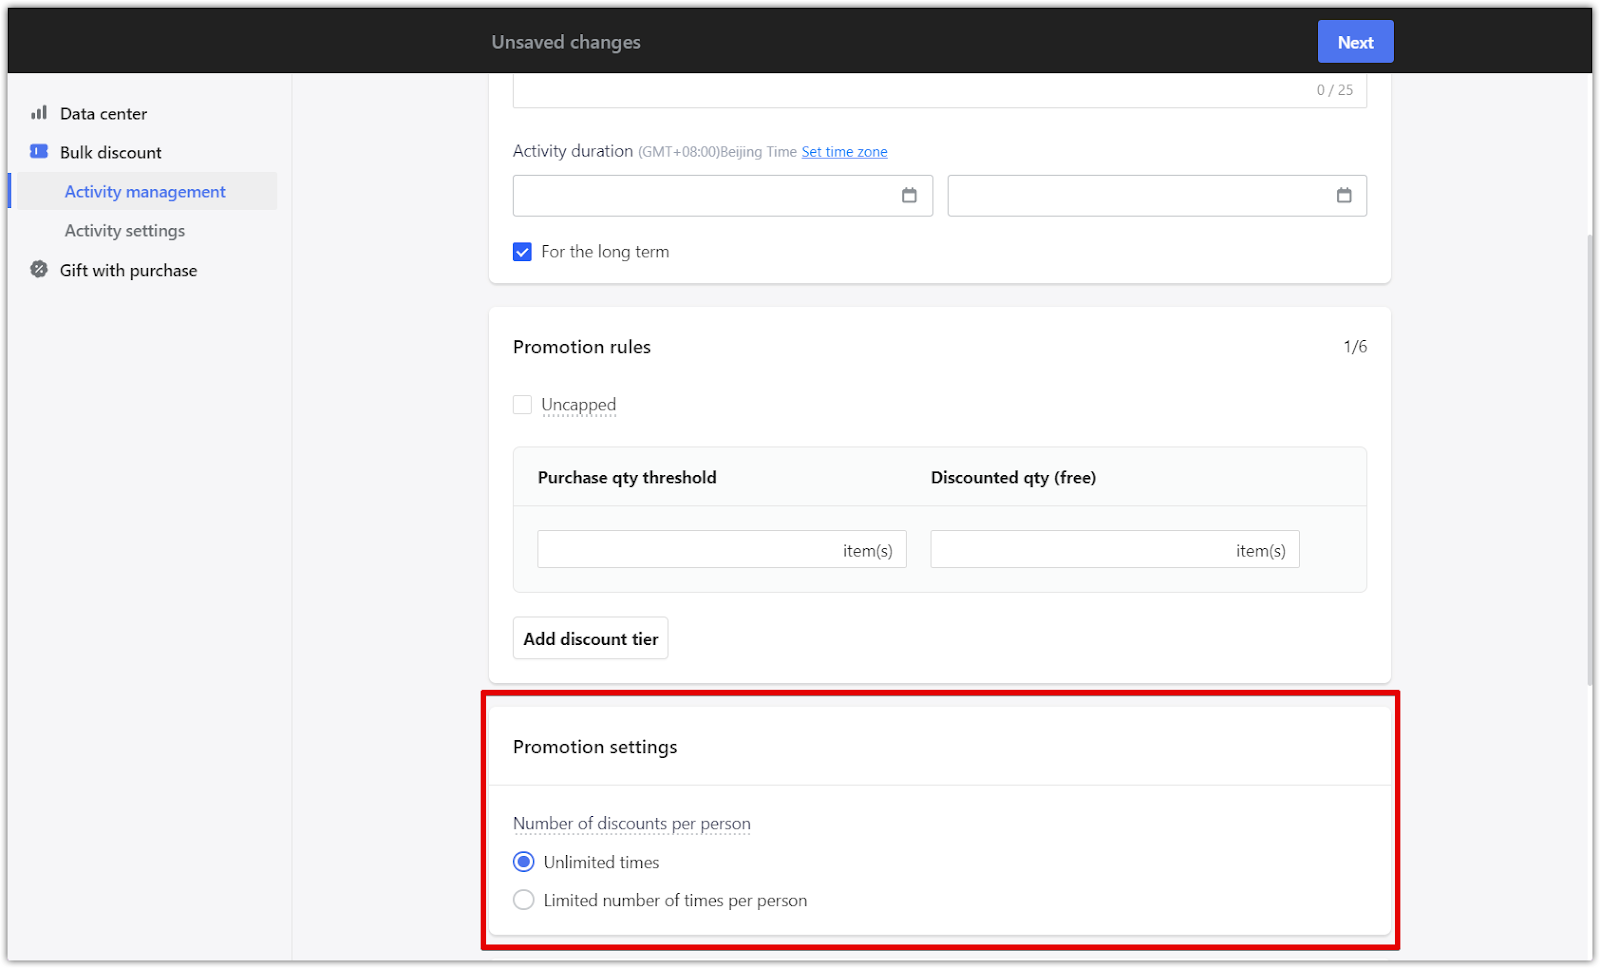
2. Promotion settings:
- Number of discounts per person: Select whether customers can use the discount an Unlimited number of times or set a Limited number of times per person. This setting gives you flexibility based on your campaign goals and strategy.
3. Applicable products:
- Choose whether the discount applies to All products, Collection products, or Partial products.
- For Partial products, click Select products to choose specific items included in the discount. You can also adjust the display order of the selected products, such as listing them From A to Z. Once you’ve entered all the required details and selected the applicable products, click Next to move on to the Activity page setup.

Setting up the Activity page
In this section, you'll design how your promotion appears to customers. Here are the steps to customize and optimize the look of your promotion:
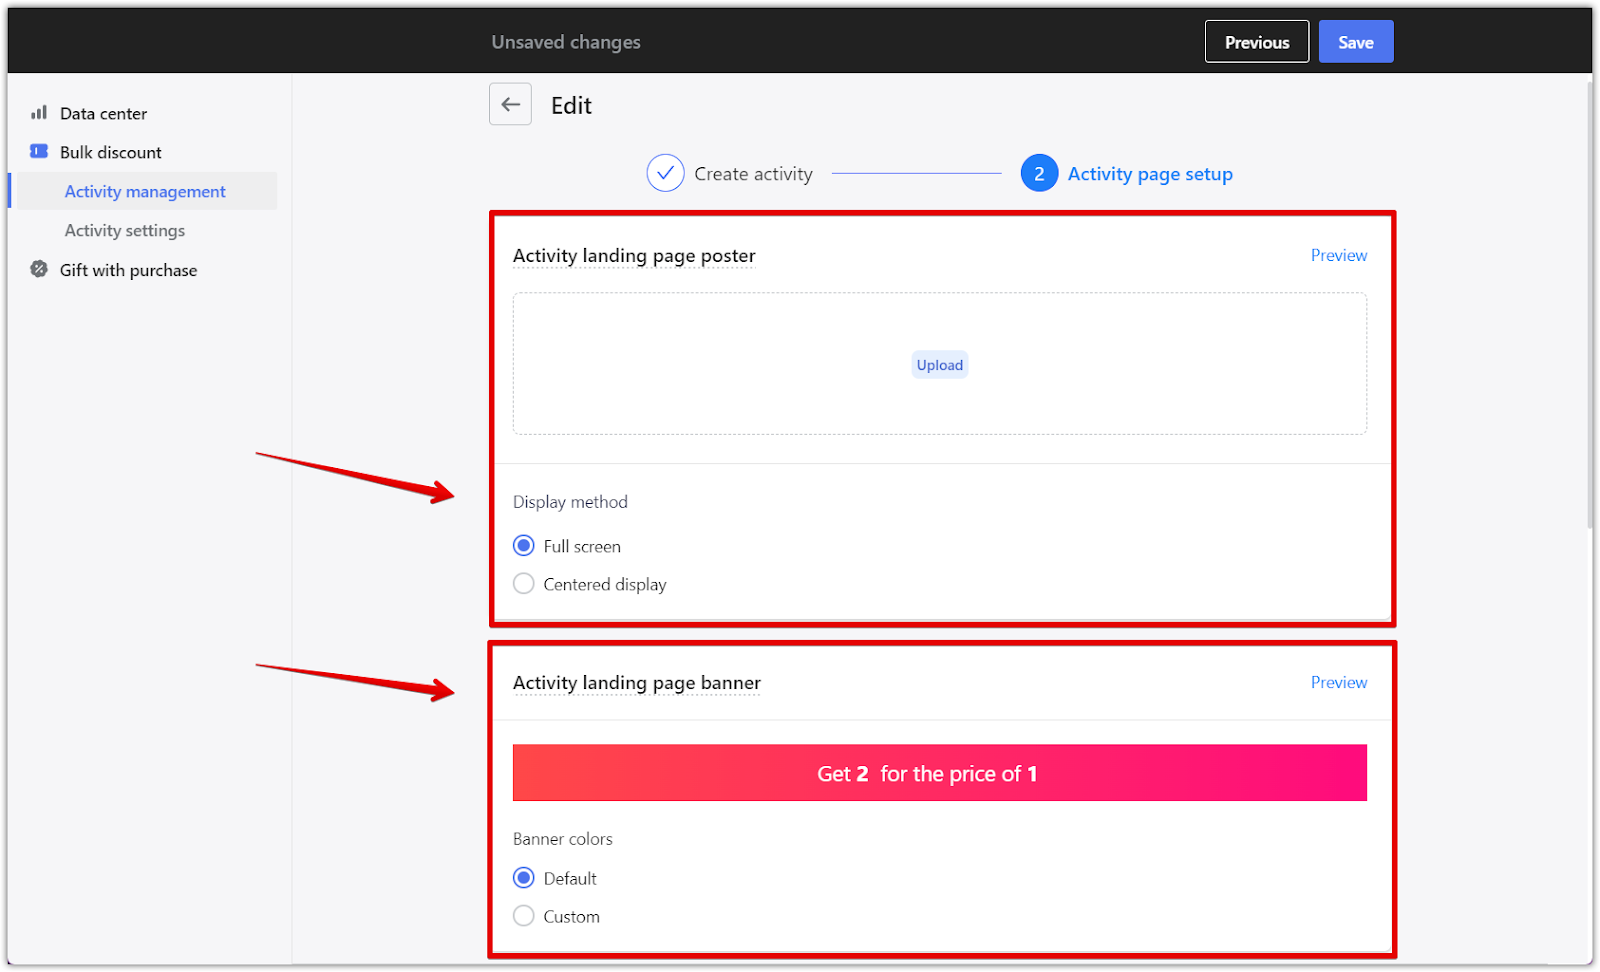
1. Design engaging visuals: Add banners or posters that visually represent your promotion. This helps attract attention and makes your promotion stand out.
2. Include additional content: Add extra promotional content or instructions that enhance the customer's experience. You can also provide tips for customizing banners, such as using brand colors.
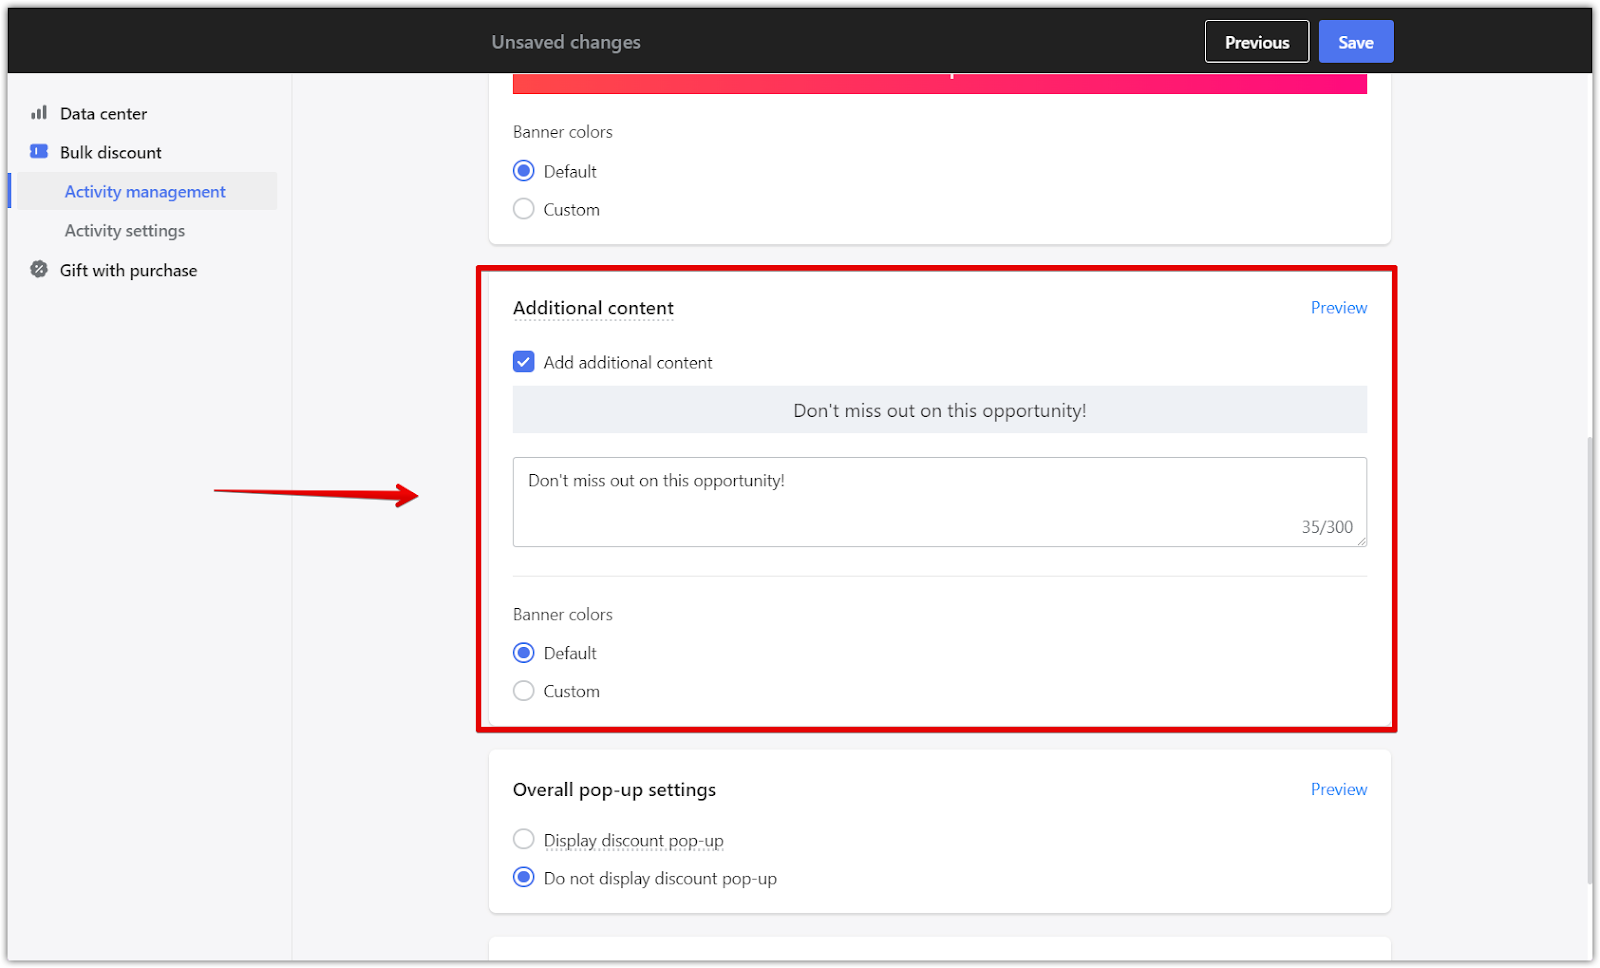
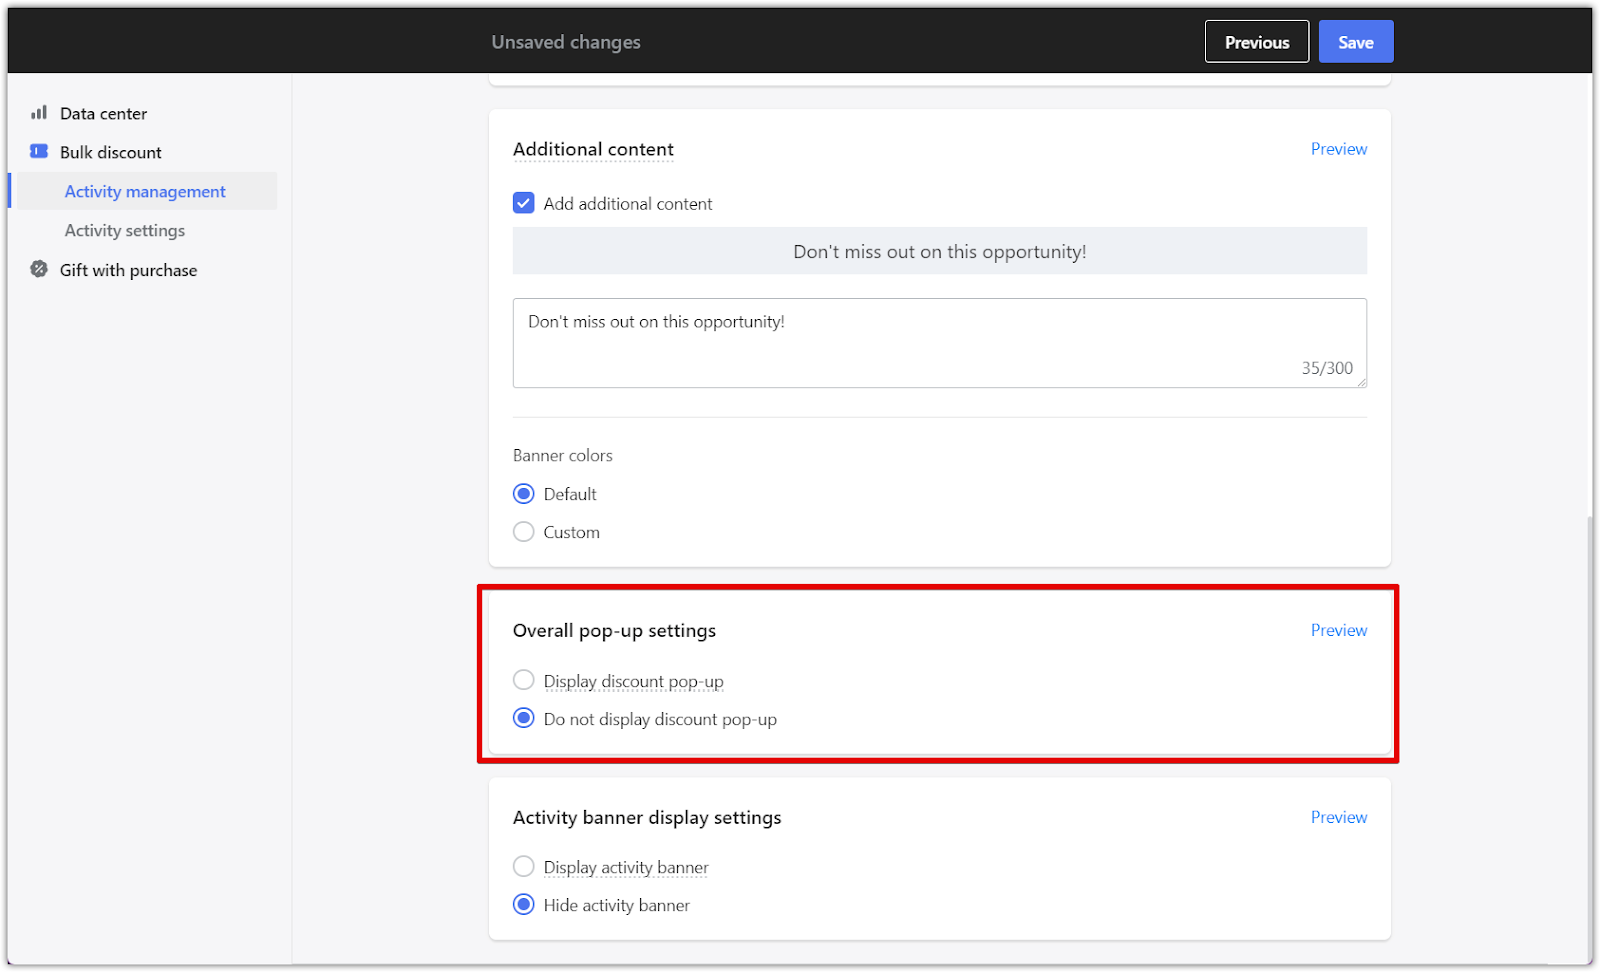
3. Set up pop-up notifications: Use pop-ups to immediately inform customers about the promotion when they visit your site.
- Display discount pop-up: This pop-up will show up on all pages (excluding checkout and registration pages) and will be displayed once per visit. This option is great for increasing awareness of the ongoing discount.
- If you choose Display discount pop-up, you can further customize its settings by clicking Pop-up list settings. Here, you can adjust the appearance, timing, and behavior of the pop-up to fit your promotional goals better.
- Select Do not display the discount pop-up if you prefer not to show it.
4. Optimize banner placement: Adjust where your banners are displayed to ensure maximum visibility across your site.
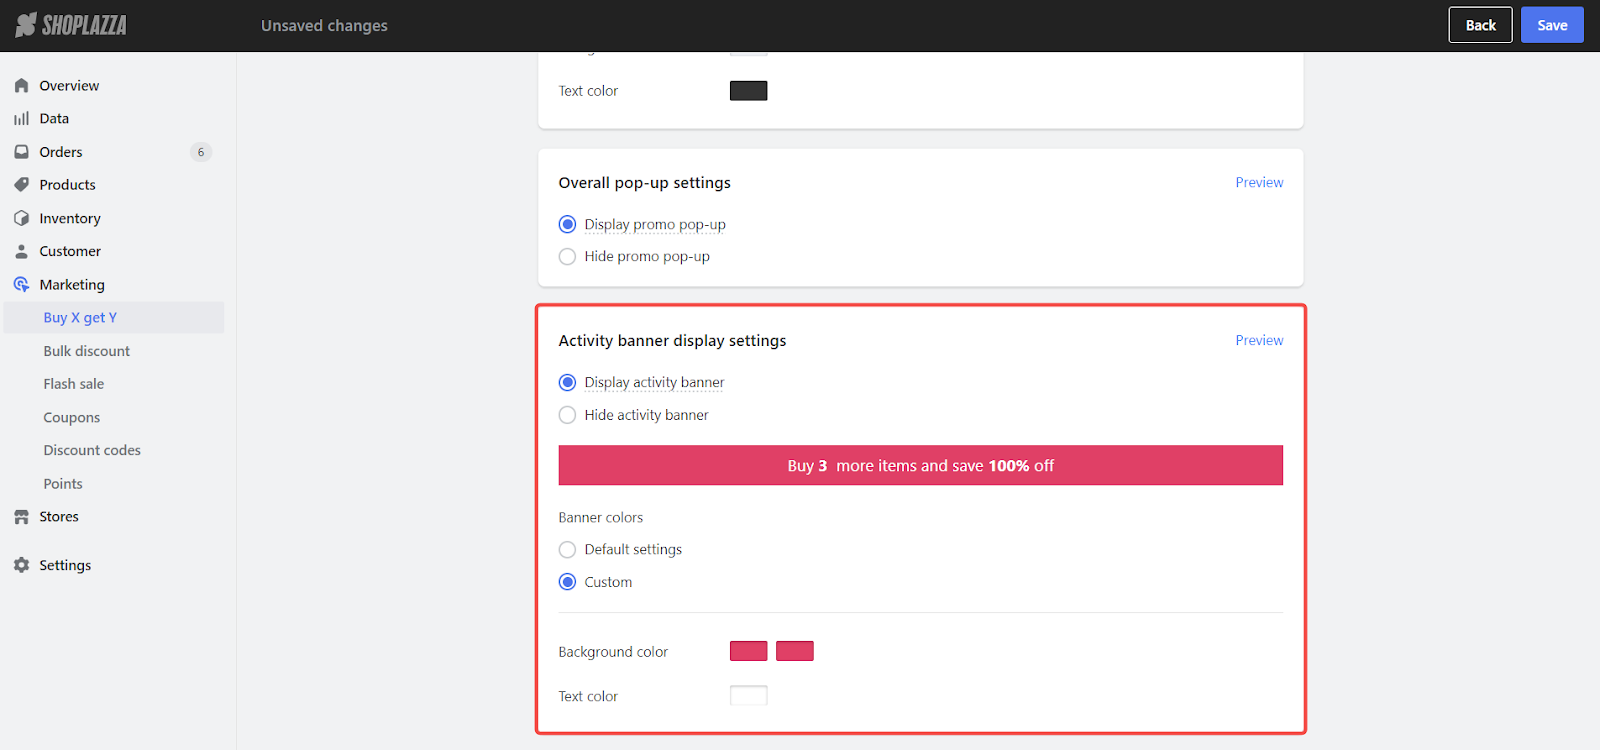
- Display activity banner: This banner will display promo information on all pages except the shopping cart, checkout, and registration pages.
- Once you select Display activity banner, additional options will appear to customize your banner:
- Banner colors: You can choose the default color for the banner or select Custom to modify the colors according to your brand’s style.
- A banner preview will show your promotional message, such as "Get 2 for the price of 1," so you can see how it will look before publishing.
- If you prefer not to display the banner, select Hide activity banner.
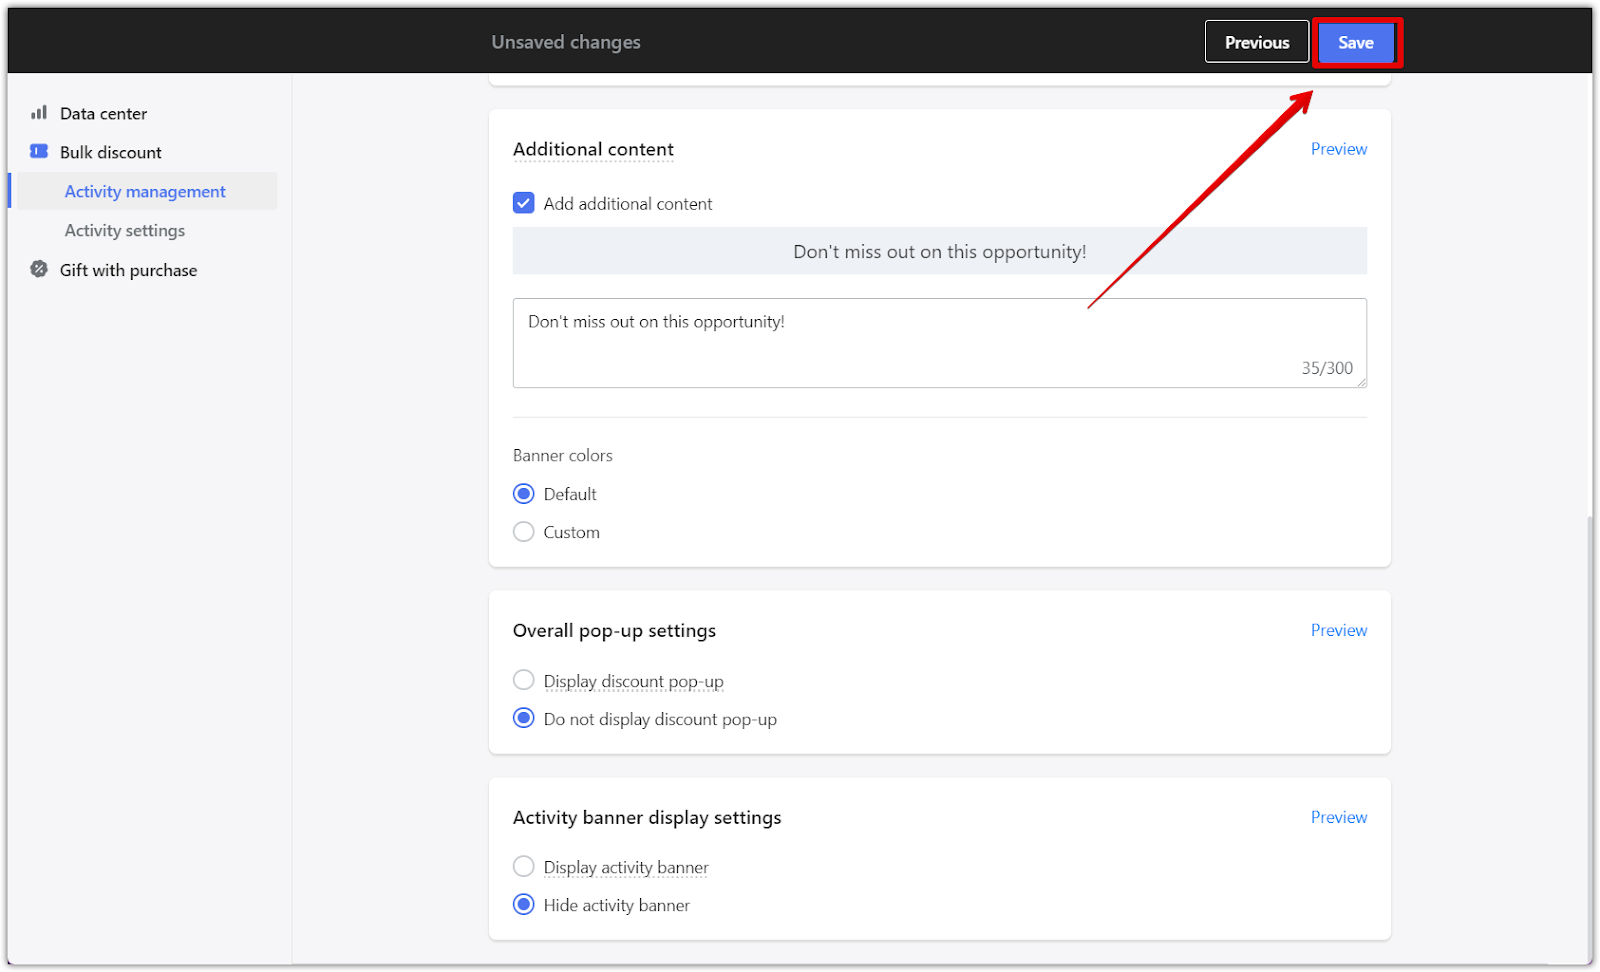
5. Save and launch: Once you’ve finished setting up your activity page, click Save to launch your campaign and make it live.
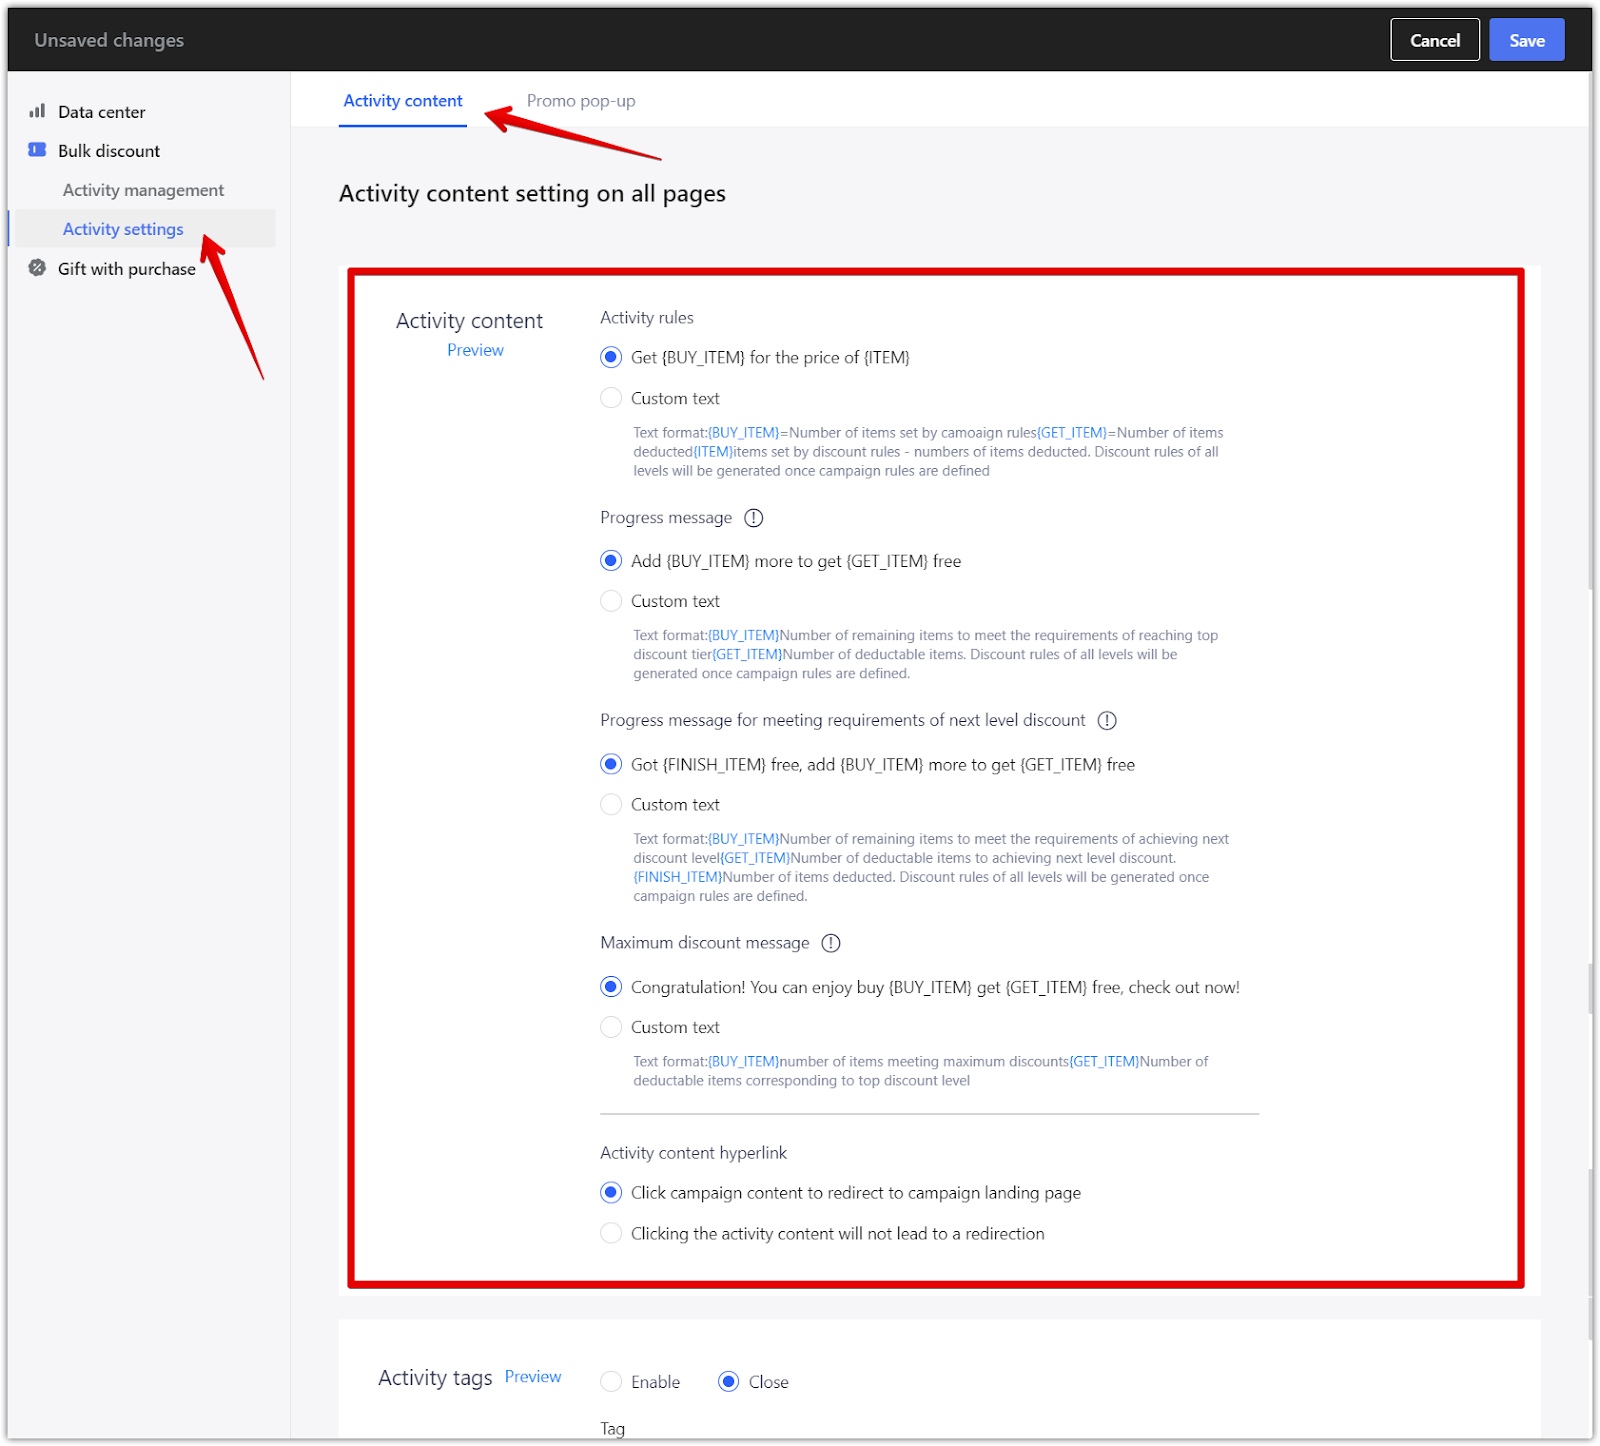
Activity content settings
This section lets you customize how promotional messages are displayed to customers during their shopping experience. The promotional messages you create use dynamic placeholders, automatically updating based on the promotion’s configuration. Here’s a breakdown of the placeholders:
- {BUY_ITEM}: Represents the number of items a customer must purchase to qualify for the promotion (e.g., "2" in a "Buy 2, Get 1 Free" promotion).
- {GET_ITEM}: Refers to the number of free or discounted items the customer will receive (e.g., "1" in the same promotion).
- {FINISH_ITEM}: Indicates how many items the customer has completed purchasing to reach a promotional milestone (e.g., "Got 1 free item, buy 2 more to get another free").
These placeholders ensure that the correct information is displayed dynamically as customers interact with the promotion.
- Activity rules: This defines the main promotional rule. For example, "Get {BUY_ITEM} for the price of {ITEM}" will dynamically display the actual values, such as "Get 2 for the price of 1."
- Progress messages: As customers add promotional items to their cart, they will see messages like "Add {BUY_ITEM} more to get {GET_ITEM} free," which could show as "Add 1 more item to get 1 free."
- Next level discount messages: If your promotion has multiple tiers, customers will be notified of their progress toward the next discount level. For instance, "Got {FINISH_ITEM} free, add {BUY_ITEM} more to get {GET_ITEM} free" might display as "Got 1 item free, add 2 more to get another free."
- Maximum discount message: Once customers reach the maximum discount level, they will see a message such as "Congratulations! You can enjoy buy {BUY_ITEM} get {GET_ITEM} free, check out now!" which could display as "Congratulations! Buy 3, get 1 free, check out now!"
- Activity content hyperlink: Choose whether the promotional content will include a clickable hyperlink that directs customers to the campaign landing page. This is particularly useful to provide additional details or redirect customers to a specific product page. If you'd prefer not to include a link, select the option that turns off the redirection.
Note
These dynamic placeholders require coding knowledge, specifically working with templating languages like Liquid. If you’re unfamiliar with how to use these variables, learn more here: Shoplazza Liquid Overview .
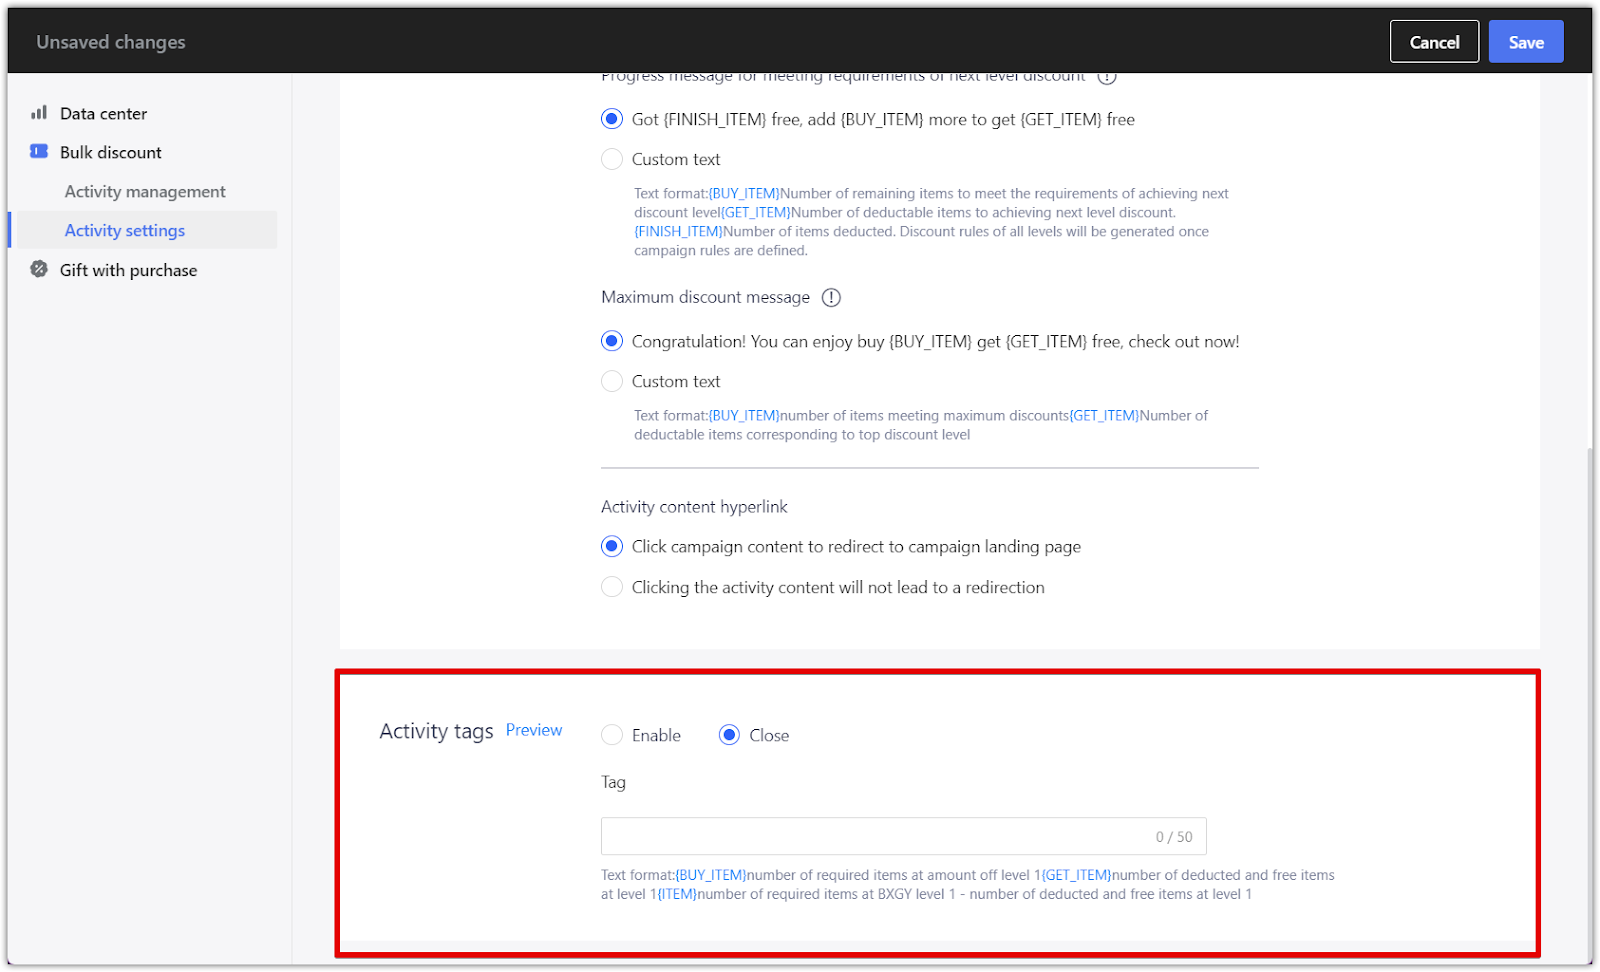
Activity tags
Activity tags allow you to customize and edit the text displayed as a visual banner on your product or shopping cart pages. This banner highlights the promotion, making it visible to your site's customers.
For example, you might display a banner that says, "Buy 2, Get 1 Free," to communicate the promotion to shoppers. You can enter up to 50 characters for the banner text, and it will be dynamically updated based on the promotion’s rules using placeholders like:
- {BUY_ITEM}: The number of items a customer needs to purchase to qualify for the promotion.
- {GET_ITEM}: The number of free or discounted items the customer will receive.
You can preview how the banner will appear, and once you're satisfied with the content, enable it to display the promotional message on relevant product pages or shopping carts.

Note
While the name mentions "tags," this section is specifically for editing the text of the visual banner displayed during your promotion, rather than for organizing content.
Promo pop-up settings
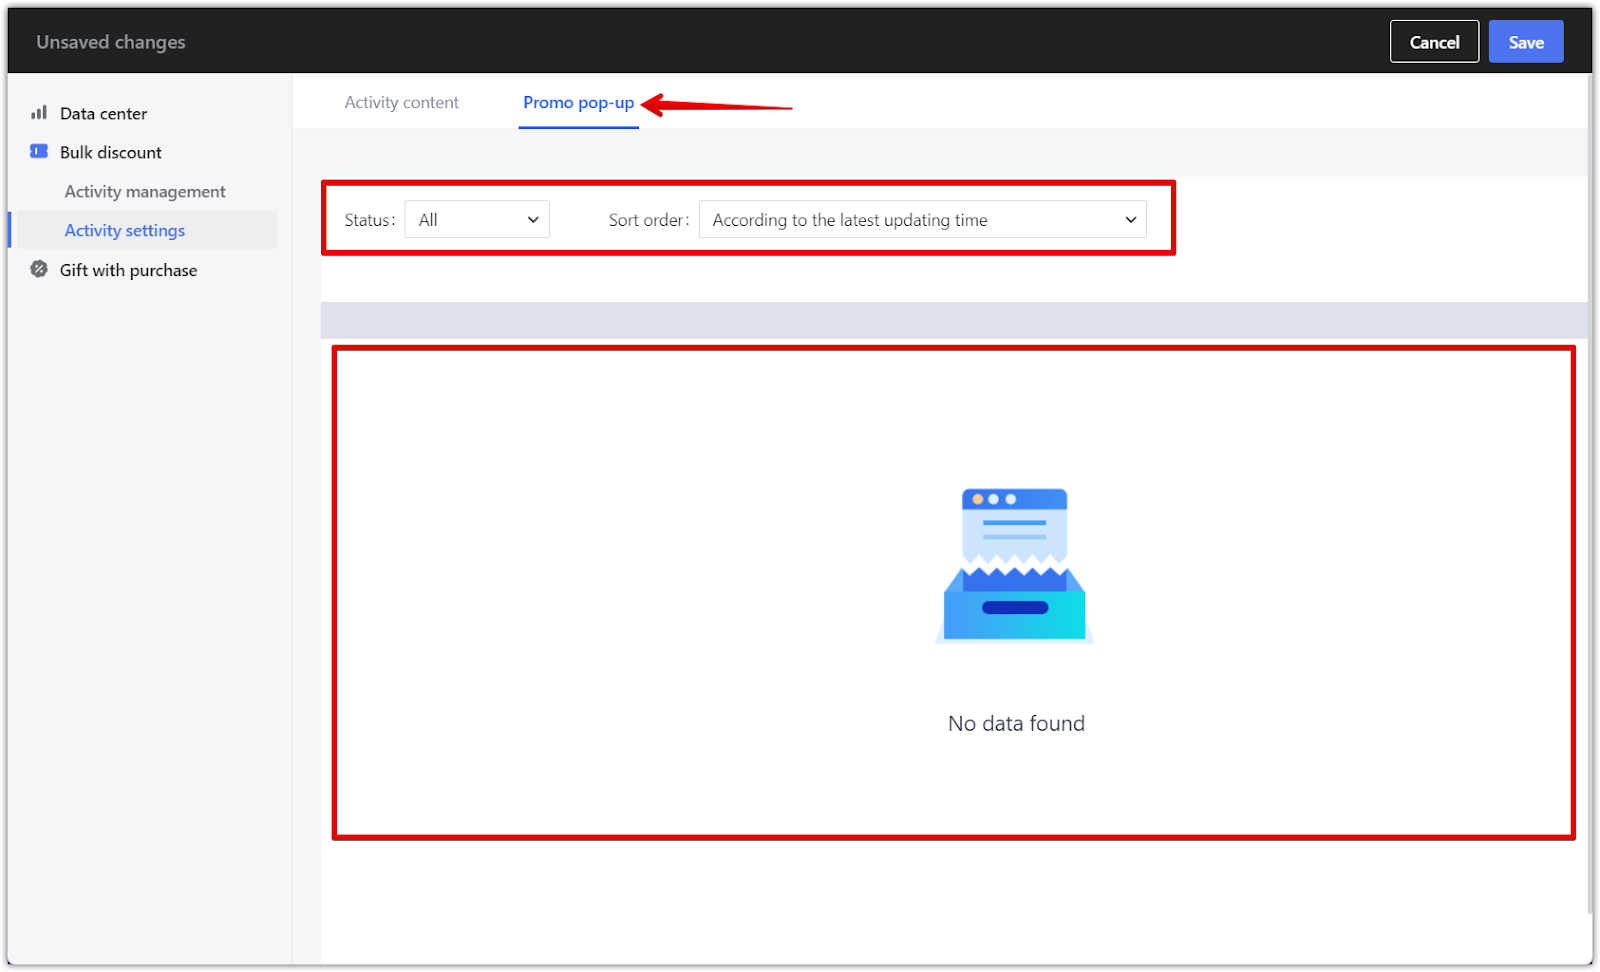
To manage your pop-up campaigns, navigate to the Promo pop-up section in the Activity settings:
- Status filter: Use the dropdown to view pop-ups by their current status (Active, Paused, Scheduled, or Expired).
- Sort order: Pop-ups can be sorted by various criteria, including the latest update time, exposure times, the number of successful subscriptions, or the conversion rate. This helps you track the effectiveness of your campaigns based on your business goals.
Campaign management and tracking
Once your promotion is live, the Campaign management and tracking section helps you monitor its performance. Here, you can track important metrics, review campaign data, and adjust or end your promotion as needed. This section provides insights that help you optimize your promotional strategy for better results.
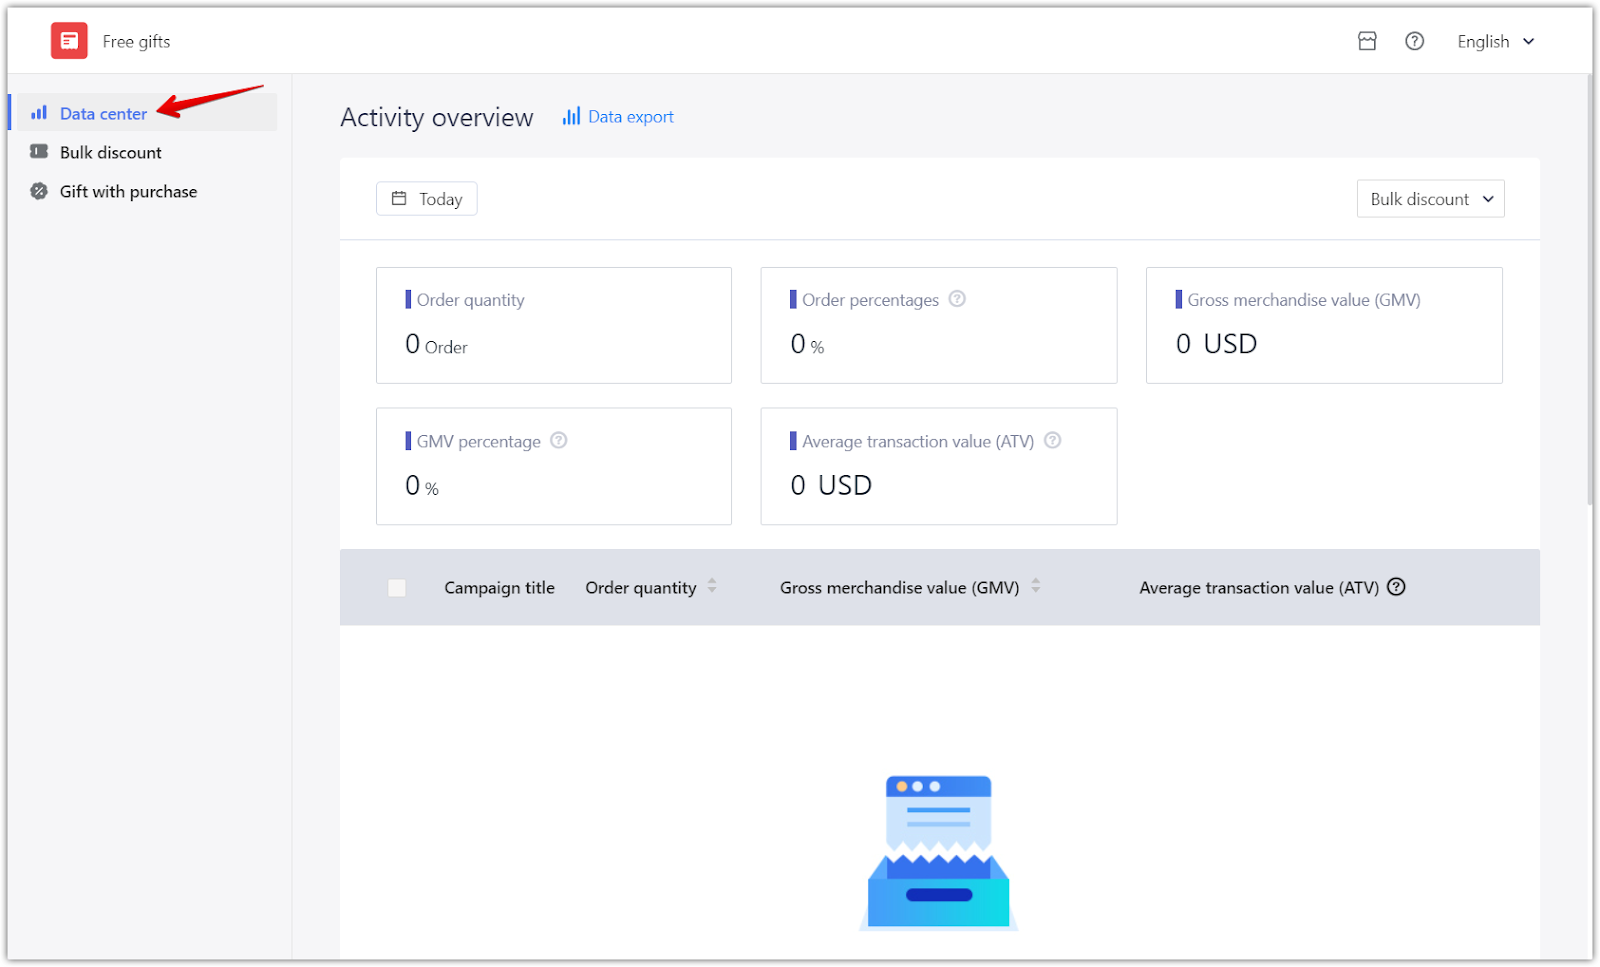
1. Monitor your campaign: You can track the progress of your campaign in two ways:
- From your main online store: Go to the Discount with Purchase app in the Data Center section to view your campaign.
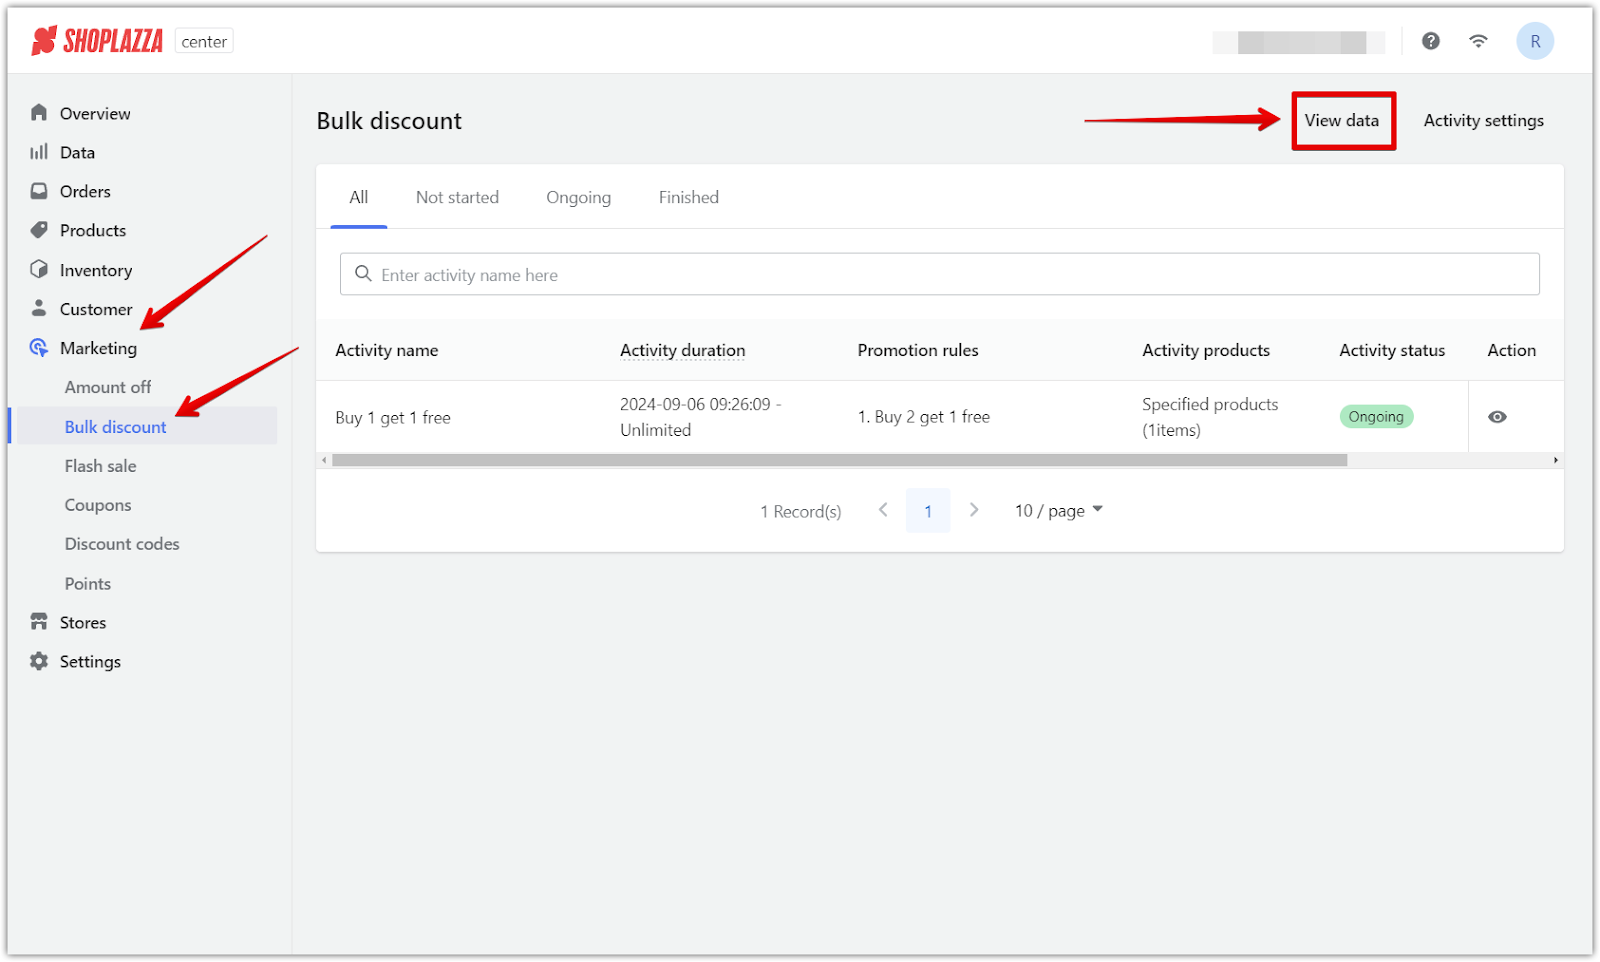
- From Shoplazza POS Center Admin: Navigate to Marketing > Bulk Discounts and click on View Data. This section allows you to view the campaign details and data, but you cannot make changes here.
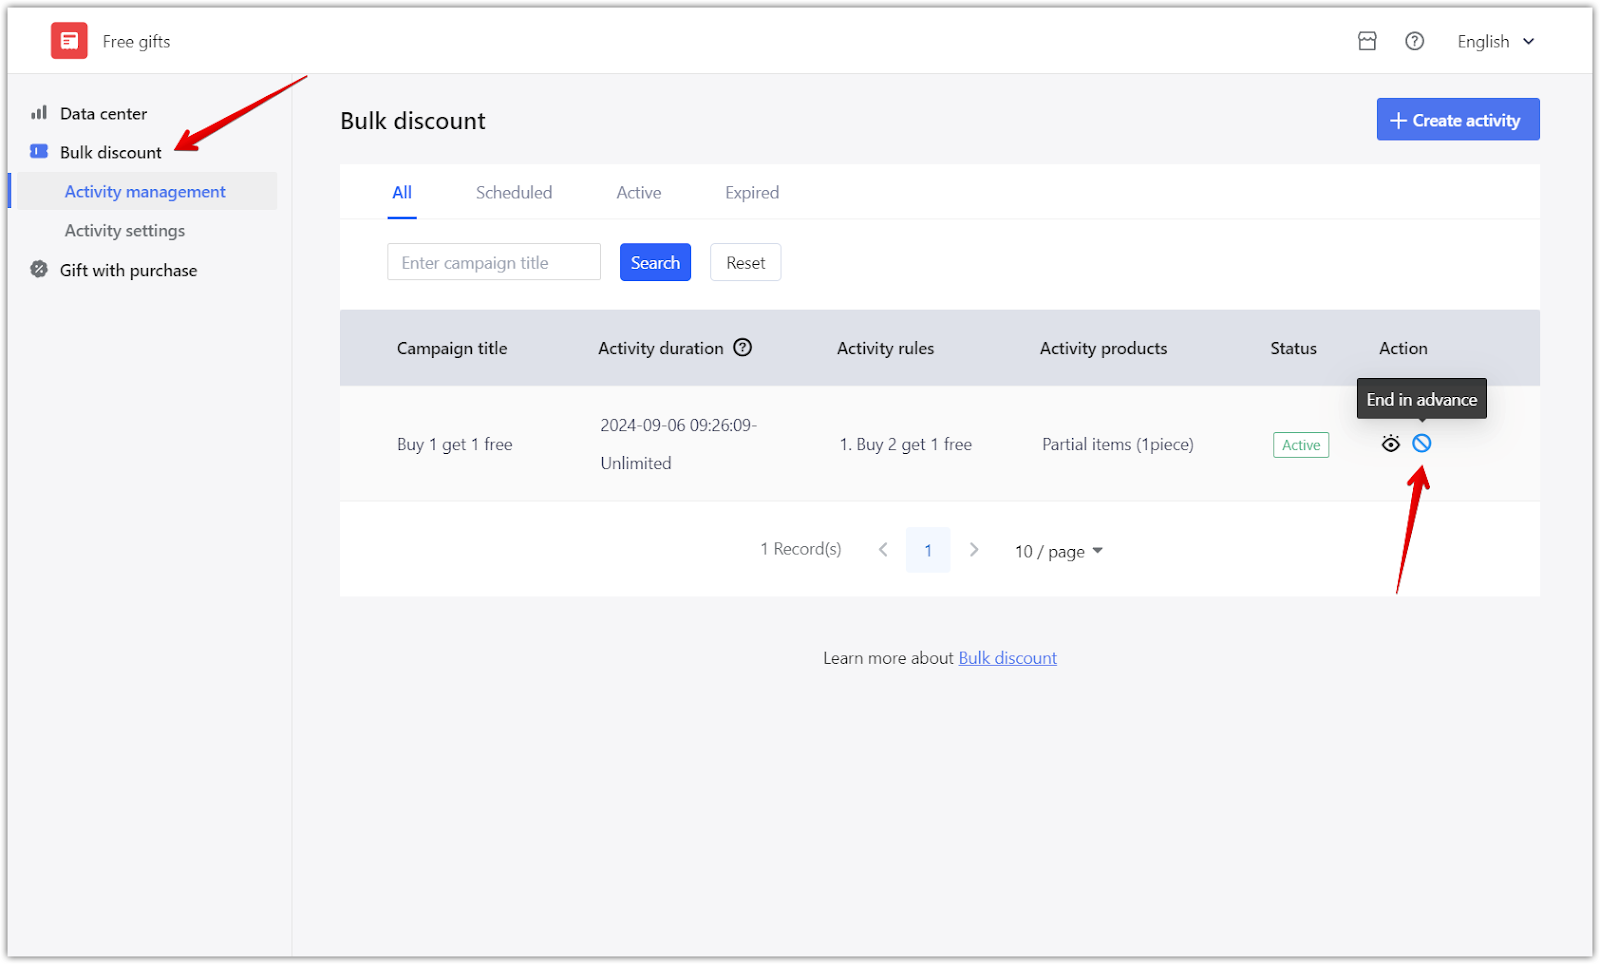
2. Ending the promotion: If you need to end the promotion, you must do so through the Discount with Purchase app in your main online store. The Shoplazza POS Center Admin only allows you to view the campaign data but does not permit edits or termination of the campaign.
Setting up and managing bulk discount campaigns is a powerful way to boost customer engagement and increase sales. With flexible discount rules and detailed tracking features, your promotions can be customized to fit your business needs. Regularly reviewing performance data allows for ongoing optimization, ensuring your campaigns deliver maximum impact. Leverage these tools to create compelling promotions that attract customers and drive growth for your store.


Comments
Please sign in to leave a comment.