On This Page
1. Updated: Enhanced product editing settings
2. Updated: SPU as the filter for creating automated collections
3. Updated: New features for UTM reports
4. Updated: Add UTM parameters for View Sales by SPU Report
5. Updated feature: Configuring applicable page for product labels in Booster Store Conversion
6. Updated feature: Setting up expected pickup time and business hours for Local pickup
7. Updated: Enhanced features at checkout
8. Updated: Data dashboard for Card Advanced Settings
1. Updated: Enhanced product editing settings
Usage scenarios:
To make it more convenient and flexible for you to edit products, we have updated the product editor. You can now personalize the font style, size, and line height for product and collection descriptions. This lets you showcase your brand style more.
Usage path:
These features have been automatically updated in your Shoplazza Admin > Products. You'll find the new settings available when you're either editing an existing product or collection, or creating a new one.
Feature overview:
Once you're in the product or collection editor, you'll find new options for font style, size, and line height under the "Description" section. These added controls make it simple to fine-tune your text to better match your brand's style.

2. Updated: SPU as the filter for creating automated collections
Usage scenarios:
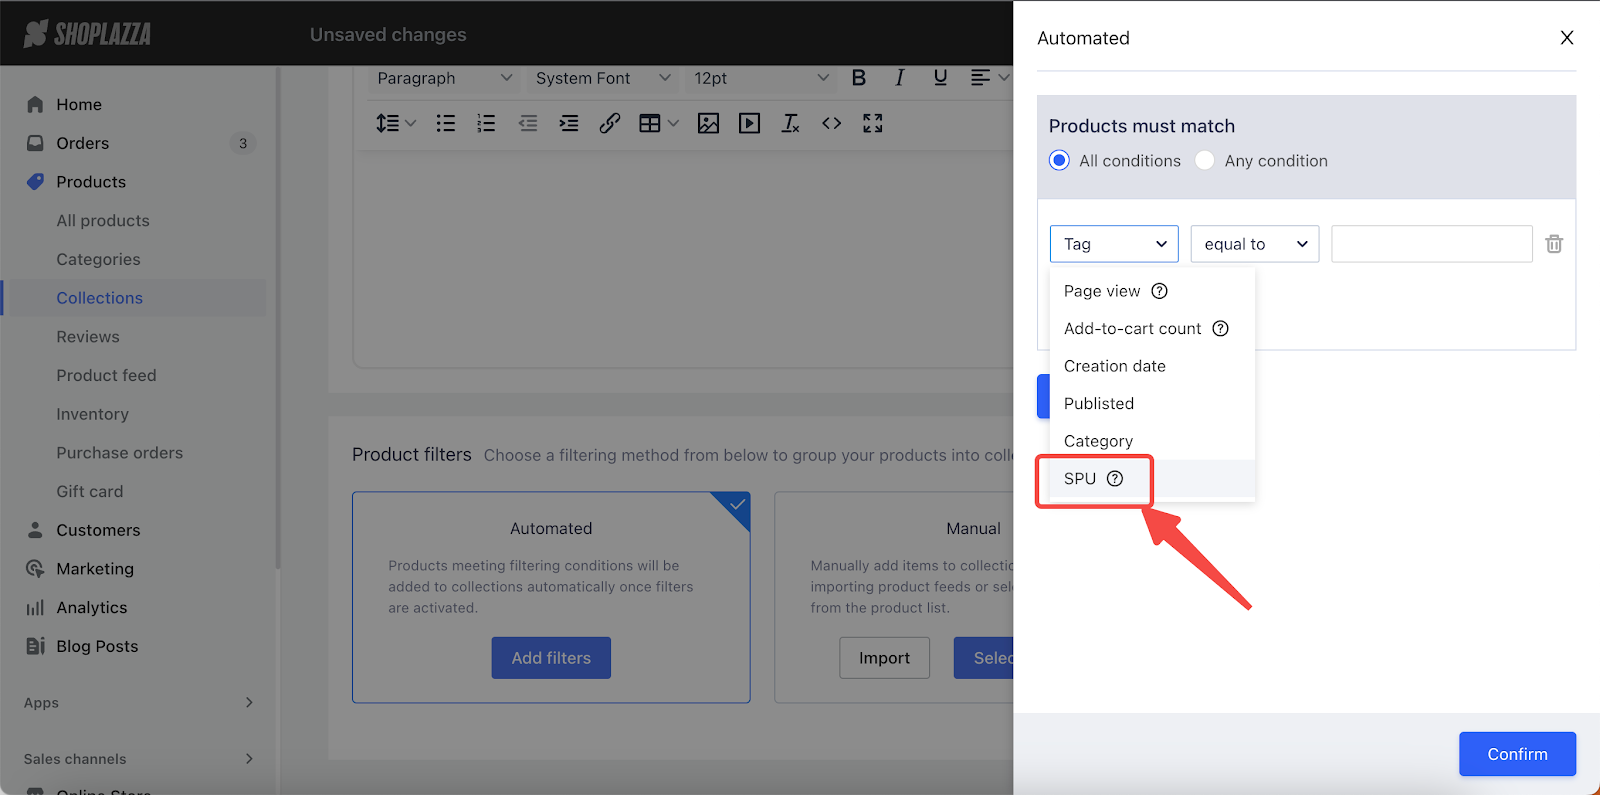
If you're using an ERP system to manage your products, you likely use Standard Product Units (SPU) to keep things organized. We've updated the system to allow you to create automated collections using SPU as a filter. This addition offers you more flexibility in sorting your products and streamlines the process of setting up collections.
Usage path:
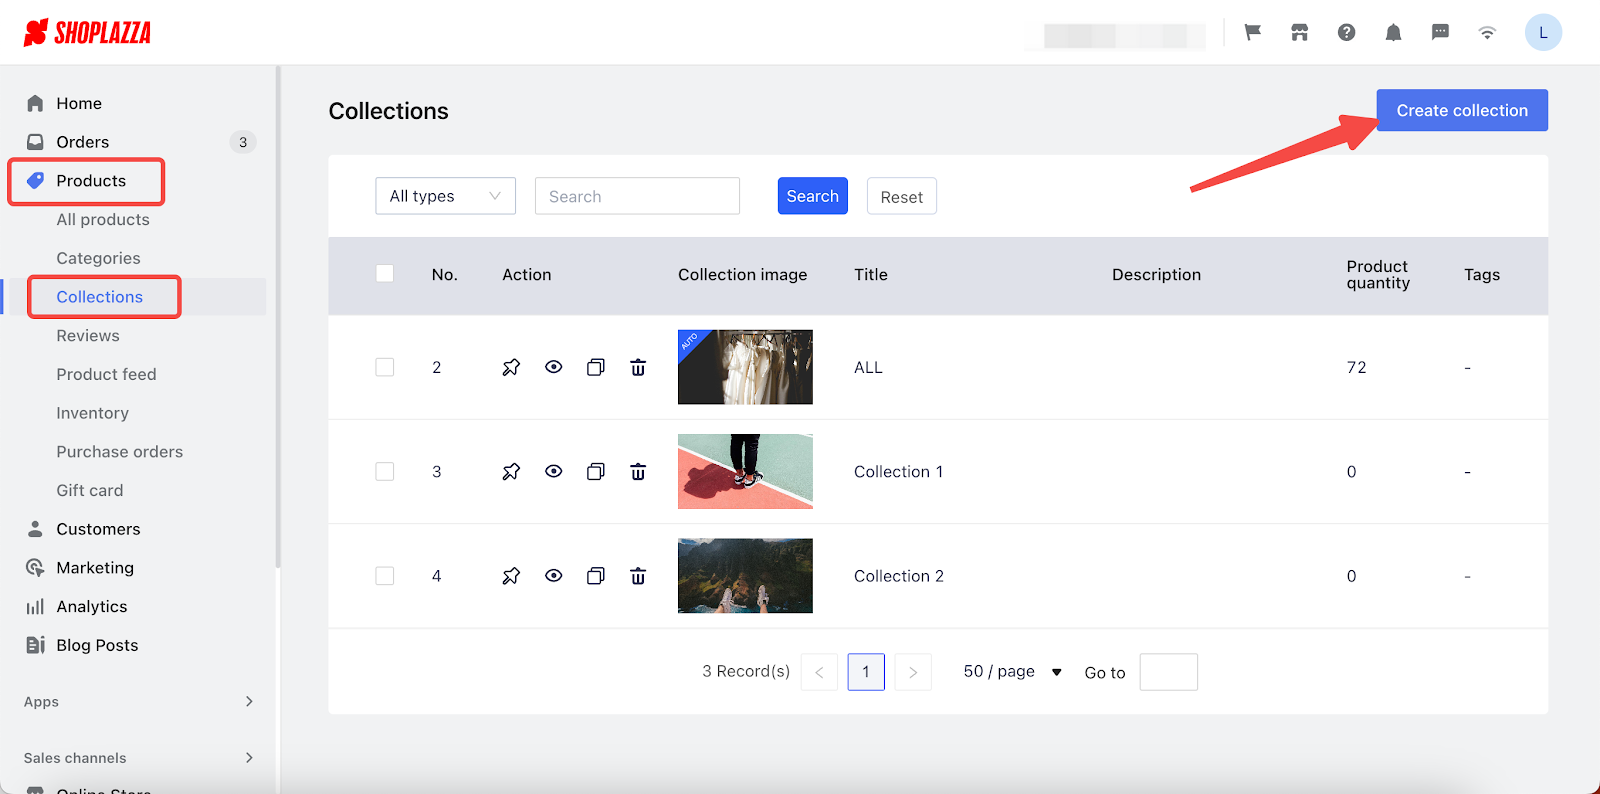
Navigate to your Shoplazza Admin > Products > Collections, click Create collection.
Feature overview:
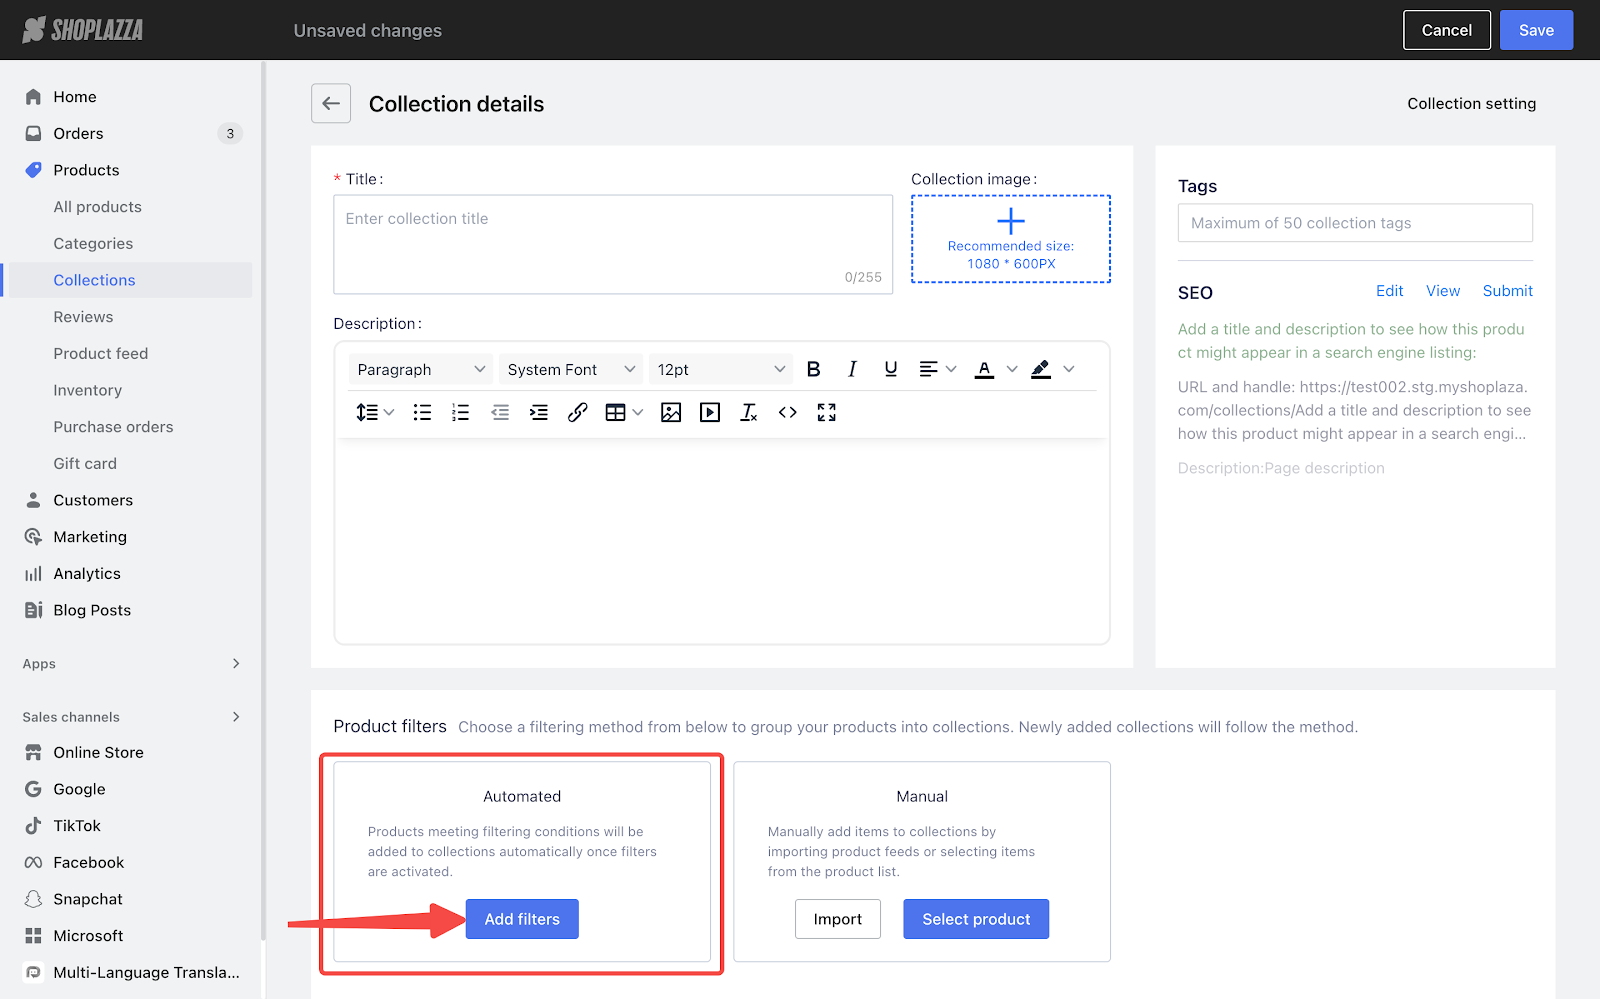
When you click Add filters to create an Automated collection, you can scroll down to find and select SPU in the dropdown as the filter.
3. Updated: New features for UTM reports
The UTM report has been enhanced with two optional columns and two preset columns for data collection. In addition, the time range selection dropdown now includes two more convenient options. These updates will help you customize advertising strategies and increase sales.
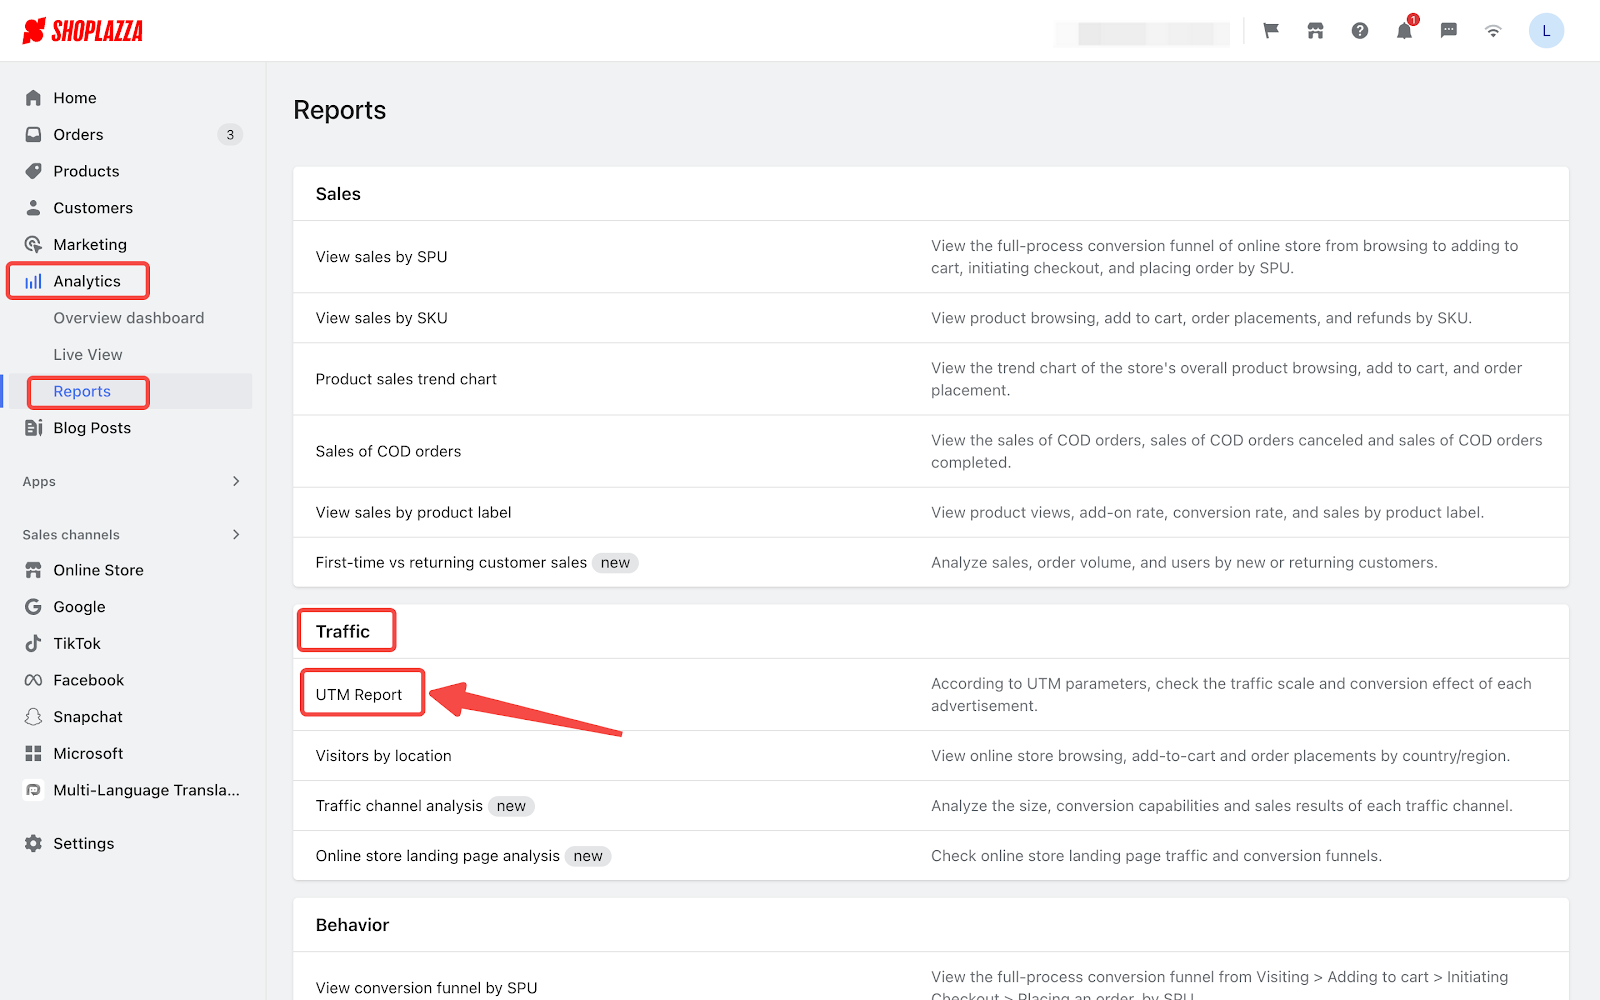
From your Shoplazza Admin > Analytics > Reports, scroll down the page to find the Traffic section and click UTM report.
3.1 New optional columns: UTM country/region and UTM landing page path
Usage scenarios:
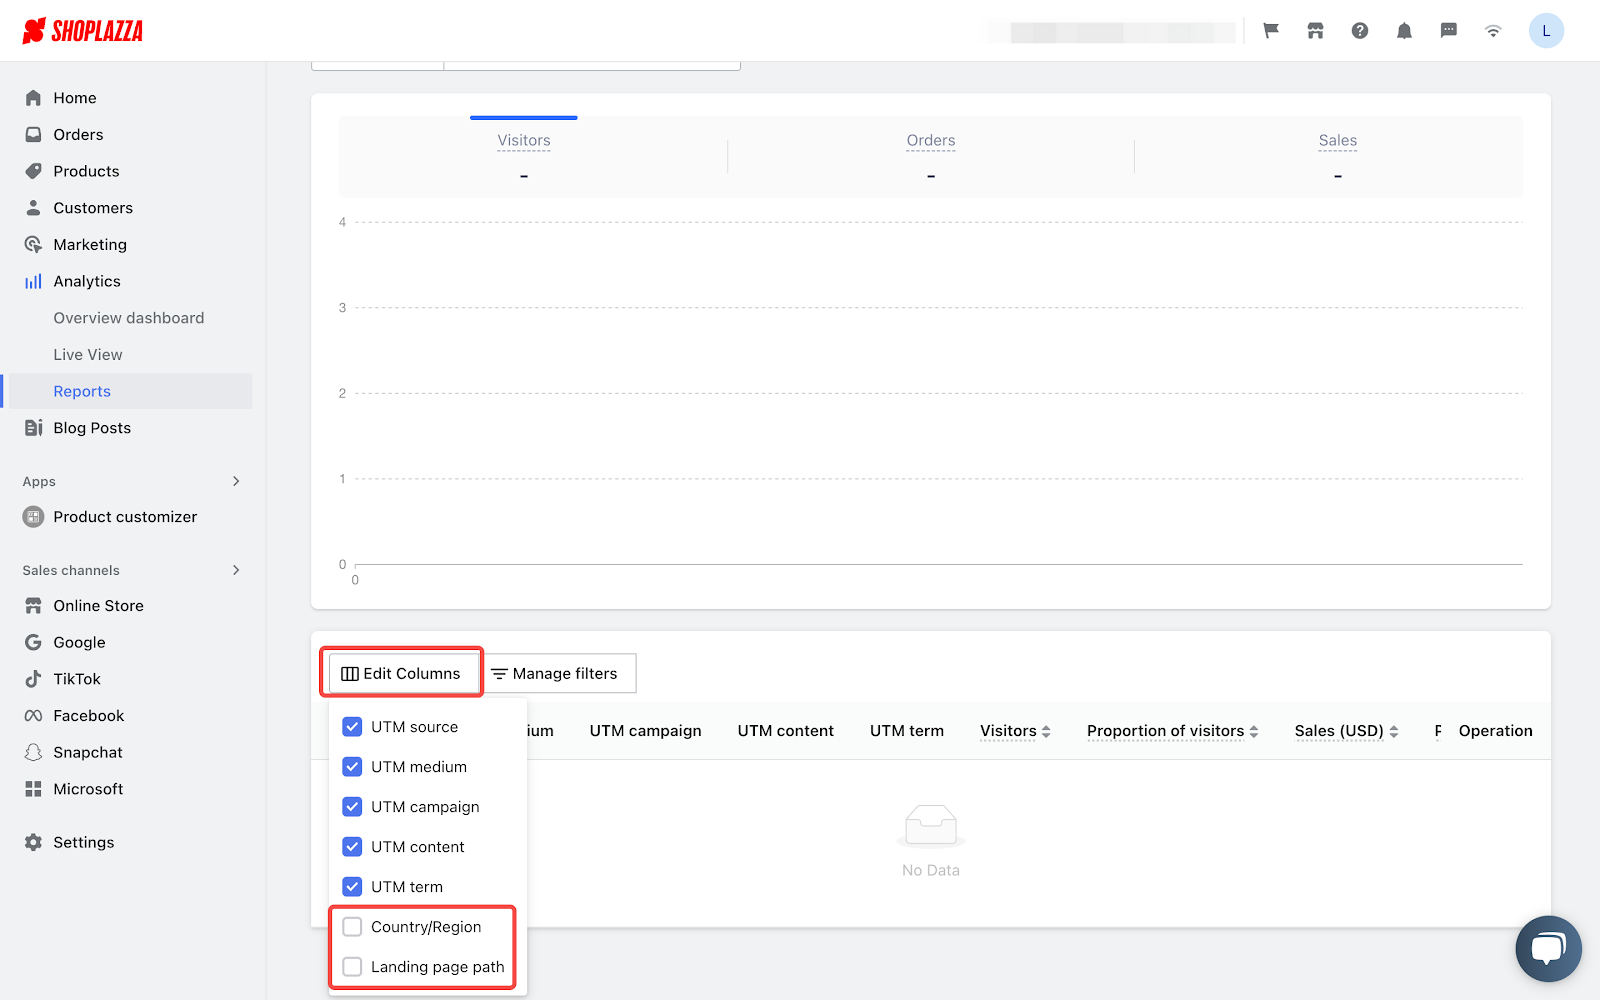
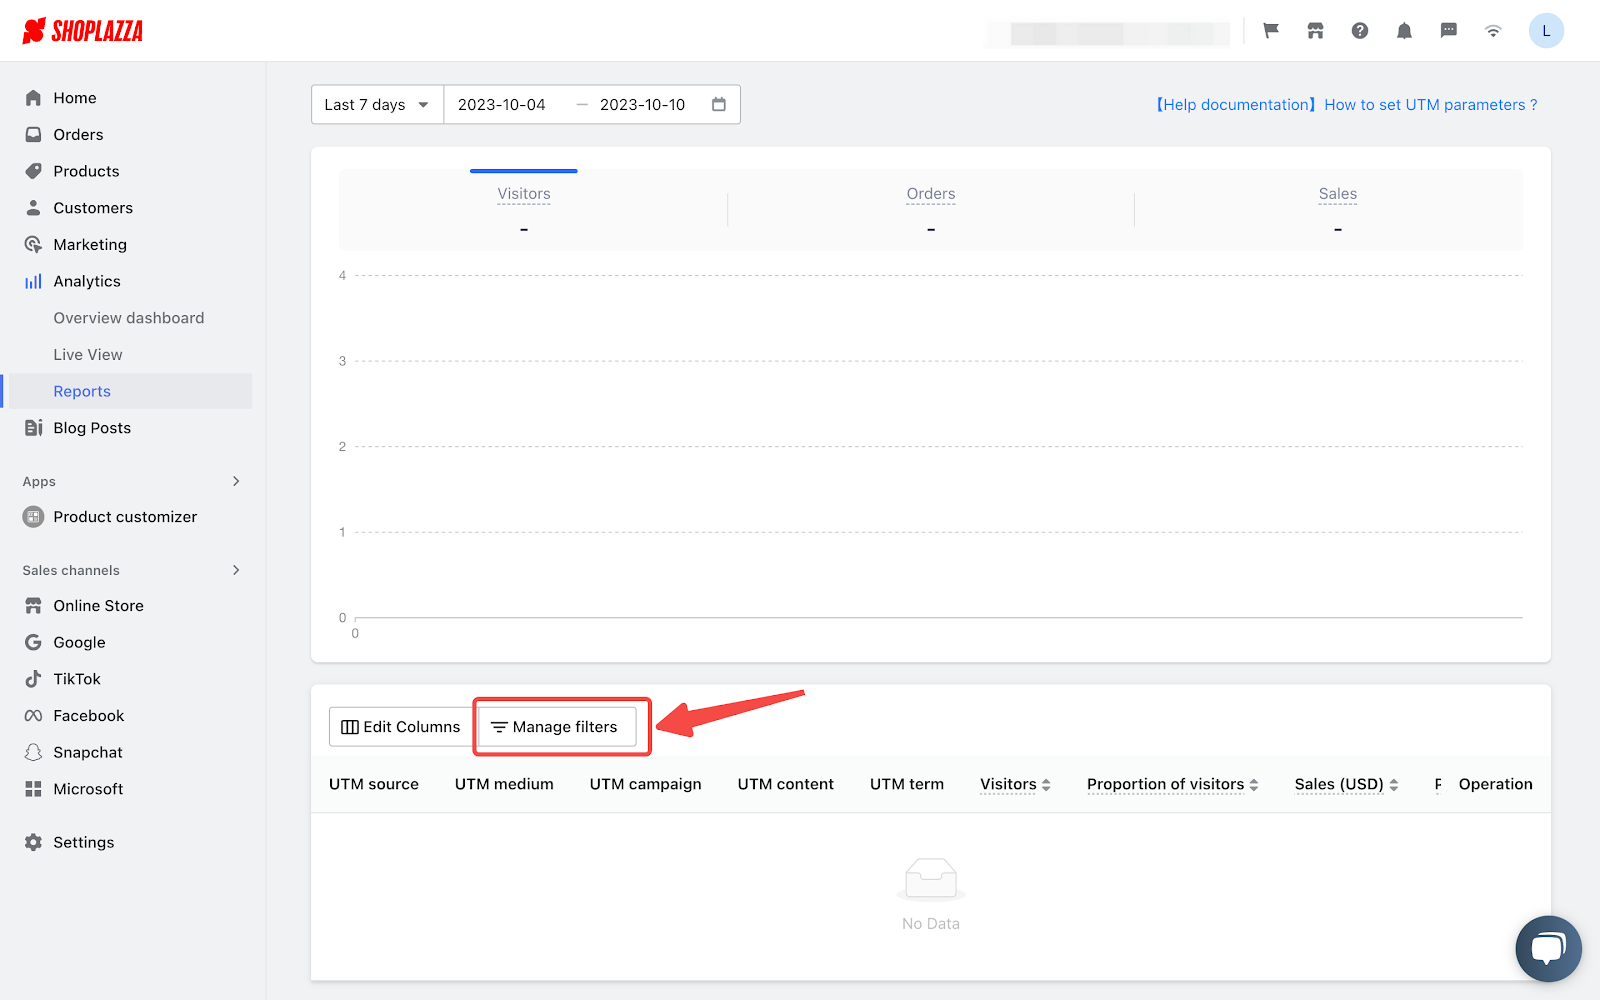
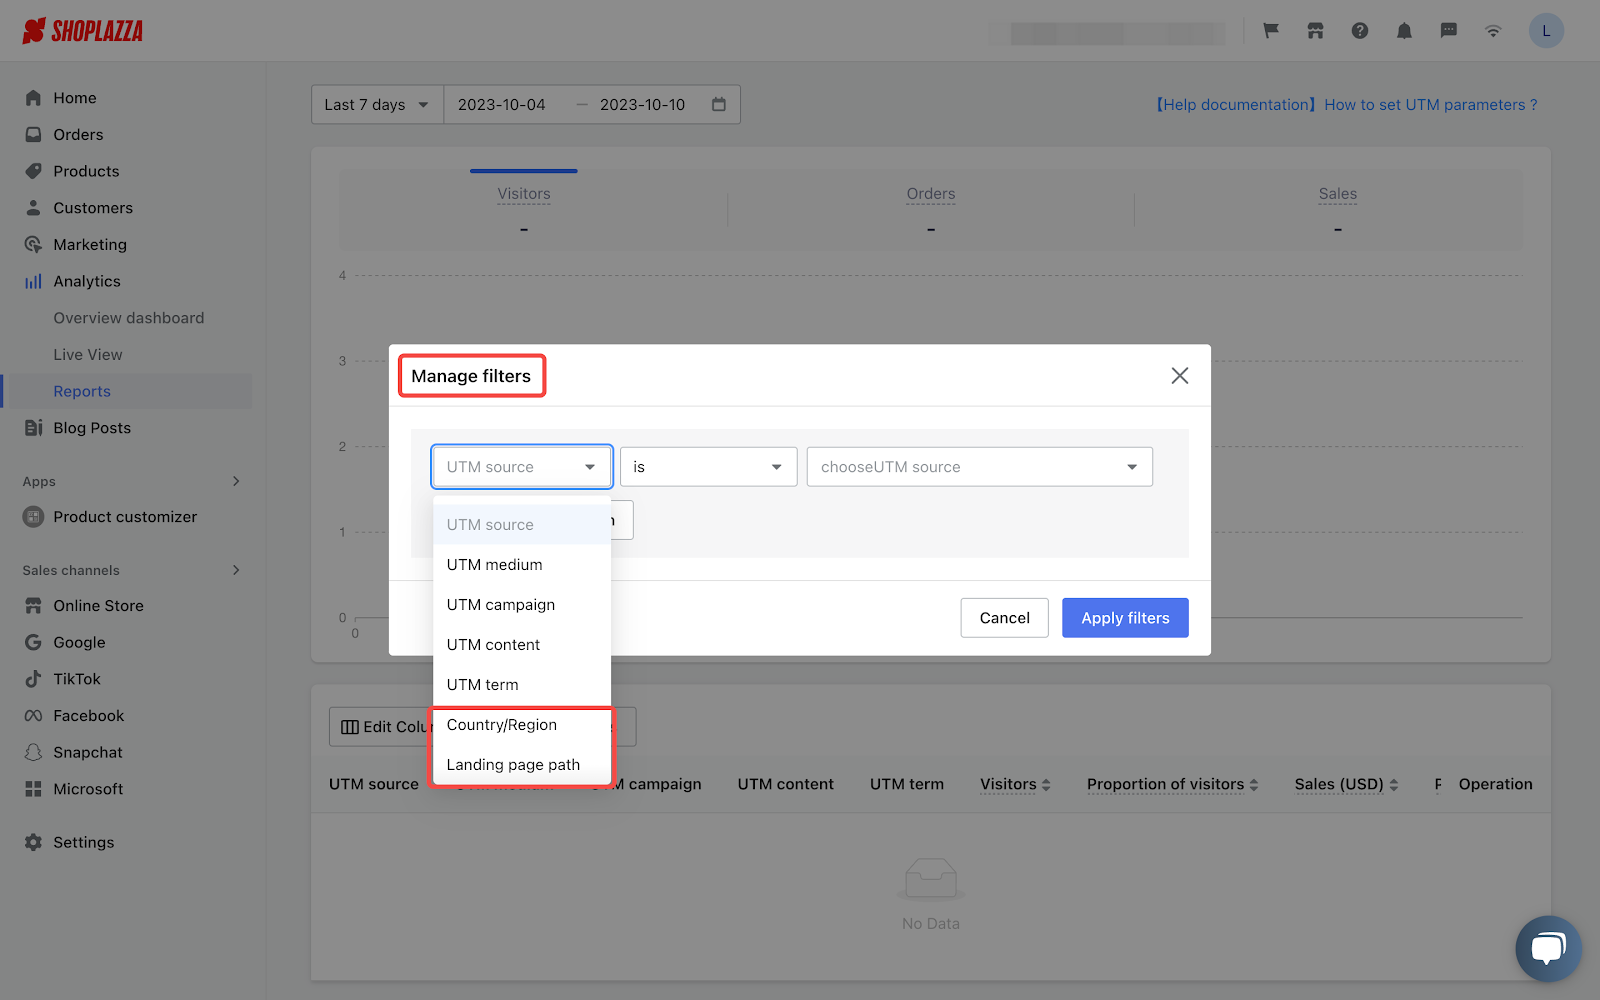
We've added two optional columns, UTM country/region and UTM landing page path to the UTM report. By collecting and analysing data from these two aspects, you can better customize your ad strategies, leading to higher conversion rates.
Feature overview:
Click Edit columns or Manage filters on the UTM reports page, and you will find the two new options available.
3.2 New preset columns: First order customers and First order customers rate
Usage scenarios:
We've added two preset columns, First order customers and First order customers rate to the UTM report. This simplifies the process of evaluating how well different channels are doing in terms of attracting new customers. As a result, you can make data-driven adjustments to your advertising efforts.
Feature overview:
These new preset columns are automatically included in your UTM reports, requiring no manual setup on your end.
3.3 New optional time periods: This year and Last year
Usage scenarios:
We've added two preset options, This year and Last year to the time range selection dropdown of UTM report. You can easily select from these options without manually inputing time ranges.
Feature overview:
These new time period options are automatically enabled in your UTM reports, so you can take advantage of them right away without any manual setup.
4. Updated: Add UTM parameters for View Sales by SPU Report
Usage scenarios:
In this latest update, we have introduced a new feature to help you analyze your product traffic more accurately. Now you can easily filter the traffic sources based on your specific needs, such as UTM or referral sources. This allows you to see where each of your products' traffic is coming from. With this information, you can gain a clearer understanding of how your products perform on different channels and platforms, and optimize your marketing strategies accordingly.
Usage path:
Navigate to your Shoplazza admin > Analytics > Reports > View sales by SPU.
Feature overview:
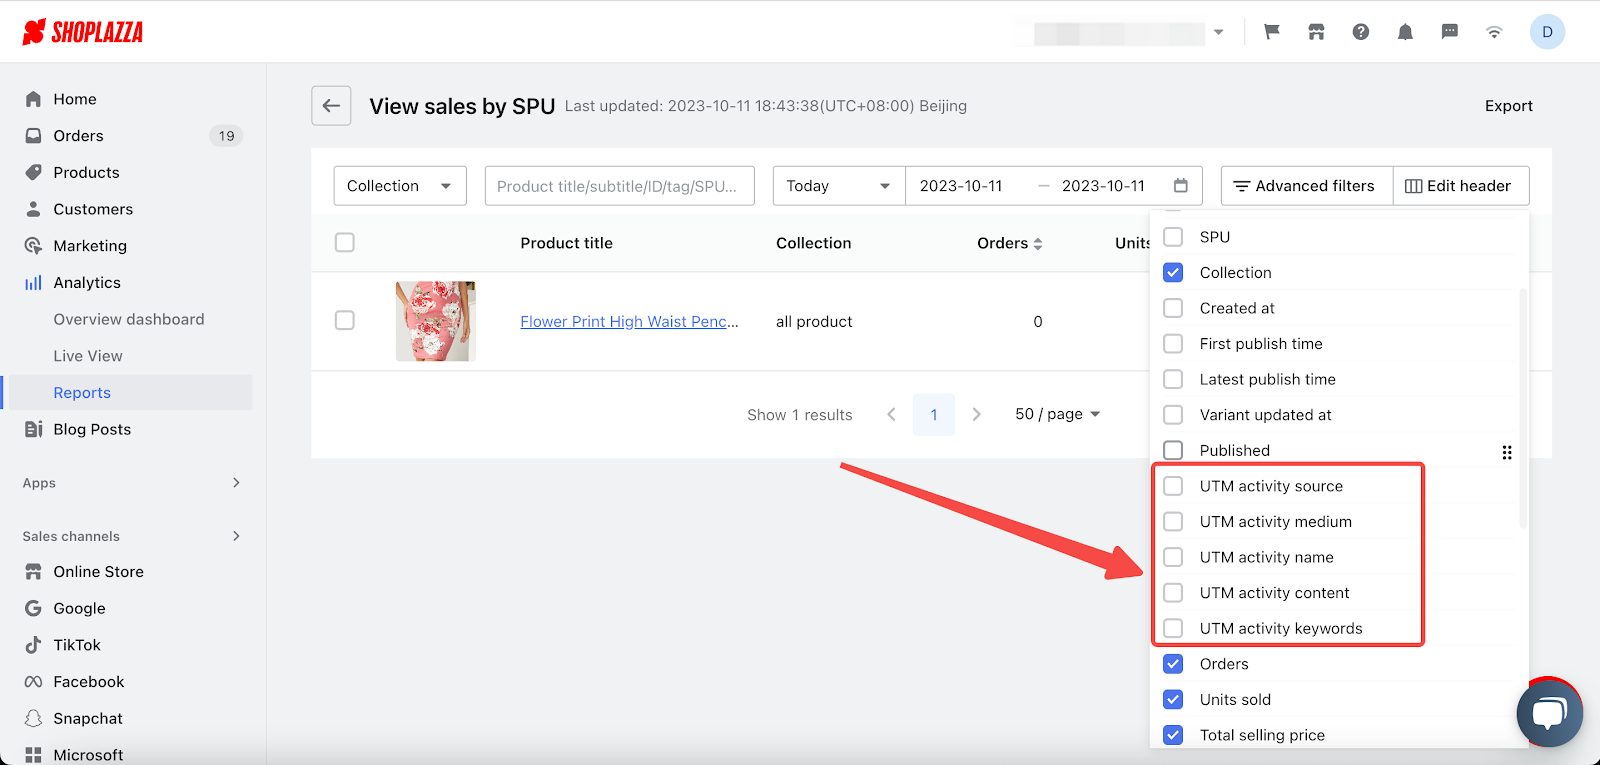
- In the header editing section, we have included five UTM-related parameters: UTM source, UTM medium, UTM campaign, UTM content, and UTM terms. These parameters are relevant for tracking and analyzing data.
- For more details on each UTM item, please refer to the Introduction to UTM.
Note
You can easily change the order of parameters and other items by dragging and dropping them. However, please note that you can not drag and drop across different groups.
5. Updated feature: Configuring applicable page for product labels in Booster Store Conversion
Usage scenarios:
If a product belongs to multiple collections, it might show up with more than one tag. To streamline this, we've added a new feature. You can now specify which pages your product tags will show up on, allowing for a more personalized approach to your marketing.
Usage path:
Navigate to your Shoplazza admin > Apps > Booster Store Conversion > Product labels, click on Create new label.
Feature overview:
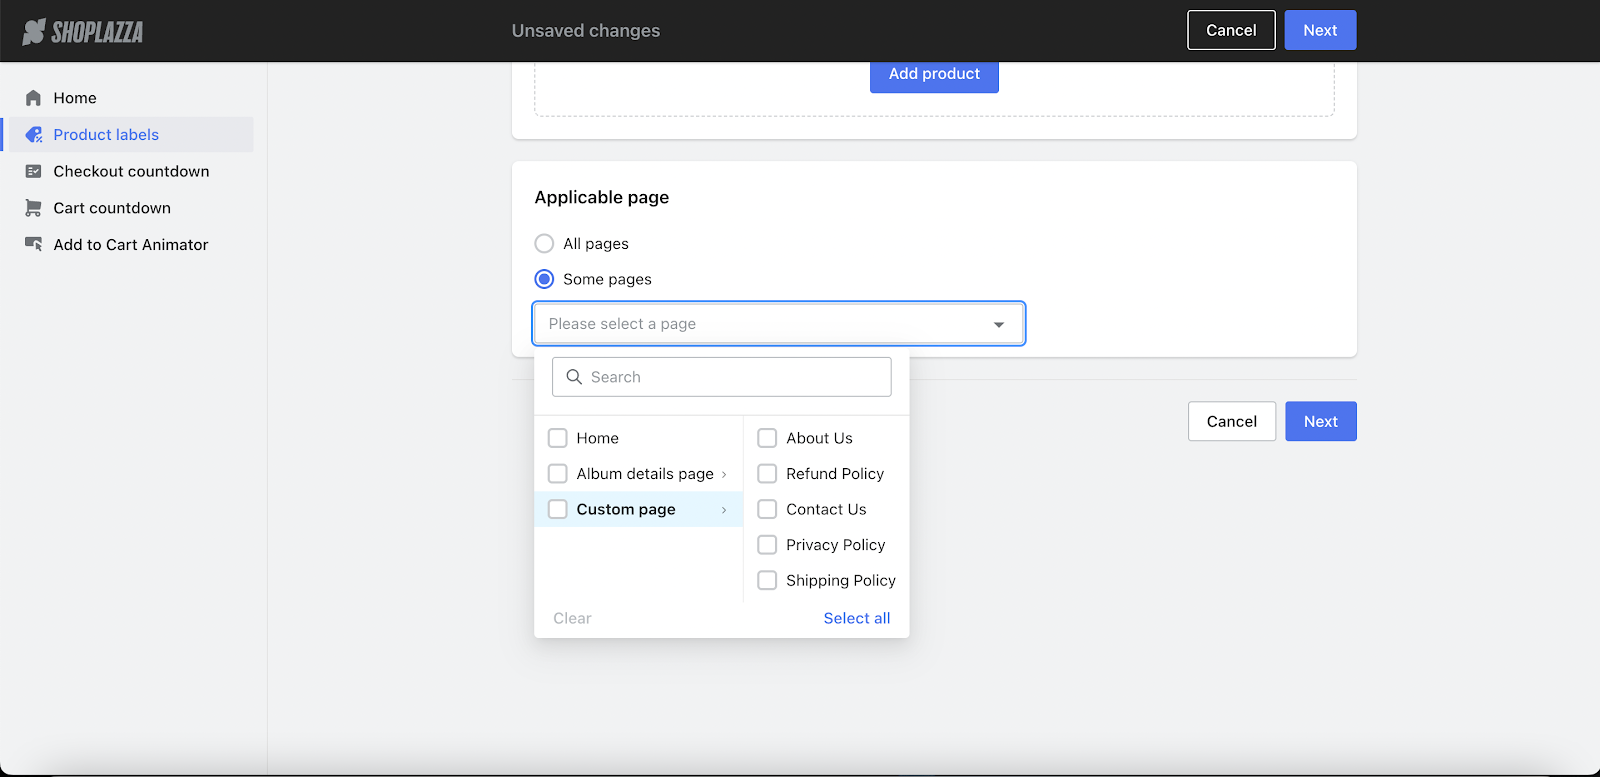
- Added a new feature for configuring applicable pages, where you can choose to display all pages or select specific ones (with all pages selected by default).
- When selecting some pages, a dropdown menu will appear below, allowing you to search for and select pages. The available page types are:
- Home Page: The main page of your storefront.
- Album Details Page: You can choose a specific album detail page (not limited to theme template). If a certain album has multiple templates in theme editor, selecting that album will apply the selected template to all its related album detail pages.
- Custom Page: You can choose a specific custom page.
6. Updated feature: Setting up expected pickup time and business hours for Local pickup
Usage scenarios:
In the eyewear industry, we understand that as a business owner, you want to provide the best experience for your customers. That's why we offer online eyeglass selection and purchasing, lens production, and offline try-on and pickup services. The production time for lenses typically takes around 3-7 days, or even longer, depending on factors like the availability of lens materials.
To better accommodate different industries, we now allow you to customize the stocking duration based on your product's characteristics.
Moreover, we understand that your store's operating hours may vary throughout the week, including rest days when you're closed. To ensure accuracy and reduce instances of customers missing out, we've introduced the ability to set specific operating hours for weekdays and weekends separately. This way, you can provide your customers with reliable and convenient service.
Usage path:
Navigate to your Shoplazza Admin > Settings > Shipping > Local pickup, choose the pickup location to set up.
Feature overview:
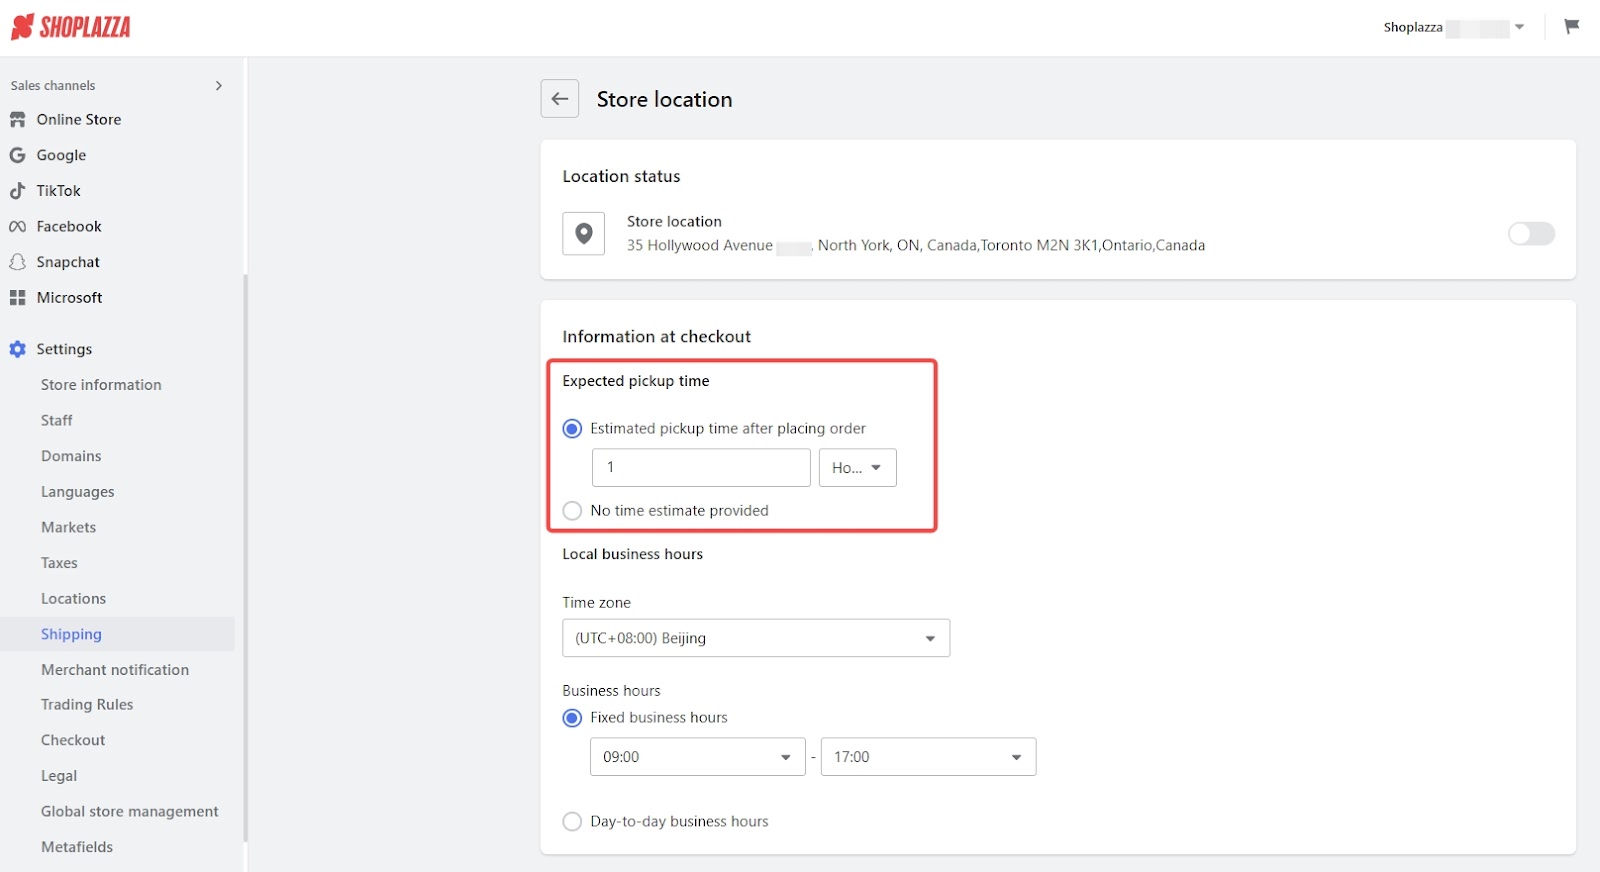
- Set the Expected pickup time, which is the estimated preparation time after an order is placed.
- If you have a consistent preparation process or can estimate a relatively stable timeframe based on past experience, you can provide an estimated pickup time after an order is placed.
- You can choose to set the timeframe in hours or days.
- The preparation time should be within 30 days.
- If your preparation time varies and you find it difficult to provide an average estimate, you can select the No time estimate provided option and provide a message such as Please wait for the merchant to notify you for pickup.
- This message will appear on the checkout page or in the customer's order center, and they will be able to see it.
- Set the Business hours for your pickup location.
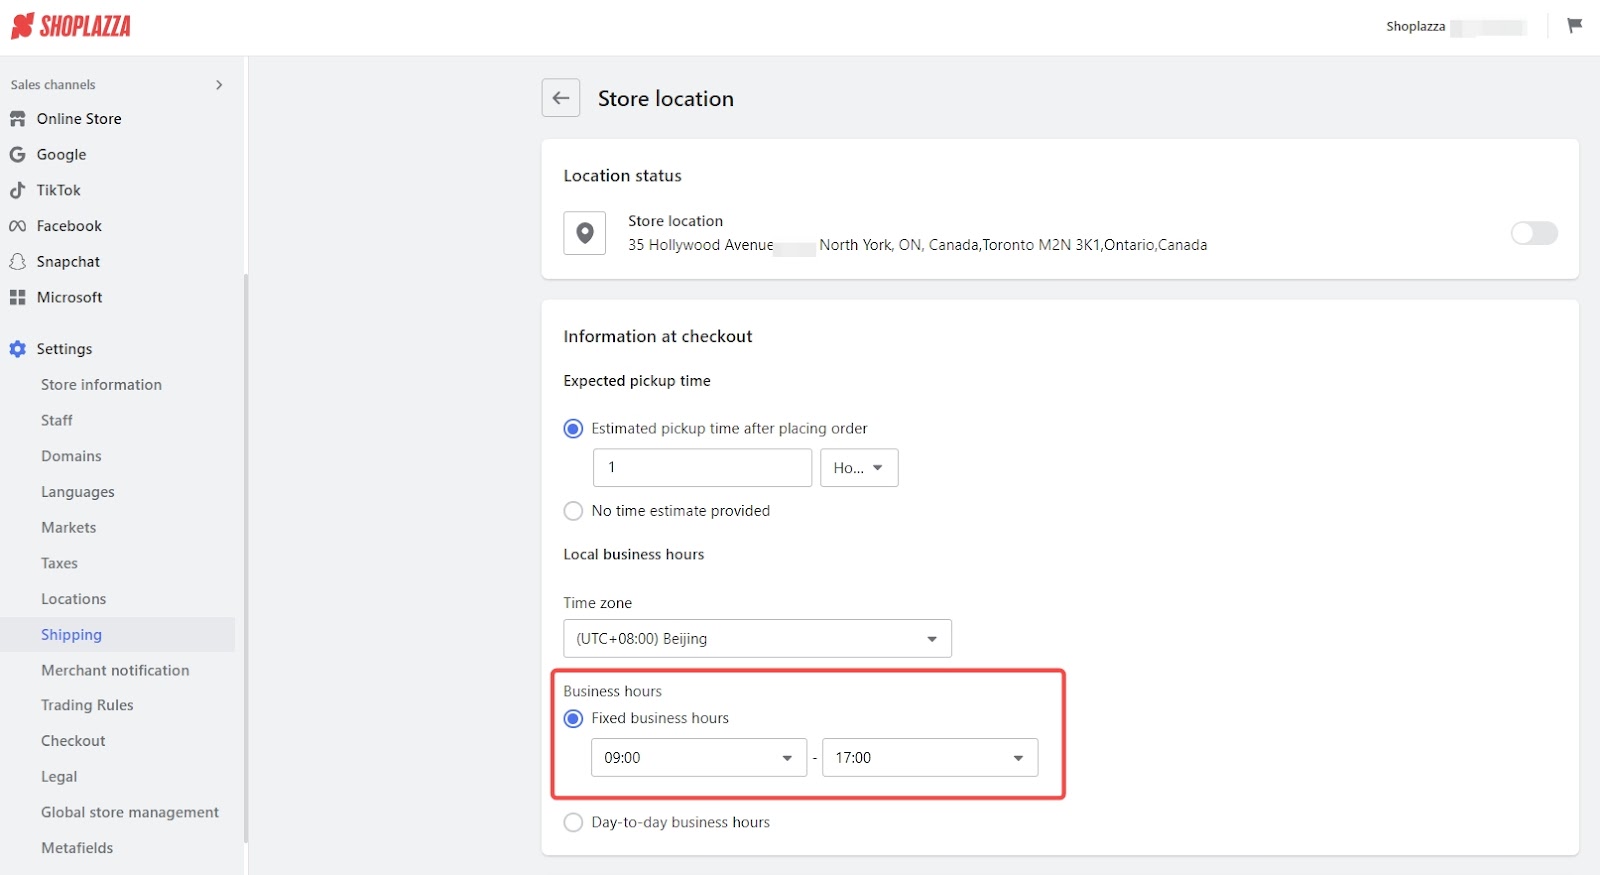
- Set the time zone for your pickup location.
- If your pickup location has consistent business hours every day and no fixed days off, you can choose to set the Fixed business hours option. Business hours can not span across multiple days.
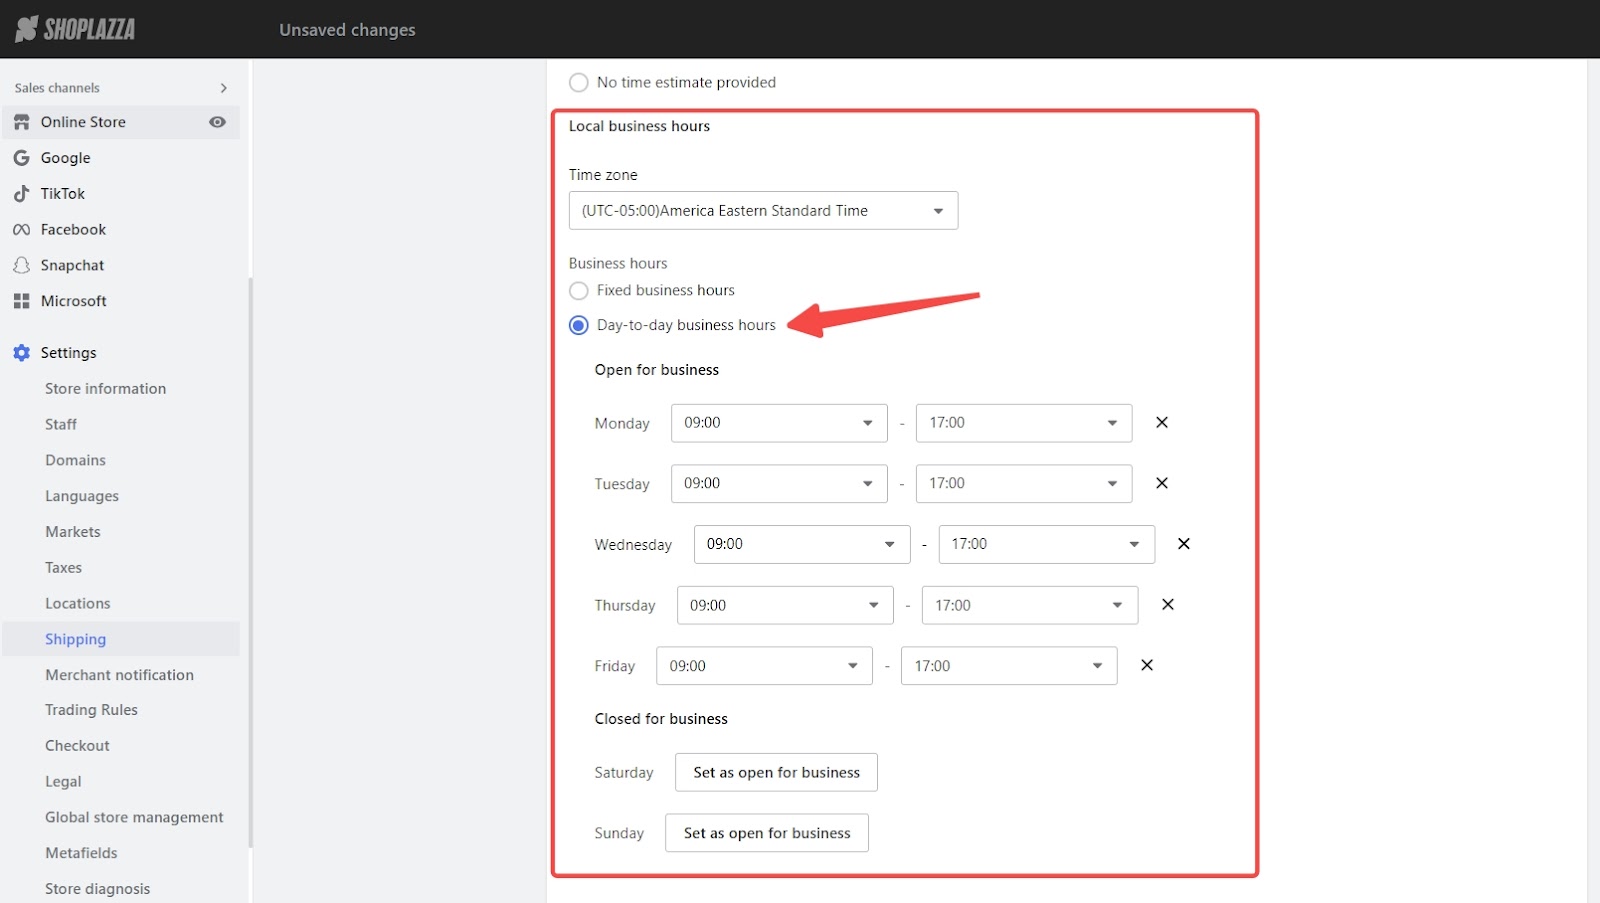
- If your pickup location has different business hours on different days and has fixed weekends off, you can choose to set Day-to-day business hours for your pickup location.
- By default, the pickup location is open at all times.
- Click the "x" button next to a specific day to mark it as a closed day. Closed days will not be considered for estimated earliest pickup time, and customers will be guided to pick up their items during business hours.
- To adjust the closed status for a specific day, simply click Set open for business to change it to an open day.
7. Updated: Enhanced features at checkout
We've made some enhancements to the checkout page to clarify shipping choices and offer new capabilities like ID number collection for customs clearance. Here's a breakdown of what's new.
7.1 Enhanced presentation of shipping options at checkout
Usage scenarios:
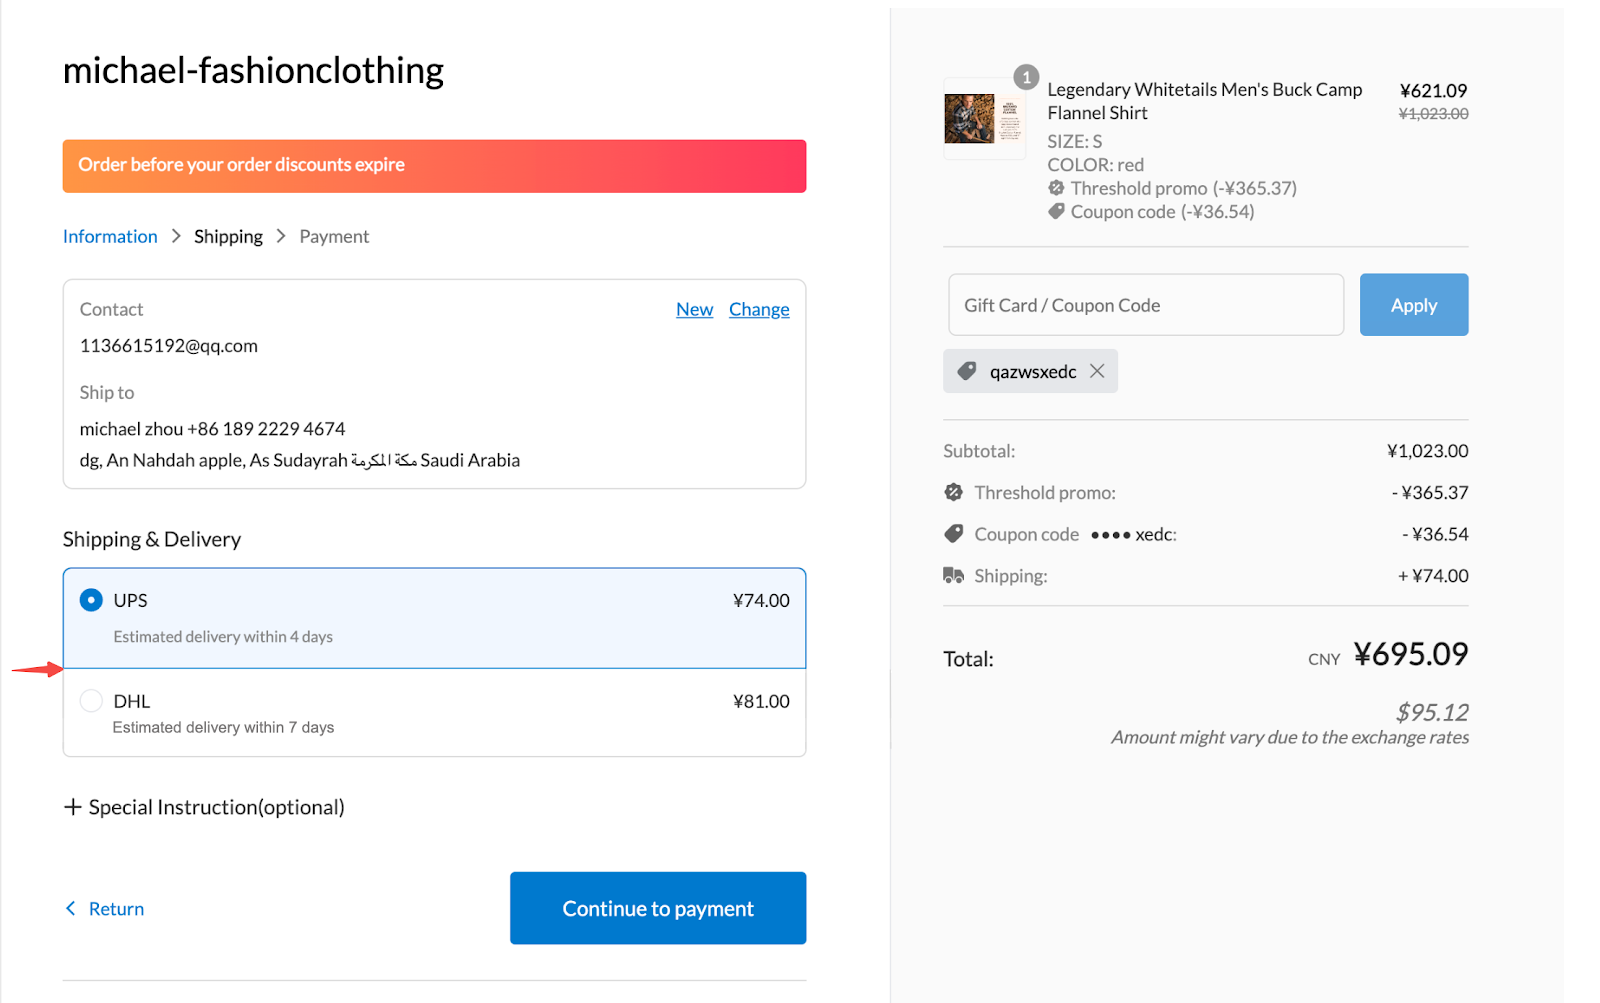
Selecting the right shipping option can be challenging due to lack of information. The updated feature aims to provide more details, allowing for an easier selection process.
Usage path:
This update is automatic, so the new features will appear without requiring any action from you.
Feature overview:
- The system will default to the shipping plan that a customer used for their last purchase.
- Also, the system will display the detailed description of all your preset shipping options.
7.2 ID number collection feature at checkout
Usage scenarios:
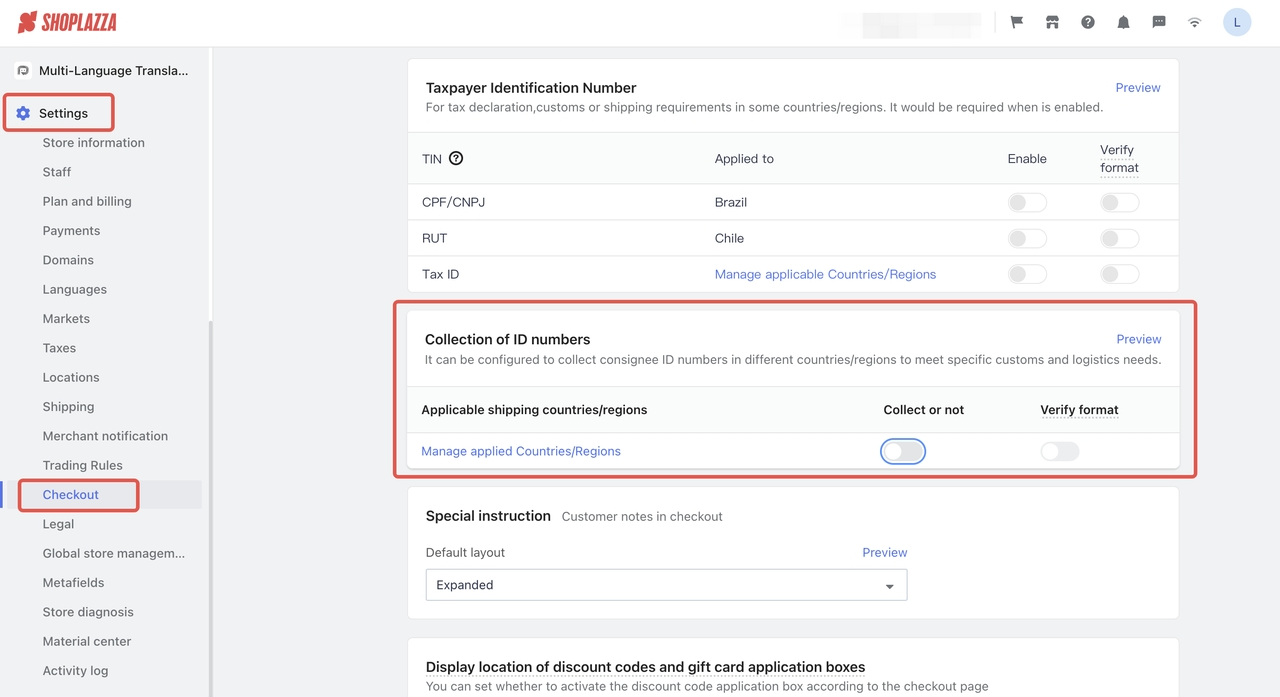
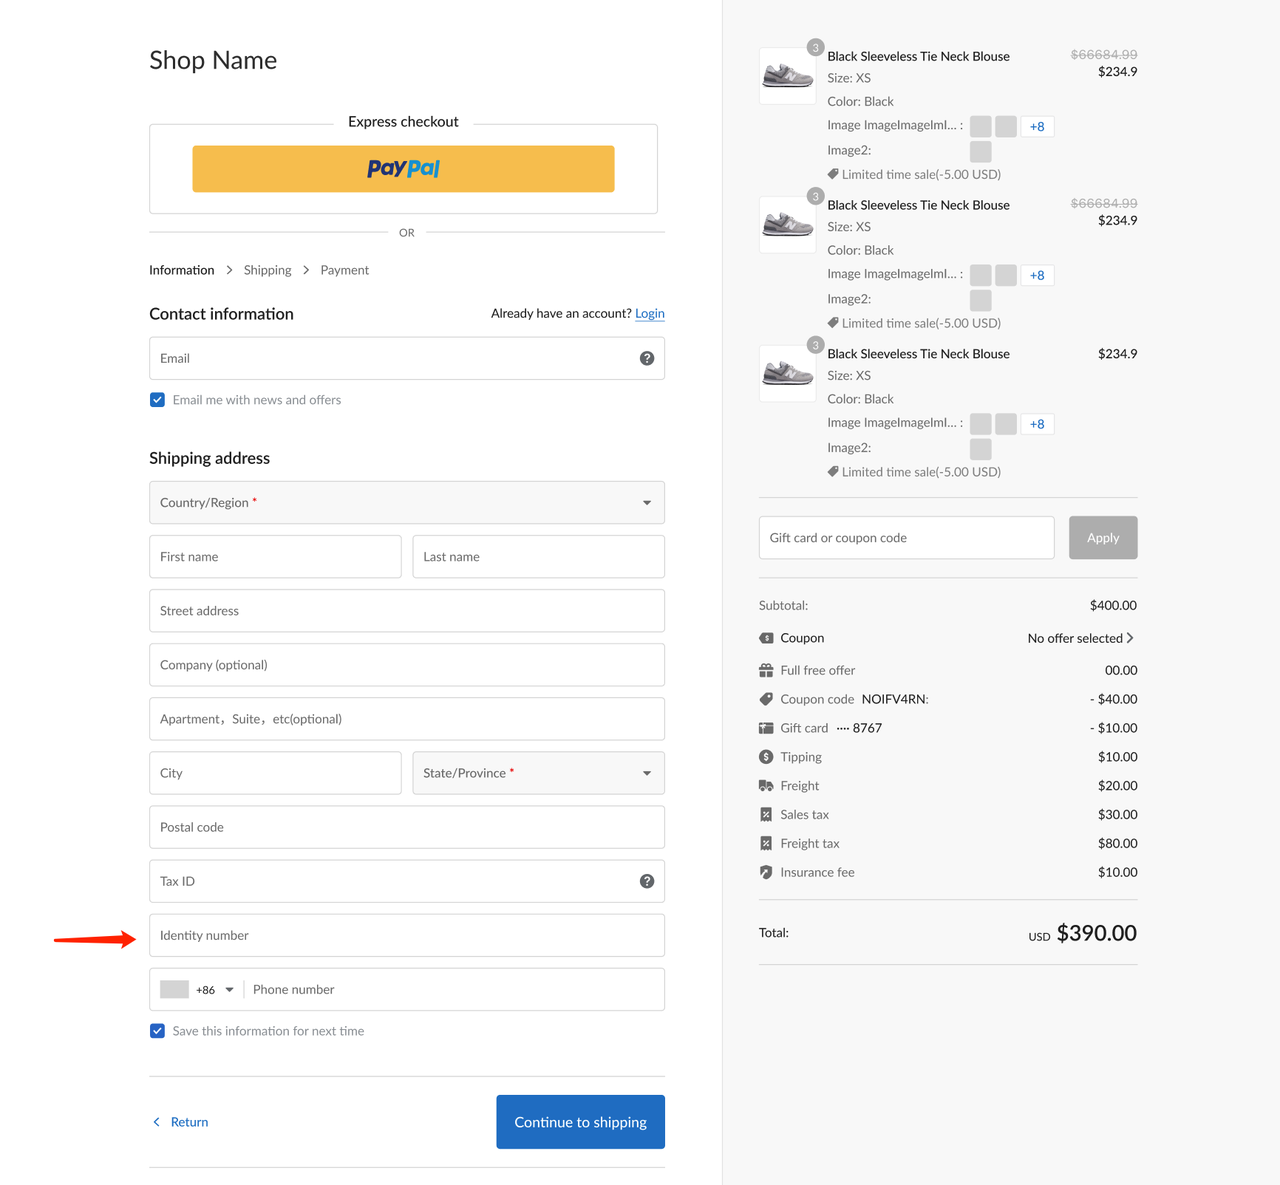
When sending packages to certain countries or regions (Turkey, South Africa, Taiwan, China), the local customs authorities will ask the shipping company to provide the customer's ID number and related information, or the package cannot go through customs. This update allows you to collect the customer's ID number if needed.
Usage path:
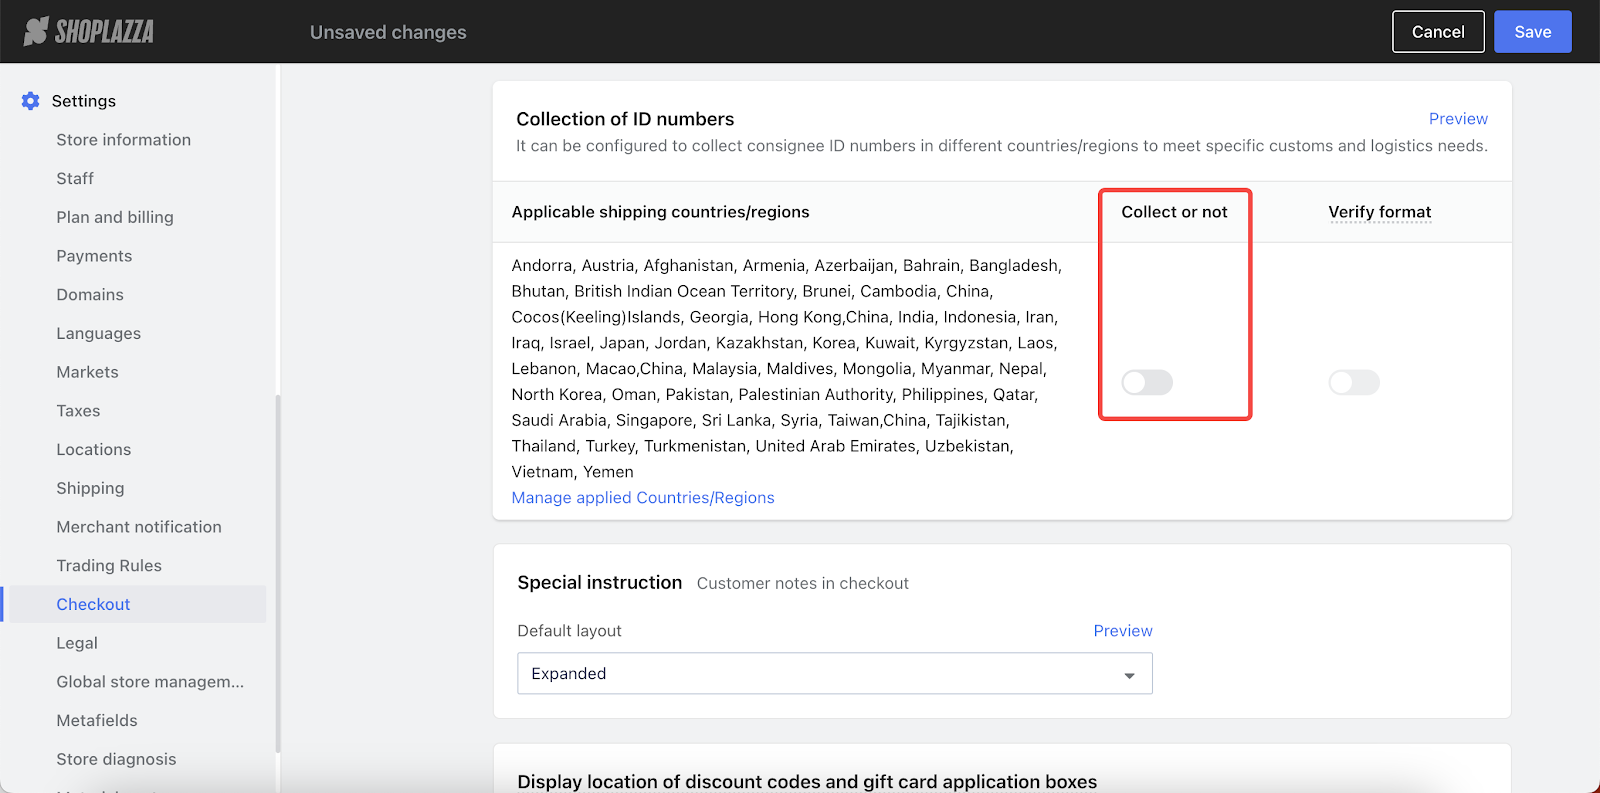
Navigate to your Shoplazza Admin > Settings > Checkout, scroll down to find the Collection of ID numbers section.
Feature overview:
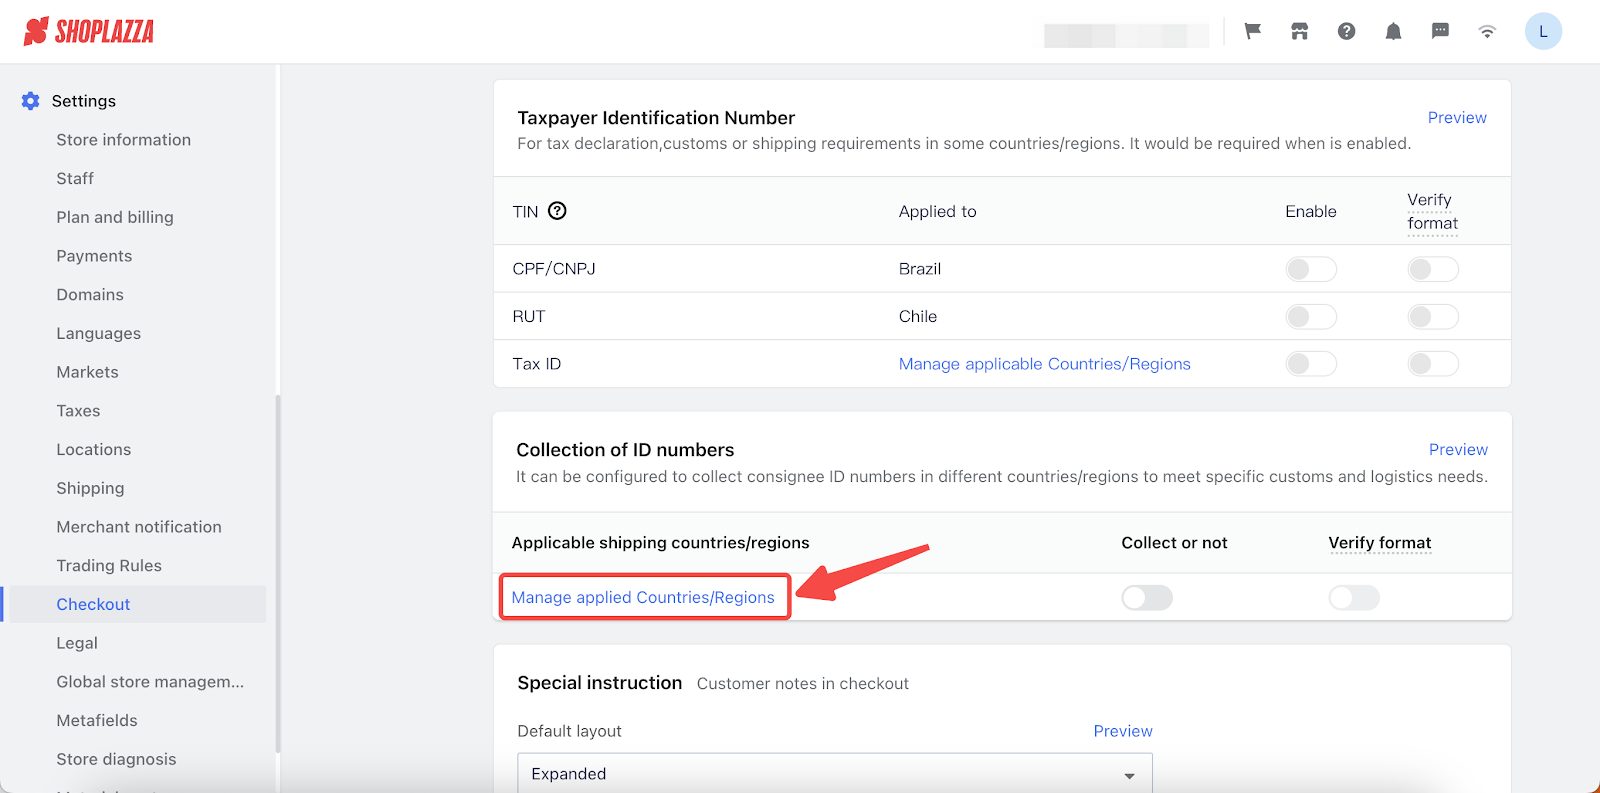
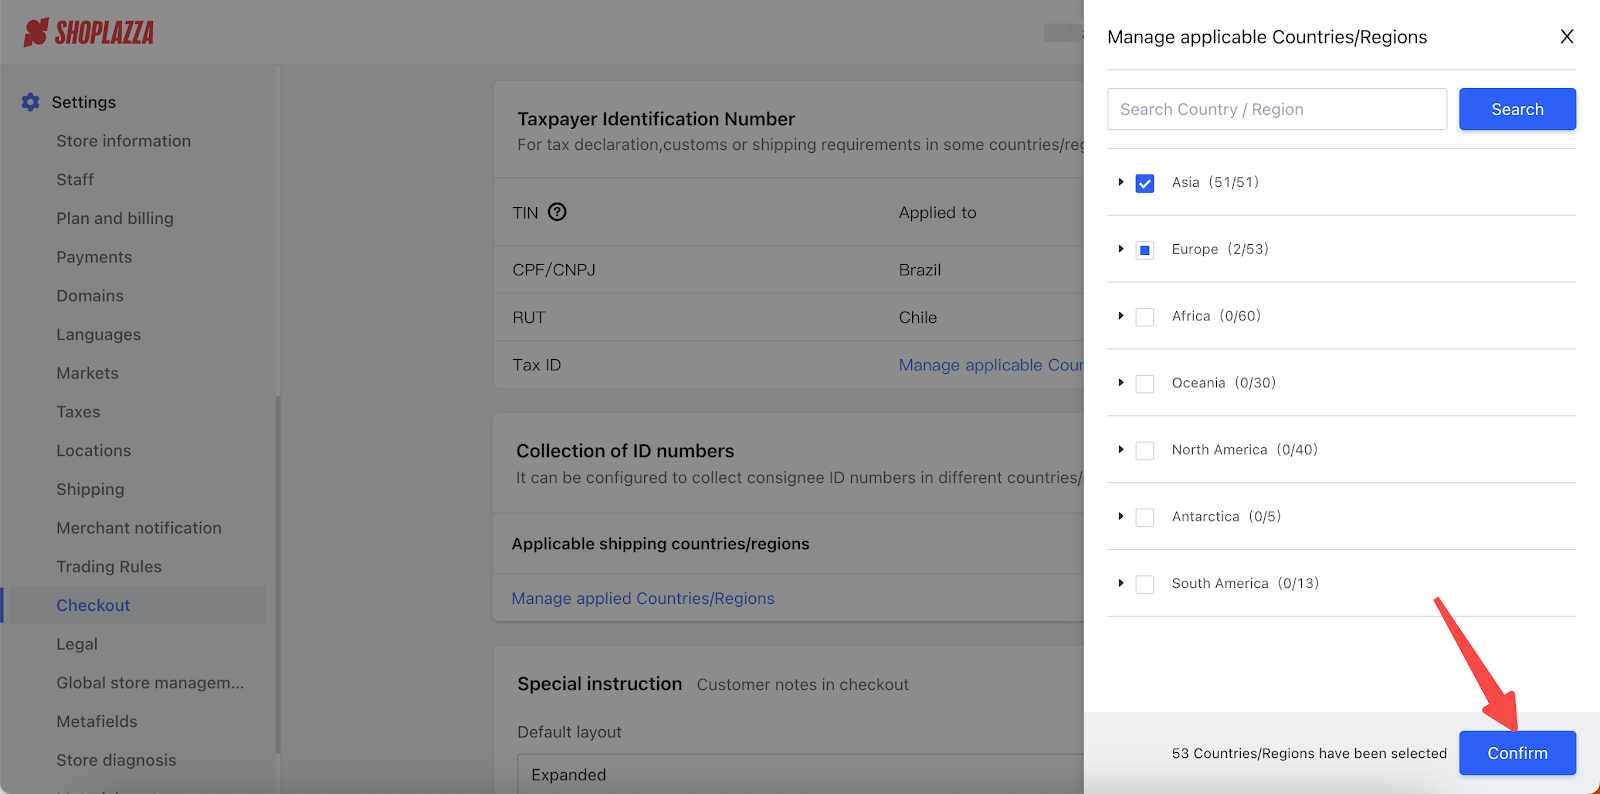
- Manage applied Countries/regions: Click to select the countries or regions to apply this feature. Then, click Confirm.
- Collect or not: Click on the switch to enable or disable this feature. If you enable this feature, customers from the selected countries will need to fill their ID numbers at checkout.
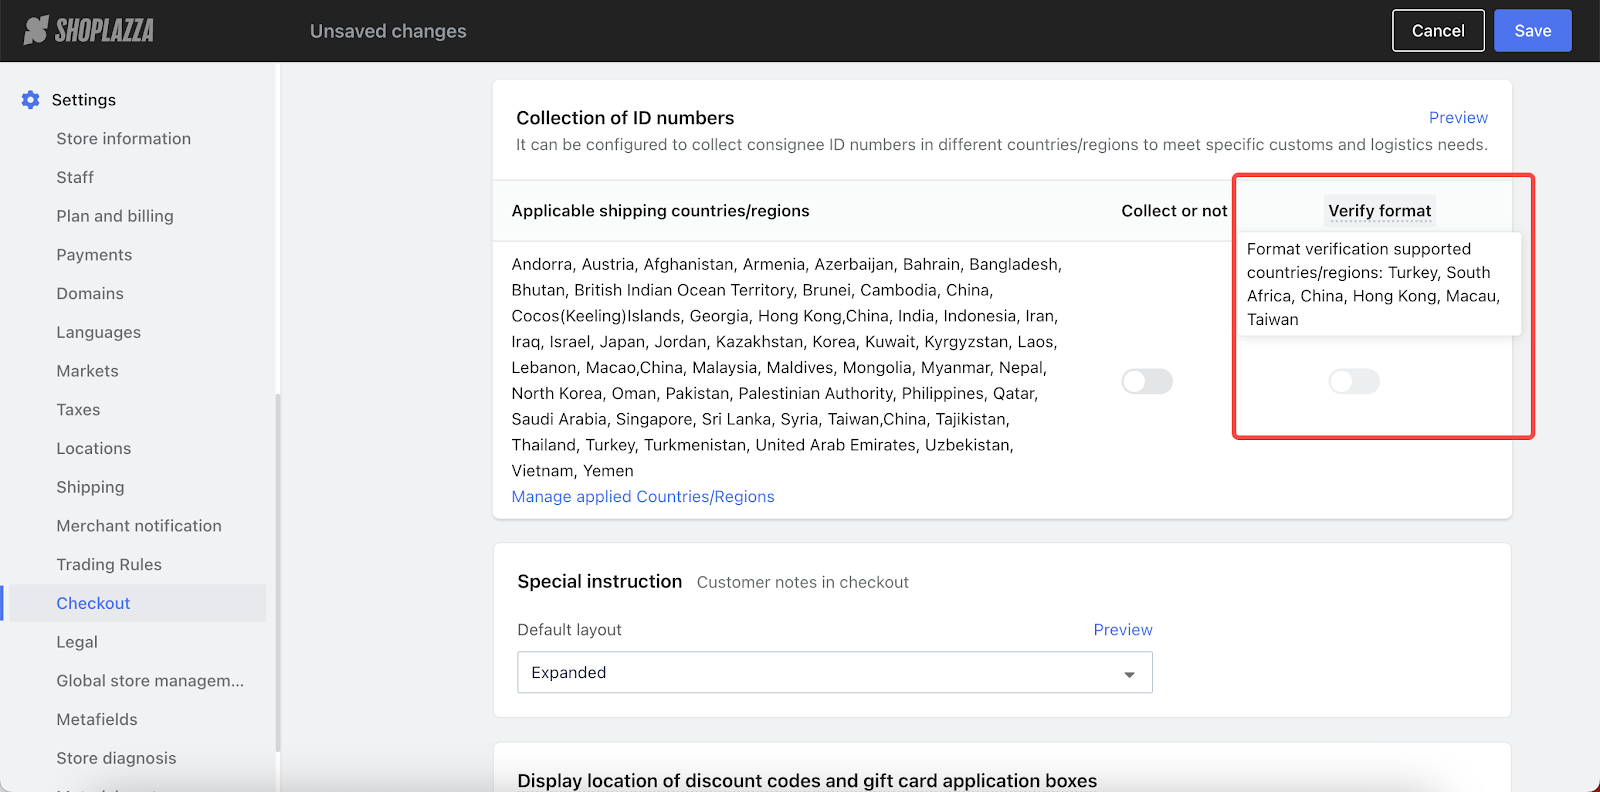
- Verify format: Click on the switch to enable or disable this feature. The system will check if the customer's ID number is in the correct format. If it's not, an error message will be shown to let the customer know.
- The ID numbers collected can be viewed in the order details by you and your customers. They can also be synced with your ERP system.
Note
Format verification is currently supported for Turkey, South Africa, China, Hong Kong, Macau, and Taiwan.
8. Updated: Data dashboard for Card Advanced Settings
Usage scenarios:
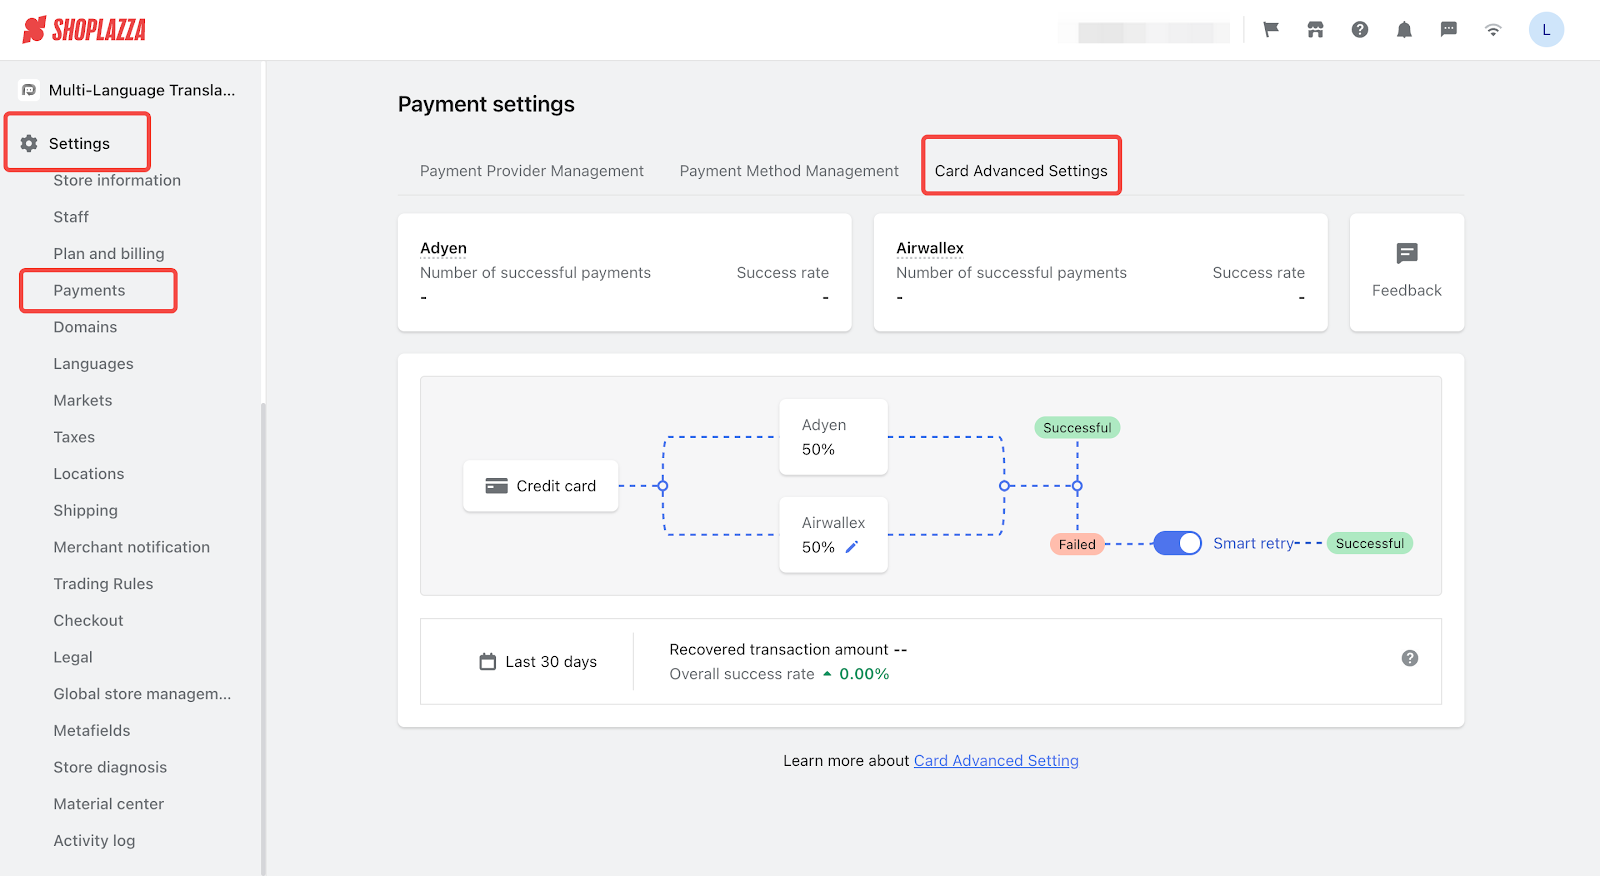
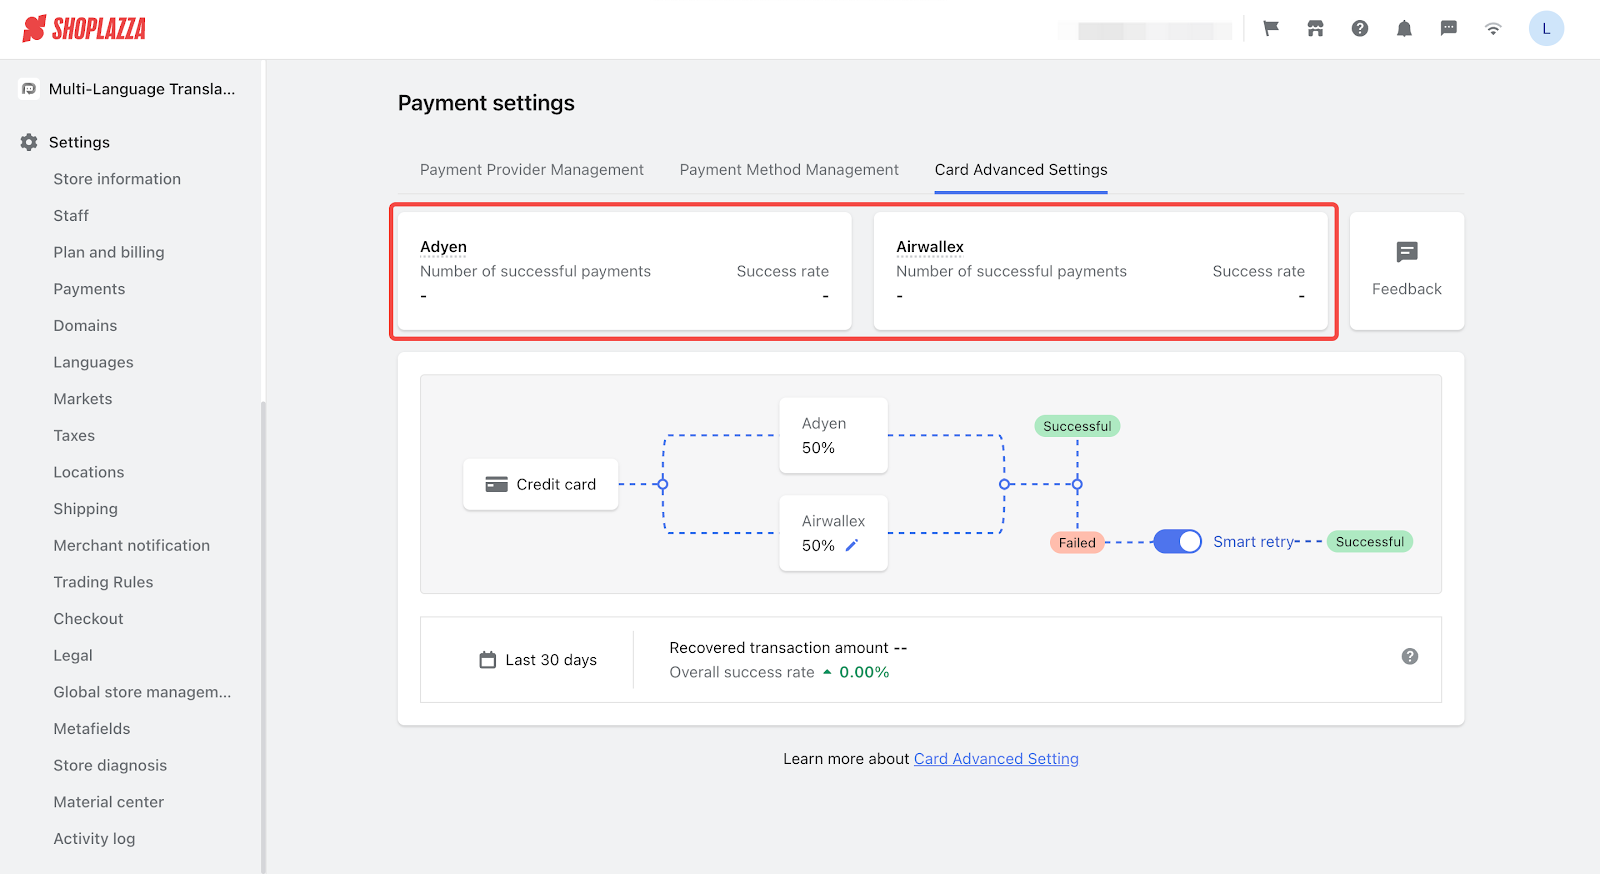
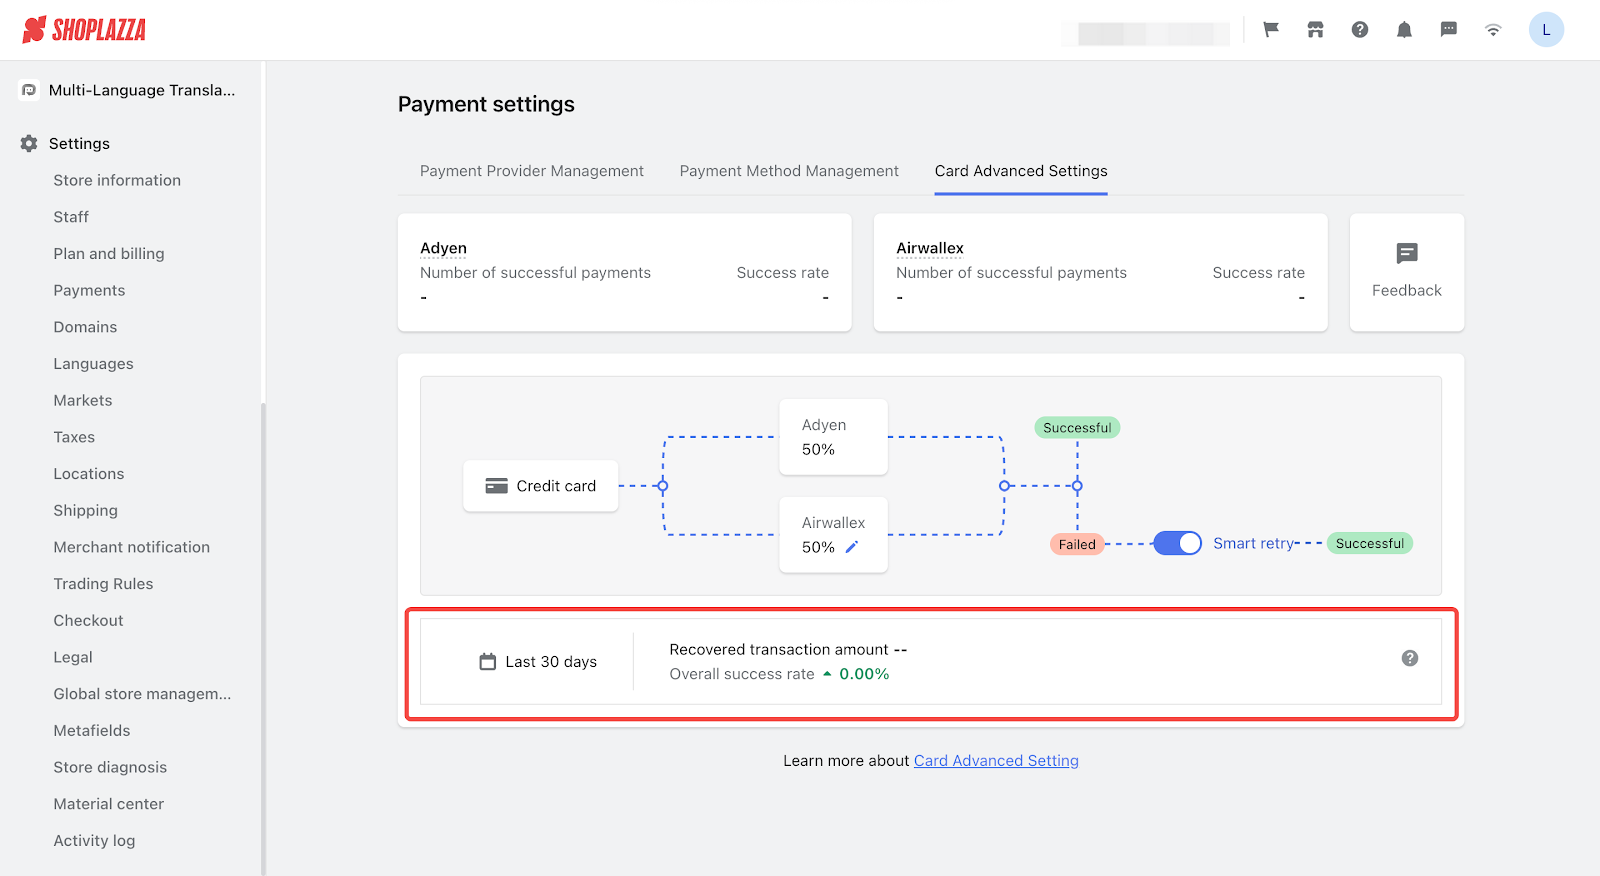
This dashboard allows you to monitor payment success rates and understand the benefits of using the "Smart retry" feature.
Usage path:
Navigate to your Shoplazza Admin > Settings > Payment > Card Advanced Settings.
Feature overview:
- The success rate of payment channels will be displayed here.
- Display data from the last 30 days.
- The success rate is calculated by dividing the number of successful payments by the total number of payment requests.
- The data related to the "Smart retry" feature will be displayed here.
- Display data from the last 30 days.
- If a recovered transaction amount is in a currency other than USD, it will be converted to USD at the current exchange rate.

Comments
Please sign in to leave a comment.