
New features
1.Managing staff app permissions
2.Card Advanced Settings—Automatic Payment Provider Selection
3.Price Rounding applied to shipping costs
4.Added Local Pickup Service
5.Enhancing Multi-Location Management
6.Creating Order Priority
7.Support for Custom Payment Orders with Manual "Marked as Paid" Feature
8.Improved visual display of shipping discounts on checkout page
9.Enhanced the User Interface(UI) and interaction of the checkout page
10.Support for Multiple Inventory Locations
11.Importing and exporting products in Wholesale mode (Shoplazza Pro subscription)
12.Introducing a tax-free option In Customer Management
13.Customizing Flash Sales Banner Title
14.Updated the Reports section
15.Enhancements to the Product Customizer App
16.Enhancements to Size Chart app functionality
17.Incorporated Cart and Checkout Settings for MoCart app
18.Added notification menu update in MoCart app
19.Hide Product App
1. Managing staff app permissions
Usage scenarios:
When the app is installed in your store, different app permissions may need to be set for different employees depending on their work needs.
Usage path:
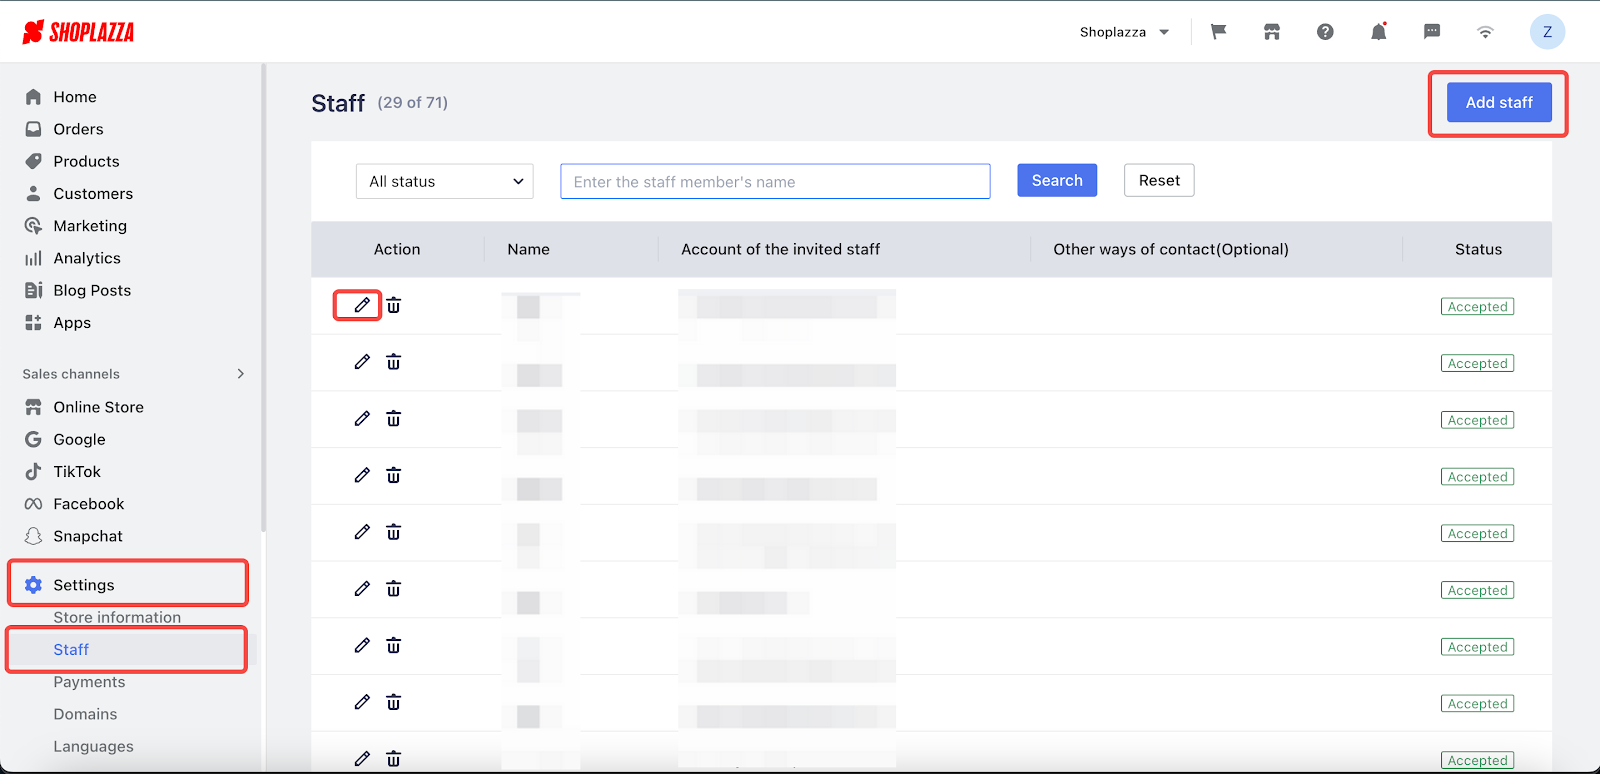
1. Navigate to your Shoplazza Admin > Settings > Staff. If the staff member has not been added to your store, click the "Add staff" button. When inviting a staff member, ensure that they have been granted the necessary permissions.
2. If the staff member has been added to your store, click on the edit icon in the action column. This will allow you to update the staff member's permissions."
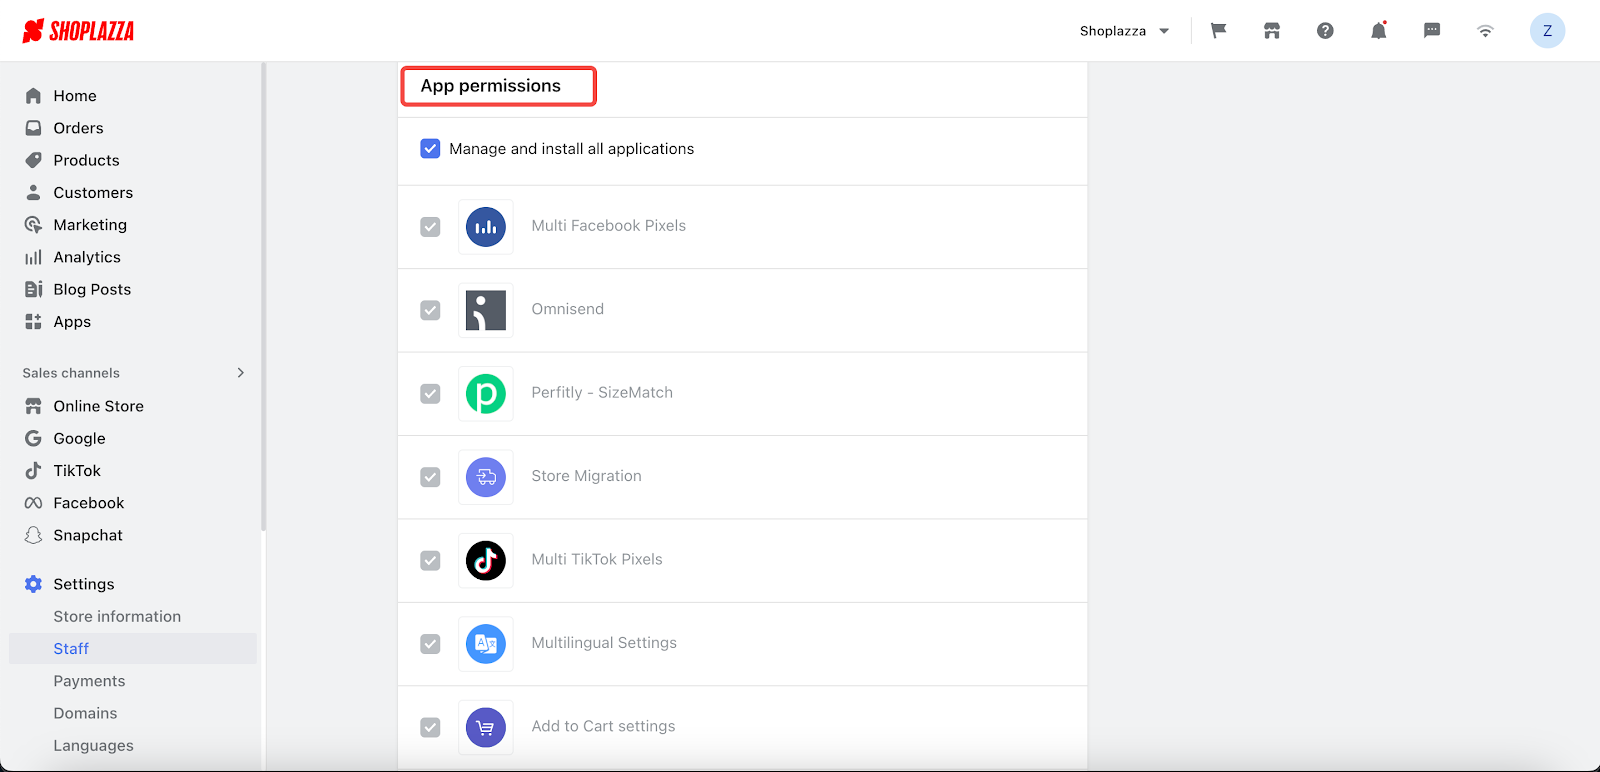
3. Scroll down to the "App Permissions" section. Locate and select the app for which the staff member needs permission to. Click "Save" after selecting the appropriate permissions to update the staff member's access to that app.
Feature overview:
You can give staff members usage permissions to specific apps in your store.
2. Card Advanced Settings—Automatic Payment Provider Selection
Usage scenarios:
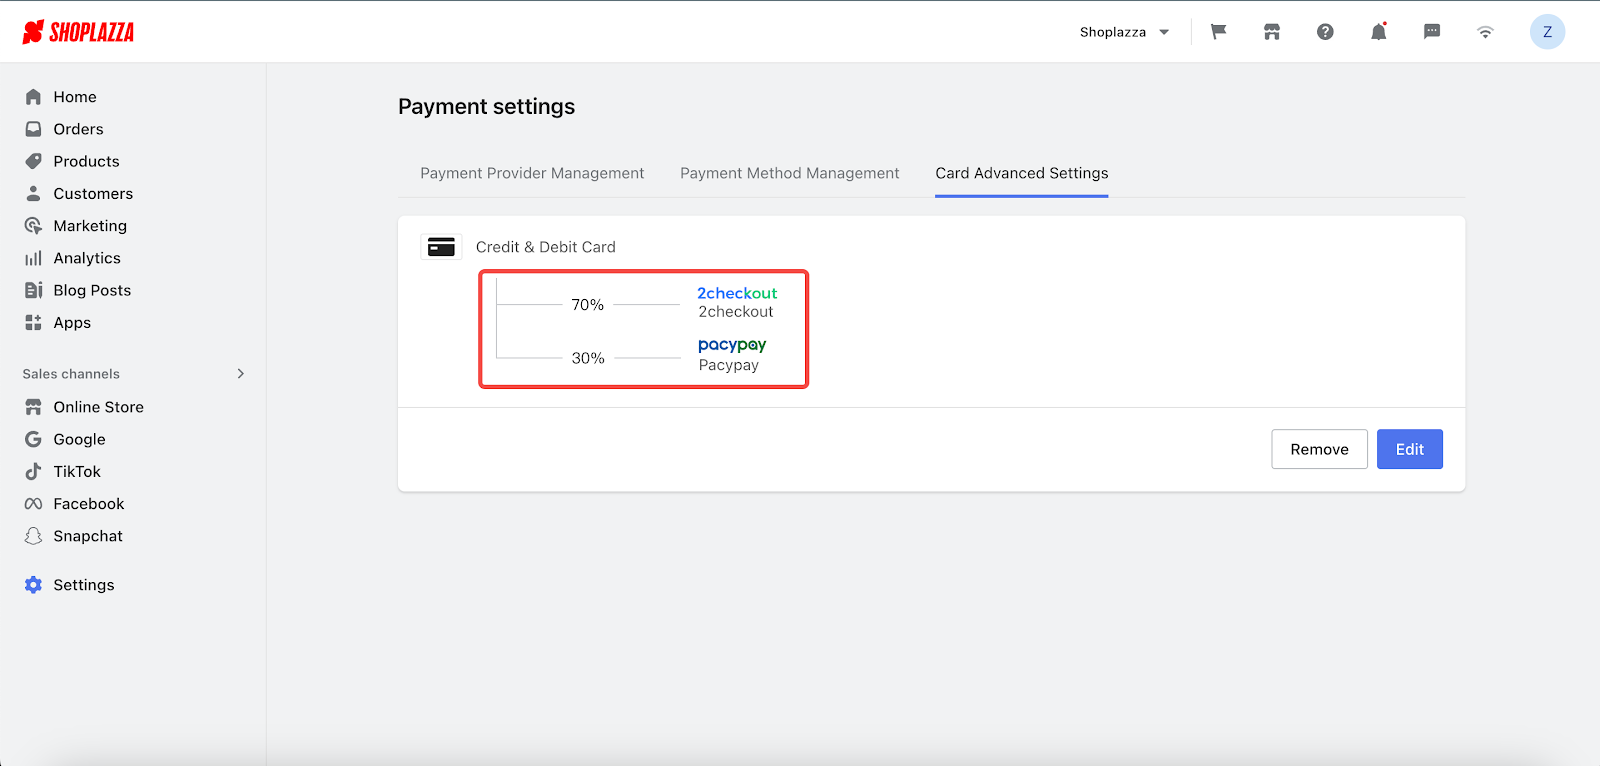
This feature enables you to create rules for handling credit card payments in your online store. Based on these rules, the system will automatically choose the payment provider for each transaction. Customers will only see one payment option at their end, but behind the scenes, transactions might be handled by different providers. Here's how it might be used:
- Comparing Providers: By splitting payments between two providers, you can assess which one performs better.
- Stability: You can share payments across two providers. If one fails, the other will continue to process the payments.
- Order-Based Splitting: If you choose to send 40% of payments to provider A and 60% to provider B, the orders in your store will be split that way. With more transactions, the actual split will be close to these percentages.
Usage path:
1. Navigate to your Shoplazza Admin > Settings > Payments, click on Card Advanced Setting.
Feature overview:
Click on Add button under Card Advanced Settings section.
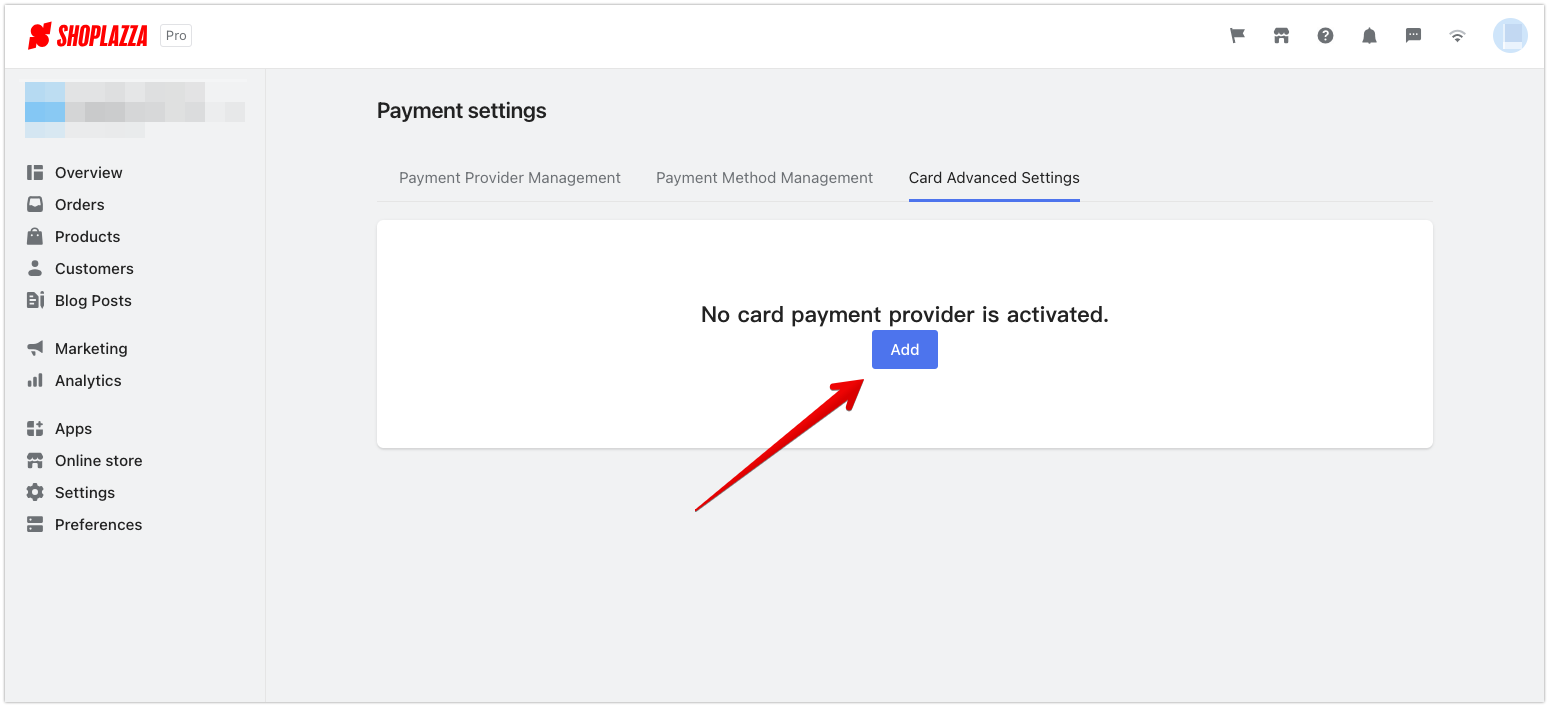
Note
For advanced card payment settings, you need to have an activated card payment method in your payment method.
Step 1:
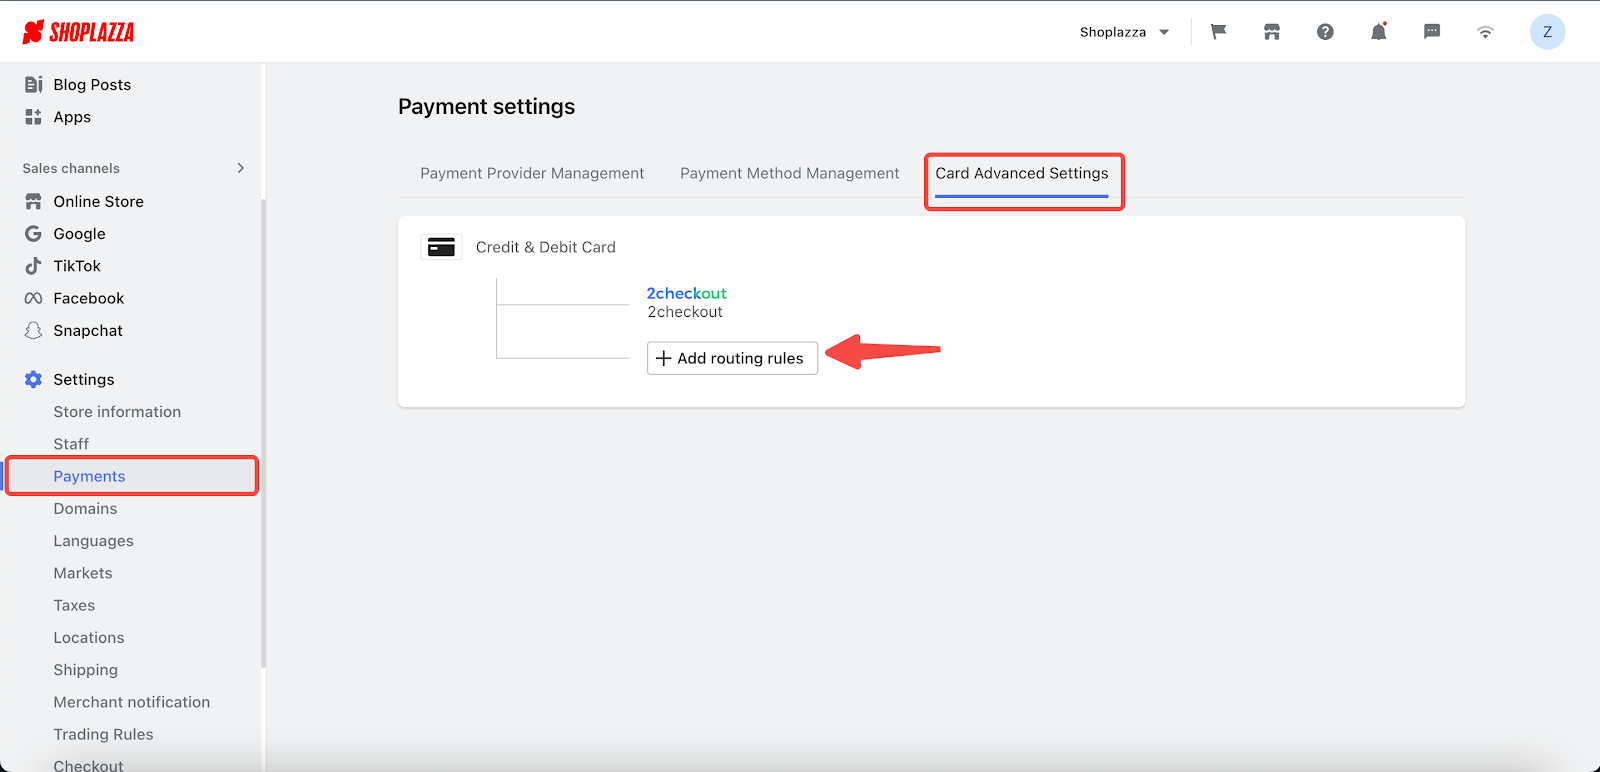
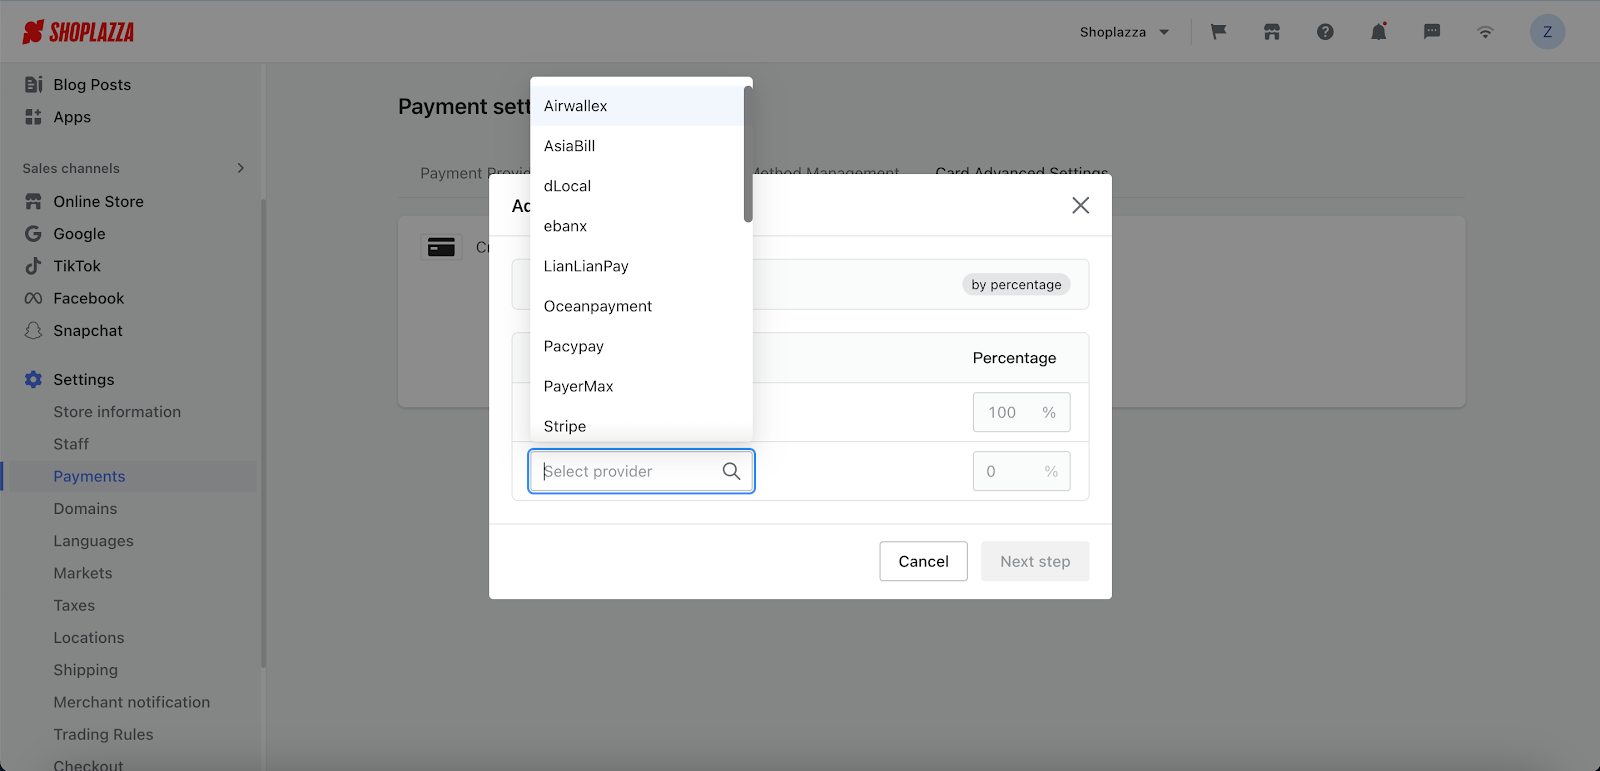
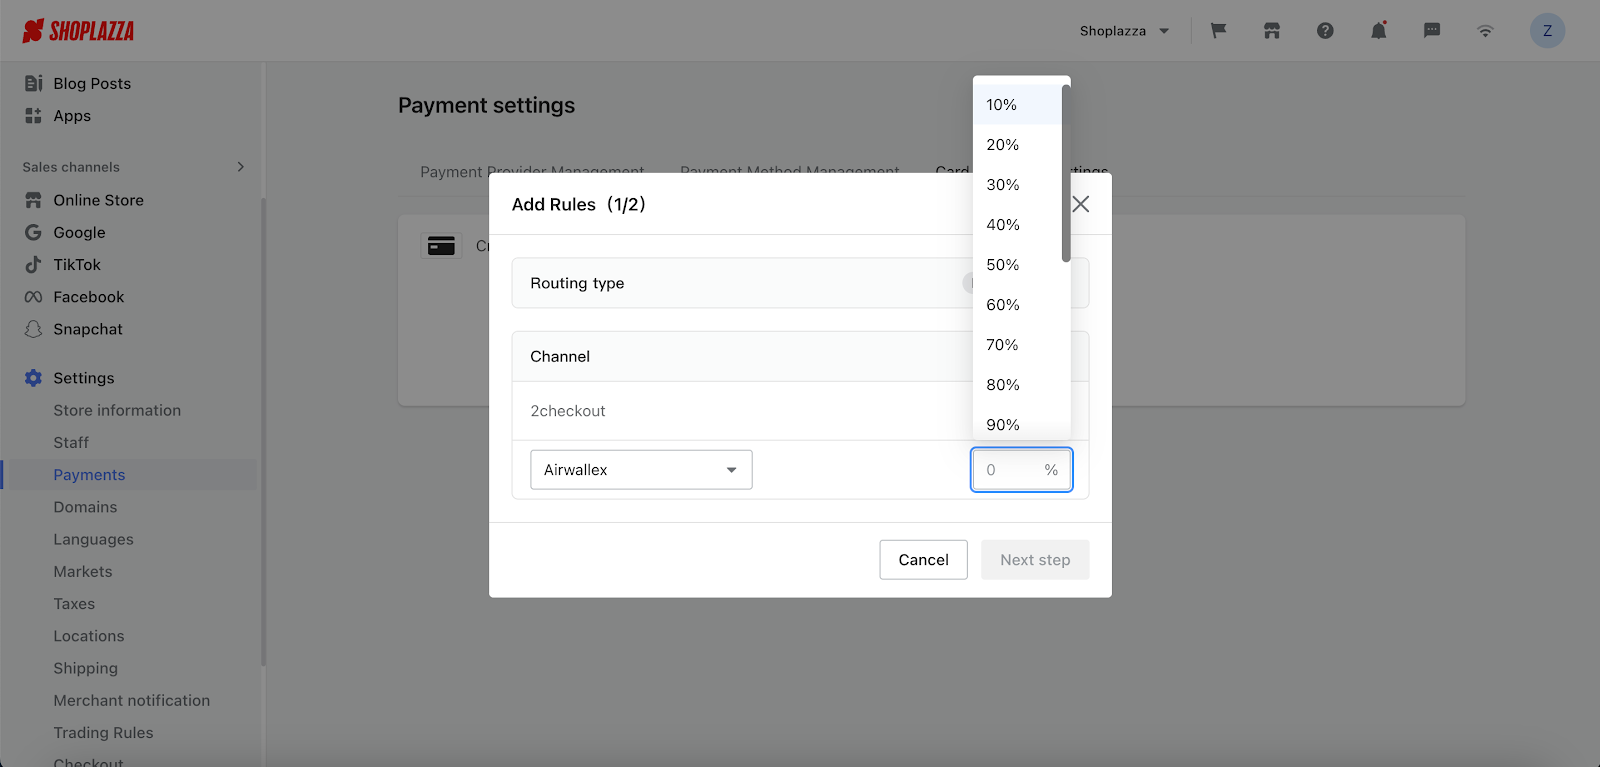
1. Add Rules: Create guidelines that determine how payments are directed to different providers.
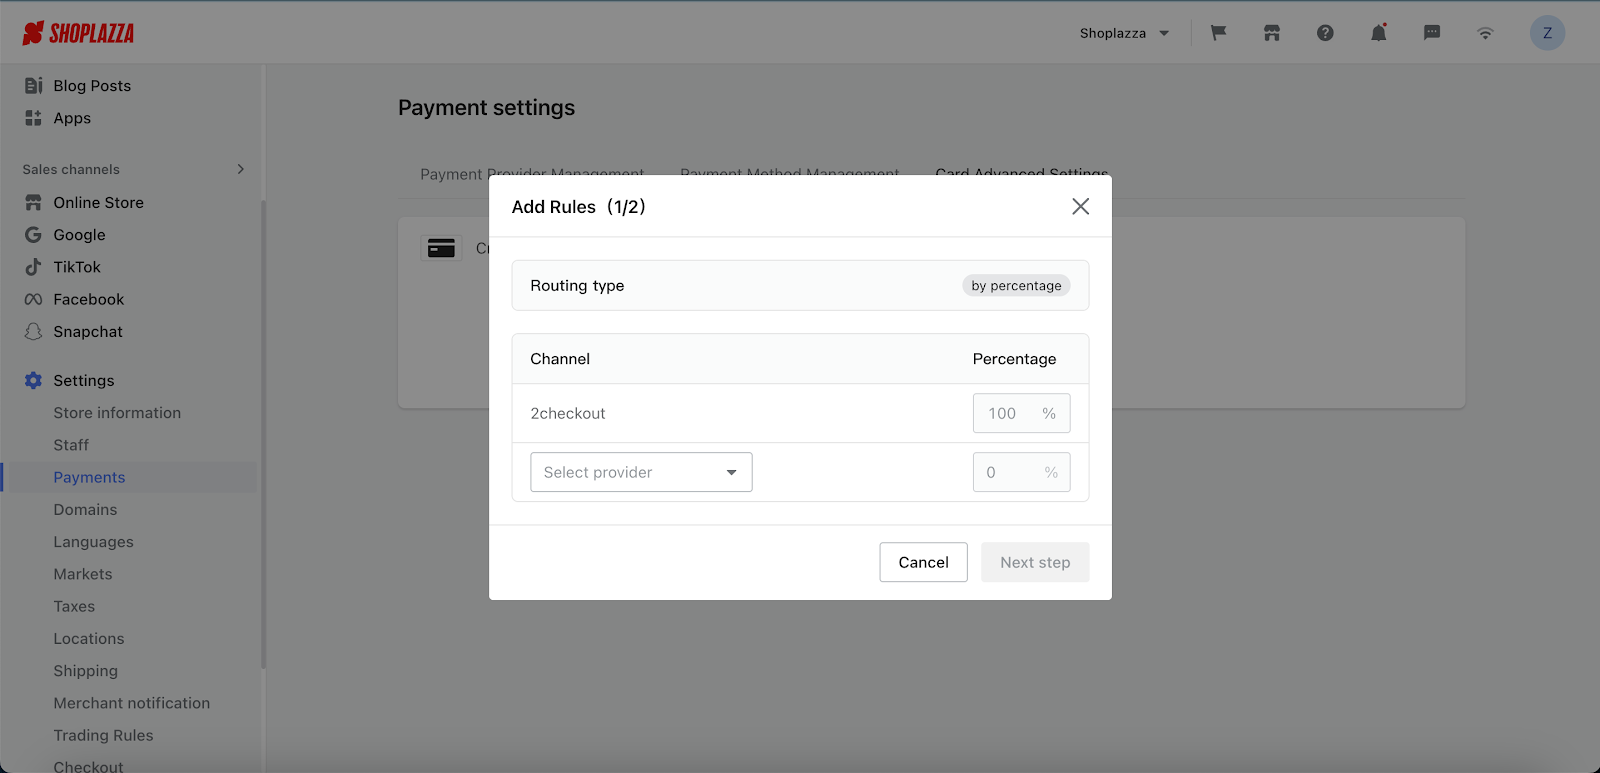
2. Select the Payment Provider and set the Percentage , then click Next step
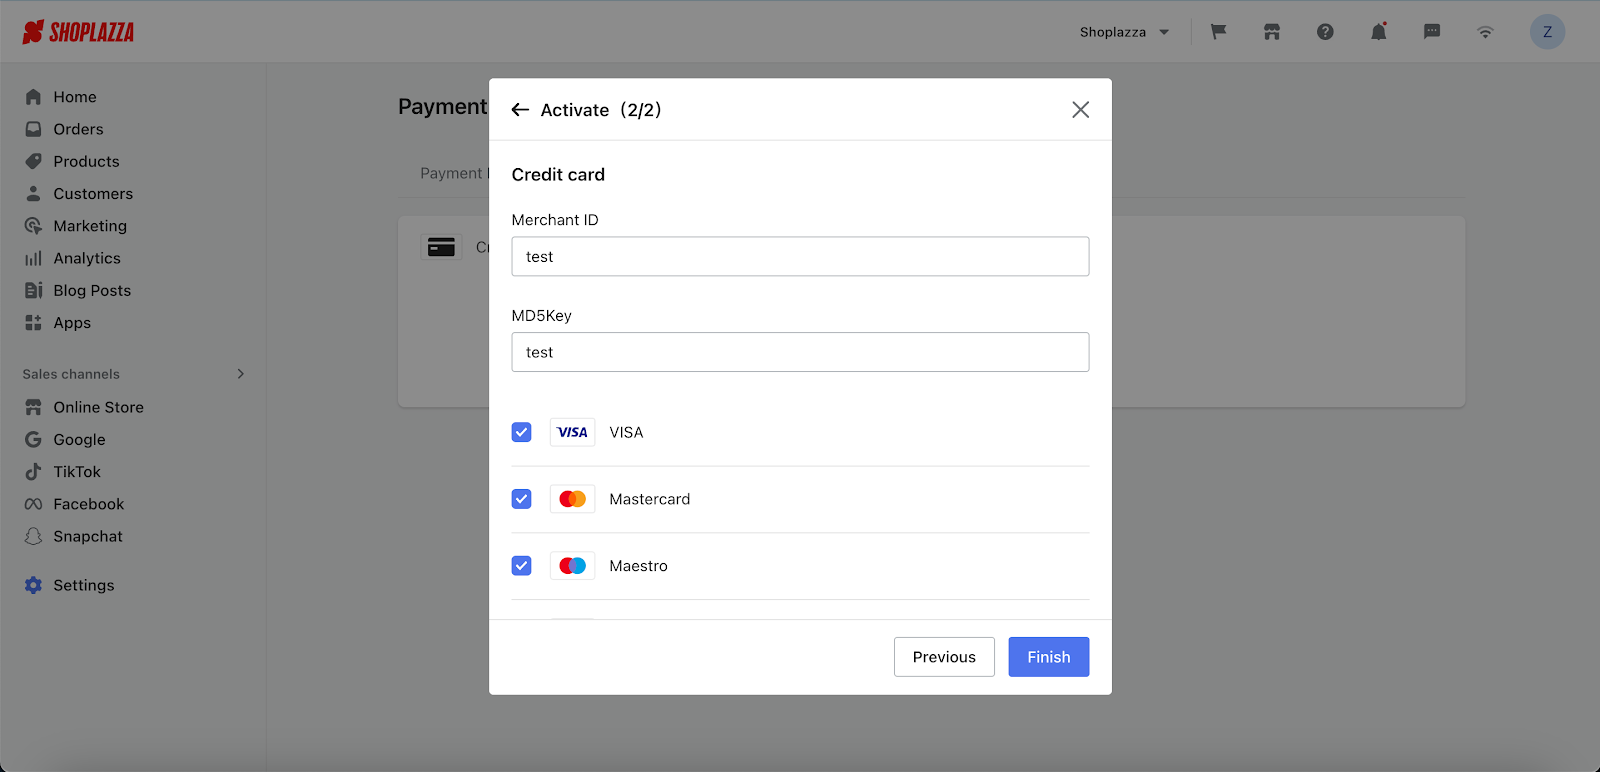
Step2:
1. Activate the Payment Path: Put the rules into action by starting the payment path. This step involves choosing the specific payment provider and setting up the basic information (the settings on this page are the same as those on the Payment Provider Management section). Follow the prompts on the page to fill in the Merchant ID and complete the basic settings (the settings on this page are the same as those on the Payment Provider Management section). Once the information is filled out, click Finish.
2. You will then be brought back to the main page, where you can see the activated paths and how payments are divided.
3. If needed, click Edit to change the provider or the way payments are split.
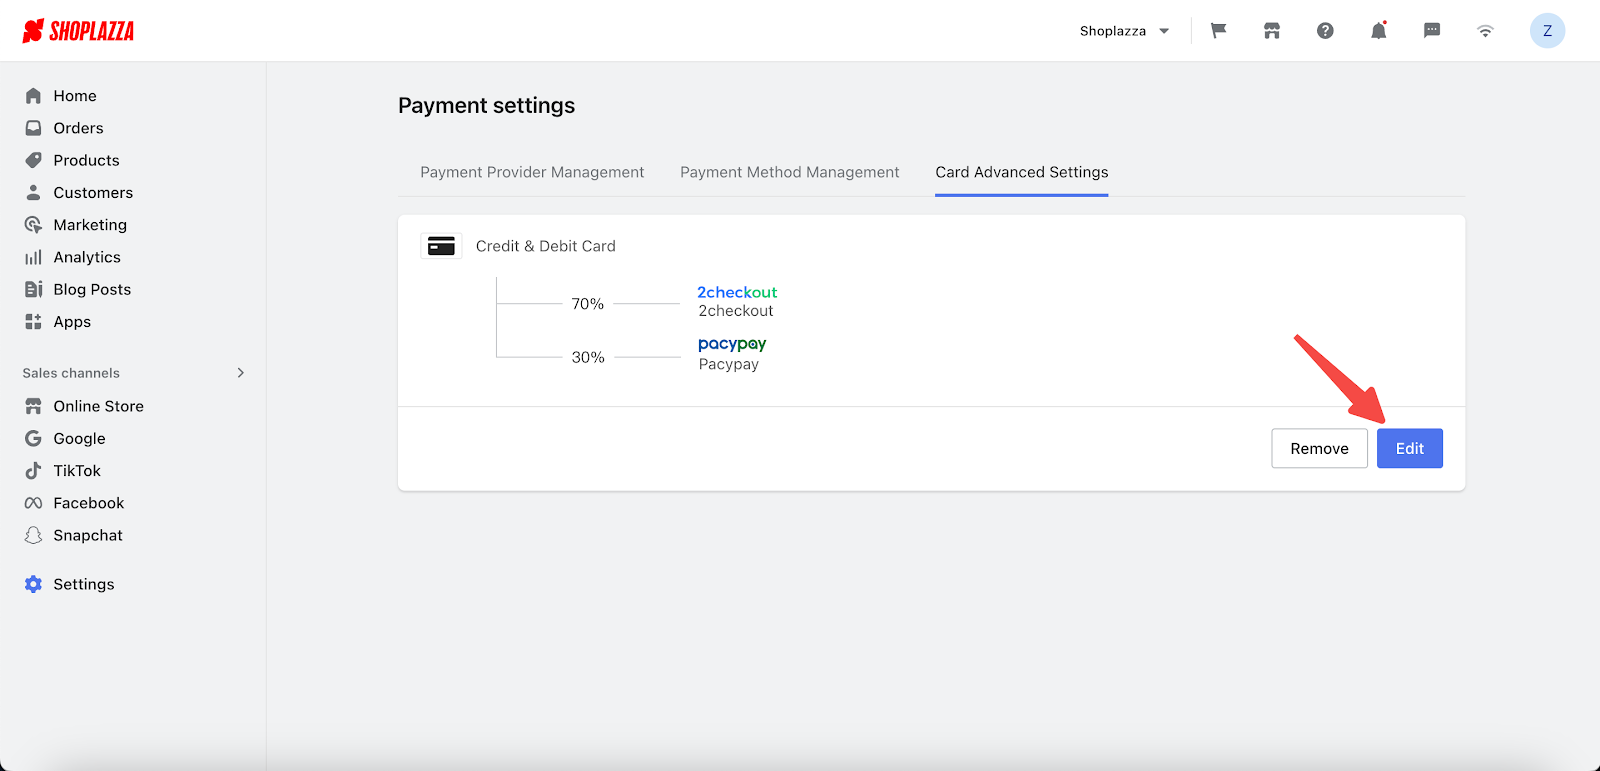
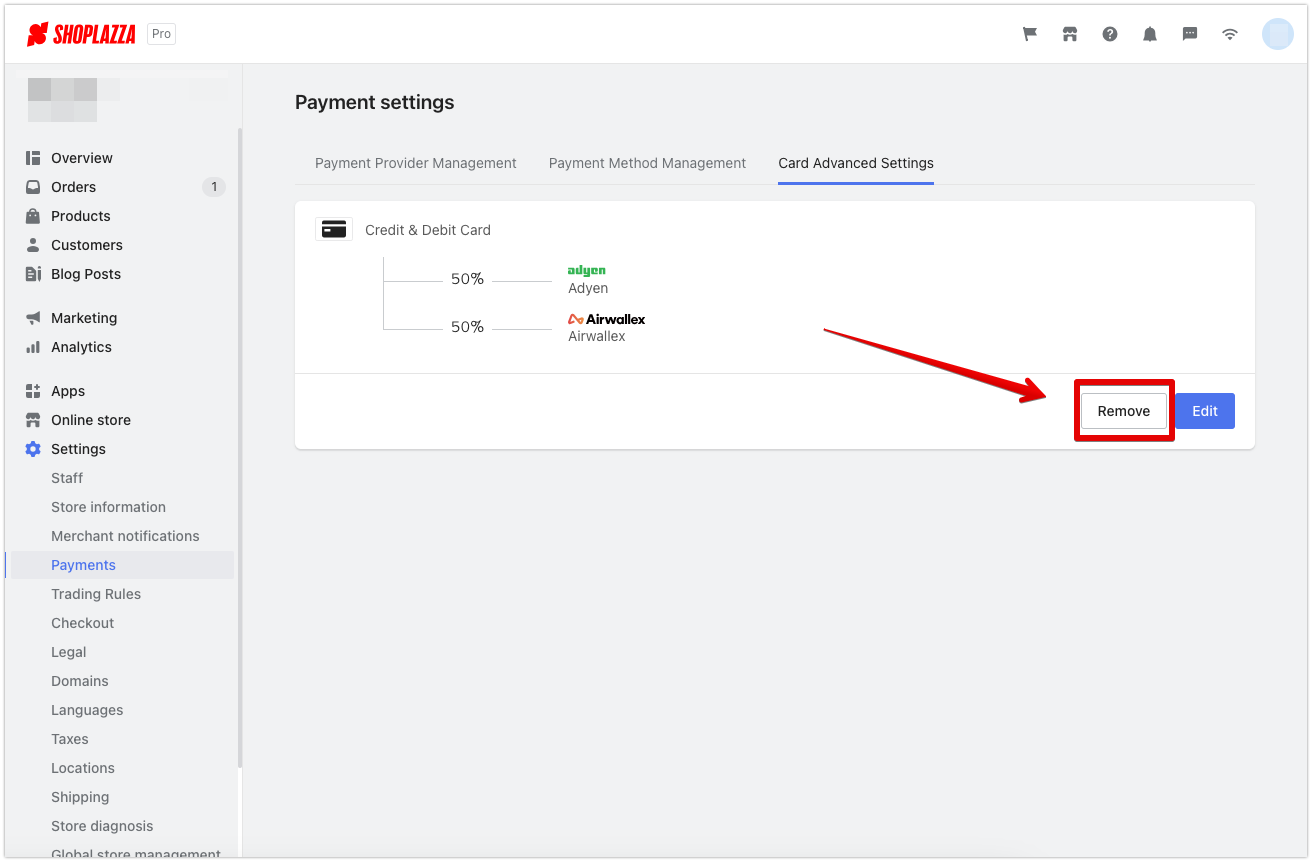
4. To turn off this feature, click Remove. The added payment path will be turned off, and all payments will go through the default path.
3. Price Rounding applied to shipping costs
Usage Scenario:
The market function can easily calculate product prices and shipping costs in various markets, using real-time bank exchange rates. Due to the fluctuating nature of exchange rates, there may be variations in the converted prices. To enhance price consistency, you have the option to turn on the price rounding feature in the preferences setting for each market. This will round the price to the nearest whole number or standard increment according to the currency's denomination. Now, we've extended this convenient feature to the calculation of shipping costs, making the process of collecting and settling these costs more straightforward.
Usage path:
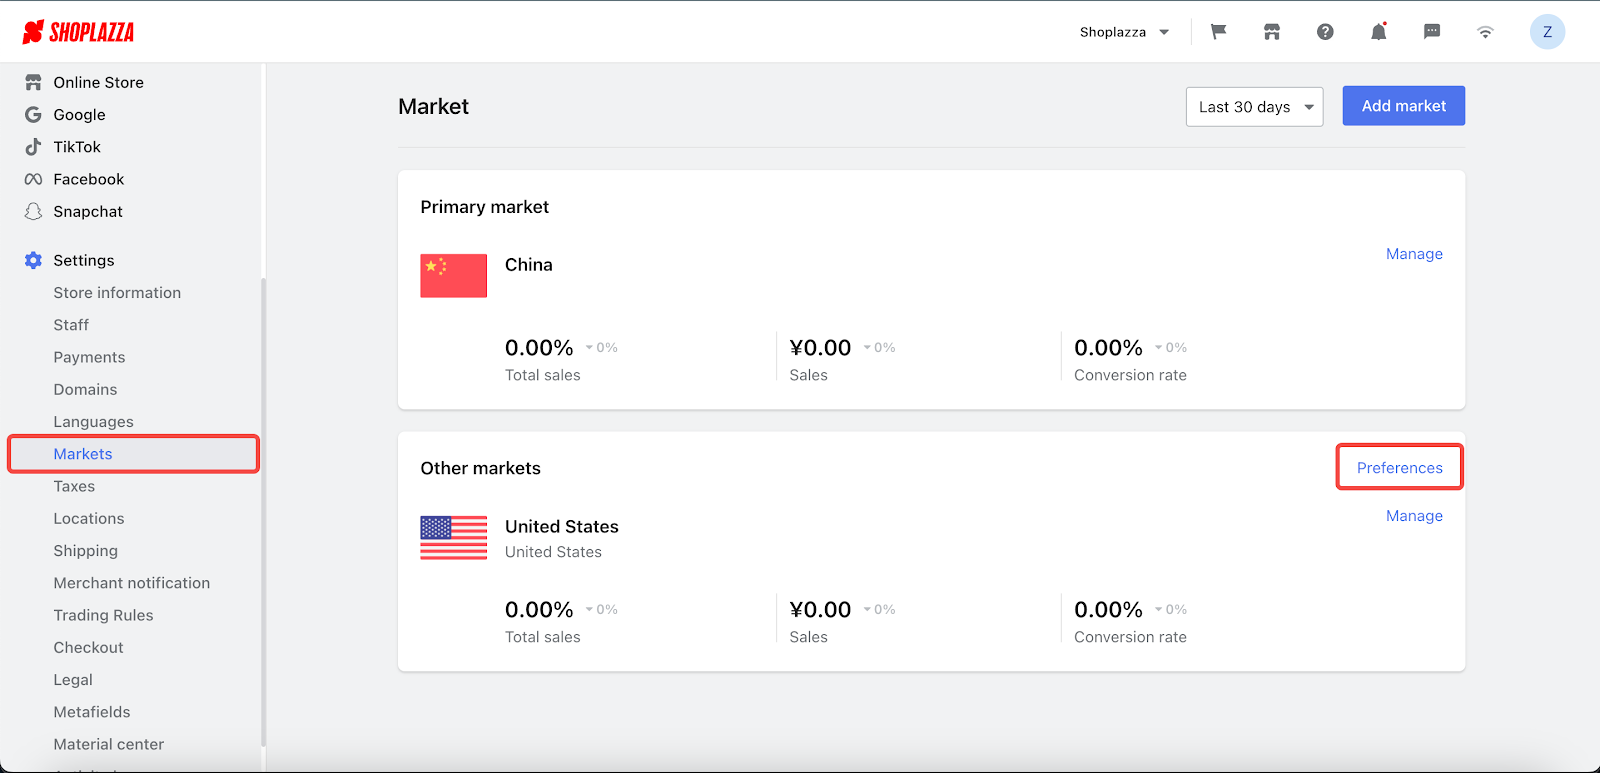
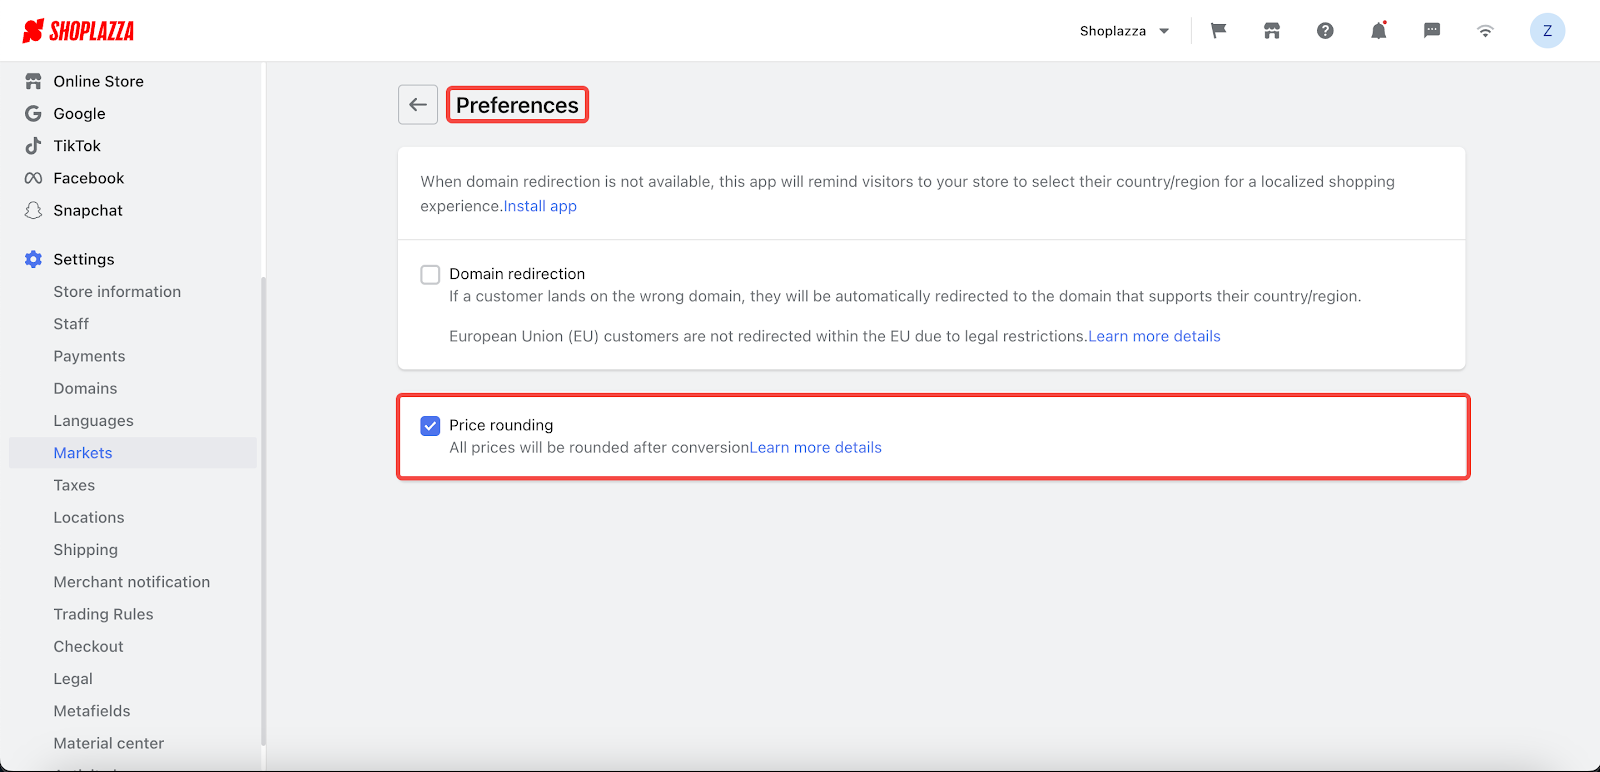
1. Navigate to your Shoplazza Admin > Markets > Shipping and click on Preferences in the Other markets section. Check the price rounding option on the preferences setting page to enable the feature. If you have already enabled the price rounding feature, the update will be automatically applied without additional settings.
Feature overview:
Price rounding feature in other markets preference setting applies to shipping costs calculation.
For more information on Price Rounding, please refer to the Price Rounding Help Article on the Shoplazza Help Center.
4. Added Local Pickup Service
Usage scenarios:
If a merchant's warehouse or store can allow customers to pick up their own purchases, they can offer a "local pick-up" service. This service can significantly reduce shipping and handling costs for the merchant, with the primary focus being on preparing the orders for pickup.
At a local pick-up location, merchants can enable the "local pick-up" feature. This can include providing an estimate of when the order will be ready for pick-up, sharing the store's operating hours, and offering the option for customers to pay in cash upon pick-up (COD).
Because this service eliminates the need for home delivery, customers won't have to provide shipping addresses during the checkout process. As a result, merchants aren't required to provide information regarding courier services, tracking numbers, or other delivery-related details.".
Usage path:
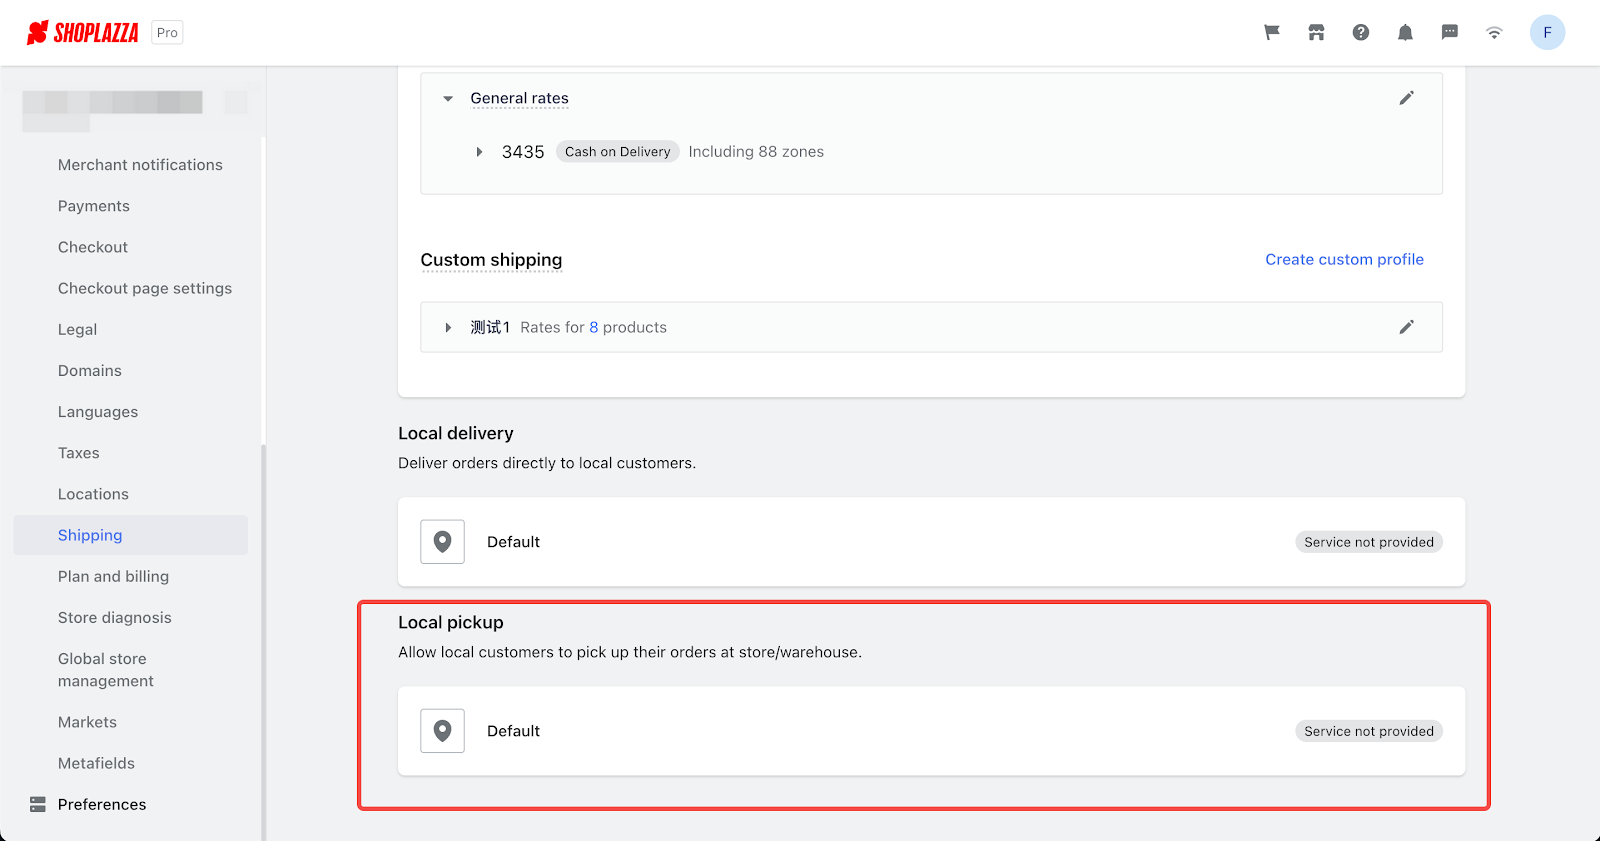
1. Navigate to your Shoplazza Admin > Settings > Shipping and click to enter.
2. You can scroll down and can find the Local pickup section.
Feature overview:
1. Navigate to your Shoplazza Admin > Settings > Shipping, and you can see the local pickup section.
2. Then you can click the corresponding pickup location to manage service information.
3. On this page, you will fill in specific information about the local pickup service based on the prompts. Once the information is completed and click Save.
4. You also have the ability to manage all aspects of this local pickup location, including:
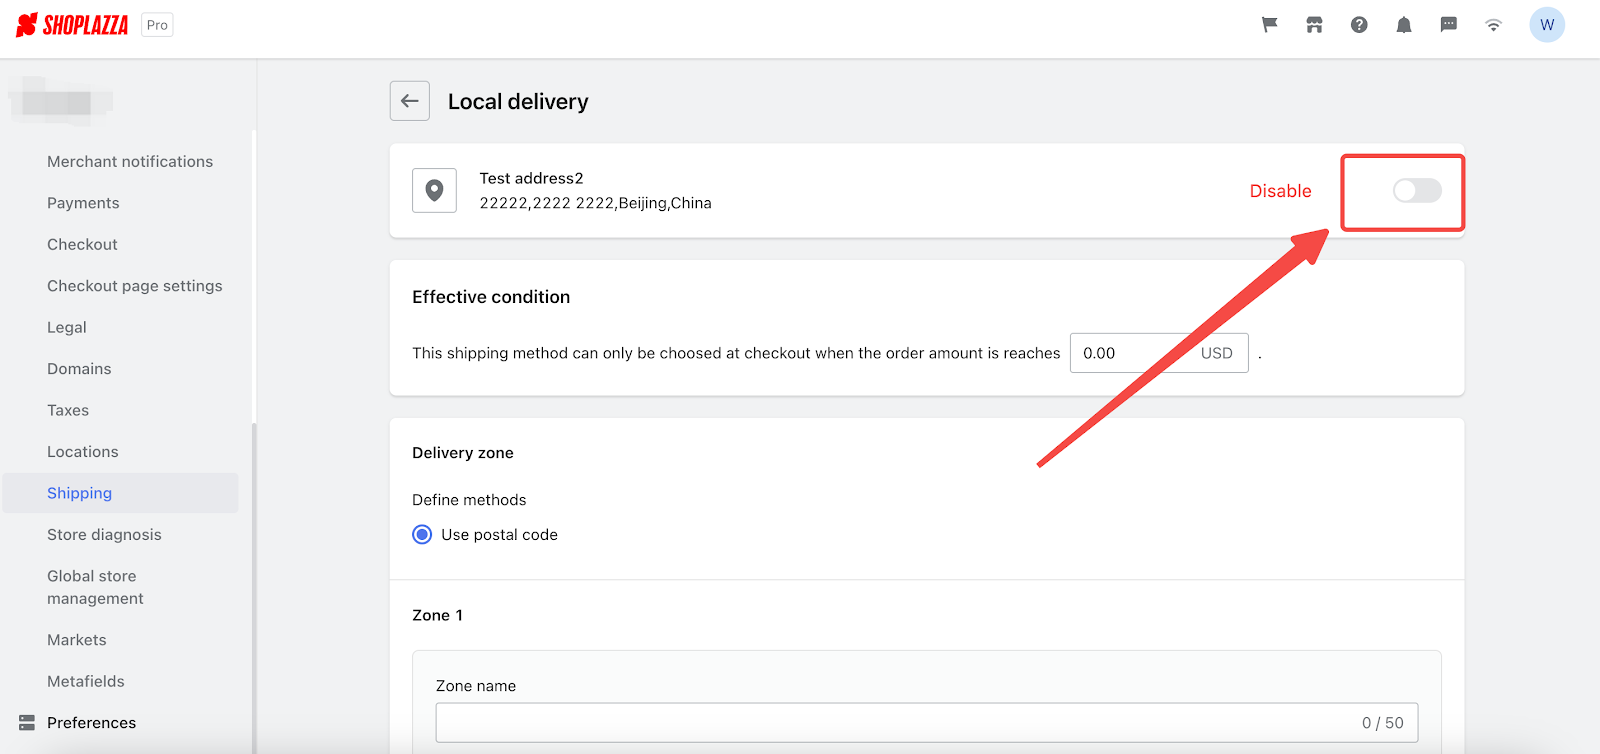
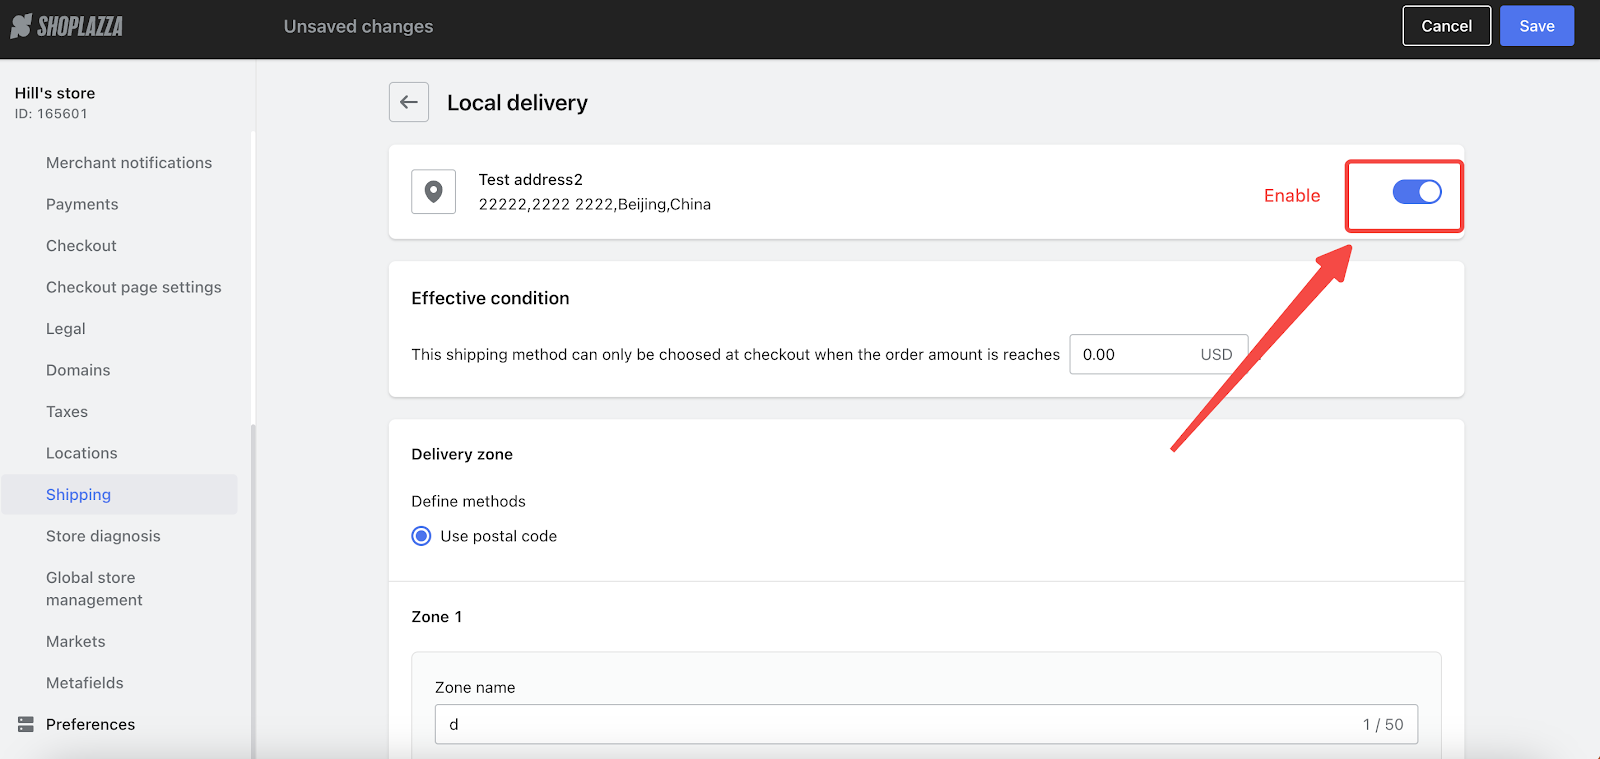
- Service Availability: You can choose to enable or disable this service as per your operational needs.
- Expected pickup time: based on your configuration, the system will automatically calculate the pickup time based on the opening hours. You simply need to prepare the product before pickup time and wait for customers to collect their orders.
- Store Operating Hours: You can set the store's hours of operation according to the local time zone. This prevents any inconvenience to customers who might otherwise visit when the store is closed.
- Cash on Delivery (COD) Options: It's important to consider the local customs and preferences. For instance, in the Middle East, many customers prefer the Cash on Delivery (COD) option. So, based on what customers in your area prefer, you can decide whether to allow COD when they pick up their items at different locations. This helps you offer payment methods that customers are comfortable with, which can enhance their shopping experience.
5. Enhancing Multi-Location Management
Usage scenarios:
When you own multiple warehouses, stores, or any location to store your products, Shoplazza can help you to manage multiple location information.
By using the Locations feature, you can leverage the following capabilities:
- Inventory Management: This feature allows you to monitor and manage the stock levels of each product at different locations, ensuring accurate inventory tracking.
- Express Delivery Options: When dispatching orders via express delivery, you can select any of your multiple shipping locations as the "shipping location" to place an order with your logistics provider.
- Local Delivery Service: For local deliveries, you can establish multiple service points to cater to a wide range of areas.
- Local Pickup: This functionality allows you to offer multiple pickup locations, giving consumers more flexibility to collect their orders.
Usage path:
1. Navigate to your Shoplazza Admin > Settings > Locations.
Feature overview:
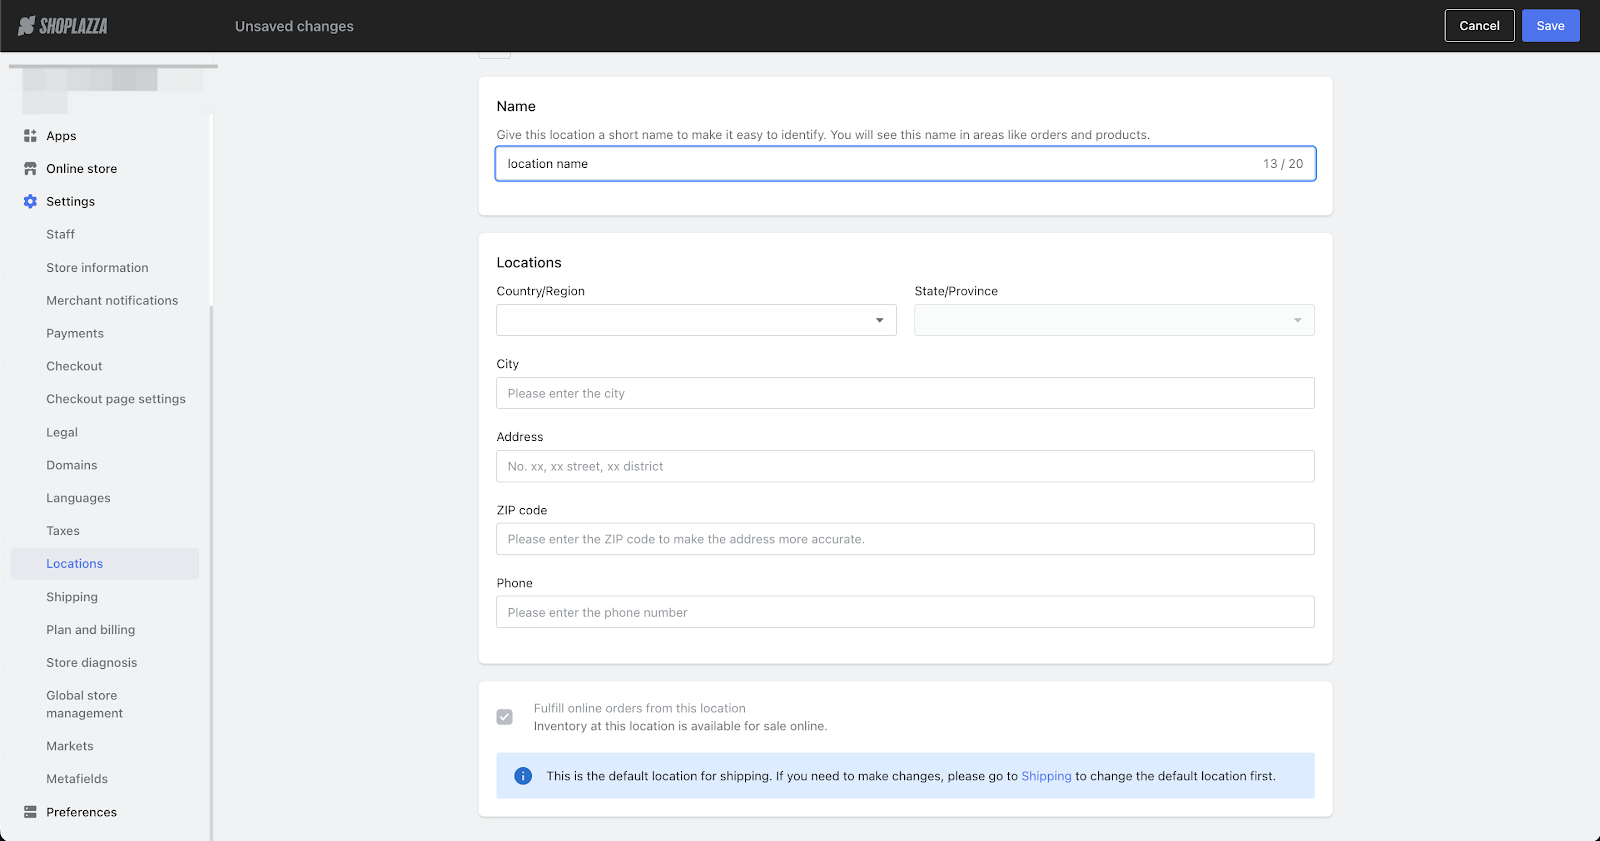
1. Navigate to your Shoplazza Admin > Settings > Locations, and click Add location.
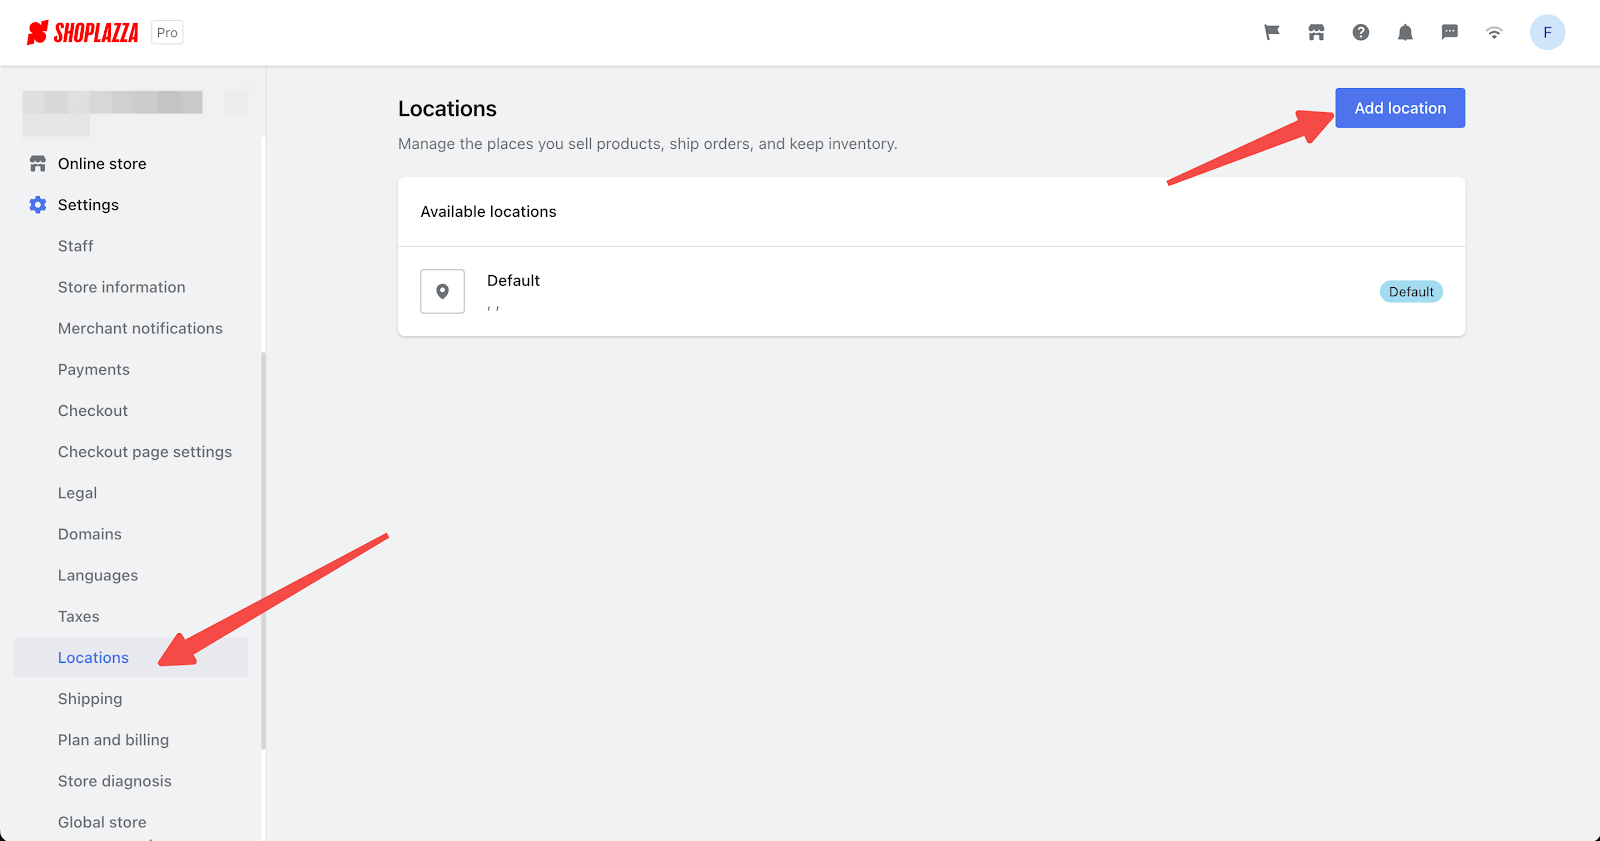
2. You'll then have the option to input the location name and its specific address. This name will only be visible to customers on your store's website when you designate this location for deliveries or customer pickups. If you wish to make the inventory from this location available for online sales, select "fulfill online orders from this location.
3. This feature is available across all pricing plans, allowing you to manage information for all of your locations. You have the capability to add up to fifty locations.
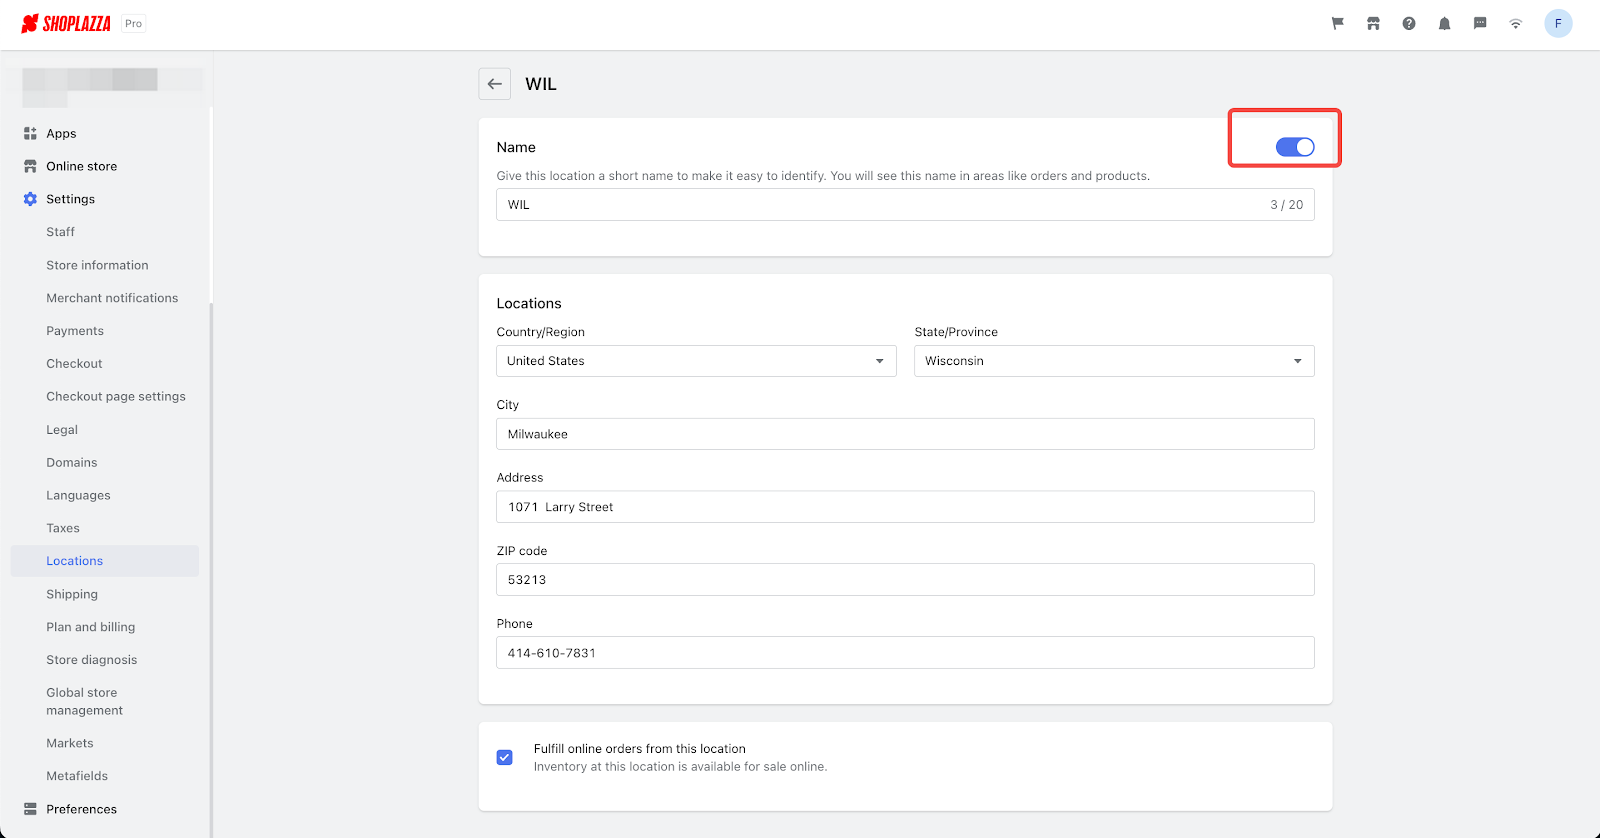
Enable and Disable Locations
1. All newly added locations are enabled by default. When a location is enabled, it becomes an available option for shipping, is visible in the local delivery and store pickup lists, and allows for inventory management across different locations.
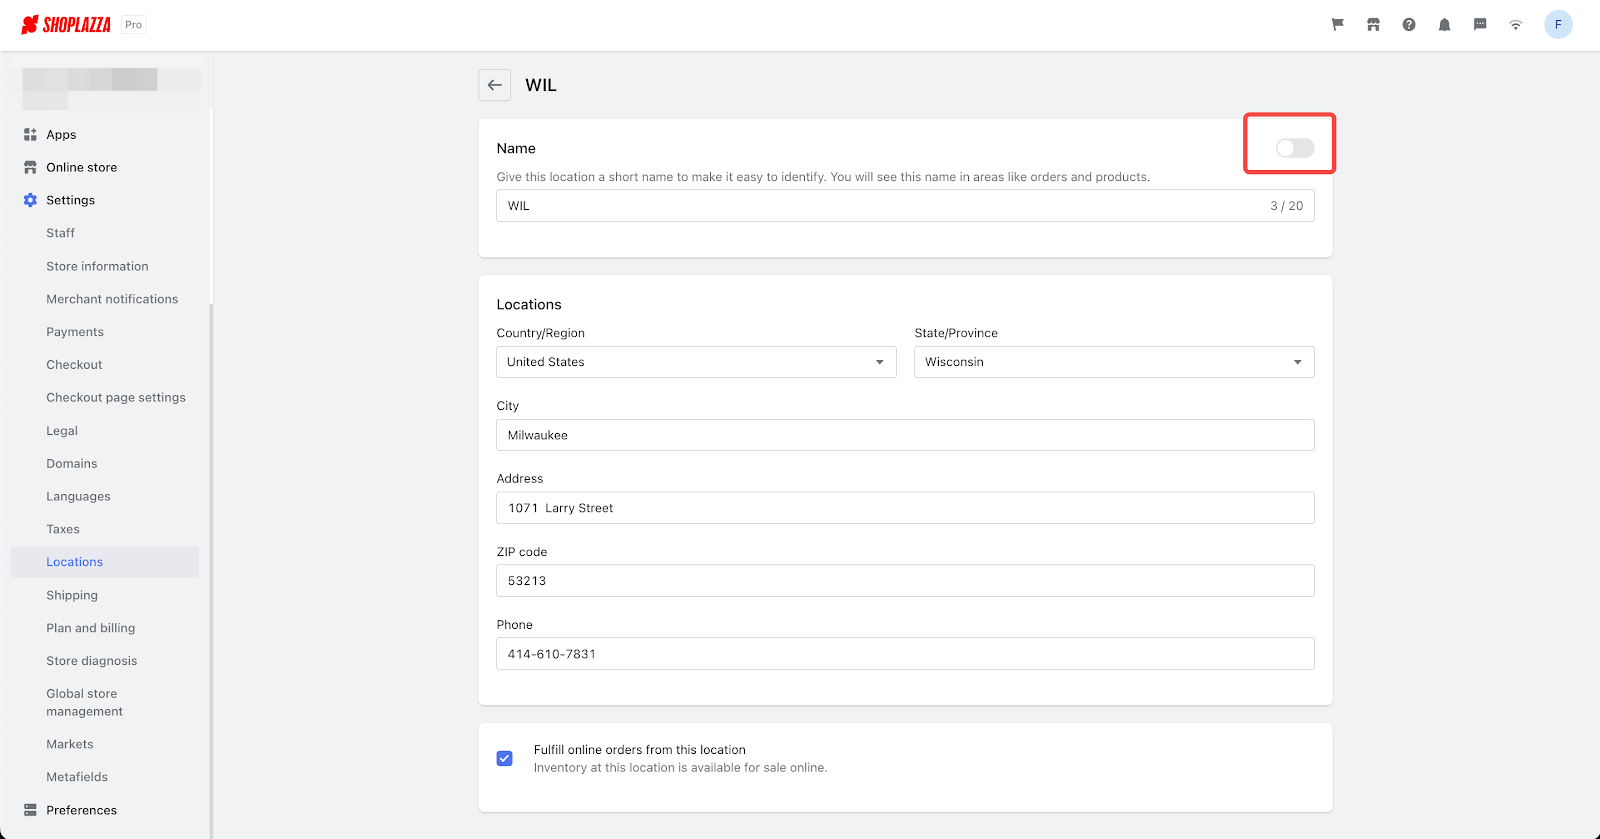
2. If you decide to stop selling or managing inventory at a specific warehouse, store, or any other location, you can choose to 'disable' that location. Before disabling a location, the system will verify whether there's any remaining inventory at that location or if it's being used as a store application by the POS system.
- If the inventory is still present, it must be transferred to another active location before disabling.
- If the location is used by the POS system, you'll need to confirm again before disabling it. If disabled, the corresponding store application on the POS system will no longer be functional.
Once a location is disabled, it can no longer be chosen as a shipping point for placing orders with your logistics provider. Any previously set up local delivery and in-store pickup options at this location will no longer function, and customers will not have the option to select this location for their order pickup. Additionally, you will not be able to manage the product inventory at this location anymore.
6. Creating Order Priority
Usage scenarios:
Should you have multiple warehouses, stores, or other locations for storing products, orders will be sent to one of these locations for picking and shipping once customers make a purchase. You can also oversee and arrange the priority with which orders are distributed among various locations. Once an order is assigned to a location, the inventory at that location will be adjusted accordingly.
Usage path:
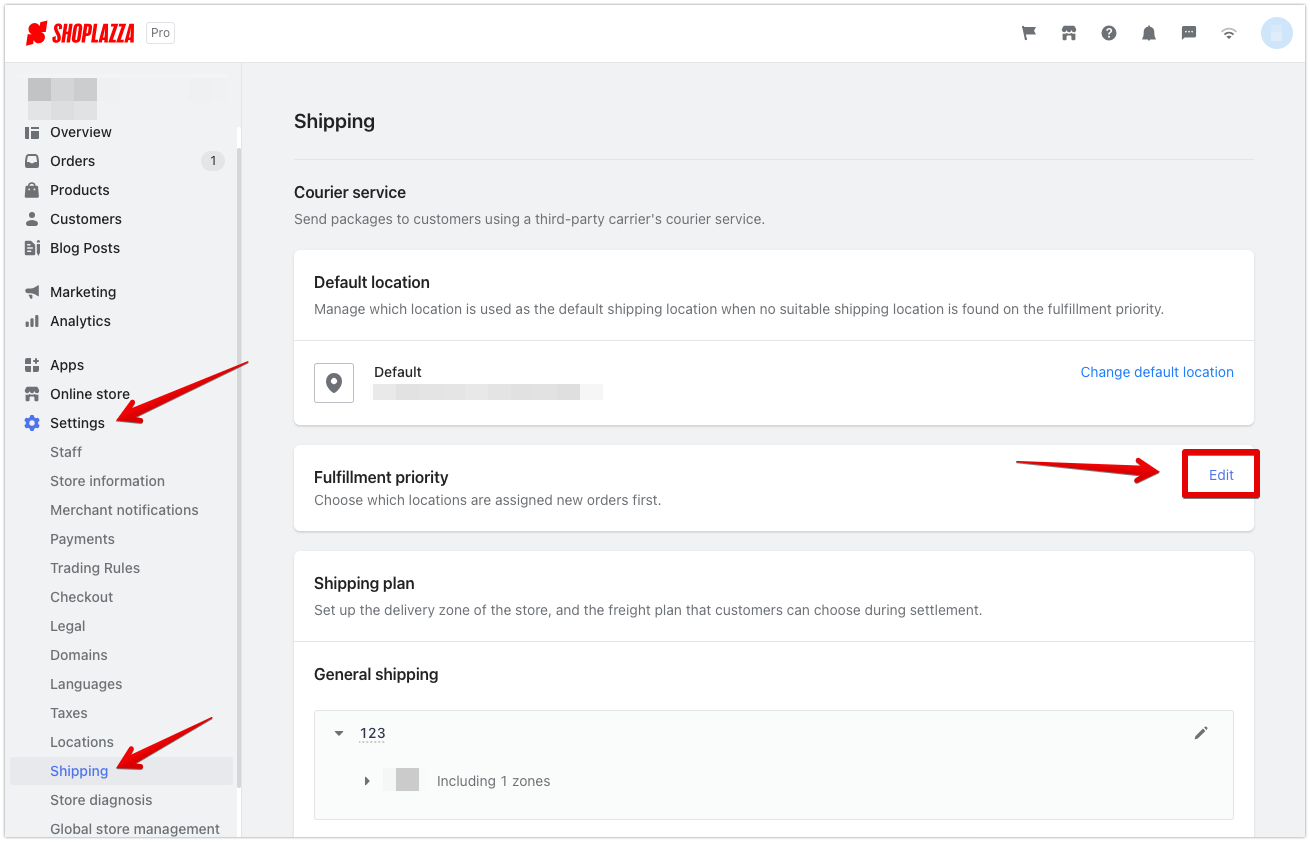
1. Navigate to your Shoplazza Admin > Settings > Shipping.
2. In the courier service section, you can select the default location and change the priority for how orders are fulfilled.
Feature overview:
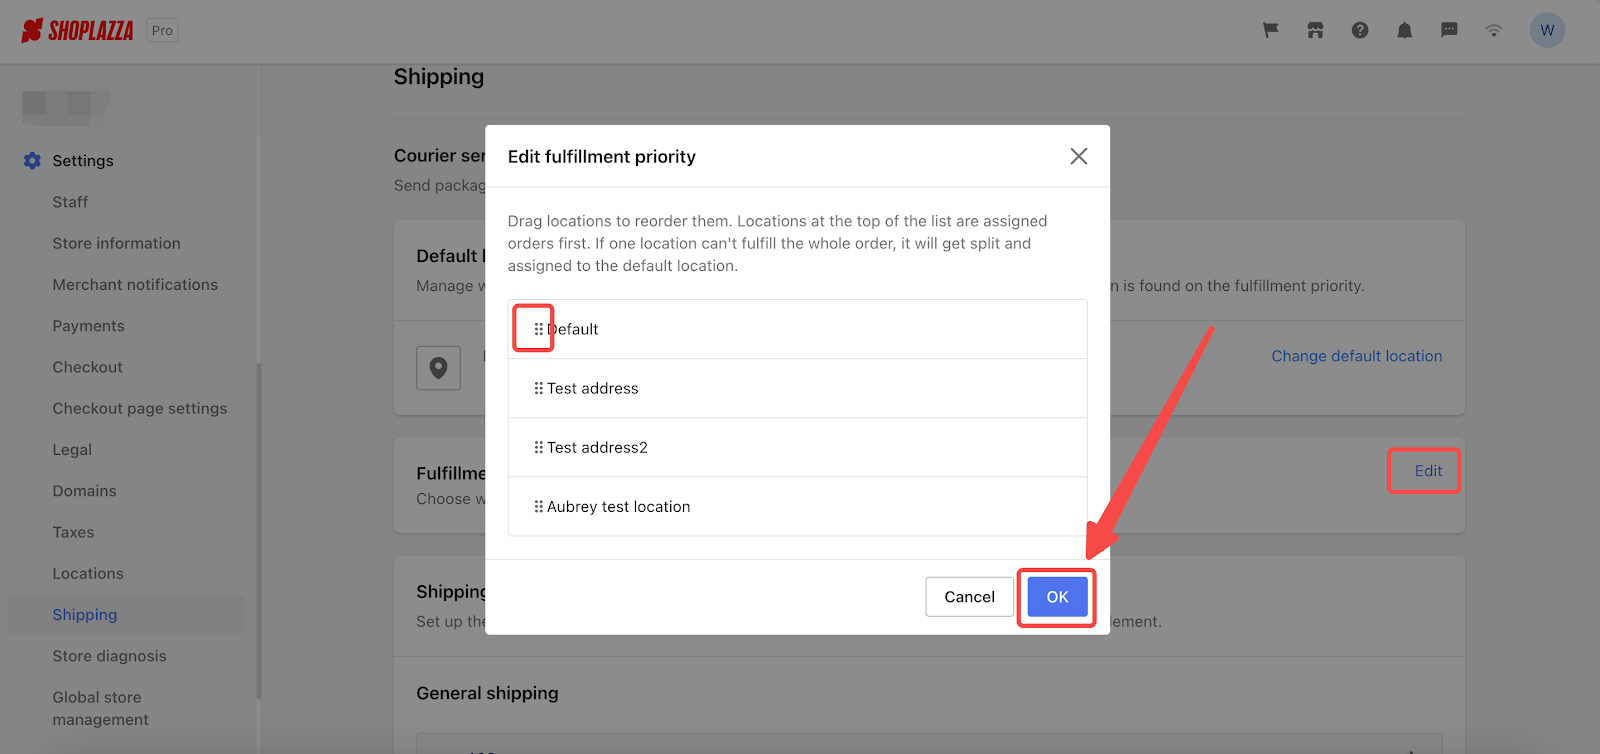
Fulfillment priority: When your locations have products in stock and are equipped to provide delivery service, the 'fulfillment priority' function allows you to establish the order of priority. To manage this priority, first click Edit to access the interface, then drag the locations to arrange them as you see fit. Click OK to save your arrangement once you're finished.
Once you've set your fulfillment priority, the system sends orders to the designated location according to your preference. Inventory is reduced when customers place orders, and you can use this location as your shipping point.
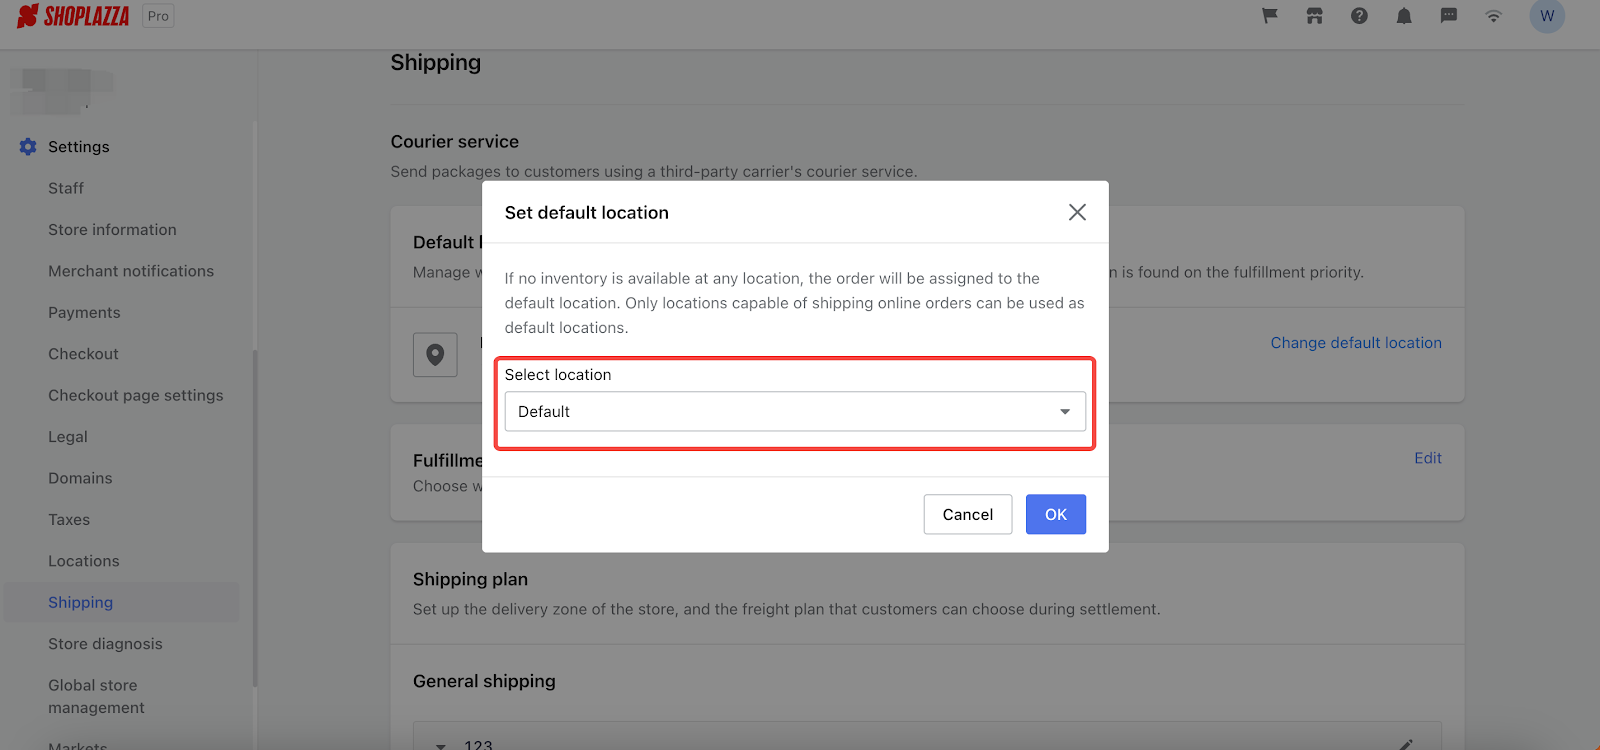
Setting a default location: Based on your fulfillment priority, you can review the stock across all locations. If no location has stock to fulfill product orders, the order will be automatically sent to the default location. Keep in mind that only locations capable of fulfilling online sale orders may be designated as default locations.
7. Support for Custom Payment Orders with Manual "Marked as Paid" Feature
Usage scenarios:
If you are a merchant involved in wholesale business, you may often settle transactions with buyers through various methods like bank transfers and money orders. To accommodate this, a "custom payment" option has been introduced within the "Manual Payment" section of the payment provider. This enables you to allow consumers to initially bypass payment during the order placement process, and complete the payment at a later stage. Once you verify the receipt of payment, the order status can be manually adjusted to "Marked as paid" and then shipped.
Usage path:
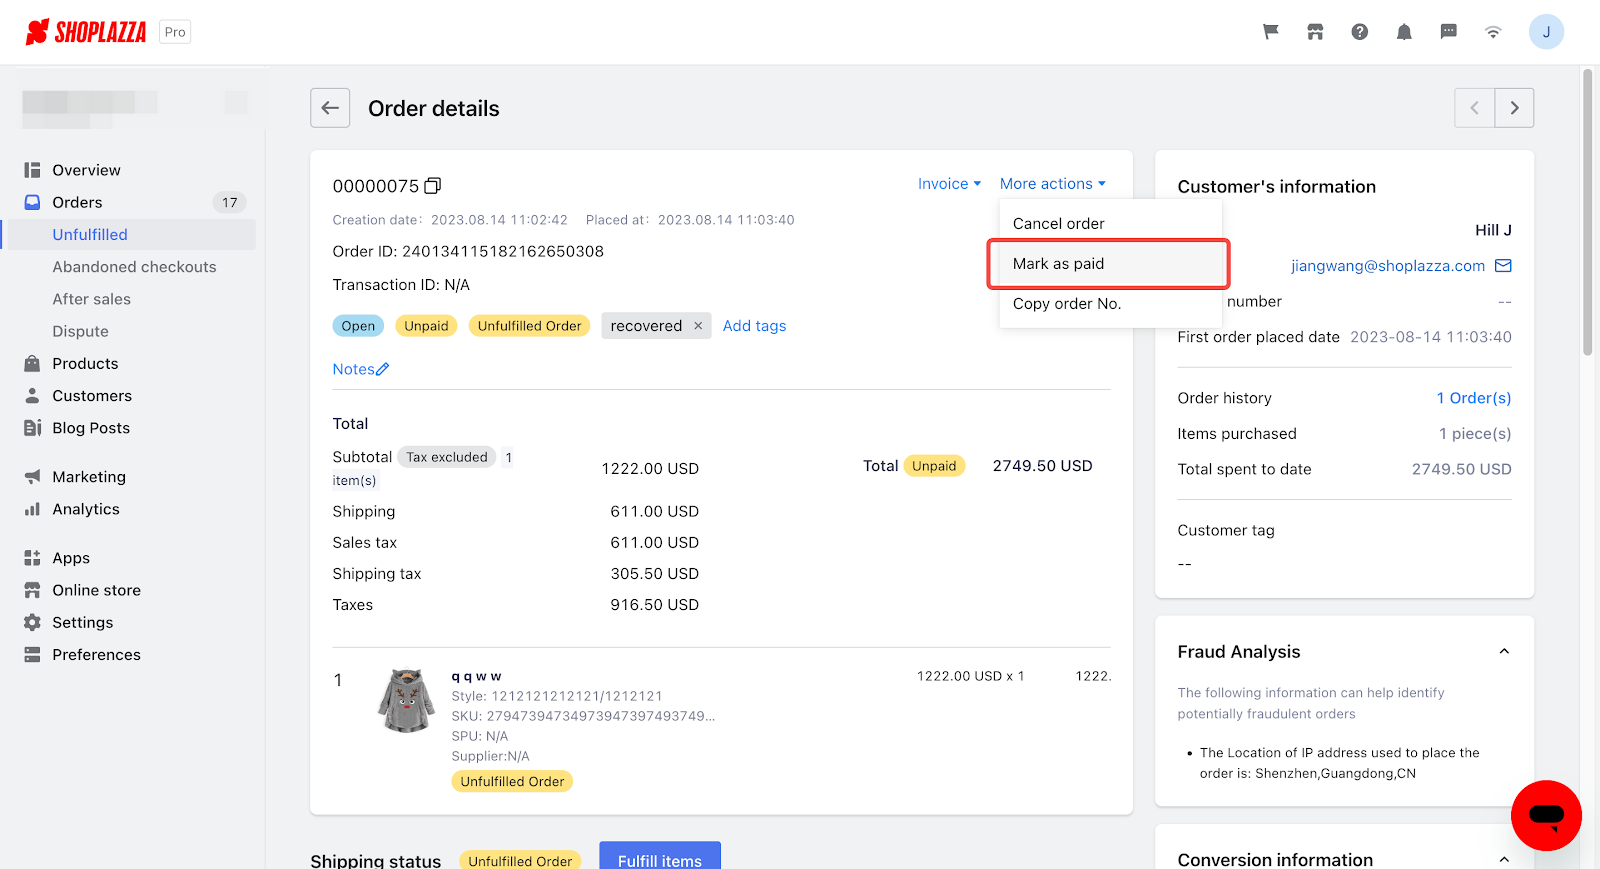
1. Navigate to your Shoplazza Admin > Orders > Unfulfilled.
2. Find and select the order that needs to be marked as paid, then go to the details page of the order.
3. Click More Actions on the order details page to expand the drop-down menu and select Mark as Paid.
Feature overview:
You have the ability to update an order to Paid status by selecting Mark as Paid from the More Options menu. However, this is only possible if the payment method for the order is Custom Payment and the payment status is currently unpaid.
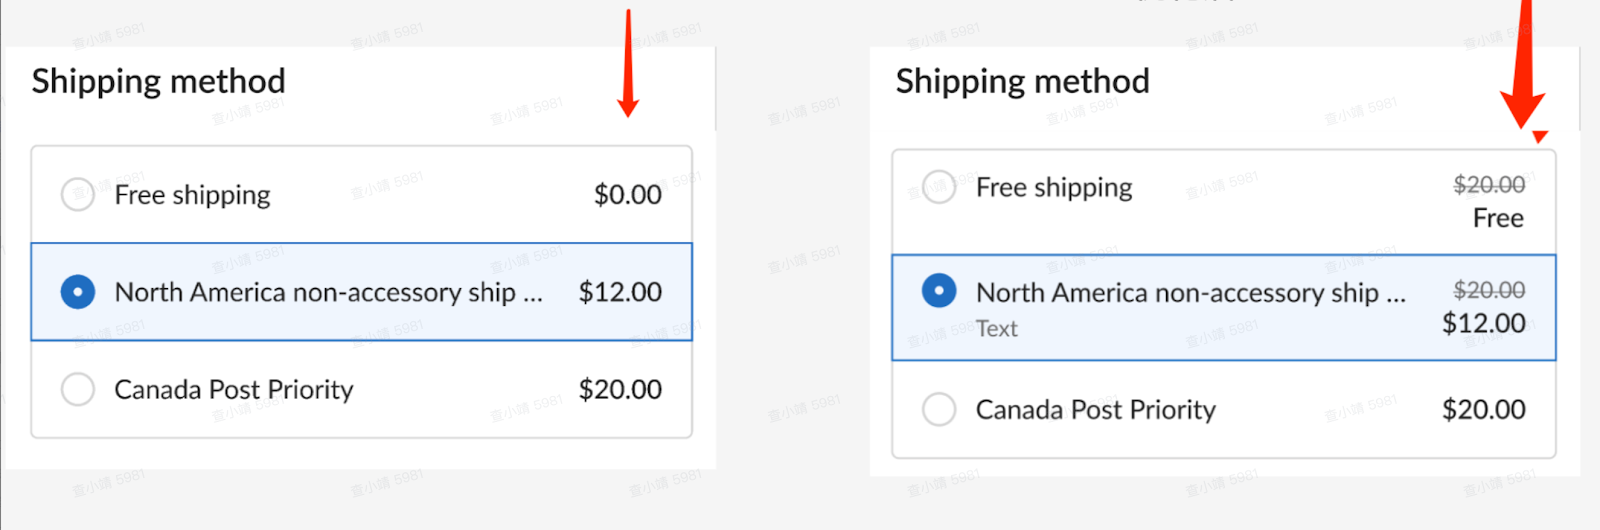
8. Improved visual display of shipping discounts on checkout page
Usage Scenario:
- Increase the shopping conversion in the "Suggested Post-Purchase" scenario.
- Enhance the customer experience by implementing shipping discount codes.
Usage path:
1. Upon successful payment, choose the recommended products that come with free shipping, then proceed to the checkout page.
2. Enter the shipping discount code during the checkout process.
3. Manual configuration is not necessary. The change will automatically become effective on the customer checkout page following the update.
Feature overview:
The new optimization focuses on clearly displaying shipping discounts during the checkout process. Customers can easily view and understand the discounts available for different shipping methods, making the final payment process more transparent and user-friendly. This enhancement aims to facilitate an improved online shopping experience, fostering customer satisfaction and trust.
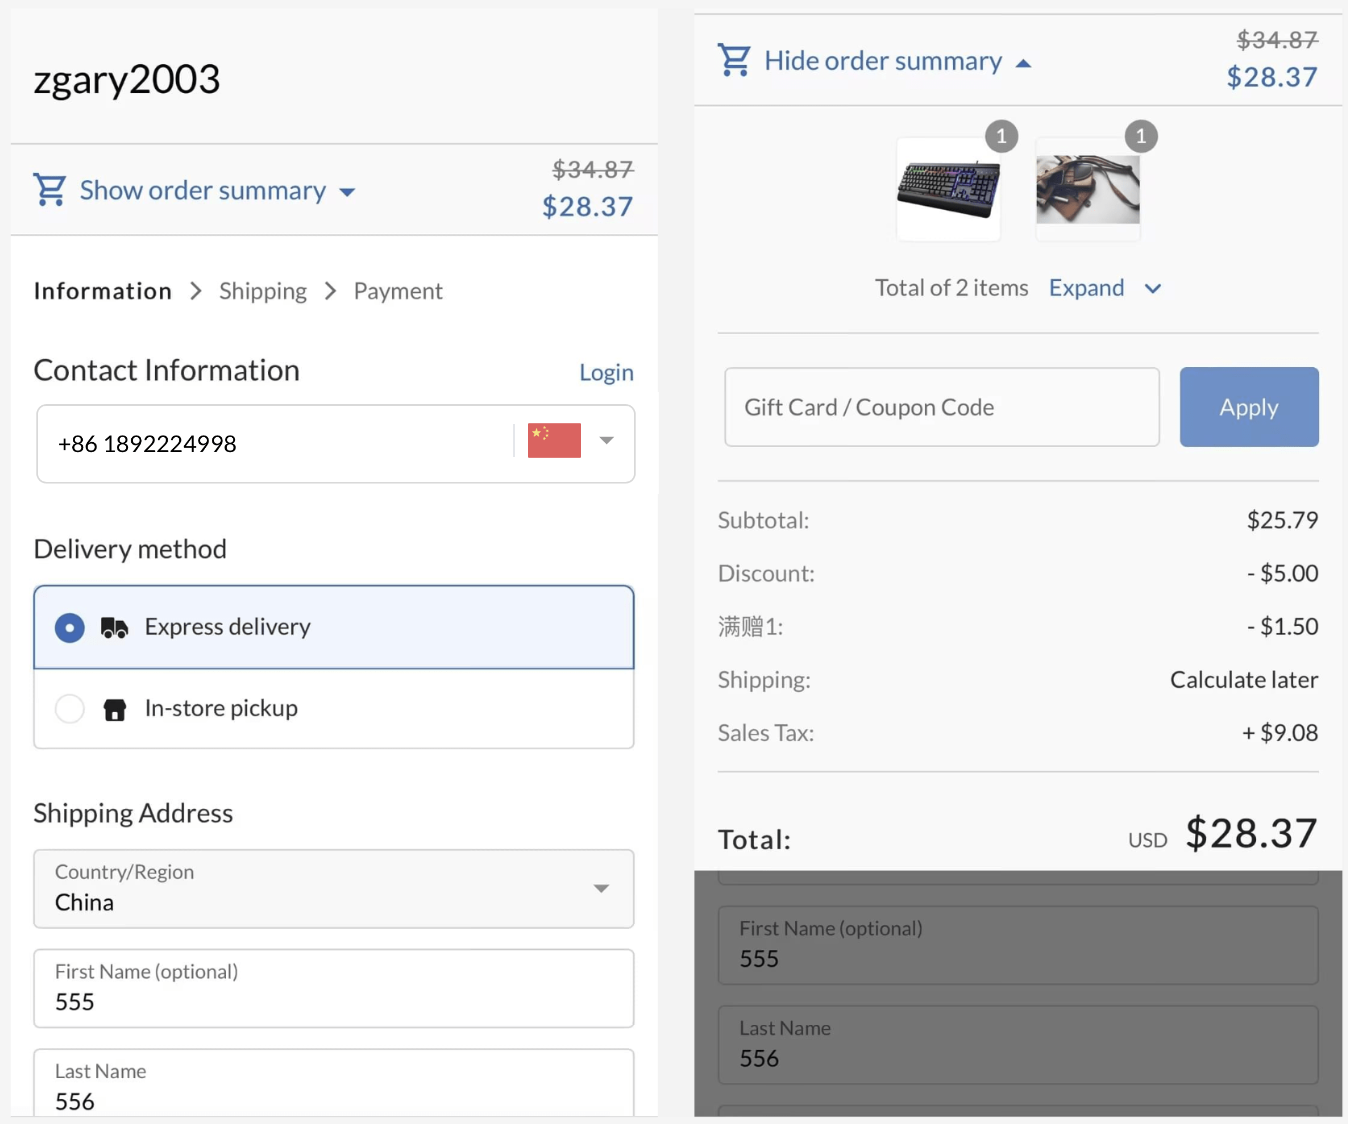
9. Enhanced the User Interface(UI) and interaction of the checkout page
This update has enhanced the interaction summary on the mobile checkout page, displaying original prices more clearly. Additionally, the phone number text box now includes the area code by default, and a one-click functionality was added for easy deletion of entered content from the address form. The Checkout Page UI has also been enhanced, providing a more streamlined and user-friendly experience.
Usage scenarios:
- Enhance customer experience during the checkout process and boost checkout conversion rates.
Usage path:
- Enhancements will be immediately active on the customer's checkout page.
Feature overview:
The improvements made to the appearance are illustrated in the image below, with the mobile version on the left and the desktop version on the right:
10. Support for Multiple Inventory Locations
Usage scenarios:
This guide provides you with the necessary steps to manage inventory at different locations within your store. It includes options to edit the inventory of individual products or adjust quantities for all products at once.
Usage path:
- Products:
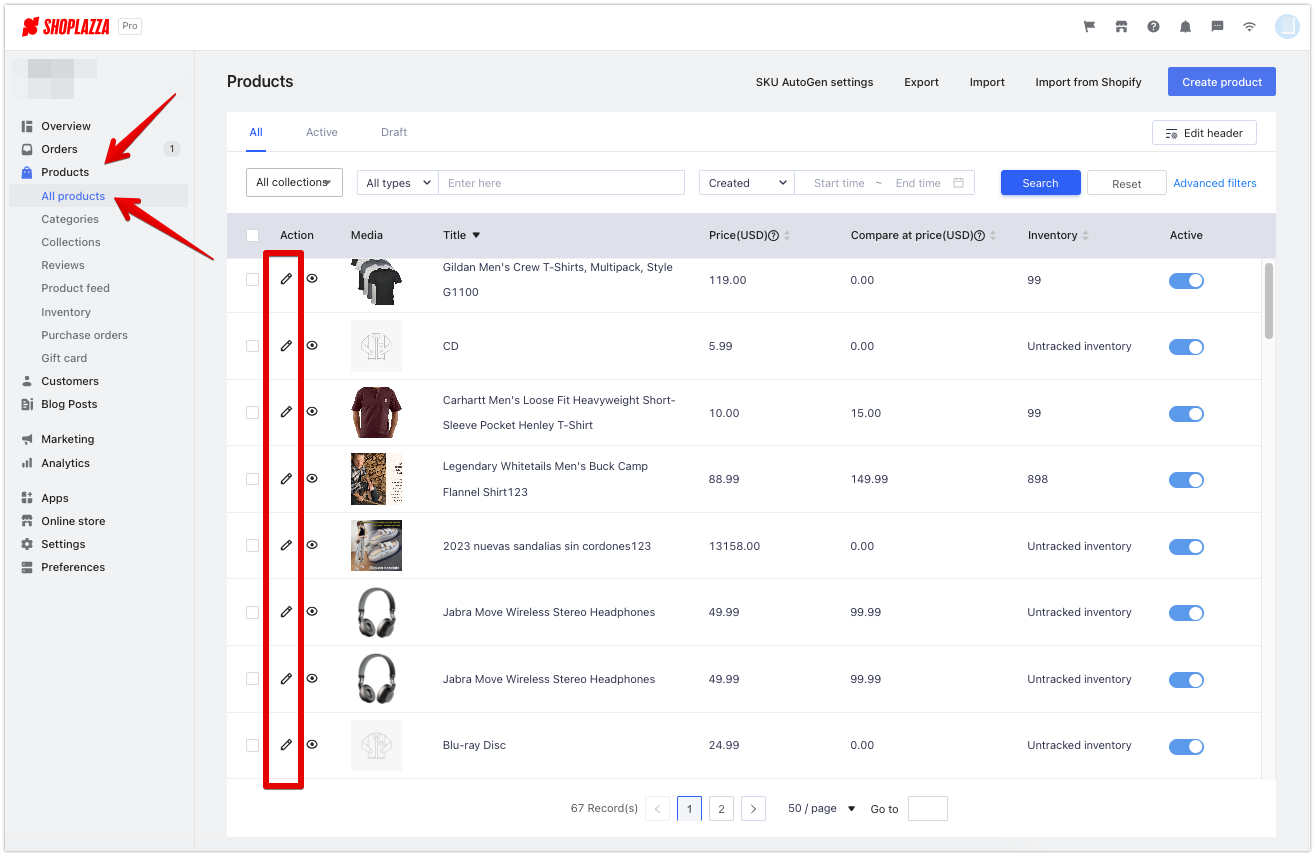
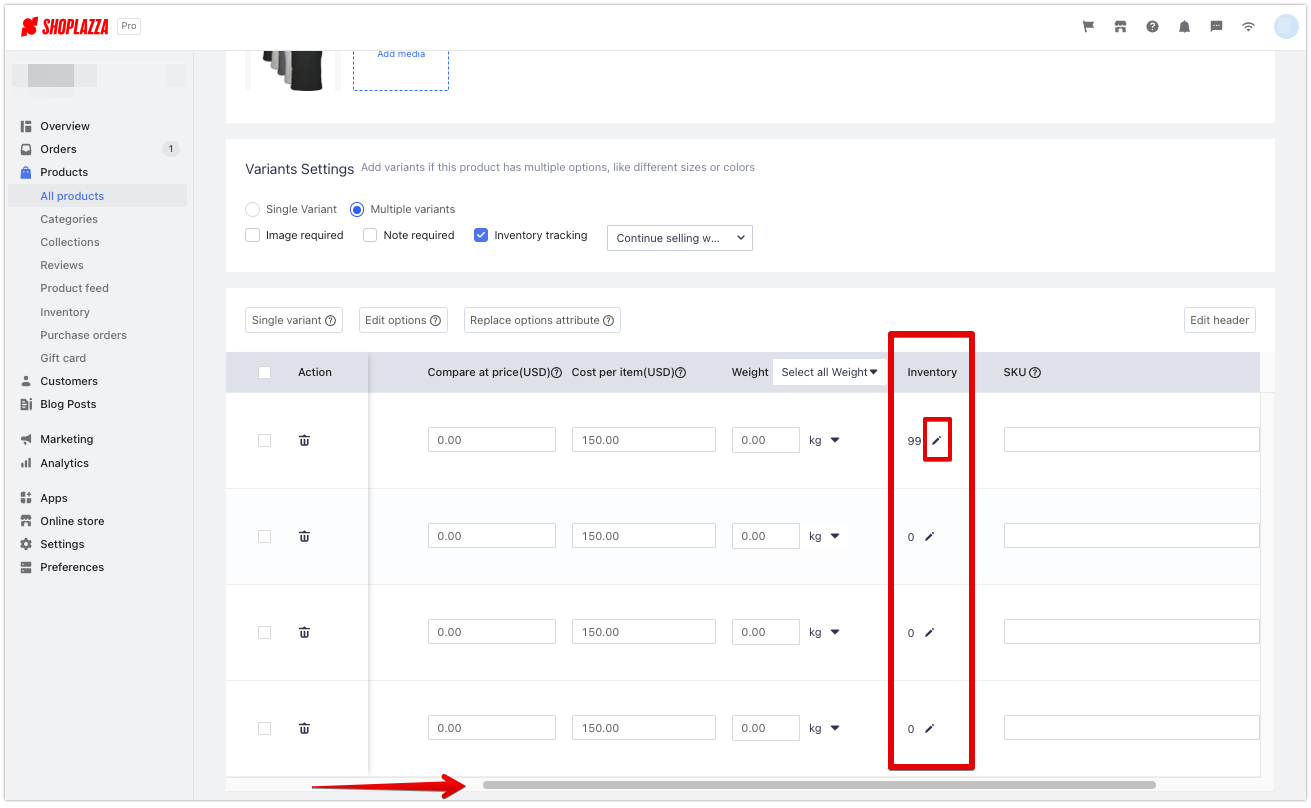
- Navigate to Shoplazza Admin > Products > All products. Find the target product and click the edit icon button.
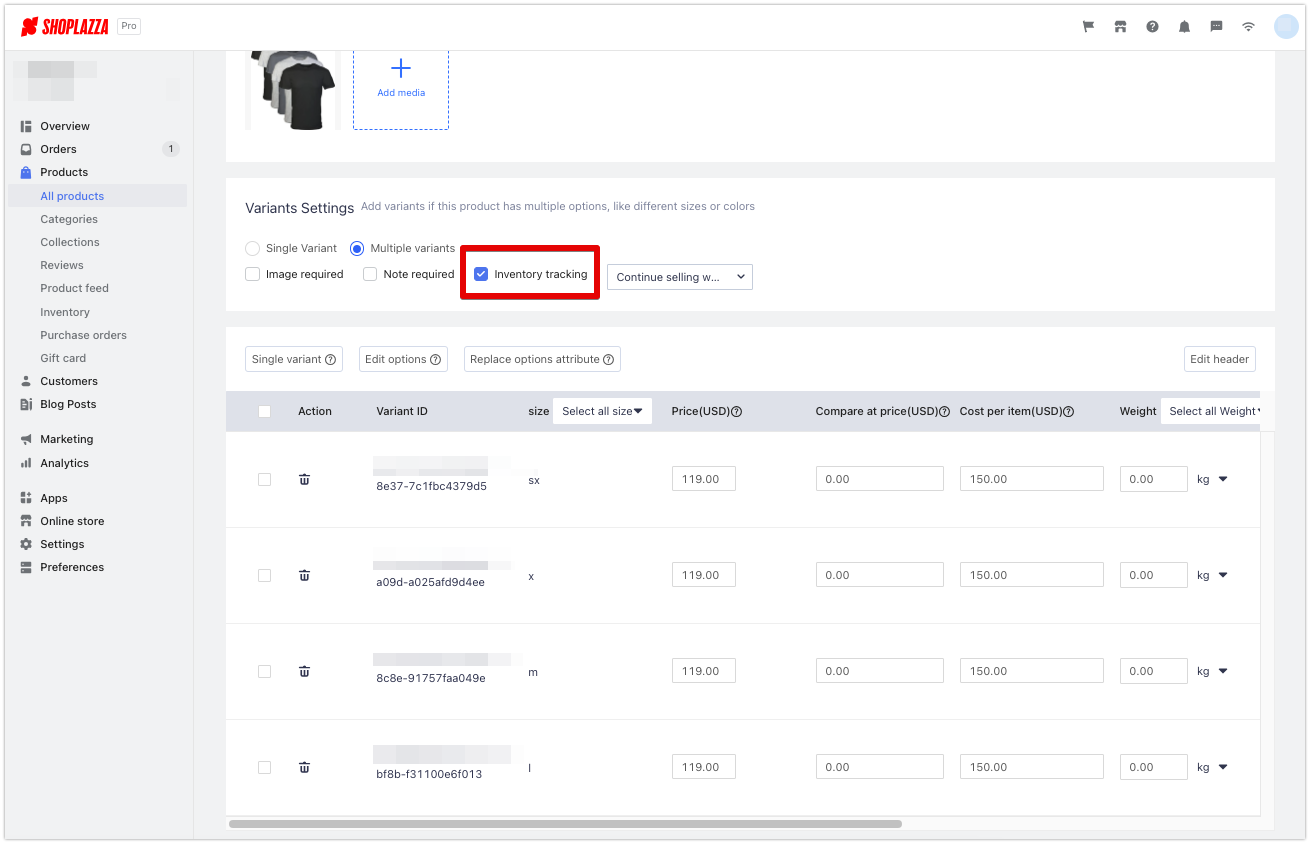
- Scroll down to the Variant Settings area and enable the "Inventory Tracking" checkbox.
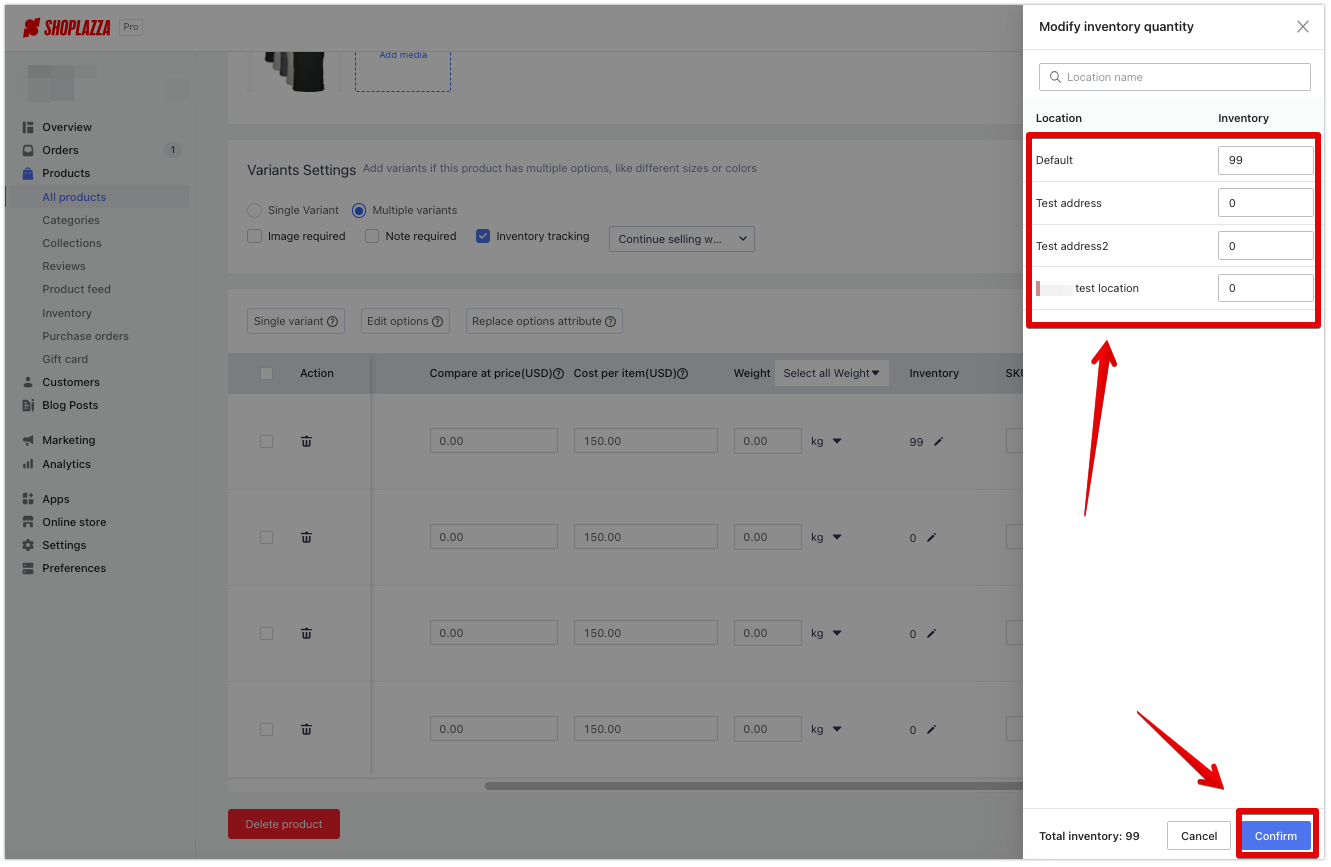
- Once enabled, in the variant details area, under the Inventory column, click the edit icon button. Fill in the inventory quantity for each location in the floating window, and click Save to update the information.
- Inventory:
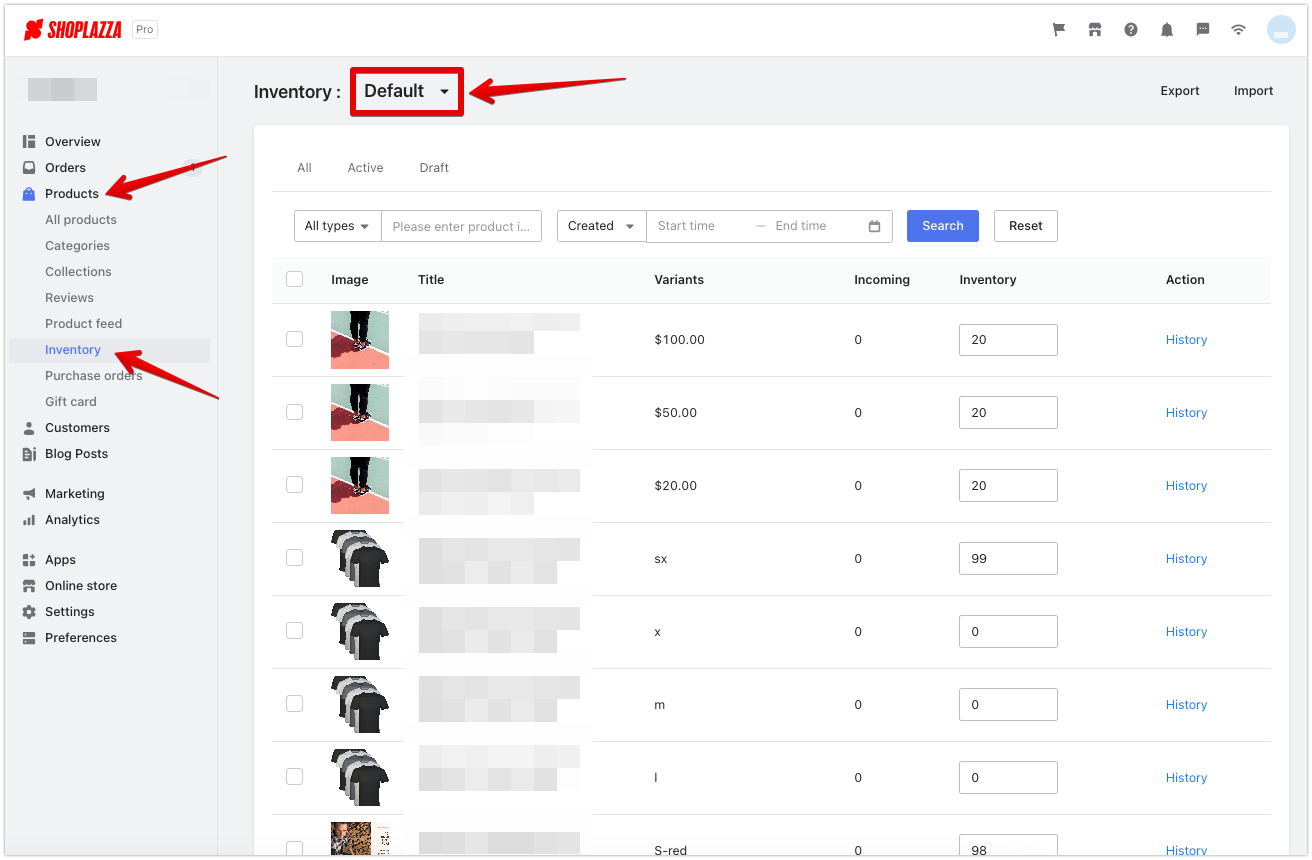
- Navigate to Shoplazza Admin > Products > Inventory.
- Use the dropdown menu to switch between locations and view or edit product inventory accordingly.
Feature overview:
Products:
1. For individual product inventory management at each location:
- Navigate to Shoplazza Admin > Products > All products. Find the target product and click the edit icon button.
- Scroll down to the Variant Settings area and enable the "Inventory Tracking" checkbox.
- Once enabled, in the variant details area, click the edit icon button. Fill in the inventory quantity for each location in the floating window, and click Save to update the information.
Inventory:
1.To view or adjust inventory for all products at different locations:
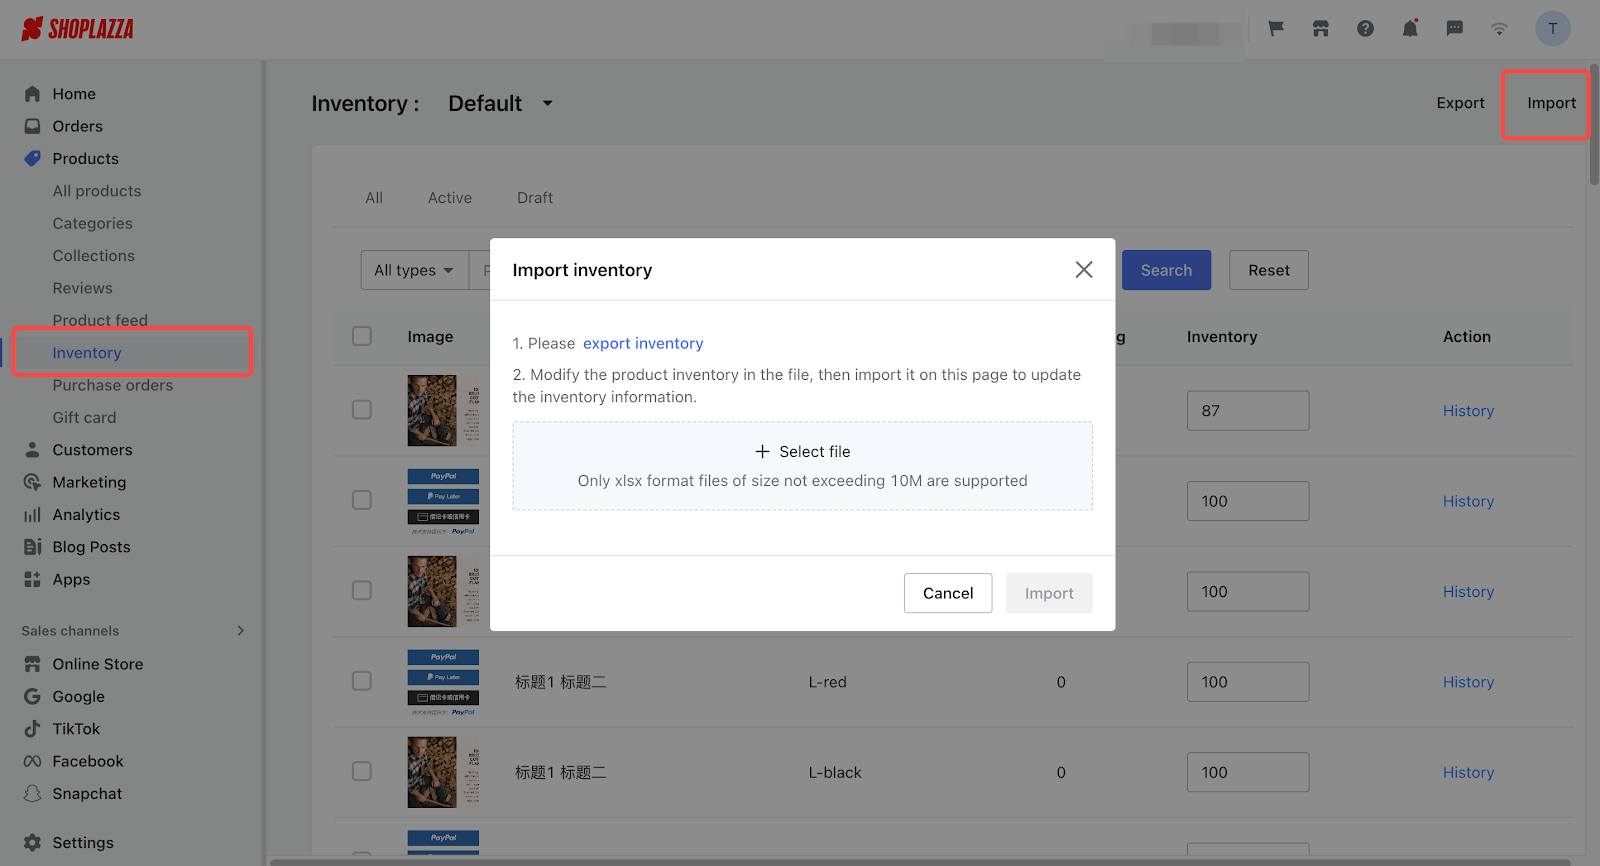
- Navigate to Shoplazza Admin > Products > Inventory.
- Use the dropdown menu to switch between locations and view or edit product inventory accordingly.
Exporting:
1. By clicking the Export button, you can create an xlsx file to export the stock quantities for each location.
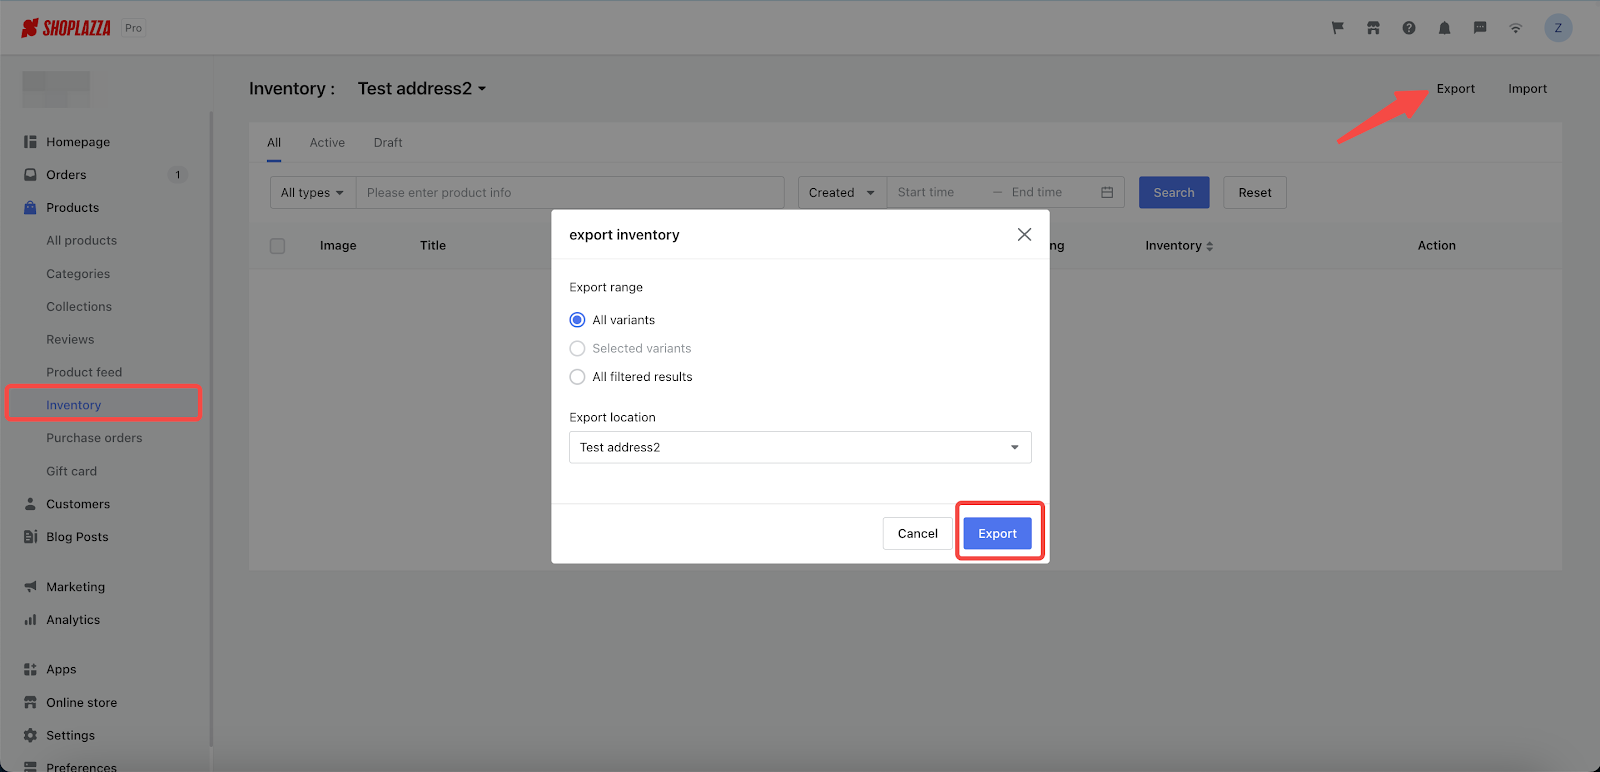
2. You can use the exported inventory file as a template to update inventory quantities for each location.
11. Importing and exporting products in Wholesale mode (Shoplazza Pro subscription)
In wholesale mode, you can now import and export products with ease using the Shoplazza Pro subscription. This functionality is especially useful for batch import and export, and it also includes the minimum quantity purchase feature, providing a more efficient way to manage your wholesale products.
Usage scenarios:
1. Improve the efficiency of creating products in wholesale mode.
2. Support for batch import and export.
Usage path:
For more detailed guidance on using this feature, please refer to the help document:Exporting / Importing Products
Feature overview
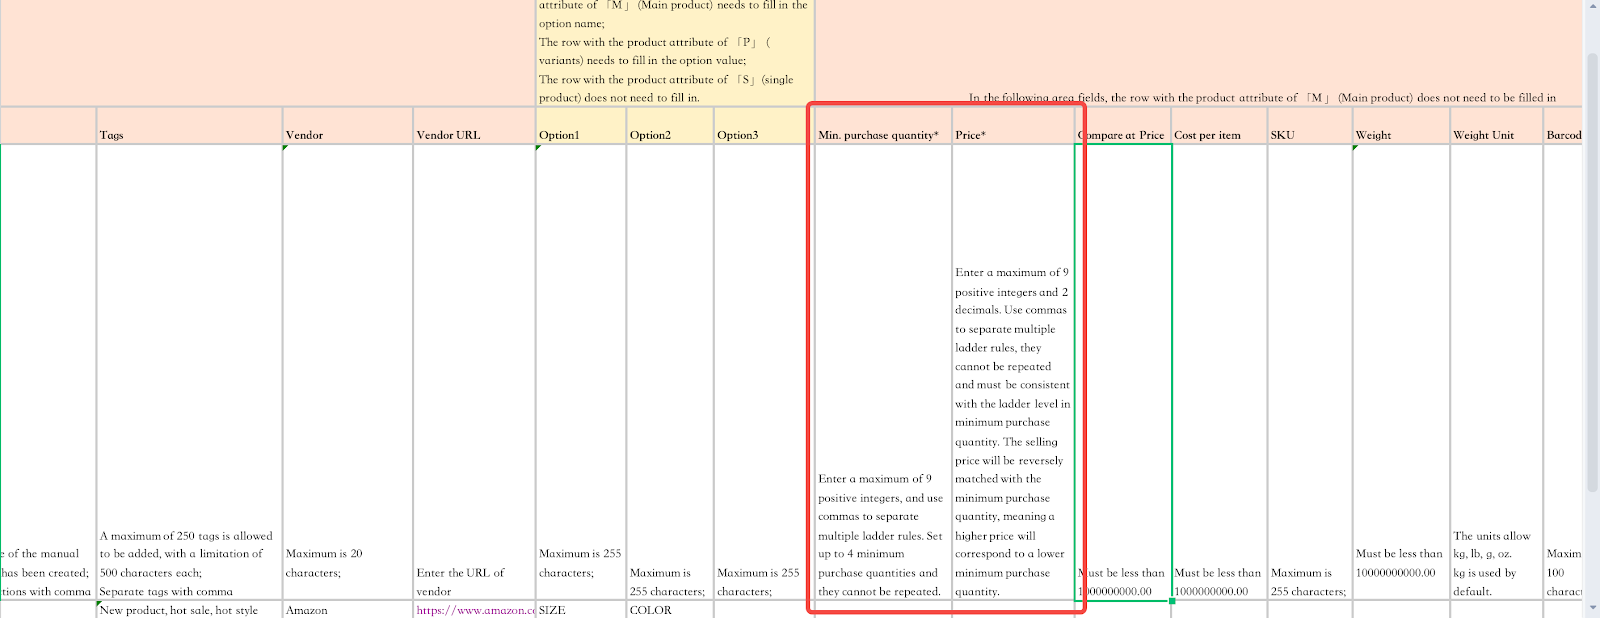
- Import and Export Products in Wholesale Mode: Simplify the handling of bulk products through easy import and export.
- Minimum Purchase Quantity Specification: Import templates now allow you to define the Minimum Purchase Quantity for a product, providing greater control over wholesale orders.
12. Introducing a tax-free option In Customer Management
Usage scenarios:
- Utilize this new feature to exempt specific customers from being taxed. This tax-free option can be configured directly in the customer's profile. It is your responsibility to assess whether a customer qualifies for tax-free status.
Usage path:
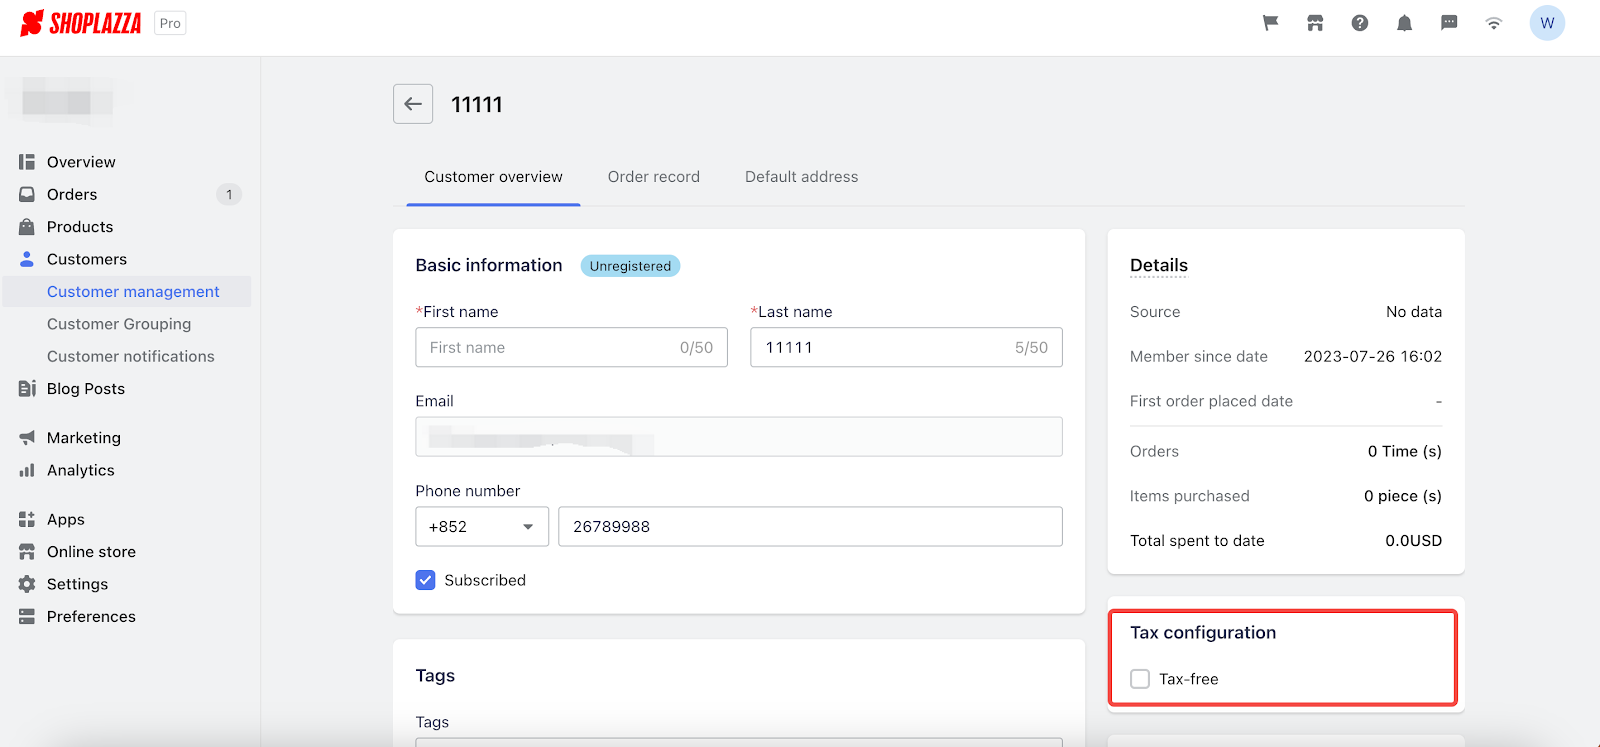
- Navigate to your Shoplazza Admin > Customers > Customer management, and select the customer's profile. Once there, you can enable the new tax-free option.
Feature overview:
- A tax-free checkbox is now available under the tax settings in each customer's profile. Activating this option ensures that your online store does not apply tax during checkout for the selected customers. (Please note: this new feature is only available for customers with an active subscription.)
13. Customizing Flash Sales Banner Title
Usage scenarios:
- Flash sales now offer banner customization across various pages such as the campaign landing page, home page, and product page. Should you create campaigns linked to specific festivals, the banner copy can be modified to reflect the festive theme. This strategy engages customers with the festival atmosphere and potentially increases sales.
Usage path:
- Navigate to your Shoplazza Admin > Marketing > Flash Sales, and click on Create campaign.
Feature overview:
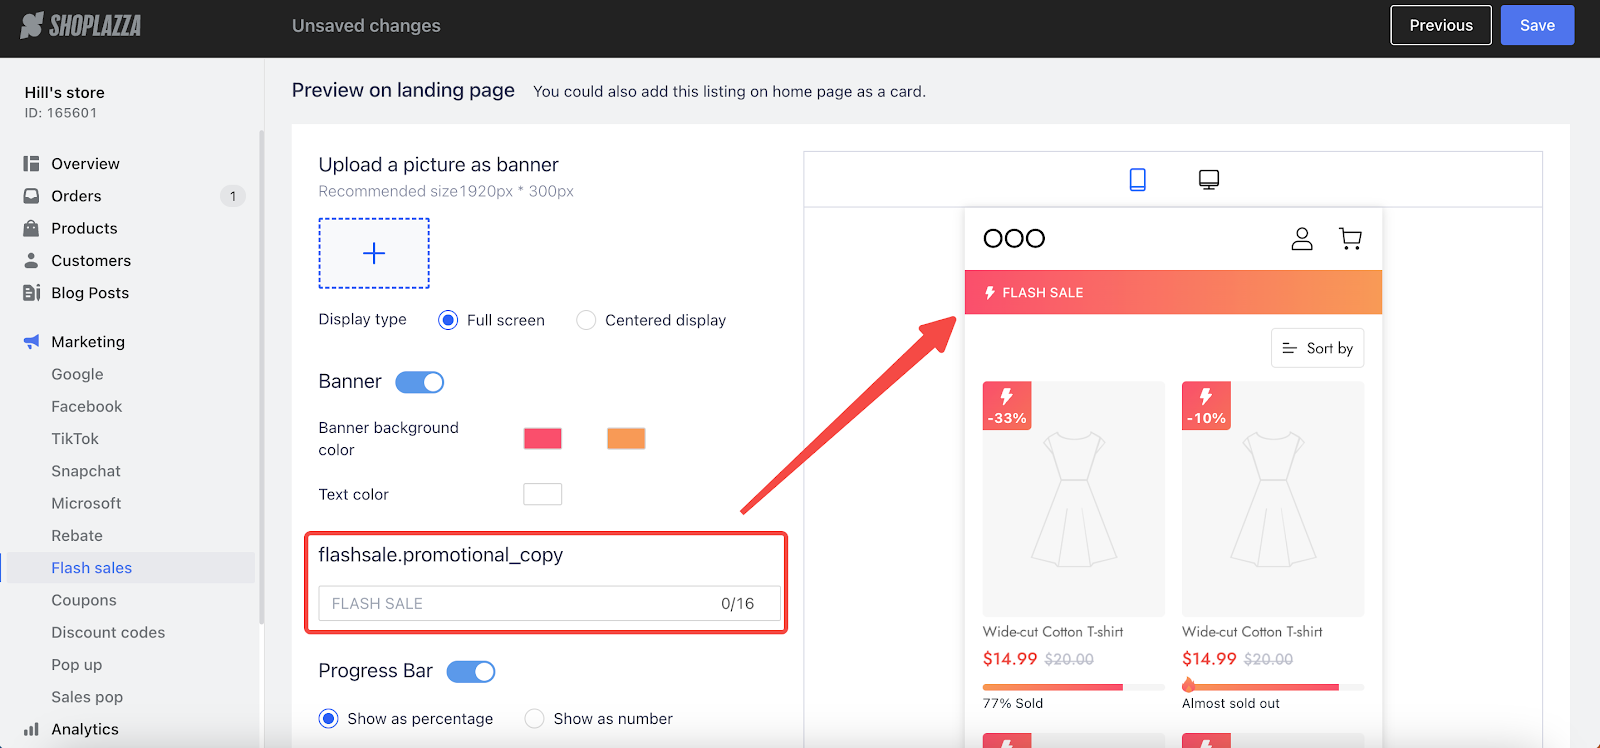
- Once you've configured your settings, the option to enable the banner becomes available. This grants you access to tailor the banner copy for both the campaign landing page and the product page.
- The default banner name is FLASH SALE.
- You have the option to create your own unique banner text, but it must be no more than 16 characters.
14. Updated the Reports section
1. Integration of sales Channels filter in various reporting sections
Usage scenarios:
- Shoplazza now supports multiple sales channels. This upgrade enhances usability across different sales channels, providing a streamlined experience for users.
Usage path:
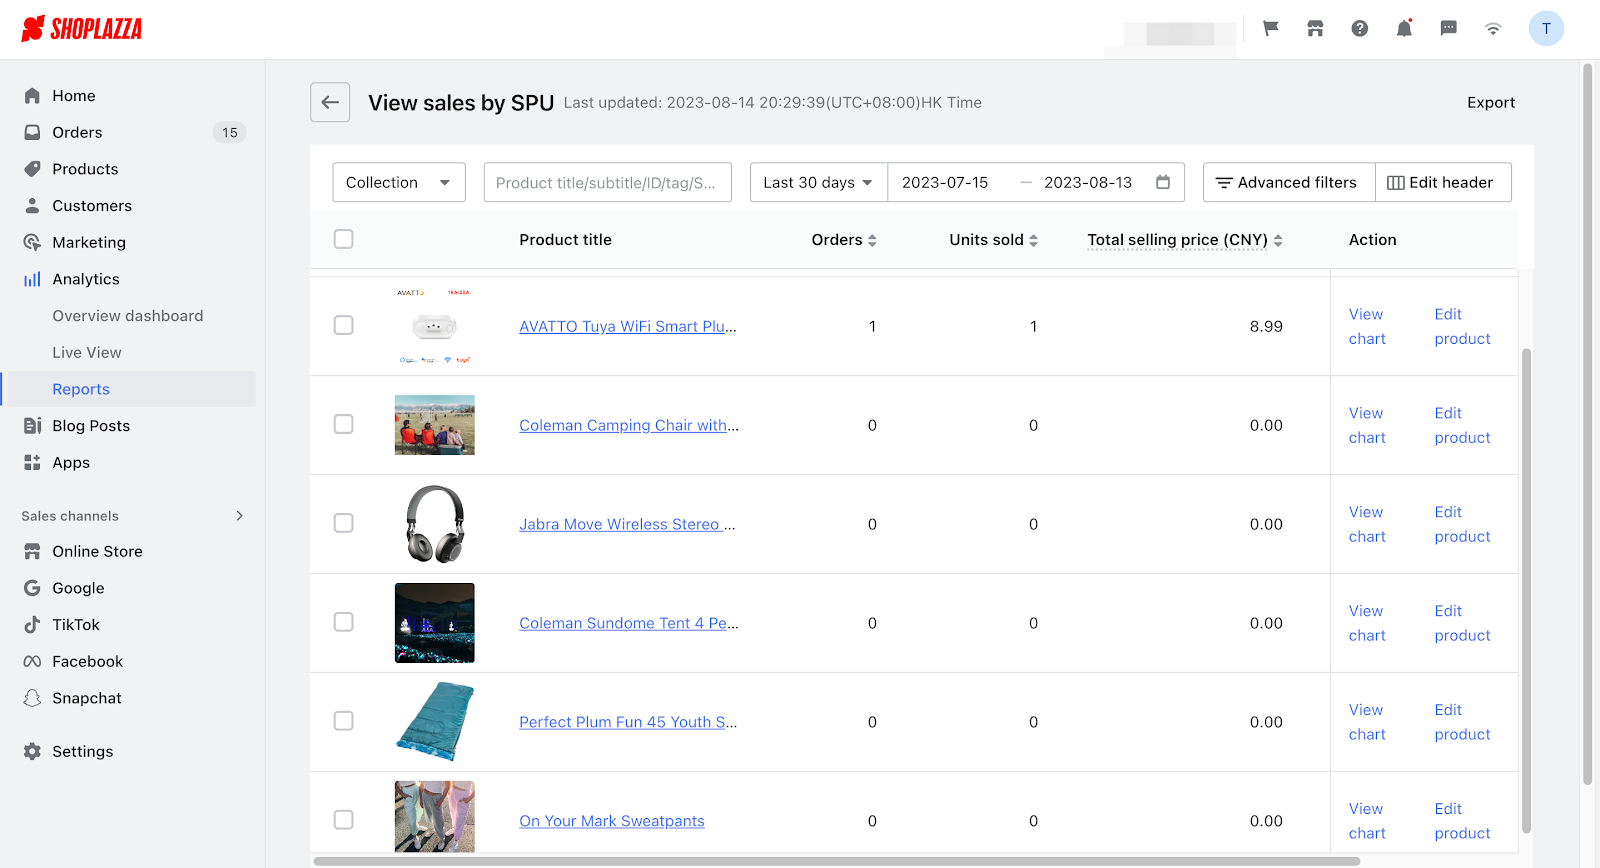
To access the various reports, navigate to Shoplazza Admin > Analytics > Reports, and then select the desired option:
- For Sales by SPU: Sales section. View sales by SPU.
- For Sales by SKU: Sales section. View sales by SKU.
- For Product Sales Trend Charts: Sales section. Product sales trend chart.
- For Rebate Data Overview: Marketing Campaign section. Rebate data overview.
- For Flash Sale Data Overview: Marketing Campaign section. Flash sale data overview.
- For Discount Codes Overview Dashboard: Marketing Campaign section. Discount codes overview dashboard.
- For Financial Reports: Finance section. Financial reports.
Feature overview:
- The new function integrates a sales channels filter for viewing sales by SPU/SKU, product sales trend charts, rebate data overviews, flash sale data overviews, discount codes overview dashboards, and financial reports. By selecting this filter, users can conveniently access data relevant to specific sales channels.
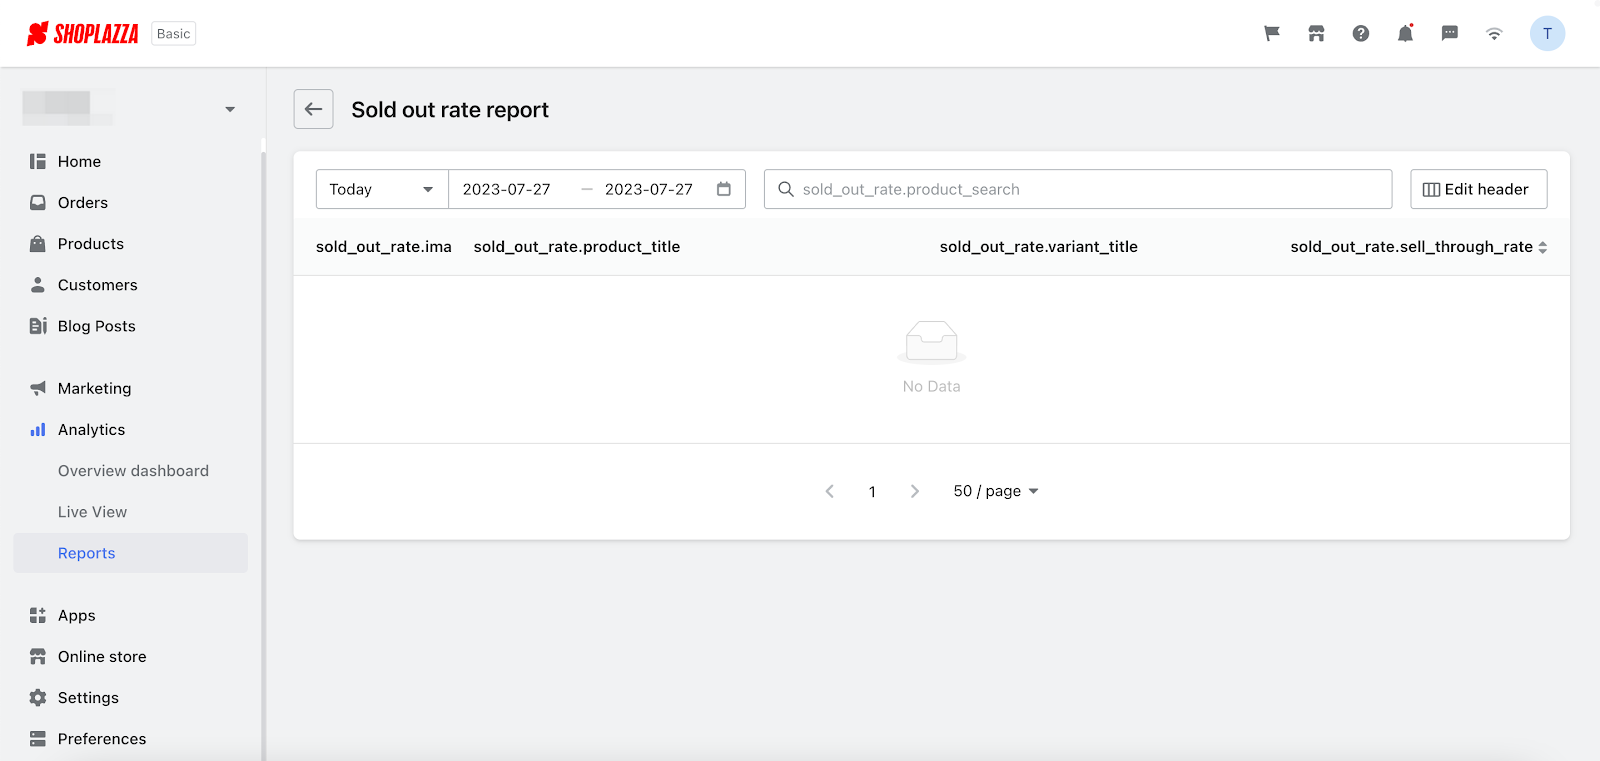
2. Updated Sold Out Rate report
Usage Scenario:
- When you need to track the sold-out rate across multiple warehouse locations, accommodating the inventory from all active locations during a selected time period.
Usage path:
- Navigate to your Shoplazza Admin > Analytics > Reports. Under the Stock section, select the Sold Out Rate Report.
Feature overview:
- Initially, each store was limited to one warehouse, and the Sold Out Rate Report drew data exclusively from that single warehouse. With the implementation of multi-location inventory functionality, the Sold Out Rate Report's metrics now incorporate the combined inventory from all locations that have remained active during the chosen time frame.
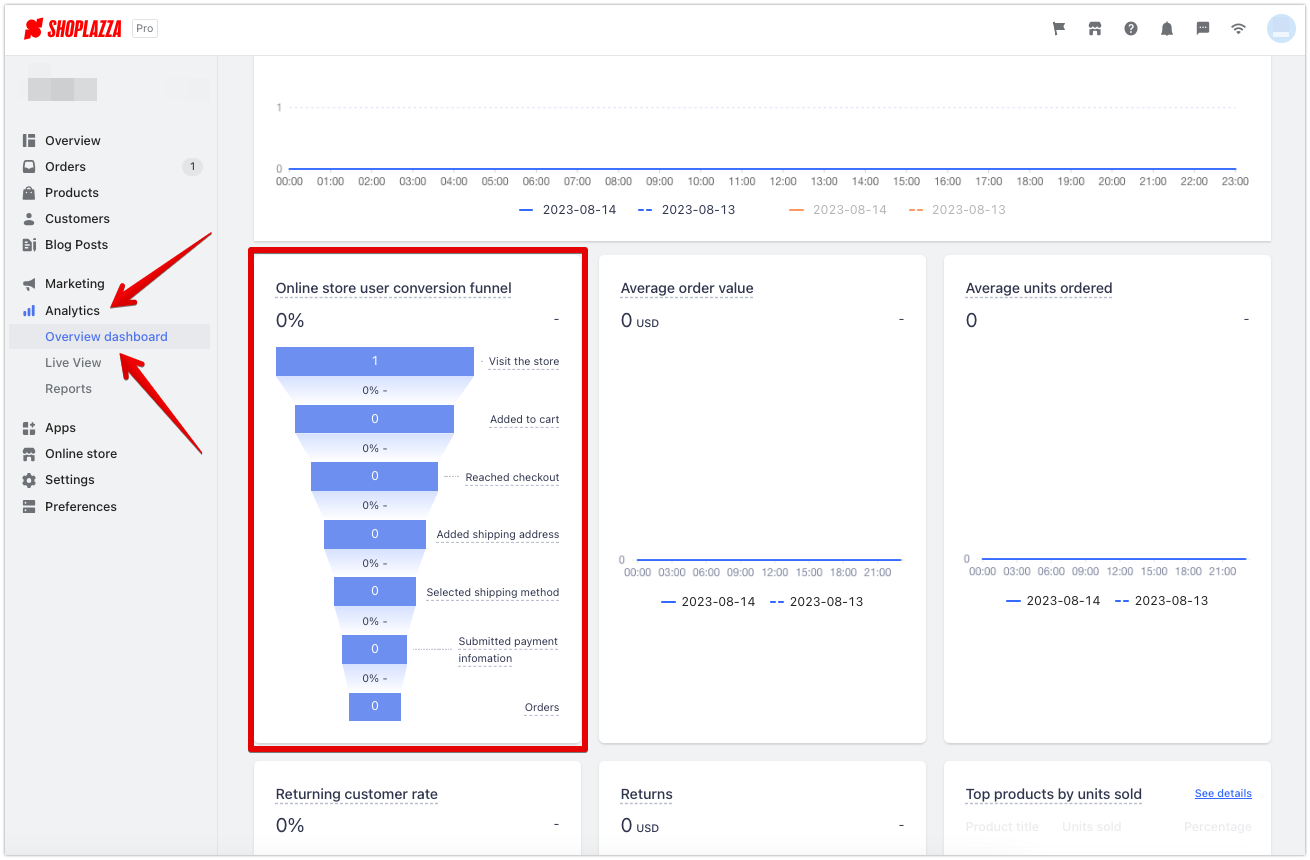
3. Updated the Online Store User Conversion funnel in the Overview Dashboard
Usage Scenario:
- This update is designed to refine the conversion funnel's conditions within the overview dashboard, enabling a more efficient process and including additional guidance notes.
Usage path:
- Navigate to your Shoplazza Admin > Analytics > Overview Dashboard. Within the dashboard, locate the online store user conversion funnel.
Feature overview:
- The new optimization feature provides a user-friendly interface to easily examine key statistical metrics.
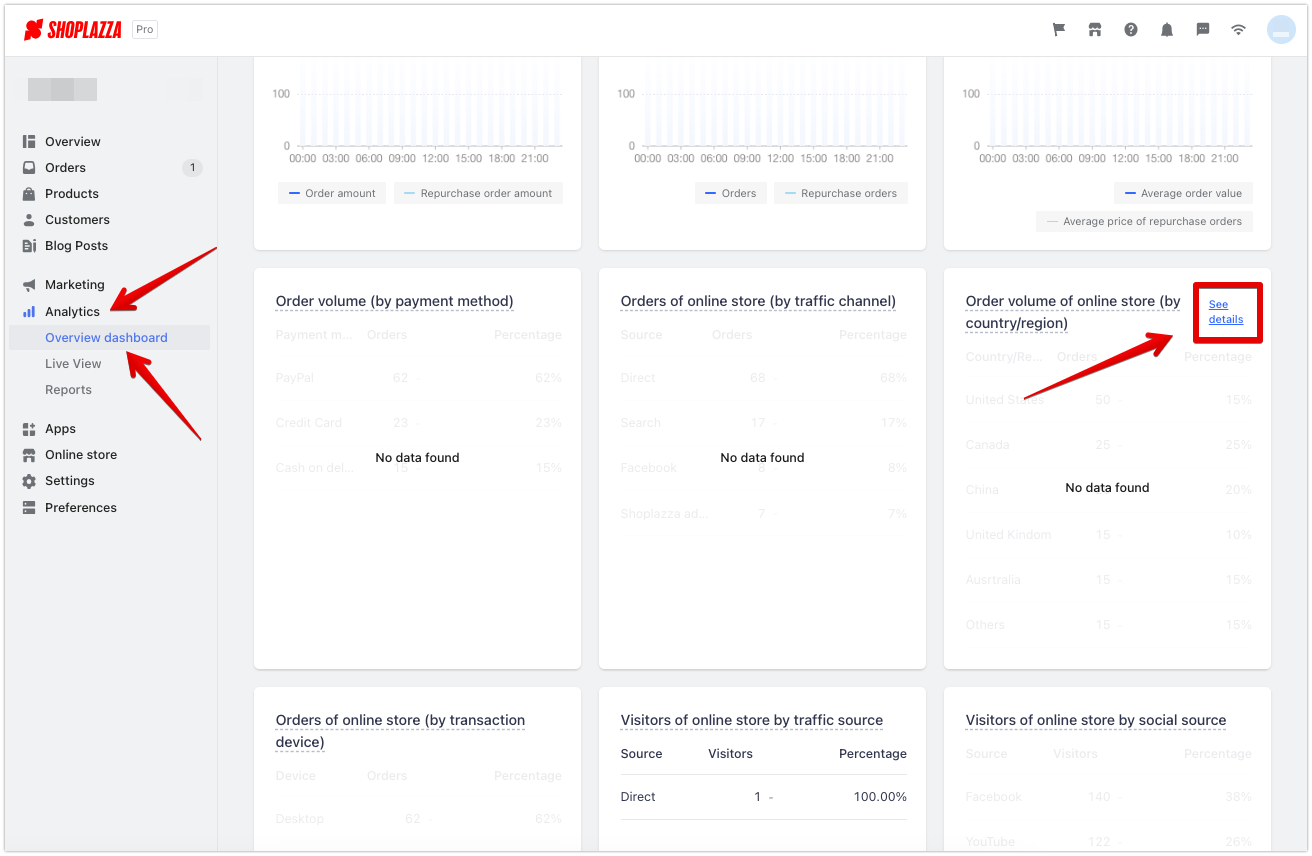
4. Added "See details" feature to Order Volume (by country/region)" card in Overview Dashboard
Usage Scenario:
- The new "See Details" option within the "Order Volume (by Country/Region)" card in the Overview Dashboard enhances the user's ability to access and analyze specific data related to visitors' locations.
Usage path:
- To access this feature, navigate to your Shoplazza Admin > Analytics > Overview Dashboard. Within the dashboard, find the "Order Volume (by Country/Region)" card.
Feature overview:
- Adding "See Details": Clicking on this option will take you to the "Visitors by Location" report, allowing for an in-depth view of complete data details related to your orders.
- Purpose: This feature makes data analysis more efficient and user-friendly by allowing for easier access to comprehensive details.
15. Enhancements to the Product Customizer App
1. Added the ability to add images to Checkbox Options
Usage scenarios:
- This feature is designed for instances where images need to be linked with checkbox options, enhancing the visual aspect of your selections.
Usage path:
- Navigate to your Shoplazza Admin > Apps > Product Customizer . Once inside, select the product you want to edit. Then click on Add option, choose Checkbox from the list, identify the option value, and click the picture icon to upload the image.
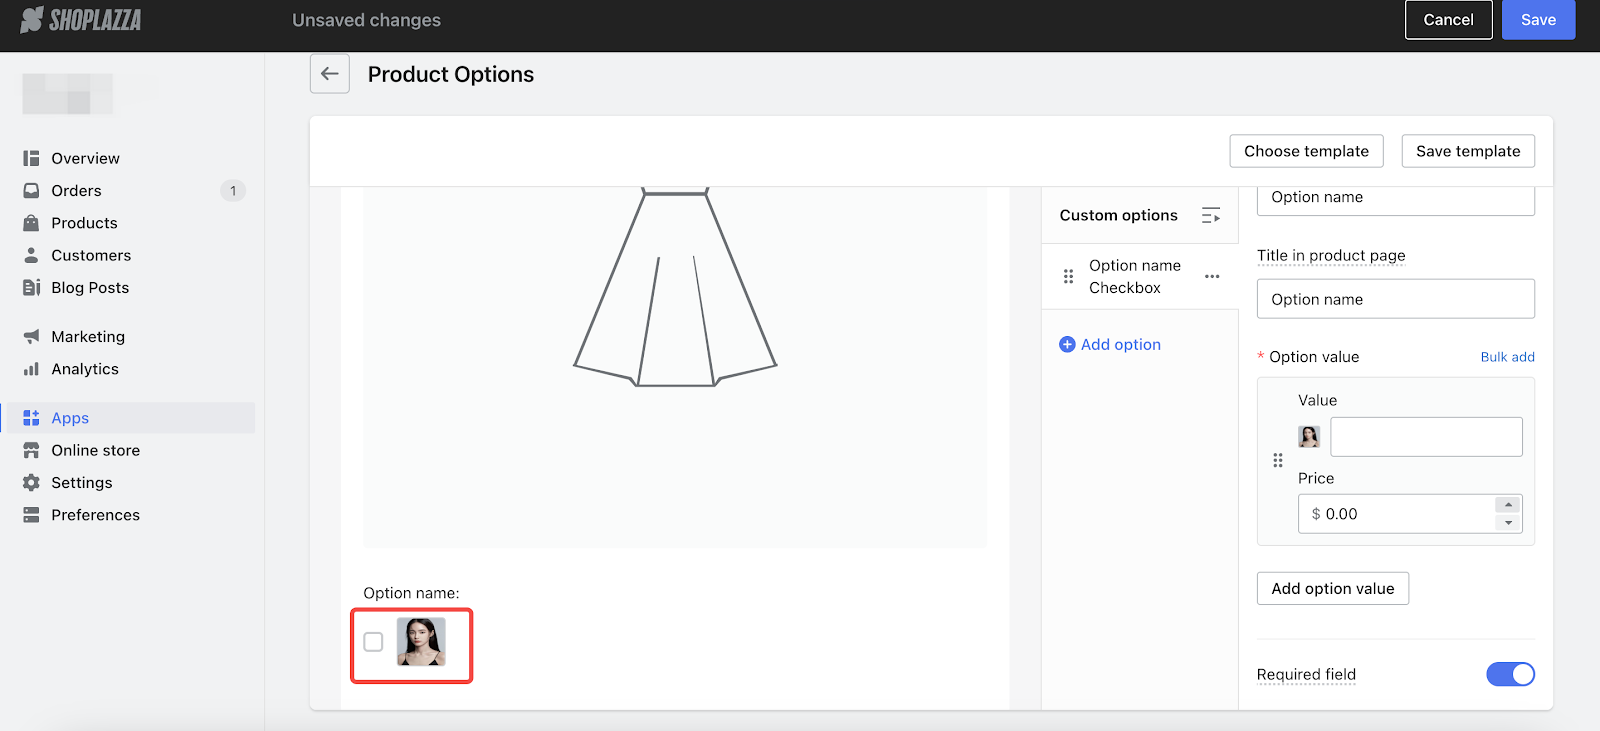
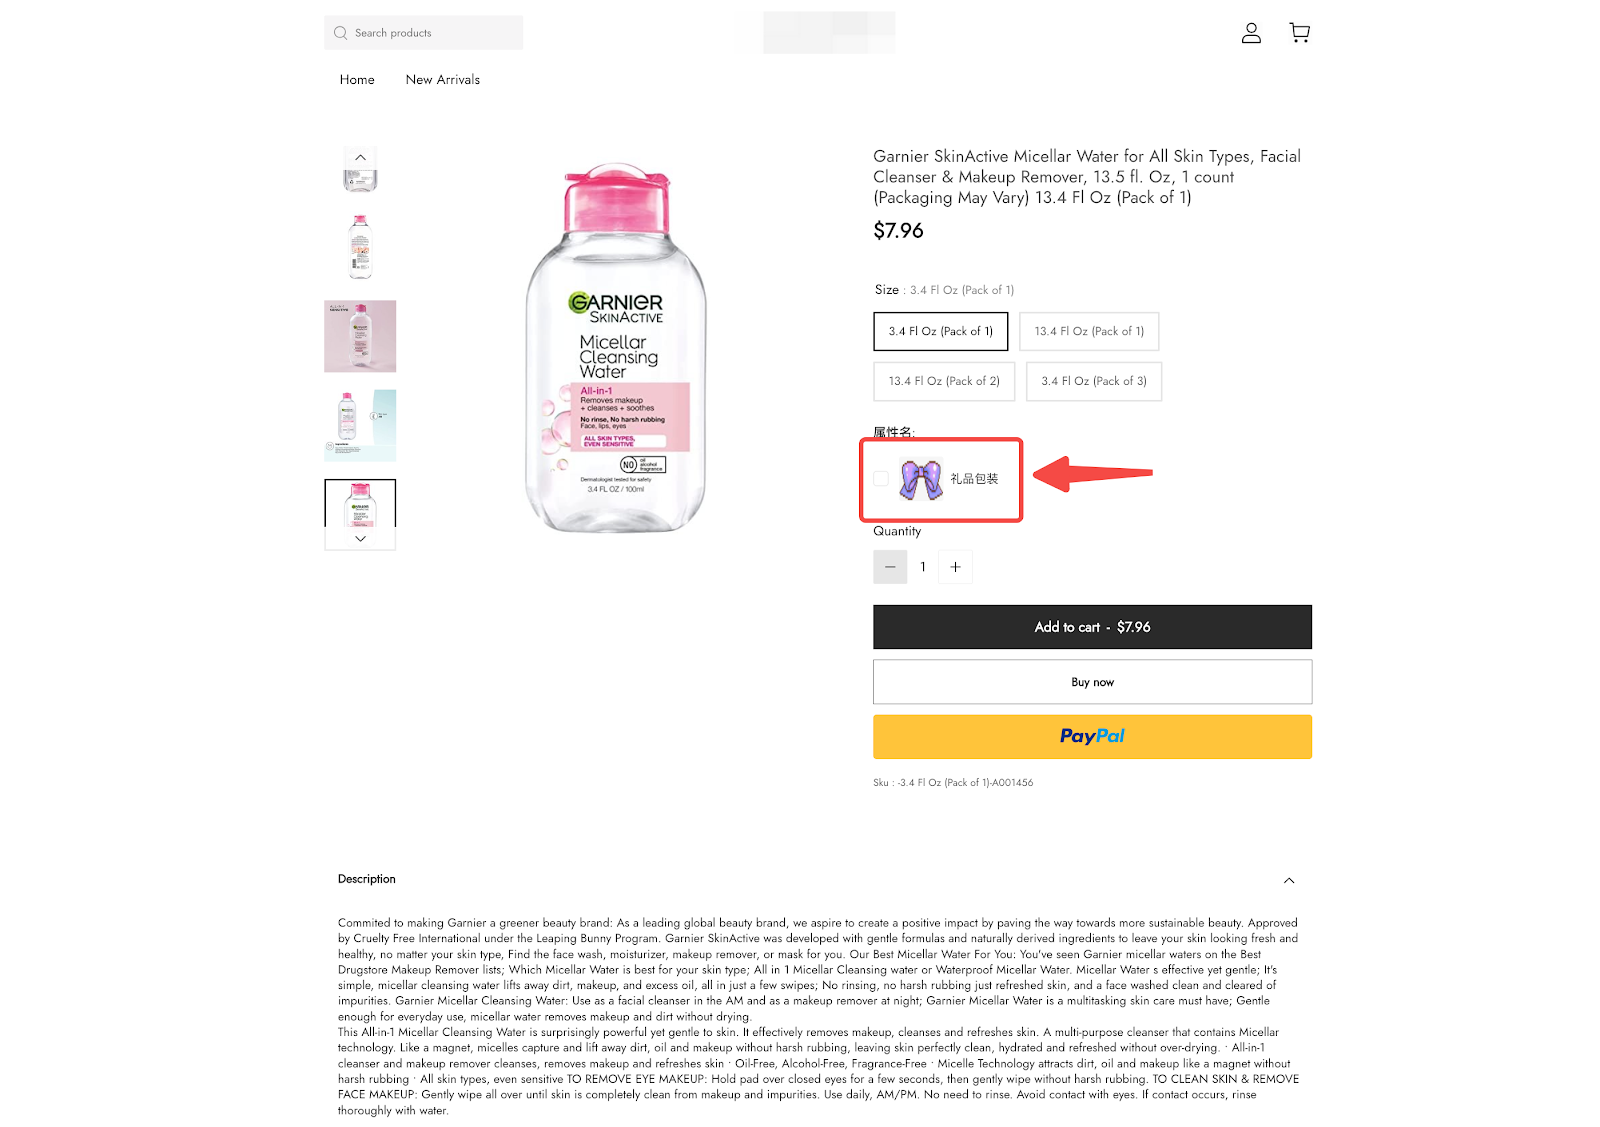
Function Overview:
- Images can now be added under the Checkbox Option Value section to suit your preferences. (Optional)
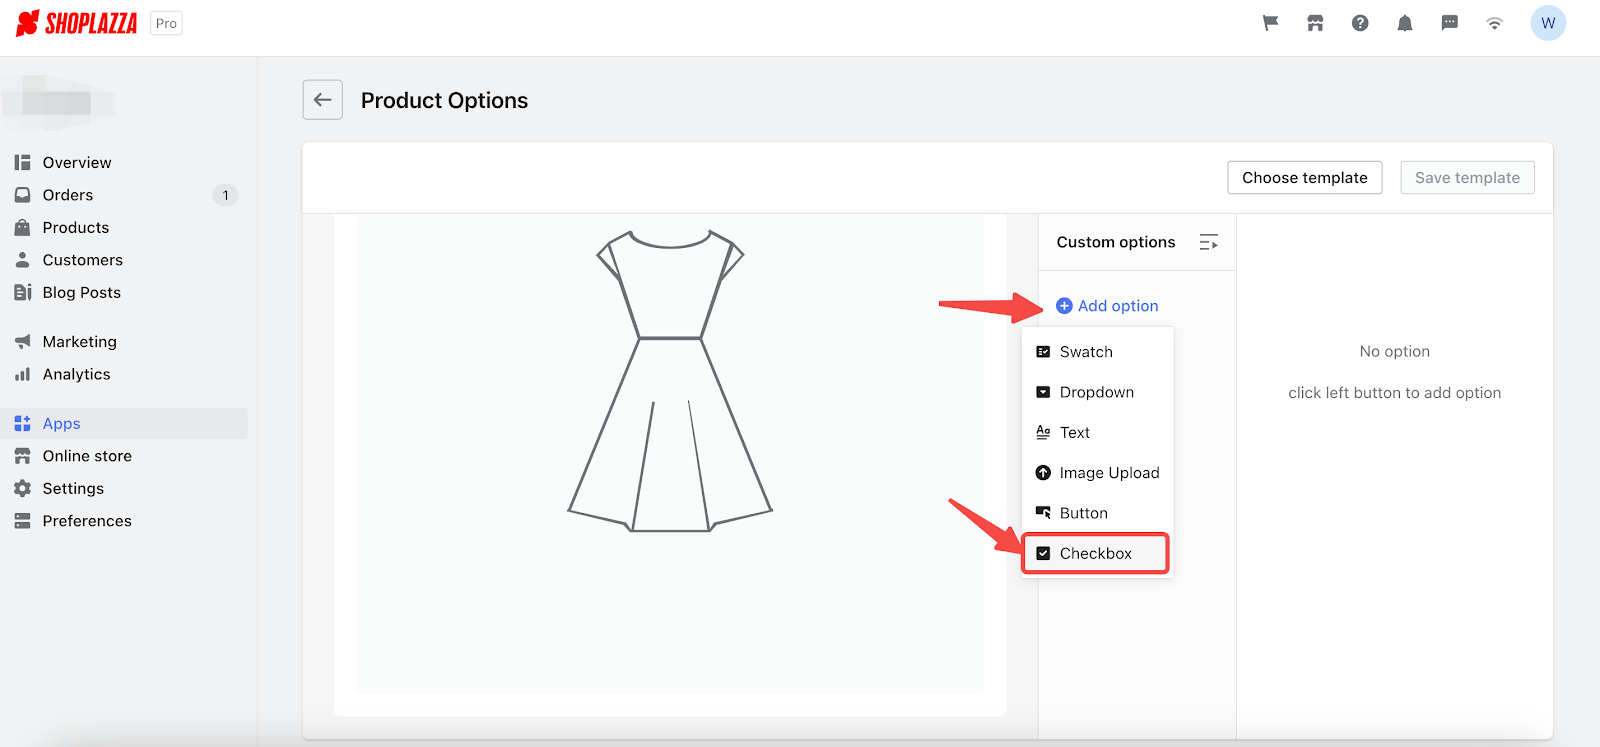
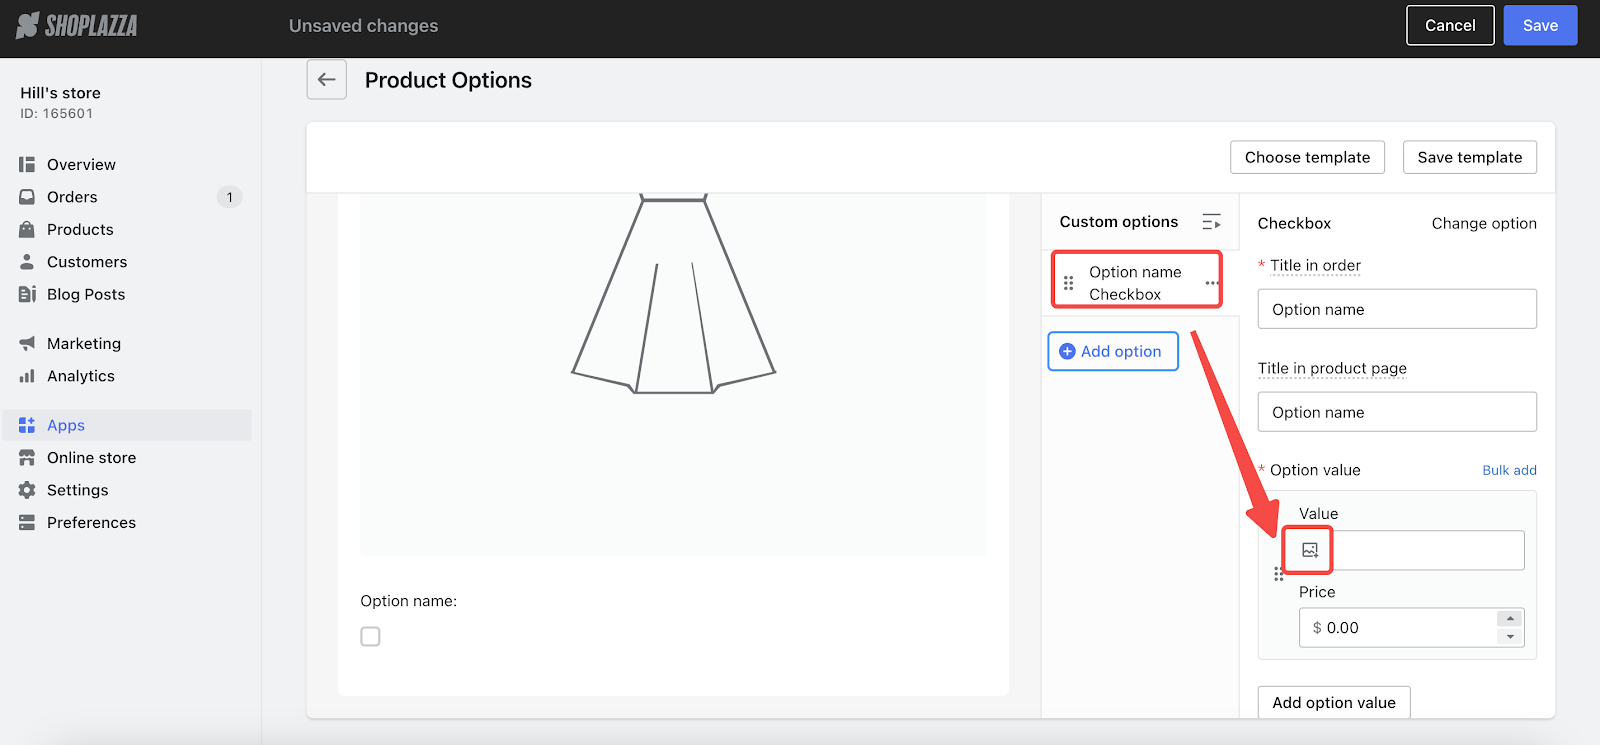
- Once the image is added, it will automatically display next to the corresponding checkbox.
2. Added a style option for bulk image uploads
Usage scenarios:
- Use this function when you need a streamlined method for uploading multiple images at once. By enabling this feature, users can easily drag and drop several images simultaneously.
Usage path:
- Navigate to your Shoplazza Admin > Apps > Product Customizer. Select the product you want to edit, then choose the Image upload option. Find the Image upload box style and select the option that allows for multiple image uploads (referred to as Large upload box).
Function Overview:
- By default, the system uses the Small upload box option, which allows only one image to be uploaded at a time.

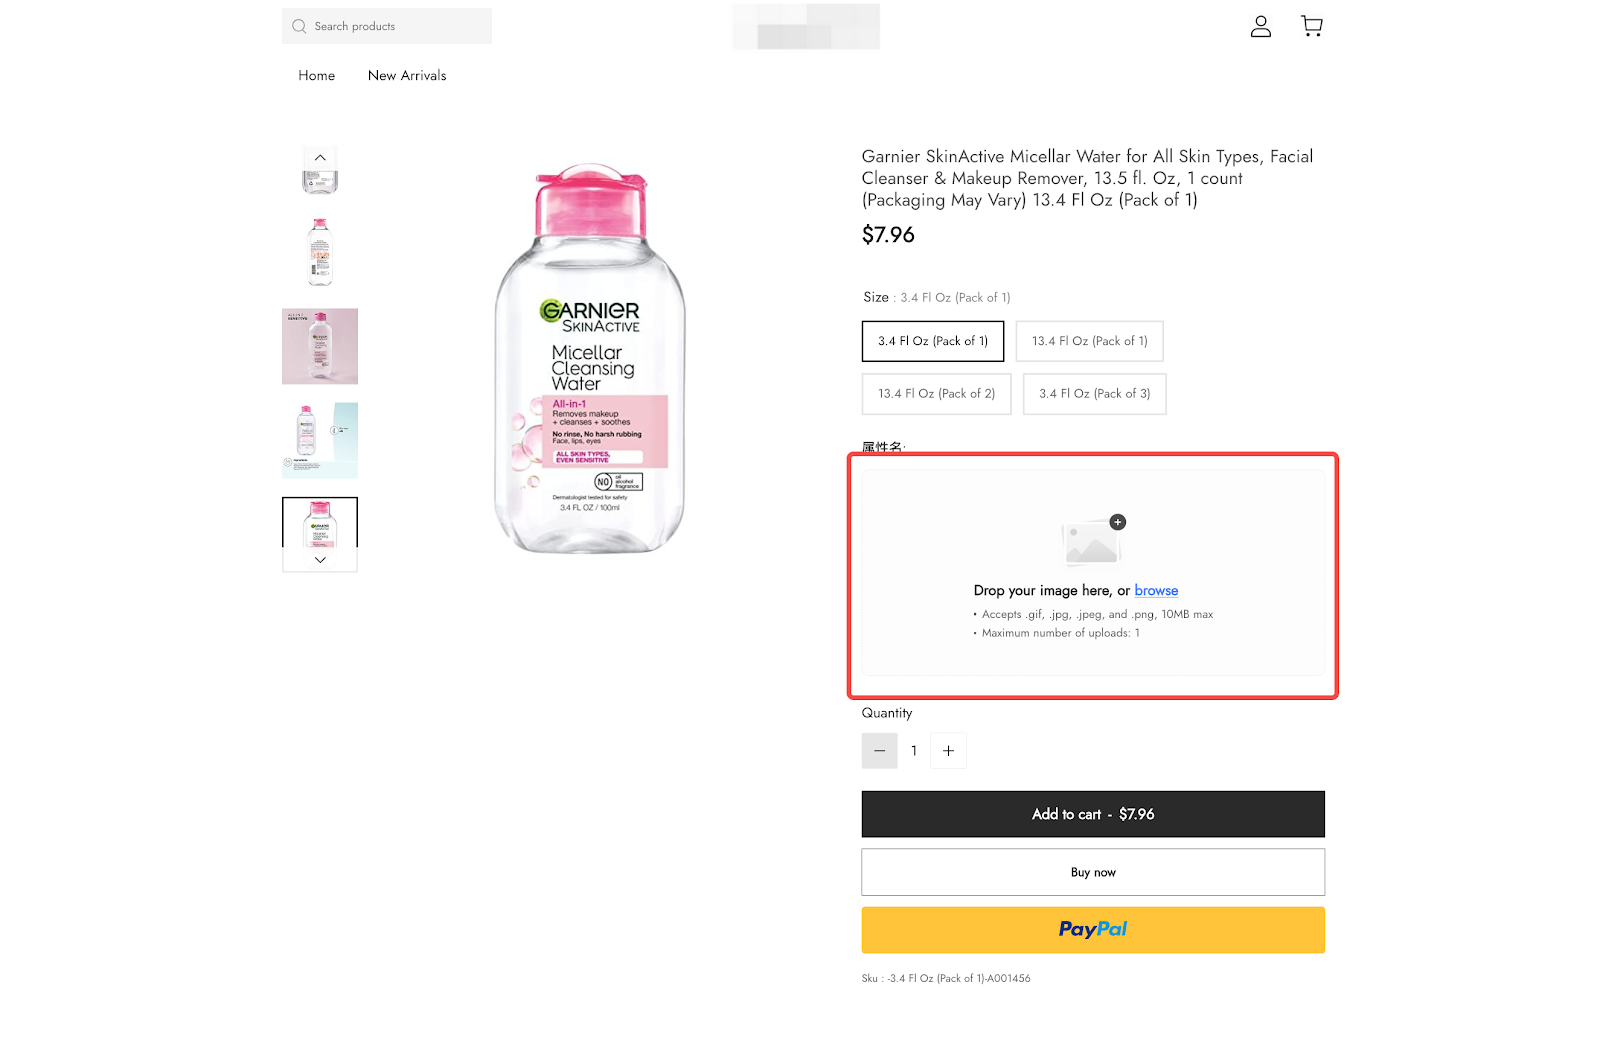
- However, by selecting the option that allows for multiple image uploads (Large upload box), the interface will appear as shown in the image below.
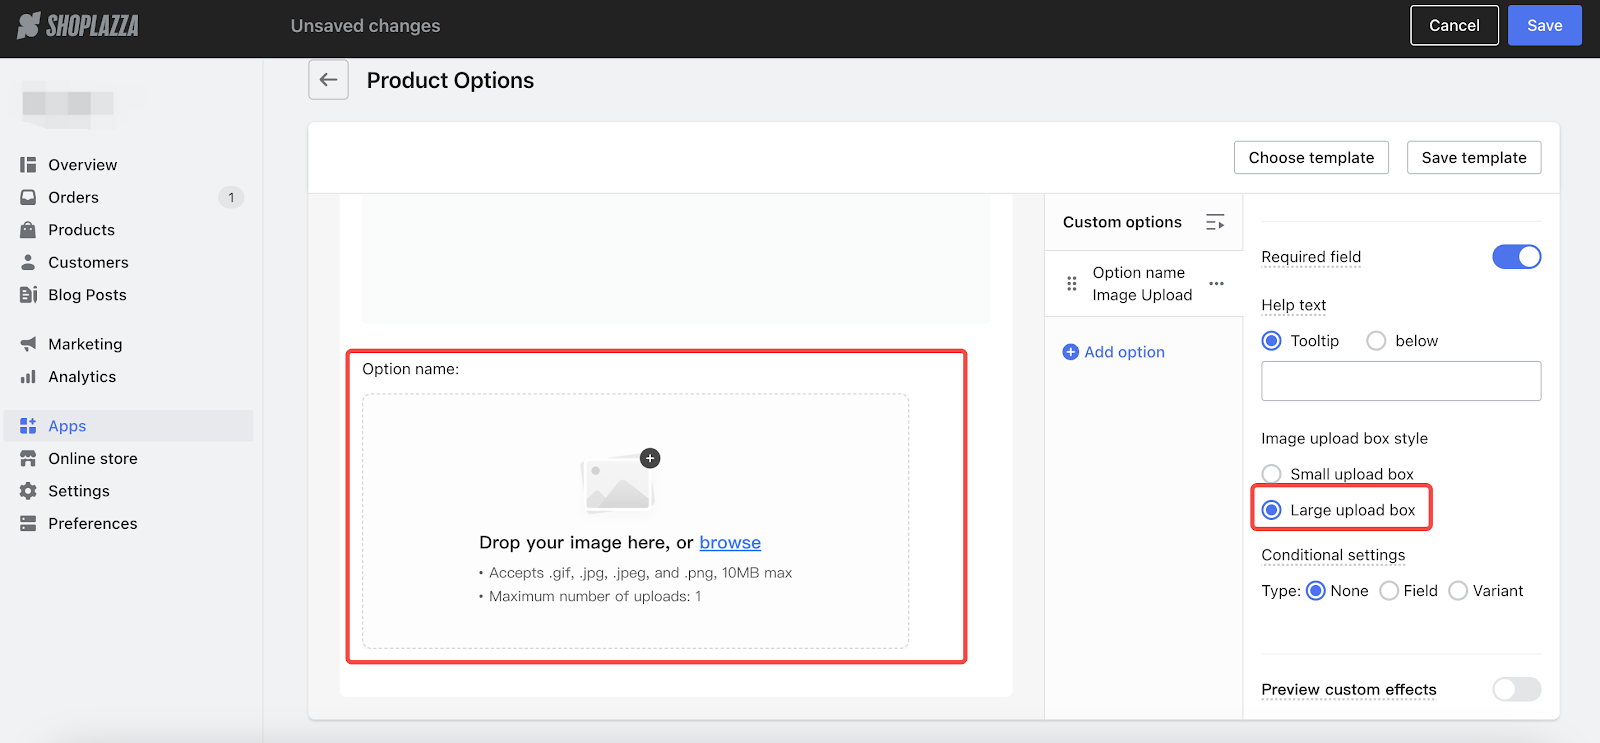
- This enhanced functionality lets customers drag and drop multiple images at once and includes clear guidelines on image requirements.
2. Added a delete template option
Usage scenarios:
- Use this function when you have an excess of templates and want to tidy up your collection.
Usage path:
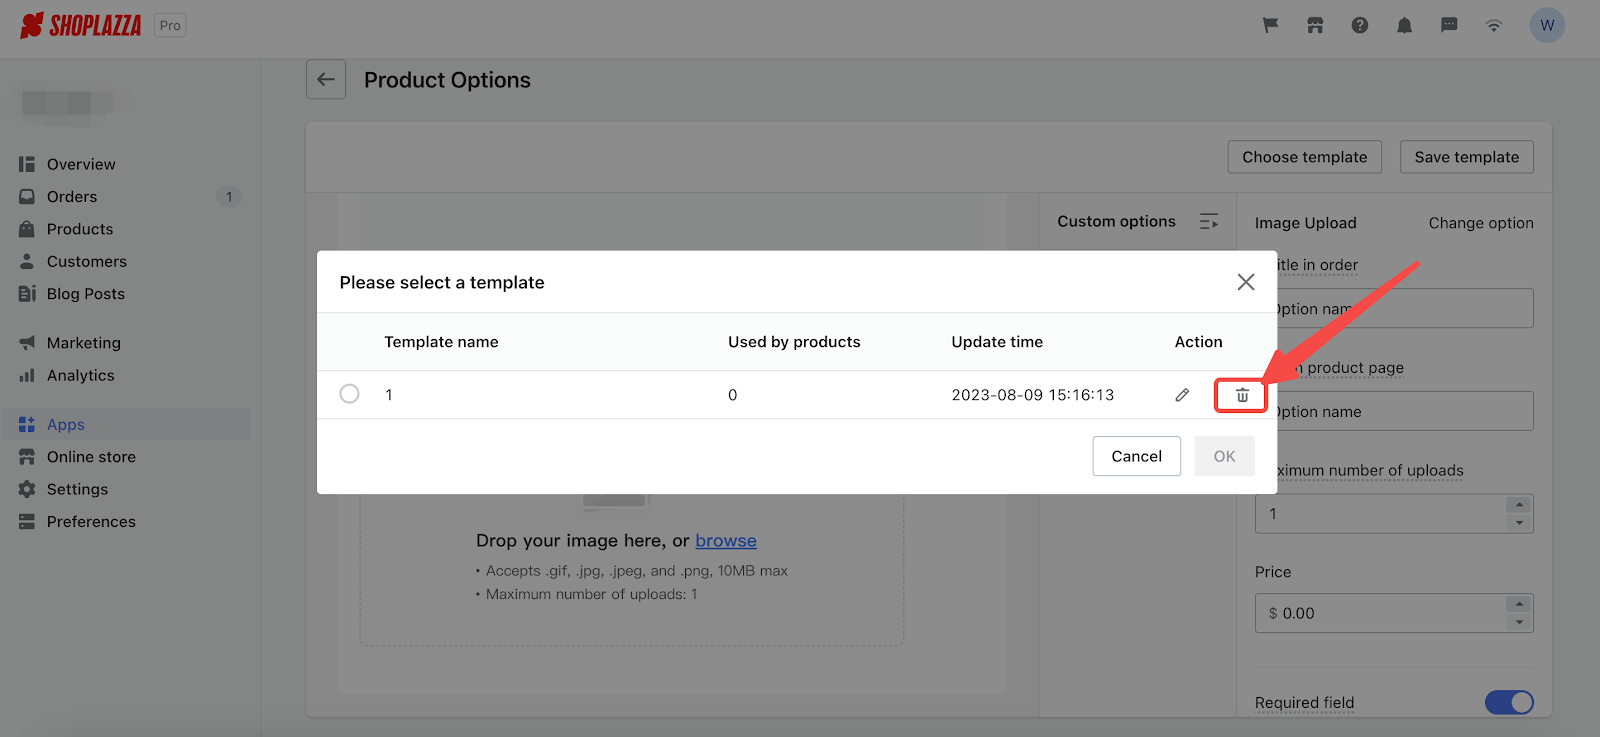
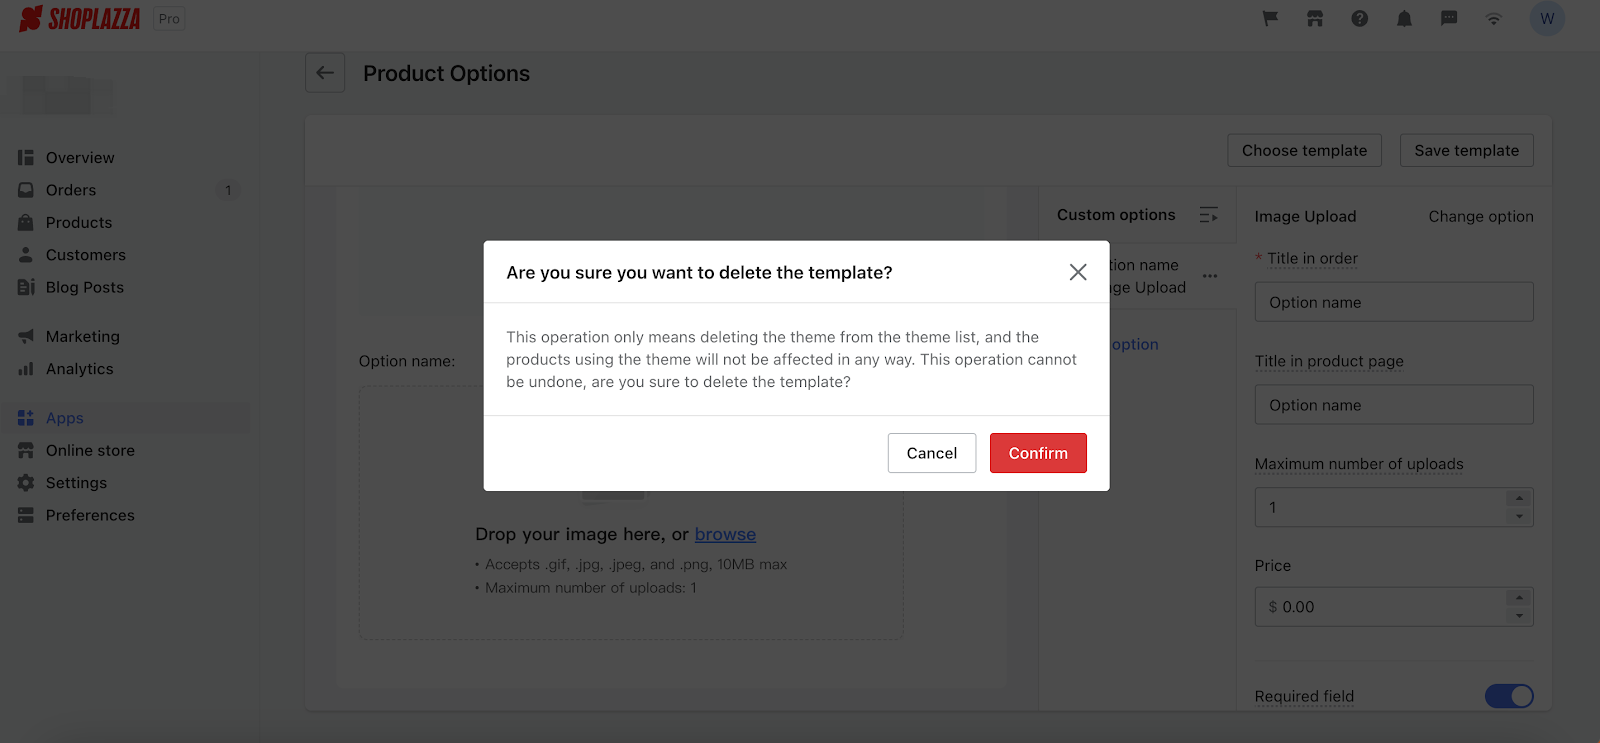
- Navigate to your Shoplazza Admin > Apps > Product Customizer. Once inside, select the product you want to edit. Then click on Choose template. From there you can bulk delete your templates by clicking on the Trash can icon. Confirm again to finalize.
Function Overview:
- When you delete a template, it will be removed from your template list. Importantly, products using this template will remain unaffected.
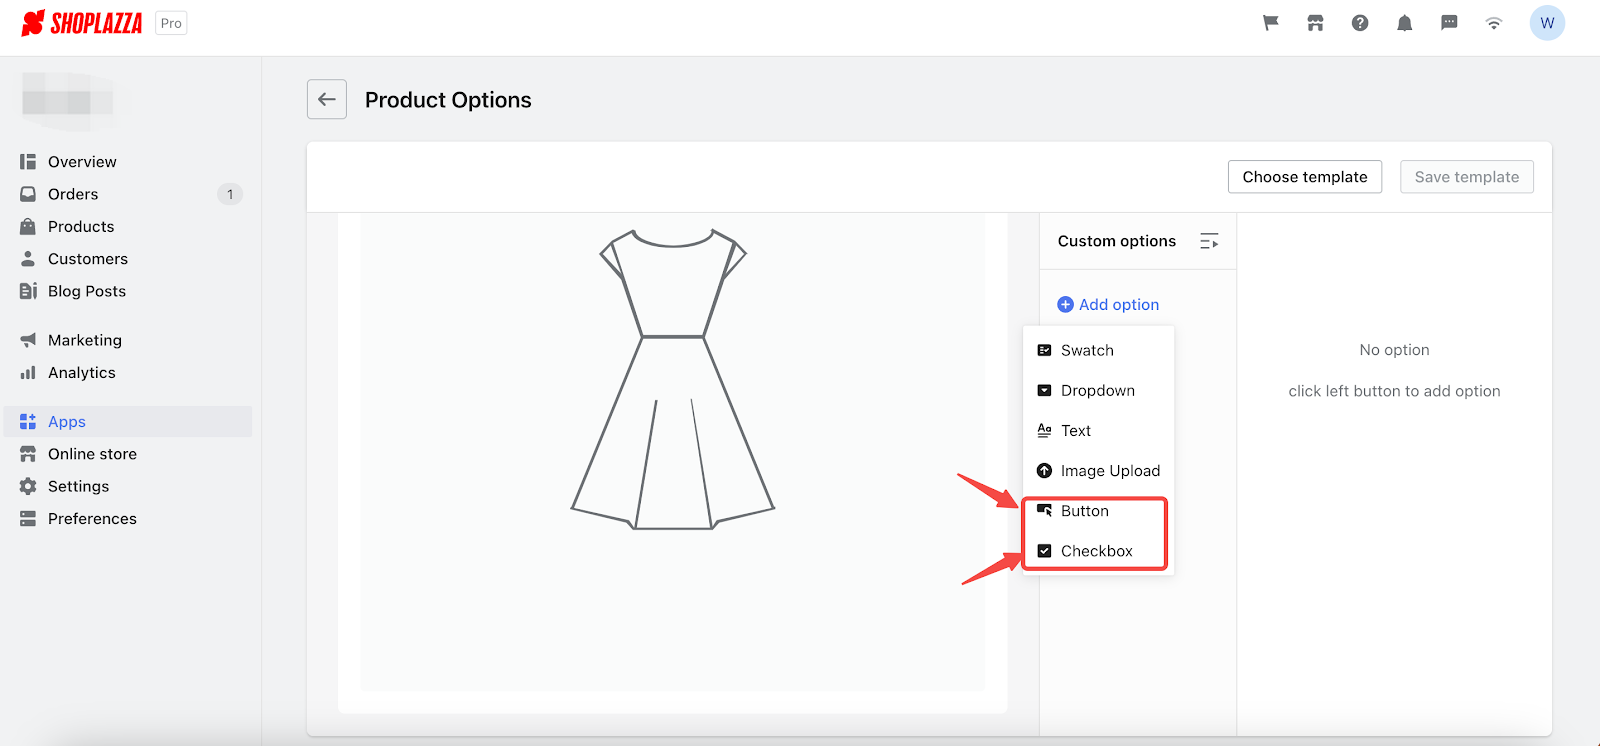
4. Added default selection feature for checkbox and button options
Usage scenarios:
- When you need to add default boxes, you can use this function. This function can currently apply to checkbox and button options.
Usage path:
- Navigate to your Shoplazza Admin > Apps > Product Customizer. Once inside, select the product you want to edit. Then click the Add option button to add either the Checkbox or Button option.
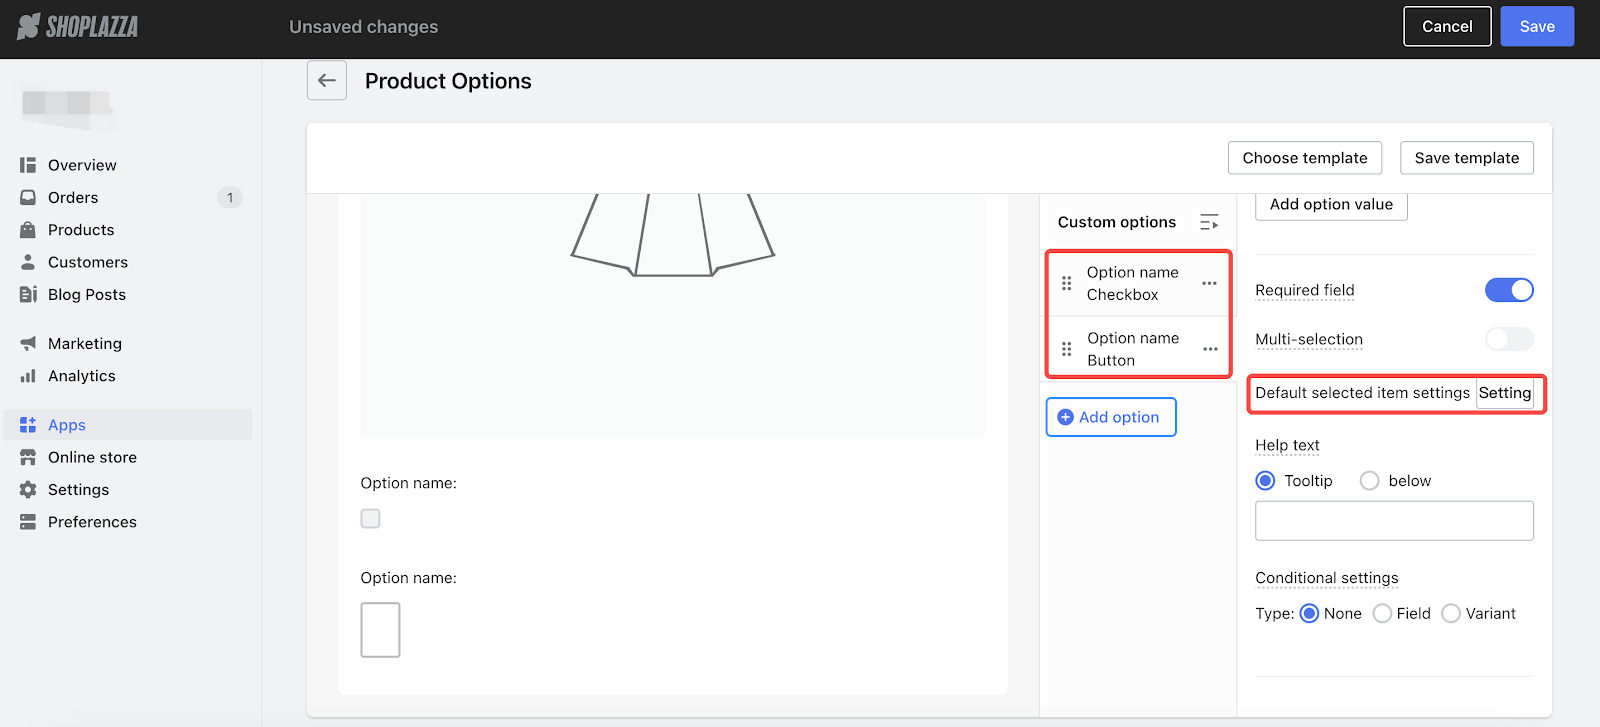
Function Overview:
- Within the checkbox or button option, you can scroll down to find the default selected item settings, and click on Settings.
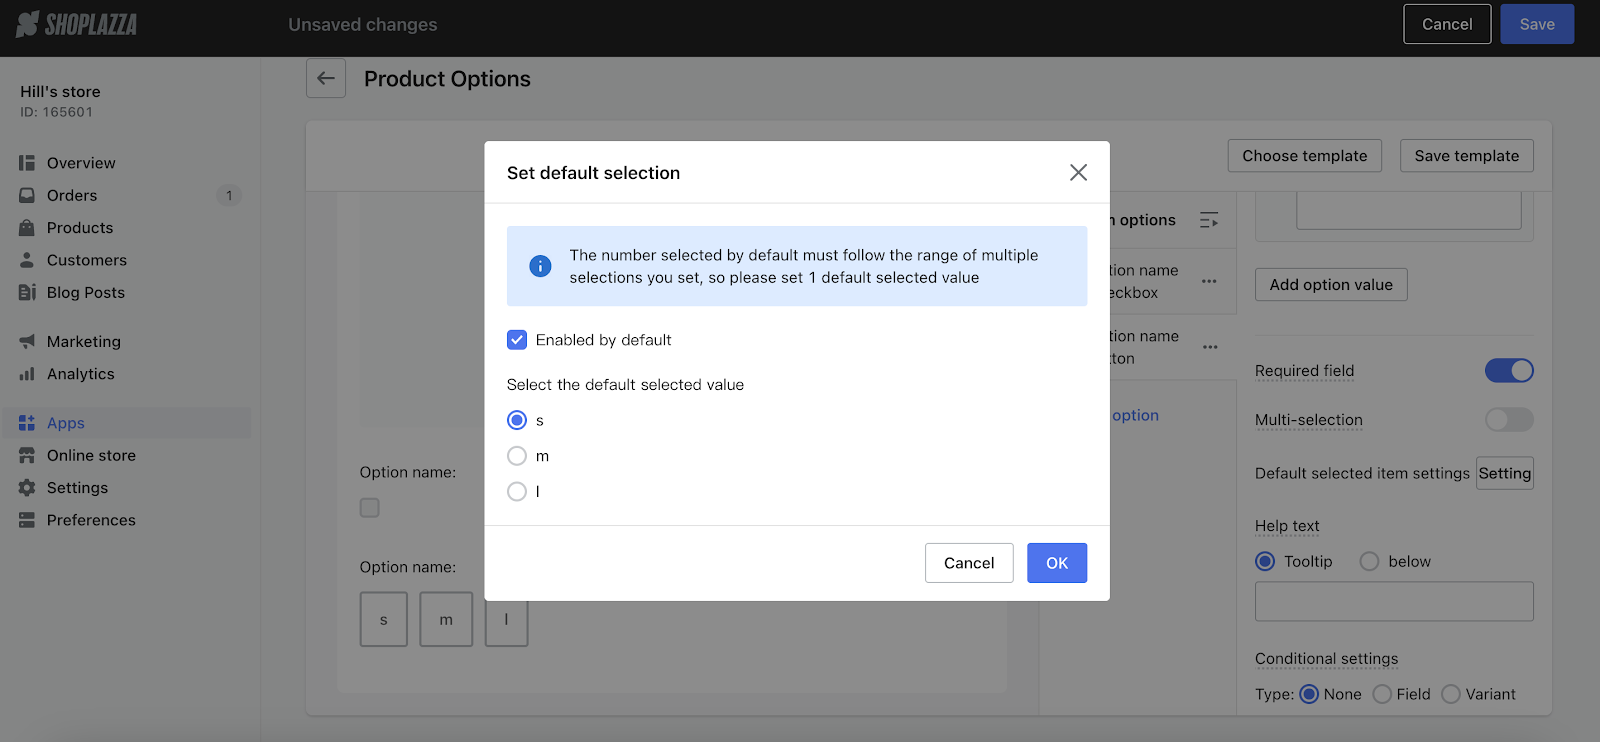
- When the Set default selection window pops up, you can check the Enabled by default box.
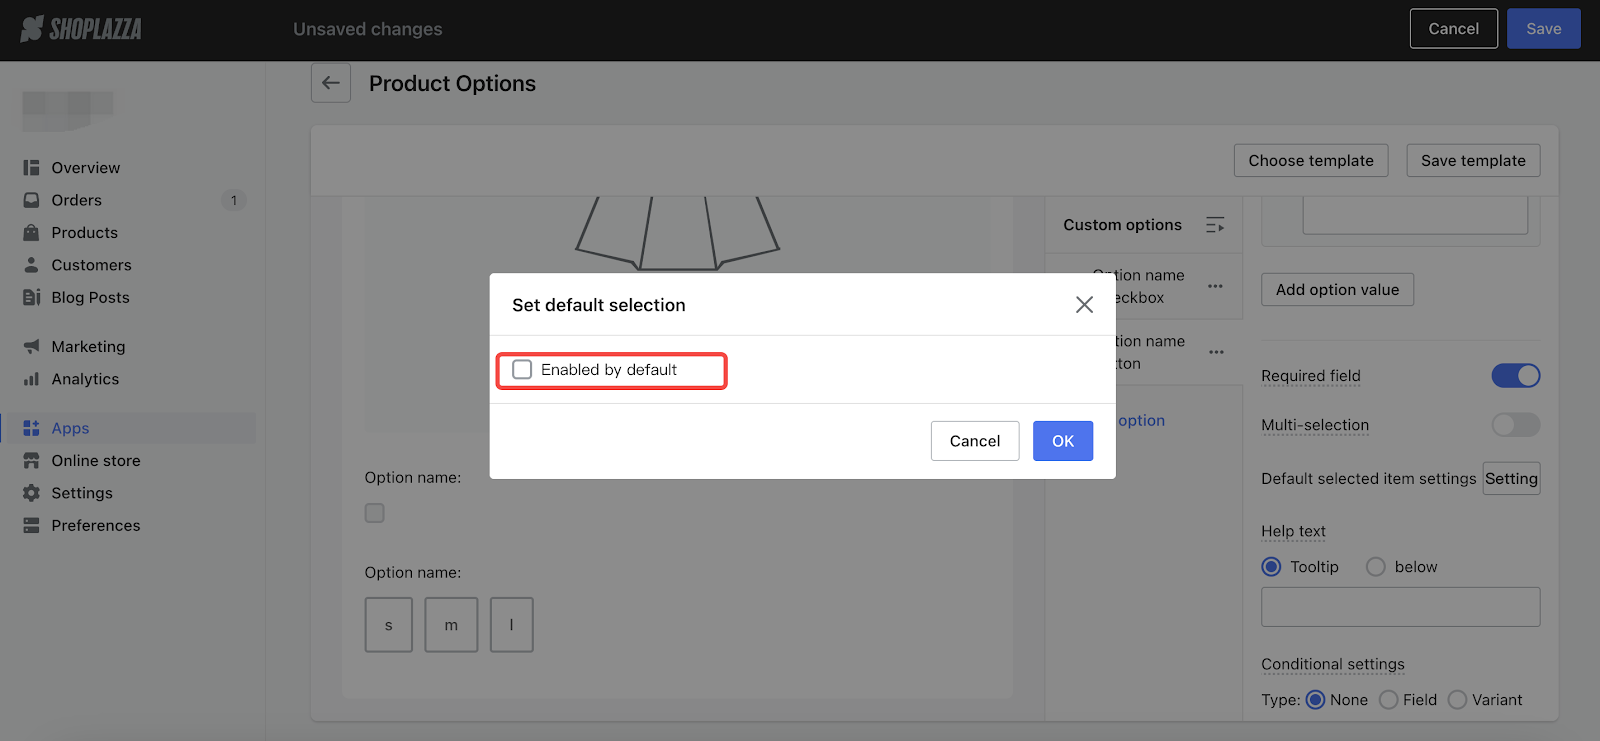
- After selecting the default options, click OK.
16. Enhancements to Size Chart app functionality
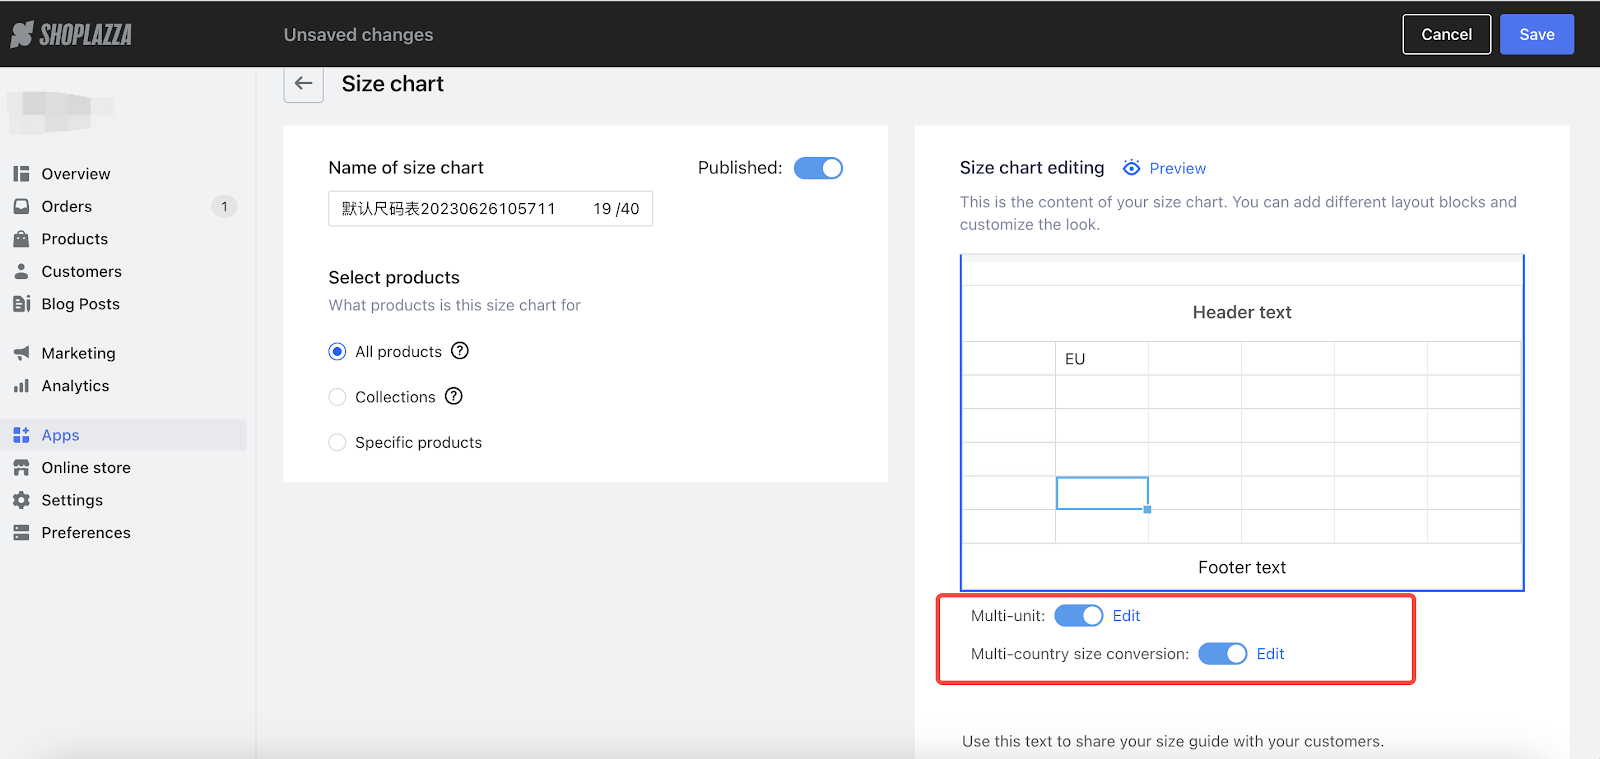
1. Upgraded to simplify multi-unit and multi-country size conversions
Usage Scenario:
- Use this upgrade to provide your customers with a more intuitive and efficient way to switch between different size charts, enhancing the overall shopping experience.
Usage path:
- Navigate to your Shoplazza Admin > Apps > Size Chart . Enter the edit size chart interface.
- Enable the Multi-unit and Multi-country size conversion buttons to activate the new simplified design.
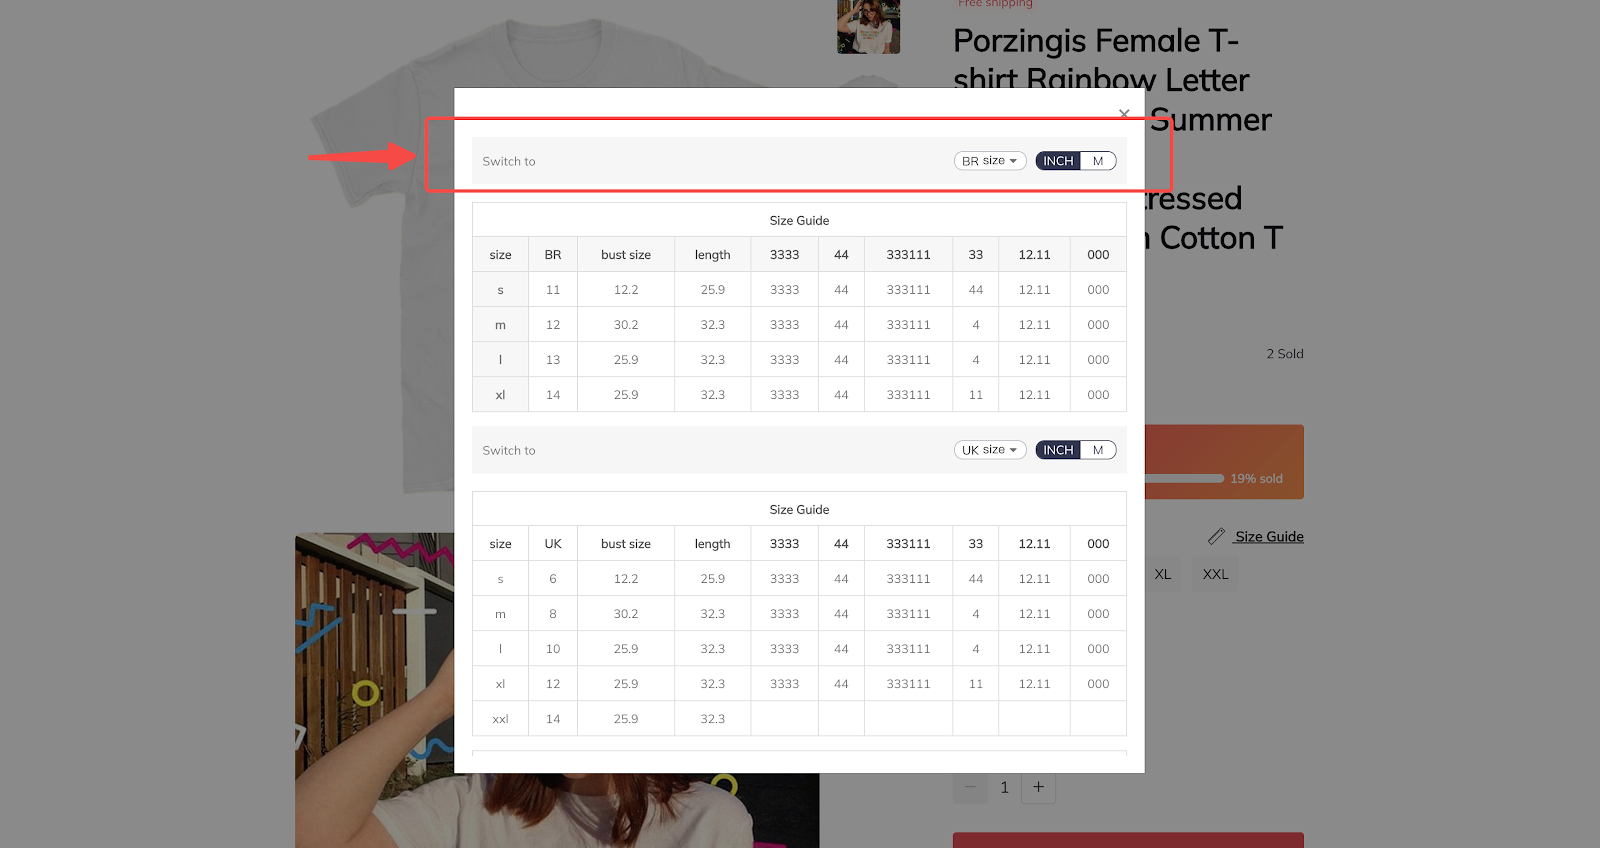
Feature overview:
- The redesigned multi-unit and multi-country size conversion buttons make it easier for your customers to switch between different size charts. By simplifying the selection process, you enhance the user experience, allowing for quick and seamless transitions between sizes.
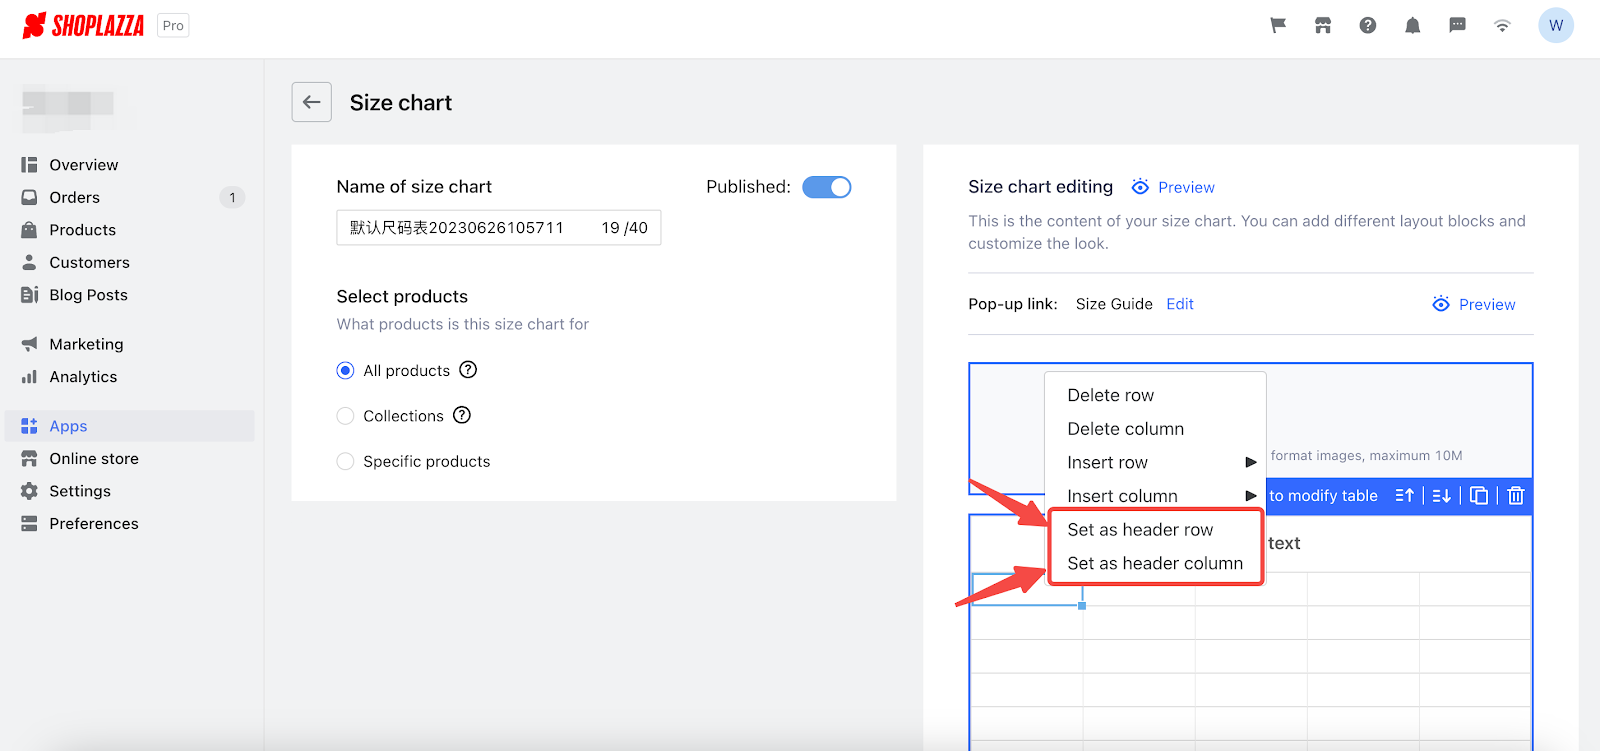
2. Added function for adding columns and rows
Usage scenarios:
- Use this function when the addition of columns or rows to your table is necessary, such as creating a table for clothing sizes.
Usage path:
- Navigate to your Shoplazza Admin > Apps > Size Chart, enter the edit size chart interface, and add the table, right-click on the table. You can choose to Set title columns and rows.
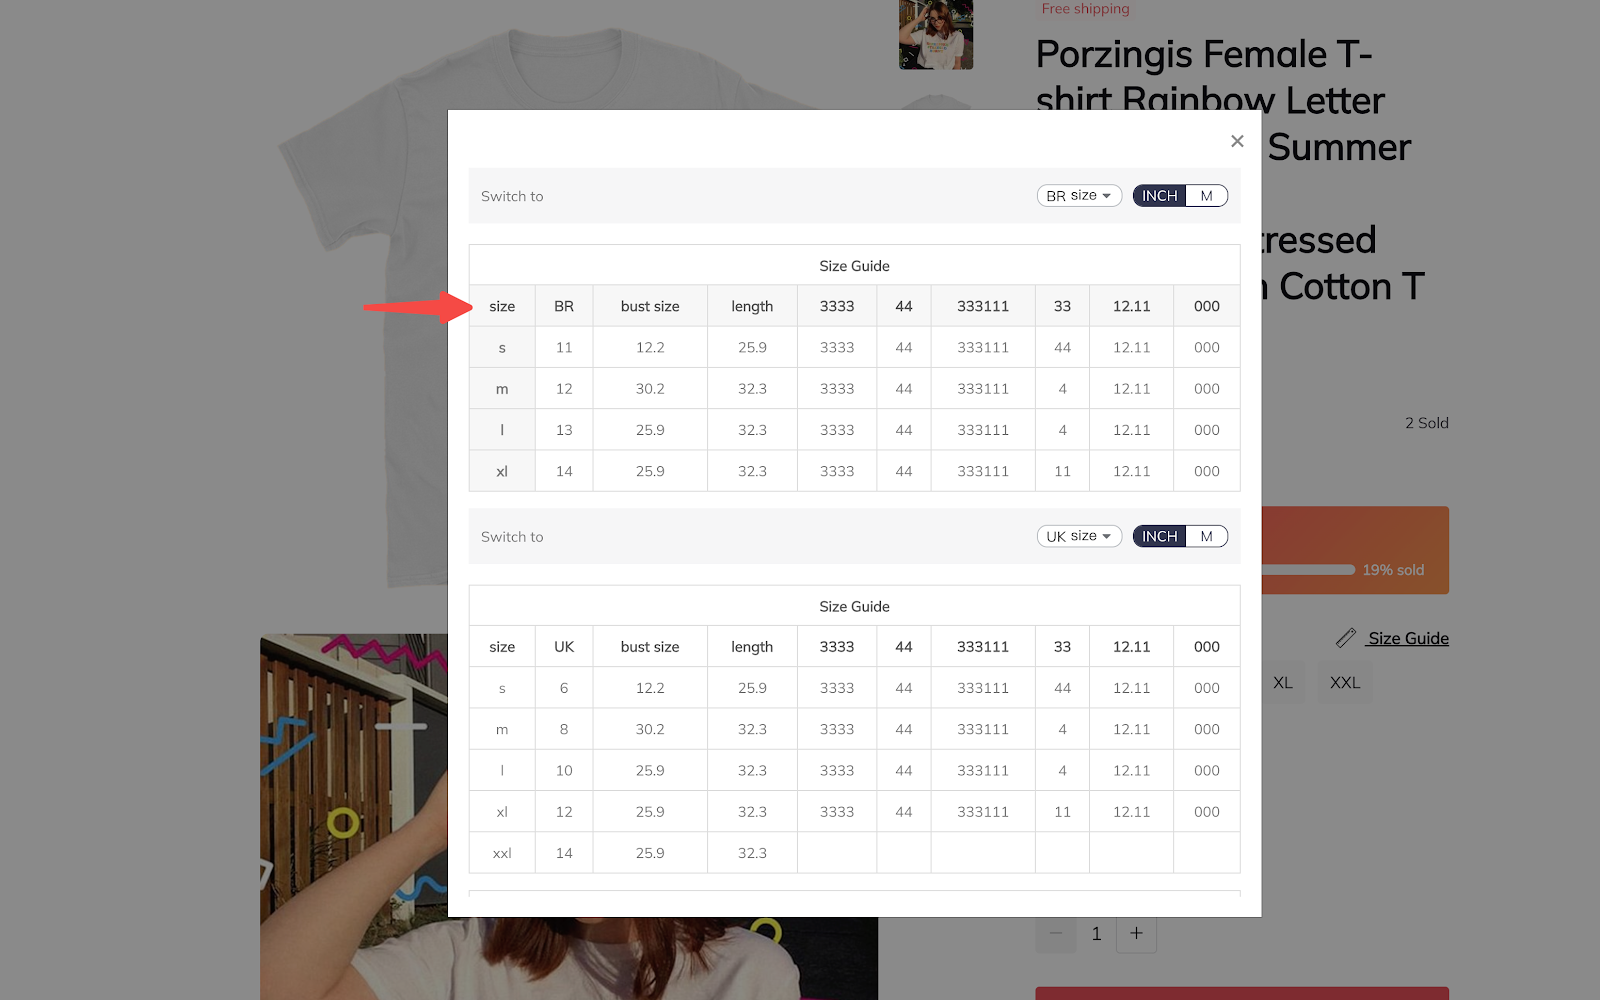
Function Overview:
- By right-clicking on the table, you have the ability to add columns and rows as needed. This can be especially helpful when designing a table for clothing sizes, allowing you to easily organize the sizes, measurements, and other relevant information. Additionally, the text in the selected row or column will be bold and displayed with a gray background.
17. Incorporated Cart and Checkout Settings for MoCart app
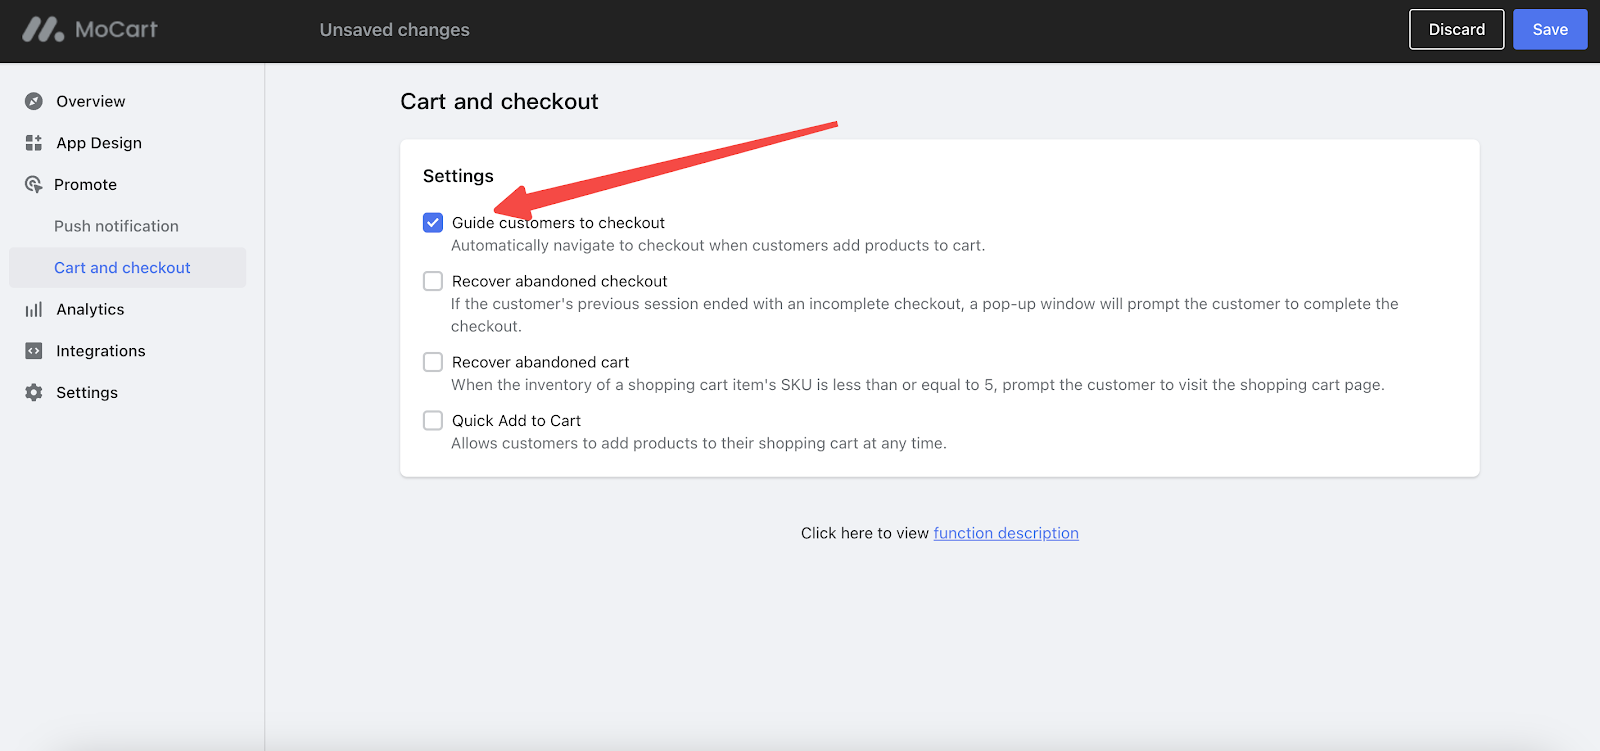
1. Added "Guide Customers to Checkout" option
Usage scenarios:
- Seamlessly direct customers to the checkout page as soon as they add products to their cart.
Usage path:
- Navigate to your Shoplazza Admin > Apps > Mocart > Promote > Cart and Checkout > Check the Guide Customers To Checkout option, and click to Save.
Function Overview:
- Simply select the Guide Customers To Checkout option then click Save.
APP Preview
- If you add a product to the shipping cart from the product page, you will be directed to the checkout page.
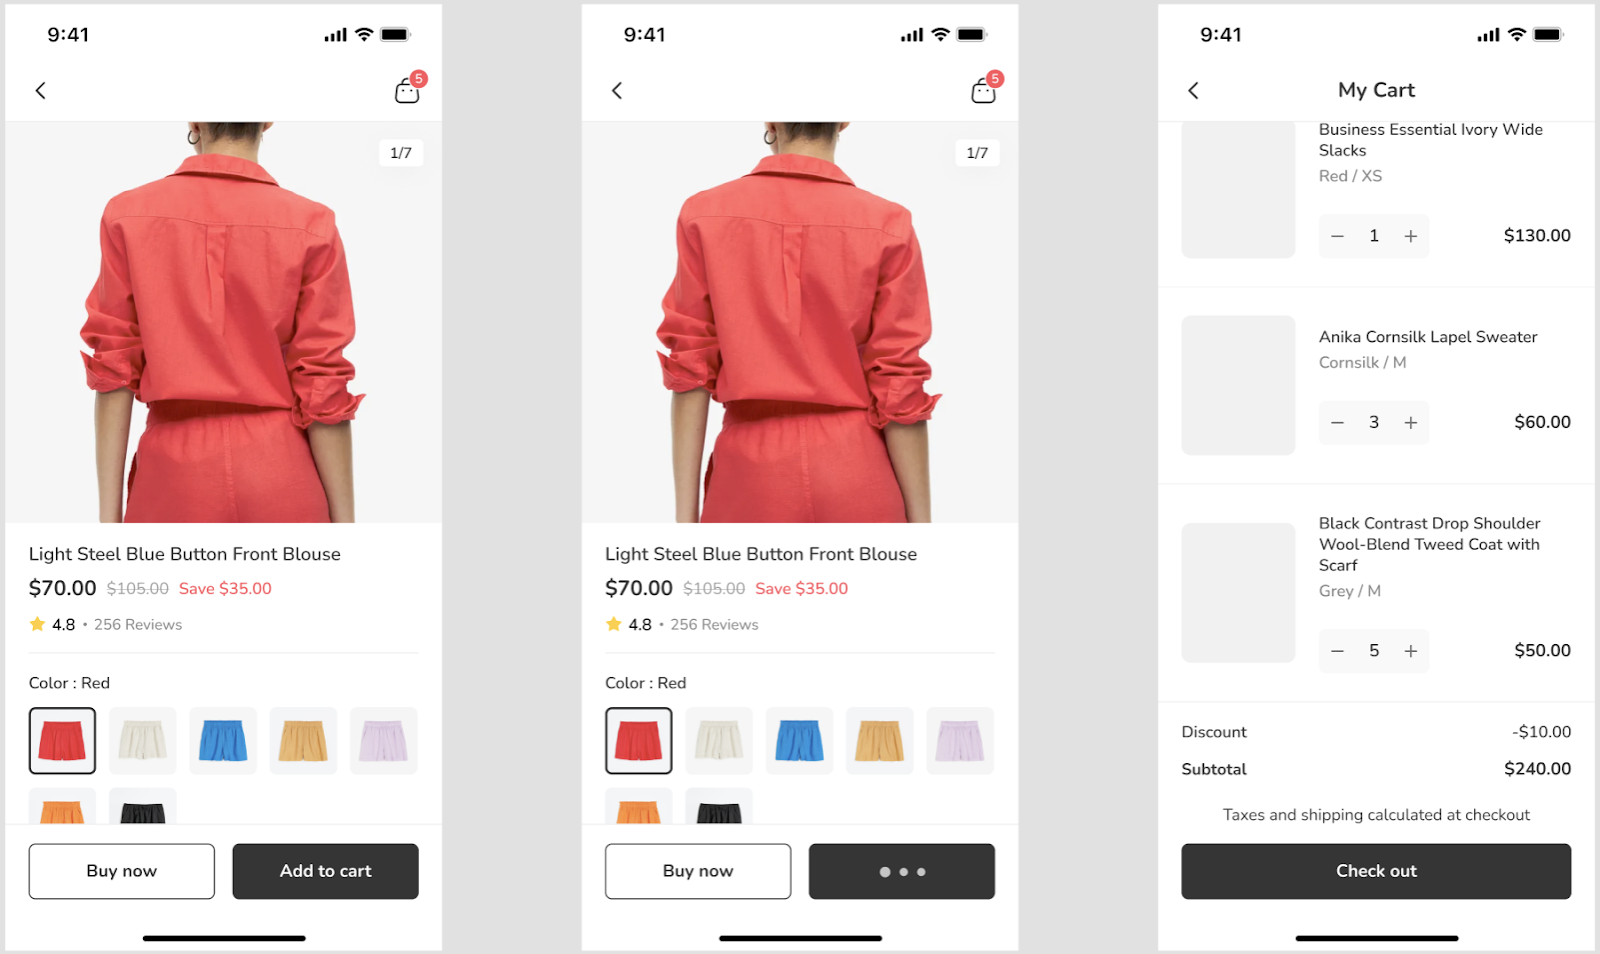
- If you add a product to the shipping cart from the collection page, you will also be directed to the checkout page.
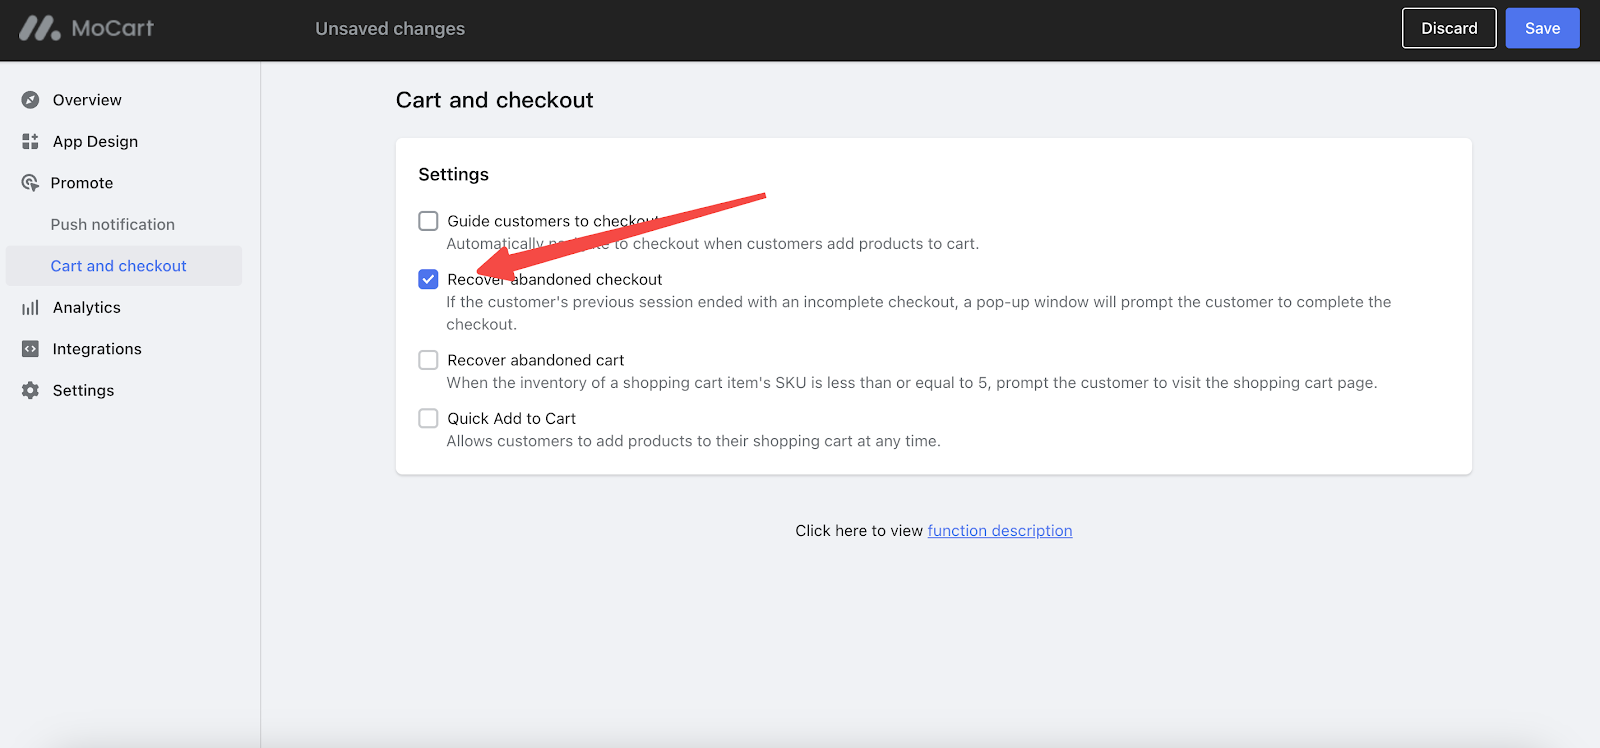
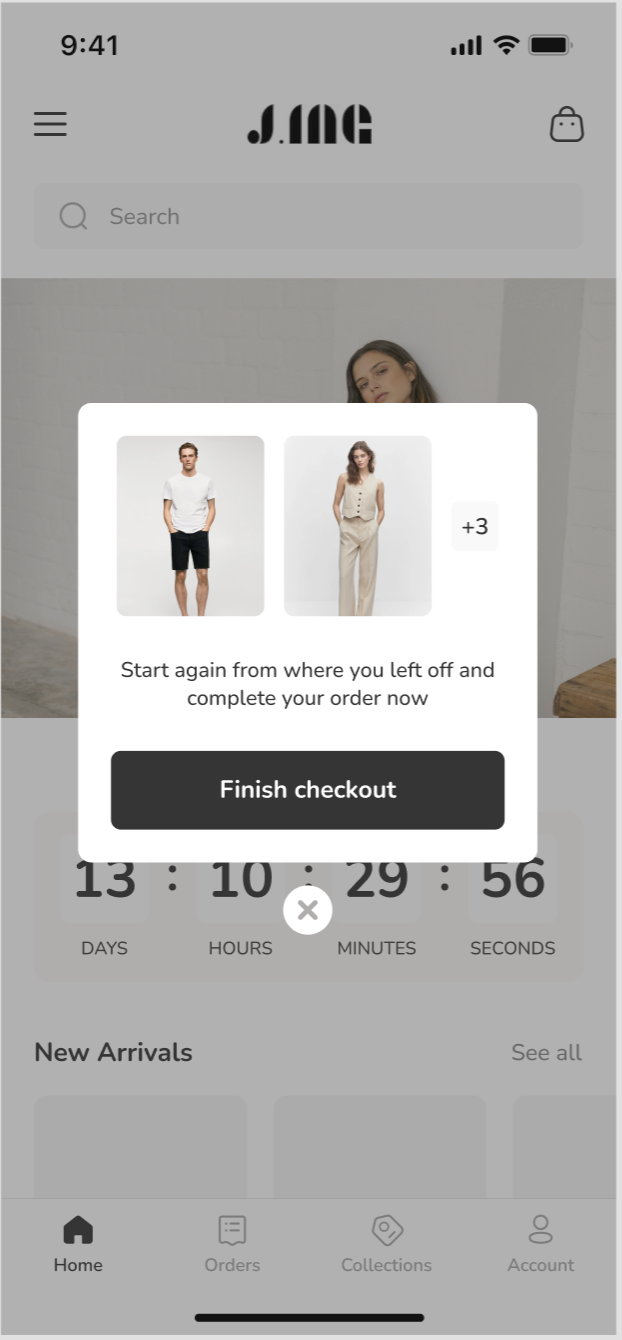
2. Added "Recover abandoned checkout" option
Usage scenarios:
- If the customer's previous purchase ended with an incomplete checkout, a pop-up window will guide the customer to complete the checkout.
Usage path:
- Navigate to your Shoplazza Admin > Apps > Mocart > Promote > Cart and Checkout > Check the Recover Abandoned Checkout option, and click to Save.
Function Overview:
- You can check Recover Abandoned Checkout option and click Save.
APP Preview
- If the customer's previous session ended with an incomplete checkout, a pop-up window will prompt the customer to complete the checkout.
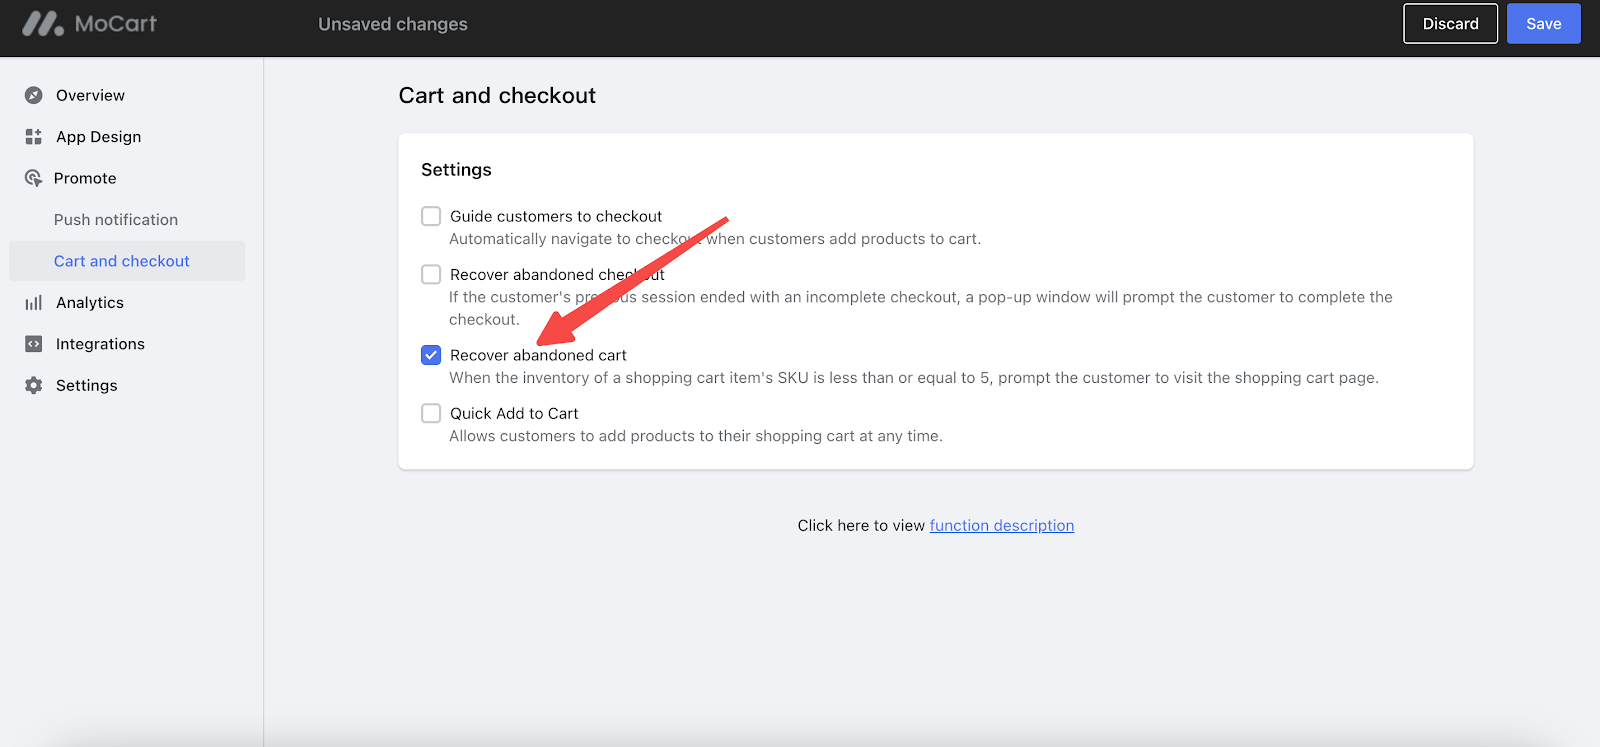
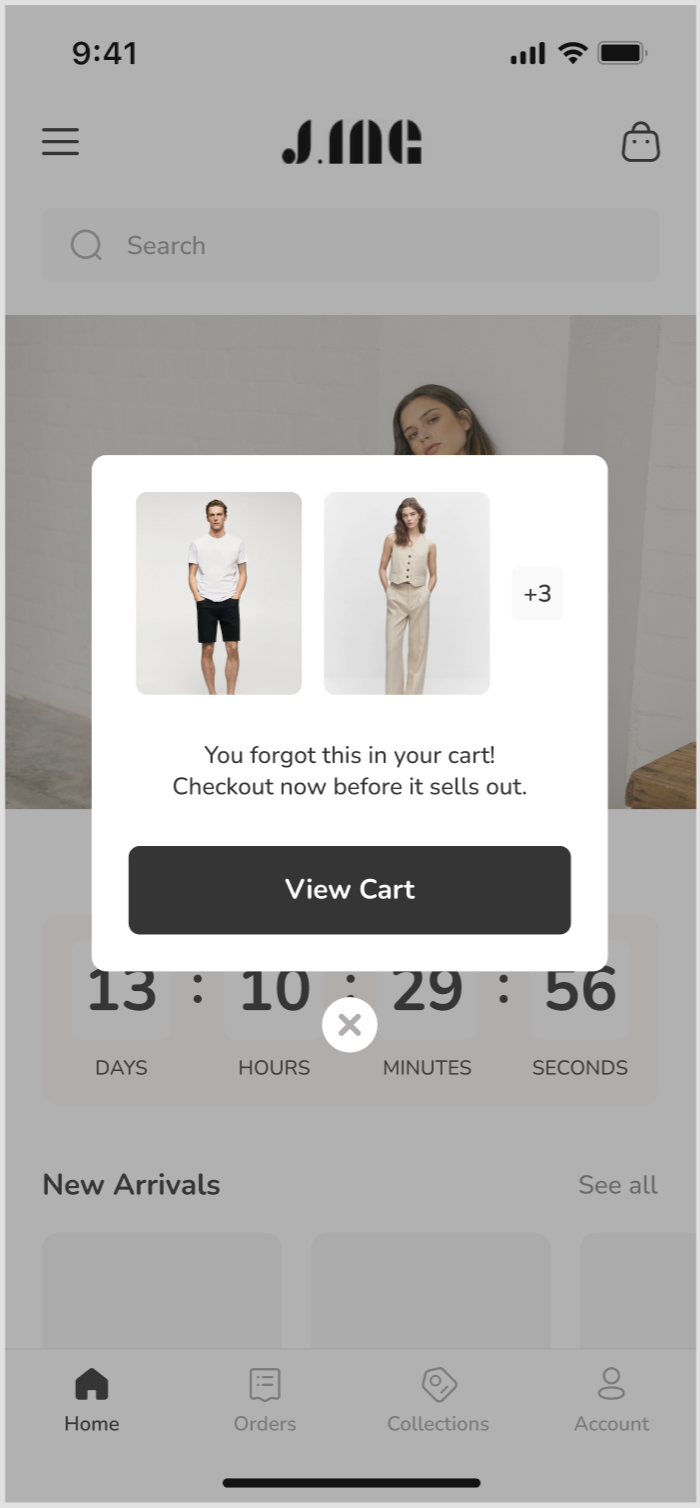
3. Added "Recover Abandoned Cart" option
Usage scenarios:
- If customers have products in the shopping cart and the product has limited inventory (less than five items), a pop-up window can guide customers to the shopping cart page.
Usage path:
- Navigate to your Shoplazza Admin > Apps > Mocart > Promote > Cart and Checkout > Check the Recover Abandoned Cart option, and click to Save.
Function overview:
- Select the Recover Abandoned Cart option and click Save.
APP Preview
- When the product in the shipping cart has less than and equal to five items, a pop-up window will remind customers of visiting shipping cart page.
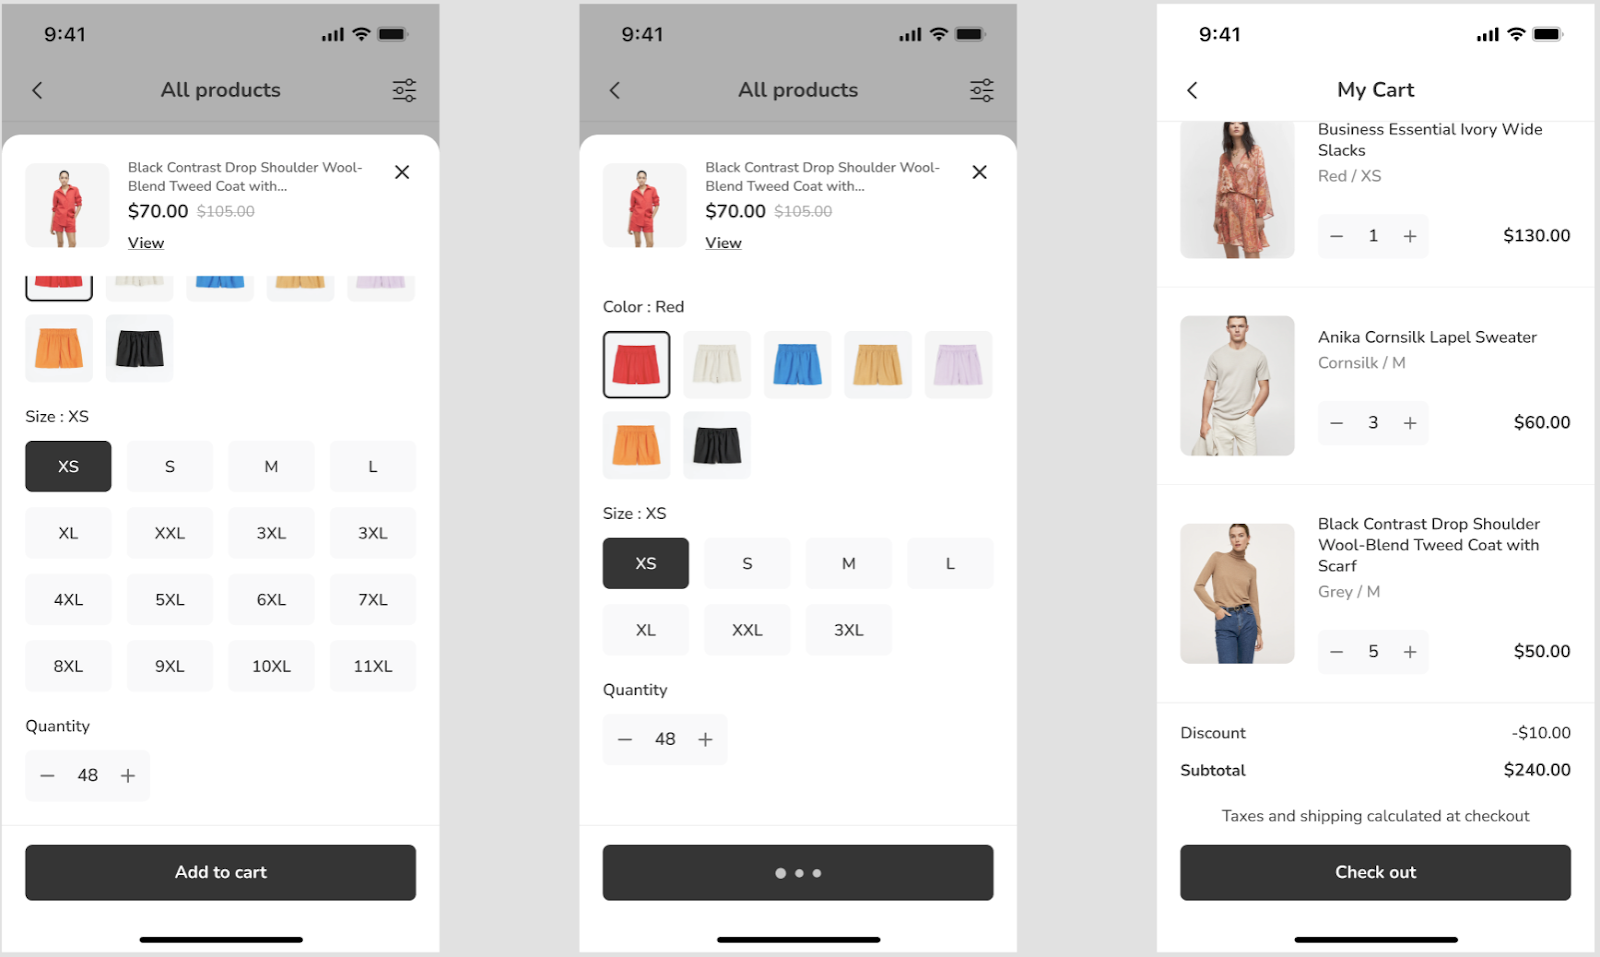
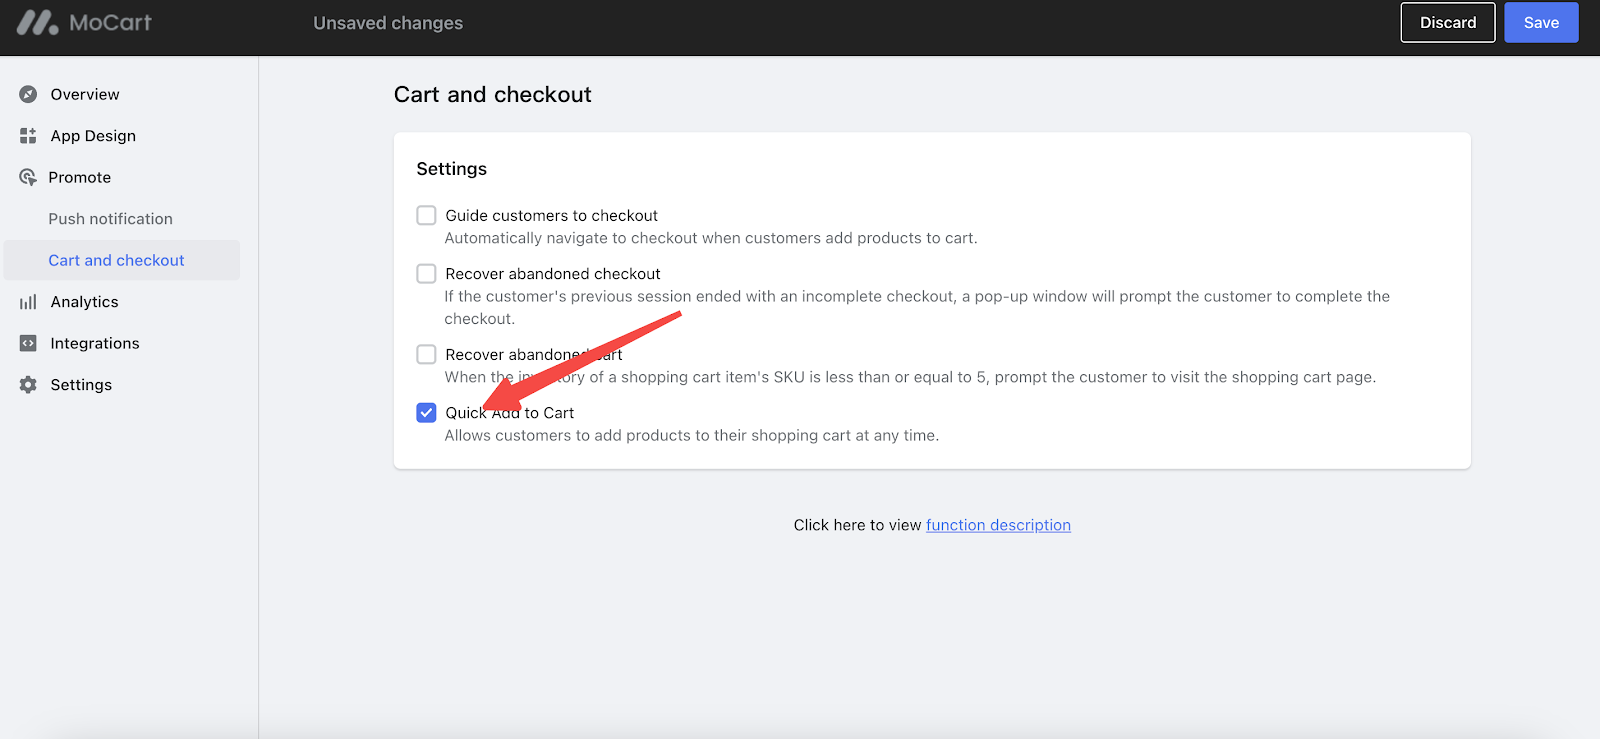
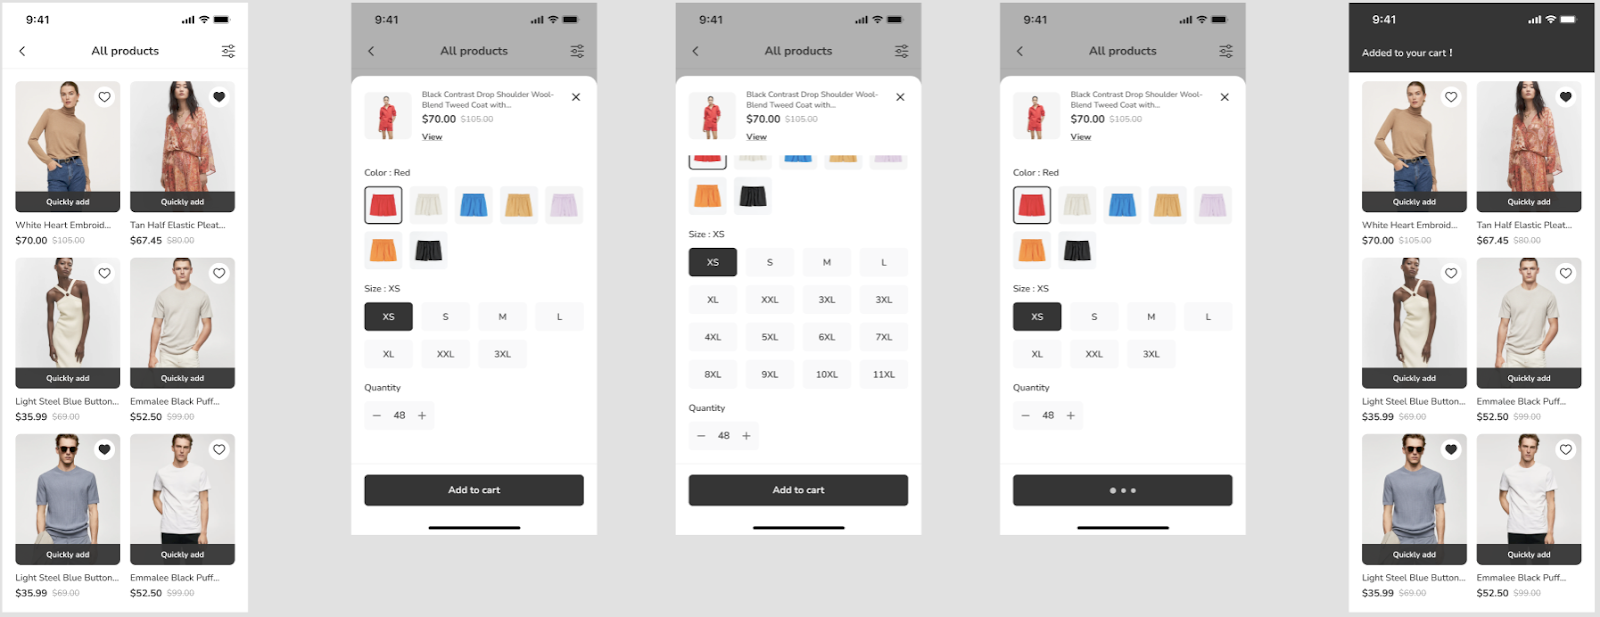
4. Added "Quick Add to Cart" option
Usage scenarios:
- Enable customers to effortlessly add products to their shopping cart whenever they choose.
Usage path:
- Navigate to your Shoplazza Admin > Apps > Mocart > Promote > Cart and Checkout > Check the Quick Add To Cart option, and click to Save.
Function Overview:
- You can check Quick Add To Cart option and click Save.
APP Preview
- The collection page can show the Quickly Add button, which can allow customers to add products to their shopping cart at any time.
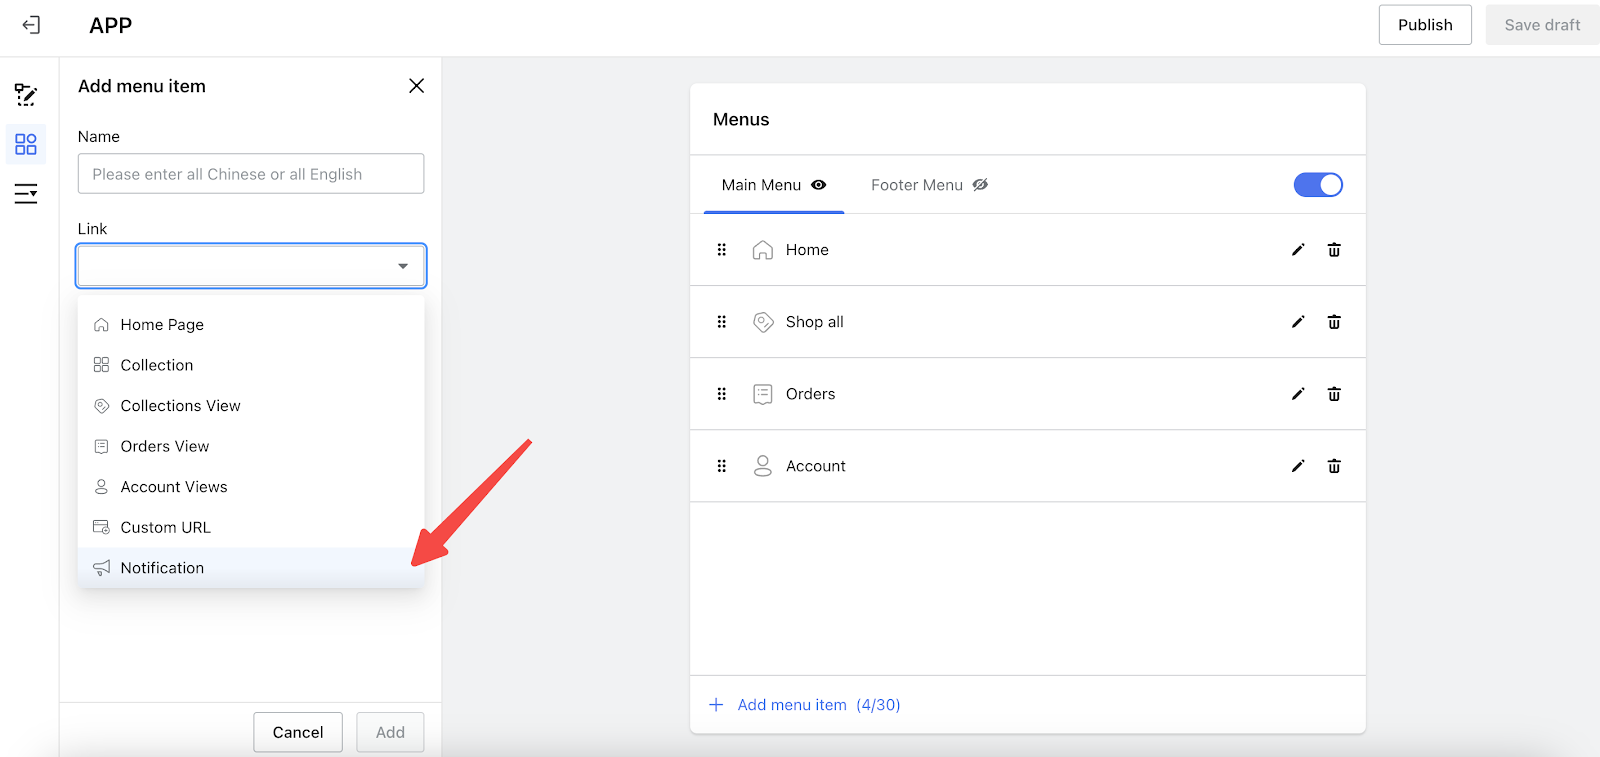
18. Added notification menu update in MoCart app
Usage scenarios:
- The notification menu enables you to view all content related to promoted products and collection pages in one place.
Usage path:
- Navigate to your Shoplazza Admin > Apps > Mocart > App Design > Menu > Add Menu item > Notification link > Click Add.
Function Overview:
- Click on the menu item to begin. Fill in the menu name. Use the link drop-down box to select the notification. Then click Add to save your settings.
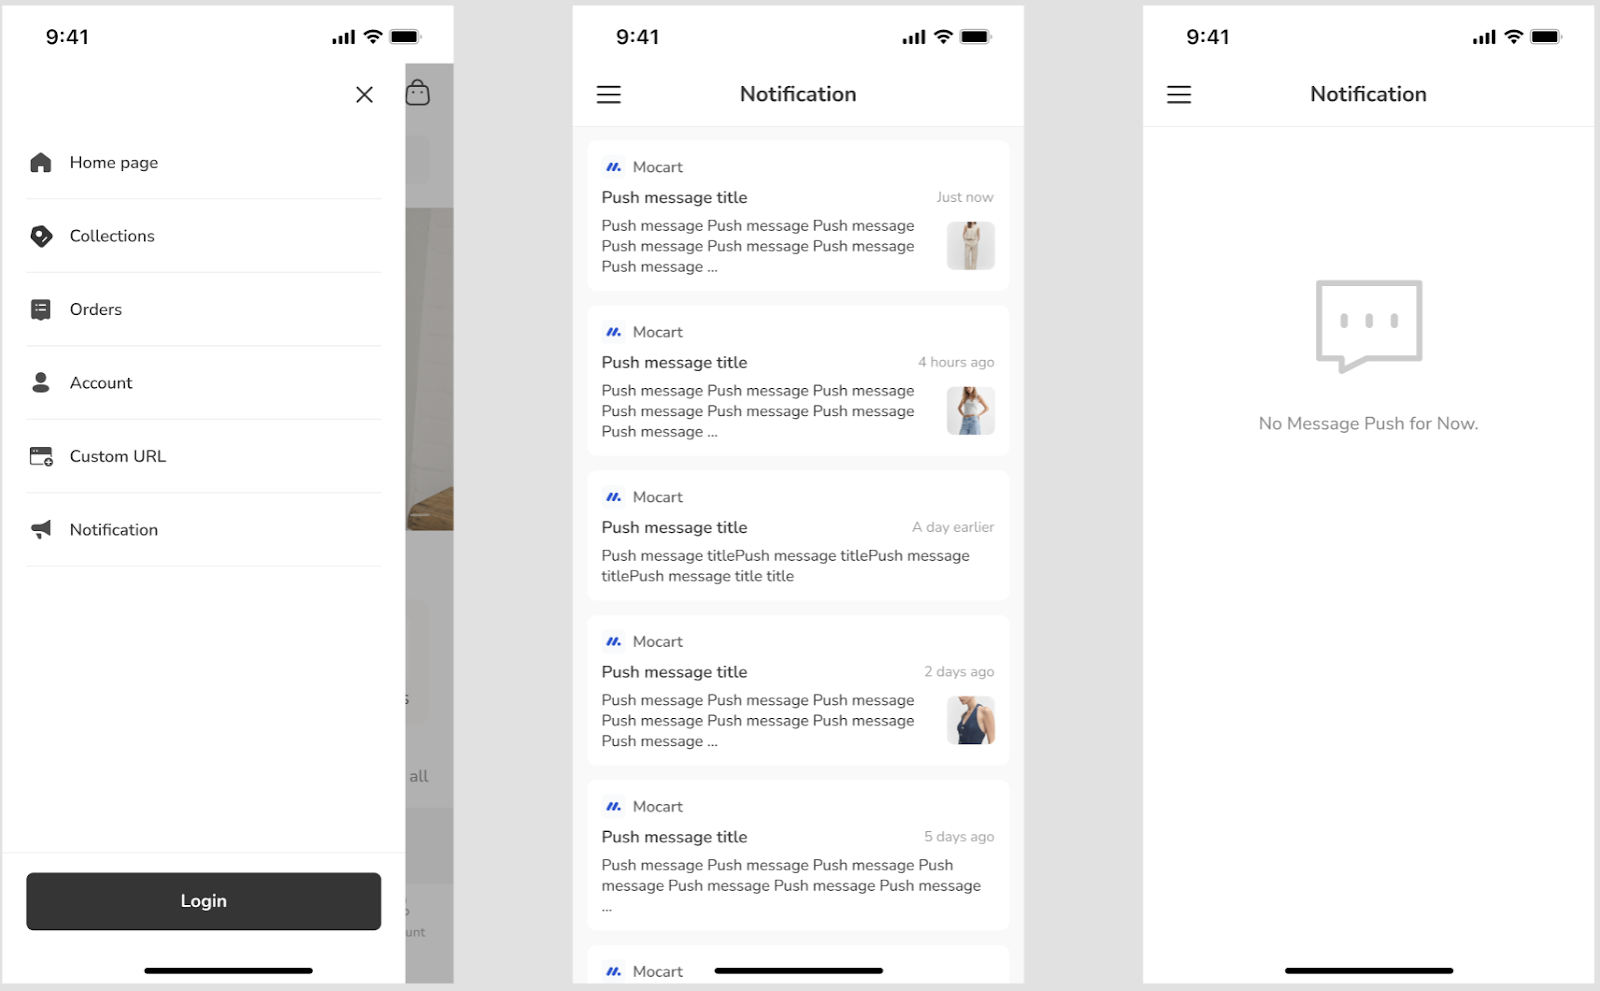
APP Preview
Once you set up the notification menu, it will be visible in the left pop-up window. Click on the notification menu to see the list, where you can choose an article to view details.
19. Hide Product App
This app is designed to hide select products from the general public within your online store. Through special links, you can grant exclusive access to certain products, control visibility, and manage special sales.
Usage scenarios:
- Offering Exclusive Products: Hide products from general view and provide special links to VIP customers for exclusive access.
- Managing Refunds and Exchanges: Make the handling of refunds and exchanges smoother by creating hidden duplicate products at special prices for affected customers to repurchase.
Usage path:
- Navigate to your Shoplazza Admin > Apps > Hide Product .
Function Overview:
- Product Search Options: Locate products to hide based on attributes like Product Name, SKU, Label, and Collections.
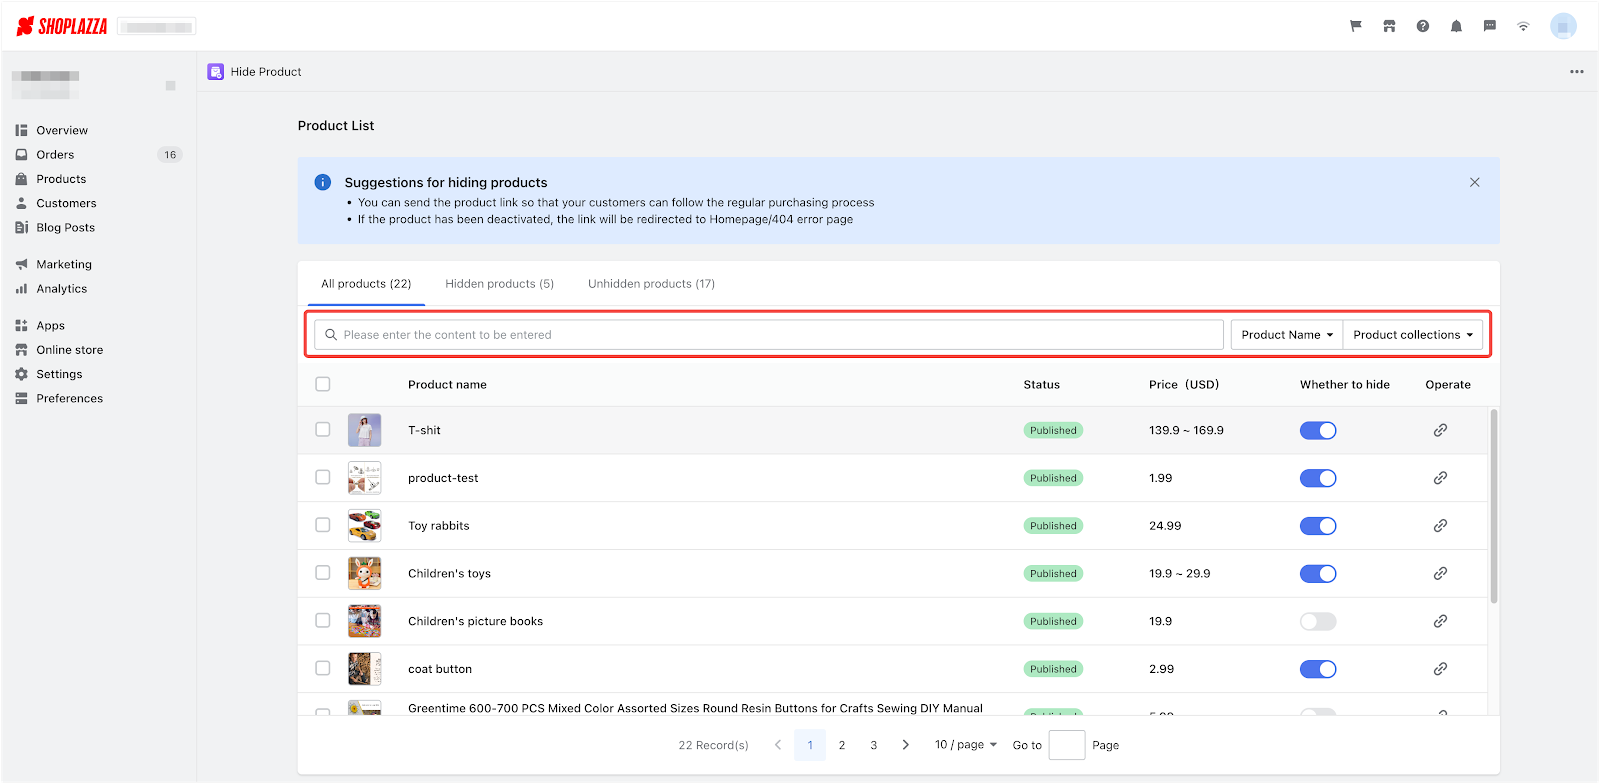
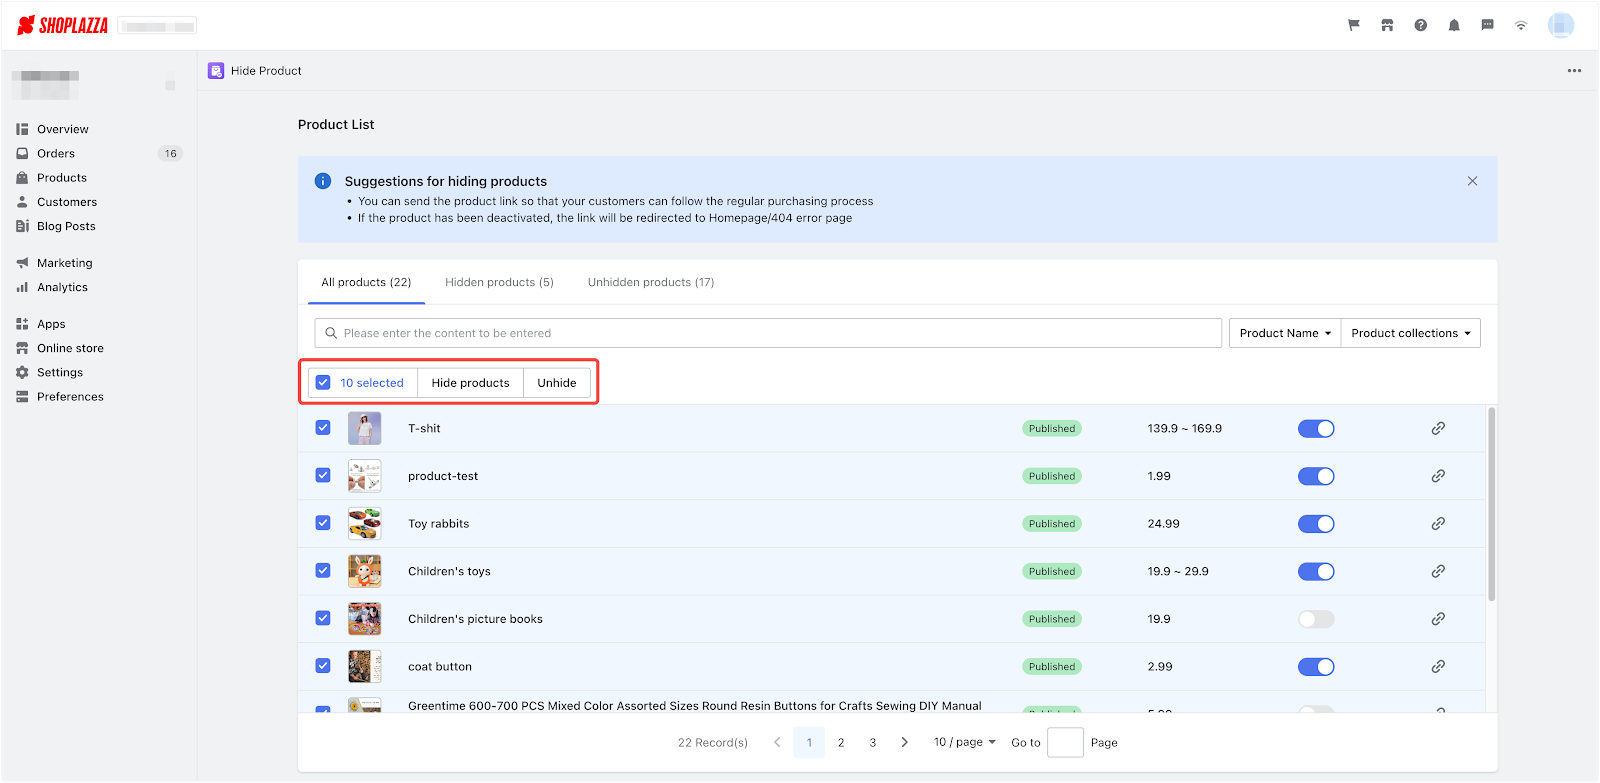
- Toggle Hide Buttons: Choose to enable or disable the hidden status for individual or multiple products.
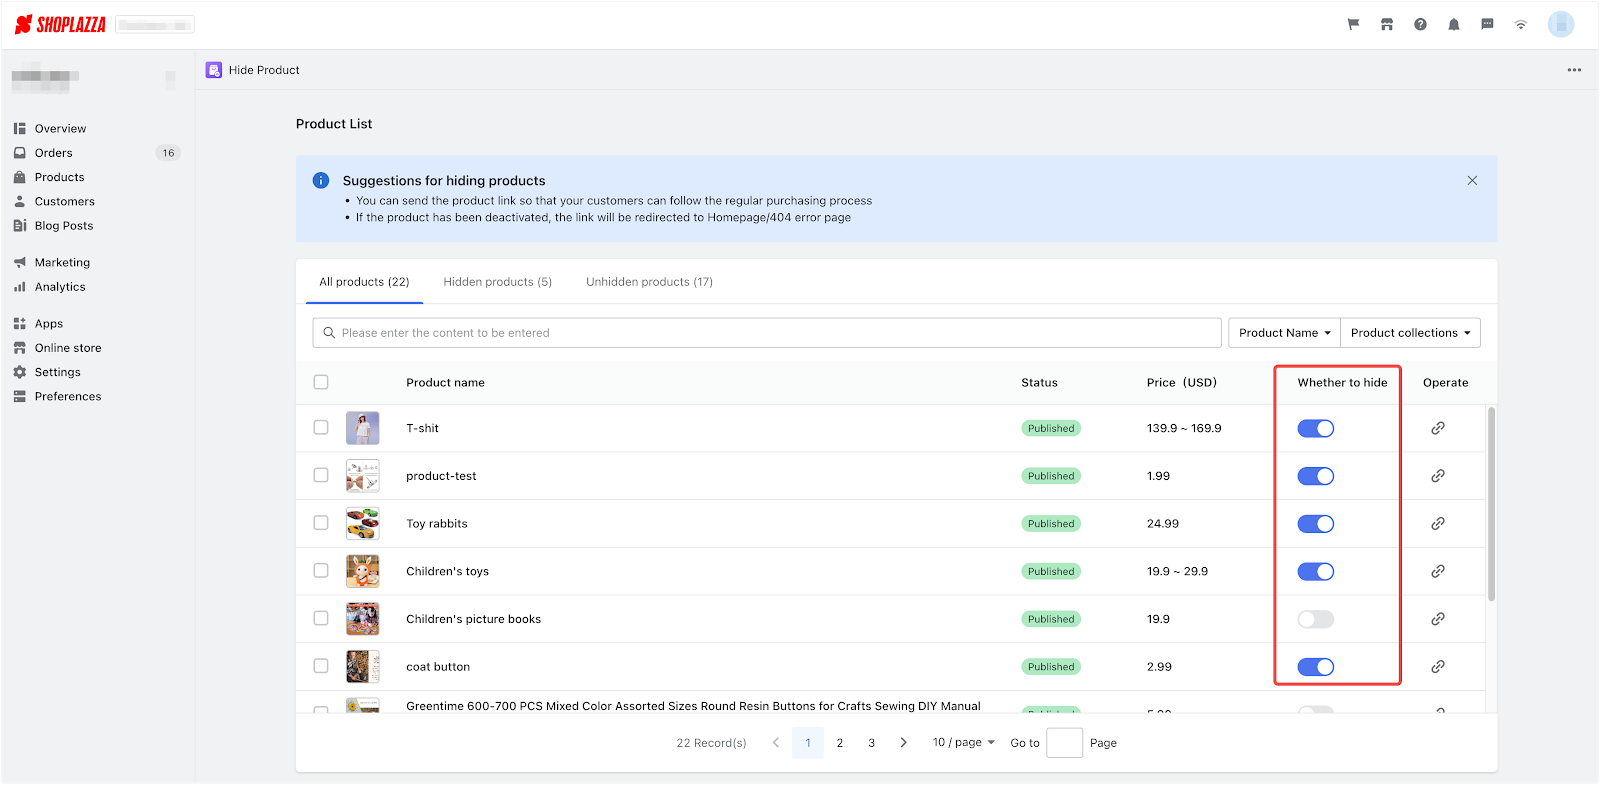
- Product Hiding Feature: When a product is hidden, it won't be visible to the general public but can be accessed by customers with a special link.

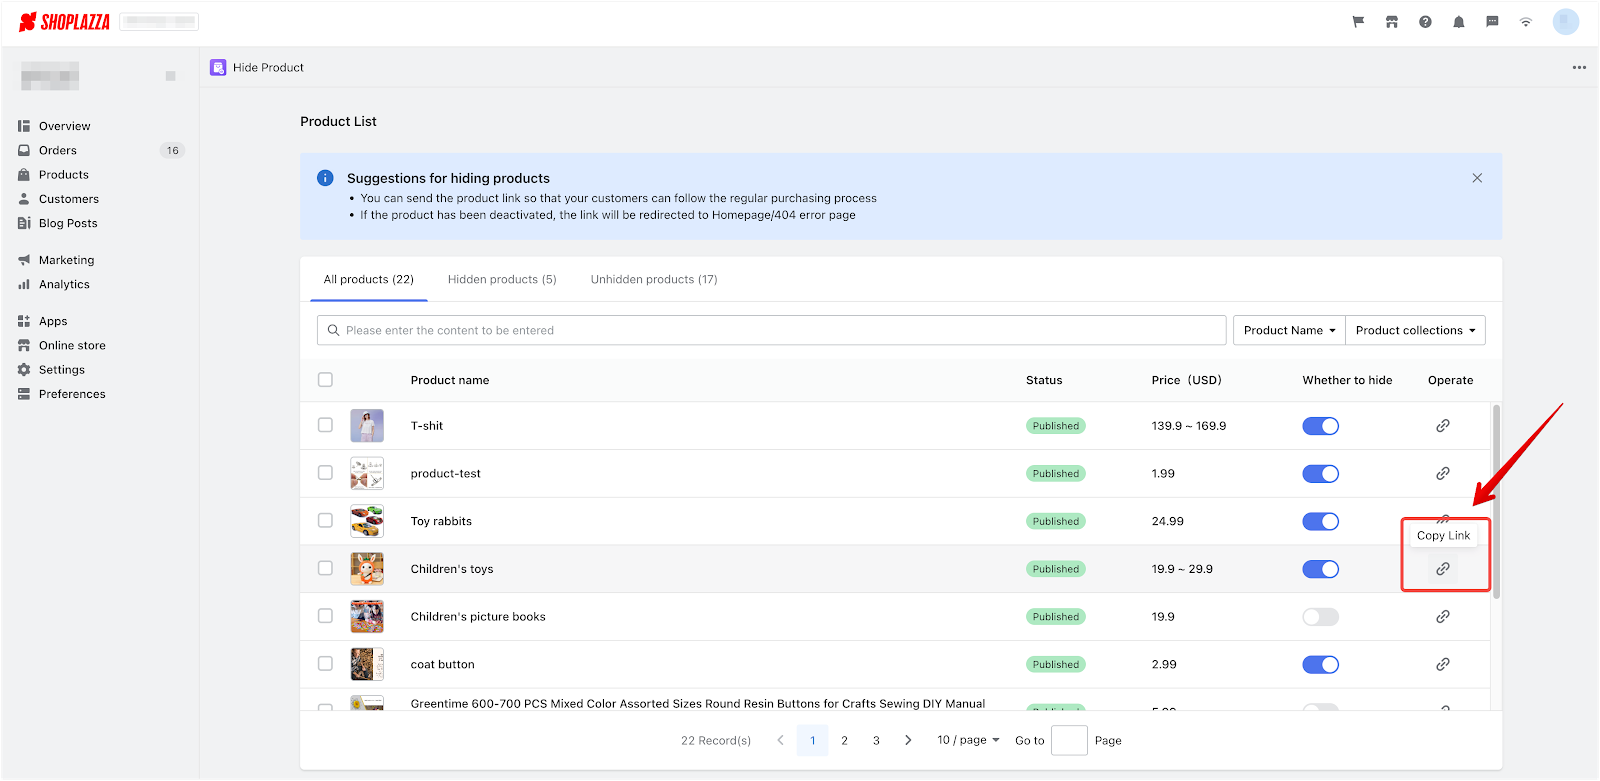
- Promotional Tools: Create and share unique product links with selected customers, allowing them to view and purchase hidden products.
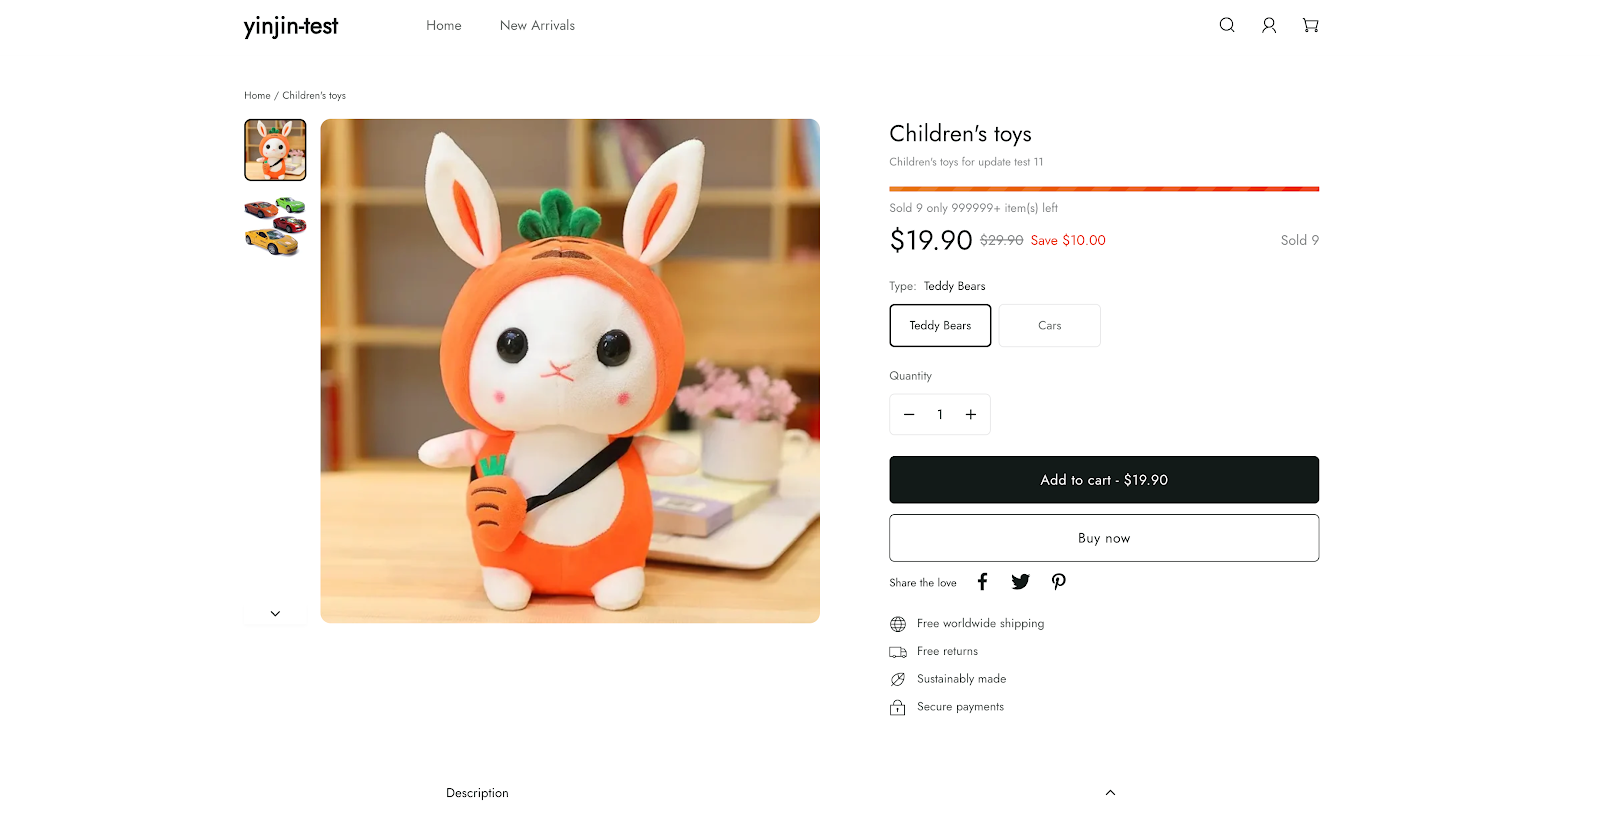
- Inactive Hidden Products: If the hidden products are inactive, those without a special link will see a 404 error page.
Comments
Please sign in to leave a comment.