New features
1. Creating Customer Grouping
2. Checkout Page Settings
3. Custom Payment
4. New addition: Alternative Payment is Now Available for Payermax in the Middle East
5. New addition: Countdown Reminder at Chechout
6. Enhanced Intelligent Product Recommendation tool for Shopping cart page, Order list page and Order details page
7. New Release: Discount for Multiple Payment Methods App
8. Reports Improvements
1. Creating Customer Grouping
Usage Scenarios:
Merchants can pick out customers who fit certain needs by grouping them in various ways. By looking at what these customers have in common, merchants can better understand the customers' needs. After they've sorted their customers into groups, merchants can offer discount codes and special deals to these particular groups. This approach helps them connect with their customers more accurately, leading to an increase in sales.
Usage Path:
1. Navigate to your Shoplazza Admin > Customers to show all the settings.
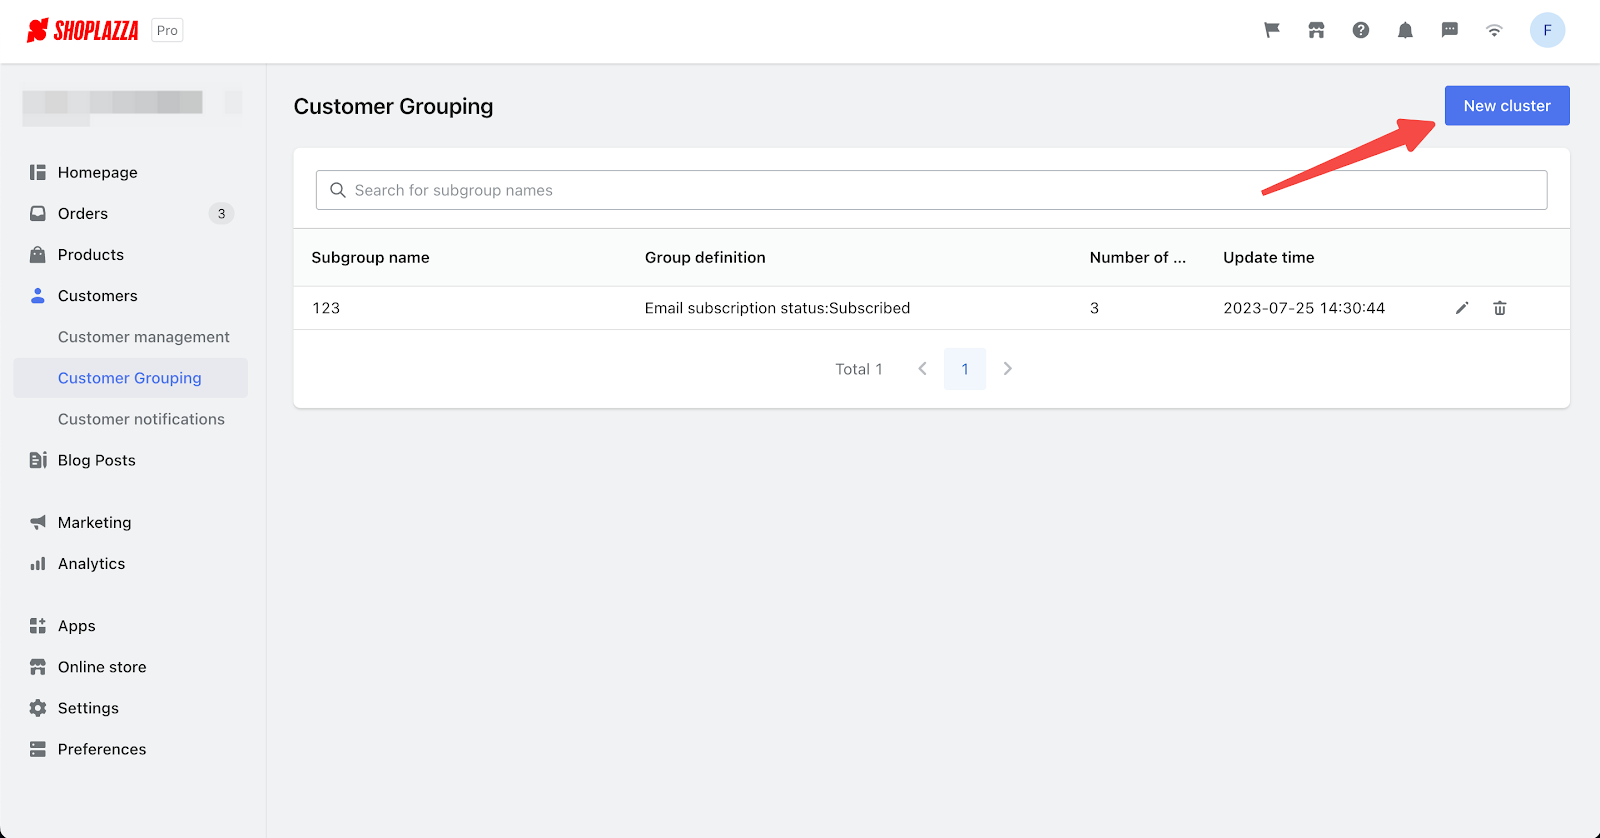
2. Click Customer grouping > New cluster
Feature Overview:
1. Setting up a new cluster:
- Creating names for a group of customers.
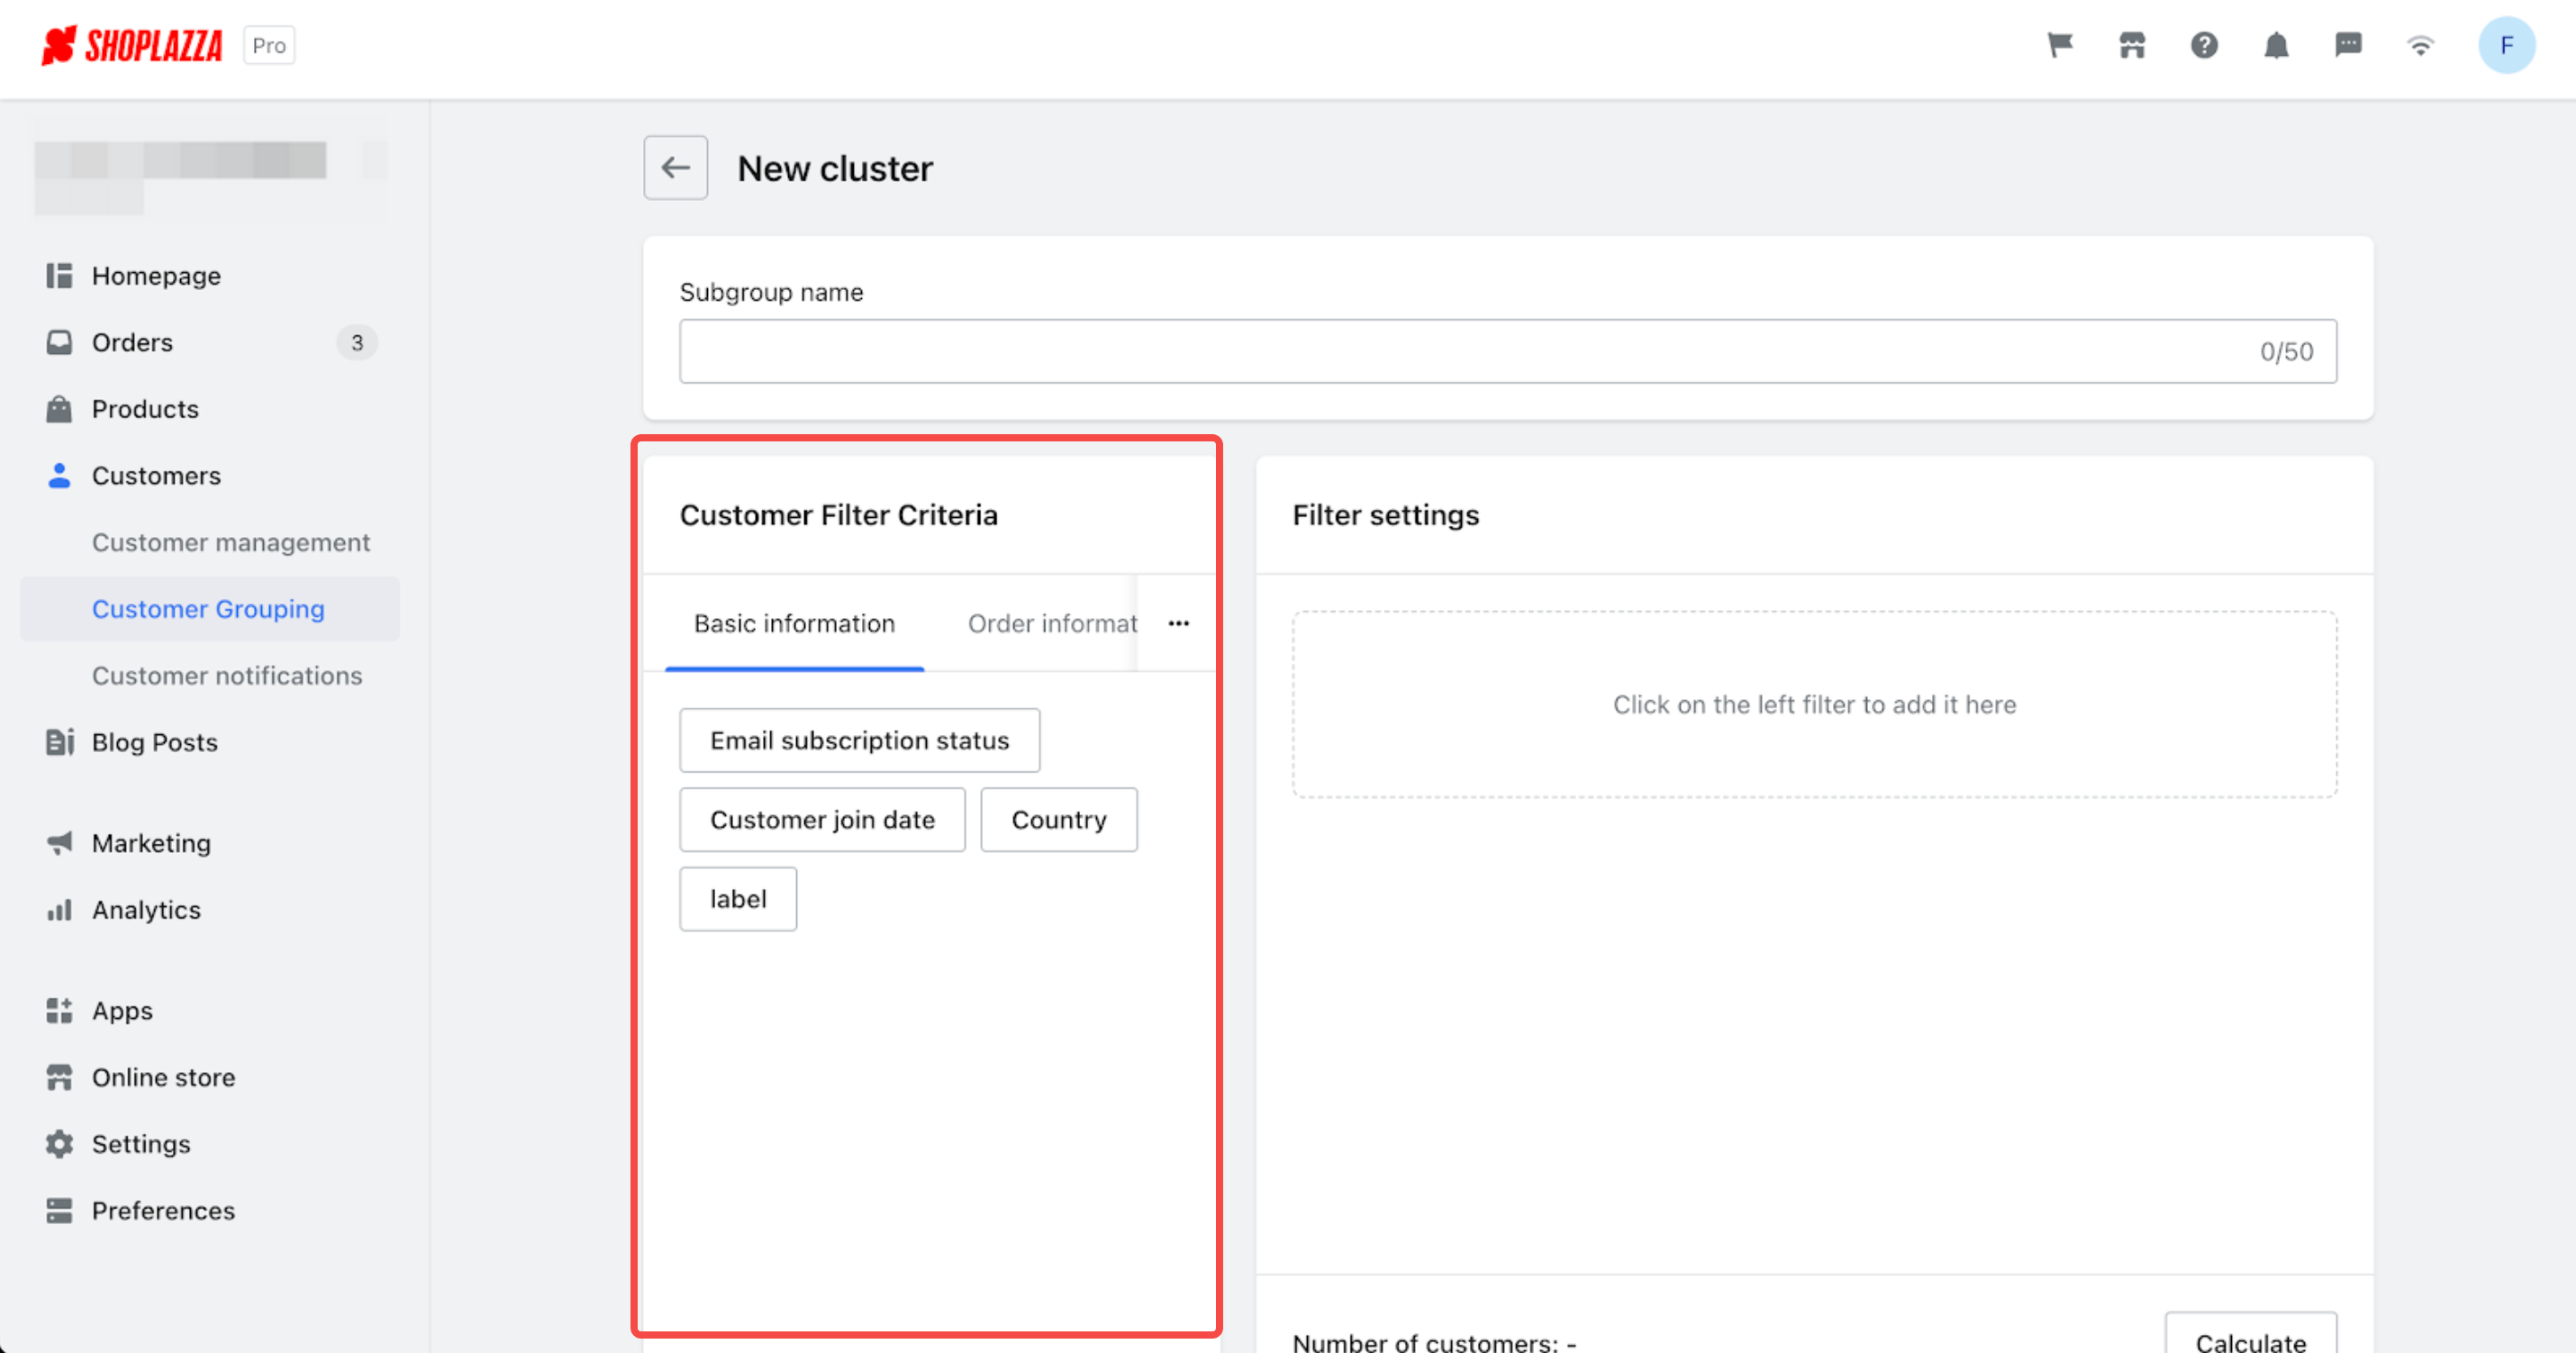
2. Choose filter criteria:
-
- Basic information (Email subscription status, join date, country, and label)
- Order information (Order quantity, cumulative consumption amount, first purchase time, last purchase time, customer unit price, and purchased the specific product)
- Customers' behaviors (Last purchase time, browse and leave, Last viewed time, additional purchase not purchased)
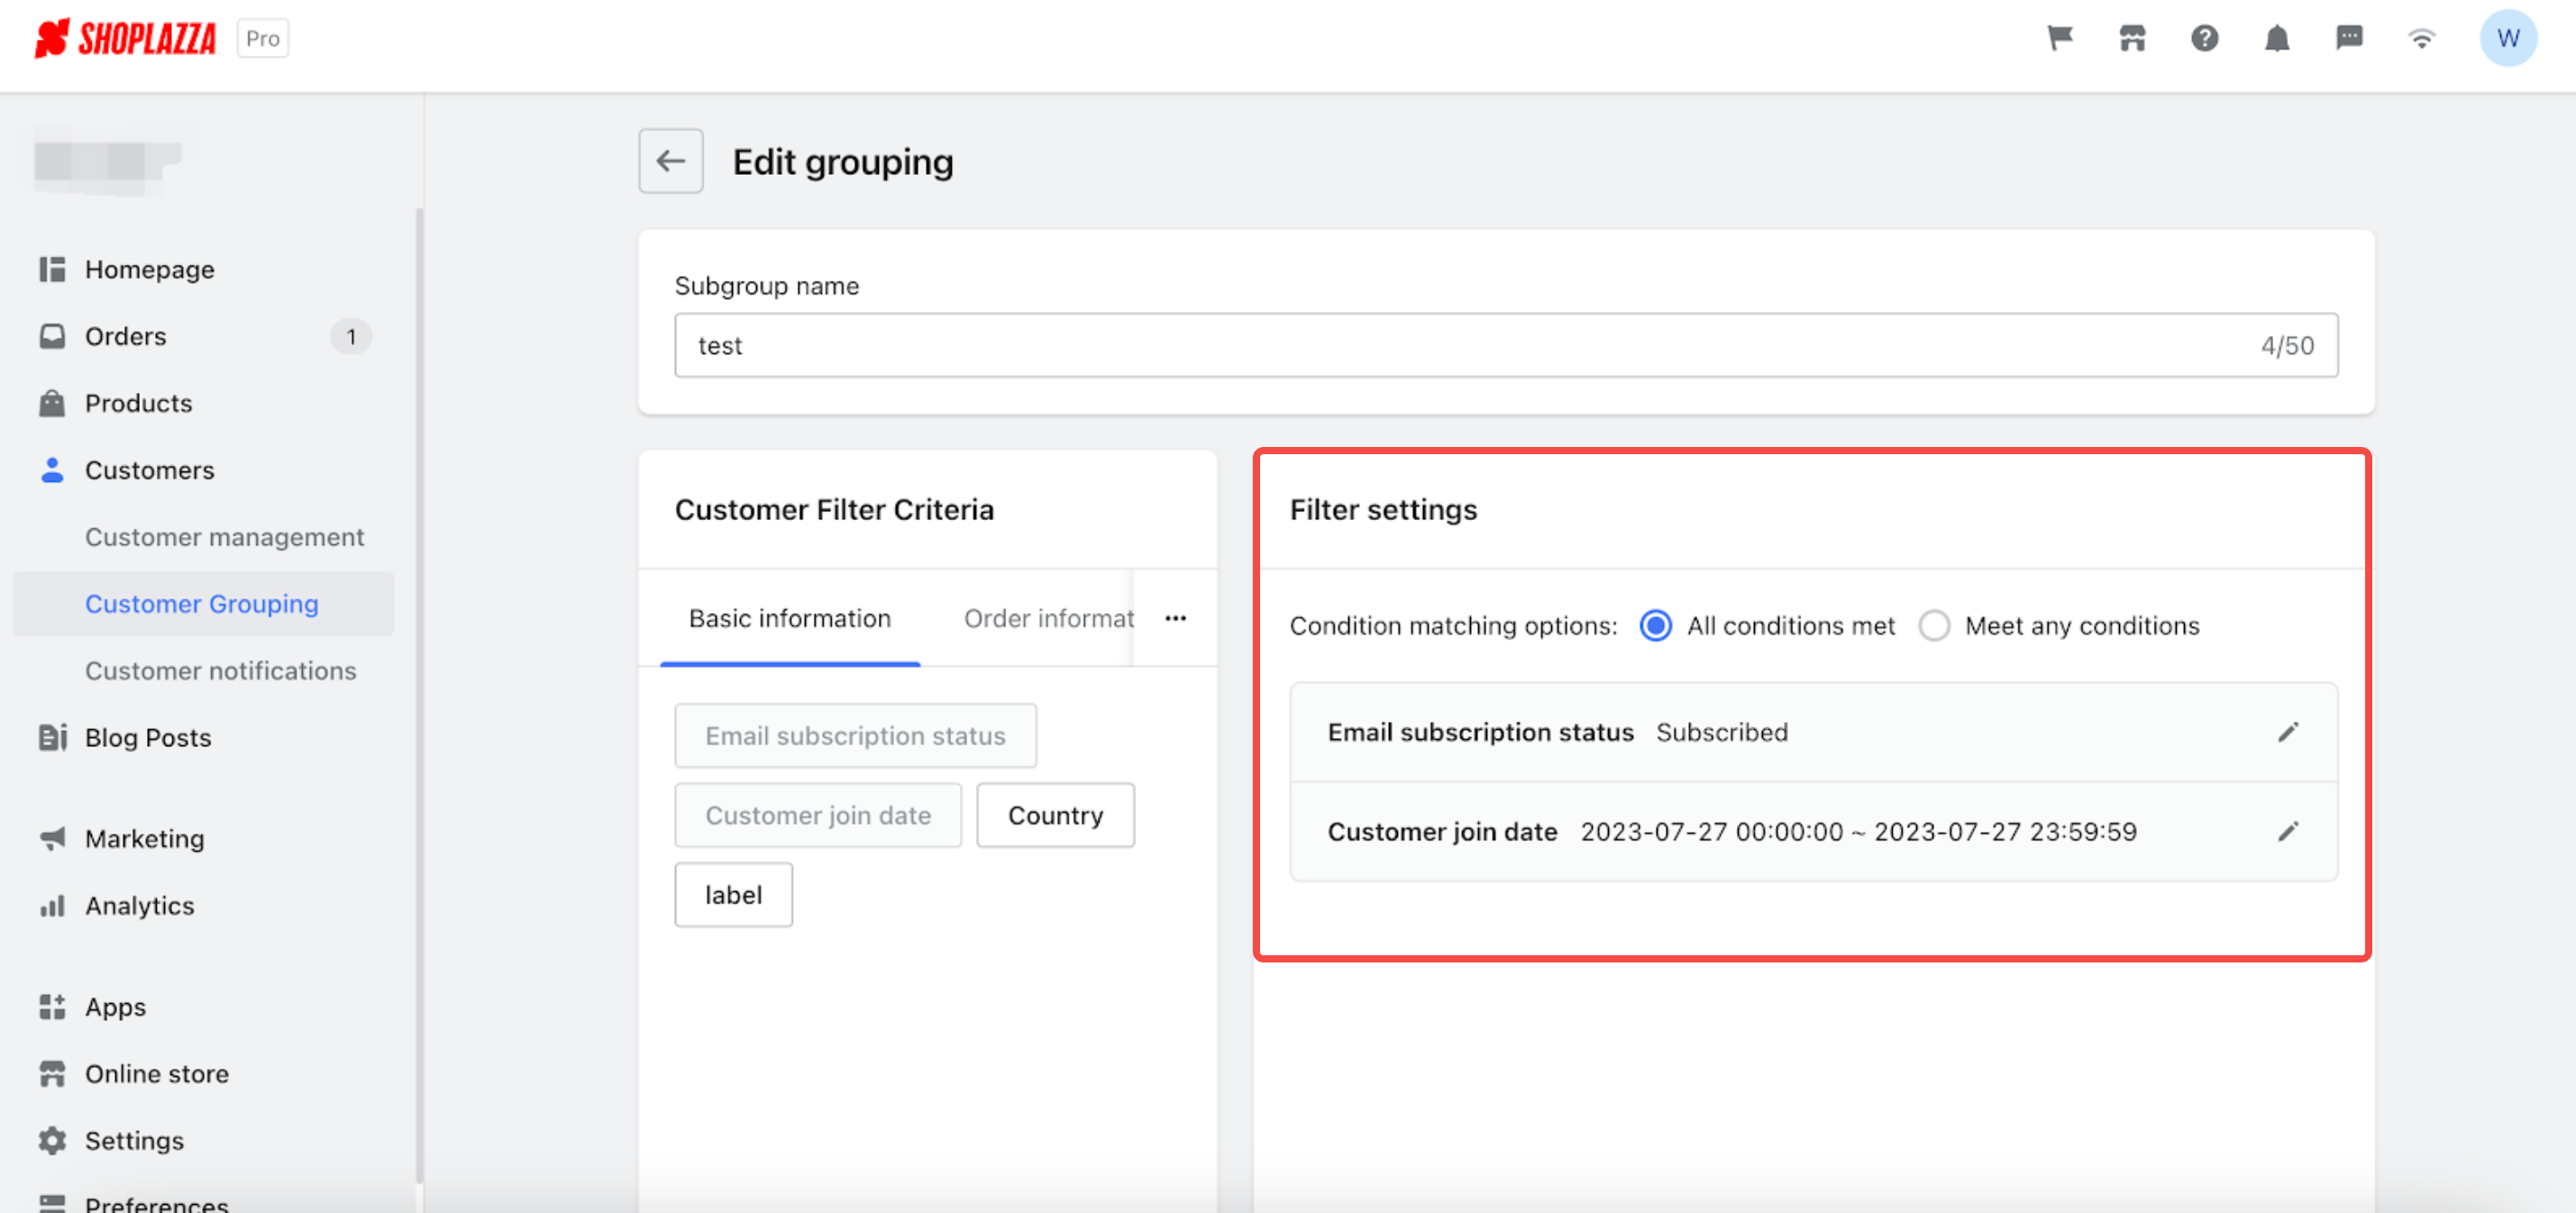
3. Apply conditions.
-
- Meet all conditions: Customers who meet all the conditions selected by the merchant can be filtered out.
- Meet any condition: Customers who meet any one of the conditions selected by the merchant can be filtered out.
- A cluster can support up to ten conditions maximum.
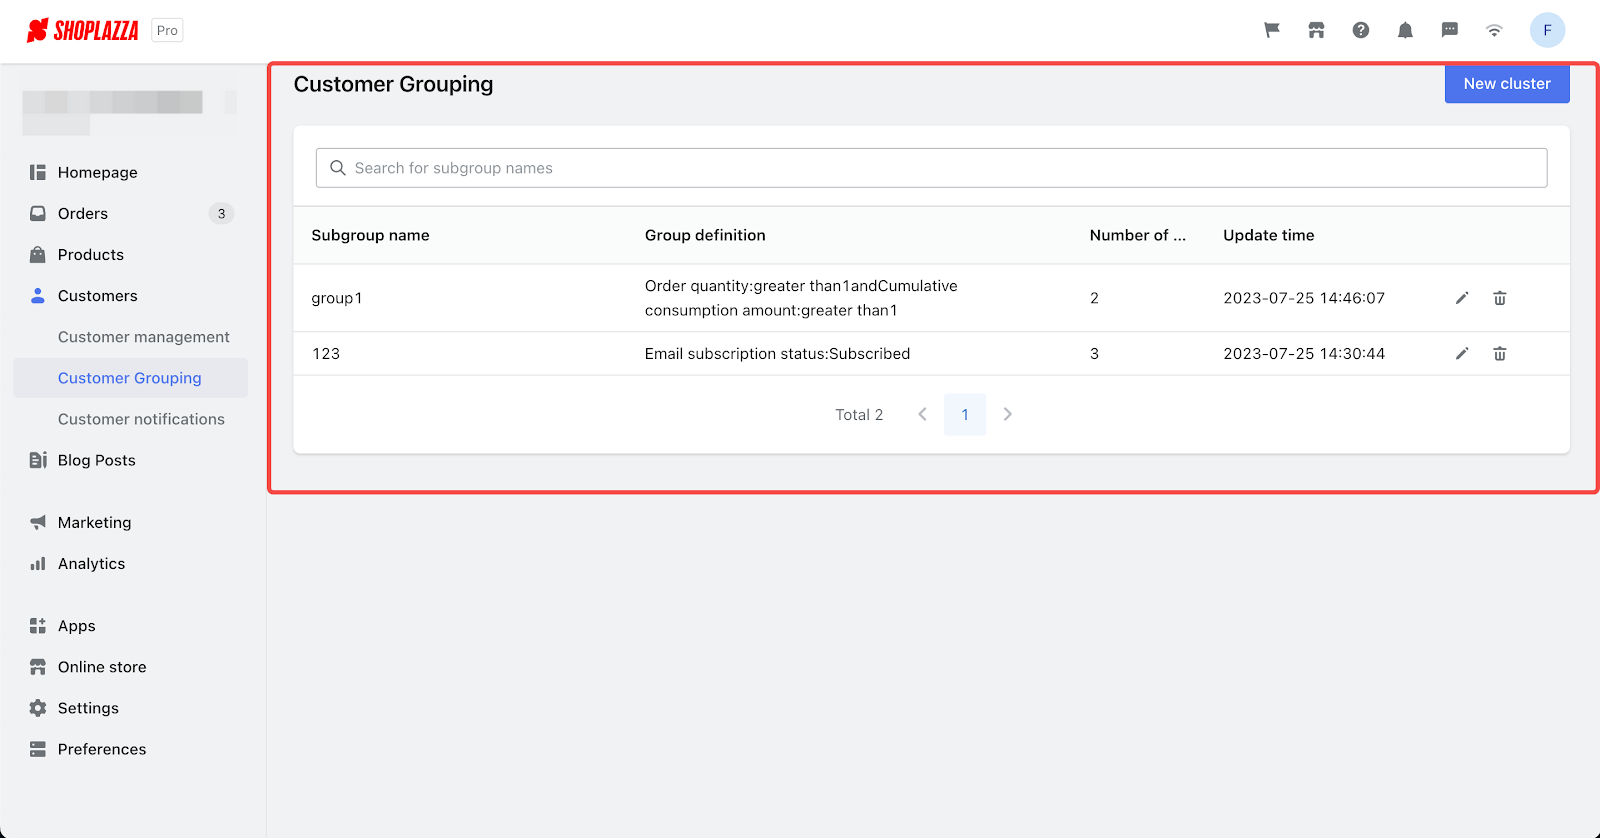
4. Viewing and updating your customer segments:
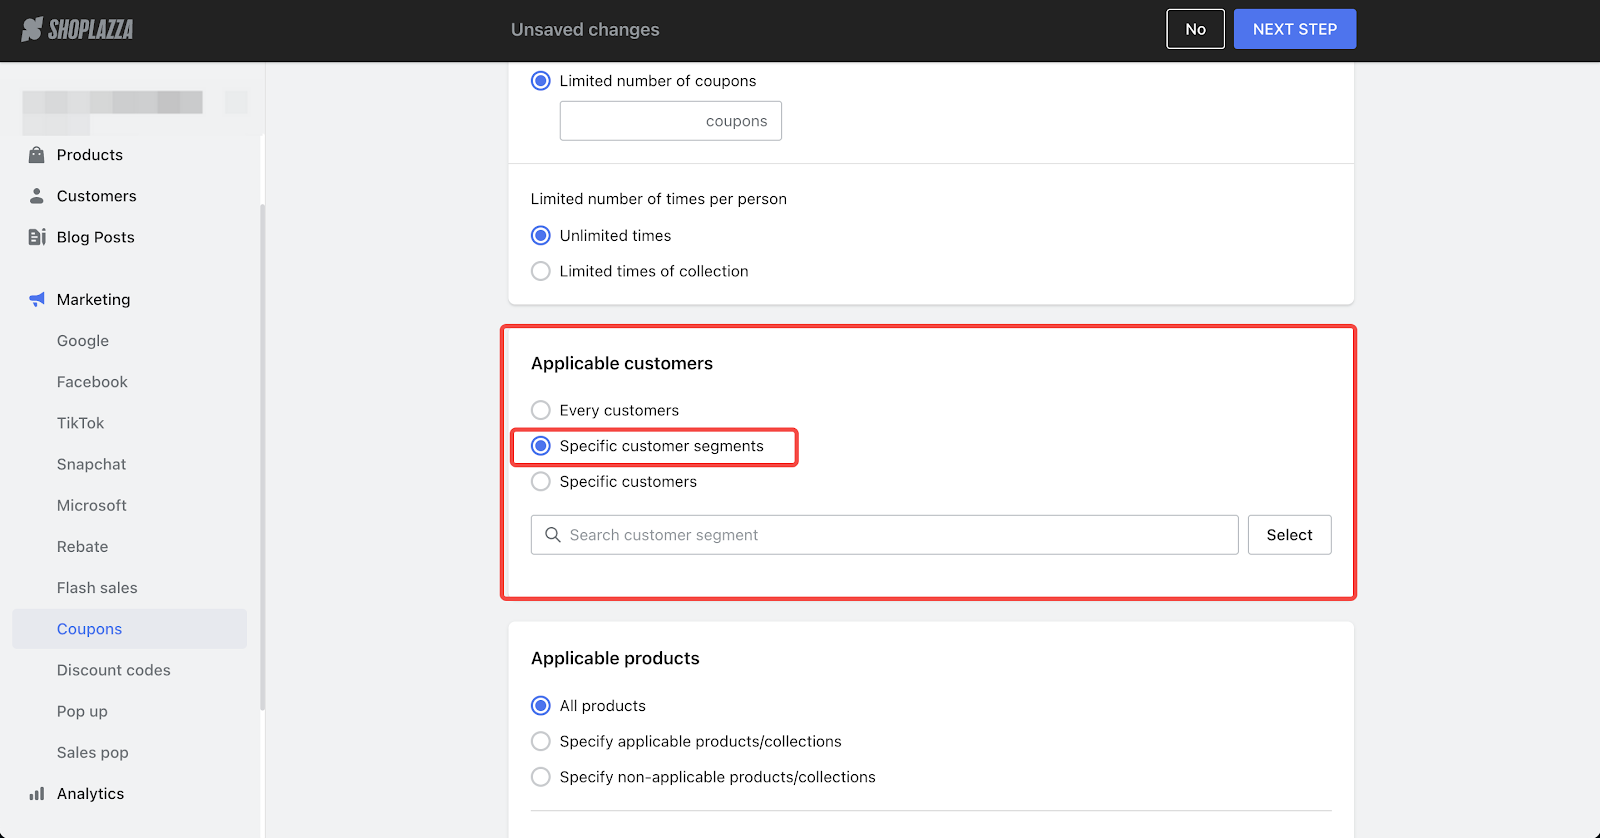
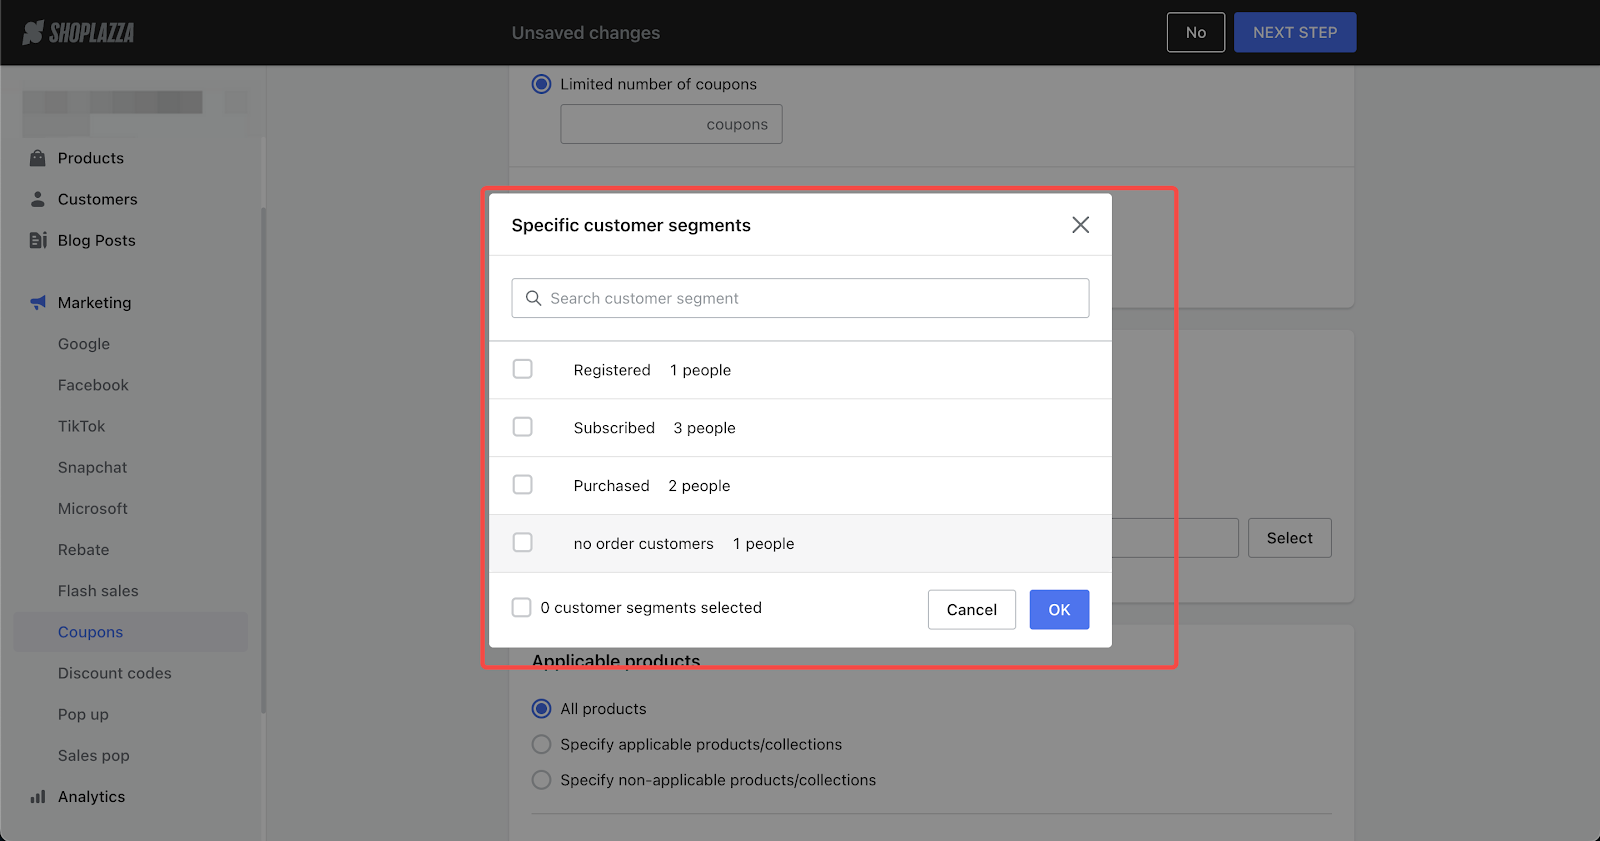
- Instantly See Created Groups: You can easily see all the groups you've made in the customer list.
- Swift Customer Filtering: At the same time, you can quickly filter and sort through all your customers in the customer grouping section.
5. Function name upgrade: Original name of consumers has been changed to customers.
6. When you create coupons and discount codes activities, you can choose specific customer segments that you just created.
2. Checkout Page Settings
Usage scenarios:
- When you need to edit the required fields and requirements for the delivery address on the checkout page
Feature Overview:
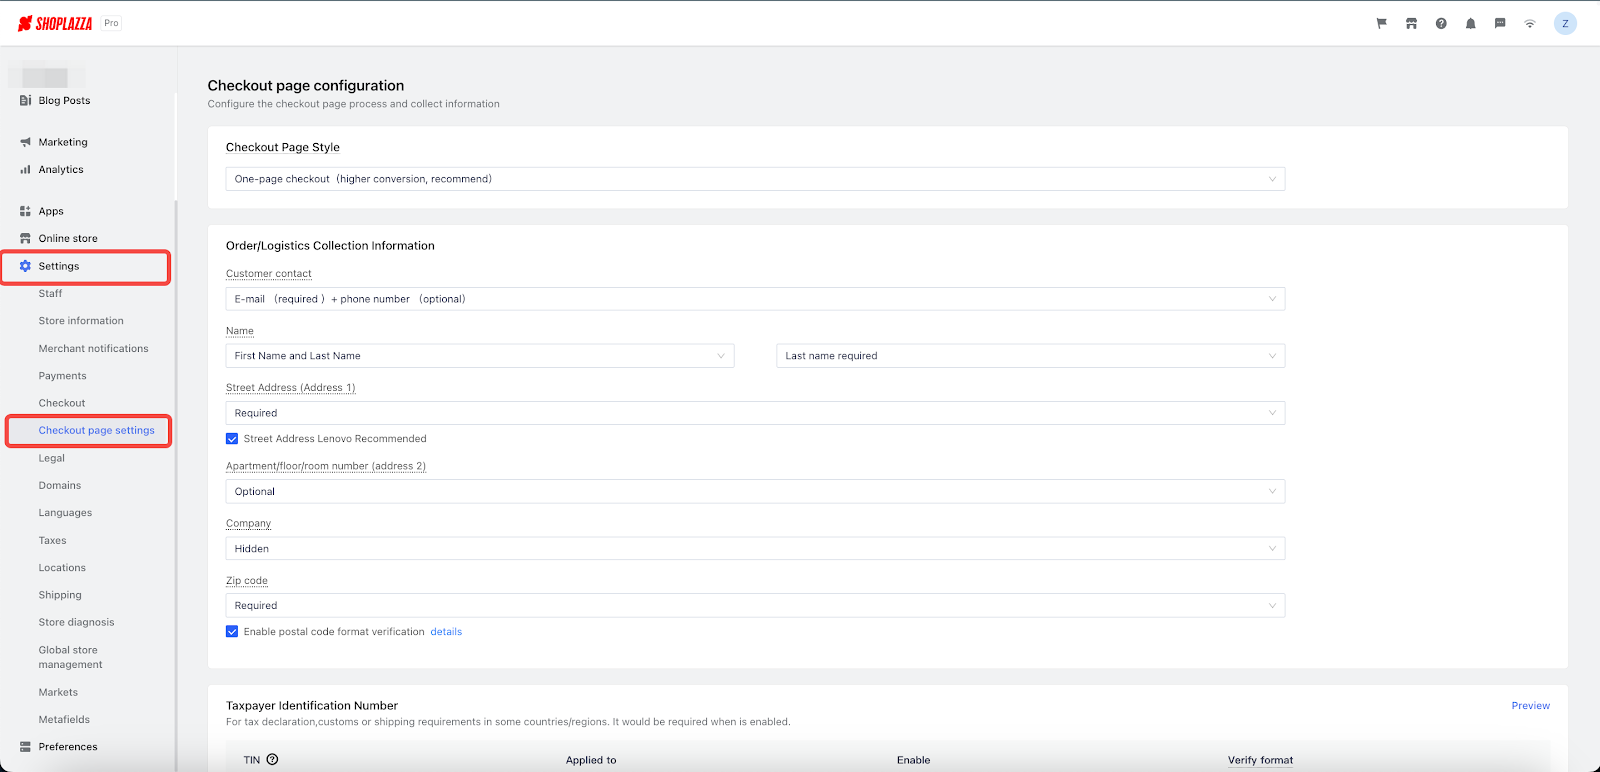
- We've separated the 'Checkout Page' settings from the 'Checkout' settings, giving it its own dedicated page, 'Checkout Page Settings'.
- Under the Order/Logistics Collection Information section, you can now set whether the Street Address is optional or mandatory and set different rules for filling out the Zip code based on the country.
- We've updated the way zip code checking works:
- By default, this feature is disabled. However, if you enable it, the system will check the format of the zip code for any country where you've set the zip code as a "required field".
- For orders the delivery address is in the UK, the system will automatically verify the postcode.
- How to activate the Post code/zip validation
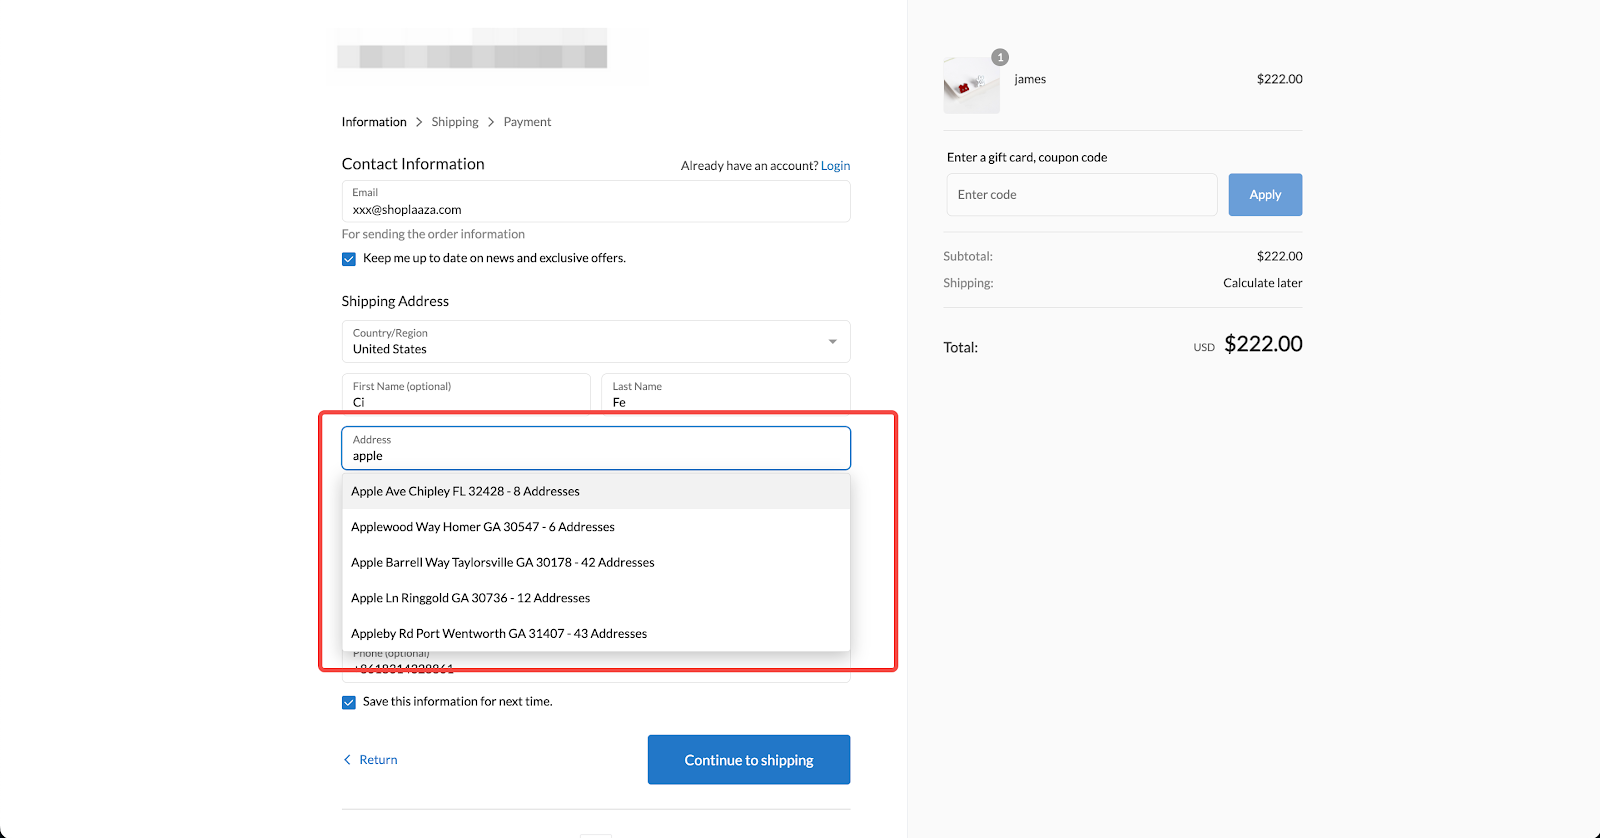
- Add the "Autocomplete Address" feature, also known as "Street Address Lenovo Recommended", which is enabled by default for your convenience.
Usage Path:
- Navigate to your Shoplazza Admin > Settings > Checkout page configuration.
3. Custom Payment
Usage scenarios:
Previously, the Cash on Delivery (COD) payment function was restricted to cash payments, and was labeled as "cash on delivery" on the checkout page. This posed a significant limitation, especially for merchants whose primary focus is COD transactions, as they couldn't add other types of COD payment methods.
In recognizing these limitations, we've significantly upgraded our COD feature. Merchants now have the flexibility to customize their payment methods to better reflect the diversity of their transactions, which could include Bank Transfers, Bank Deposits, and more. This important upgrade allows merchants to rename payment methods as per their needs and also supports the activation of multiple custom payment methods at the same time. With these improvements, we aim to accommodate the unique needs of each merchant and offer a variety of payment options for their customers.
Usage Path:
Navigate to your Shoplazza Admin > Settings > Payments. Then click on "Add payment provider". From there, under the "search by payment methods" tab, search for COD and select. Once selected, click Activate

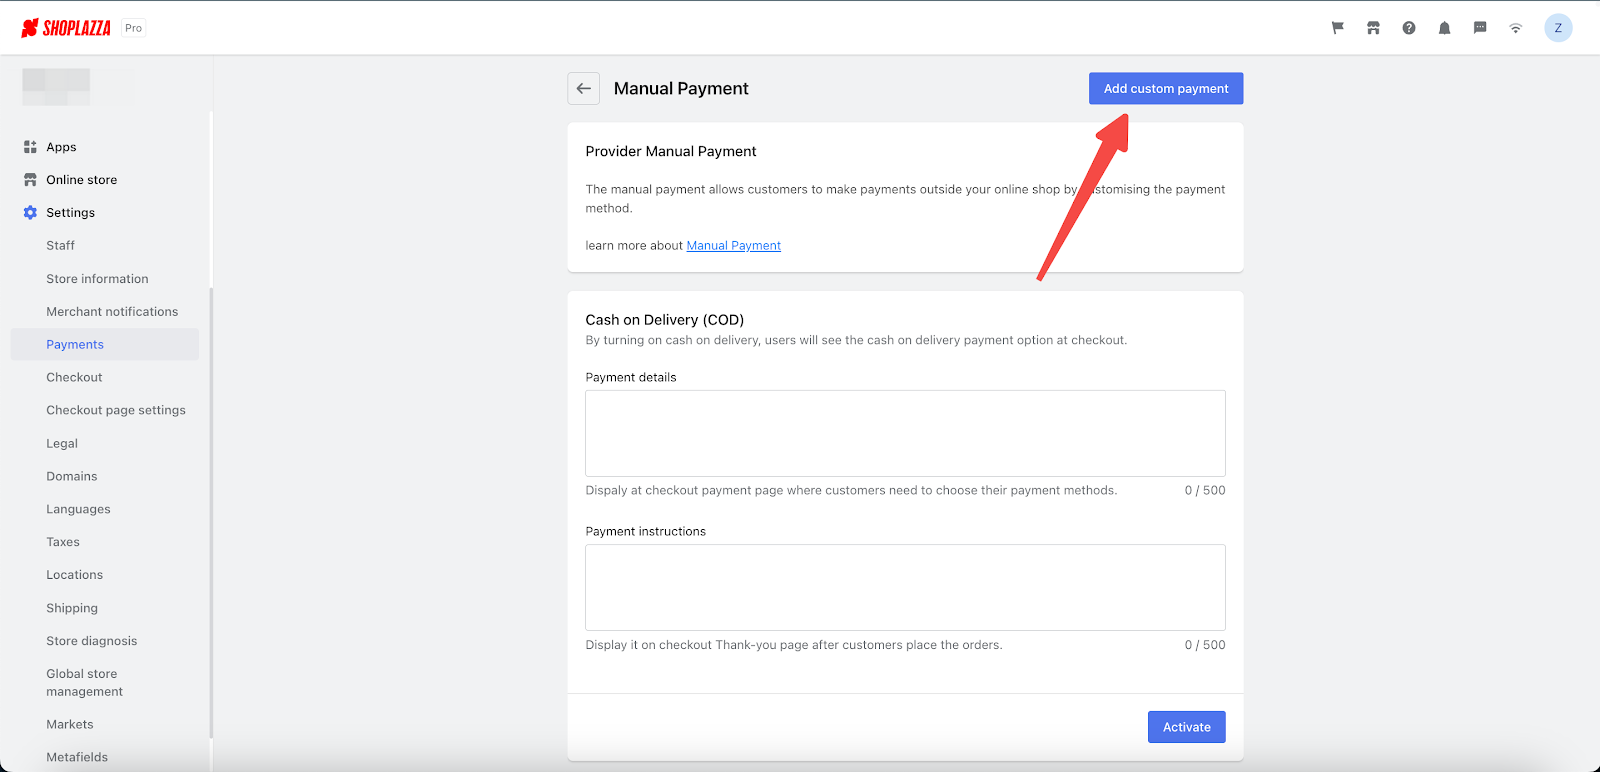
Feature Overview:
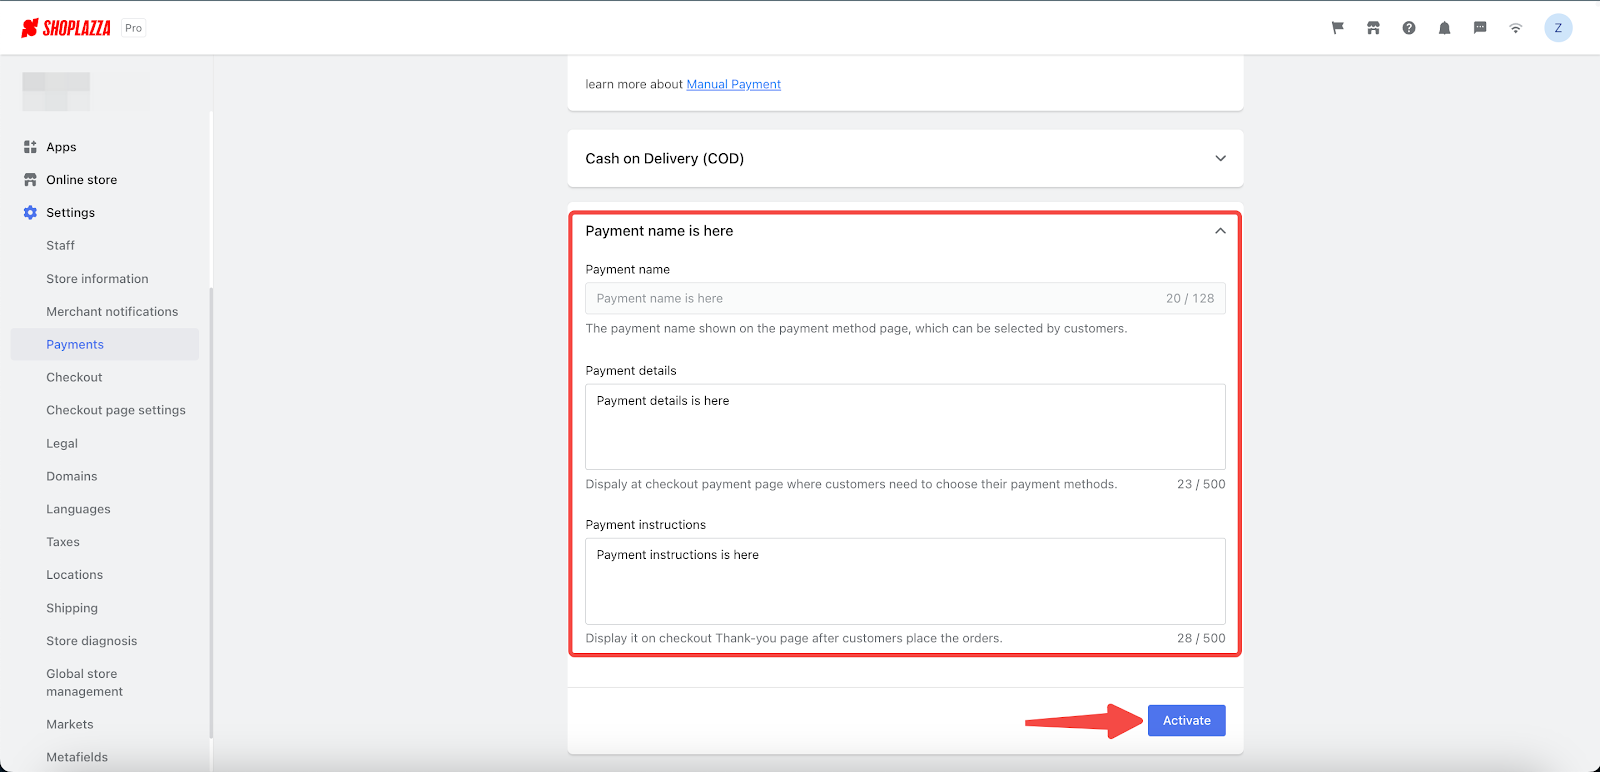
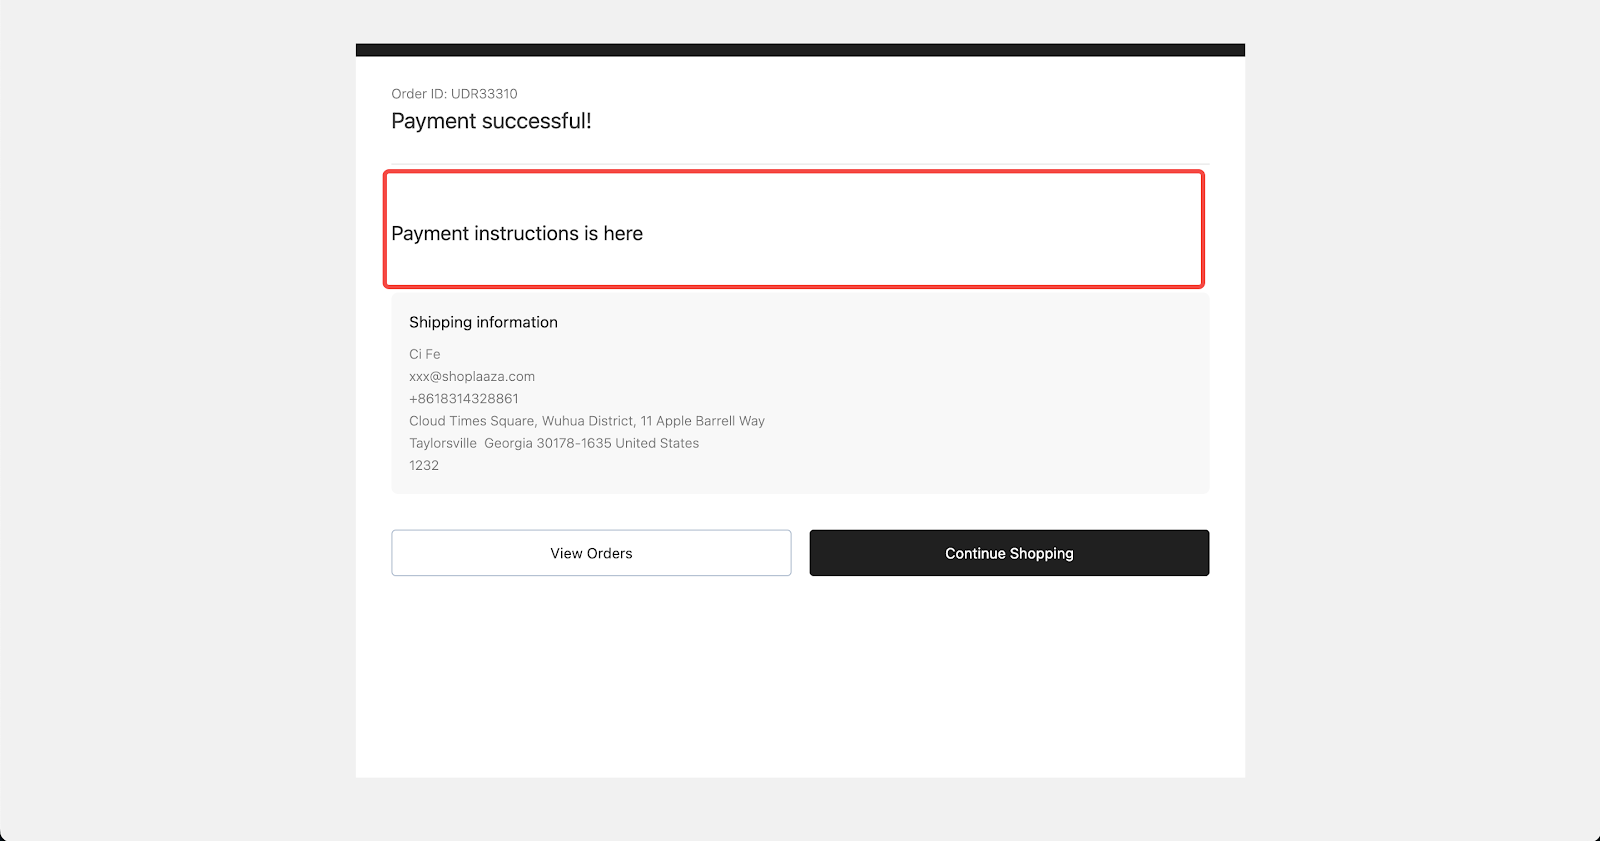
1. After adding a new custom payment. Fill in the payment name, payment details, payment instructions. Click the Activate button at the bottom right of the page to save your setting.
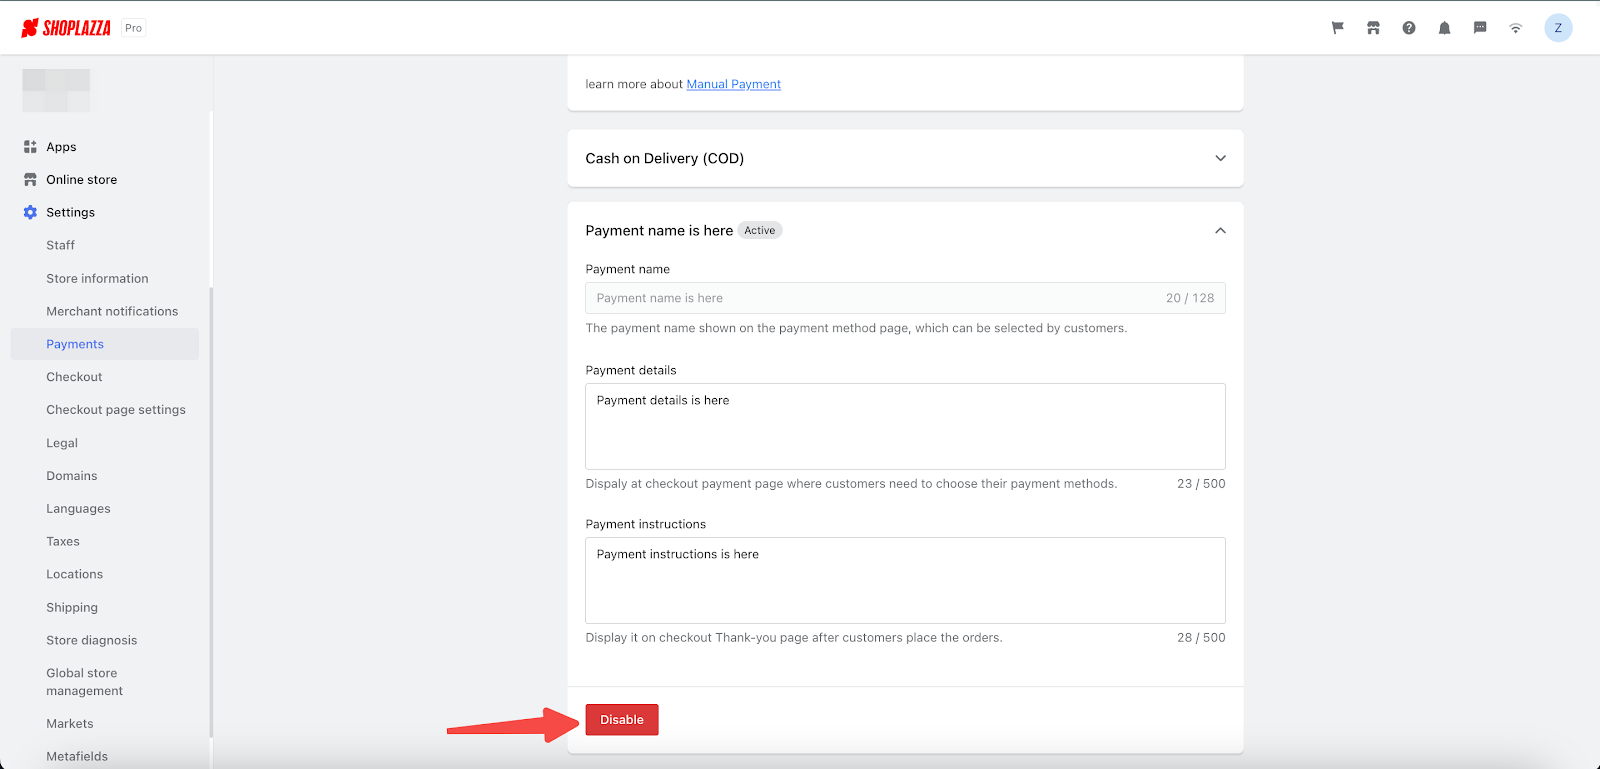
2. You can disable this payment method by clicking the Disable Button.
- The payment method name and payment details you configured will be displayed in the payment method selection on the customer end.
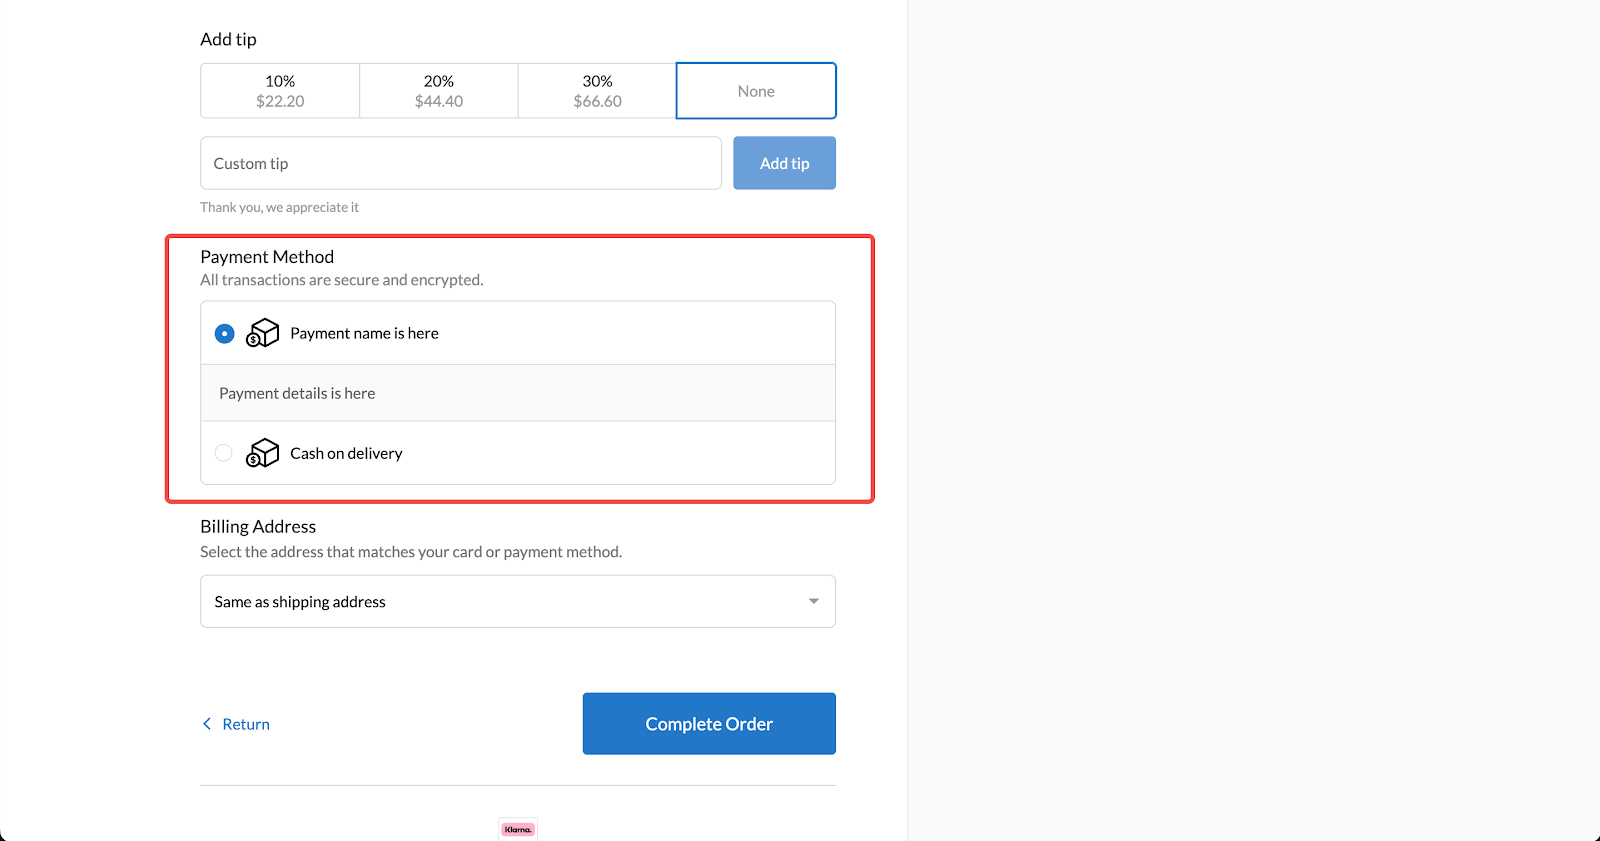
- The payment instruction will be displayed on the Thanks page after payment is completed.
4. New addition: Alternative Payment is Now Available for Payermax in the Middle East
Usage scenarios:
Payermax, a premier payment service provider, delivers access to the most popular local payment methods within the Middle East. By enhancing the variety of payment options available for online stores in this region, this payment method significantly expands the scope of your stores' online payment capacities.
Feature Overview:
The latest local payment methods that Payermax has now integrated into its system are as follows:
| Payment method | Country | Supported currency |
|
Credit & Debit Card Supported local card brands: Benefit-, Knet, Mada, Troy, NAPS |
United Arab Emirates, Bahrain, Kuwait, Saudi Arabia, Qatar, Oman, Egypt, Turkey, Morocco, Jordan, Yemen, Iraq | AED, BHD, KWD, SAR, QAR, OMR, EGP, TRY, MAD, JOD, USD |
| Apple Pay | United Arab Emirates, Bahrain, Kuwait, Saudi Arabia, Qatar, Jordan | AED, BHD, KWD, SAR, QAR, JOD |
|
Fawry Offline non-bank outlets, retail stores/ATMs/mobile payments. |
Egypt | EGP |
|
E-Wallet Vodafone, Etisalat以, Orange, PhoneCash, QaharaCash etc. |
Egypt | EGP |
|
Aman/Masary ATMs |
Egypt | EGP |
|
Bank Transfer Halkbank, Isbank, AkBank, DenizBank etc. |
Turkey | TRY |
|
Ininal prepaid card |
Turkey | TRY |
|
GPay E-wallet |
Turkey | TRY |
|
BKM Express E-wallet |
Turkey | TRY |
|
Papara E-wallet |
Turkey | TRY |
Usage Path:
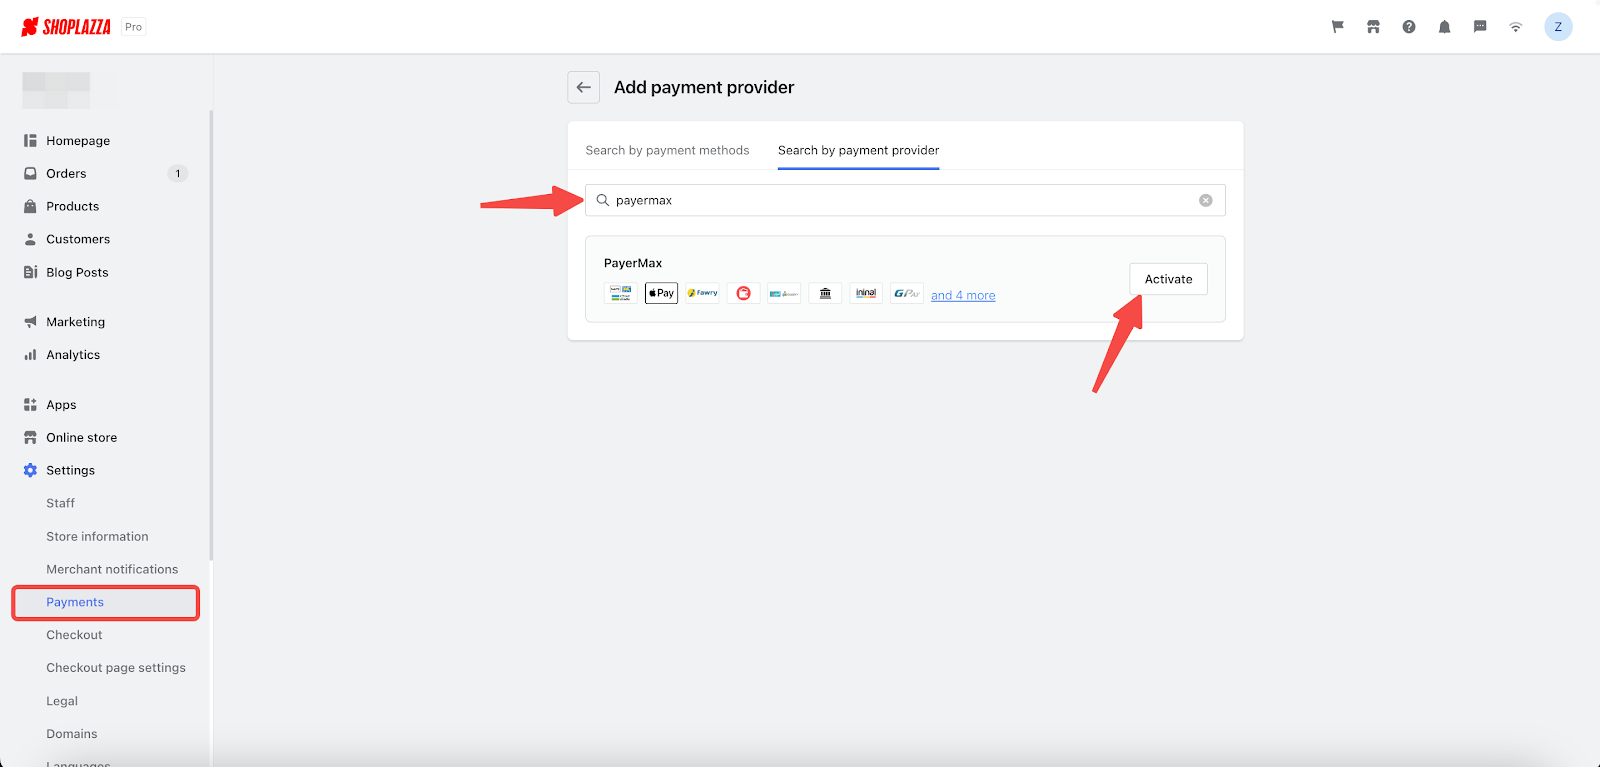
1. Navigate to your Shoplazza Admin > Settings > Payments > Click Add payment provider.

2. To activate Payermax, simply enter 'Payermax' into the search box under the payment provider section and then click on 'Activate'.
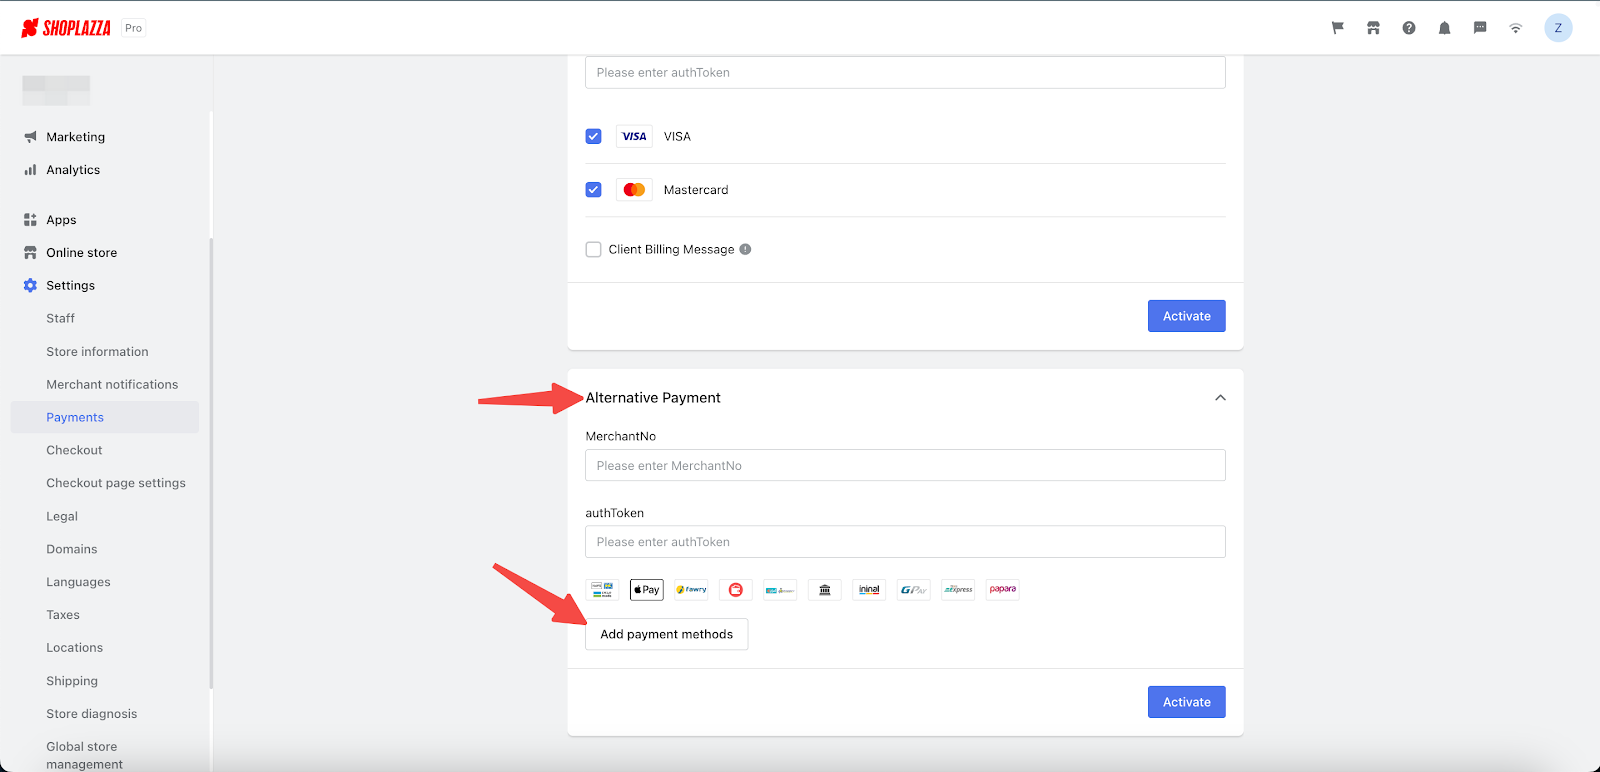
3. Navigate to the alternative payment section. Enter the MerchantNo and authToken, then click Add payment methods.
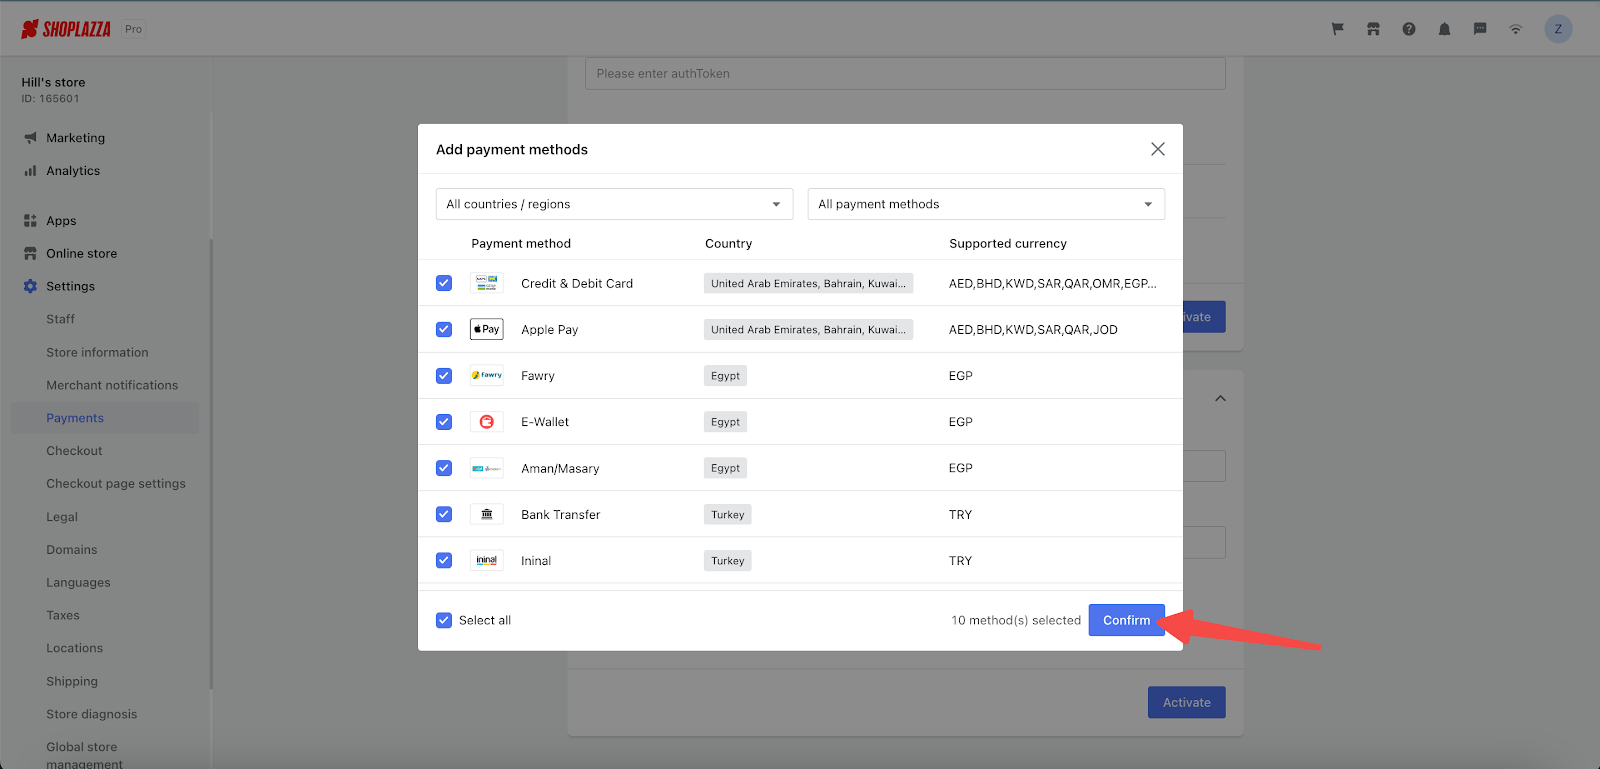
4. Choose the payment method that best suits your requirements. Once you have completed your selection, click 'Confirm' to finalize the process.
5. New addition: Countdown Reminder at Chechout
Usage scenarios:
Adding a countdown reminder for orders at checkout can create a sense of urgency and encourage customers to complete their purchase quickly. This can motivate customers to make a decision and finalize their purchase before the timer runs out, increasing conversion rates and reducing cart abandonment.
Features overview:
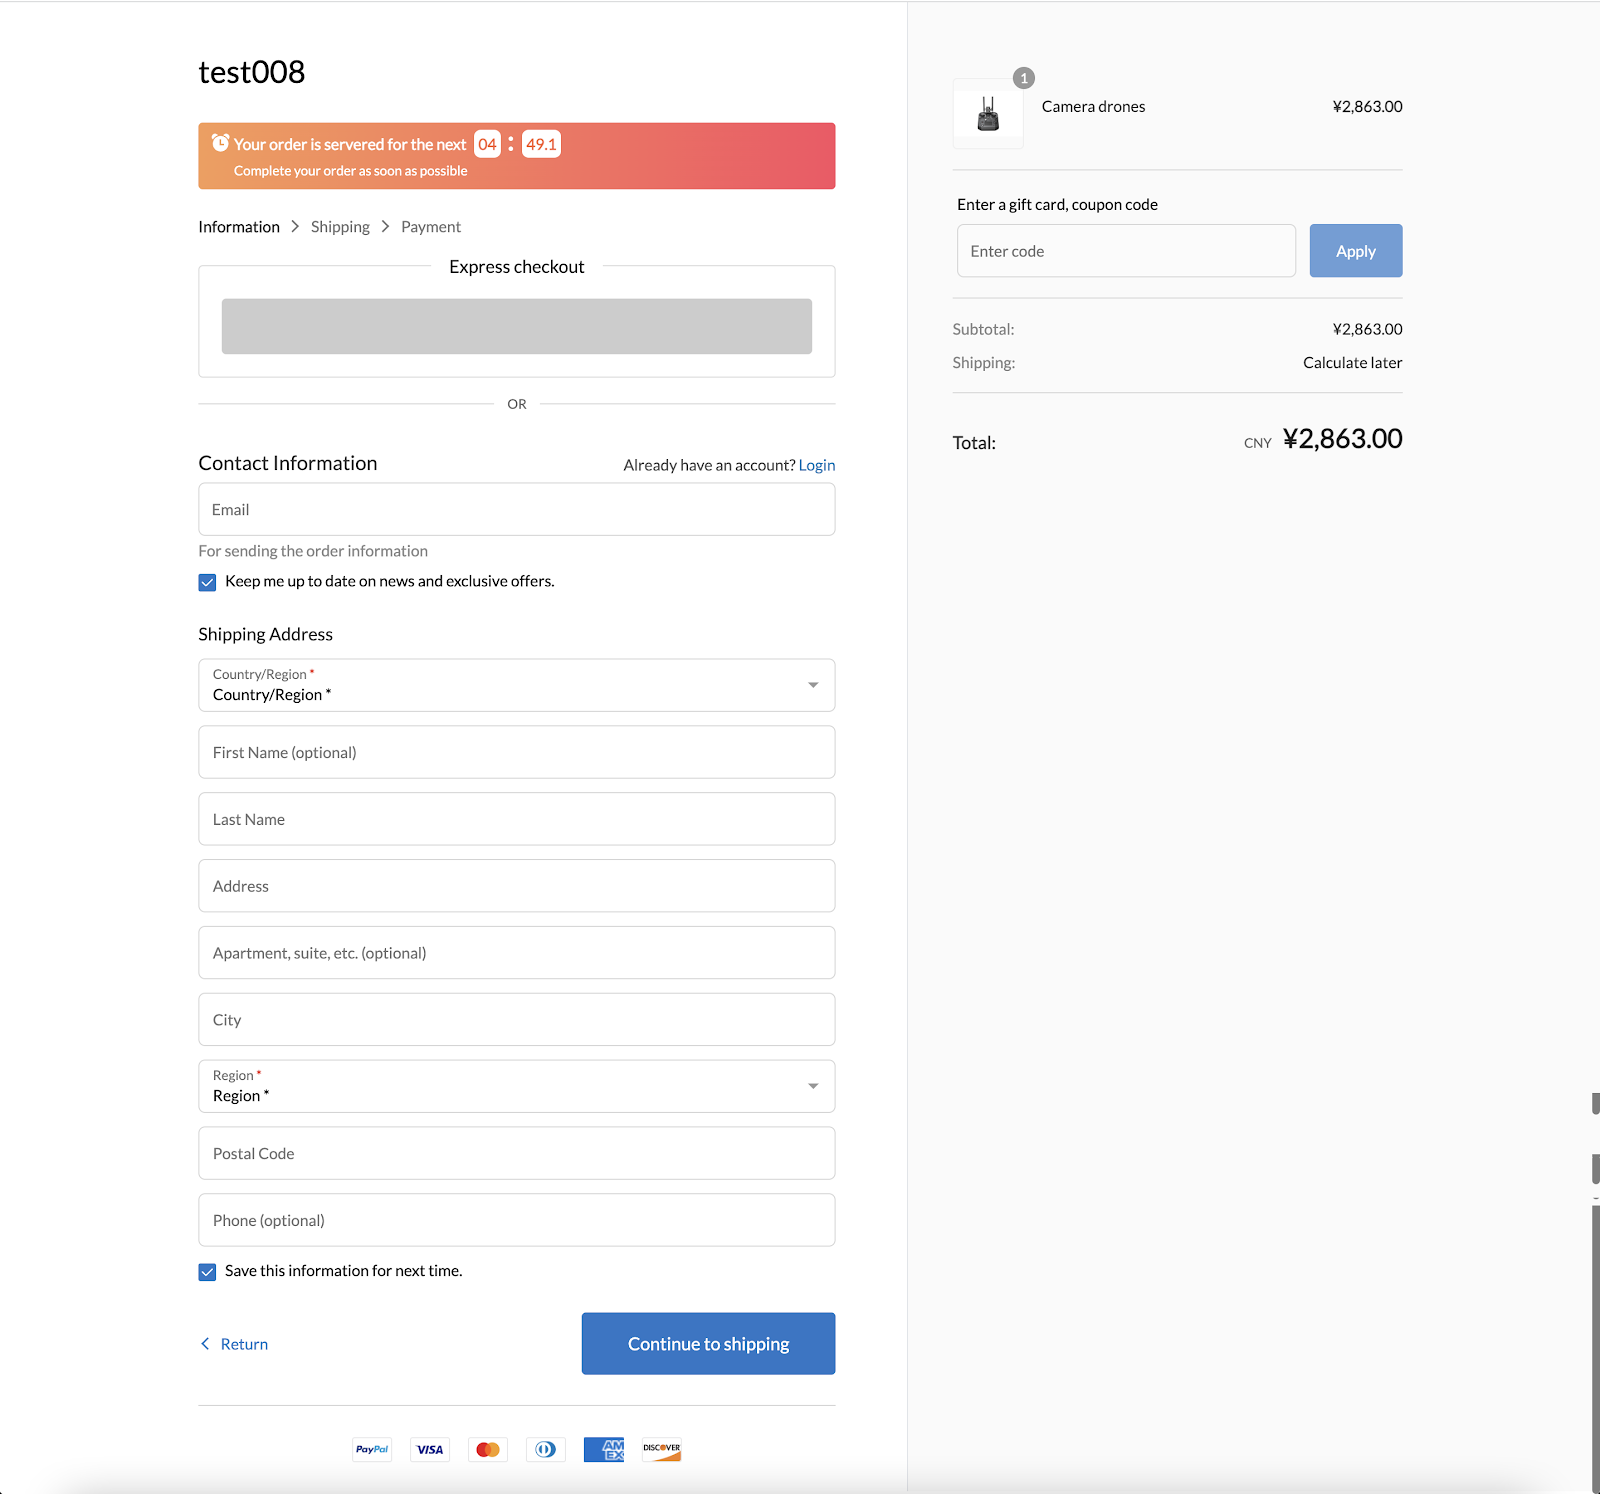
- This feature displays as a banner with text and countdown reminder at checkout.
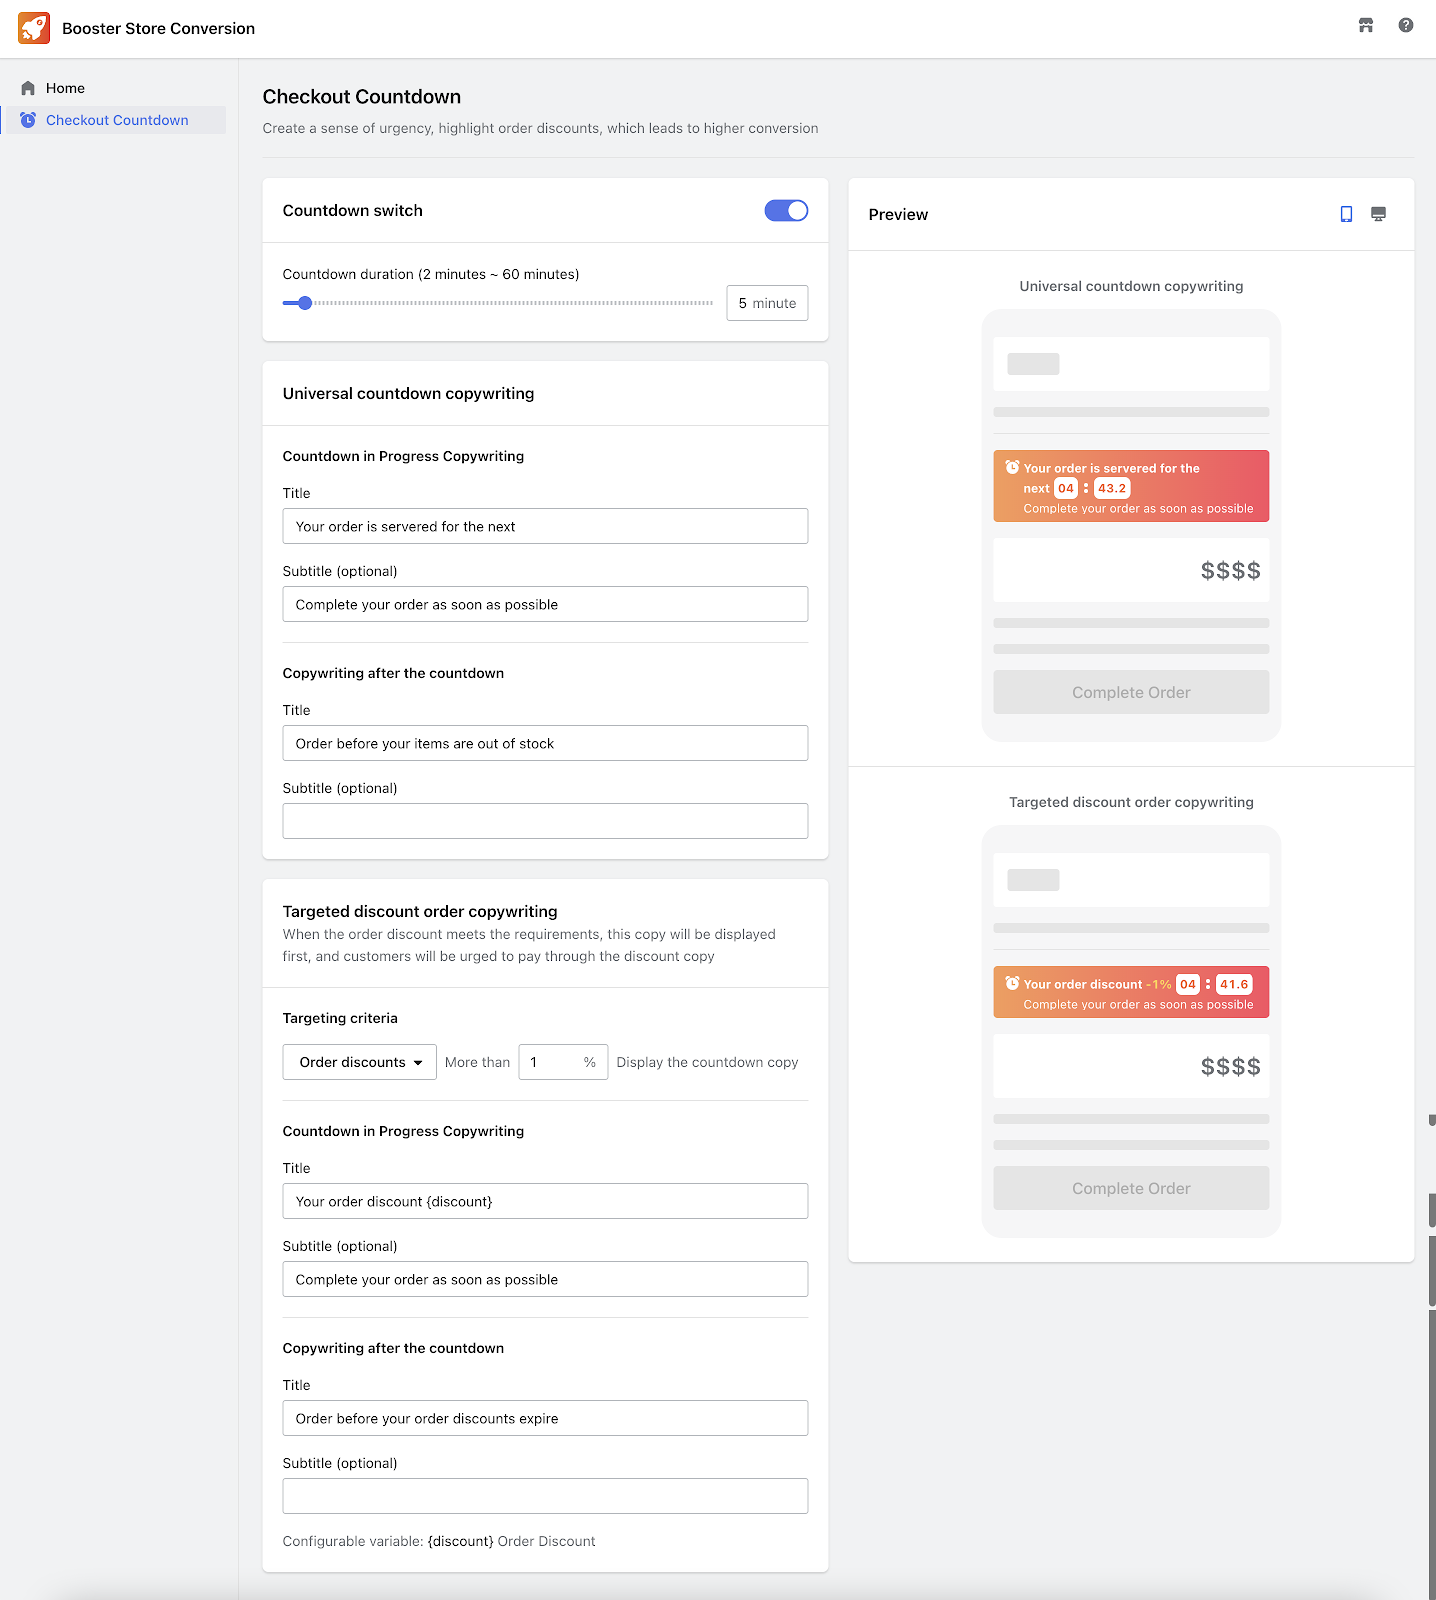
- You can edit the countdown copywriting and set its duration.
- There are two types of messages for the countdown: a general one for all customers and a special one for discounted orders.
- Each chekout page will display only one taype of message.
- The system prioritizes the special discount message if applicable. You can create a message with a part that stays the same, and a part that changes, like showing different discount amounts or a list of discounts. For example, you might have a message that says, "Hurry, only X minutes left to get your Y% discount!" The "Hurry, only X minutes left to get your" part stays the same on every banner, but the "Y%" part changes to show the specific discount for that order.
- The current version does not support the use of one-page themes. However, future updates will incorporate this feature.
Usage path:
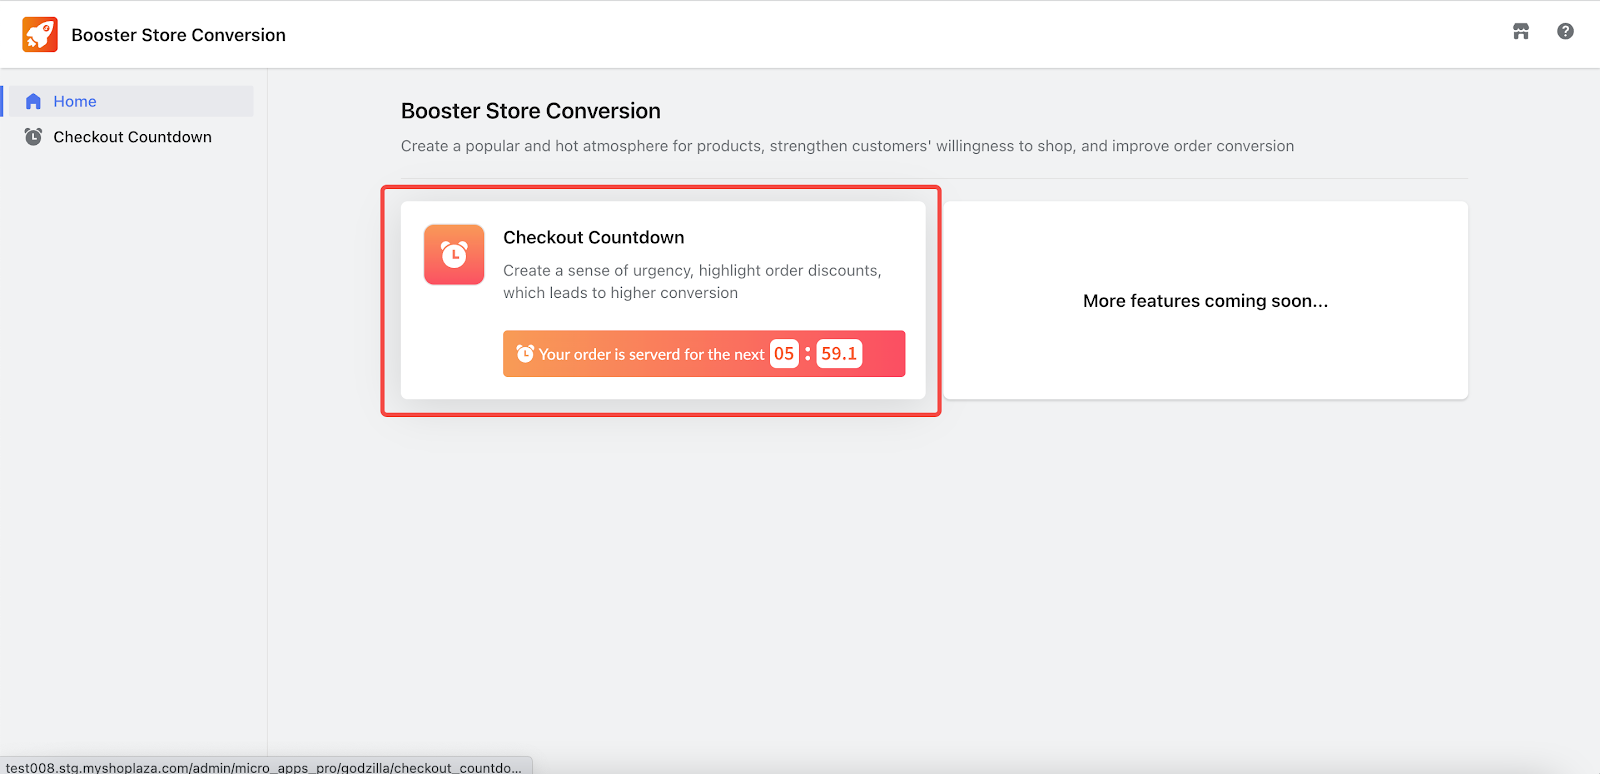
- From your Shoplazza admin > Navigate to Apps > Click on Visit App Store > Search for Booster Store Conversion and install it to your store.
- Enter the app and click Checkout Countdown.
- Activate your Countdown Switch. Complete the following configuration. And click Save at the top right corner to properly save your changes.
- Feature preview:
With this feature on, your customers can view the countdown banner at the top of the checkout page.
6. Enhanced Intelligent Product Recommendation tool for Shopping cart page, Order list page and Order details page
Usage scenarios:
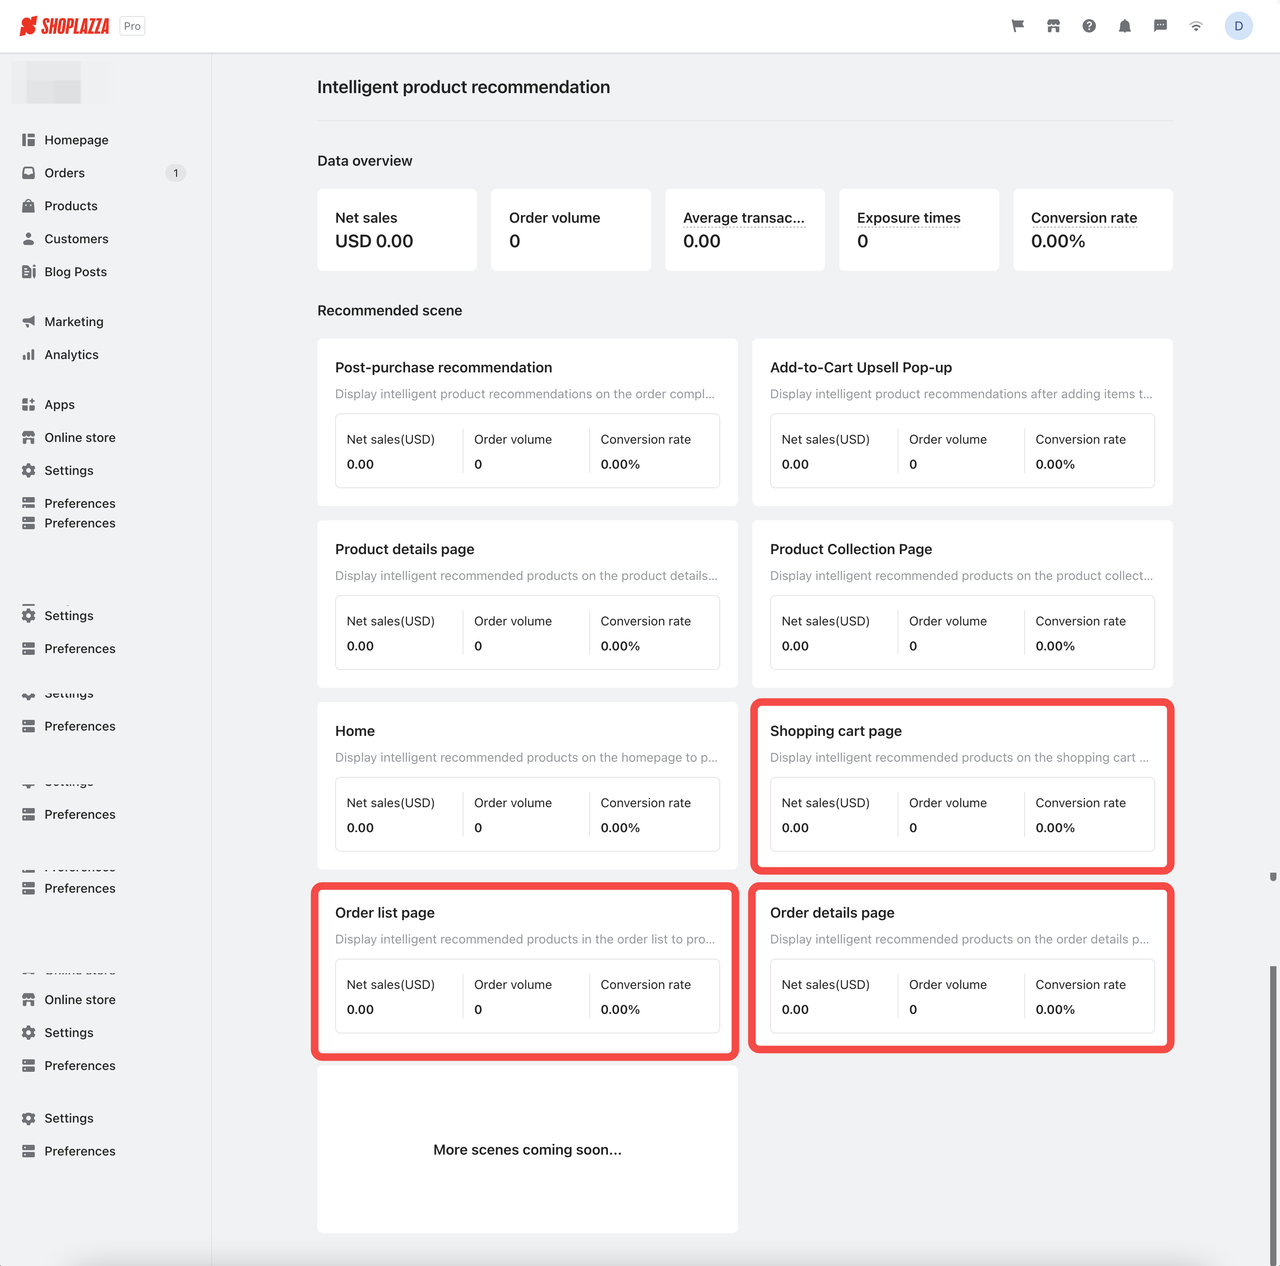
- Intelligent product recommendation app has been improved. It now works on the Shopping cart page, Order list page, and Order details page. Set up rules to show smart product suggestions to your customers as they browse, which could appeal to more purchases and a higher average order value.
Usage path:
- Navigate to your Shoplazza Admin > Apps. Click on the Visit App store button on the top right corner. Search for Intelligent product recommendation app and install.
Feature overview:
- From the home page of the Intelligent product recommendation app, you can see the results of all your promotional activities. You can also set up the rules for these new pages (Shopping cart page, Orderlist page, and Order details page).
Shopping cart page
- Go to the event list for the Shopping cart page and click New activity to start setting up.
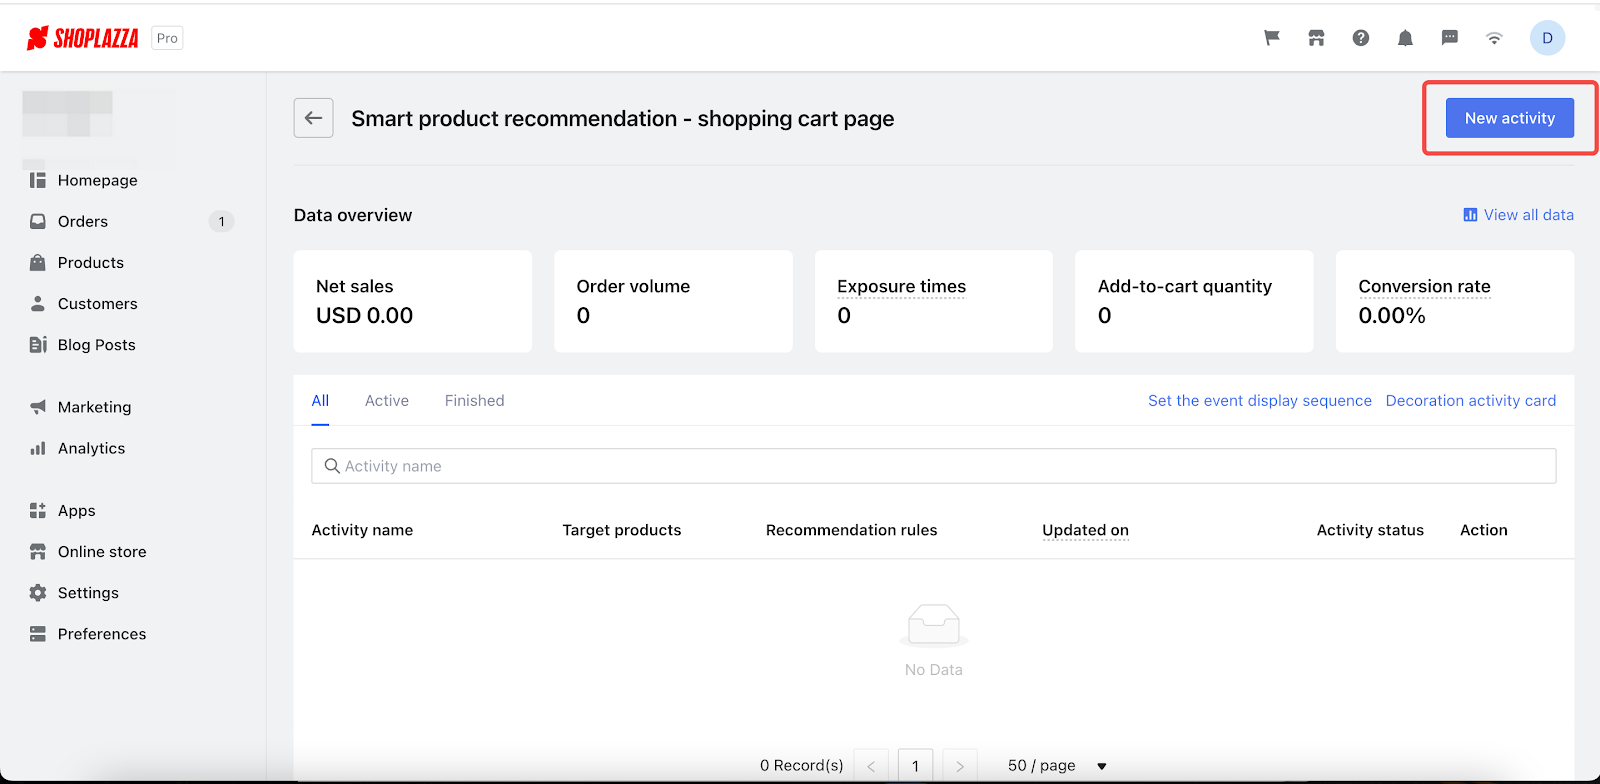
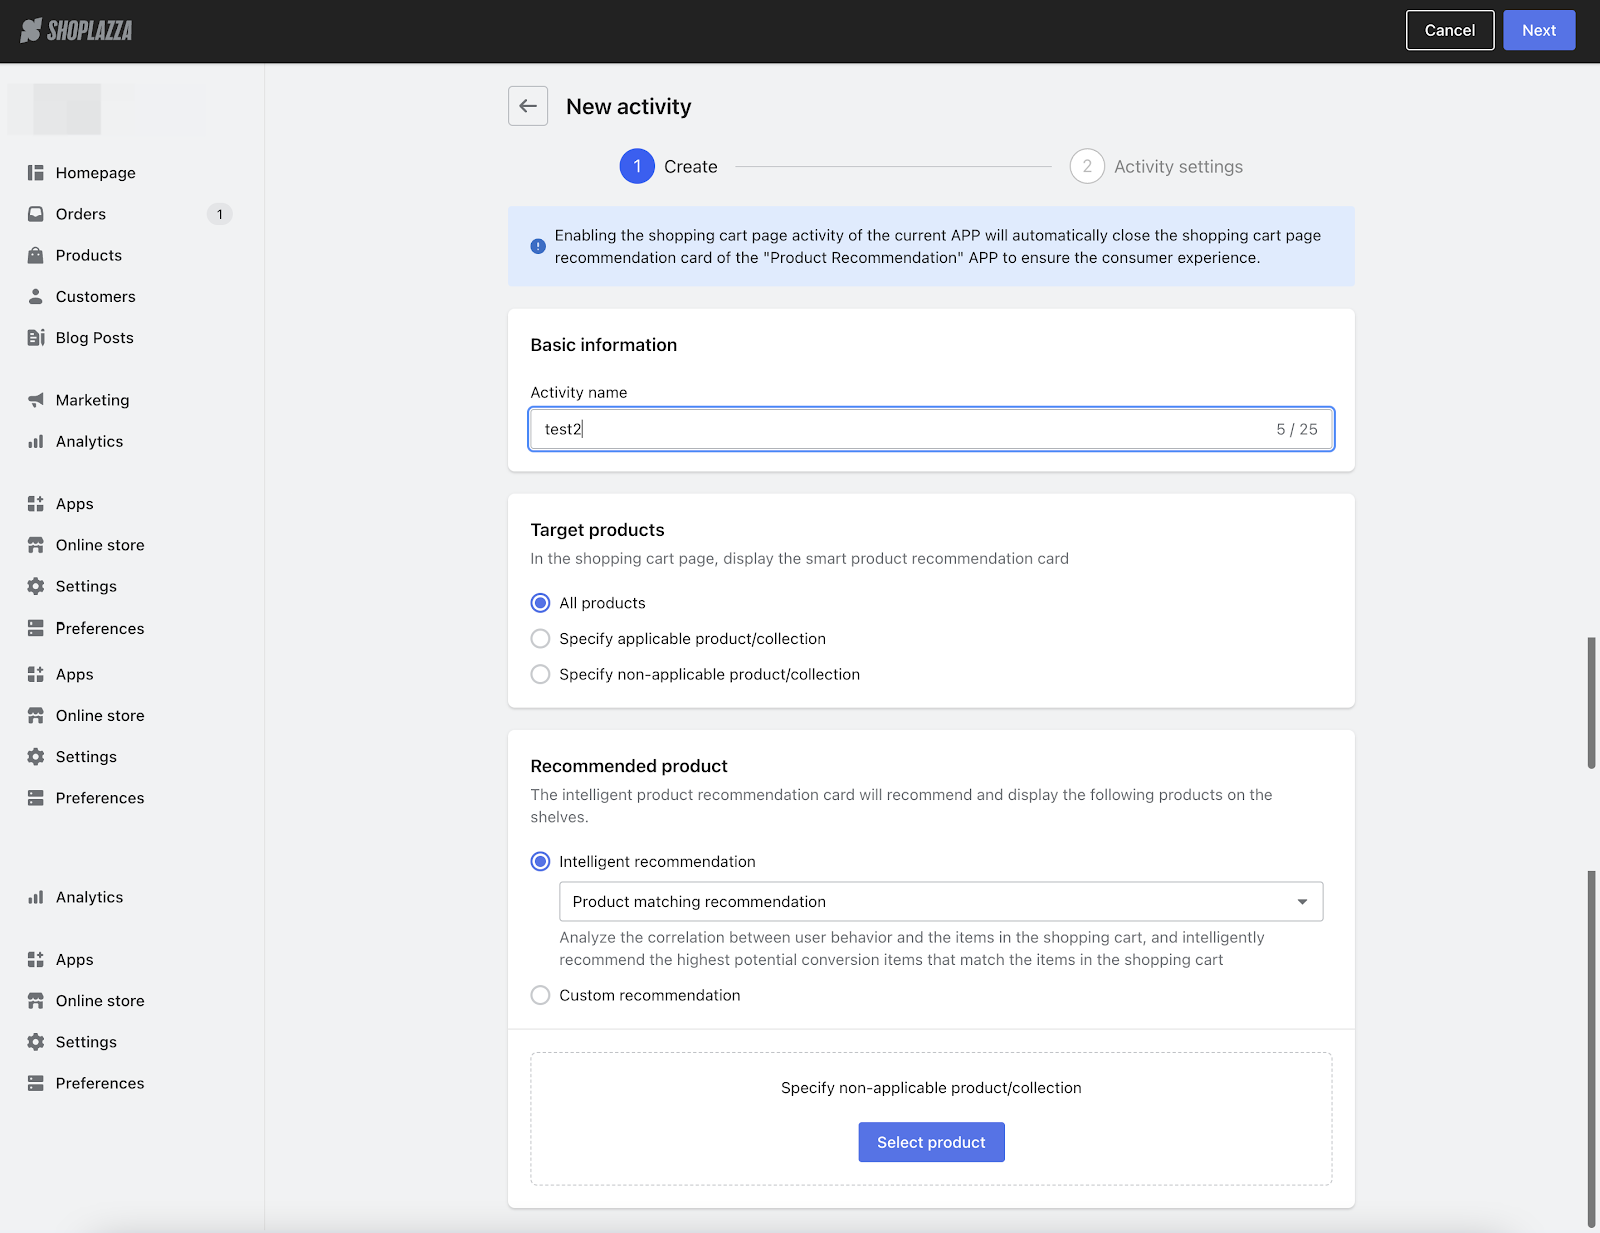
Setting up event rules
1. Fill in the basic event details like the event name.
2. Choose the target product: The product suggestion card will only show when the shopper visits the Product Detail Page of the product you choose.
- You can pick all products or specific products/collections to be part of the event.
- You can also choose to leave out certain products/collections from the event.
3. Set up the rules for product suggestions and pick the products to suggest. You can quickly choose whether to show a product suggestion or not.
- You can choose from:
-
- Smart product suggestions, with strategies for suggesting similar products and personalized suggestions.
- Custom suggestions.
-
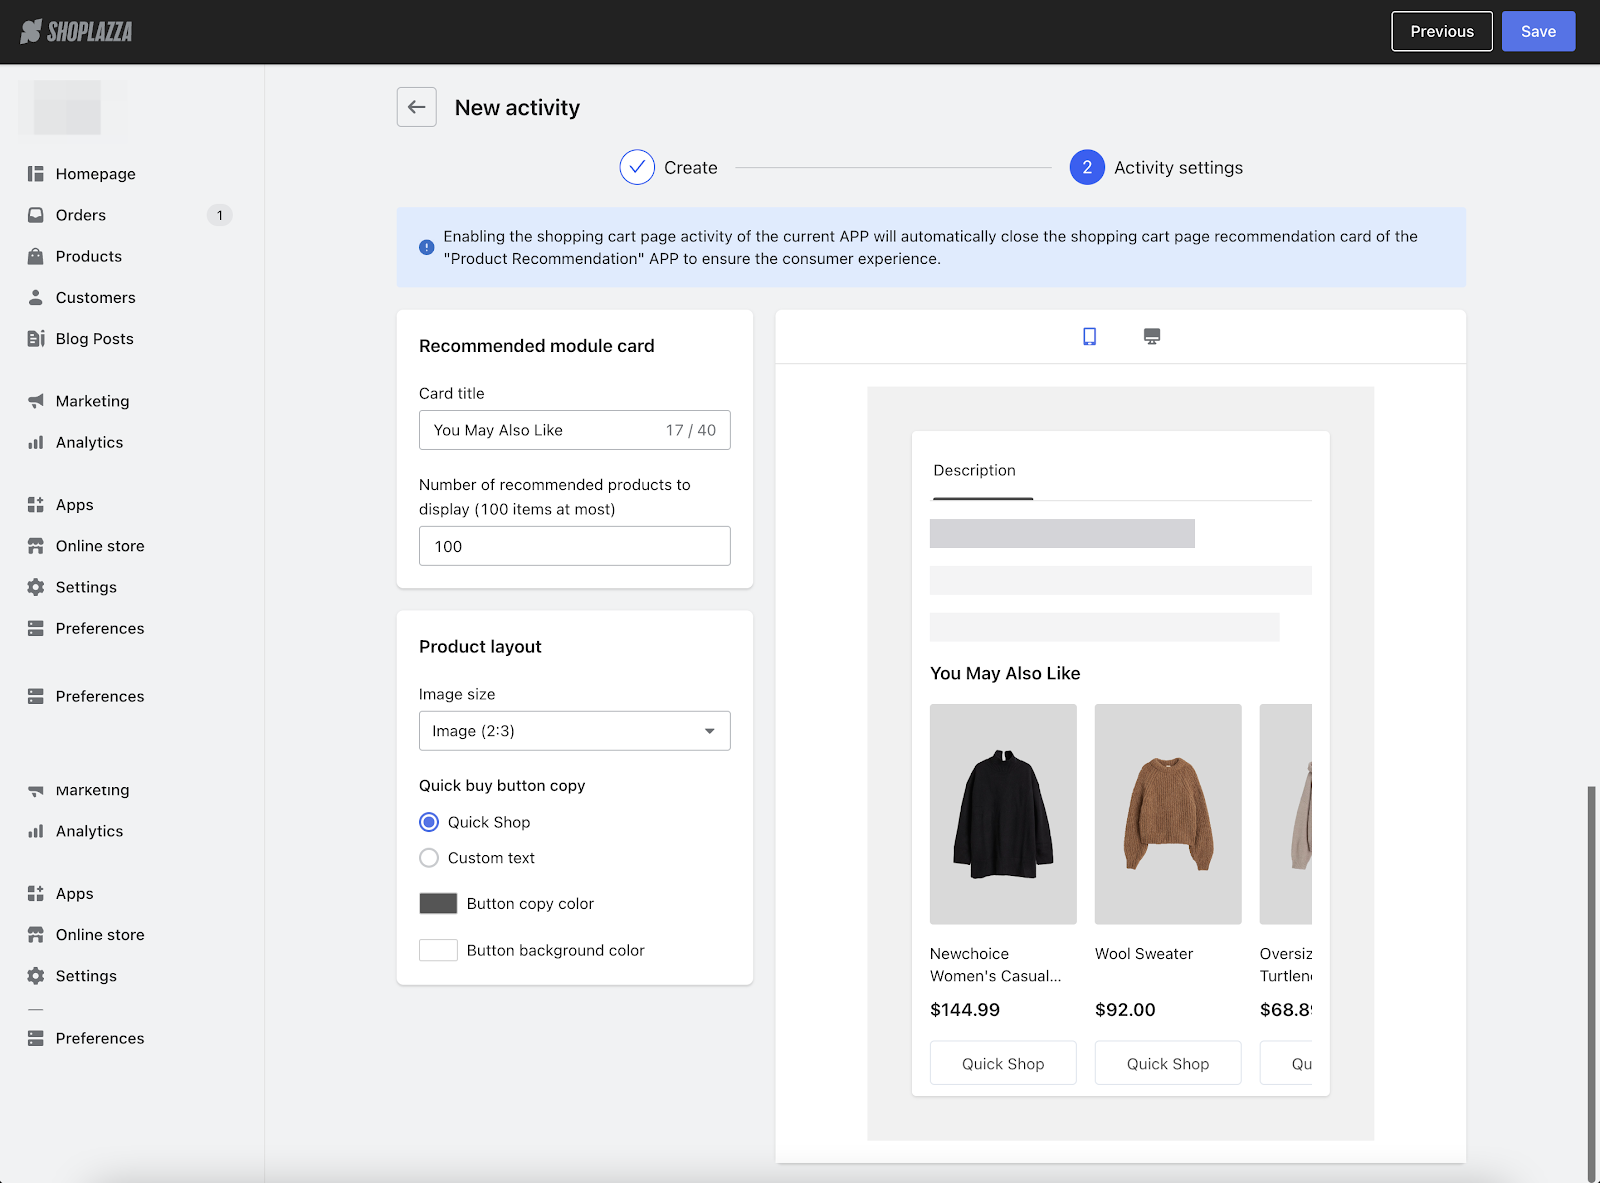
Setting up the activity page
This is the product suggestion module that customers see on the Product Detail Page.
1. Choose the title of the suggestion card and how many products to show.
2. Decide how to display products:
-
- Set the product image size.
- Change the colour and text of the quick buy button.
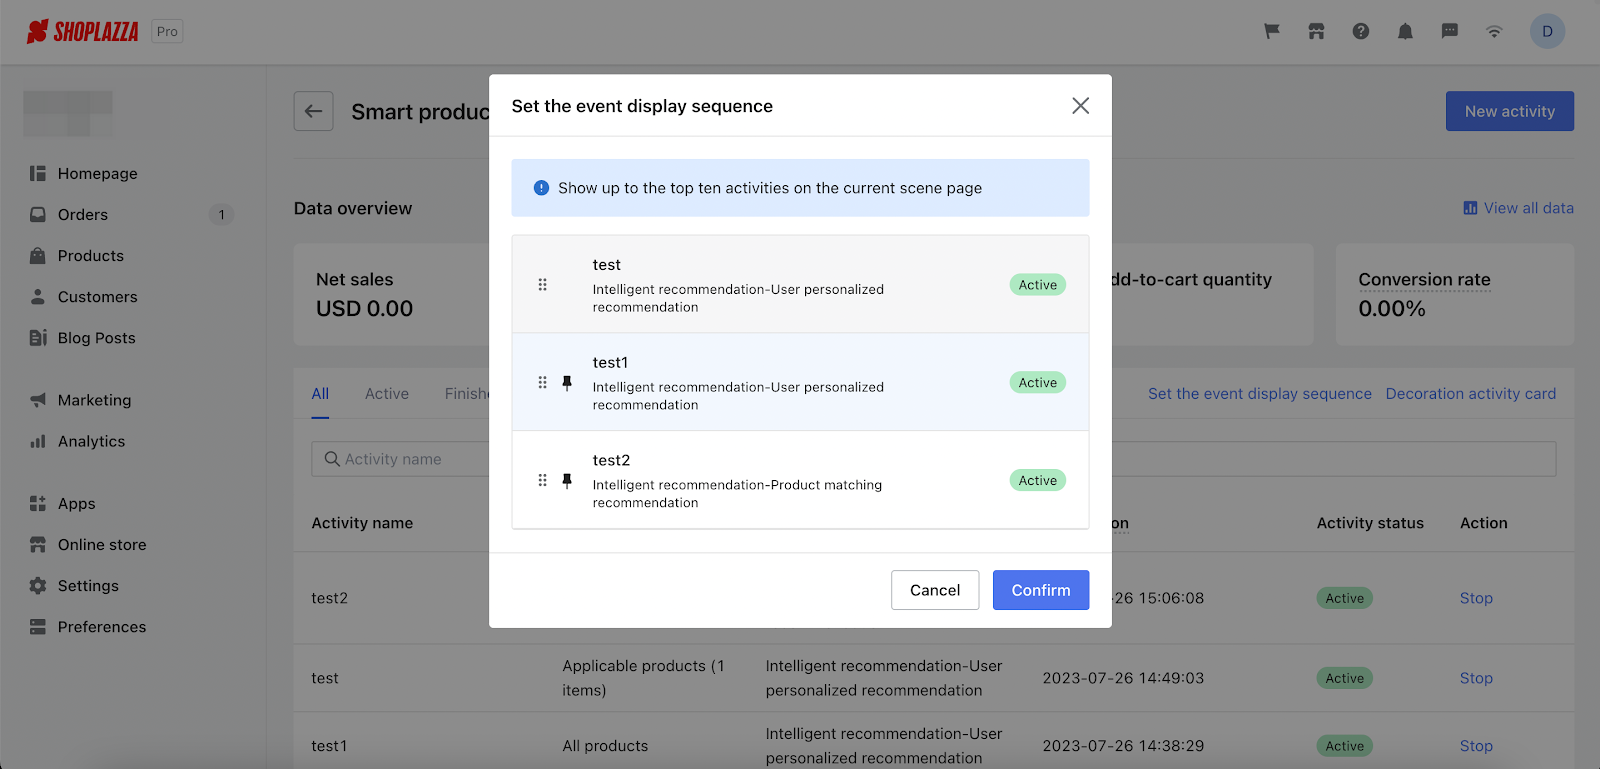
Setting the event display sequence and decoration.
1. Click on Set the event display sequence to arrange how your multiple events display.
-
- Show up to the top ten activities on the current scene page.
- Use Drag and Top icon to sort your display sequence.
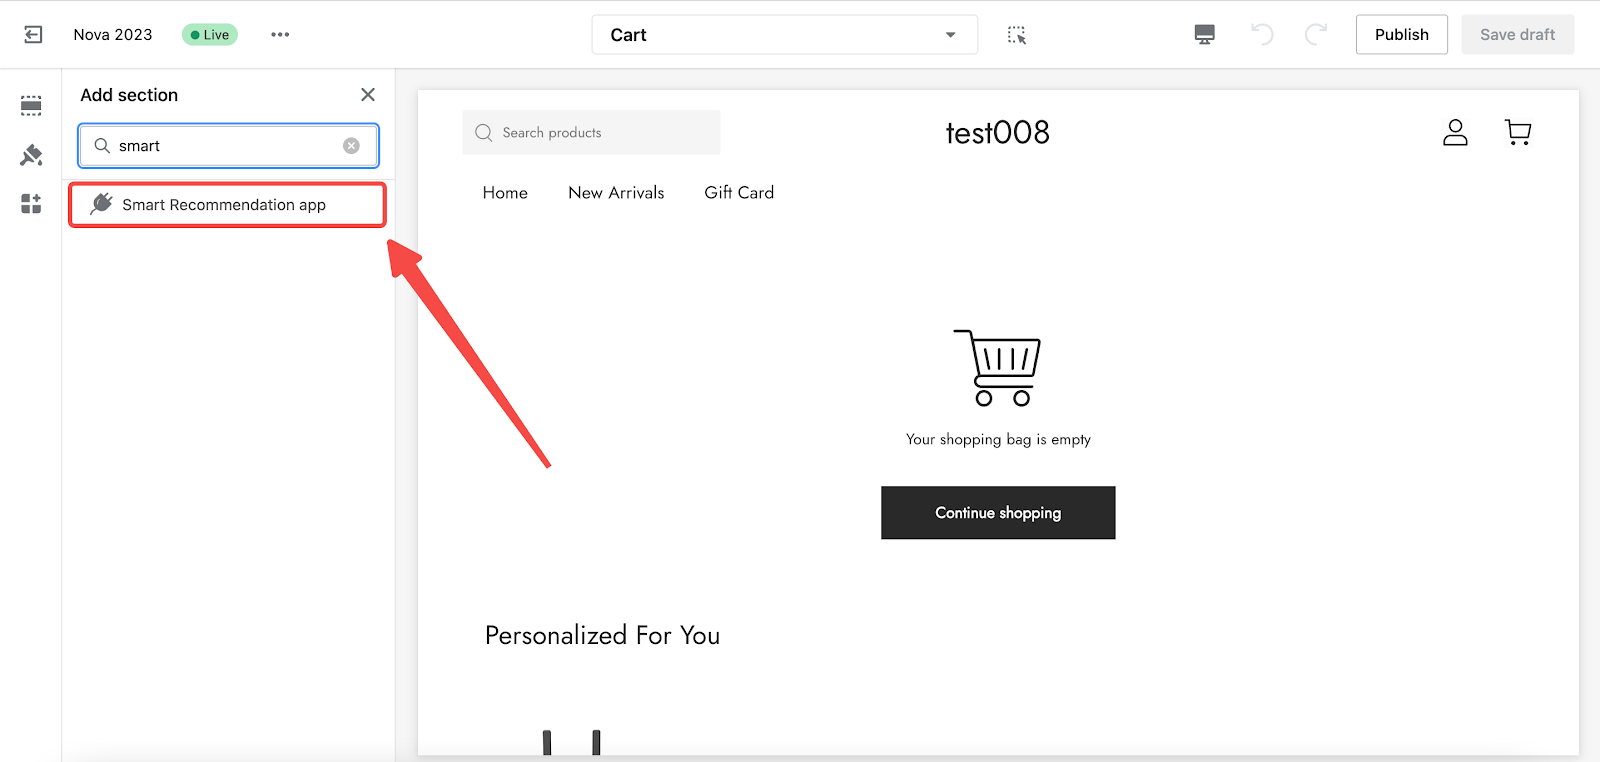
2. Click on Decoration activity card and you will be redirected to the theme editor page.
-
- Click on Add section and search for Smart Recommendation app then you can display properly.
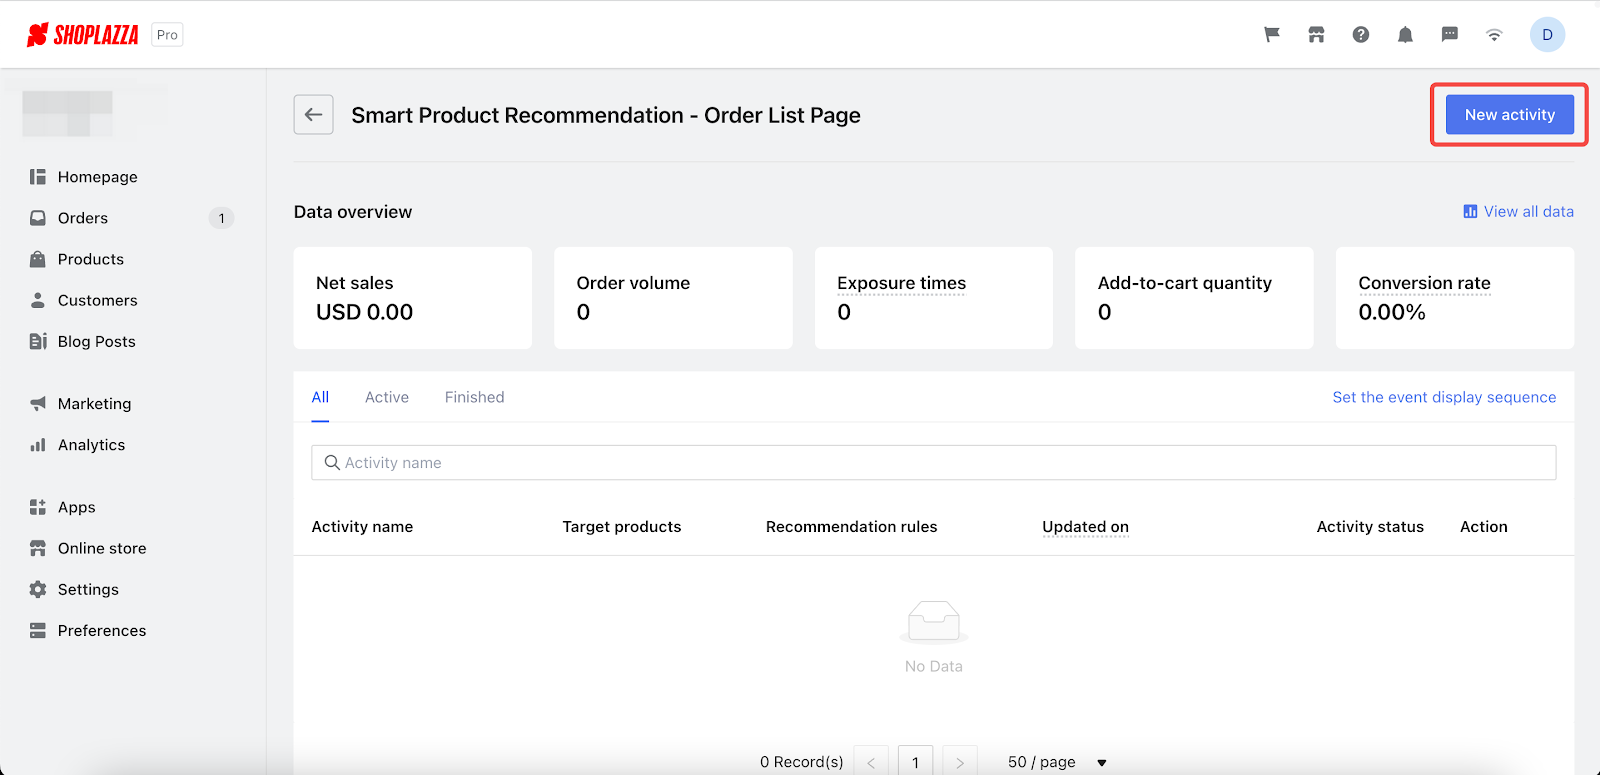
Order list page
1. Go to the event list for the Order list page and click New activity to start setting up.
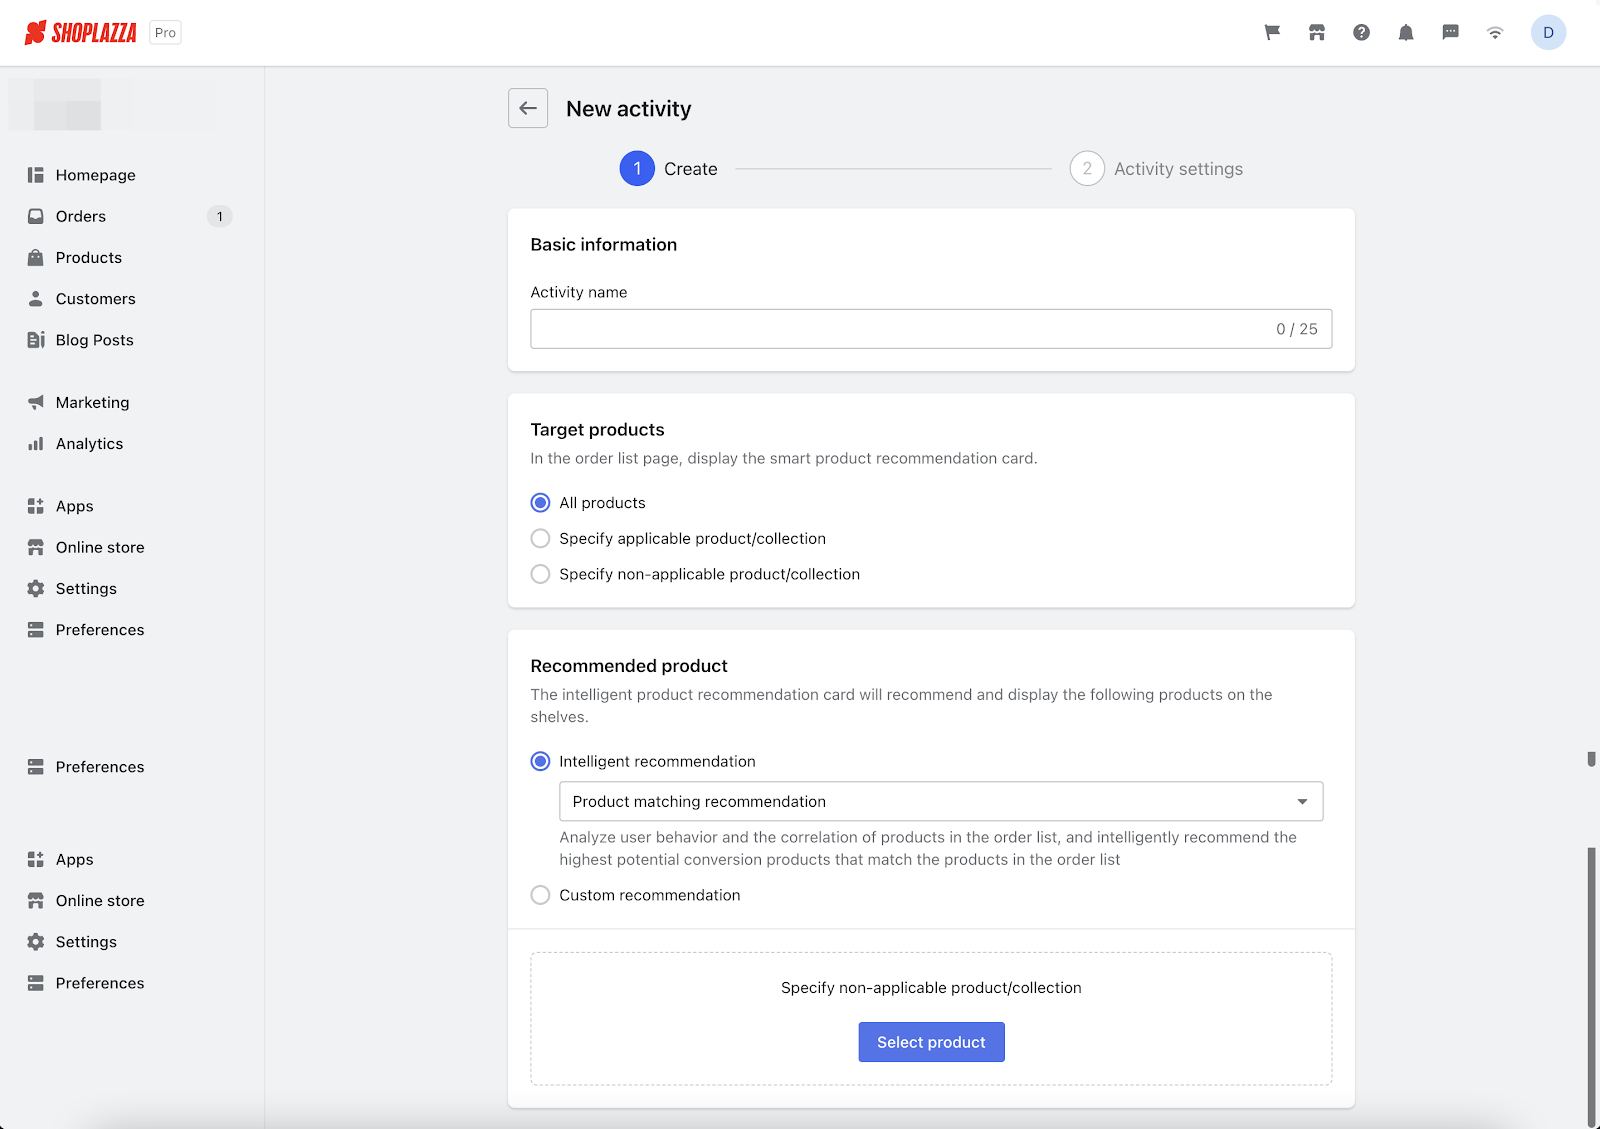
Setting up activity rules
1. Fill in the basic event details like the event name.
2. No need to choose target products.
3. Set up the rules for product suggestions and pick the products to suggest. You can quickly choose whether to show a product suggestion or not.
-
- You can choose from:
- Smart product suggestions, with strategies for personalized suggestions.
- Custom suggestions.
- You can choose from:
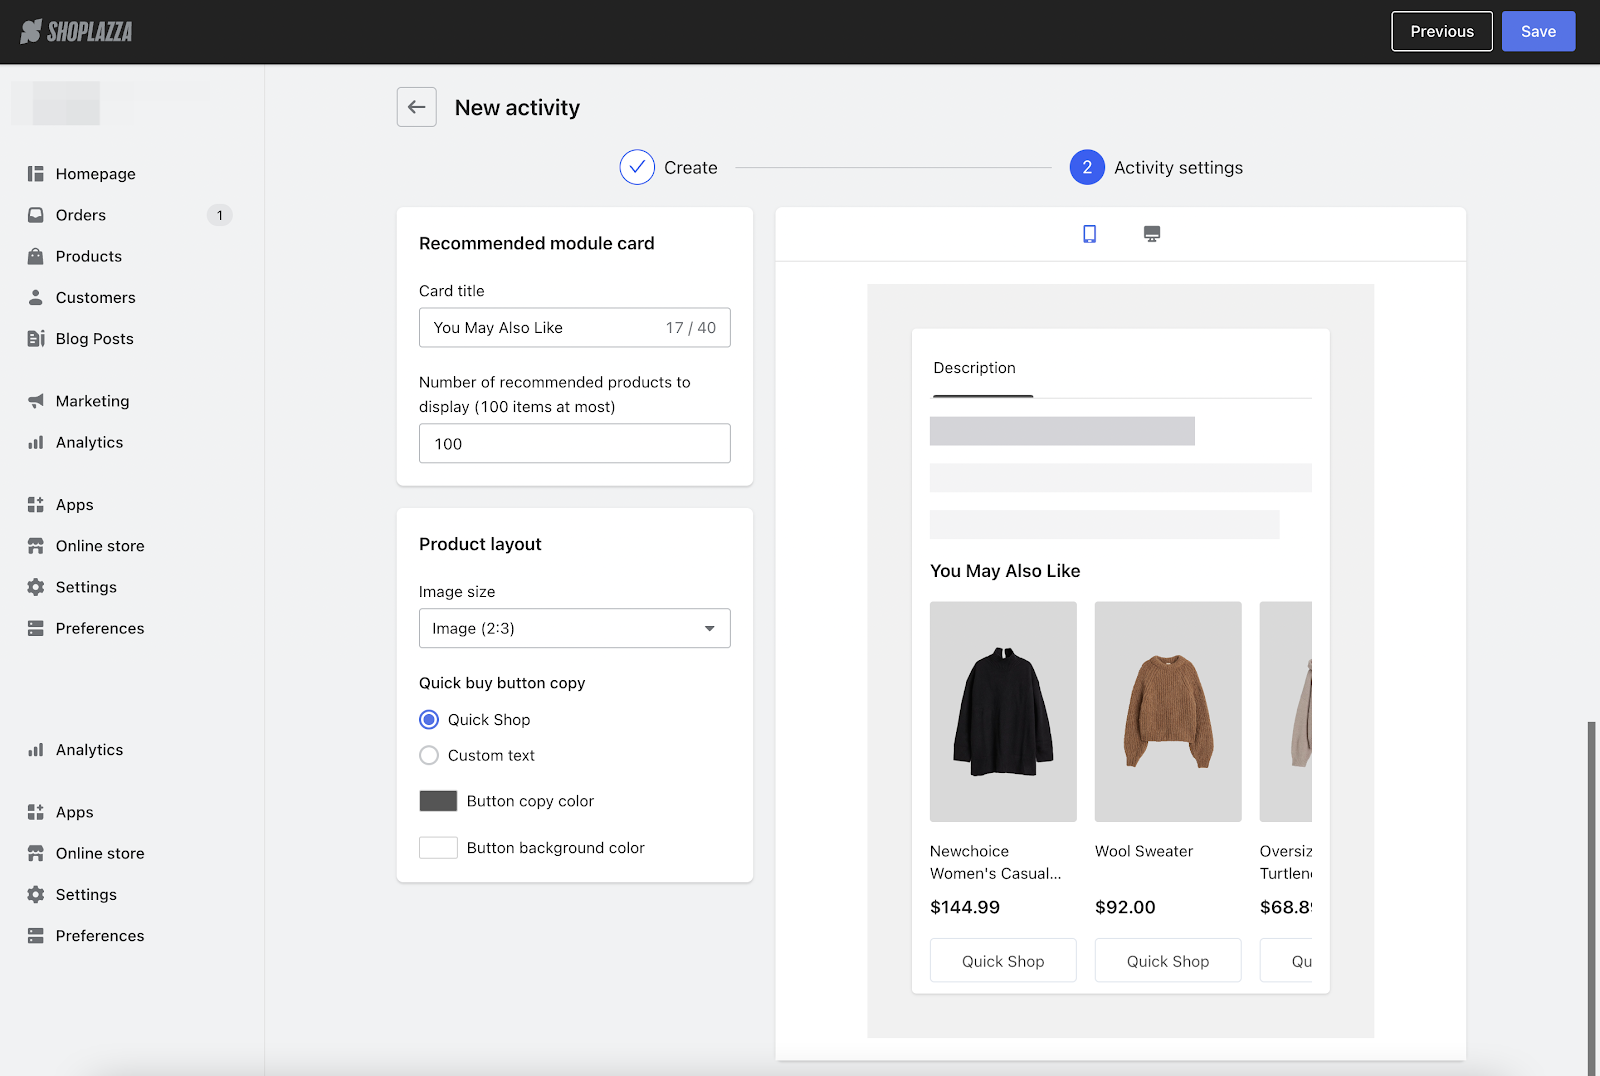
Setting up the activity page
This is the product suggestion module that shoppers see on the collections page.
1. Choose the title of the suggestion card and how many products to show.
2. Decide how to display products:
-
- Set the product image size.
- Change the colour and text of the quick buy button.
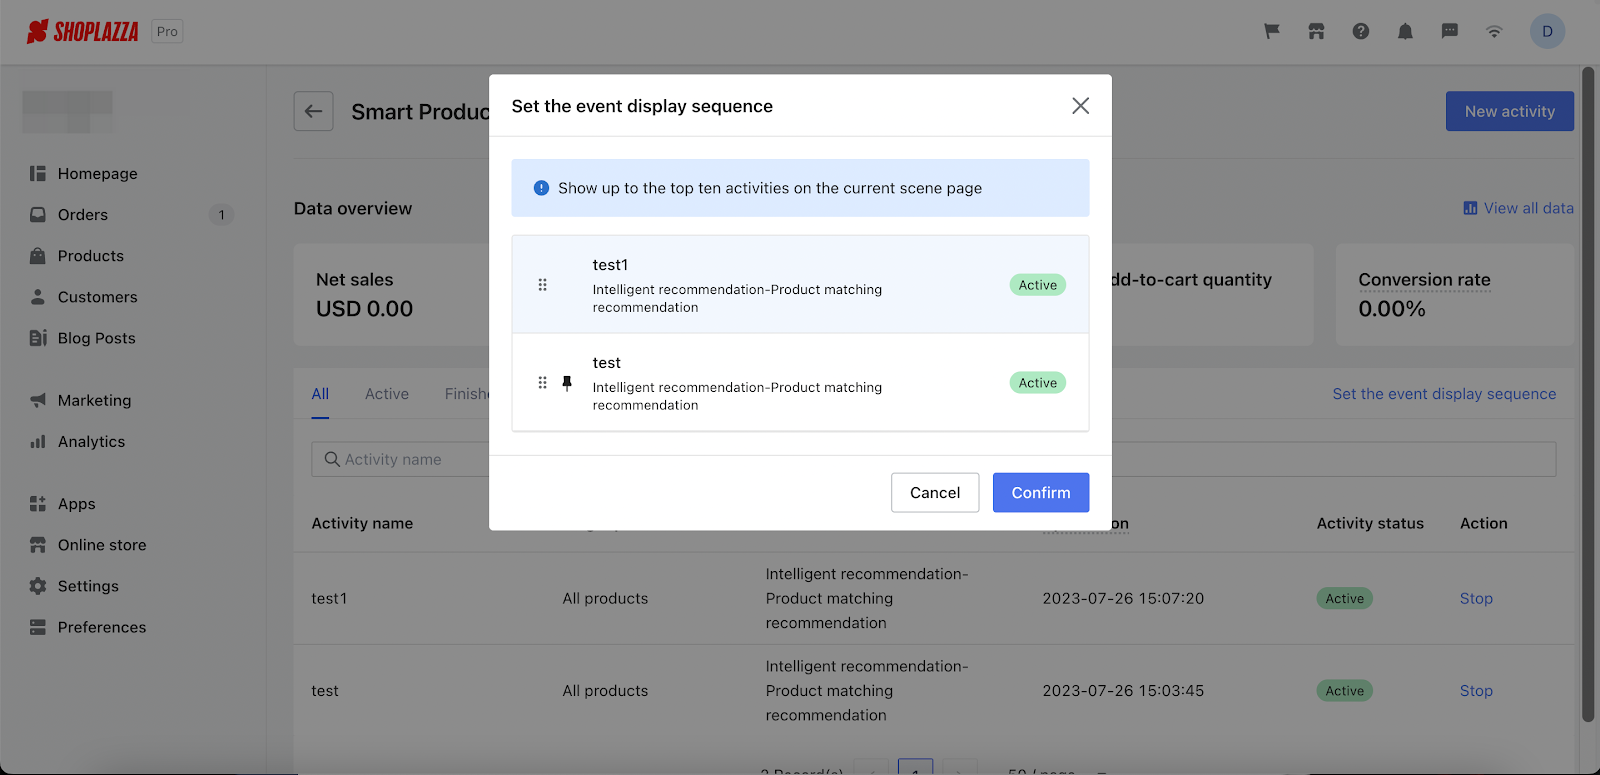
Setting the event display sequence.
1. Click on Set the event display sequence to arrange how your multiple events display.
-
- Show up to the top ten activities on the current scene page.
- Use Drag and Top icon to sort your display sequence.
- The order list recommendation doesn't need to be decorated by cards in theme editor. Once the configuration is complete, your recommendation can be displayed for use.
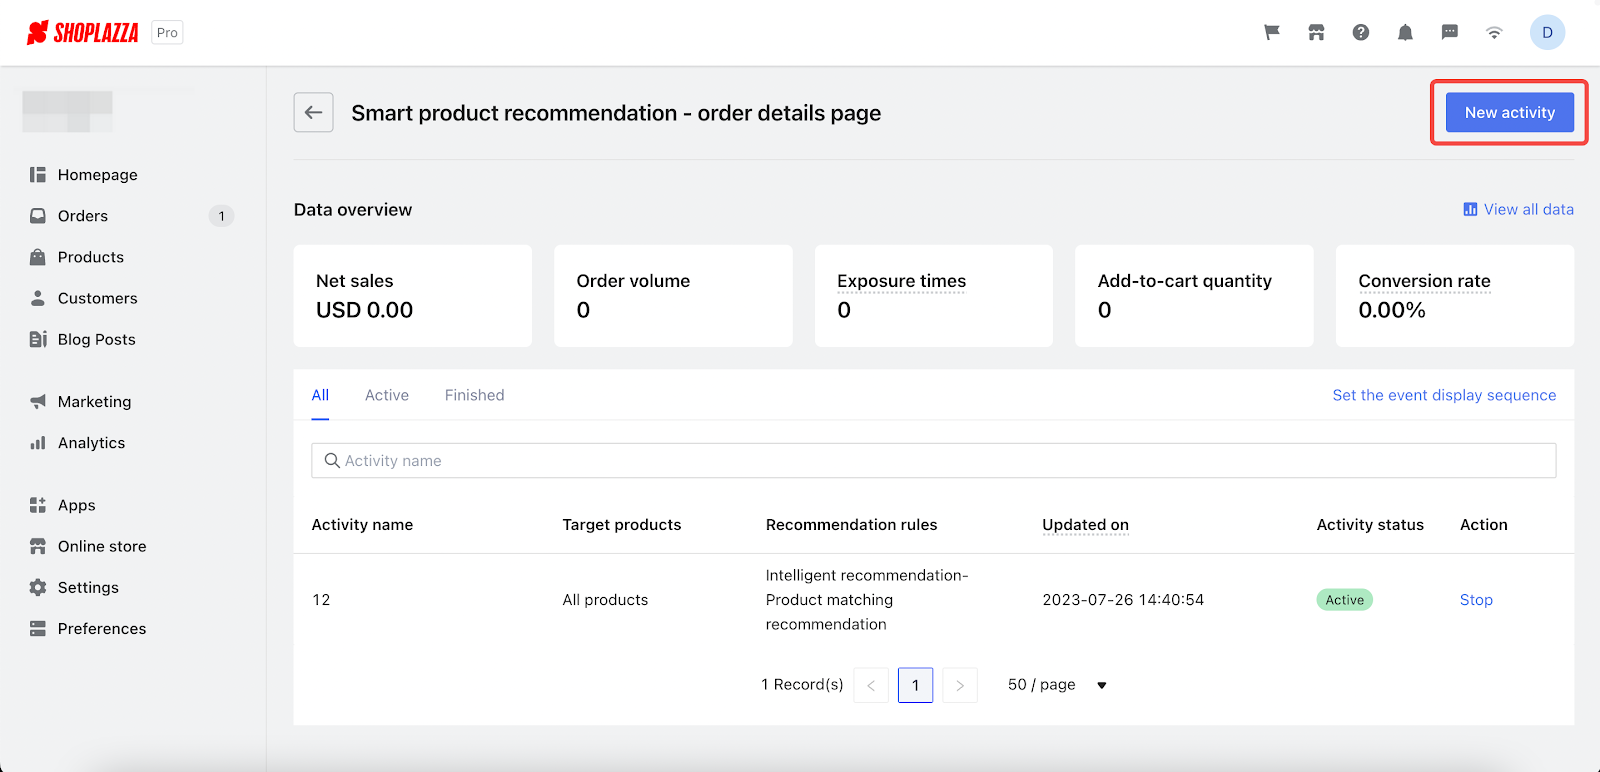
Order details page
1. Go to the event list for the Order details page and click New activity to start setting up.
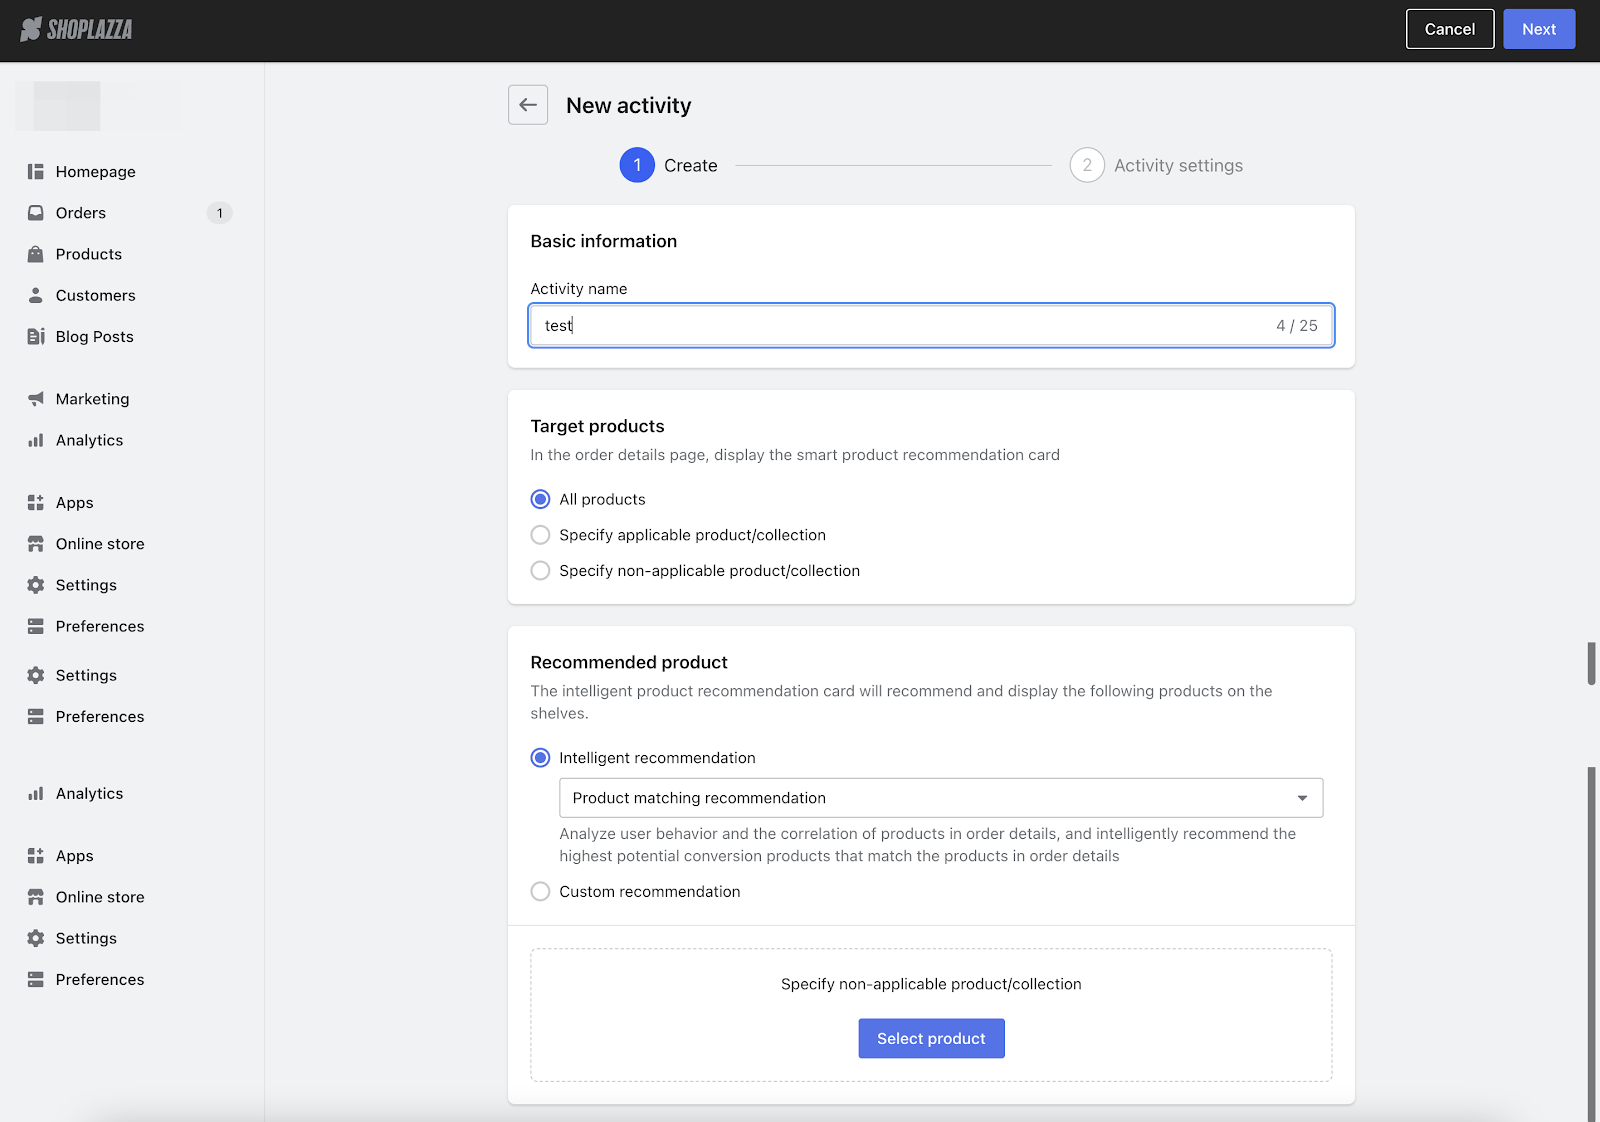
Setting up activity rules
1. Fill in the basic event details like the event name.
2. No need to choose target products.
3. Set up the rules for product suggestions and pick the products to suggest. You can quickly choose whether to show a product suggestion or not.
-
- You can choose from:
- Smart product suggestions, with strategies for personalized suggestions.
- Custom suggestions.
- You can choose from:
Setting up the activity page
This is the product suggestion module that shoppers see on the collections page.
1. Choose the title of the suggestion card and how many products to show.
2. Decide how to display products:
-
- Set the product image size.
- Change the colour and text of the quick buy button.

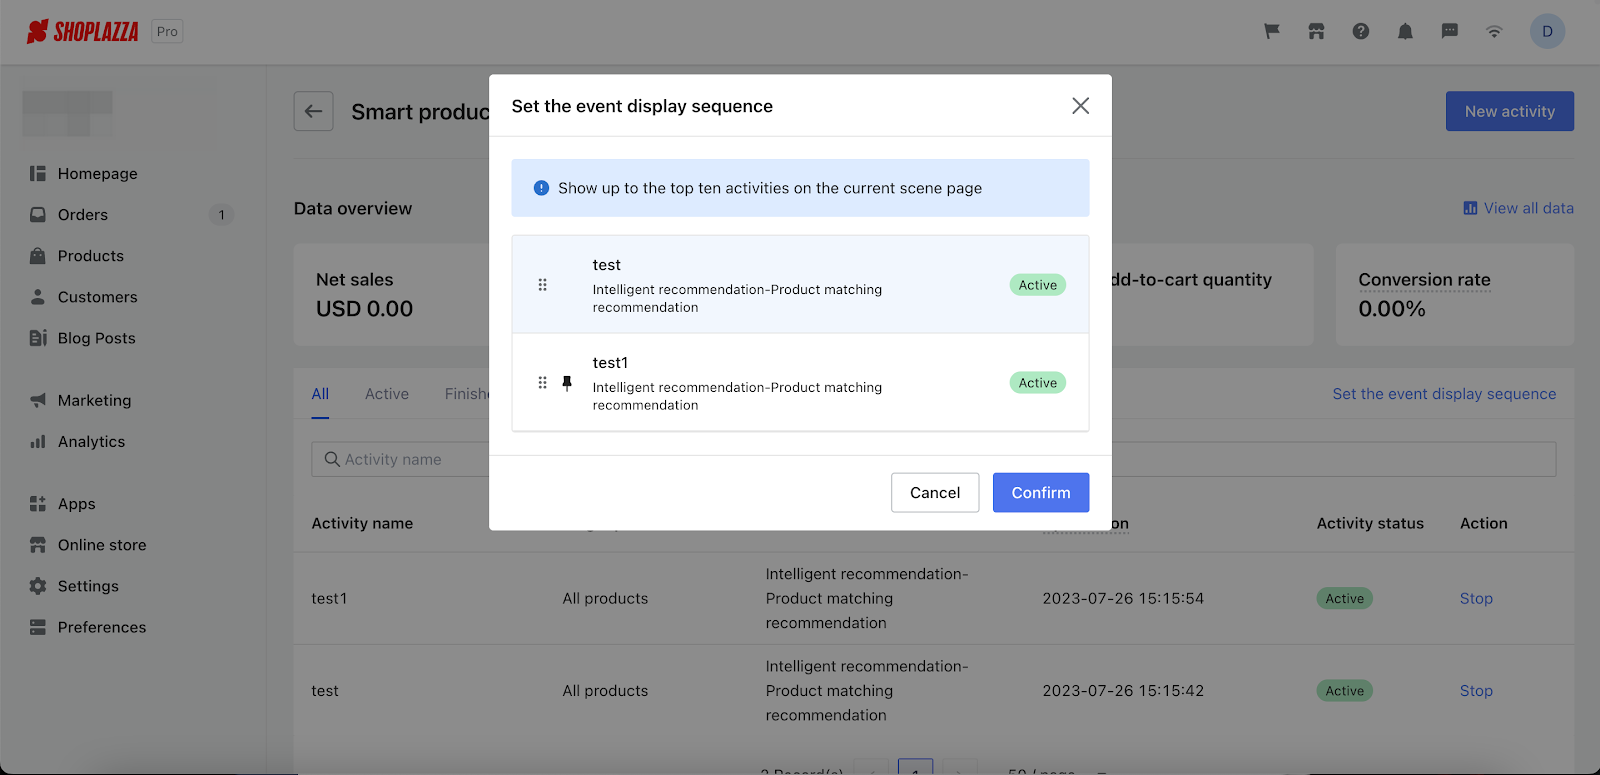
Setting the event display sequence.
1. Click on Set the event display sequence to arrange how your multiple events display.
-
- Show up to the top ten activities on the current scene page.
- Use Drag and Top icon to sort your display sequence.
- The order details recommendation doesn't need to be decorated by cards in theme editor. Once the configuration is complete, your recommendation can be displayed for use.
7. New Release: Discount for Multiple Payment Methods App
Usage scenarios:
Scenario 1: PayPal, a popular payment method for merchants, holds a strong usage rate of 44%. However, its high dispute rate can be concerning. By leveraging the "Discount for Multiple Payment Methods" app, merchants can offer discounts for alternative payment methods. This encourages a decrease in Paypal transactions and enhances the stability of Paypal accounts.
Scenario 2: Different payment methods may have different fees, so merchants can set up appropriate discounts for different payment methods to encourage consumers to use the lower fee payment method, so as to maximize the profit of each transaction.
Scenario 3: The most popular payment method used by consumers in the Middle East is COD. Many merchants want to make it easier to receive payments by increasing the percentage of online payments. By offering discounts for online payments, consumers are more inclined to use online payment methods.
Usage path:
- From your Shoplazza admin > Navigate to Apps > Click on Visit App Store > Search for Discount for Multiple Payment Methods and install it to your store.
- If you have been granted payments permissions as a staff member, click the app and then you will be redirected to a page, where you can edit preferential rules for payments.
- Click Add payment service if you haven't added it before and you will be redirected to Payments to add your payment methods.

- Once you've added payment methods, you'll be able to view your current collection of payment options.
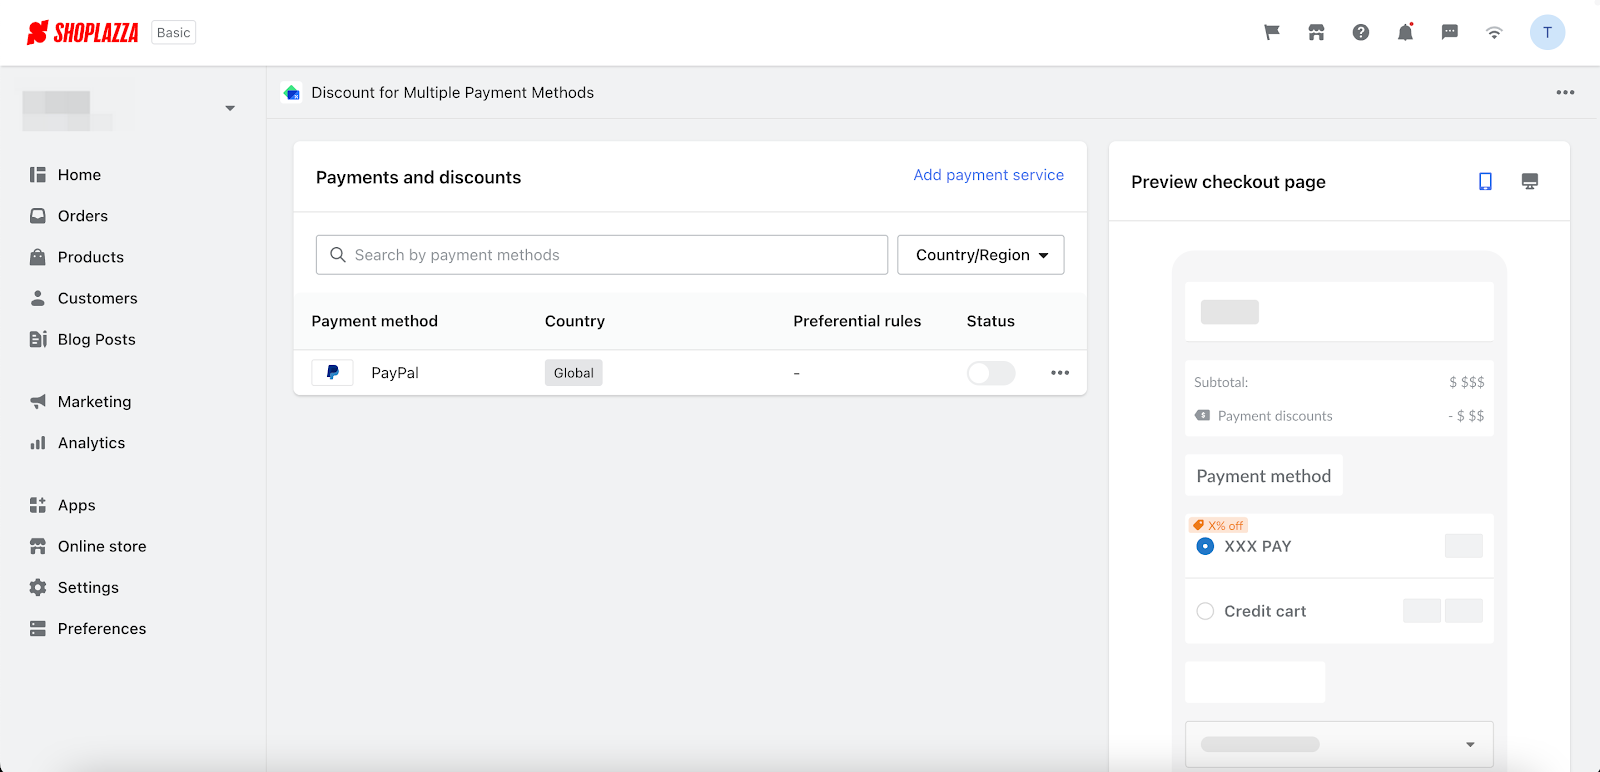
- Click "···" to edit your preferential rules for payments.
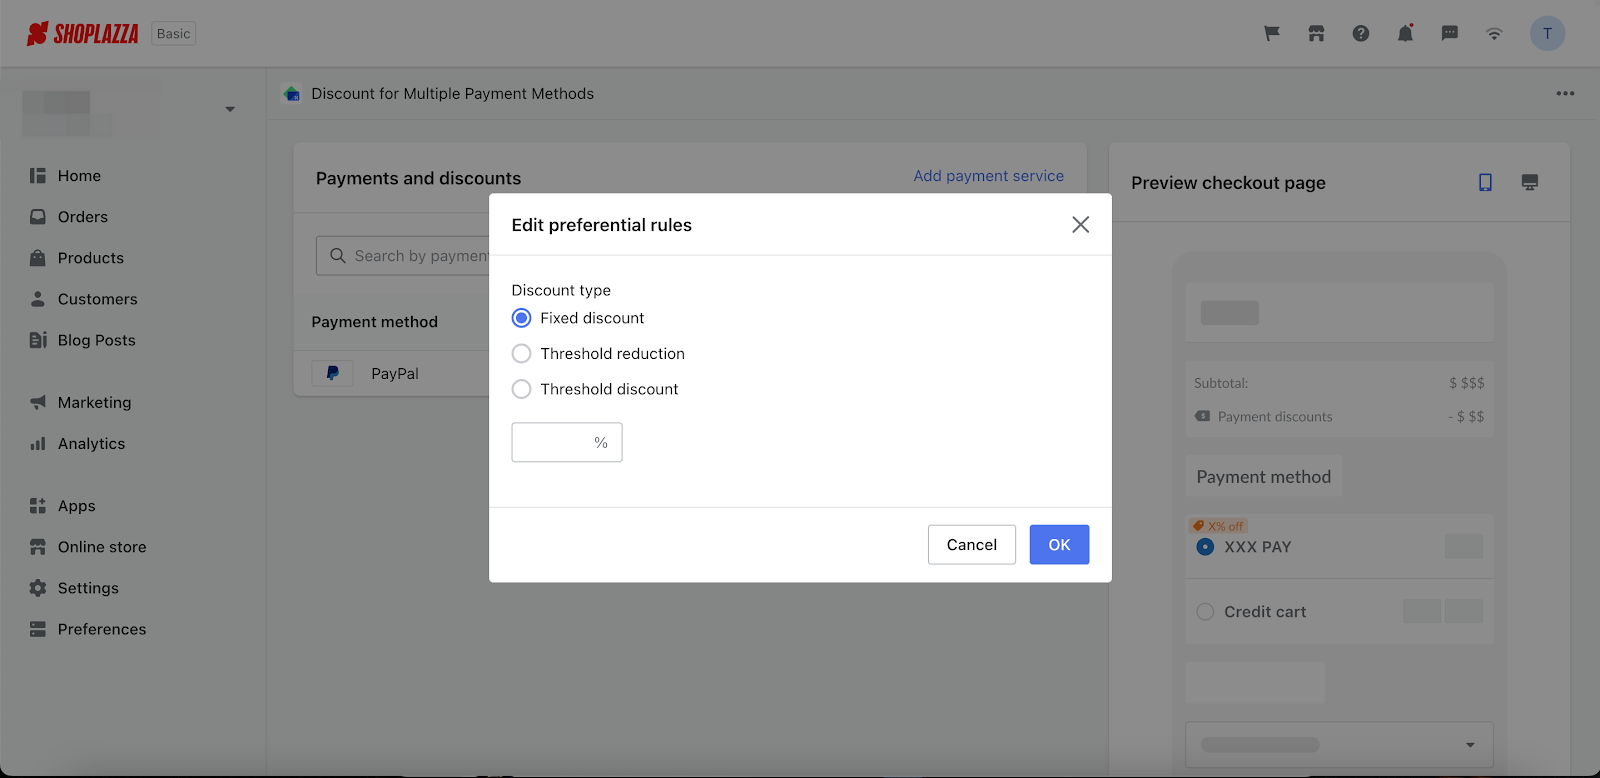
- There are three preferential rules:
- Fixed discount refers to a specific amount or percentage deducted from the original price of a product or service. It is a set reduction that remains constant regardless of the purchase amount.
- Threshold reduction is a type of discount applied when a certain spending threshold is met. Once the customer's total purchase value reaches this threshold, a predefined reduction is applied to the final price.
- Threshold discount is similar to threshold reduction, but instead of a fixed reduction, it offers a percentage or amount off the total purchase value once the threshold is reached. The discount amount may vary depending on the total spent by the customer.

Feature overview:
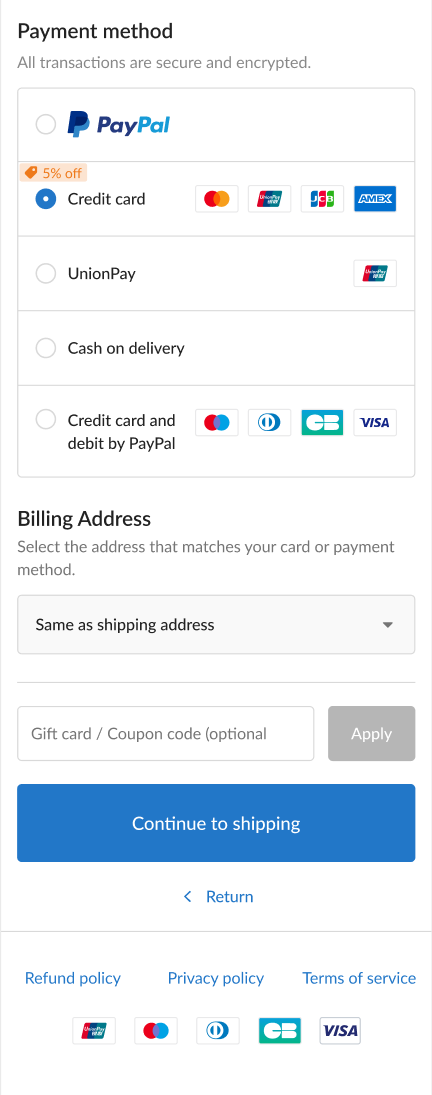
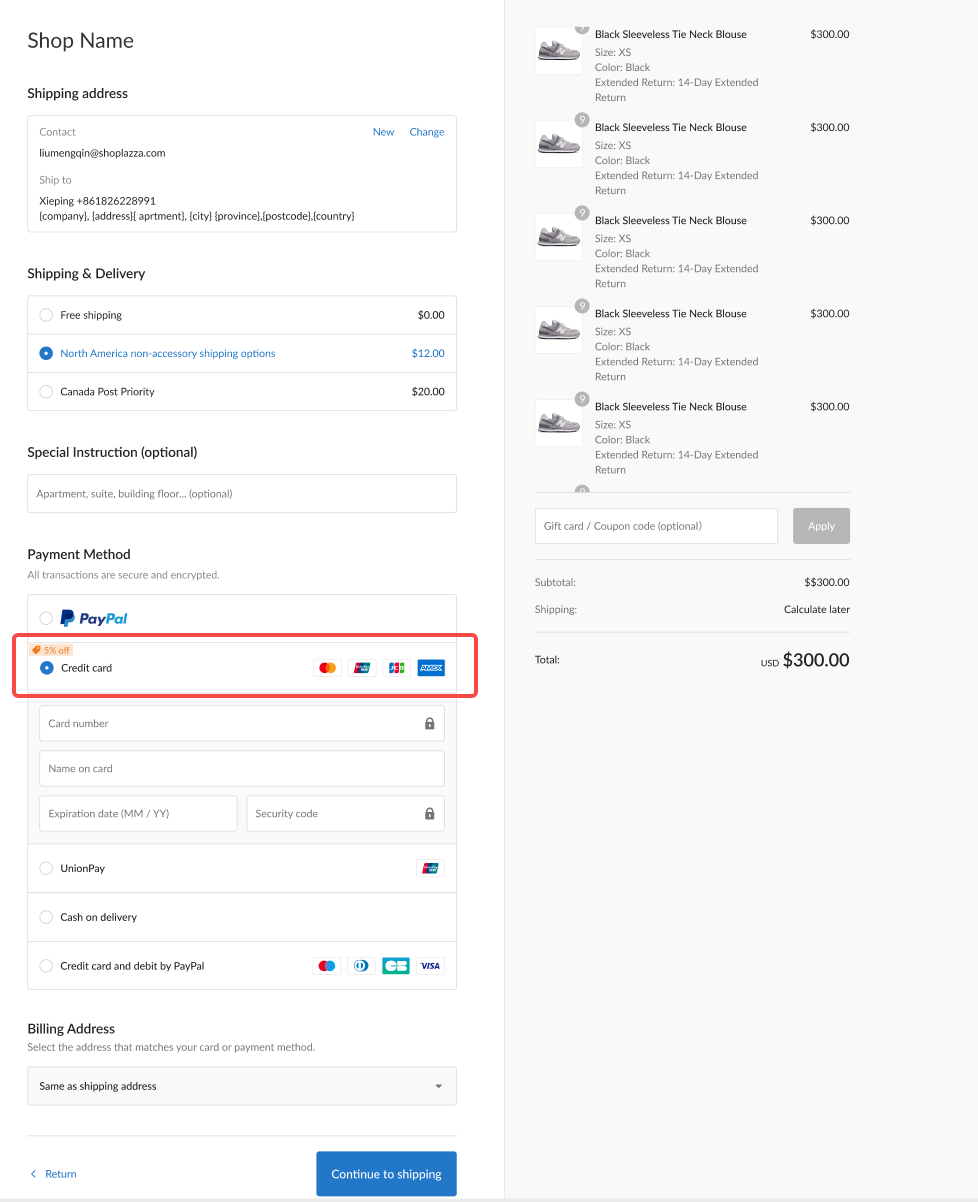
After you have configured the payment method with the preferential rule, you will see the discount offer logo in the top left corner of the payment method at checkout.
- Mobile Preview
- Desktop Preview
8. Reports Improvements
1. New Addition: SPU field in View conversion funnel by SPU
Feature Description:
This report has been improved by adding SPU field, which merchants can use to view conversion funnel and the data they need.
Usage path:
- Log into your Shoplazza Admin > Analytics > Reports. In the Behavior section, click View conversion funnel by SPU to access.
For further assistance, refer to this document: View Conversion Funnel by SPU – Shoplazza Help Center
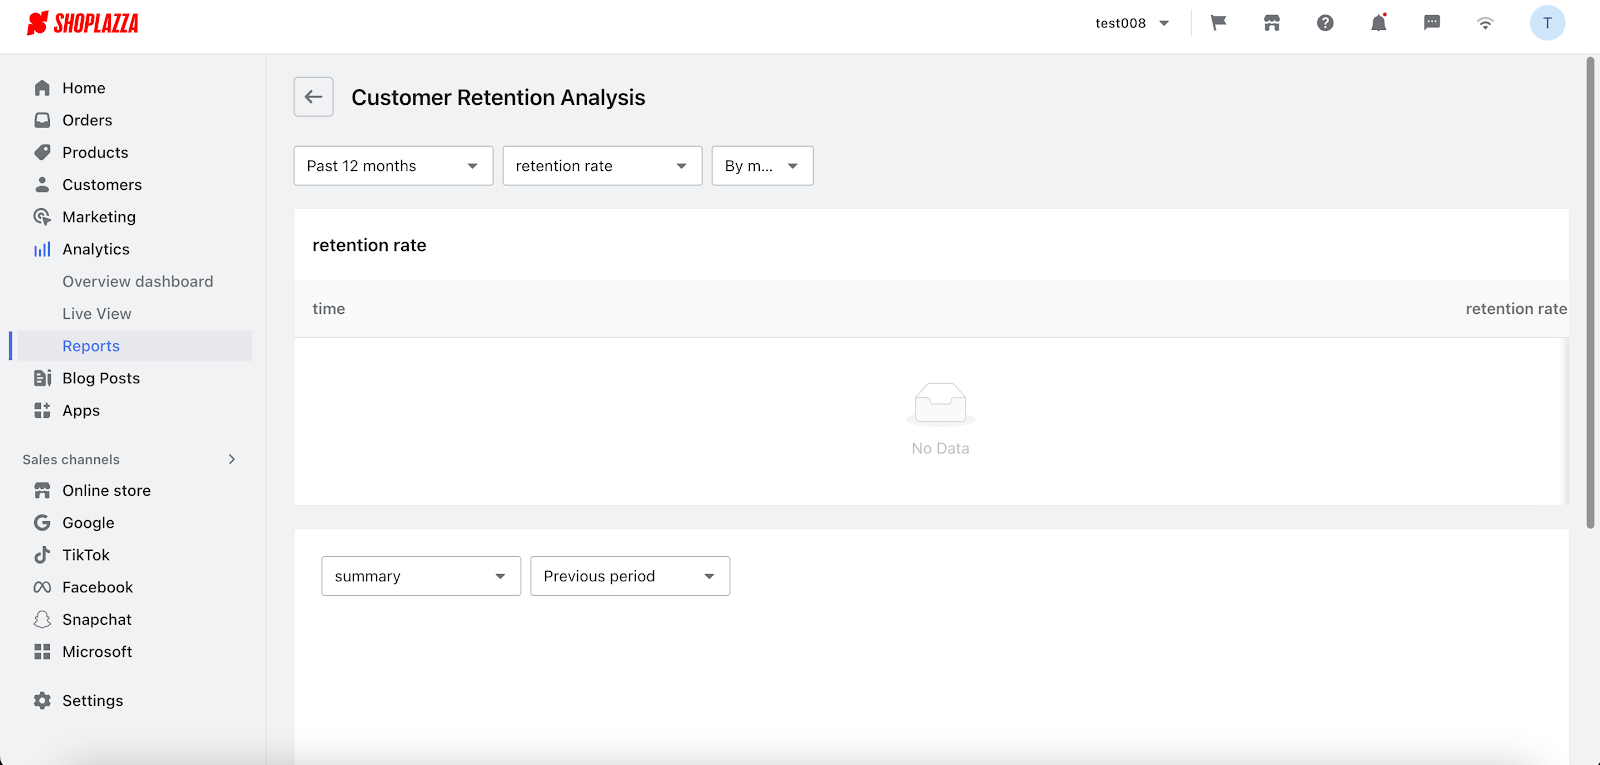
2. New Addition: Customer retention analysis
Usage scenarios:
This report can be used to see how customers are retained over a period of time to develop the best user marketing strategy.
Usage path:
- Log into your Shoplazza Admin > Analytics > Reports. In the Behavior section, click Customer retention analysis to access.
Feature overview:
- Click on the report to view the relevant data.
- You can switch the time interval, such as: the past 3 months, the past 6 months, the past 12 months, this year, last year, the year before last.
- You can switch the data metrics, such as: retention rate, number of retained users, sales, average price of orders.
- You can easily change the timeframe of your data to weekly, monthly, or quarterly views, as per your needs.
3. Enhanced UTM Report and Visitors by location
Optimization purpose:
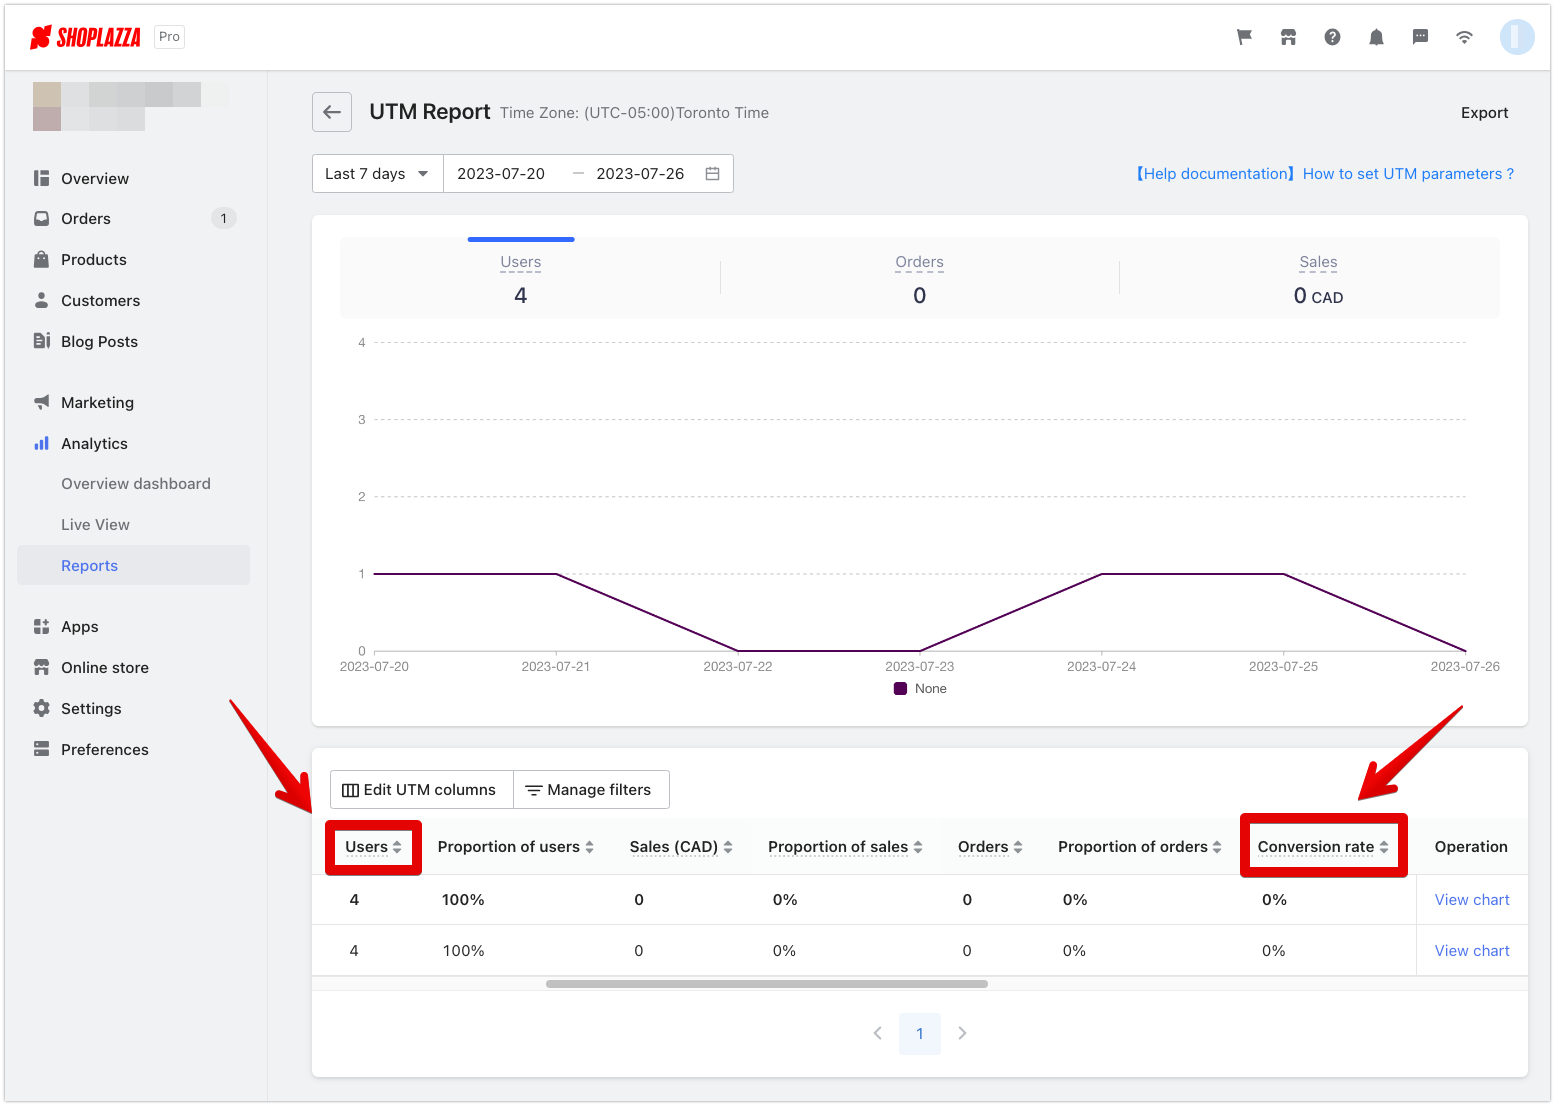
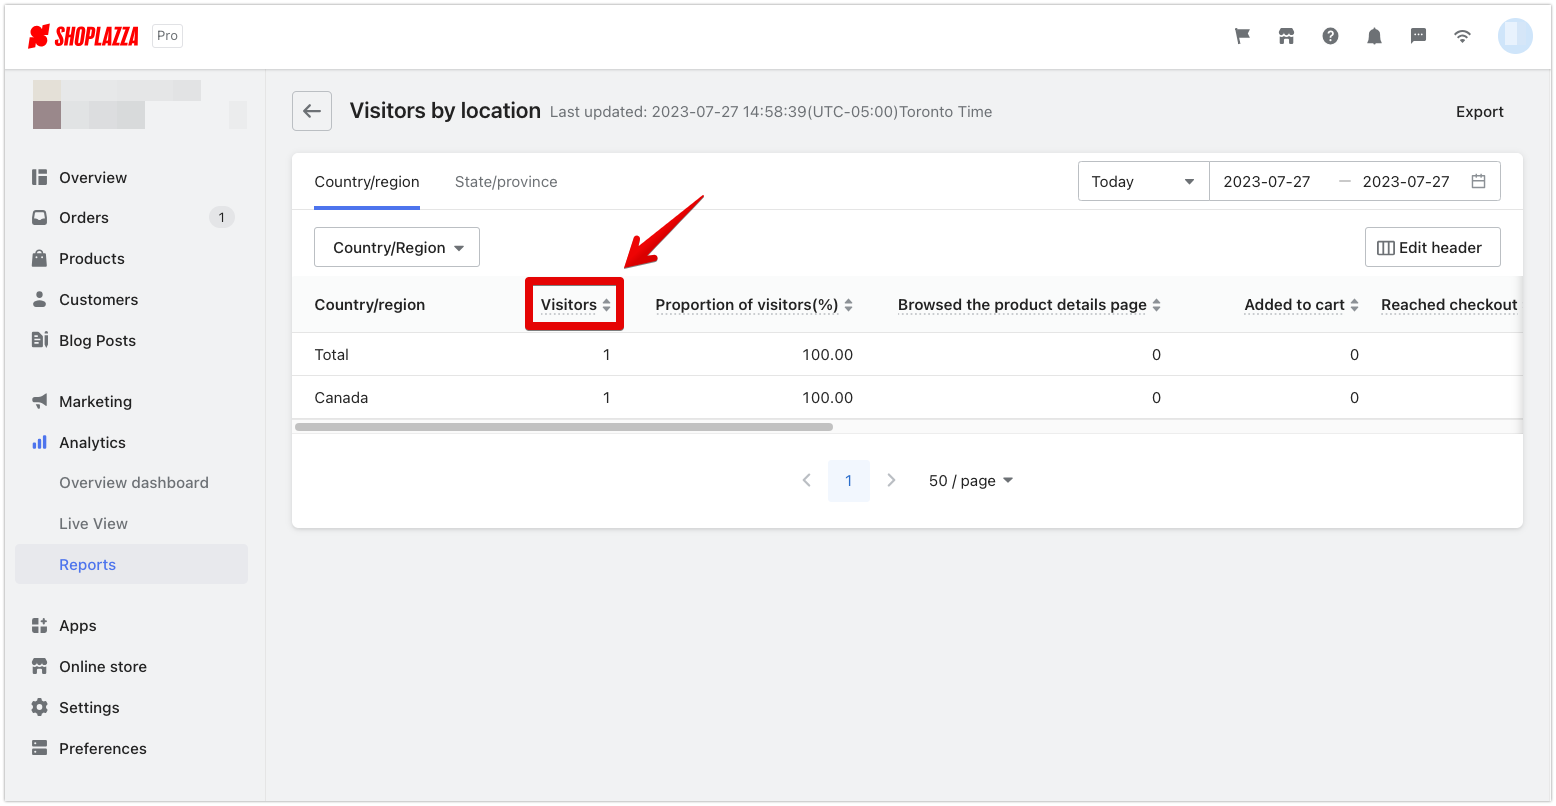
We've improved our reports to give you a clearer comparison of visitor quality and conversion rates.
Usage path:
- Log into your Shoplazza Admin > Analytics > Reports. In the Traffic section, click on UTM report.
- Log into your Shoplazza Admin > Analytics > Reports. In the Traffic section, click on Visitors by location.
Optimization features:
- Before the update, the total number of visitors was simply added up from each source or location. This meant if the same person visited from different places or sources, they were counted more than once.
- Now we've made changes so each visitor is only counted once, no matter how many sources or locations they come from. This keeps your numbers accurate.
- Also, we've added a "Conversion Rate" field to the Visitor by Location report. This is just the number of orders divided by the number of visitors.
4. Support for Multi-sales channels in Analytics
- Improved statistics in Home/Overview dashboard/Live View
Optimization purpose:
Following the launch of apps like MoCart (which enables users to build mobile apps for their online stores), Shoplazza now provides comprehensive support for multiple sales channels. This upgrade ensures seamless compatibility across various sales channels, including those powered by apps like MoCart.
Optimization features:
- The statistics in Home/Overview Dashboard/Live View will include data from all sales channels, including those generated through apps like MoCart. Data items exclusively from the online store will be identified with the label "Online Store" in the title. Hovering your mouse over the title will provide a description of the specific statistics.
Usage path:
- Log into your Shoplazza Admin > Overview dashboard.
- Log into your Shoplazza Admin > Live View.

Comments
Please sign in to leave a comment.