New features
1. Enhancing Language Support in Your Online Store
2. Tax-Inclusive Pricing Support
3. Support for wholesale customers with freight charges based on order price percentage
4. Item Exchange Voucher
5. Automatic Gift Purchase
6. Google Analytics 4 (GA4) now allows linking multiple accounts
7. Reports Improvements
8. Enhanced smart product recommendation tool for product pages, collections, and homepage
9. MoCart-Mobile App Builder
10. Product customizer app now has preview effect function
11. CJ Tracking Integration
1. Enhancing Language Support in Your Online Store
Usage scenarios:
To attract customers from different countries and regions, it's important for merchants to provide localization and translation options in their online stores. This helps increase store traffic, improve search engine optimization (SEO) results, and build trust among consumers.
Usage Path:
To enable the multi-language function in your online store, follow these steps:
- Navigate to your Shoplazza Admin > Settings > Languages and add desired language.
- Navigate back to your Settings > Markets. Choose the corresponding market and click on Manage. In the next page, under the Domain and languages section, click Manage. From here, click Add language.
- Navigate back to Online Store > Themes. In the desired theme, click the three dots for more options. In the drop-down, choose Edit Language and configure the translation for the theme text in the specific language.
- Install the Multi-Language Translator app from the Apps store to translate merchant-customized content in specific languages.
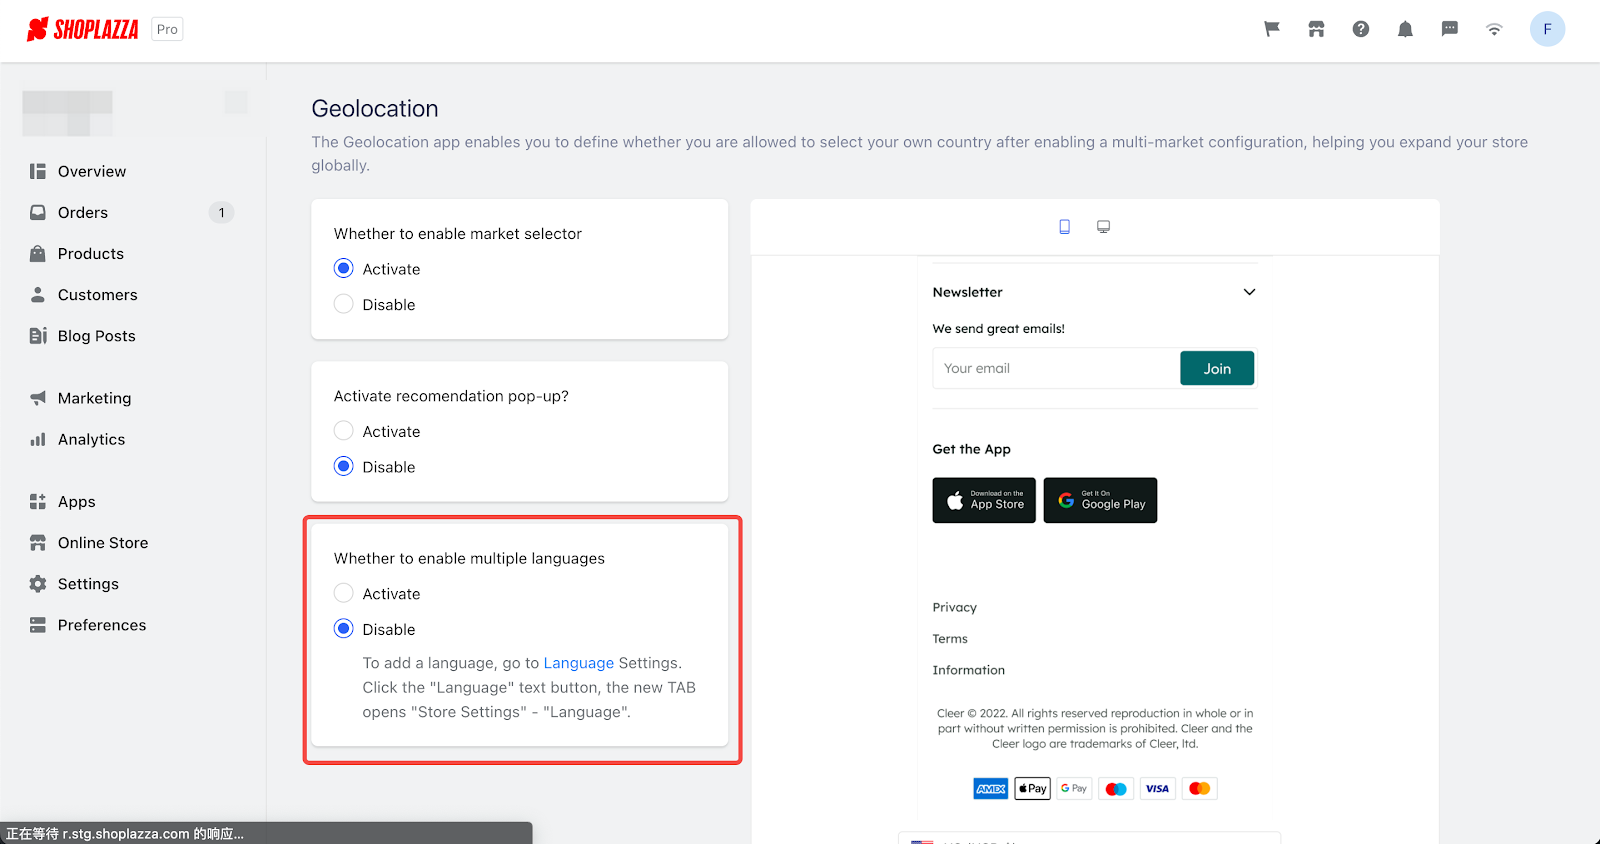
- Install the Geolocation app from the Apps section, enable the multi-language selector, and allow customers to switch market languages independently in the store.
Feature Overview:
The multi-language function in your online store provides the following features:
- Adding a Language: Navigate to your Shoplazza Admin > Settings > Languages and add desired language.
Note
When a merchant adds a new language in the Settings > Languages, this language becomes available across all the markets they've established. The store's primary language, as set by the merchant, is recognized as the default language. However, the merchant also has the flexibility to designate any added language as the default within a specific market.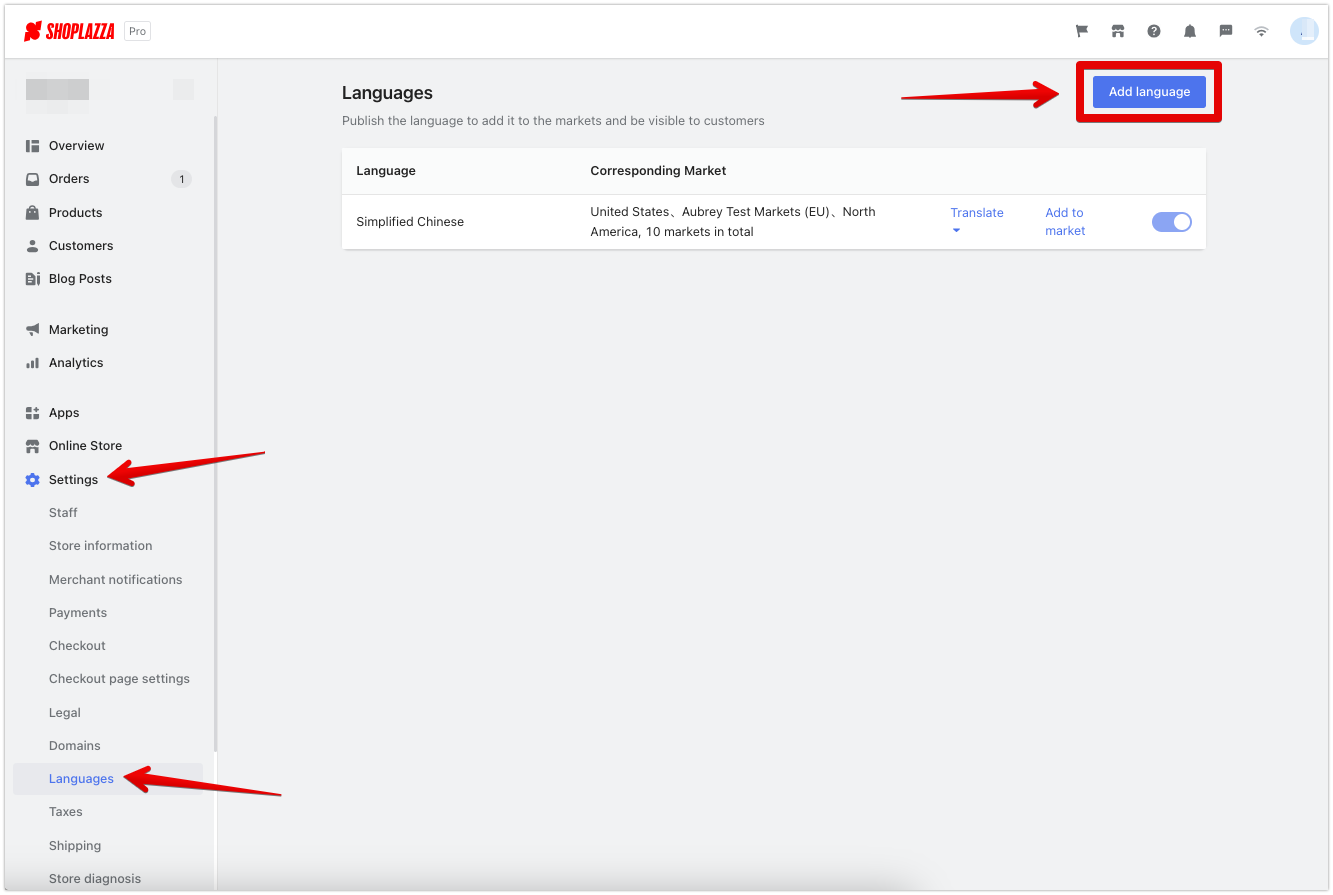
2. Translation of Content:
-
- After adding a language, choose an option to apply the translation.
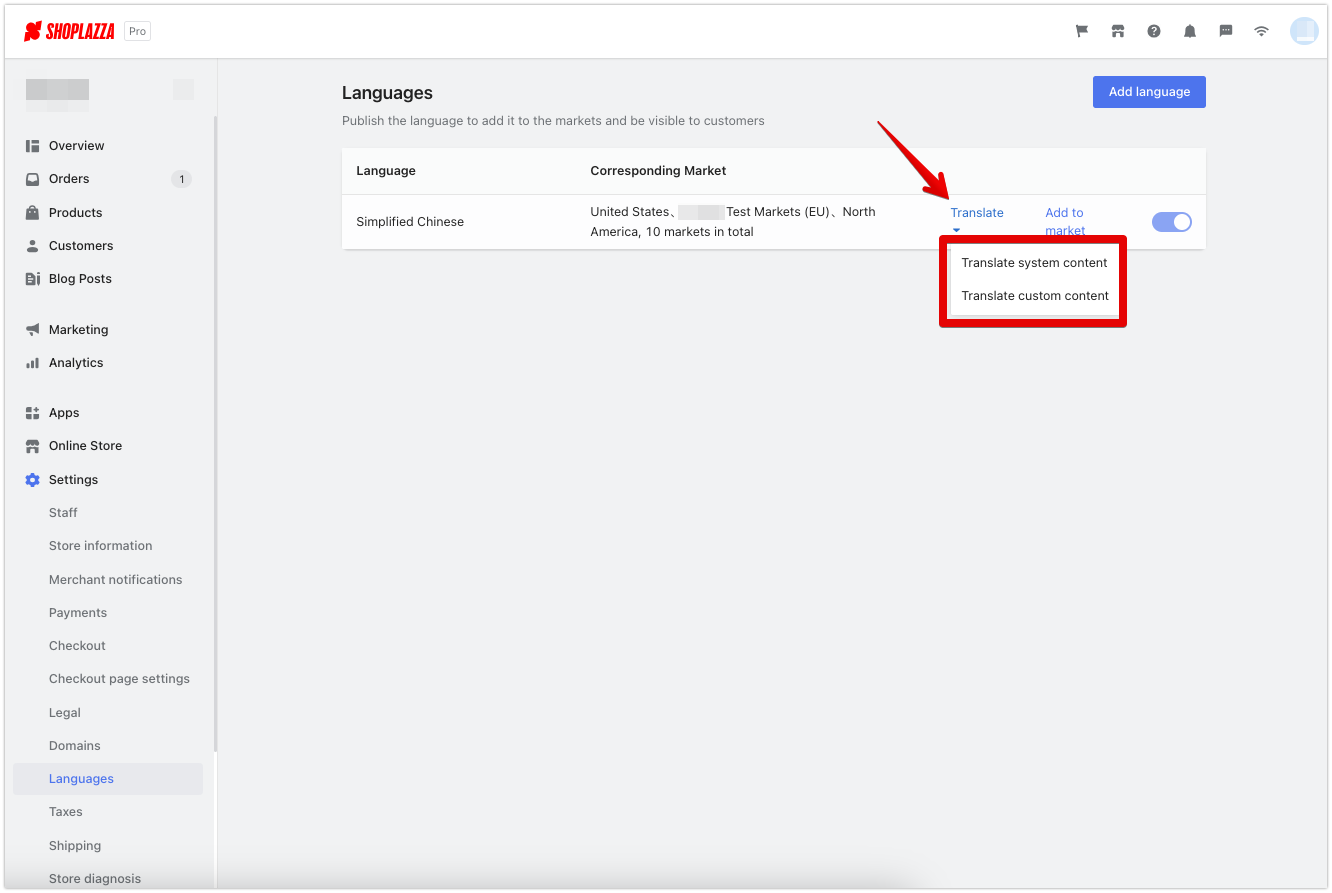
- Two types of content require translation:
- Fixed text in the store theme can be translated by clicking the Switch translation languages button and editing the translation manually.


- Custom content like product titles and descriptions can be translated using the Multilingual Visual Translation app. The app allows for manual editing, auto-translation, and switching the target language.
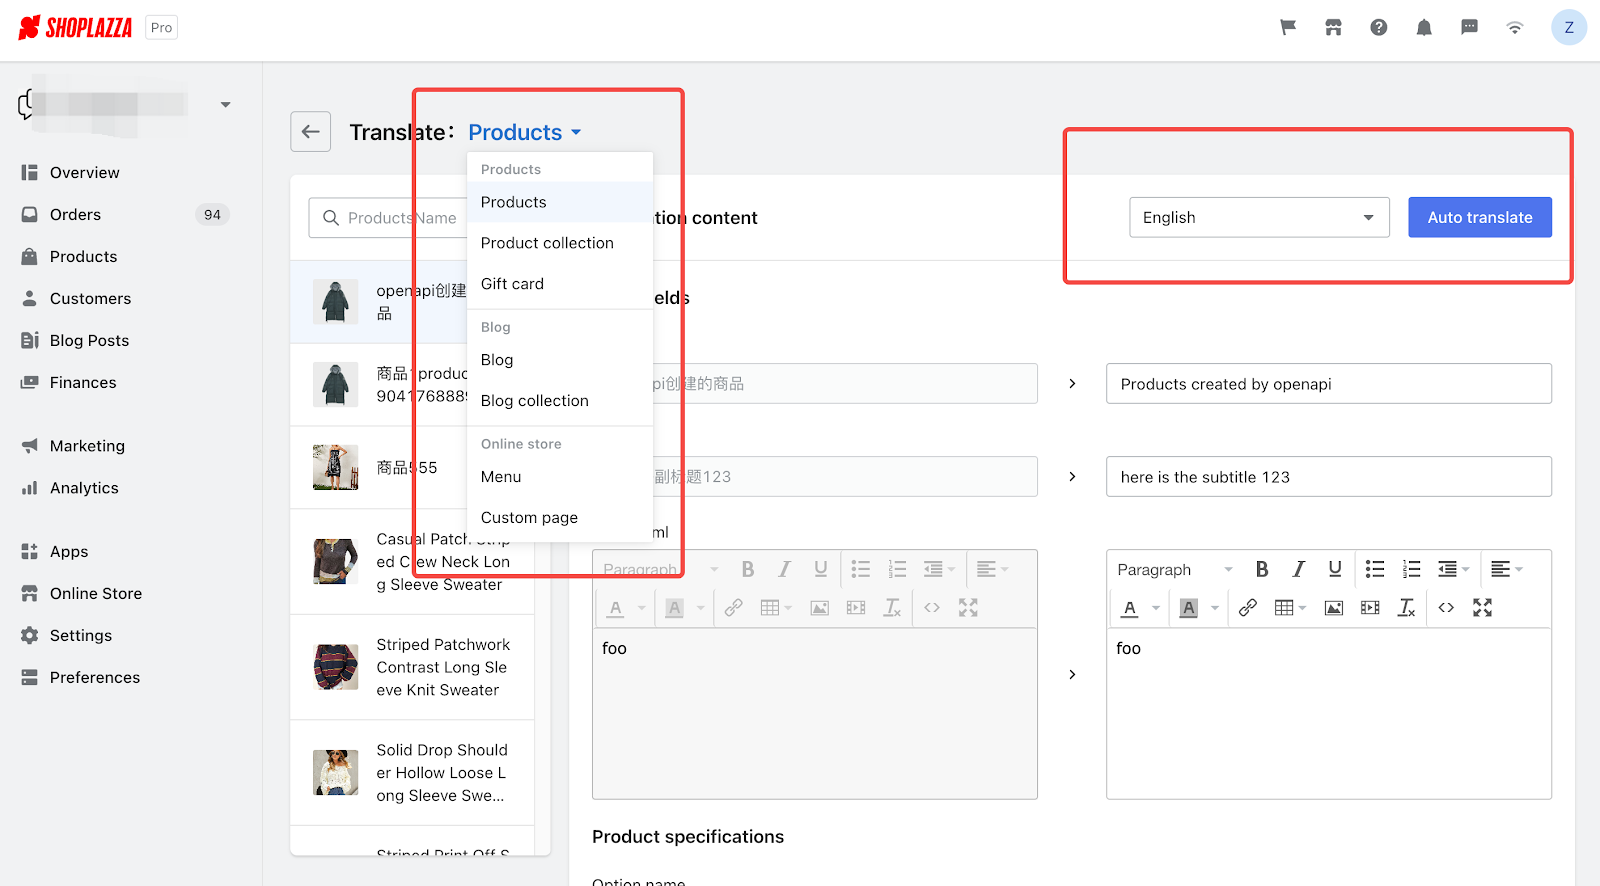
3. Configuring Language for the Market:
-
- A language becomes visible to consumers only after configuring it for the market.
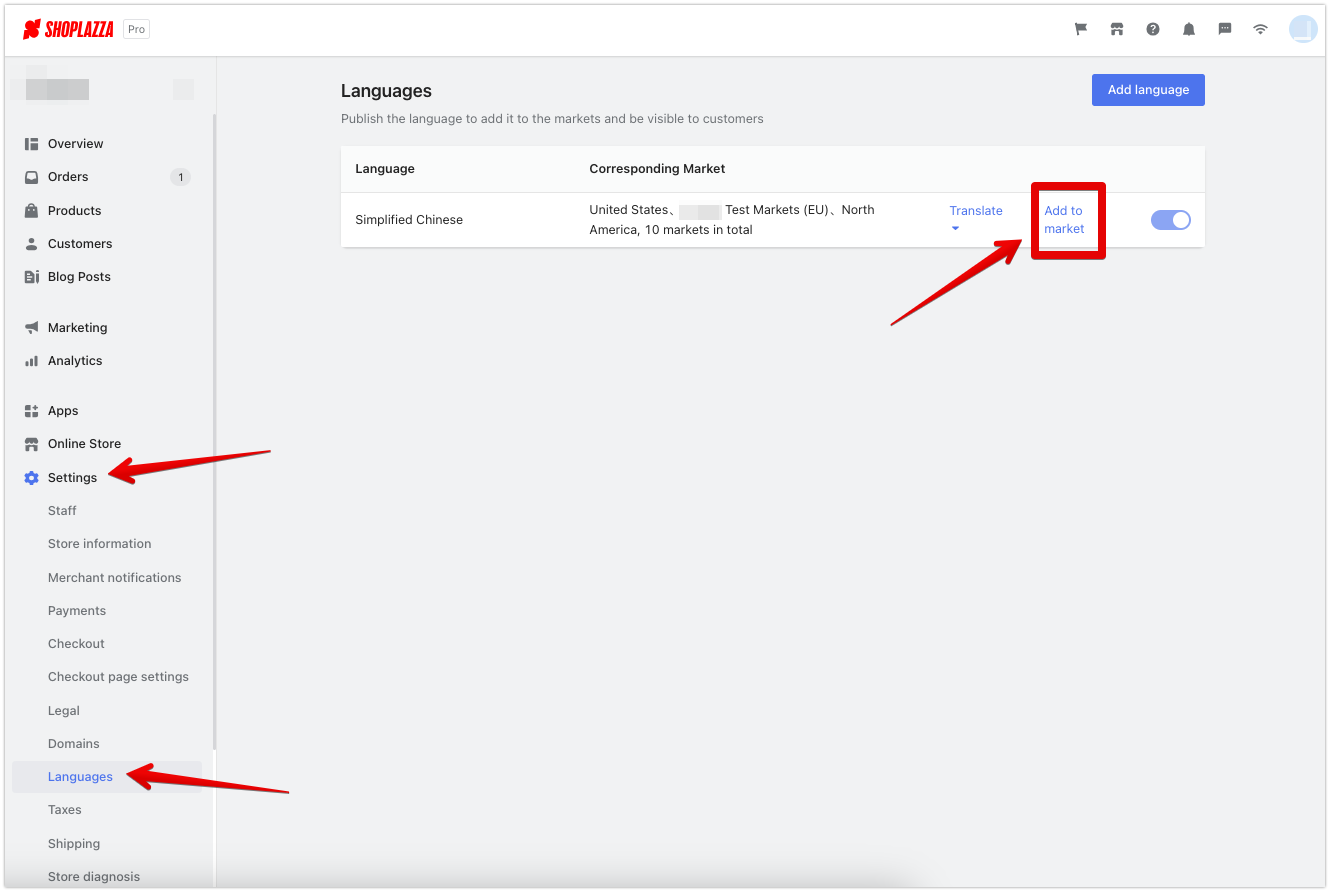
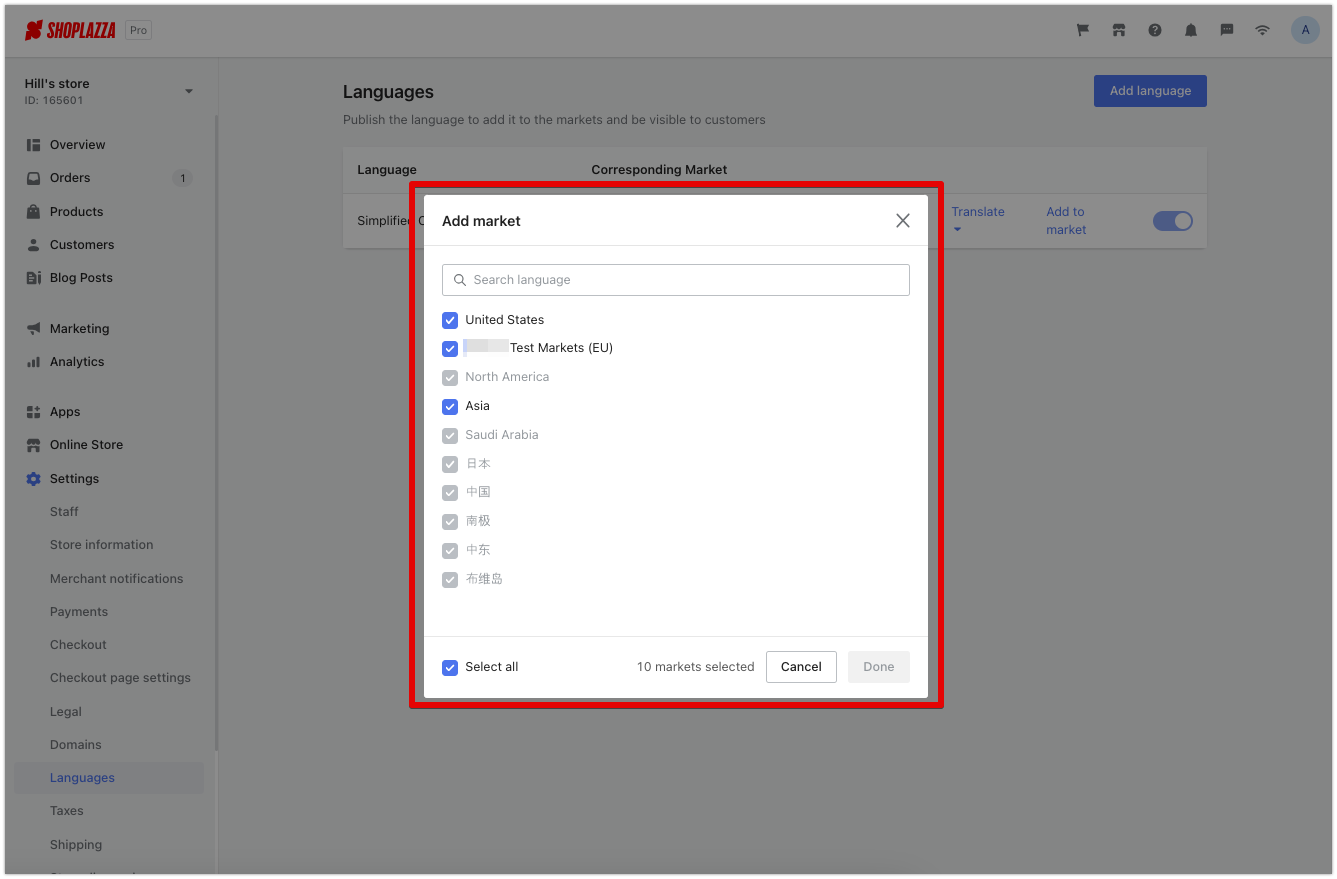
- To hide a language, it can be deactivated in Settings > Language or removed in Settings > Markets > Market name > Domains and languages.
4. Managing Market Languages:
-
- Market languages can be managed in Settings > Markets.
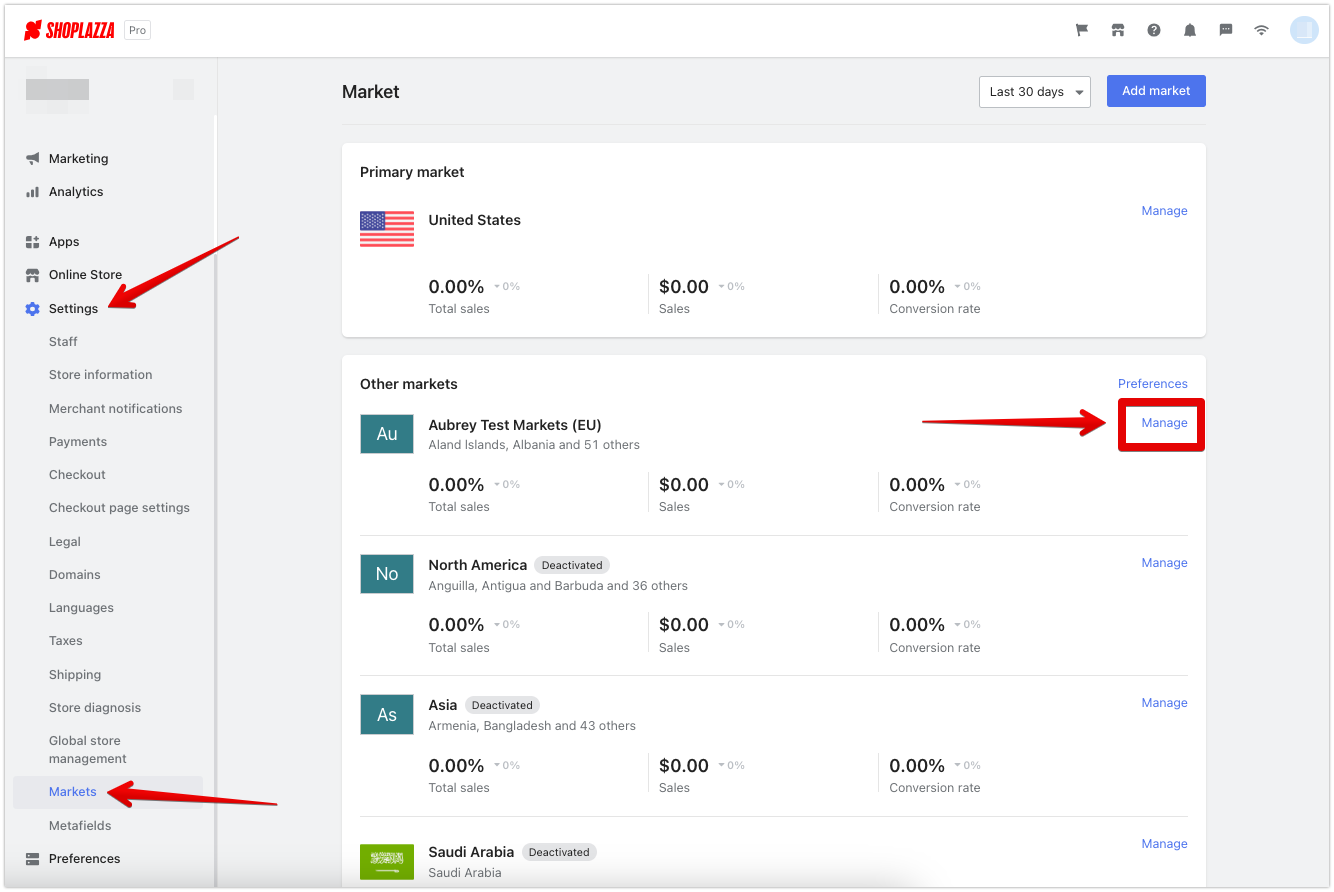
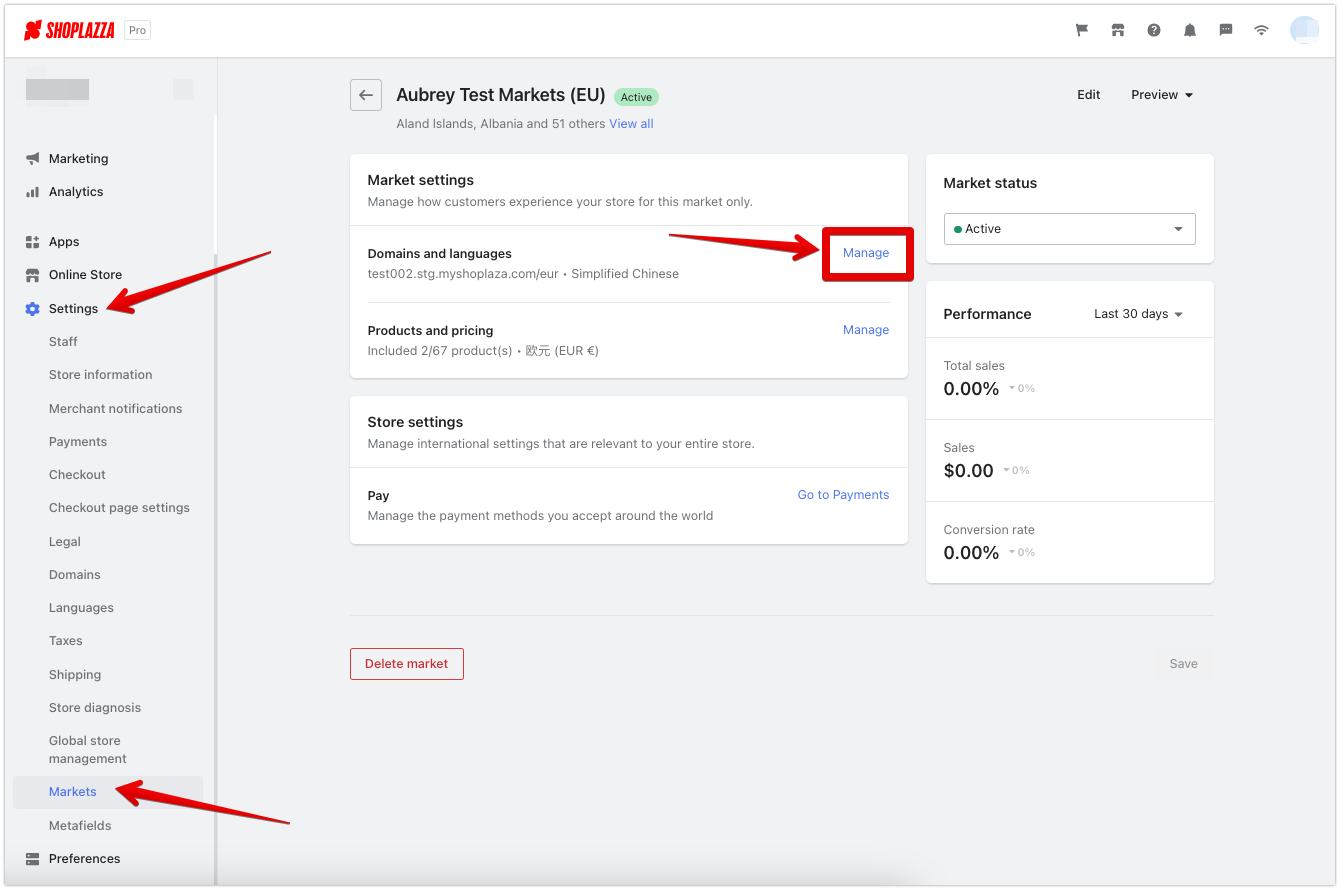

- A default language can be set for the market. When consumers access the market domain without specifying a language, the default language is automatically displayed.
5. Enabling the Geolocation app plugin:
-
- To allow consumers to switch languages on the store page, enable the Geolocation plugin.
- The plugin adds a language selector at the bottom of the store page.
-
Tax-Inclusive Pricing Support
Usage Scenarios:
- Certain regions (like Europe) have a common practice where consumers anticipate the listed price of an item to already account for taxes and fees. Our tax-inclusive pricing feature allows merchants to set their goods' prices in such a way that it already comprises all taxes and fees. This approach can enhance customer trust and provide a more localized shopping experience.
Usage Path:
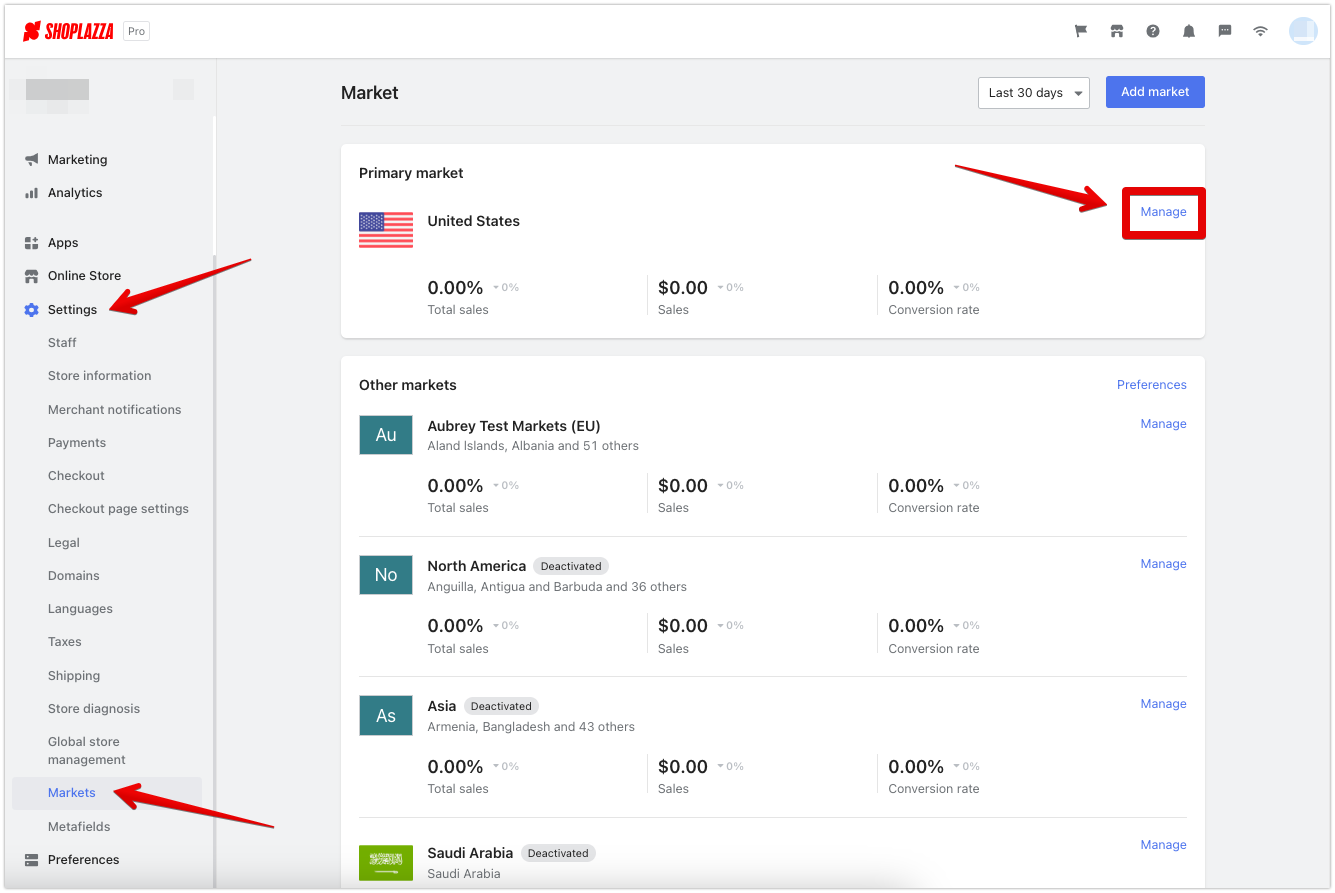
- Navigate to your Shoplazza admin console and click on Market.
- Choose the market in which you wish to enable the tax-inclusive pricing setting and click Manage.
- Within the market settings, enable Commodity price includes sales tax, and click Save.
Feature Overview:
1. For markets that require tax-inclusive display of goods' prices, activate the 'Commodity price includes sales tax' option.
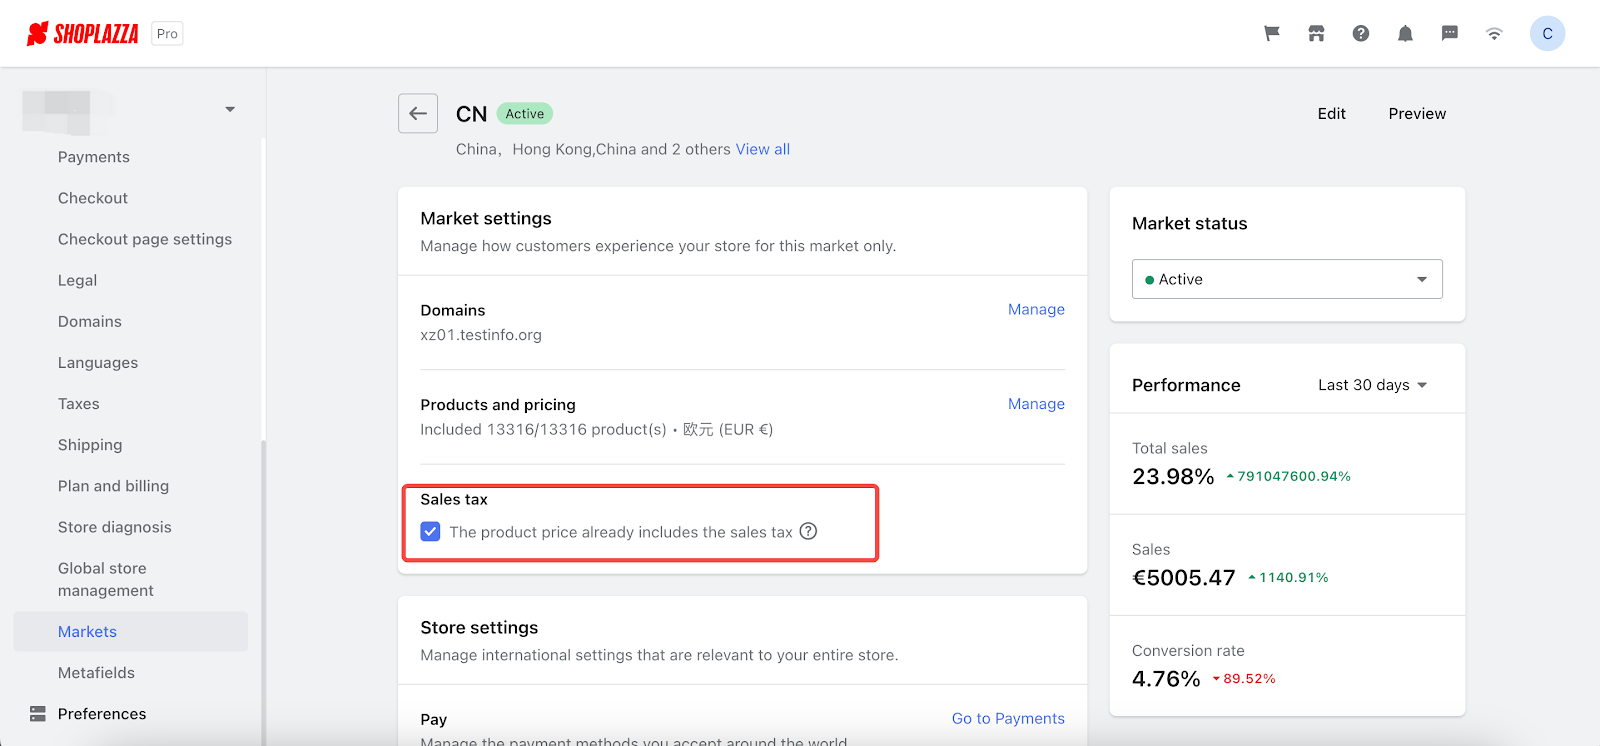
- Tax Calculation Formula: tax = (tax rate X commodity price after excluding any discounts) / (1 + tax rate)
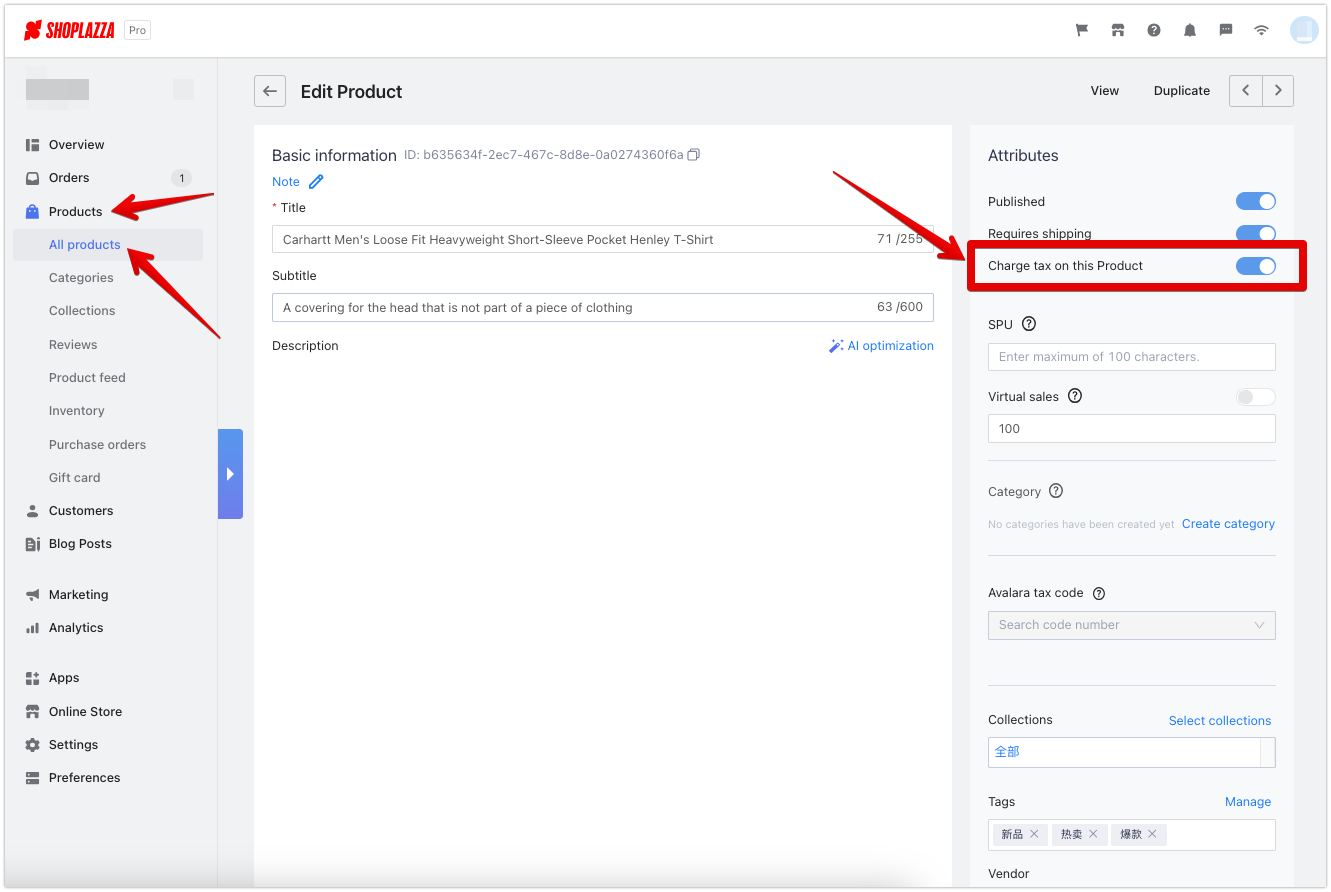
2. Once the product price is set to be tax-inclusive, ensure that the tax option on the product page remains enabled so that the tax is included in the displayed product price.
3. Upon checkout, customers will be able to view the included tax amount beneath the total order price.

4. Information regarding whether the total product price includes tax will be visible in the order details.
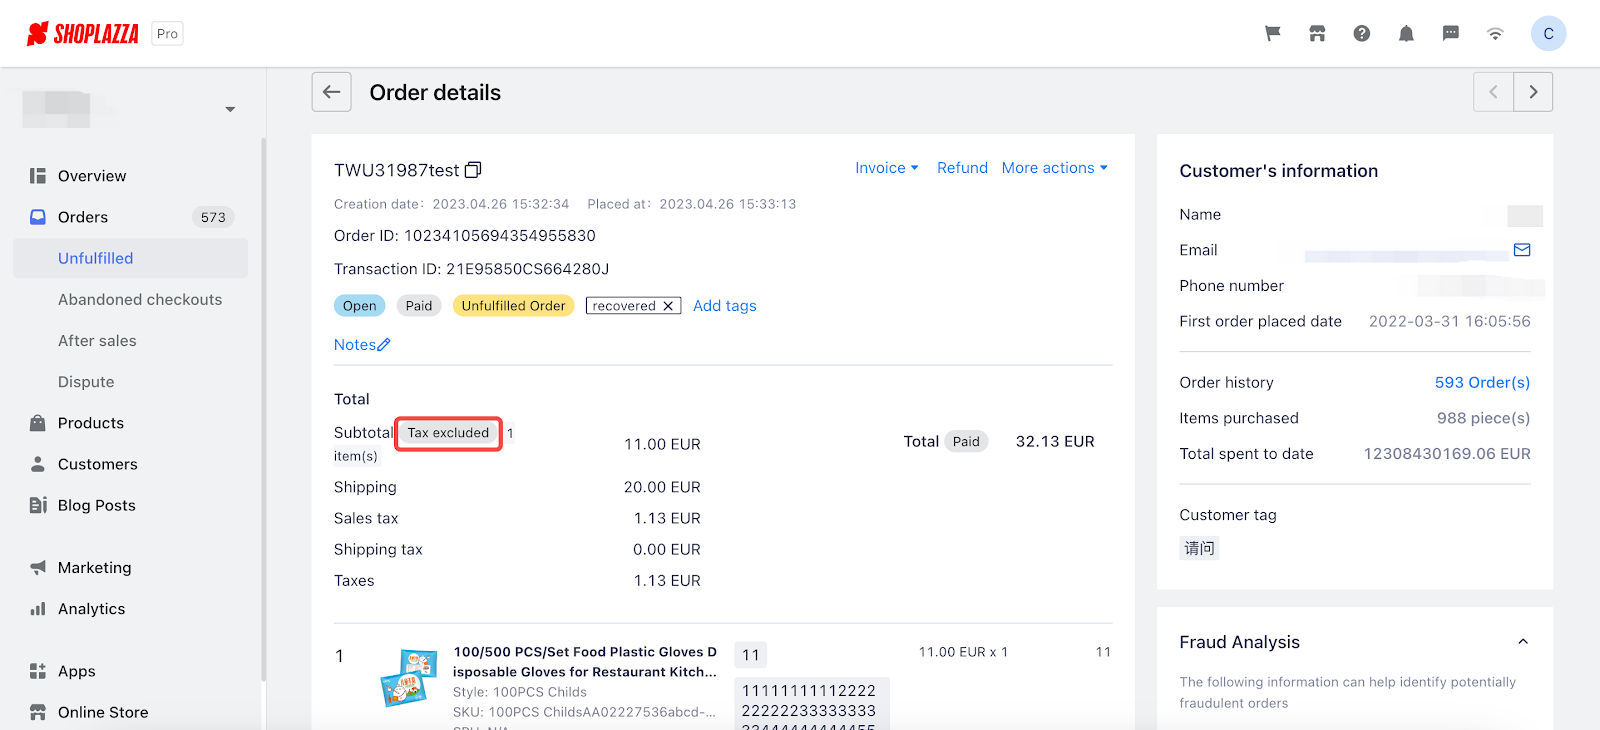
After enabling tax-included pricing, in any data report the selling price will be calculated inclusive of tax. To prevent double-counting, sales tax will no longer be separately accounted for in taxes and fees. For more details, please refer to the instructions in each report's help documentation.
3. Support for wholesale customers with freight charges based on order price percentage
Usage Scenarios:
- Wholesale sellers often calculate shipping costs based on a percentage of the total order value. To make this easier, we've added a price percentage calculation mode. This new mode works alongside the existing fixed freight mode and tiered freight mode, giving wholesale customers more flexibility in figuring out their shipping costs.
Usage Path:
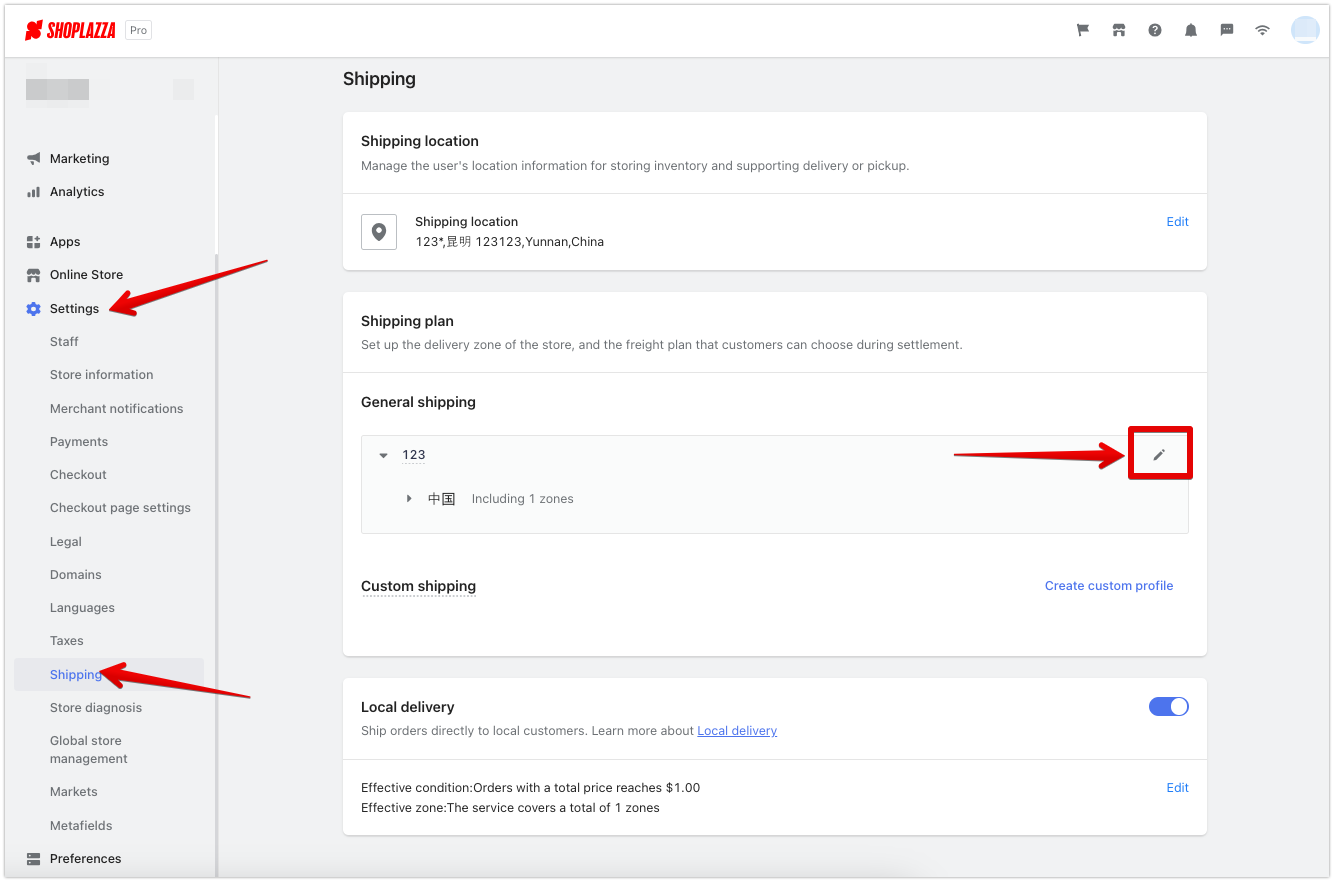
- Access your Shoplazza Admin > Settings > Shipping. Find the shipping profile you would like to update and click on the pencil icon (edit icon).
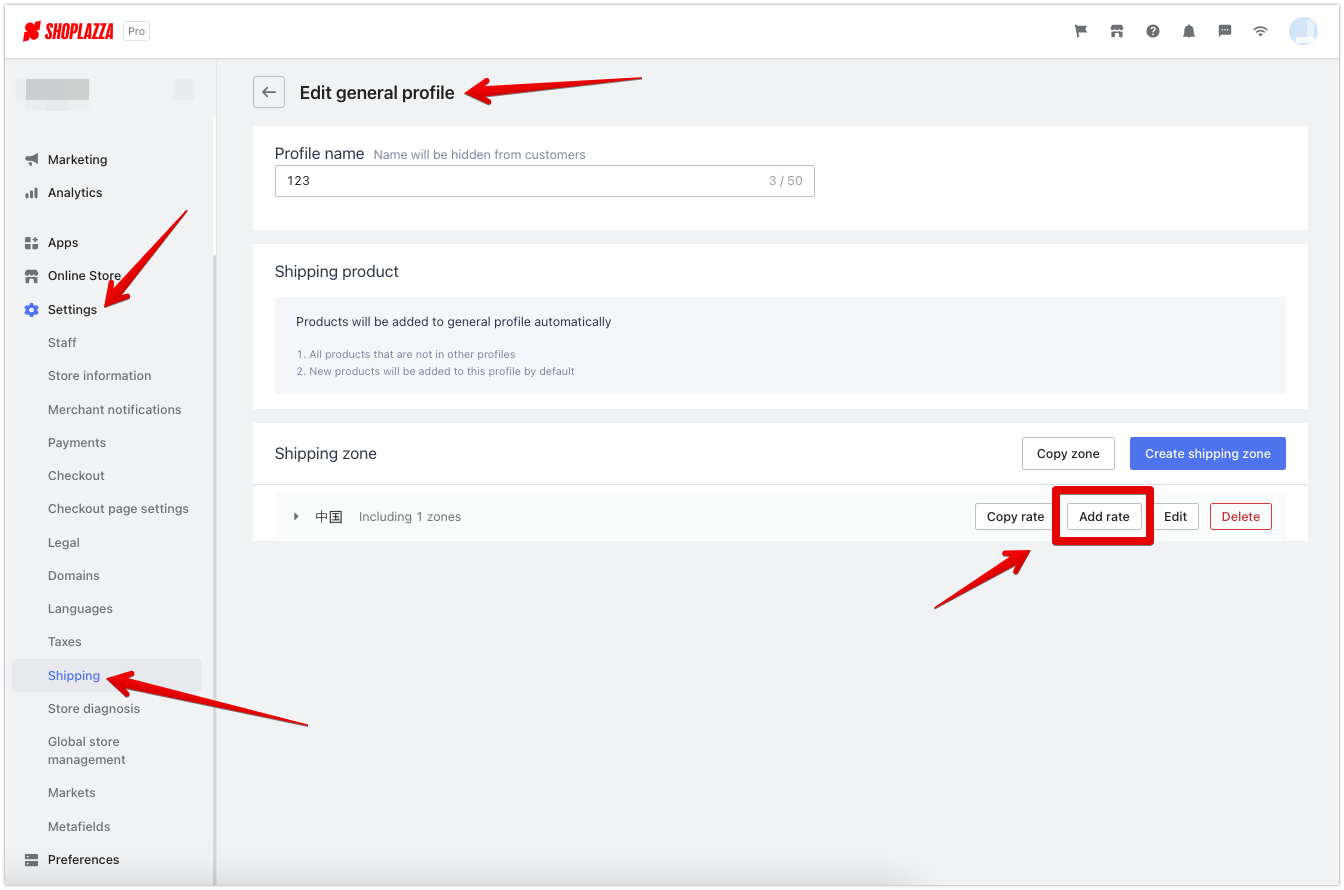
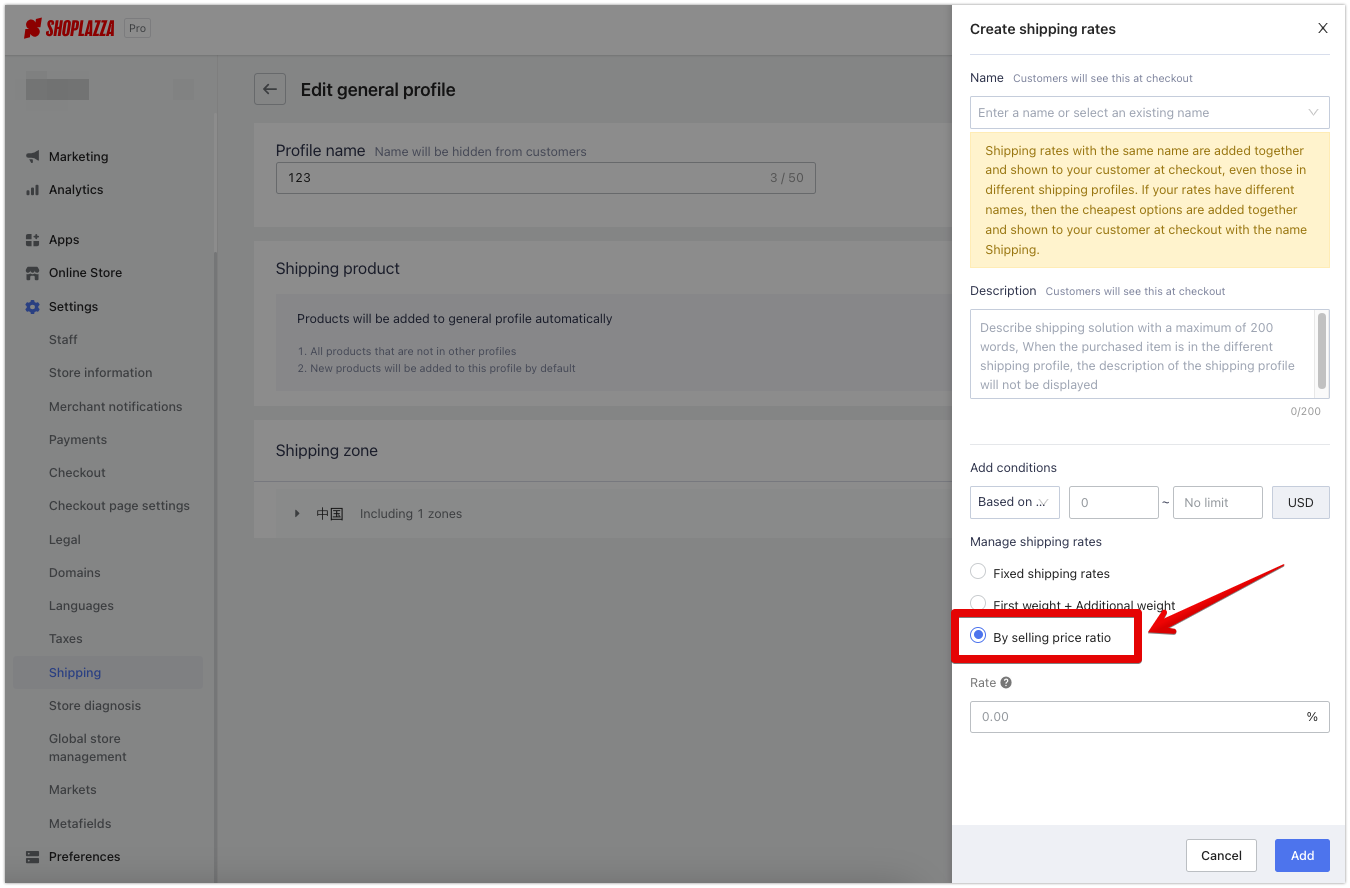
- Click the Add rate button. A window will appear on the right side of the screen. Choose By selling price ratio.
Feature Overview:
- We've added a new feature in the shipping settings: By selling price ratio. This will calculate shipping costs based on a percentage of the total order price.
- The shipping fee is the total selling price of the items in the order, multiplied by the percentage you set.
- Keep in mind that the item price is figured out before tax and doesn't include any discounts from coupons or tips.
- If an order is covered by more than one logistics plan (both general & custom), the shipping cost for each plan's items will be calculated separately based on the percentage you set. Then, these individual shipping costs are added up to give the total shipping cost.
4. Item Exchange Voucher
Usage Scenarios:
- These vouchers offer an opportunity for customers to acquire specific items, thereby motivating them to shop more. Retailers can hand out free exchange vouchers to target customer groups. Once received, these vouchers can be swapped for a particular item at no extra cost. As an example, Starbucks' coupons allow customers to choose a coffee after receiving the coupon.
Usage Path:
- Navigate to your Shoplazza Admin > Marketing > Coupons and begin creating a new coupon campaign.
Feature Overview:
1. Adding Item Exchange Coupons: These allow customers to trade their coupon for specific items, a great strategy to boost customer spending.

- The other settings are similar to those for other types of coupons. You can set up discount limits, discount rules, determine who can use the coupon, and define which products the coupon applies to.
- Regarding product exchange, a customer can only swap for one product per order. By default, the product with the lowest price can be exchanged.
5. Automatic Gift Purchase
Usage Scenarios:
- The automatic gift purchase feature enables online merchants to offer incentives to customers based on predefined conditions. For example, when a customer spends $100 or more, they receive a free t-shirt. Using the Discount with purchase app, merchants configure this promotion. When a customer adds qualifying items to their cart and proceeds to checkout, the system recognizes the gift condition and automatically adds the gift, such as a single SKU item, to their order. This enhances the customer's shopping experience, encourages larger purchases, and boosts satisfaction.
Usage Path:
- Merchant Configuration Path:
- Navigate to your Shoplazza Admin > Apps and click on Visit app store.
- Search for the Discount with purchase app and install.
- Within the app, create a gift event.
- Customer Experience Path:
- The automatic purchase function is triggered when the customer performs the following actions:
- Clicks on Buy Now or Add to Cart on the Product Detail Page.
- Proceeds to the shopping cart and clicks on Go to Checkout.
- The automatic purchase function is triggered when the customer performs the following actions:
Feature Overview:
- Discount with purchase description: Merchants can create full gift campaigns, where customers receive free goods when their shopping quantity or total amount meets the set requirements. This encourages customers to shop more.
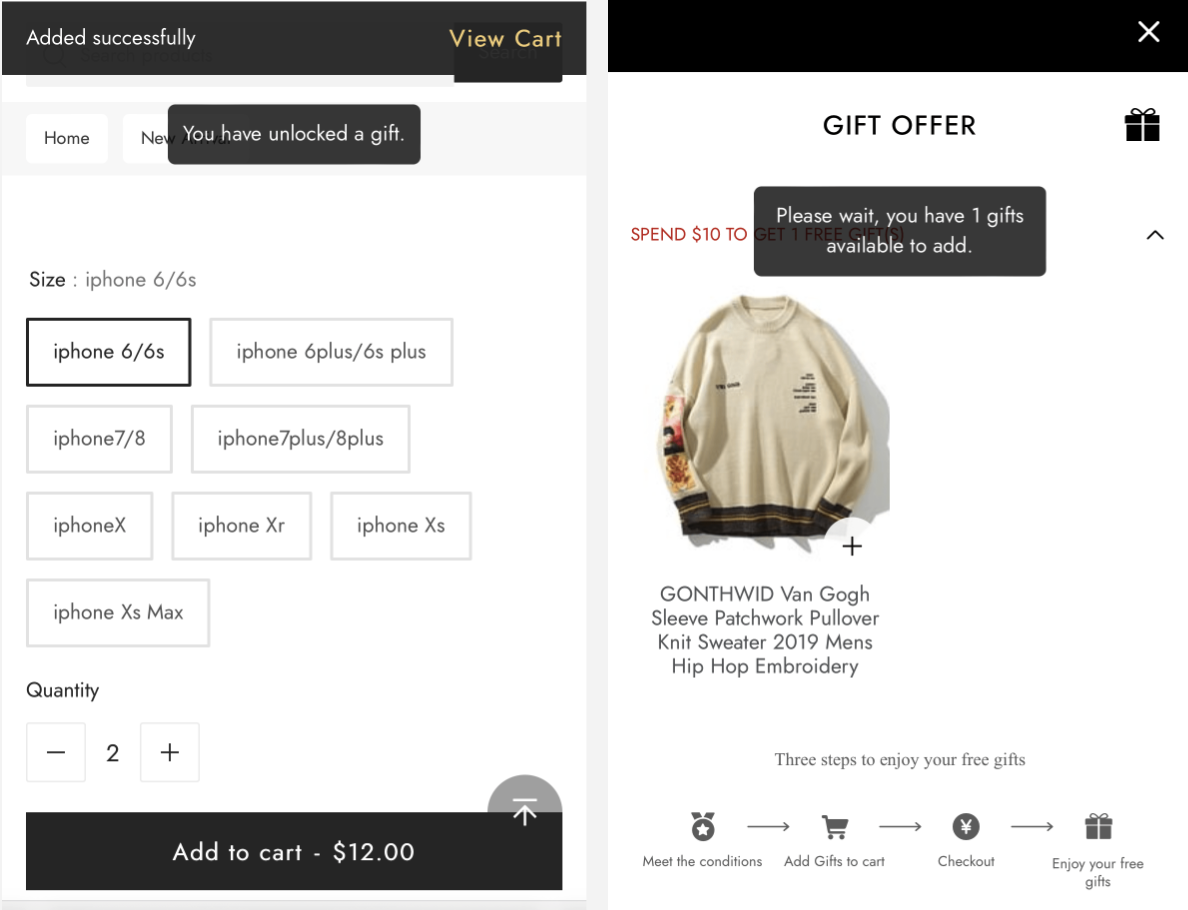
- Automatic Purchase Giveaway Function Description: When the customer purchases additional goods and meets the gift conditions:
- For a single SKU gift, the system will automatically add the gift to the customer's order.
- For a multi-SKU giveaway, the system will prompt the customer to add the giveaway during checkout. The system will continue to iterate through the multi-SKU giveaways to be automatically added.
6. Google Analytics 4 (GA4) now allows linking multiple accounts
Usage Scenarios:
- Merchants utilizing Google Analytics 4 (GA4) software can now monitor their website data by linking not just one, but multiple GA accounts. This allows data to be reported to several GA4 accounts, bolstering the reliability of data accuracy.
- Moreover, you can manually link the GA4 code to cater to the needs of multiple operational teams within your company. Each team can use their own Gmail, with each Gmail having its own linked GA account for data monitoring.
Usage Path:
- Navigate to your Shoplazza Admin > Marketing > Google. Click on the Function tab and click on Google Analytics.
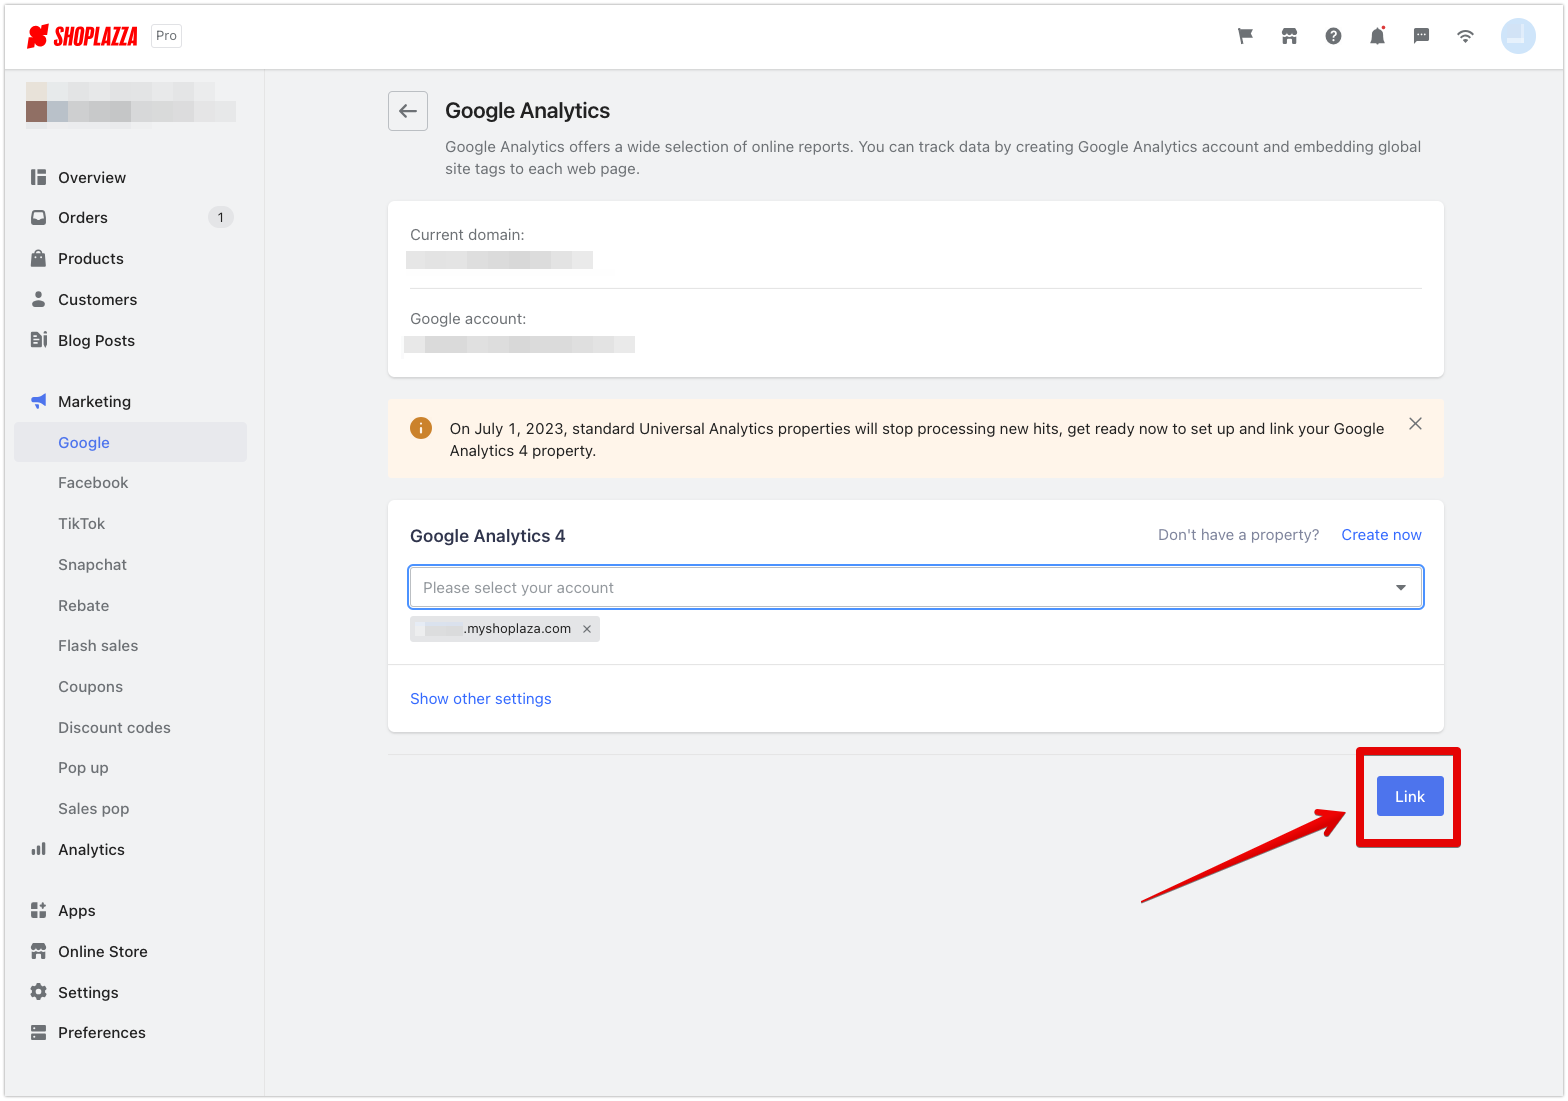
- Link your GA4 account.
Feature Overview:
- You can link accounts by choosing from the GA account list.
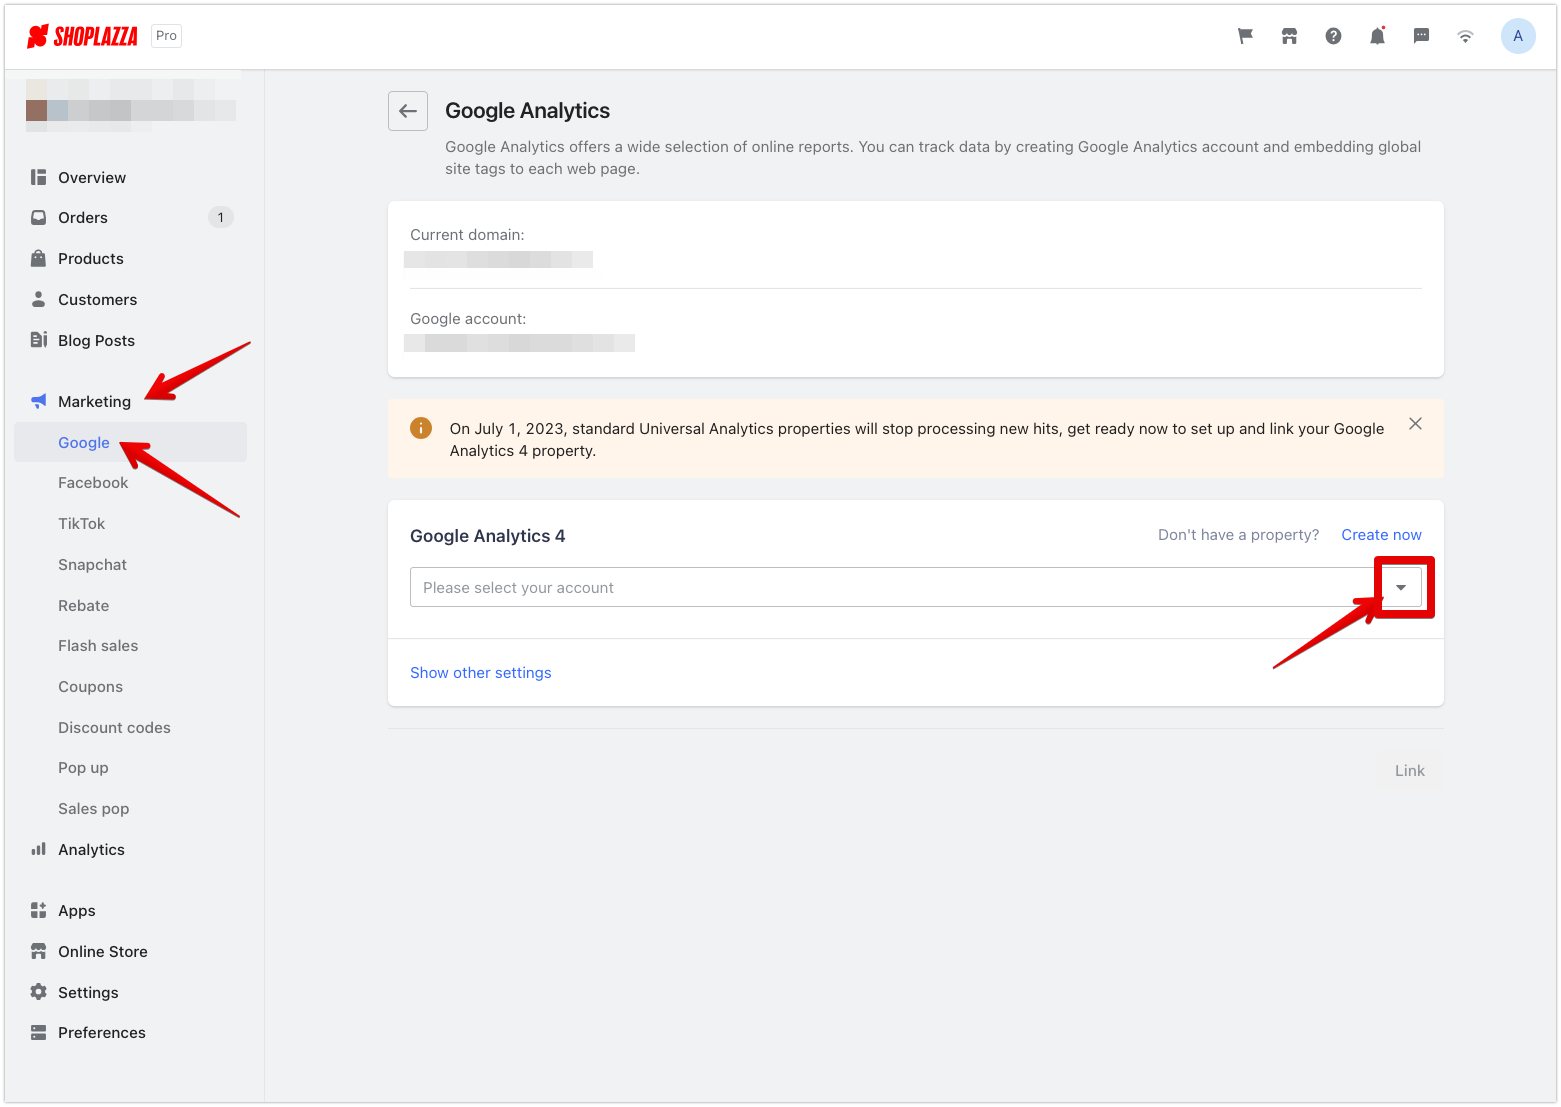
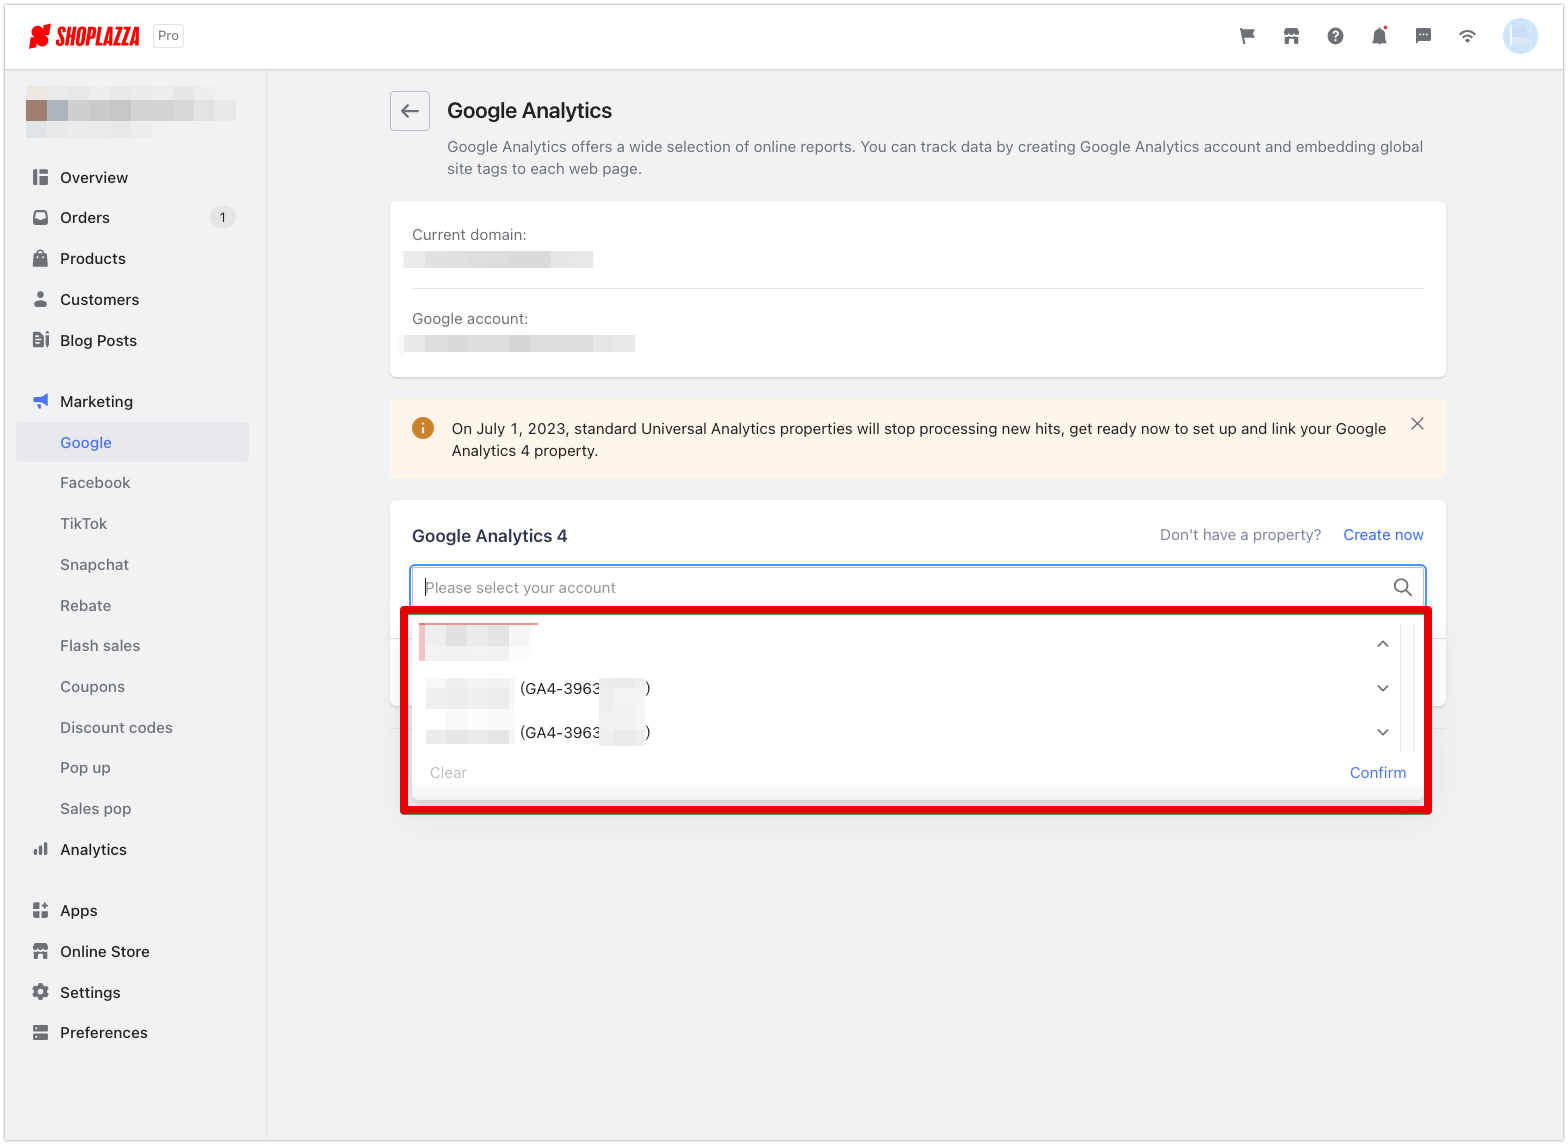
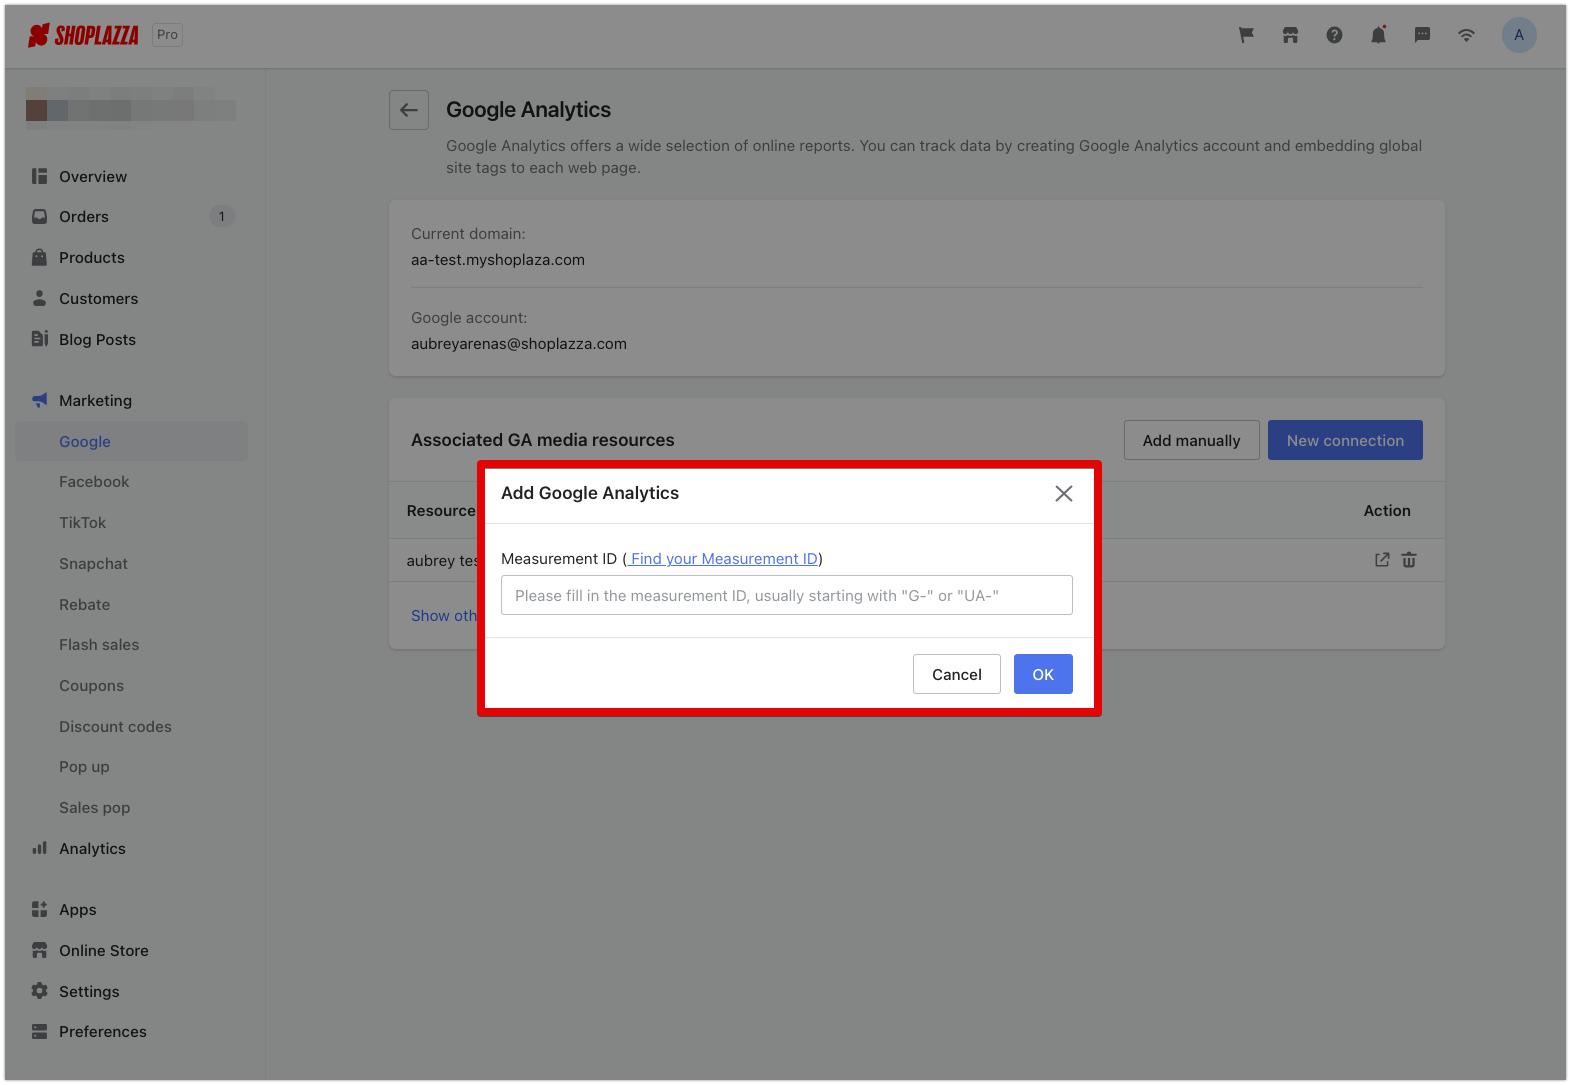
- After linking your GA4 account, you can add more sources by clicking the Add Manually Button: Hit the add manually button, and a pop-up will appear for you to put in a new measurement ID.

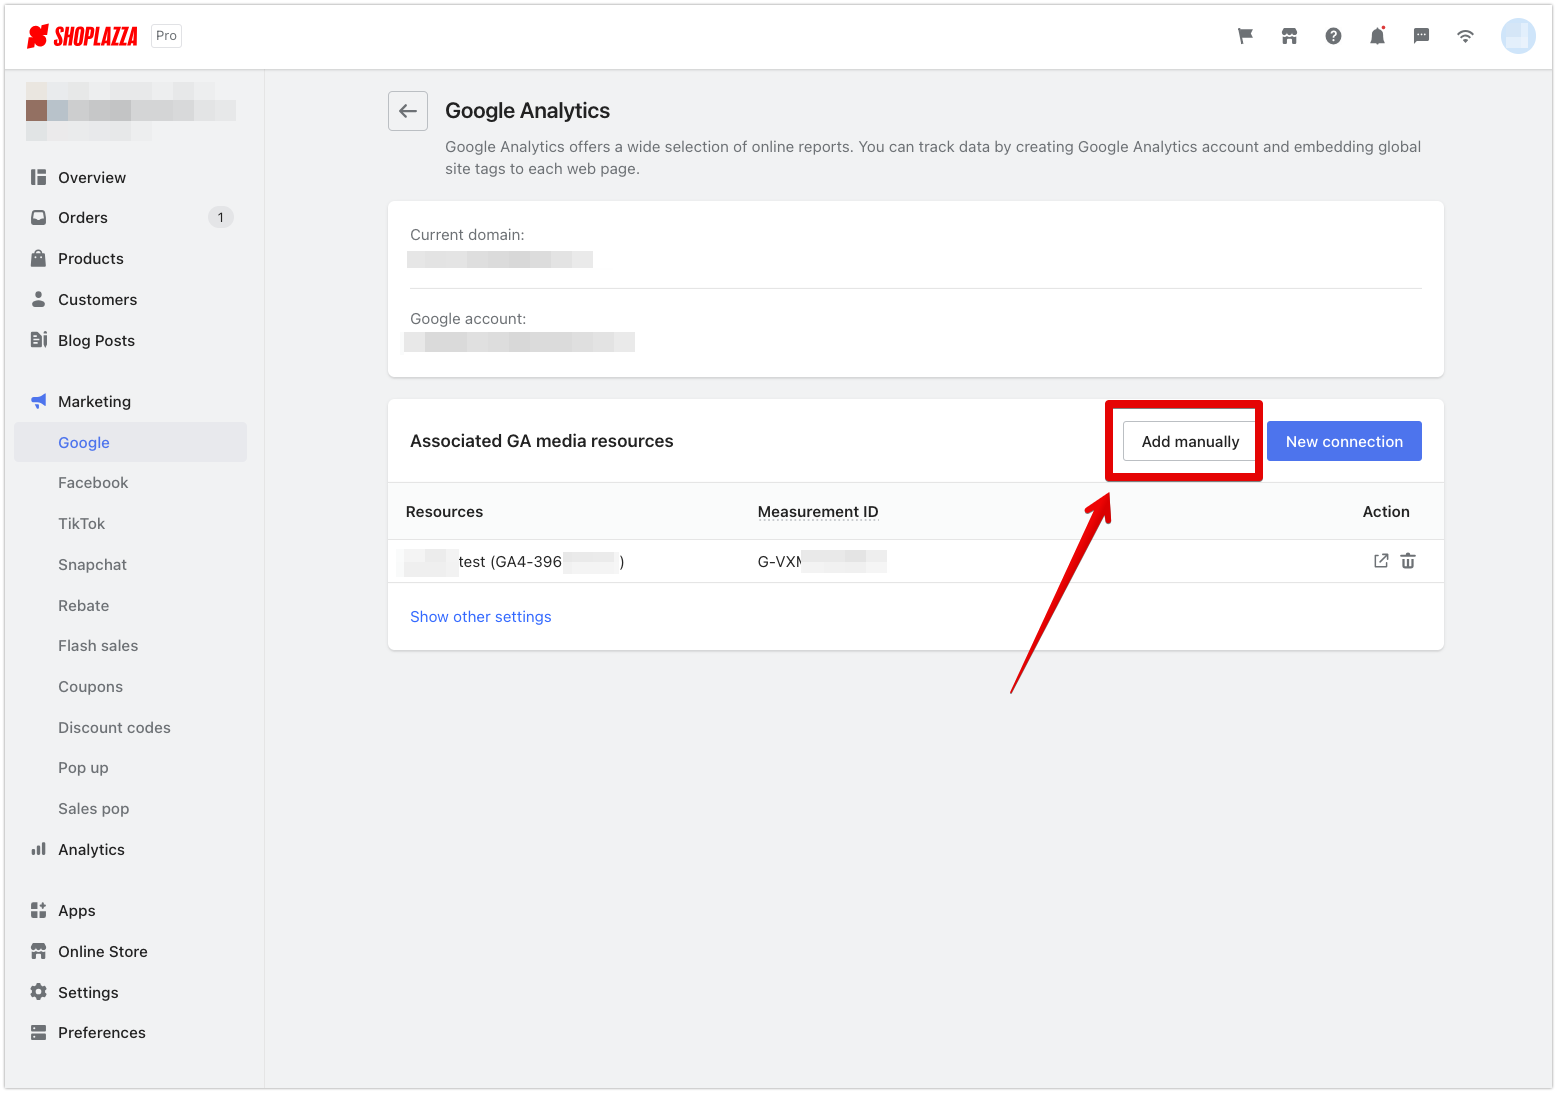
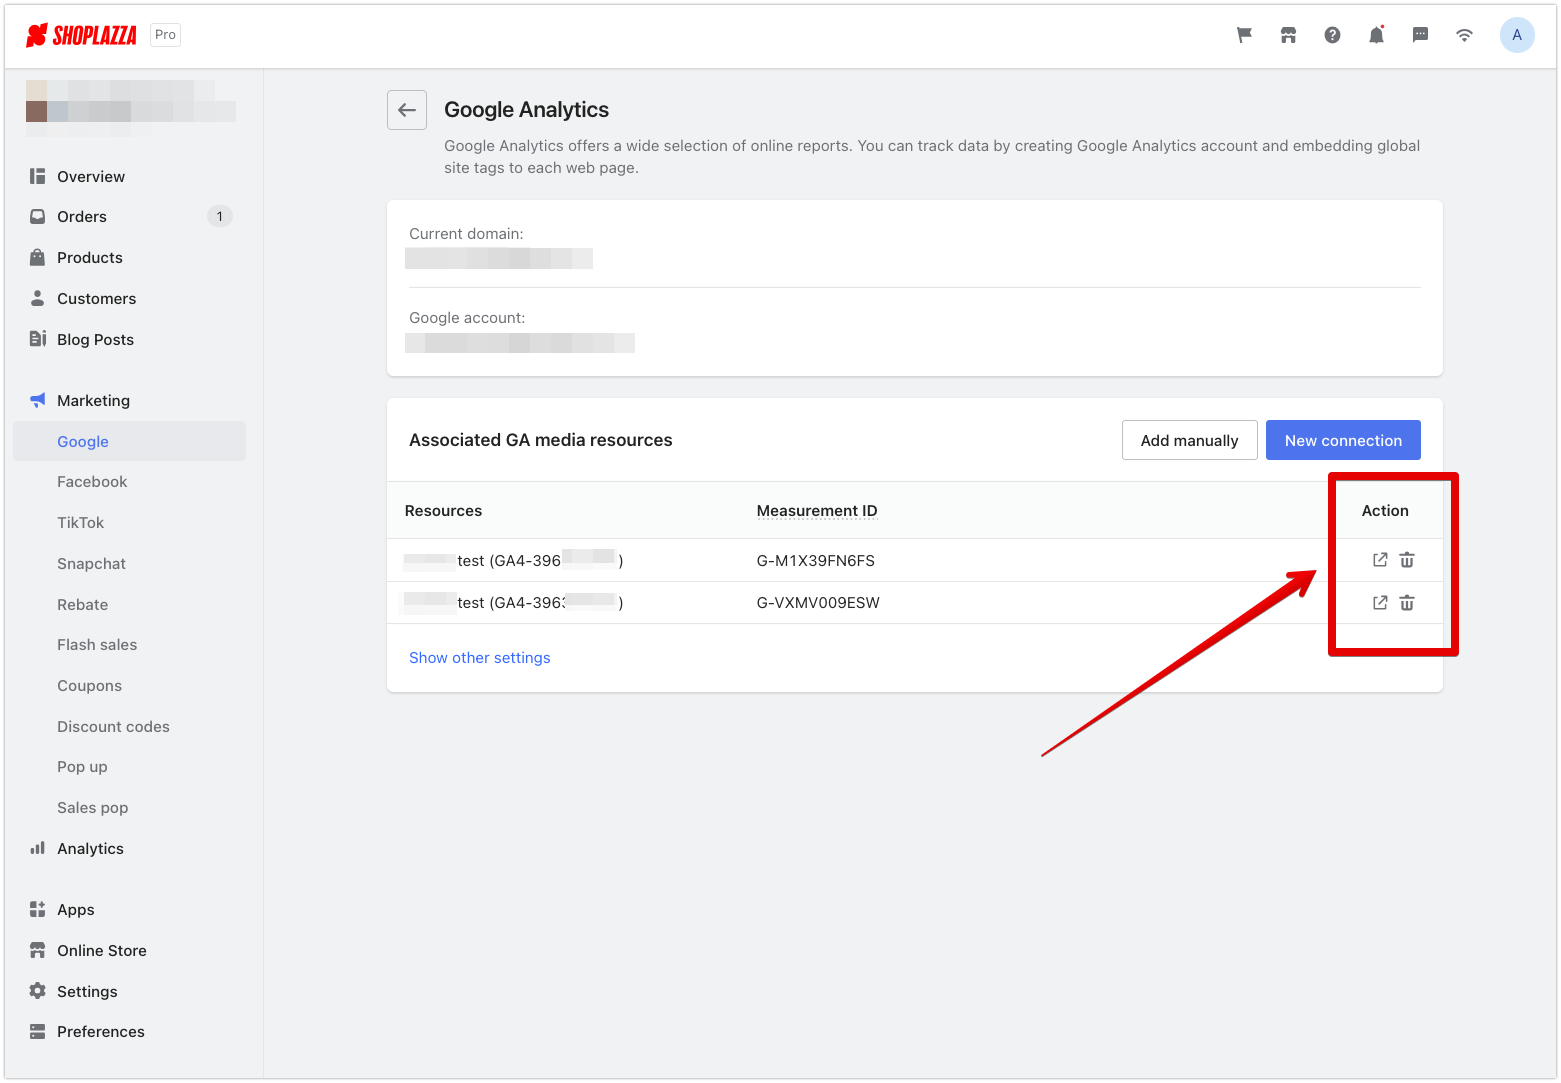
- In the main page of the Google Analytics section, you can manage your accounts by updating or deleting them.
7. Reports Improvements
New Addition: View Sales by Product Label Report
-
Usage Scenarios:
- This report can be used by merchants who want to examine the sales performance of a group of items sharing the same label.
-
Usage Path:
- Log into your Shoplazza Admin > Analytics > Reports. In the Sales section, click View sales by product label to access.

Enhanced UTM Report Filtering Function
-
Usage Scenario:
- The filtering function has been enhanced, now allowing multiple selections instead of only a single choice.
-
Usage Path:
- Log into your Shoplazza Admin > Analytics > Reports. In the Traffic section, click on UTM report.
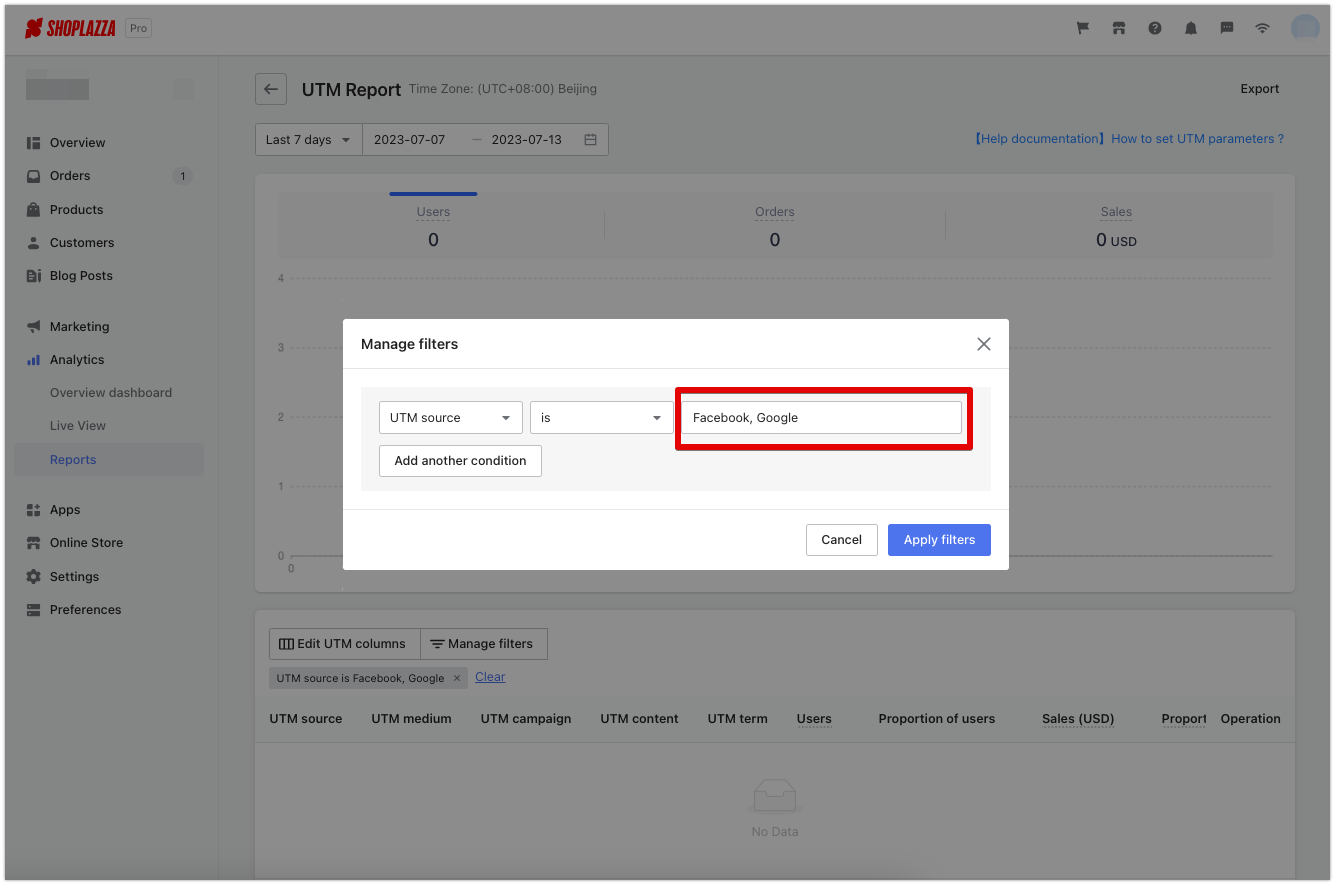
- Click Manage Filters under the graph, and select the filter conditions you require. Multiple values can be entered, separated by a comma.
- For further assistance, refer to this document:Introduction to UTM
-
Feature Overview:
- Facilitate sellers in comparing data across their most significant channels simultaneously.
- For a comprehensive and detailed feature introduction, please refer to the help document:Introduction to UTM
Refined Conversion Funnel in Data Overview
-
Usage Scenario:
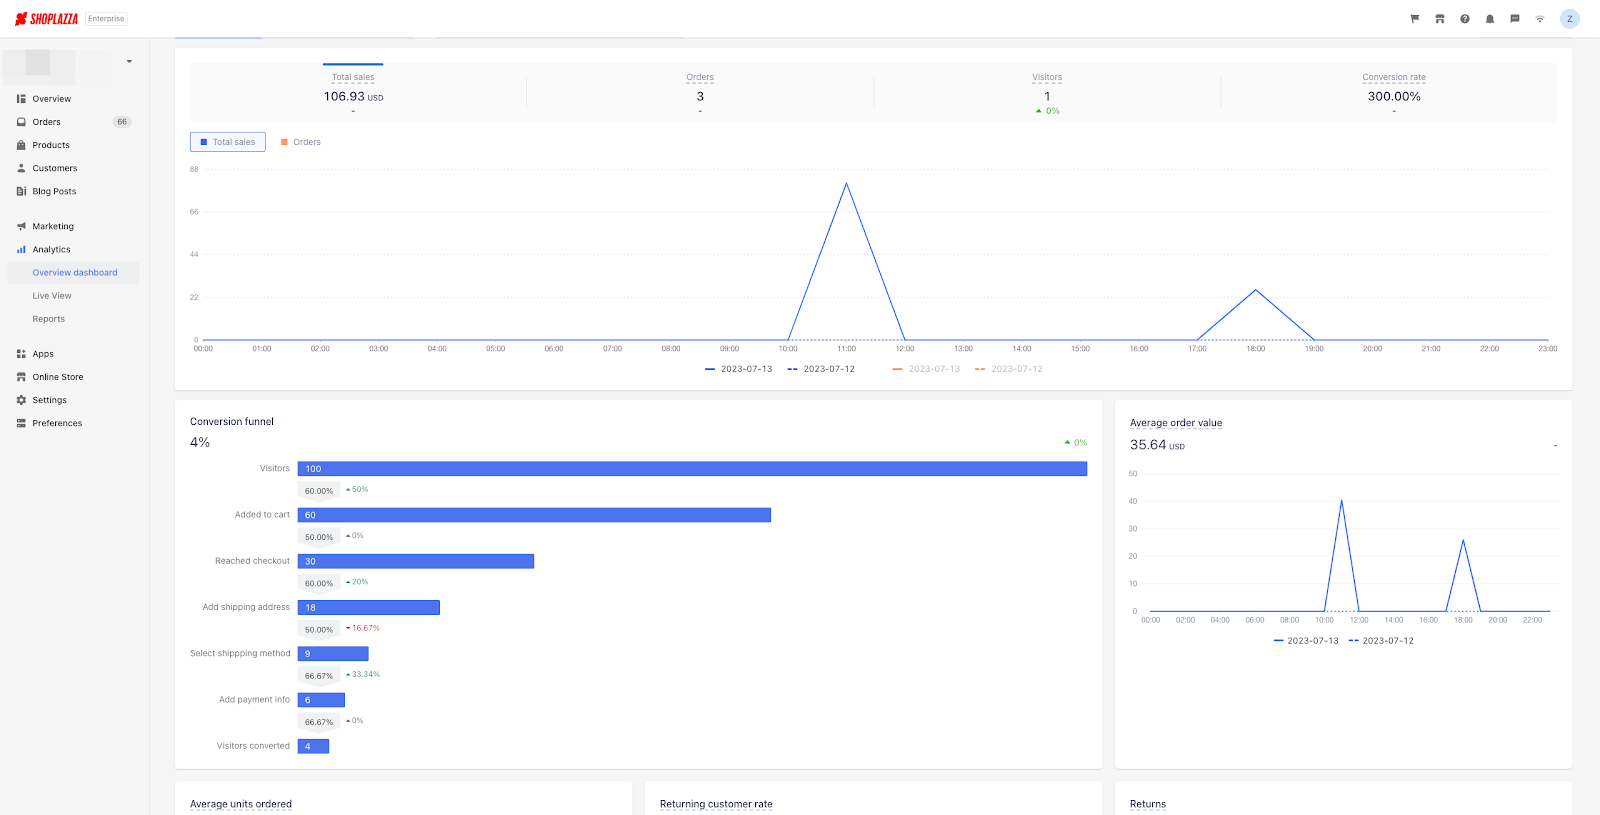
- The conversion funnel in the Data Overview now includes two new steps: Add shipping address and Add shipping method
-
Usage Path:
- Log into your Shoplazza Admin > Analytics > Overview dashboard. Here you can see the Conversion funnel card.
-
Feature Overview:
- To enable merchants to analyze the three steps of the checkout page.
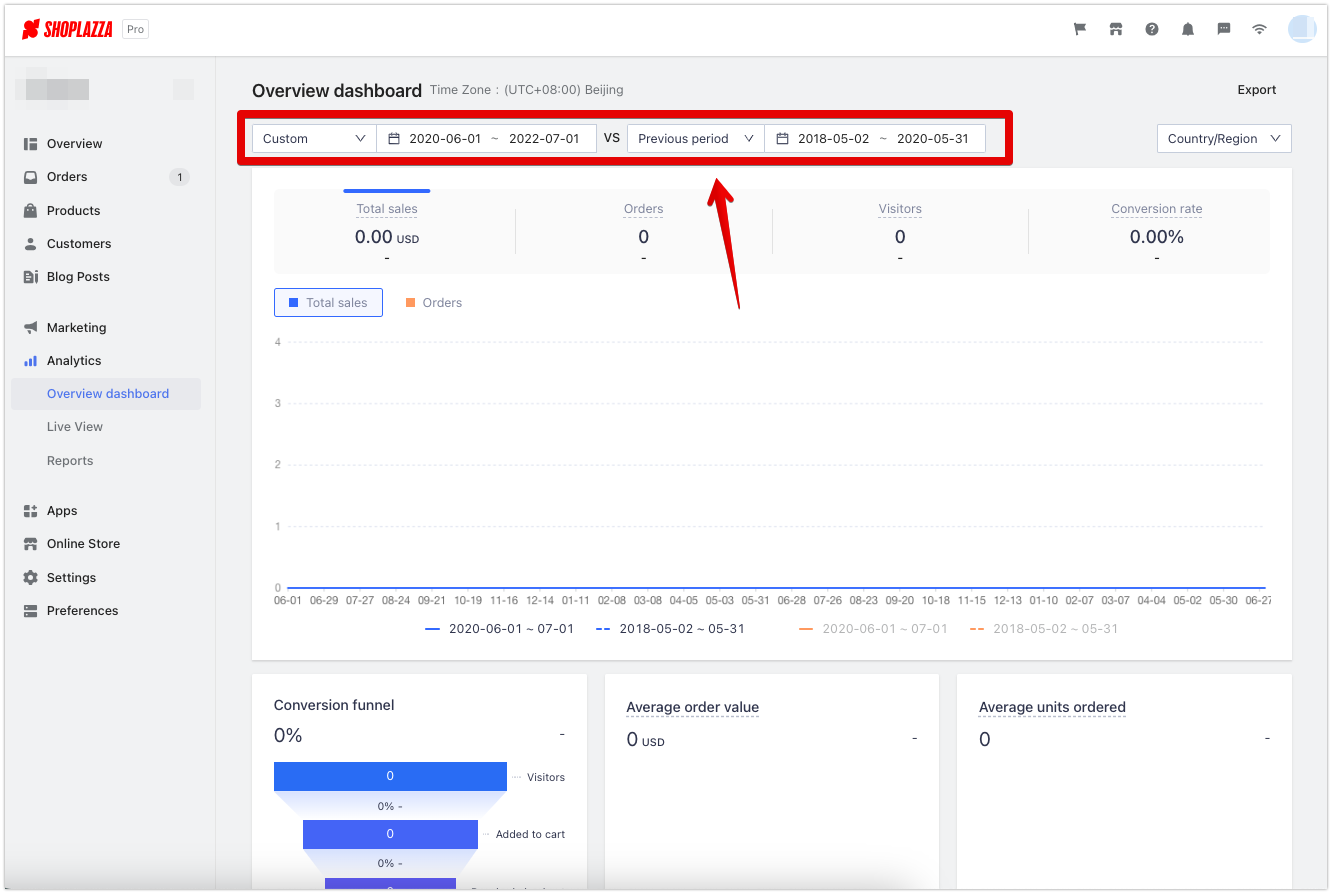
Improved Data Overview Timing
-
Usage Scenario:
- The date selection field has been improved for more precise time selection.
-
Usage Path:
- Log into your Shoplazza Admin > Analytics > Overview dashboard.
-
Feature Overview:
- To make the selection of time periods more convenient for sellers.
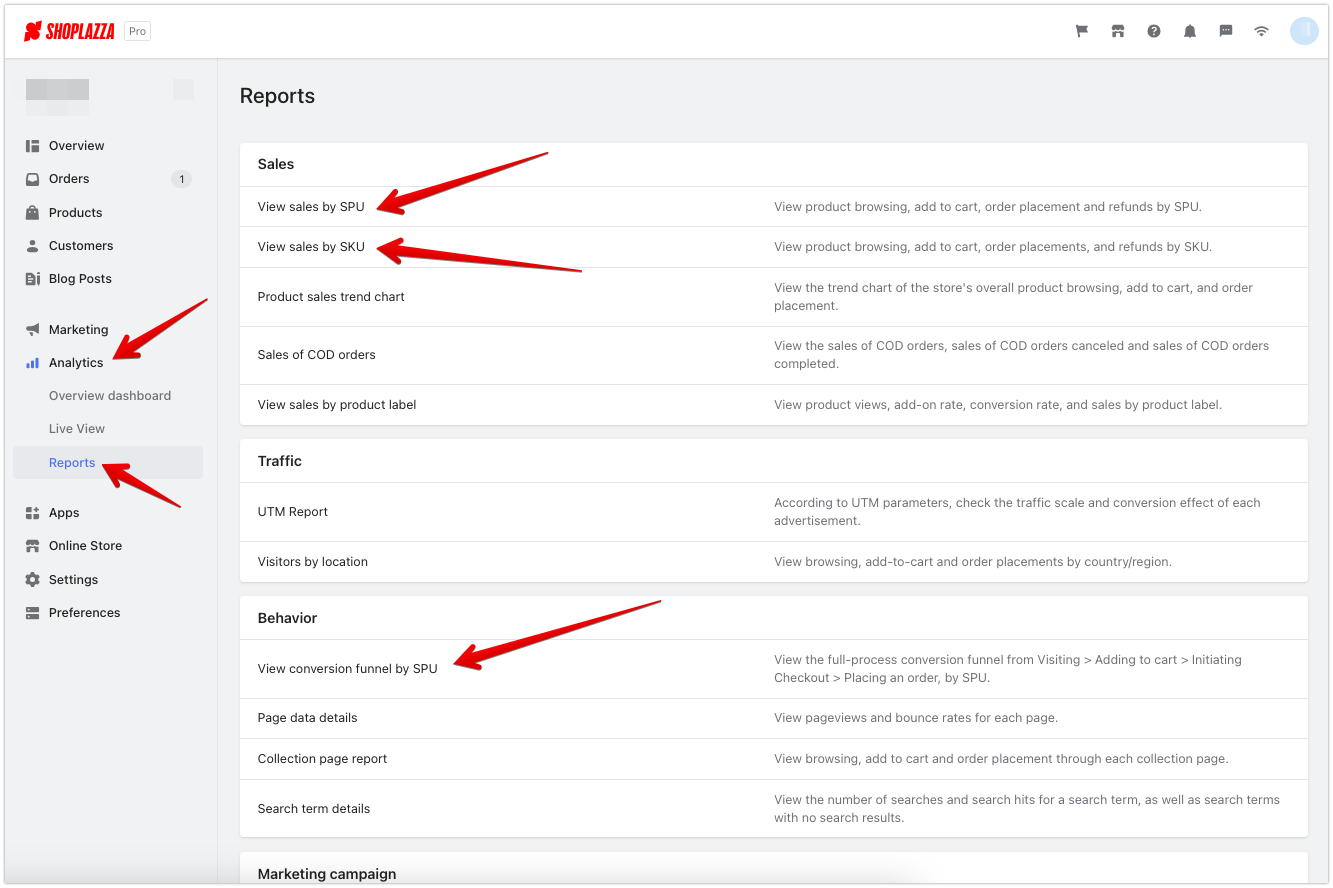
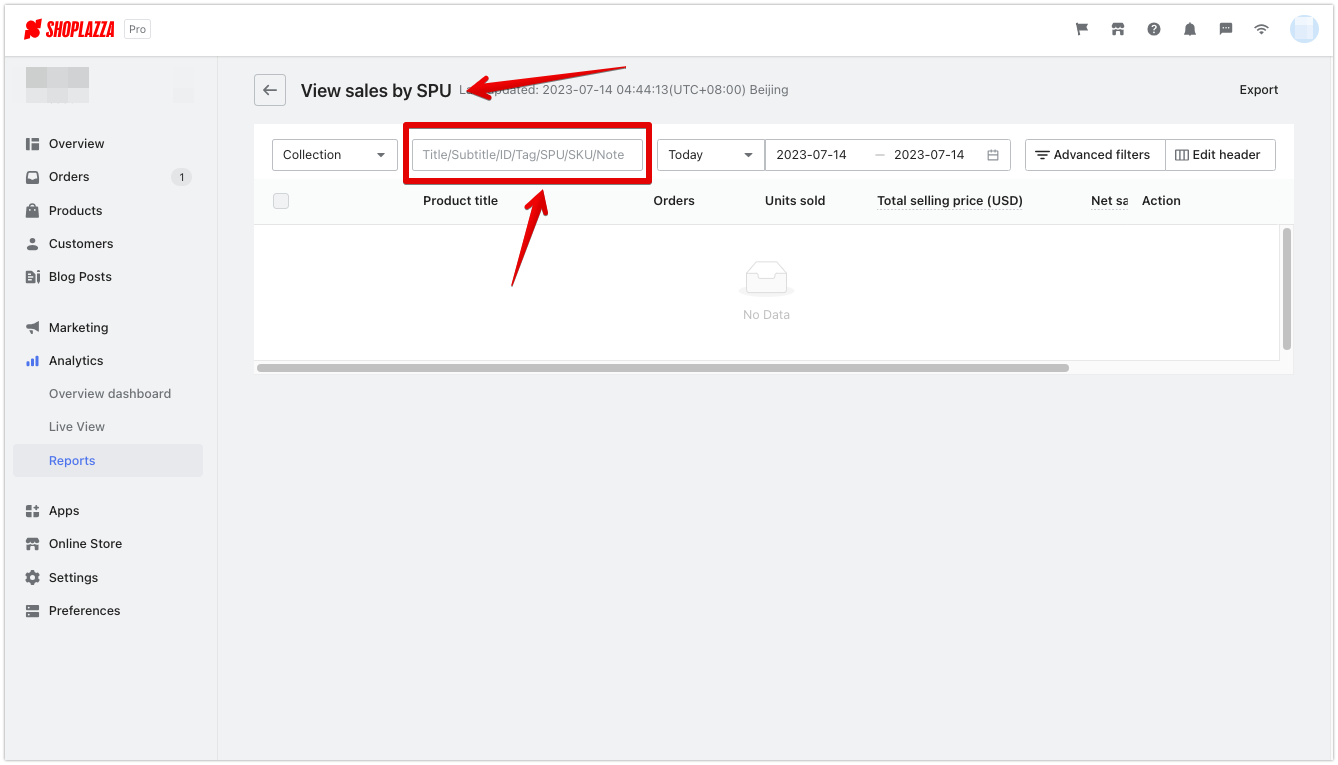
Upgraded Basic Search Box for "View Sales by SPU," "View Sales by SKU," and "View Conversion Funnel by SPU" Reports
-
Usage Scenario:
- The search functionality now supports subtitle, SKU, tag, and comment searches.
-
Usage Path:
- Log into your Shoplazza Admin > Analytics > Reports.
- Navigate to the relevant reports:
- View Sales by SPU
- View Sales by SKU
- View Conversion Funnel by SPU
Feature Overview:
- To provide sellers with a more efficient way to search for specific products they need to view.
8. Enhanced smart product recommendation tool for product pages, collections, and homepage
Usage Scenario:
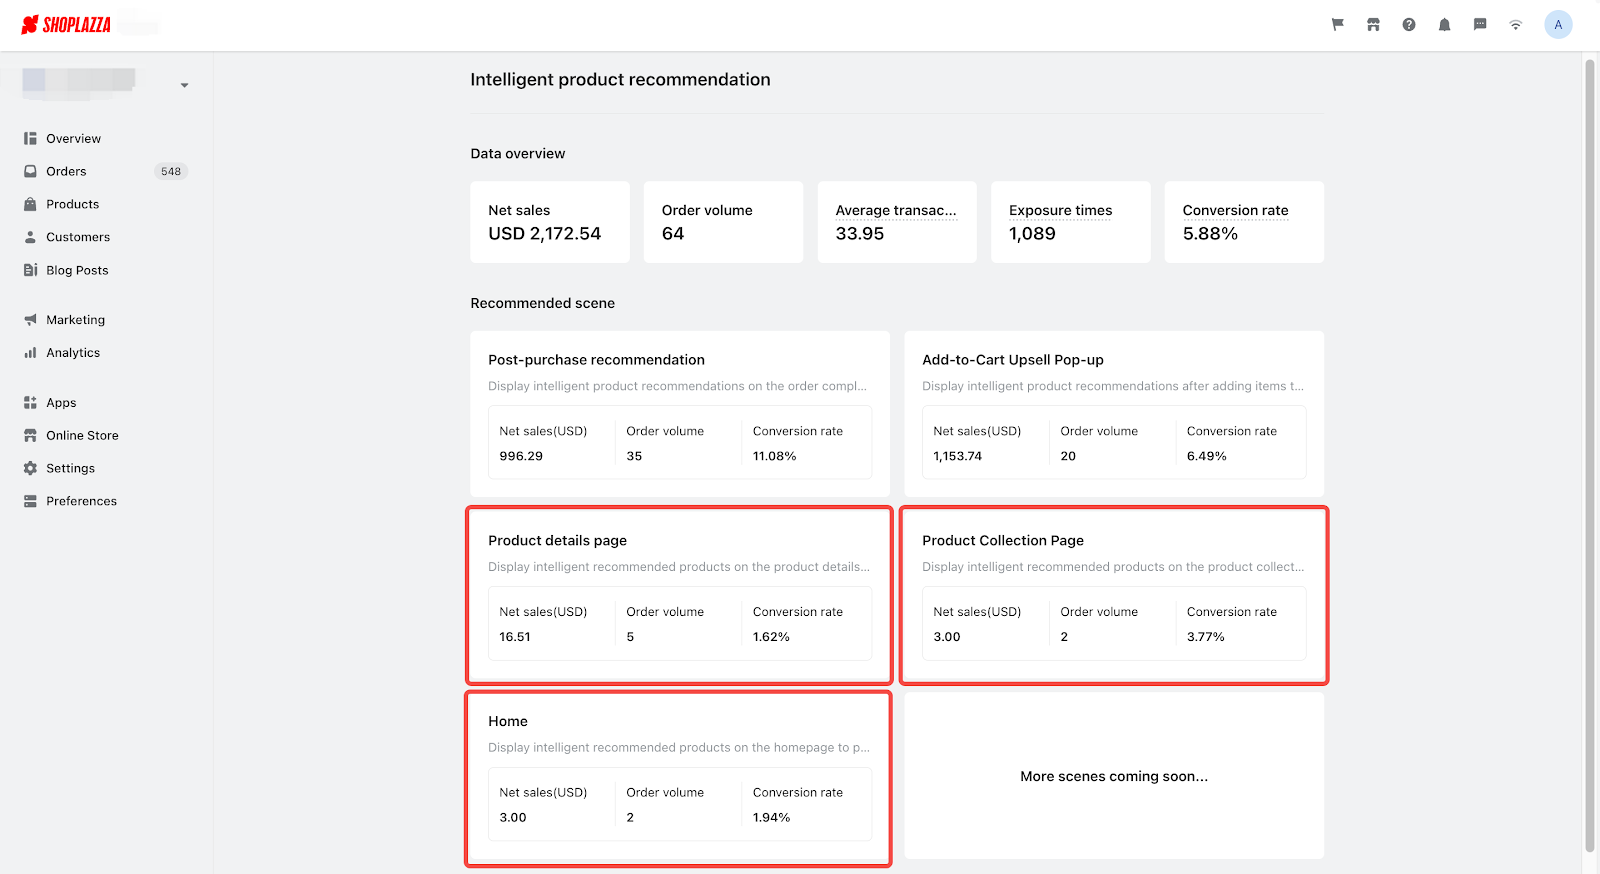
- Intelligent product recommendation app has been improved. It now works on the Product Detail Pages, Collections Pages, and Home pages. Set up rules to show smart product suggestions to your shoppers as they browse, which could lead to more purchases and a higher average order value.
Usage Path:
- Navigate to your Shoplazza Admin > Apps. Click on the Visit App store button on the top right corner. Search for Intelligent product recommendation app and install.
Feature Overview:
- From the home page of the Intelligent product recommendation app, you can see the results of all your promotional activities. You can also set up the rules for each page (Product Detail Page, Collections Page, and Homepage).
-
Product Detail Page
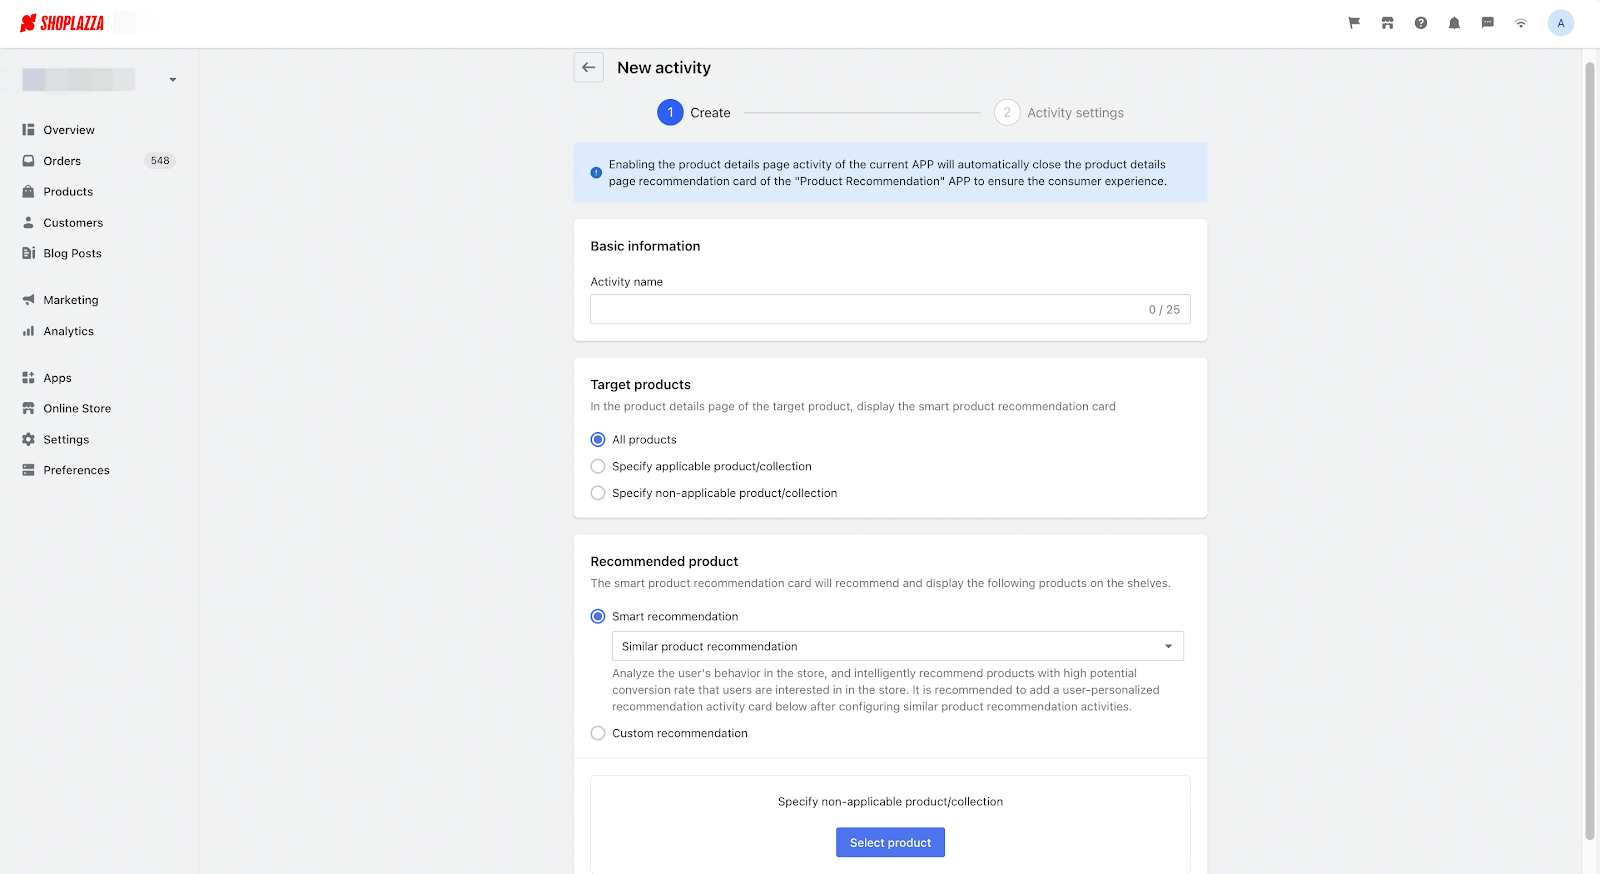
- Go to the event list for the Product Detail Page and click New activity to start setting up.

1. Set up event rules
- Fill in the basic event details like the event name.
- Choose the target product: The product suggestion card will only show when the shopper visits the Product Detail Page of the product you choose.
- You can pick all products or specific products/collections to be part of the event.
- You can also choose to leave out certain products/collections from the event.
- Set up the rules for product suggestions and pick the products to suggest. You can quickly choose whether to show a product suggestion or not.
- You can choose from:
- Smart product suggestions, with strategies for suggesting similar products and personalized suggestions.
- Custom suggestions
- You can choose from:
-
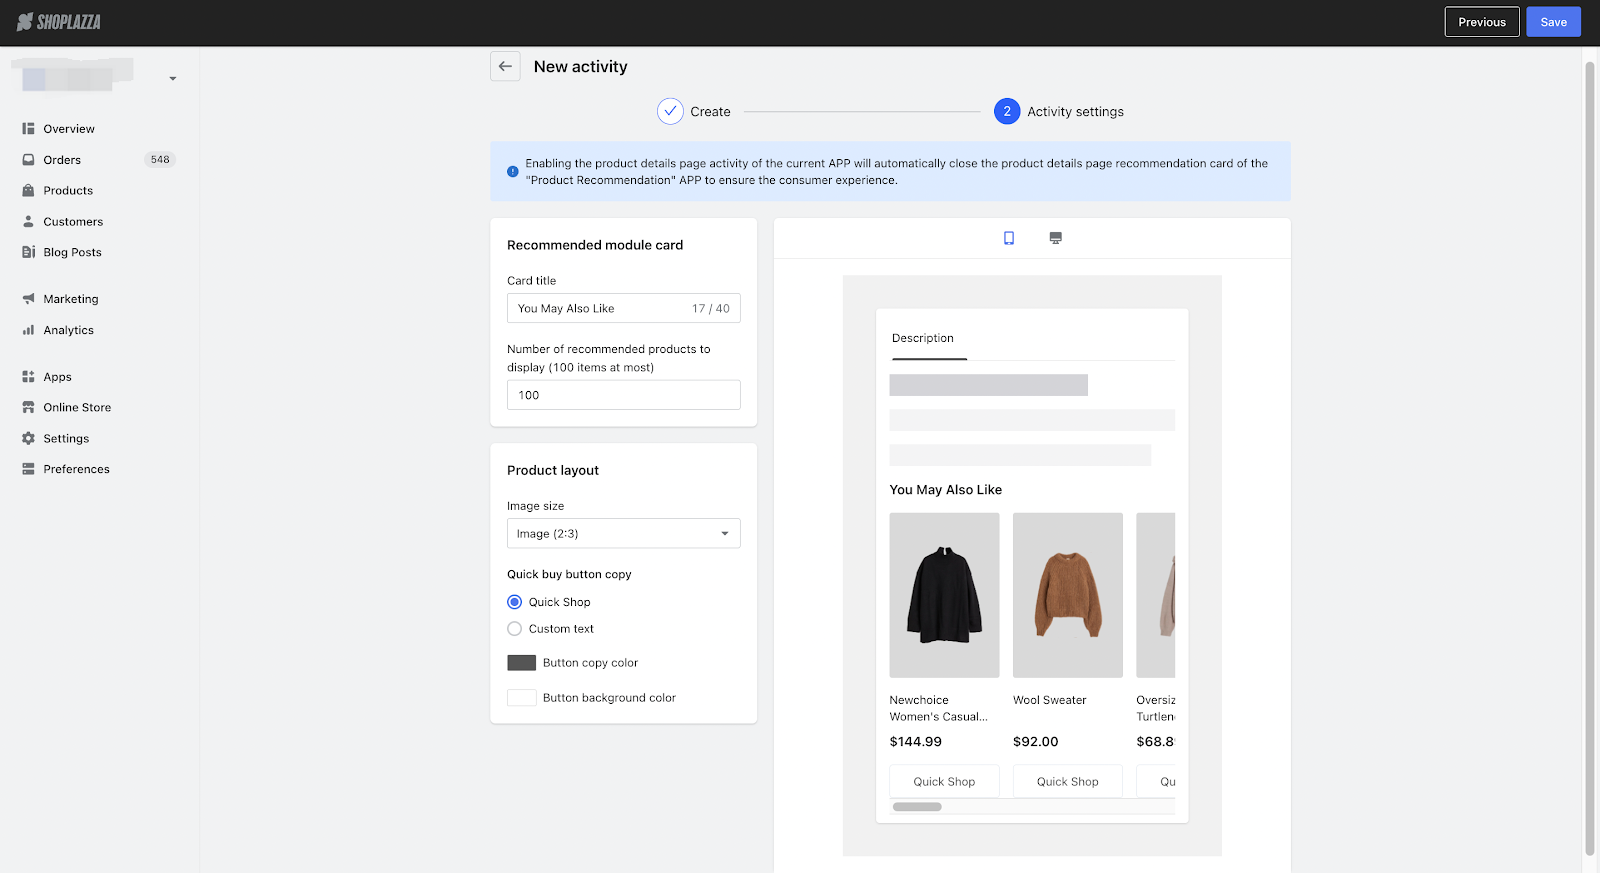
2. Set up the activity page
- This is the product suggestion module that shoppers see on the Product Detail Page.
- Choose the title of the suggestion card and how many products to show.
- Decide how to display products:
- Set the product image size.
- Change the colour and text of the quick buy button.
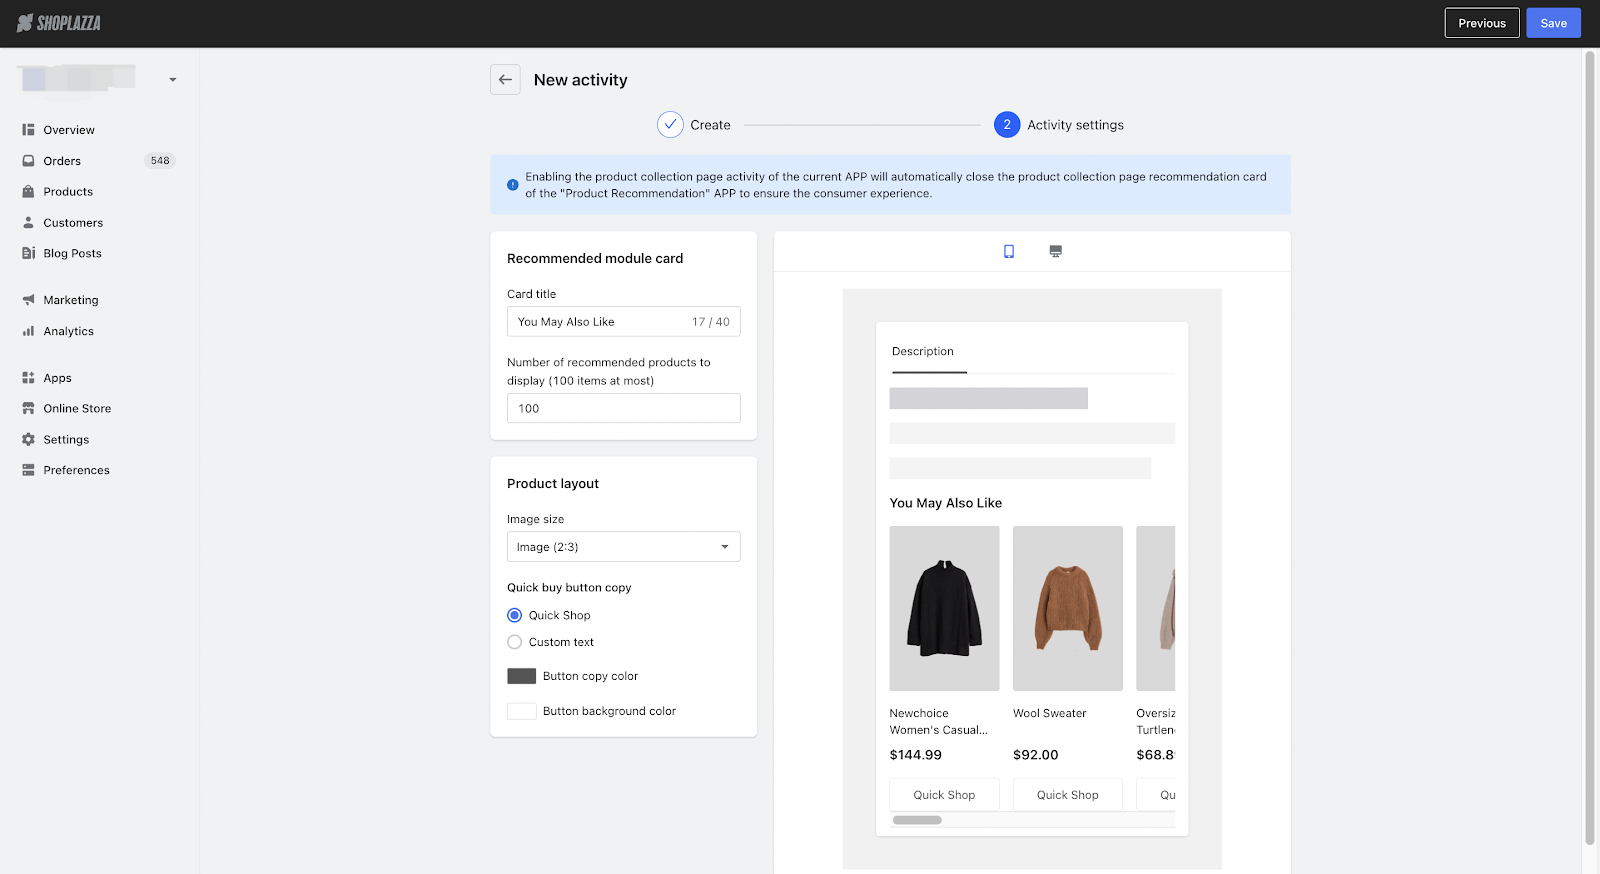
3. Collections Page
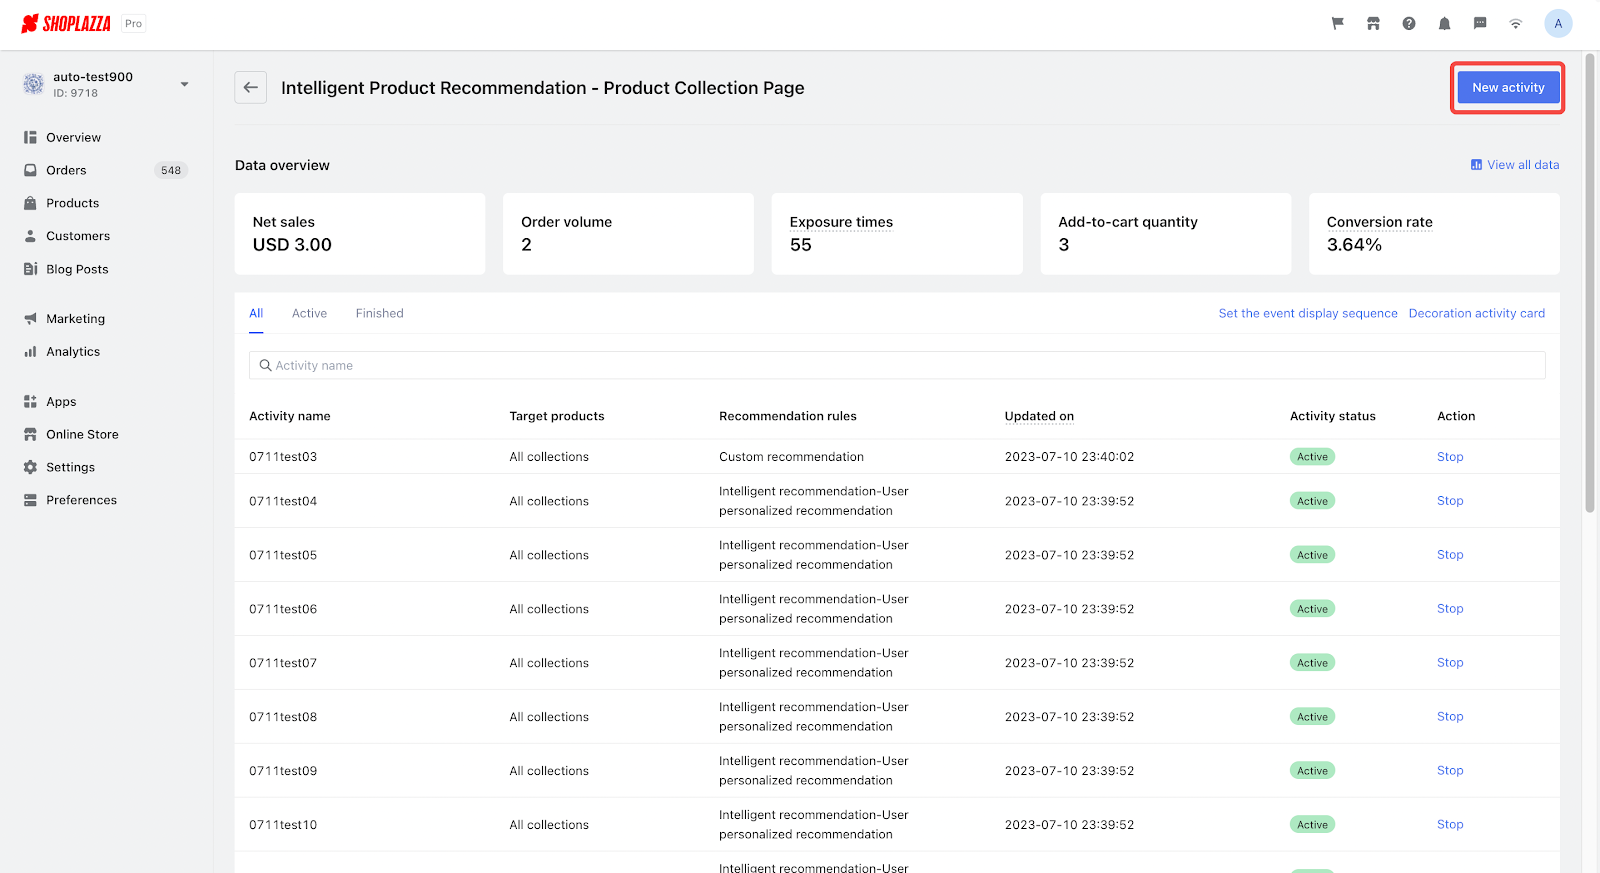
- Go to the event list for the Collections Page and click New activity to start setting up.
-
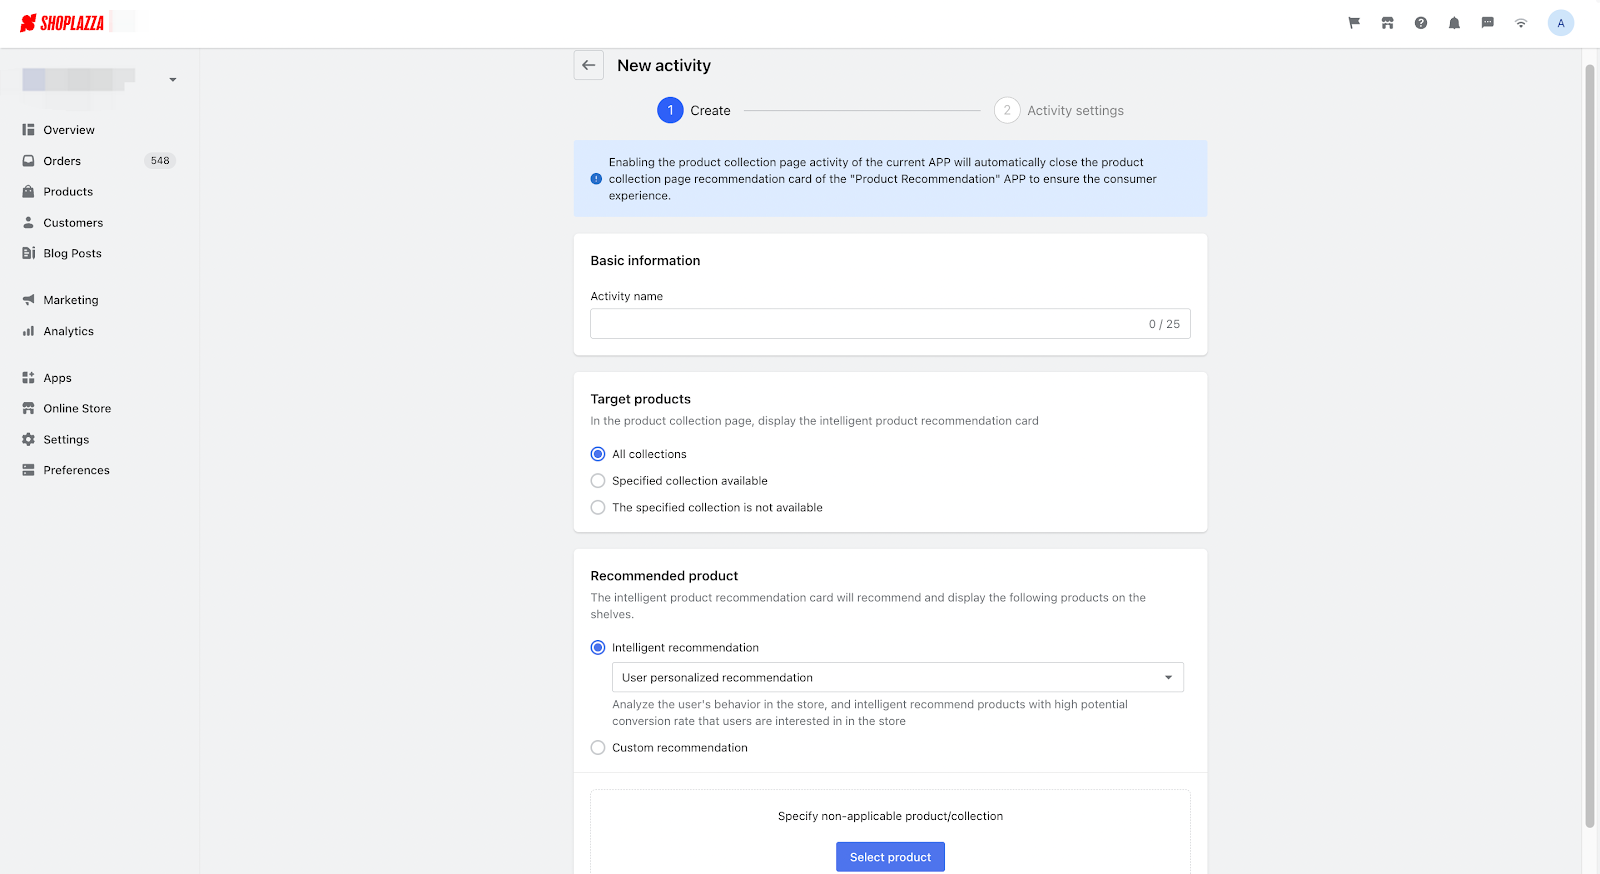
Set up activity rules
- Fill in the basic event details like the event name.
- Choose the target collection: The product suggestion card will only show when the shopper visits the page of the collection you choose.
- You can pick all collections or specific collections to be part of the activity.
- You can also choose to leave out certain collections from the event.
- Set up the rules for product suggestions and pick the collections to suggest. You can quickly choose whether to show a product suggestion or not.
- You can choose from:
- Smart product suggestions, with strategies for personalized suggestions.
- Custom suggestions.
- You can choose from:
-
Set up the activity page
- This is the product suggestion module that shoppers see on the collections page.
- Choose the title of the suggestion card and how many products to show.
- Decide how to display products:
- Set the product image size.
- Change the colour and text of the quick buy button.
Home page
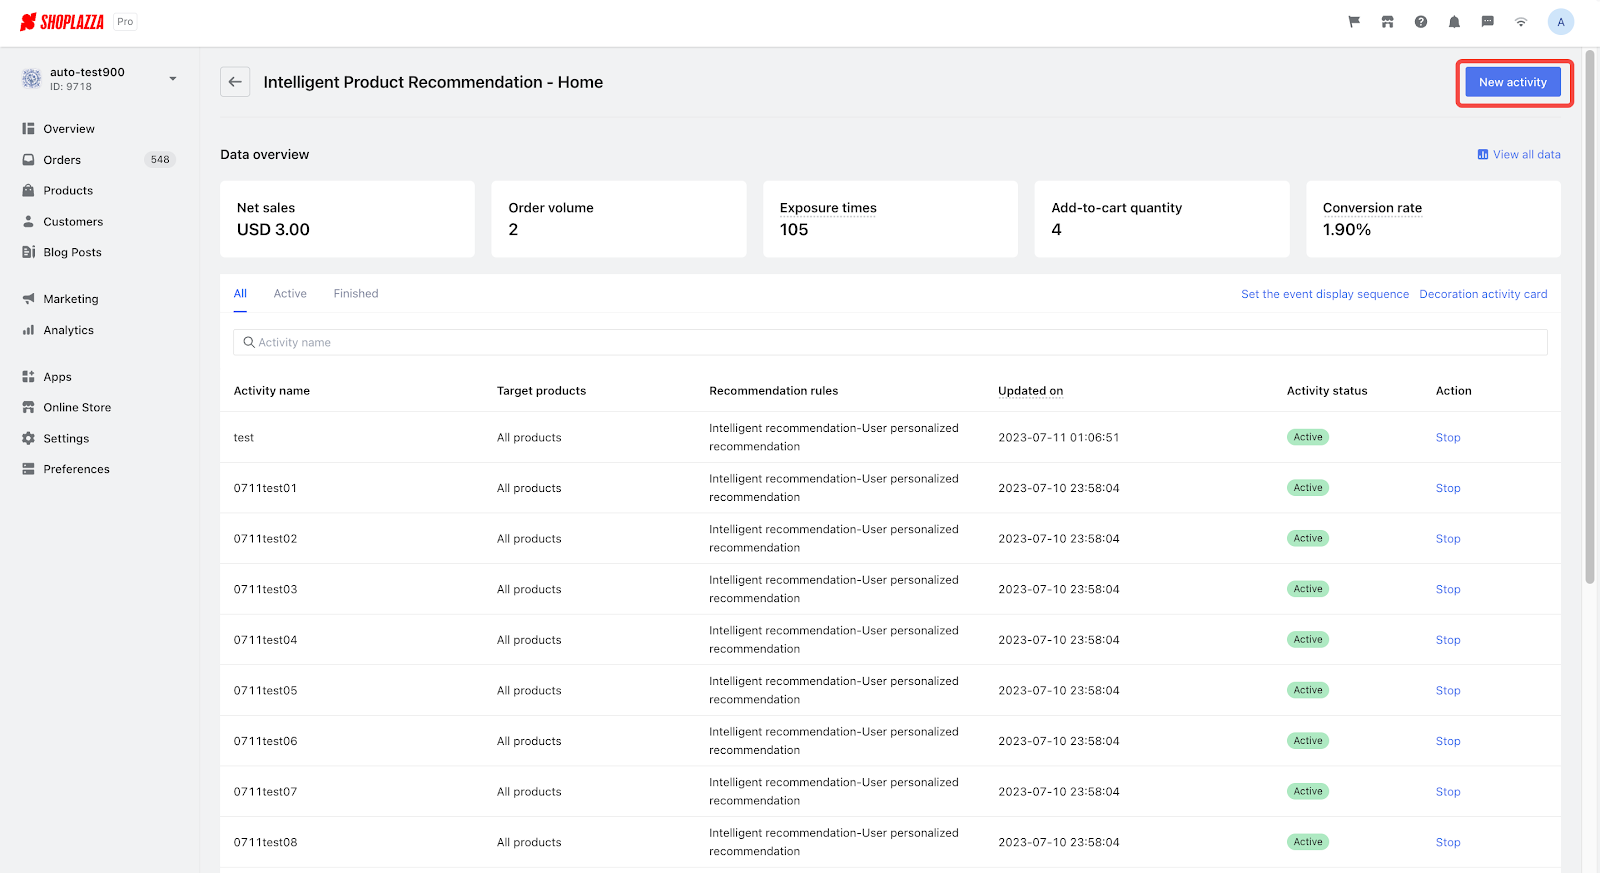
- Go to the event list on the homepage and click New activity to start setting up.
-
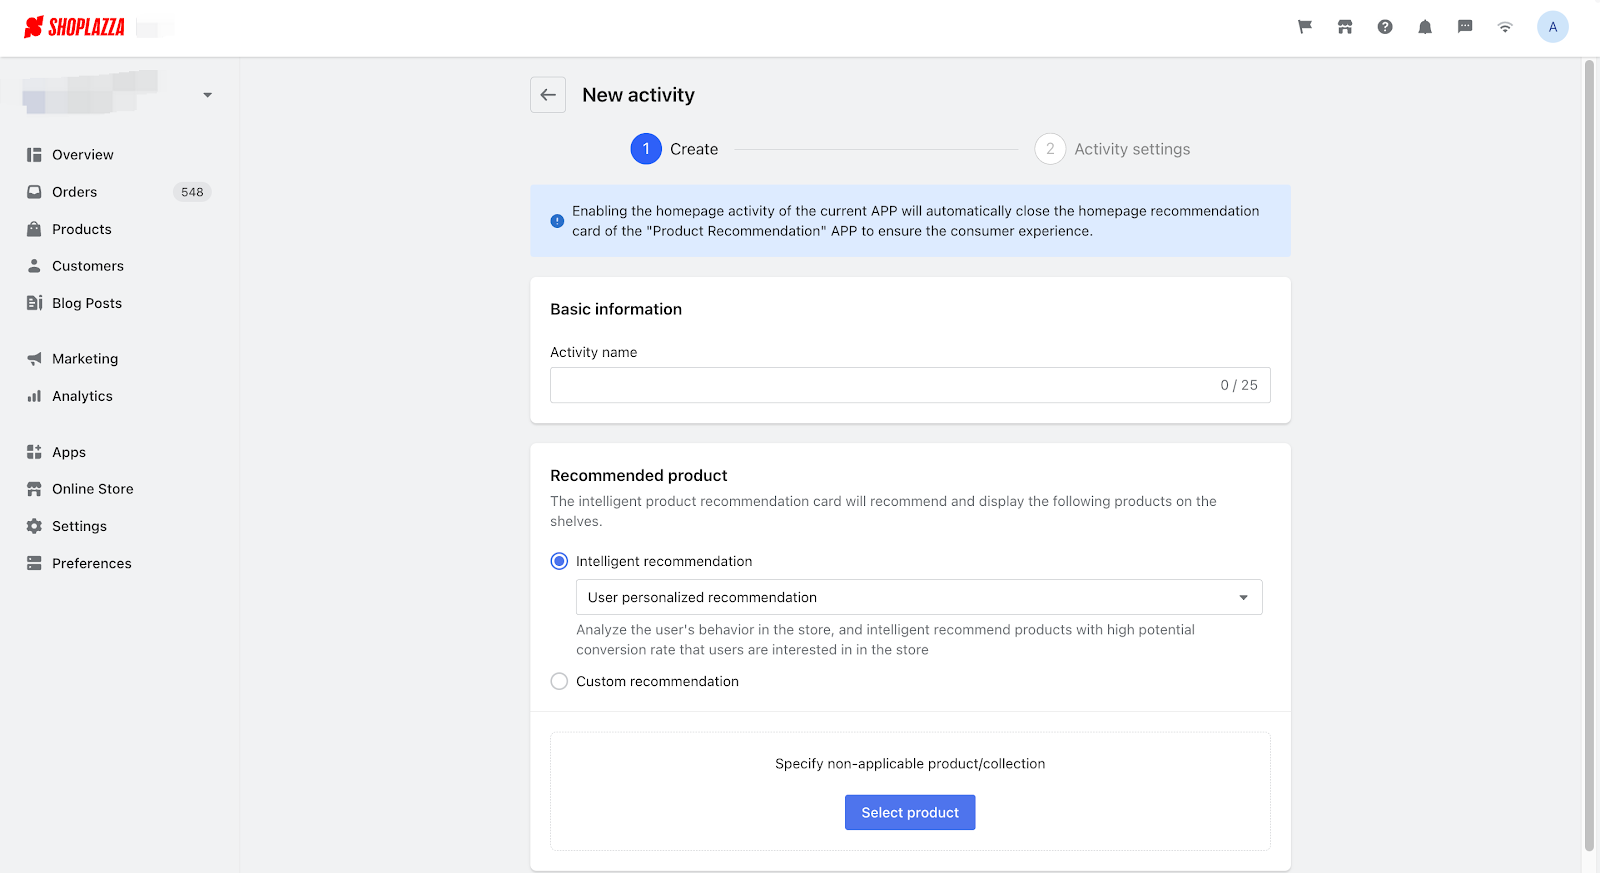
Set up activity rules
- Fill in the basic event details like the event name.
- No need to choose target products.
- Set up the rules for product suggestions and pick the products to suggest. You can quickly choose whether to show a product suggestion or not.
- You can choose from:
- Smart product suggestions, with strategies for personalized suggestions.
- Custom suggestions.
- You can choose from:
-
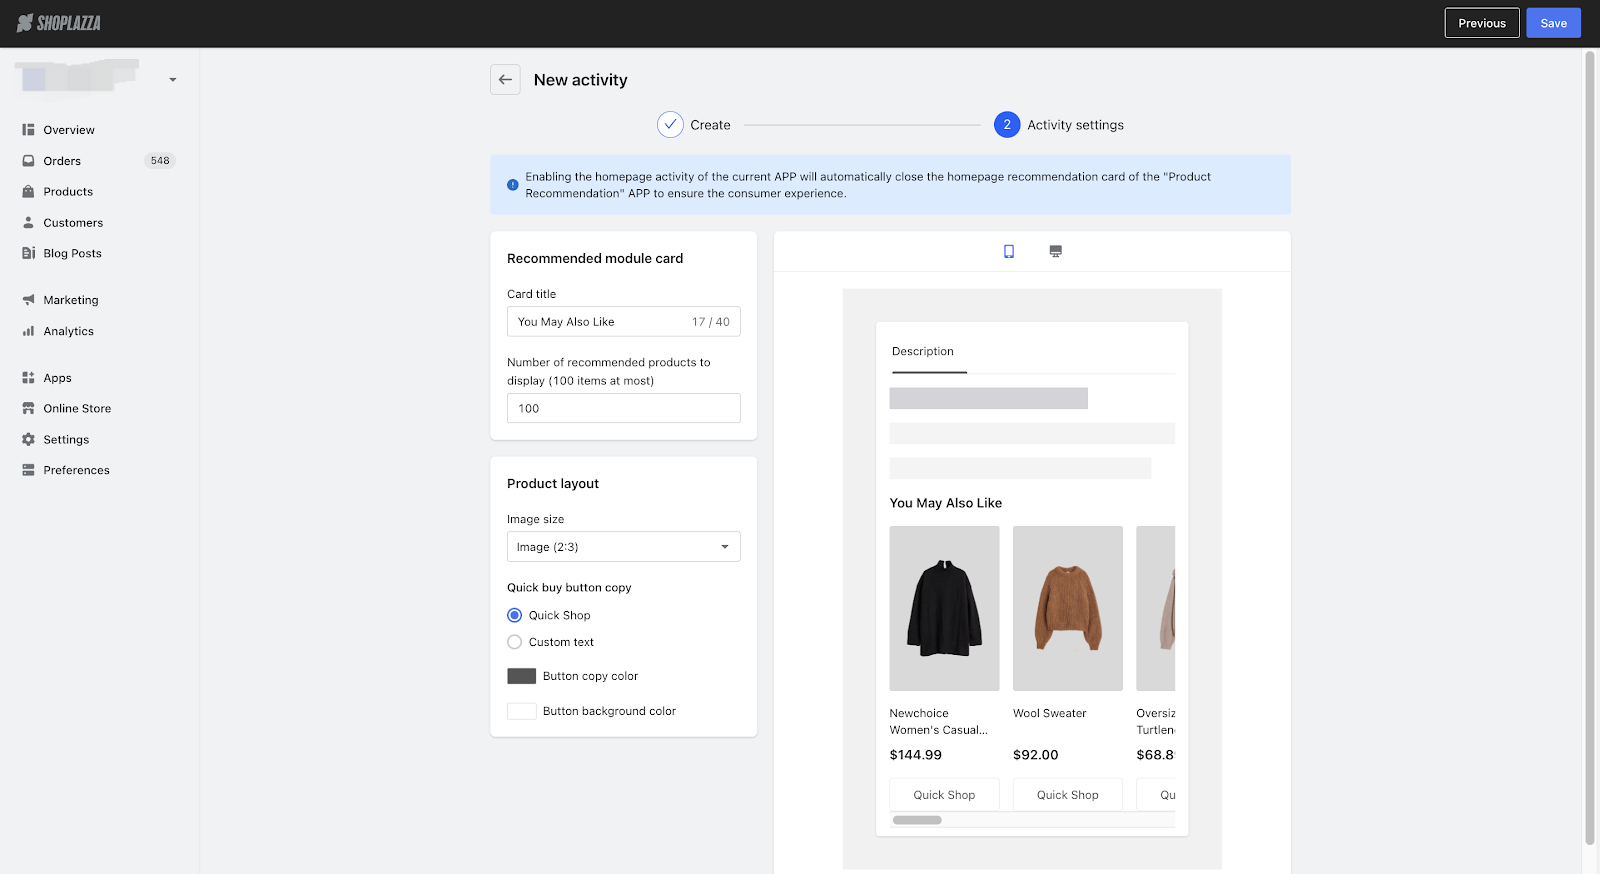
Set up the activity page
- This is the product suggestion module that shoppers see on the collections page.
- Choose the title of the suggestion card and how many products to show.
- Decide how to display products:
- Set the product image size.
- Change the colour and text of the quick buy button.
9. MoCart-Mobile App Builder
Usage Scenarios:
- MoCart offers a transformative solution for businesses seeking to transition their online stores into mobile platforms. With MoCart, customers can effortlessly convert their Shoplazza online stores into mobile applications, expanding sales channels, enhancing user experience, and fostering additional revenue streams.
Usage Path:
- Implementing MoCart involves the following easy steps:
- Log into your Shoplazza Admin > Apps. Click on Visit app store.
- Search for MoCart - Mobile App Builder and install.
- Once the installation is successful, navigate to the MoCart application page.
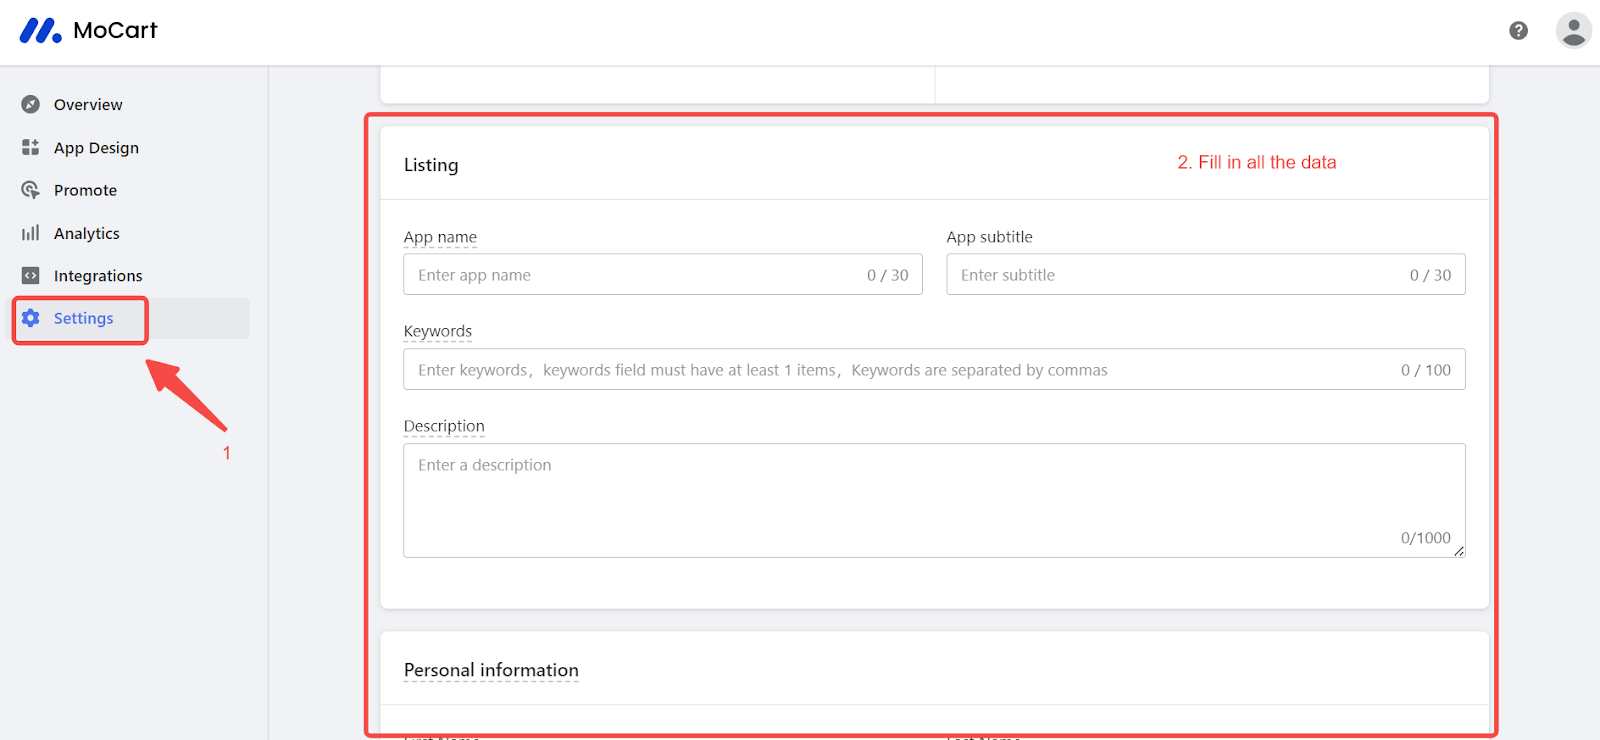
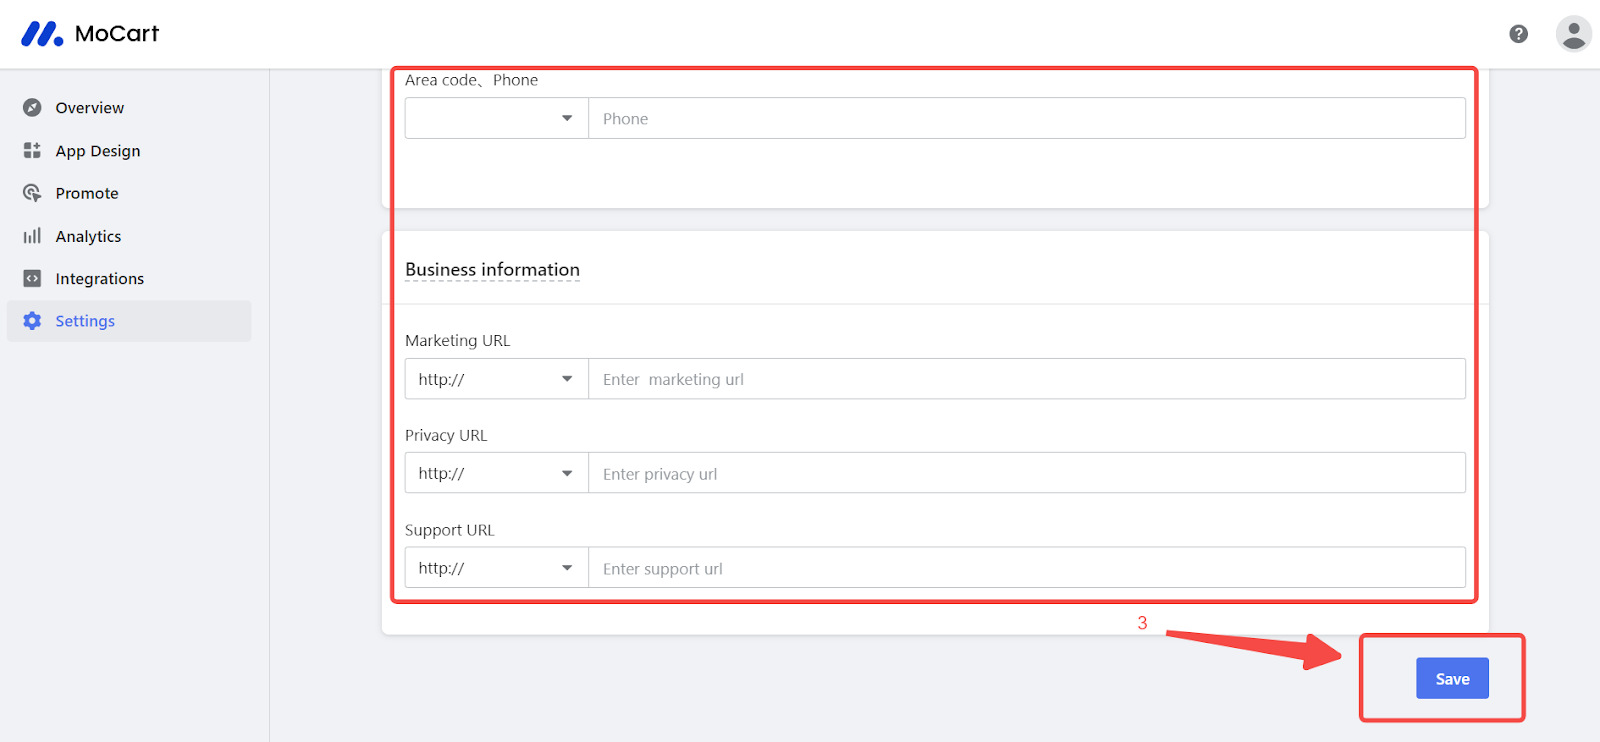
- Select the Settings module and populate the necessary application list information.
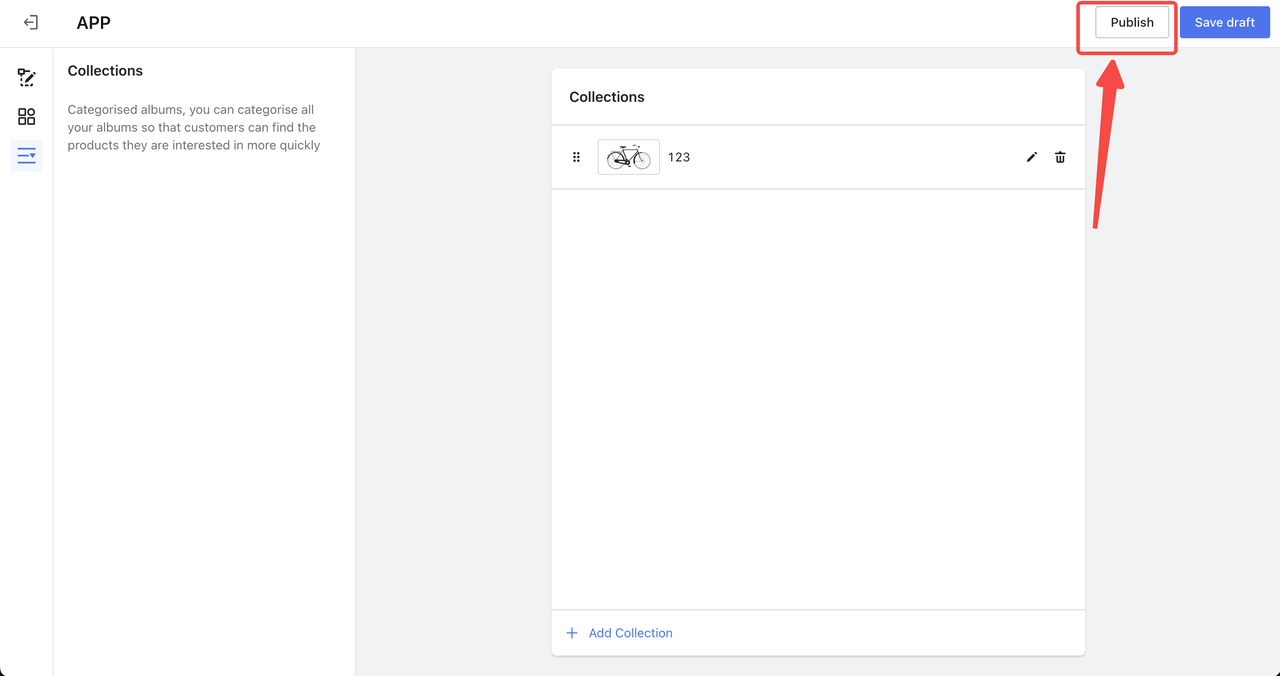
- Enter the 'App Design' section, utilize the editor design platform to style your application, and click Publish when you're pleased with the design.
- If needed, select Integrate to incorporate Appsflyer/Firebase plugins.
- After your app is ready, choose your preferred app store from the homepage and click Publish. Please note, Apple/Google developer qualifications are necessary to publish the app on the respective stores.
Feature Overview:
MoCart is loaded with user-friendly features:
- Design Your App with Our Editor Plug-in: You can give your app a personal touch by setting up the look of your homepage, your menus, and even create cool photo albums.
Setting Up Your Homepage:
- Click App Design to start designing. Every block can be replicated multiple times.
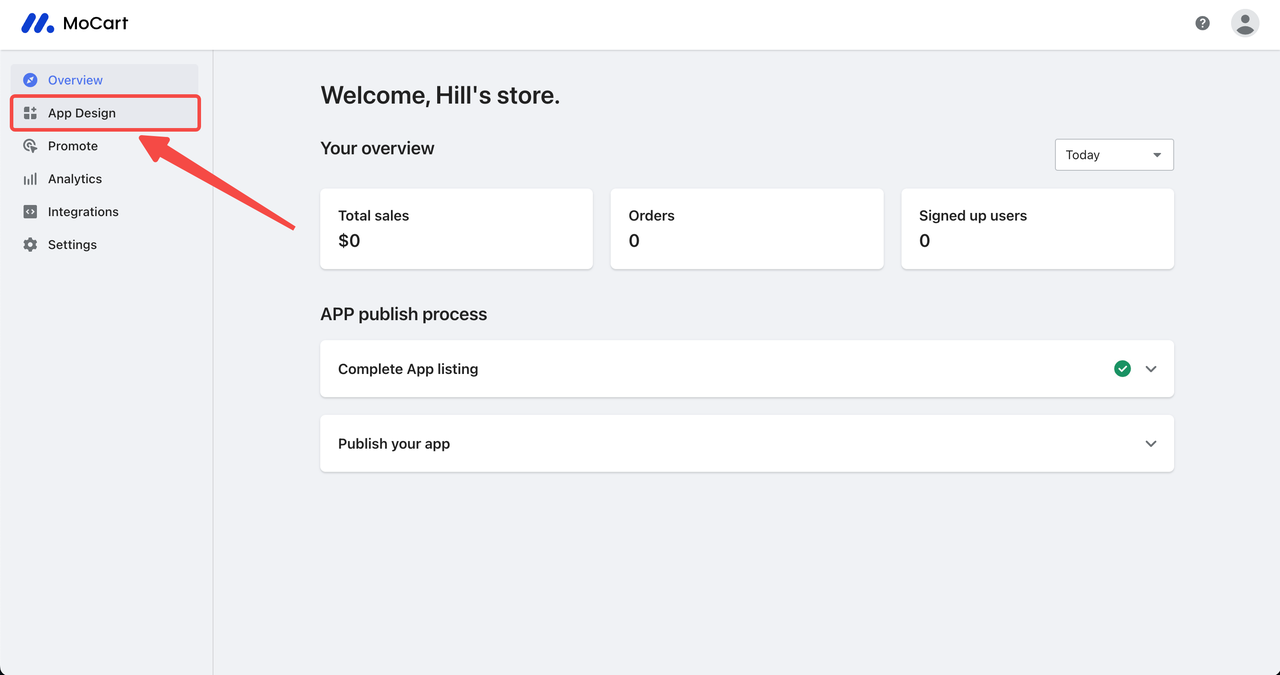
- Click on a block to add it to your preview area.
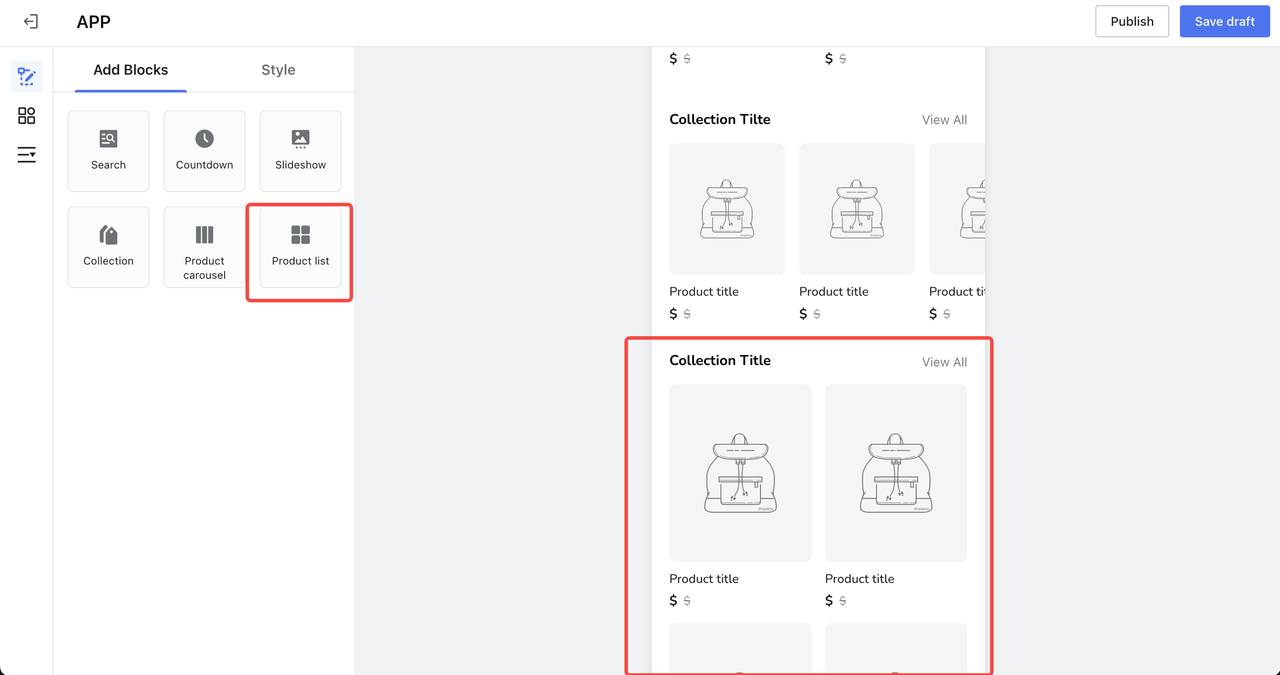
- Edit the blocks according to your preferences. Once setup is complete, return to the previous page.
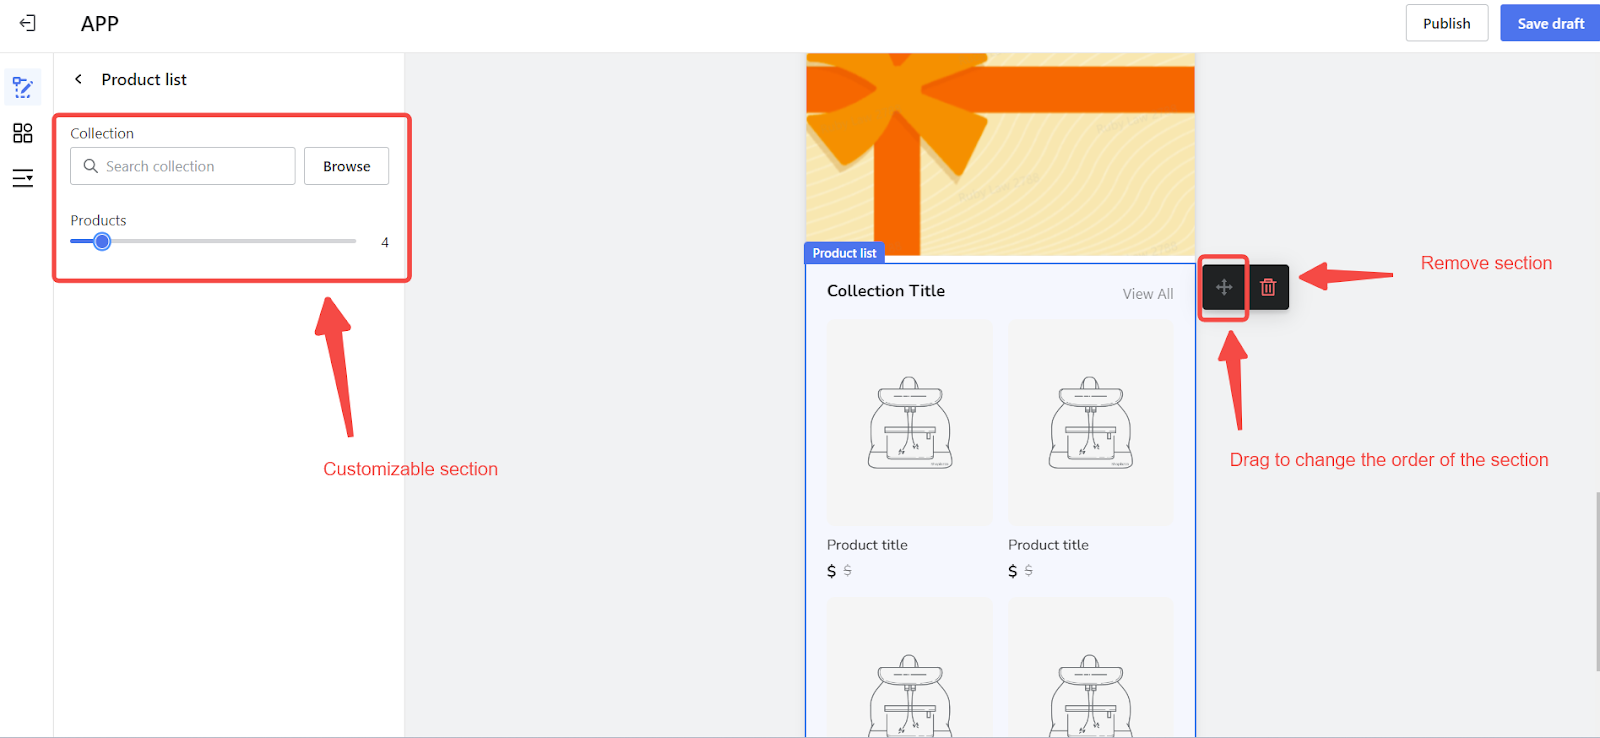
- To modify a block, click on it, and adjustments can be made on the left side of the screen.
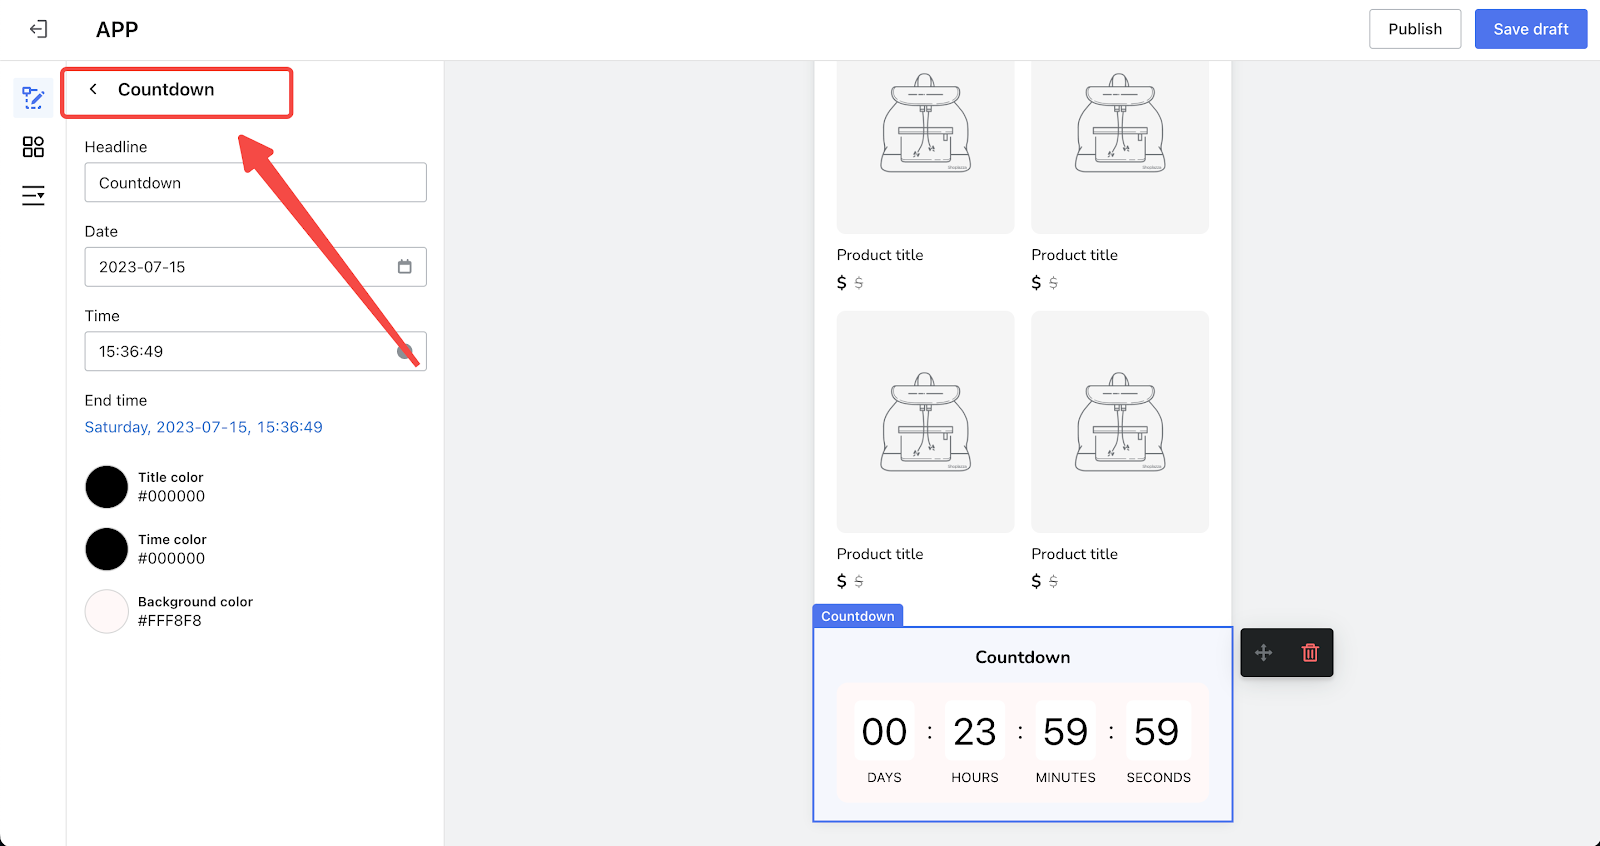
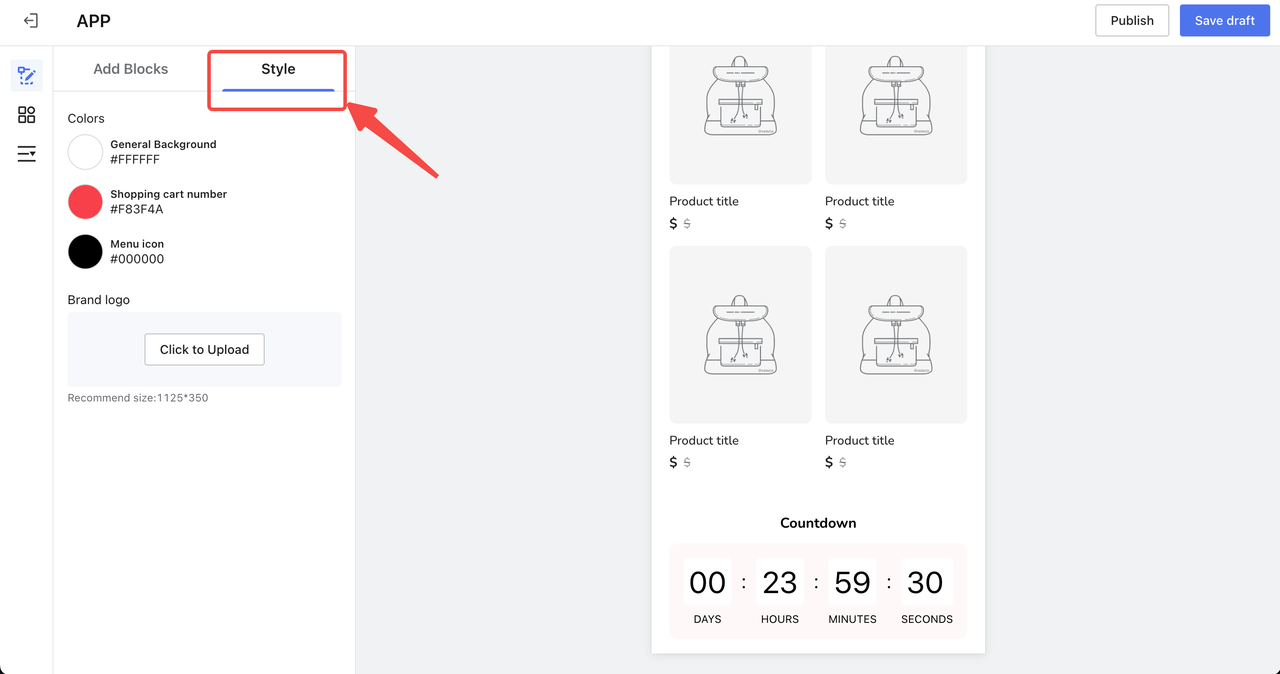
2. Getting the Right Look:
- Click 'Style' to pick the perfect design and brand logo for your app.
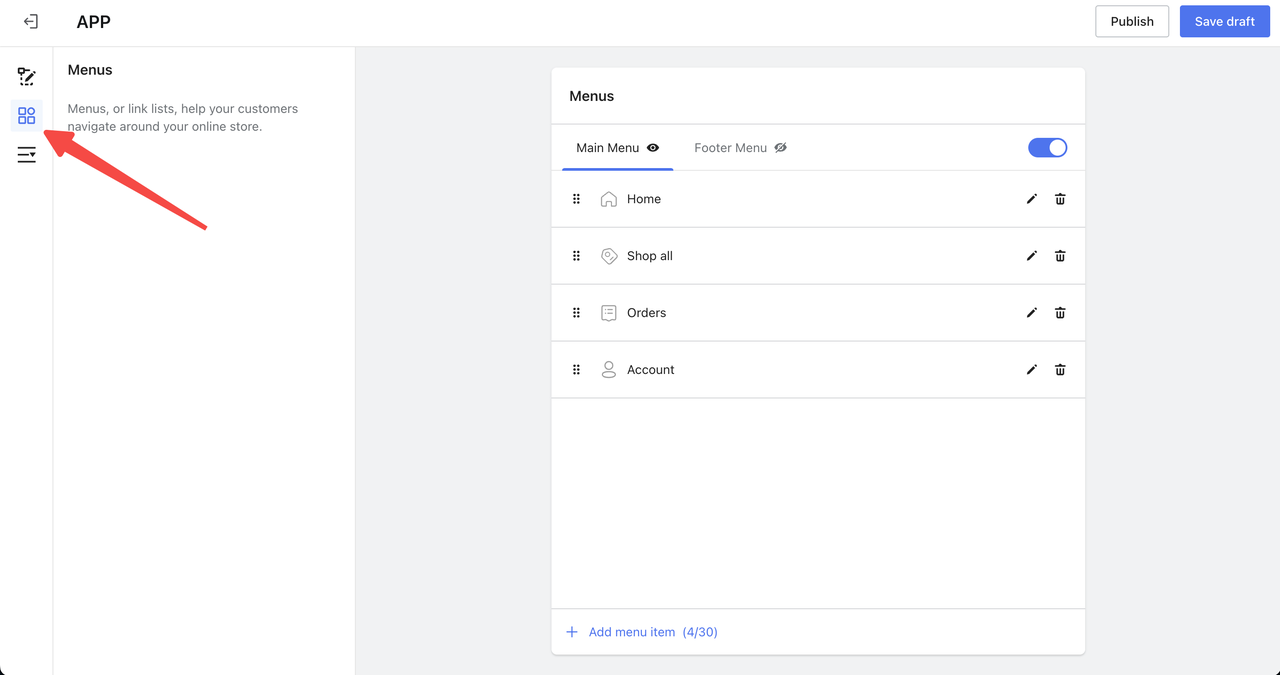
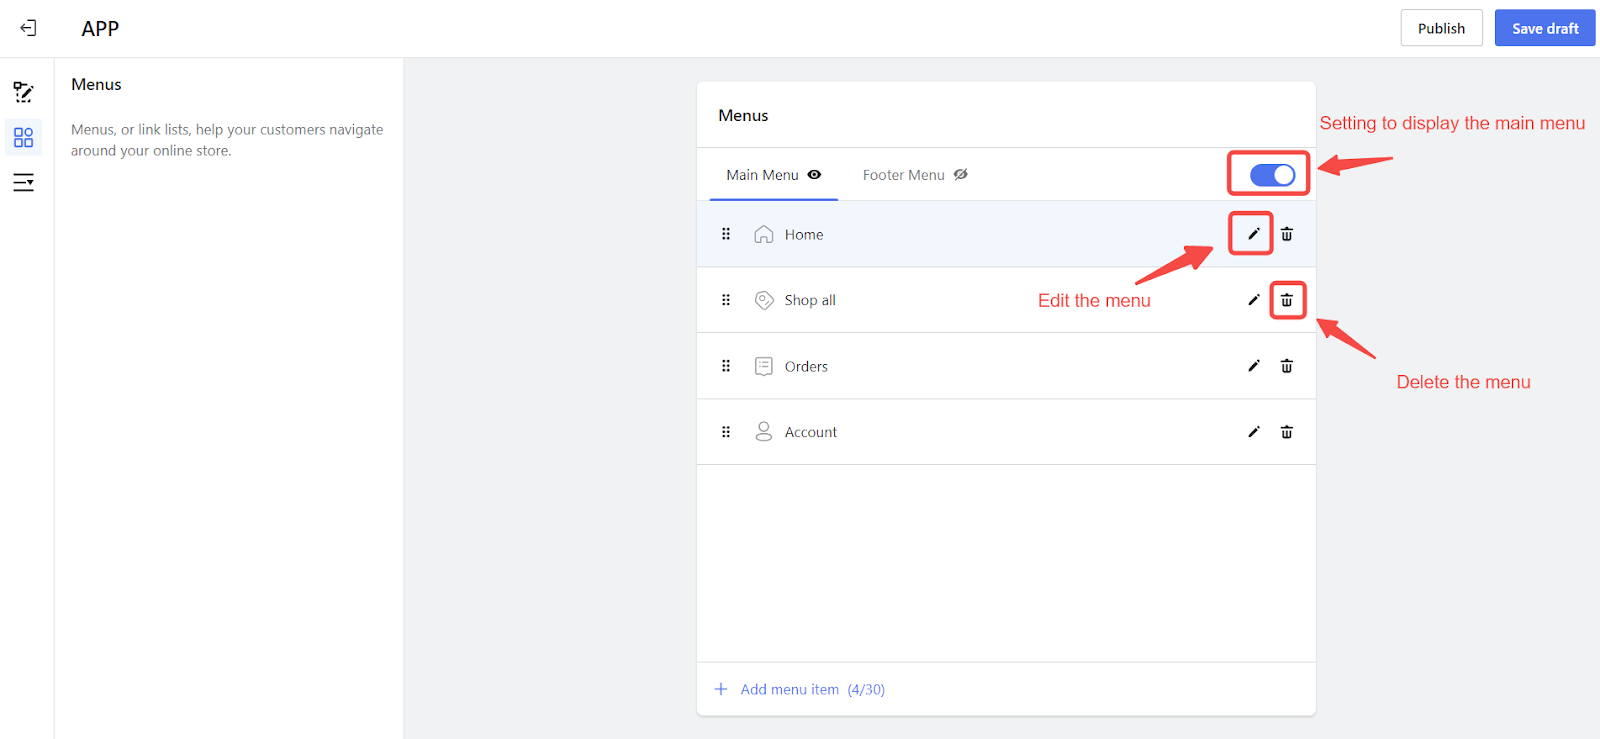
3. Creating Your Menu:
- Click on the menu icon to start setting up your menus.
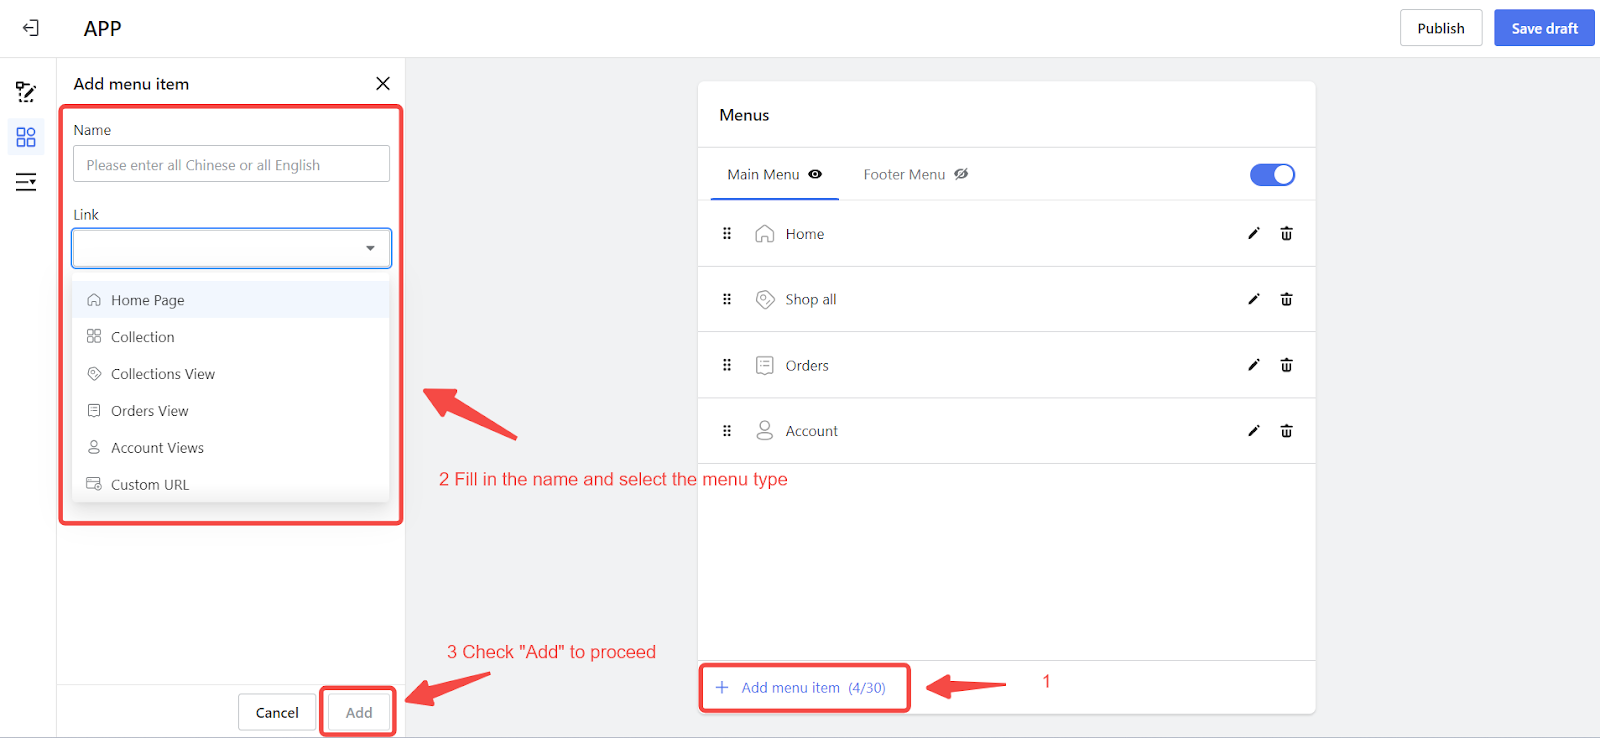
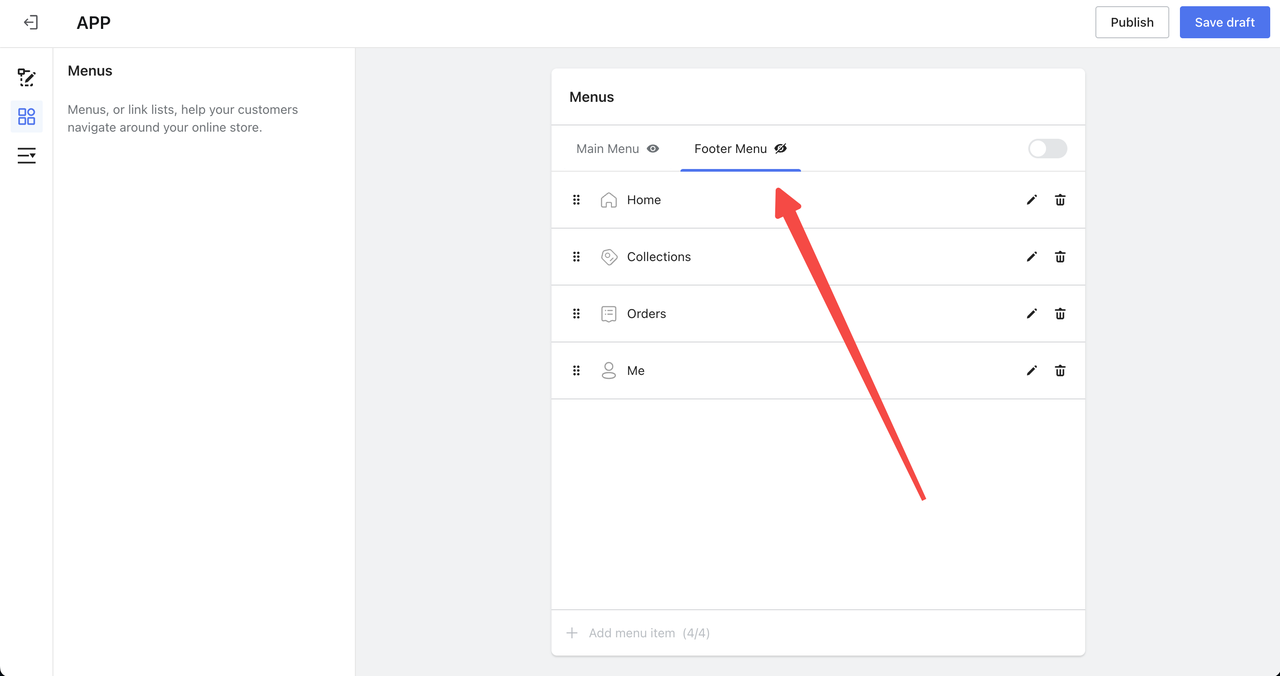
- Click Add to create a new menu in the Main Menu area. You can do the same for the Footer menu.
4. Sorting Out Your Collections:
- Click Collections to start organizing your photo albums.
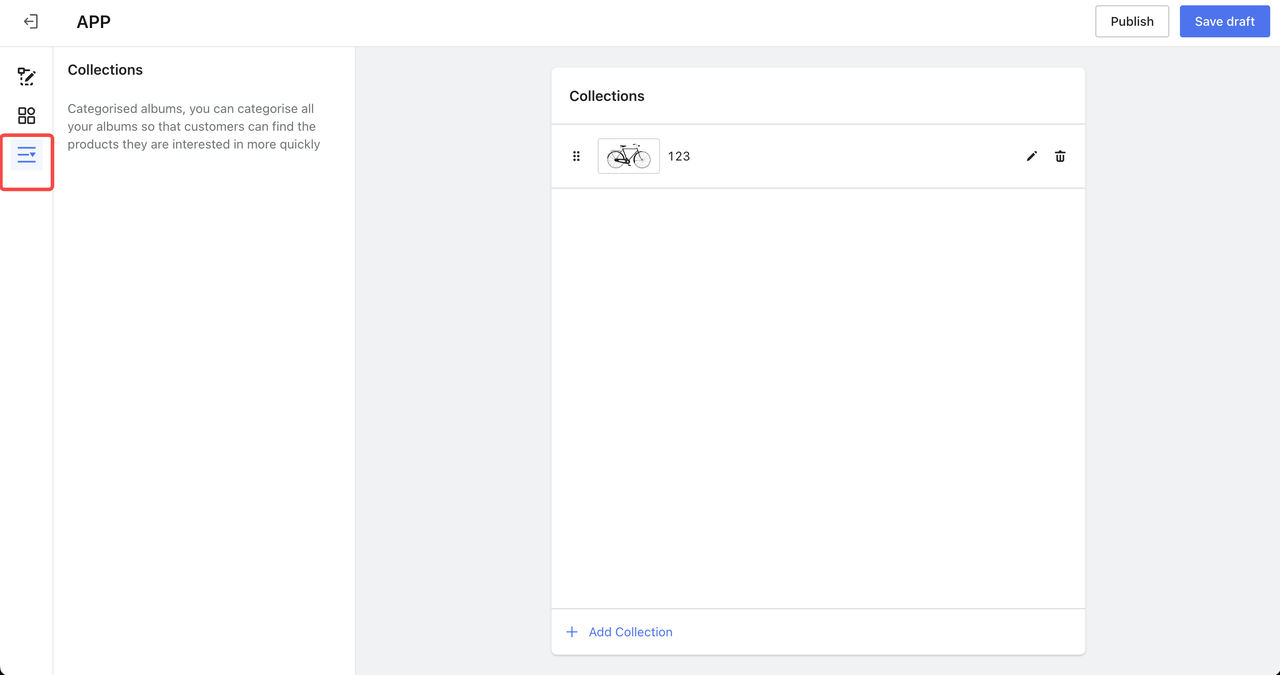
- Remember: Once your app's up and running in the app store, you can use the Publish button (top right of the editor) to push live updates to your app. No need to build a release audit on the homepage.
- Show Off Your Stats with Our Plug-in: Keep track of your app's performance with data displays, set up tables, and get step-by-step help with publishing.
6. Keep Track of Your App:
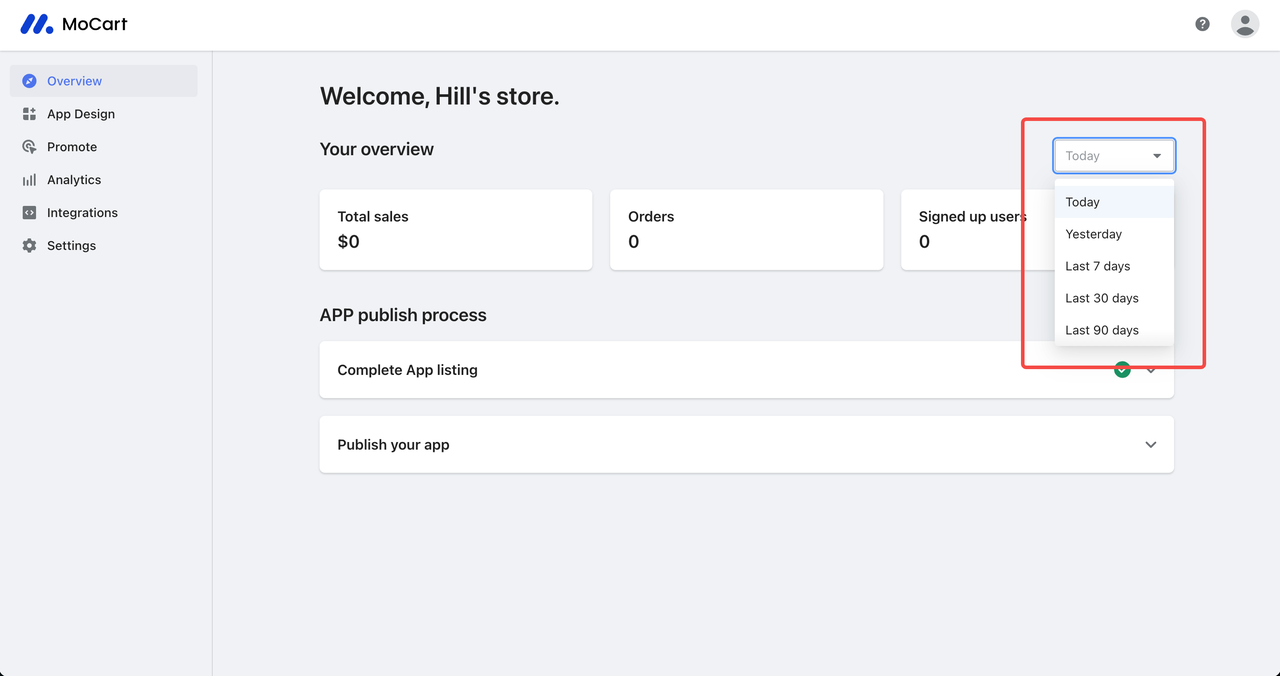
- The homepage will display your total sales, orders, and registered users.
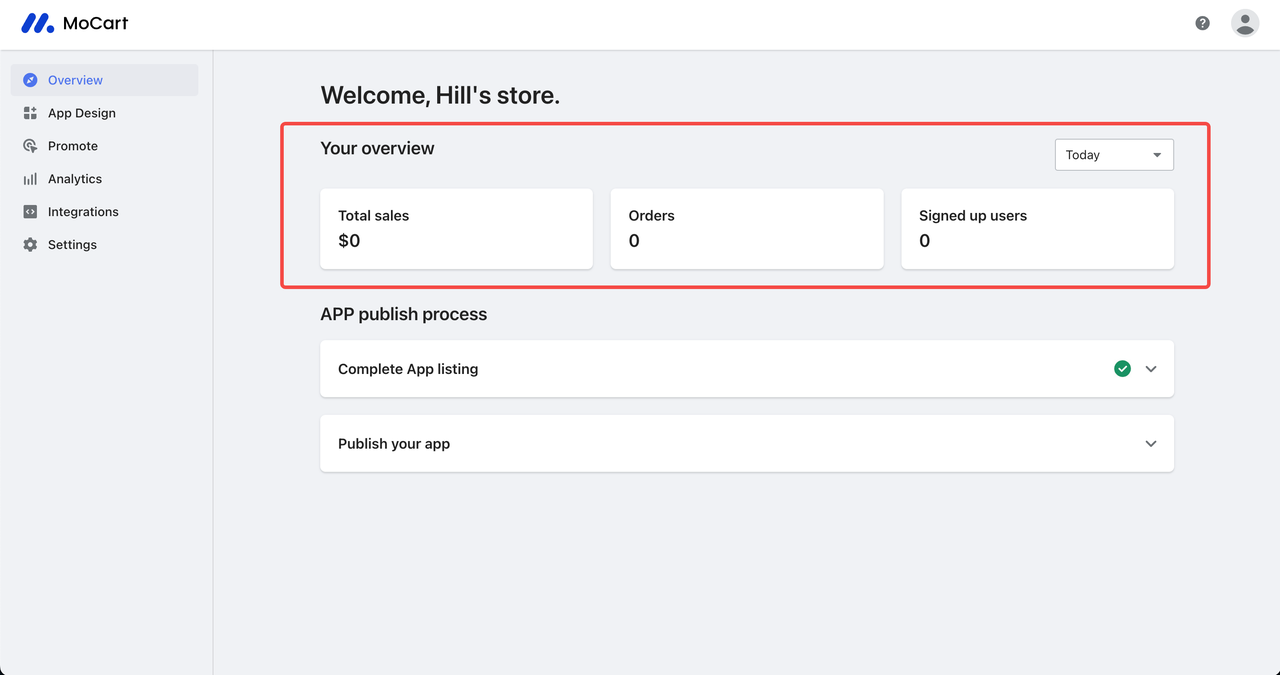
- You can pick different time periods to see how your app's been doing over time.
- Save your data entries.
10. Product customizer app now has preview effect function
Usage Scenario:
- Aimed at businesses looking for a platform where their consumers can preview and comprehend the look of their customized products in an intuitive manner before finalizing their purchase.
Usage Path:
- Navigate to your Shoplazza Admin > Apps. Click on Visit app store and search for Product customizer app and install.
- Proceed with 'Edit Custom Products' > Enable the 'Dropdown''Text'and'image upload' items under the 'Preview the Custom Effect' section.
Feature Overview:
This plug-in assists consumers in previewing colour cards, uploading images, and customizing text in real-time.
- Merchants can add colour cards, upload pictures, and create text customization items using the plug-in, each of these will have a 'preview customization effects' feature. Click to access this feature:
- colour card
- Upload images
- Text
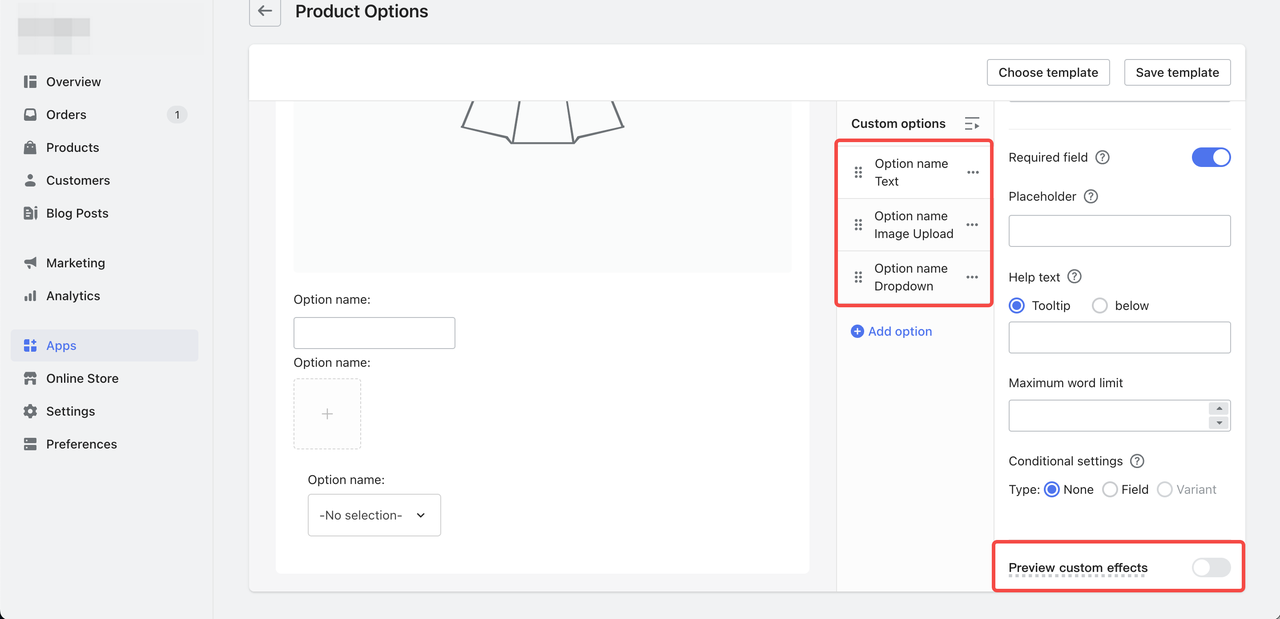
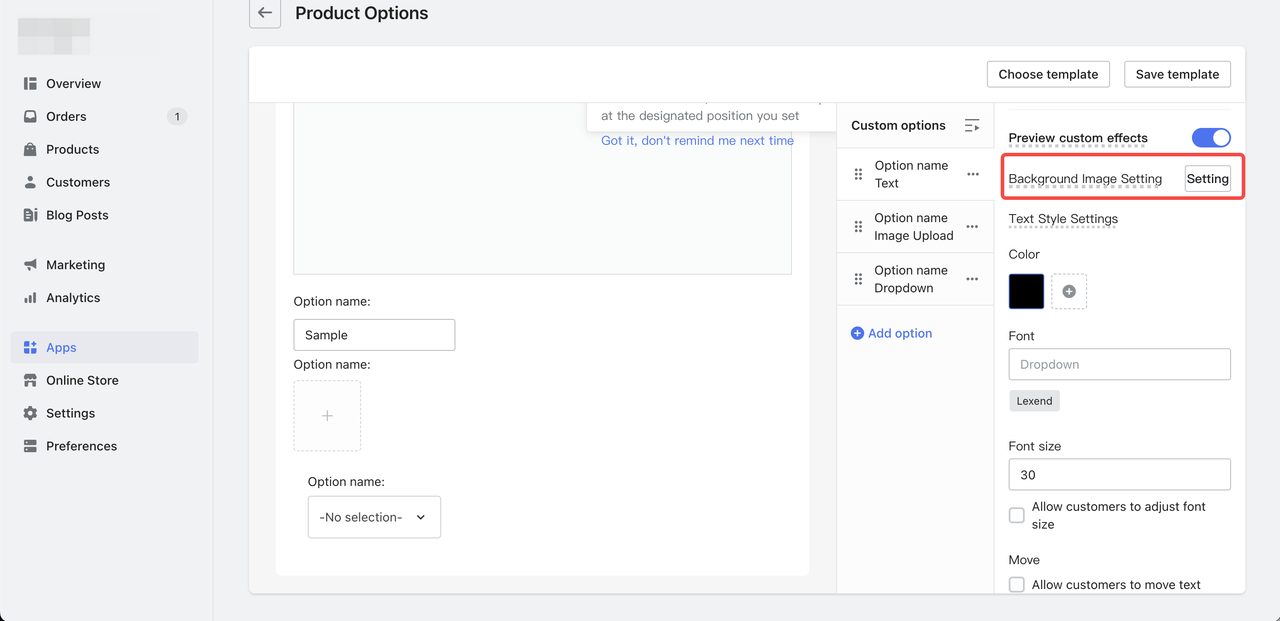
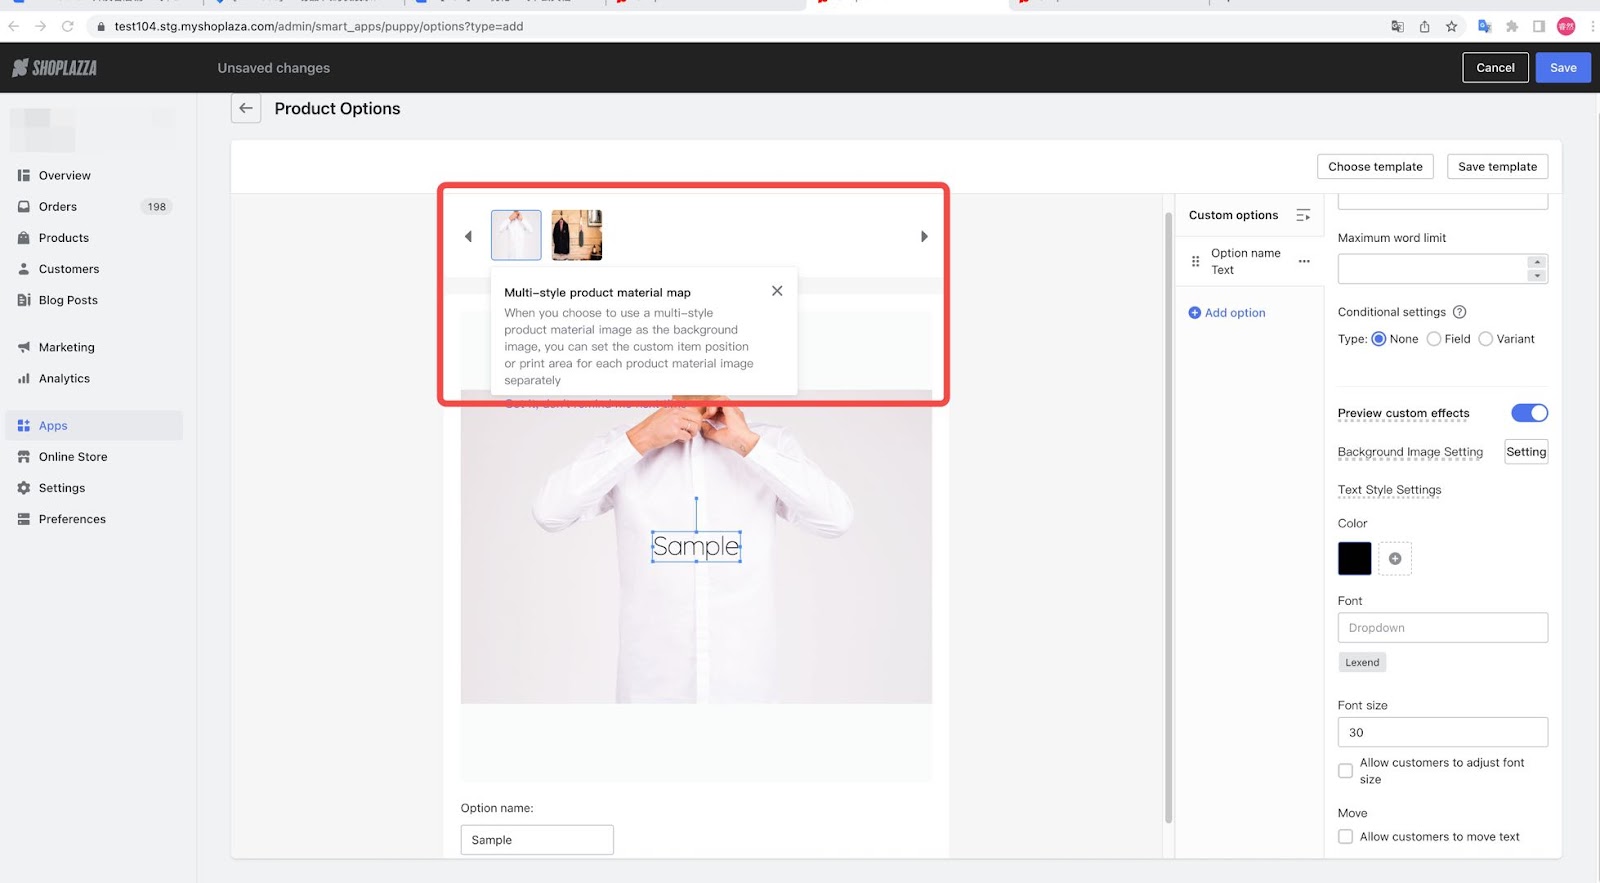
2. Once the 'Preview custom effect' feature is activated, merchants have the ability to establish a background cover. By default, the initial product image serves as the background cover. To adjust this setting, simply select the 'Settings' option.
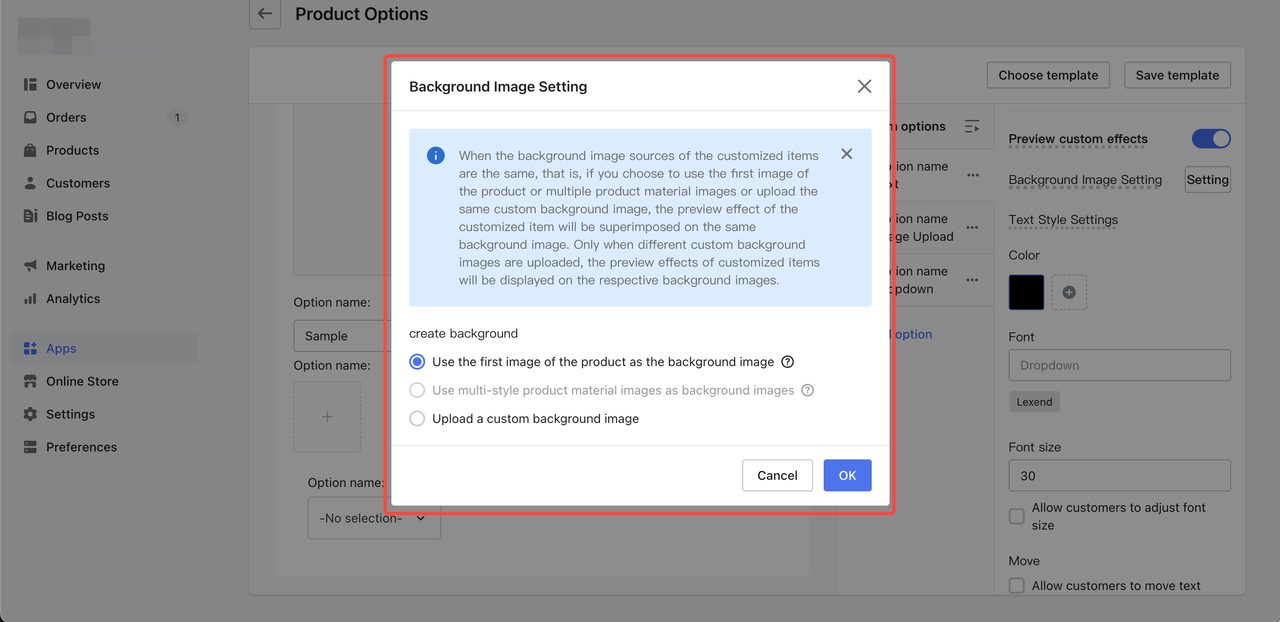
3. The background cover can be set from a range of options - the first product image, multi-style product material image, or a custom background cover.
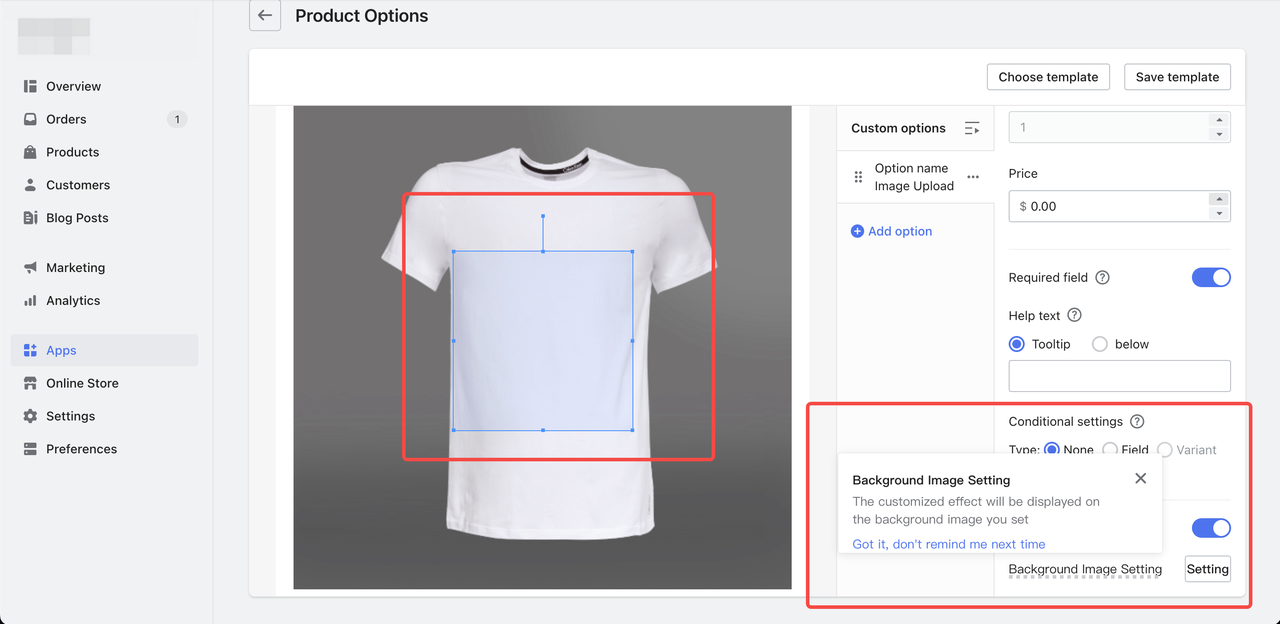
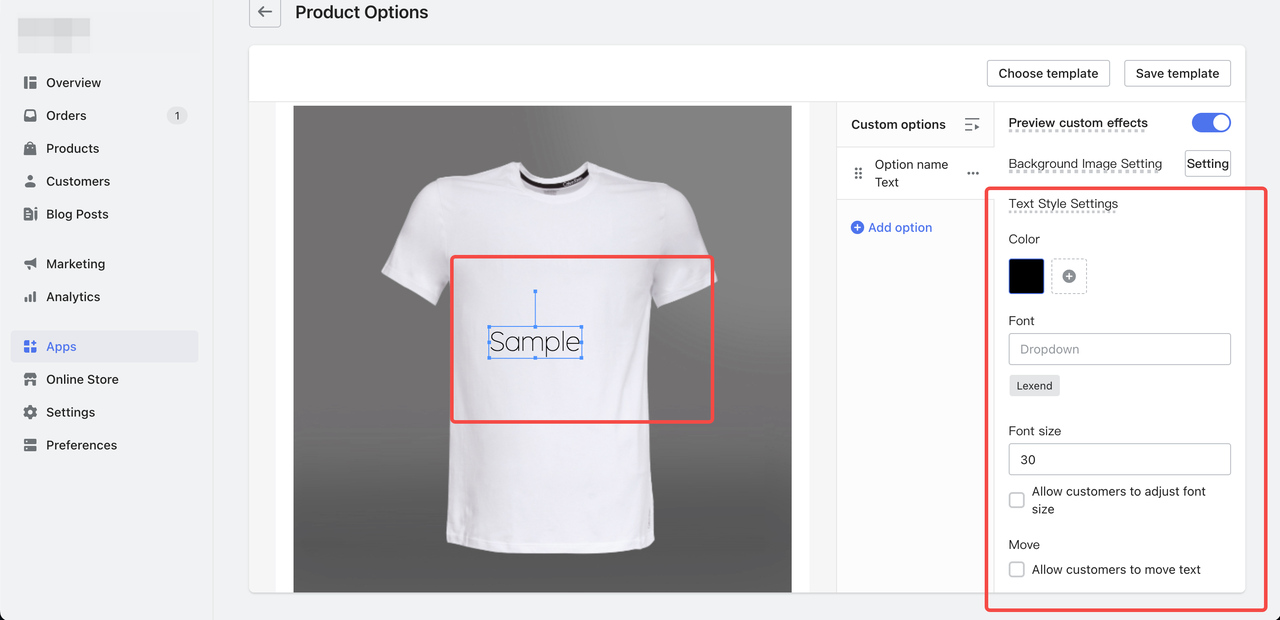
- Once the background cover is in place, merchants can further set custom item positions, print areas, and text styles.
- Colour card: Select the 'Attribute Value'. Proceed to modify the position of this attribute value on the background cover. If your background image features a multi-style product material, you have the flexibility to set unique positions for the attribute value on each individual material image.

- Upload image: Set the printing area. For a background image with multi-style product material, each material image's print area can be set separately.
Tips:
- Adjust text position: Merchants set the text position when customer movement isn't permissible.
- Set text style: When there's only one text style, it won't be displayed on the consumer side. However, multiple text styles will present style selection items to consumers.
- Set print area: Merchants set the print area when customers are allowed movement.
6. For a multi-style product material image, each material image can have separate positions or print areas.
7. Consumers can adjust the location/style of customization items and preview the effect in real time.
- Colour card: Select 'Customization'
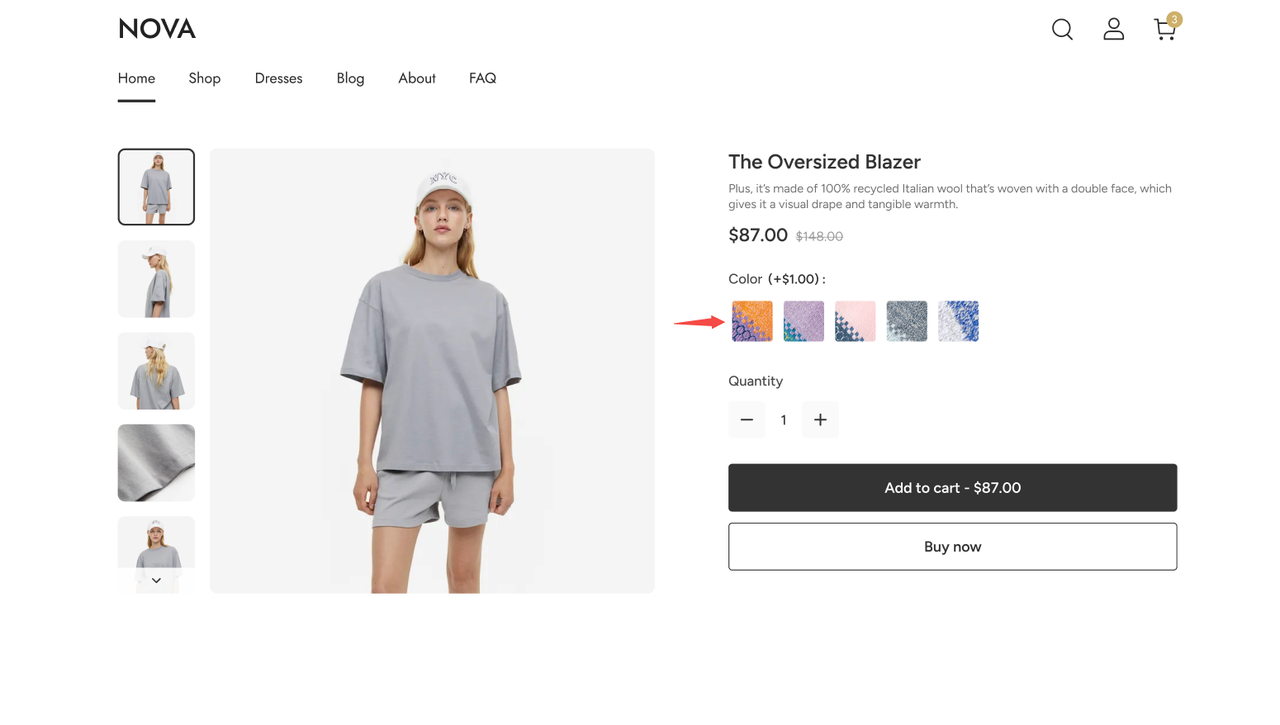
- The preview box image will transition from the original product catalog to the preview effect image. The selected customization item value will appear at the merchant-specified position.
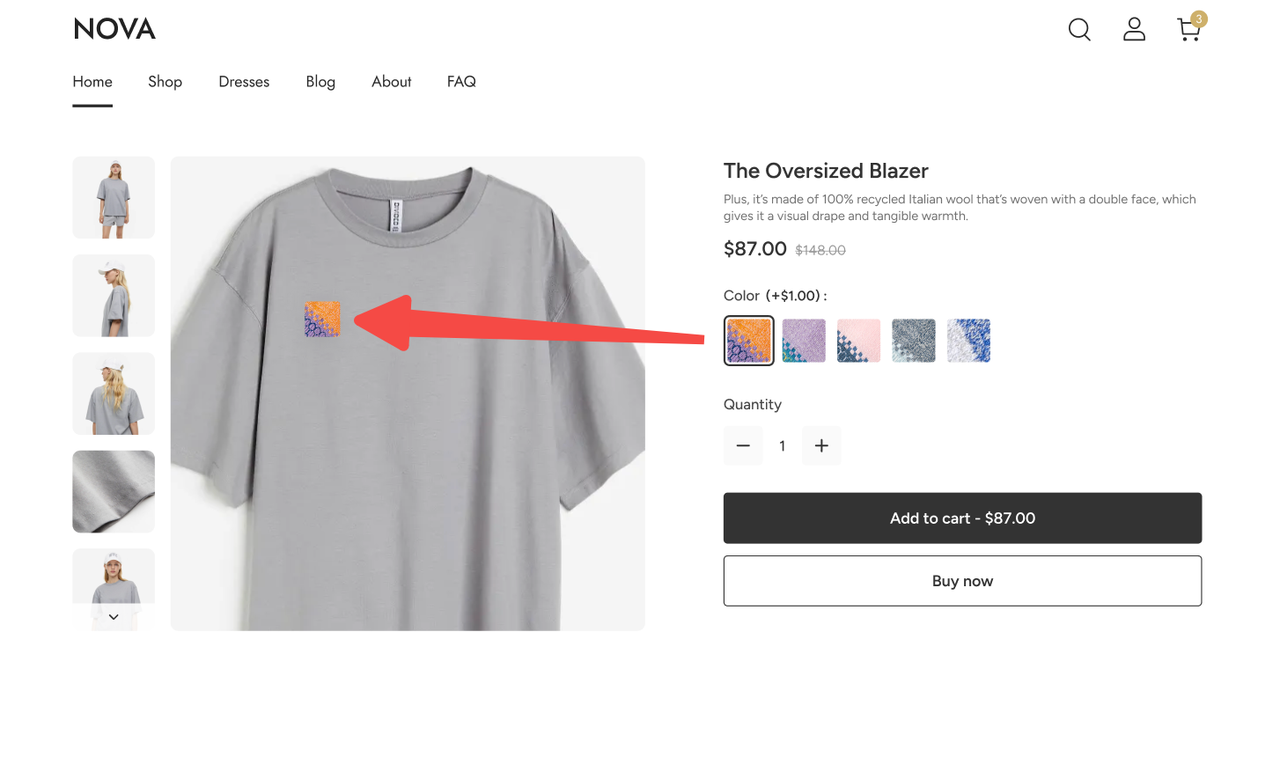
- Upload image: After the upload process, consumers are provided with the capability to manipulate the image within the merchant-designated print area, including moving, zooming in or out, and rotating the image as needed.
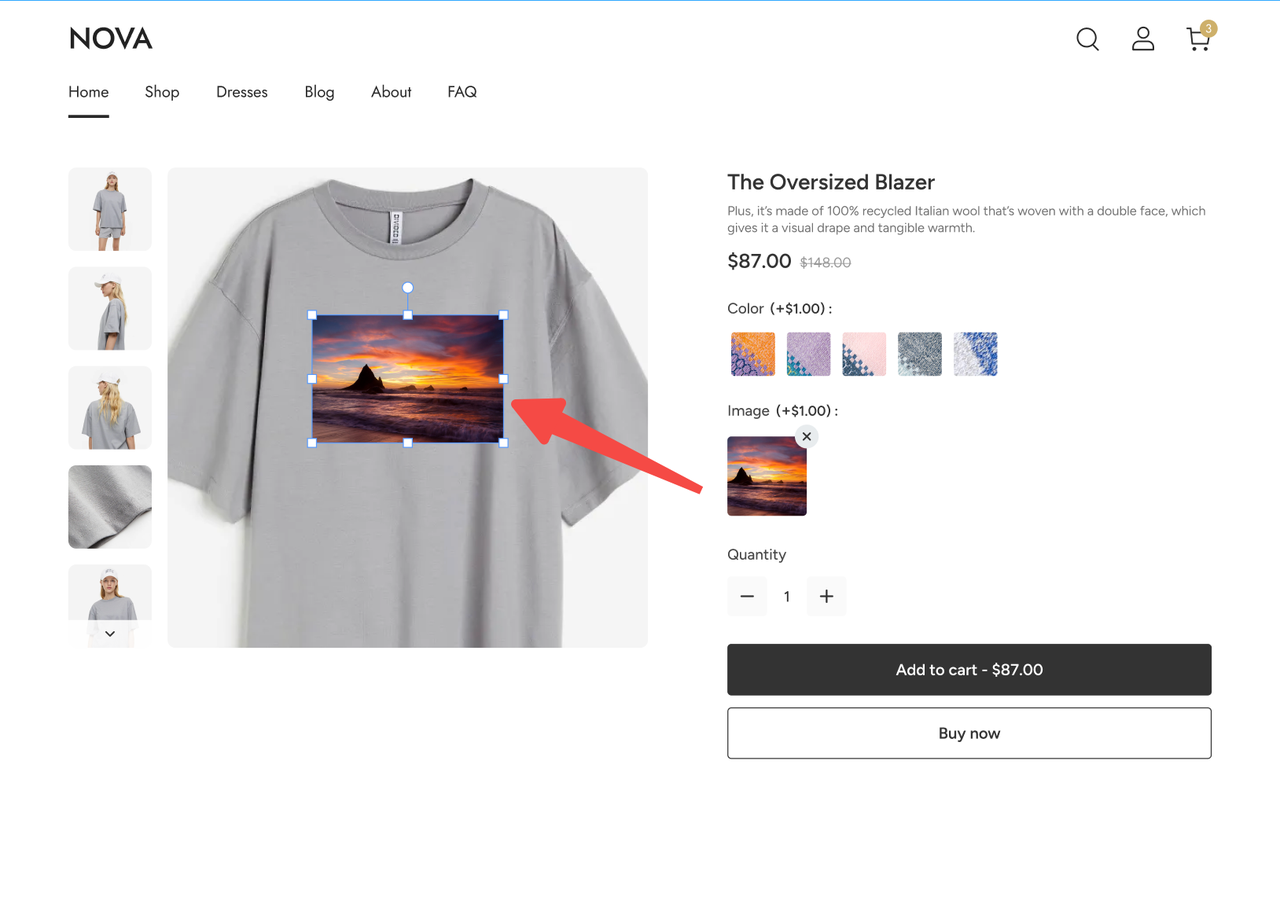
Tips If there's only one text style available, it won't be visible to the consumer. However, if the merchant restricts customer adjustments, the text will be displayed according to the pre-defined position established by the merchant.
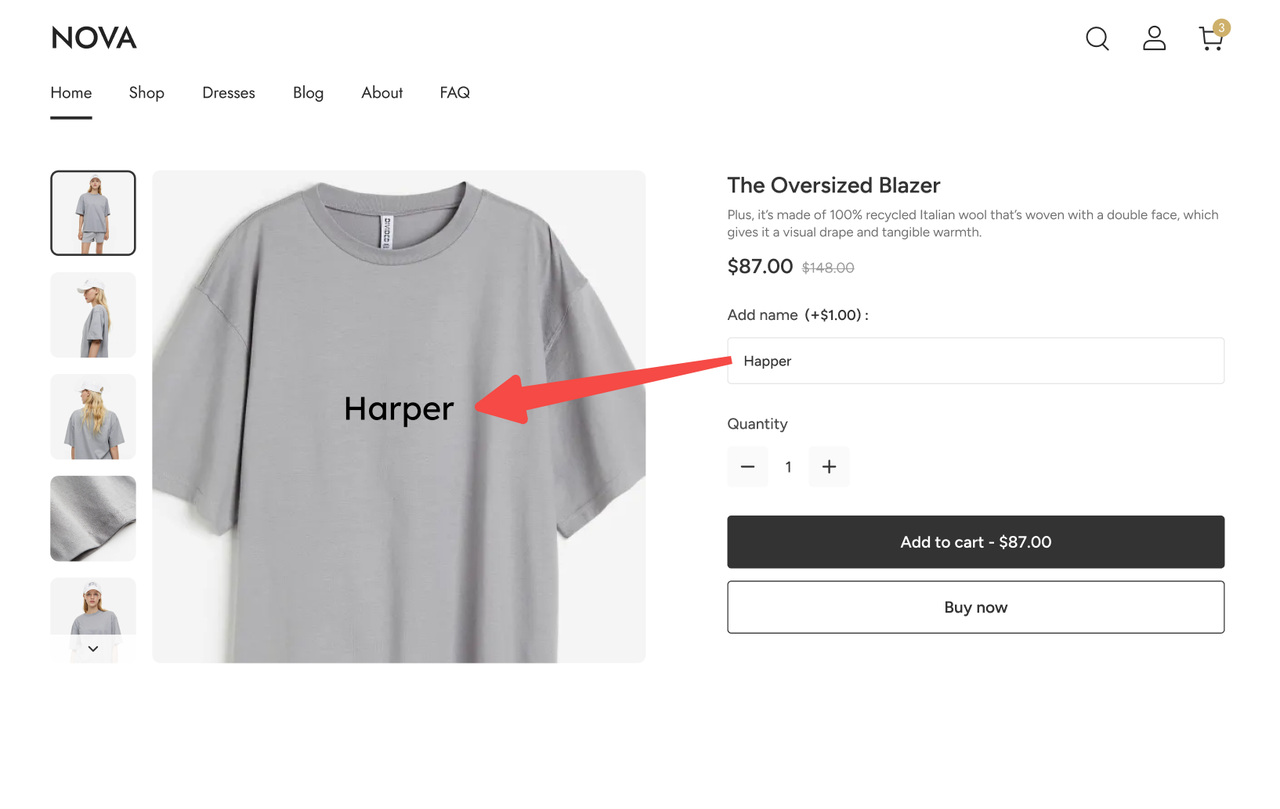
When multiple text styles are present, the consumer side will display style options; if the merchant allows customer movement, consumers can adjust the text within the print area. Final renderings along with custom item attribute values will be incorporated into the order, providing a design basis for merchants to create products.
11. CJ Tracking Integration
Usage Scenario:
- With CJ affiliate marketing, merchants can effectively promote their stores and discover new customers via the affiliate platform.
Usage Path:
- Navigate to your Shoplazza Admin > Apps. Click on Visit app store and search for CJ Tracking Integration app and install.
Feature overview:
- Synchronize product data to CJ for marketing promotion.
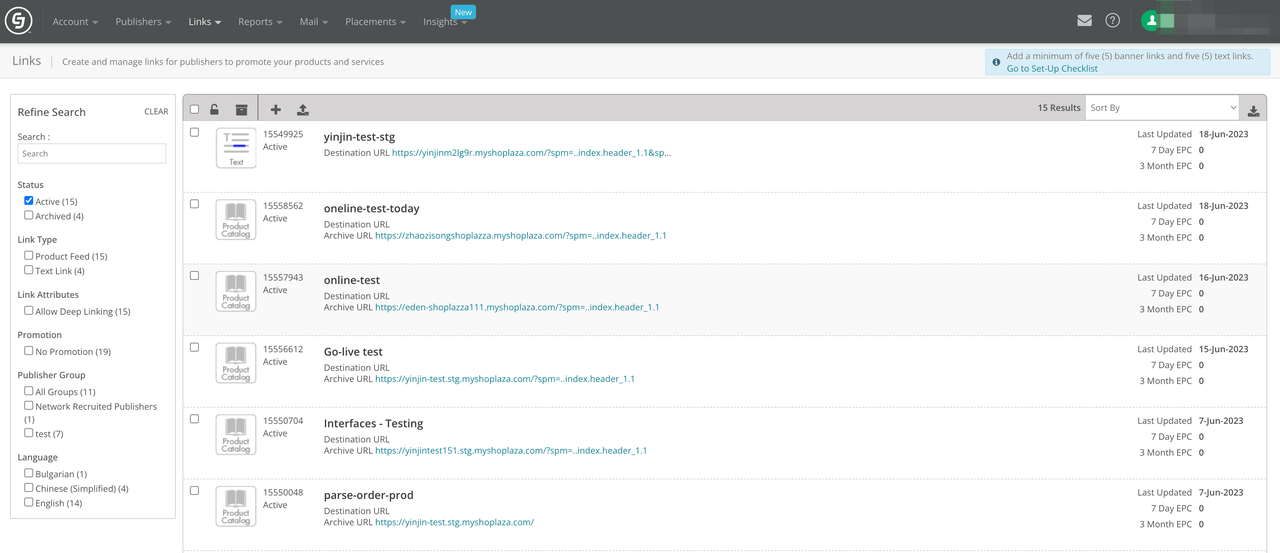
Log in to your CJ platform and navigate to Links > Feeds > Register Feed.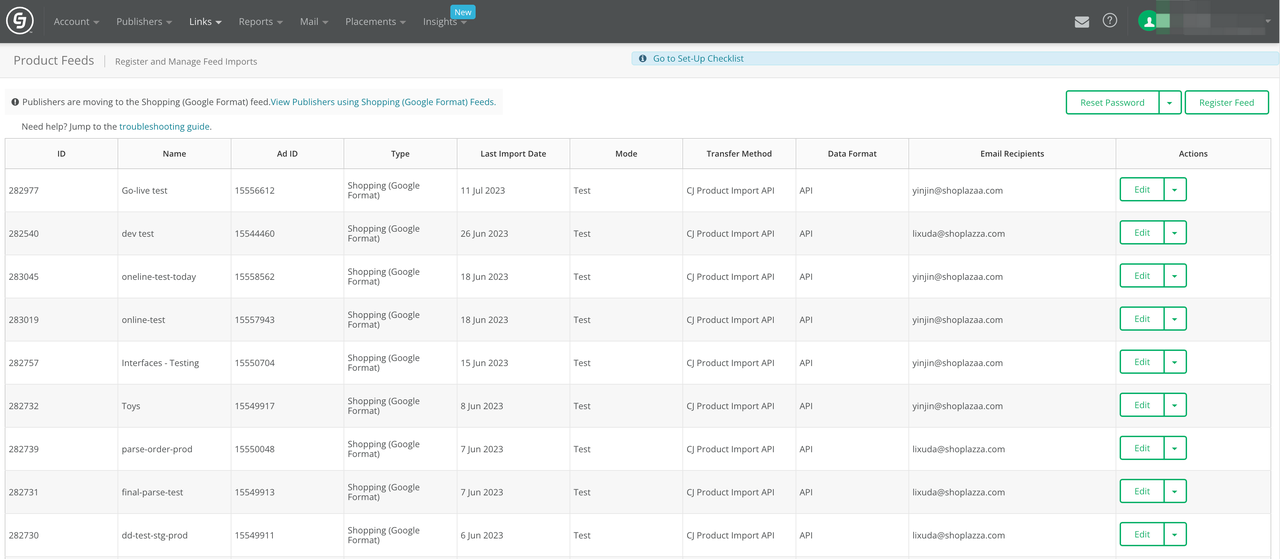 3. The Product Feed feature enables the provision of products to a select group or all publishers in the program. Publishers can embed product links within their content, creating purchasing opportunities for consumers. Navigate to Links > Manage to view.
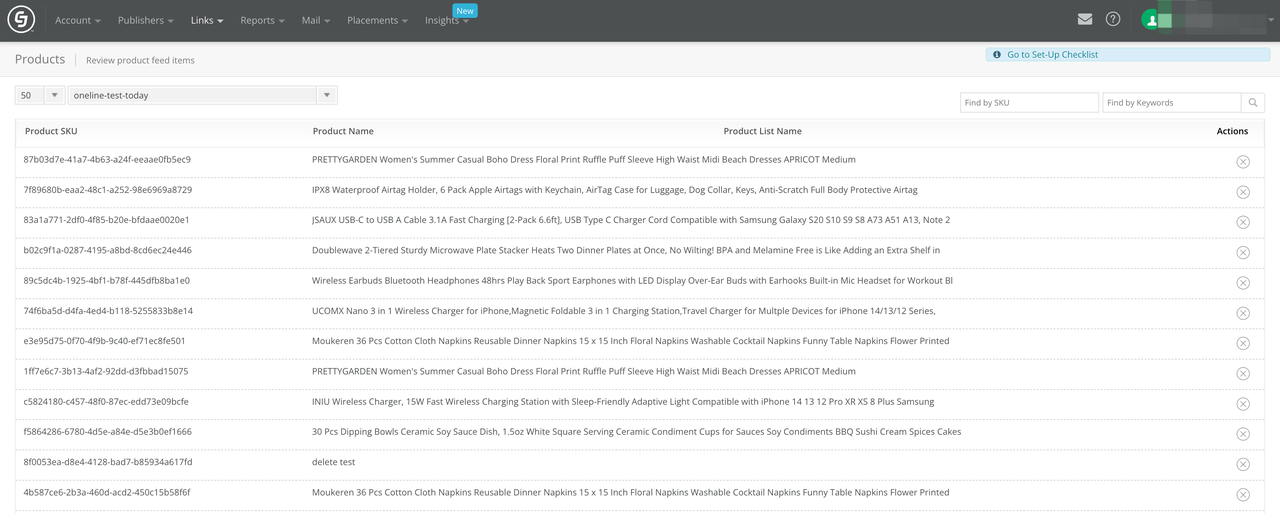
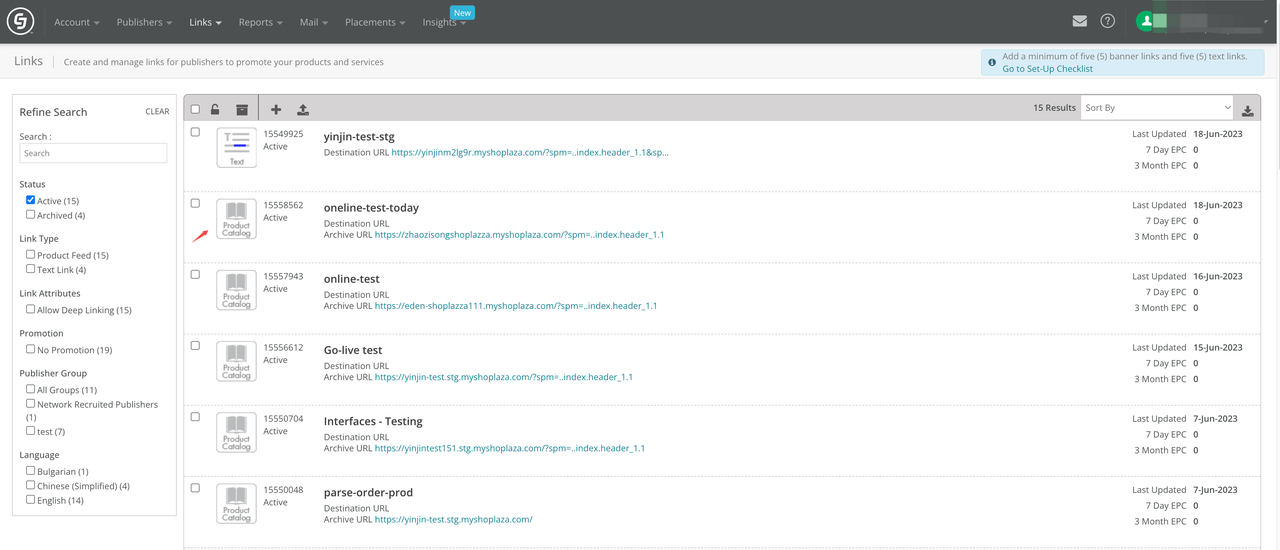 4. Add, delete, or modify products in the store and synchronize these changes with the CJ platform. Navigate to Links > Products to view.
 5. Synchronize order data to CJ for attribution and commission calculation.
Log in to your CJ platform, navigate to Links > Manage, and click ➕ to add a promotion link.
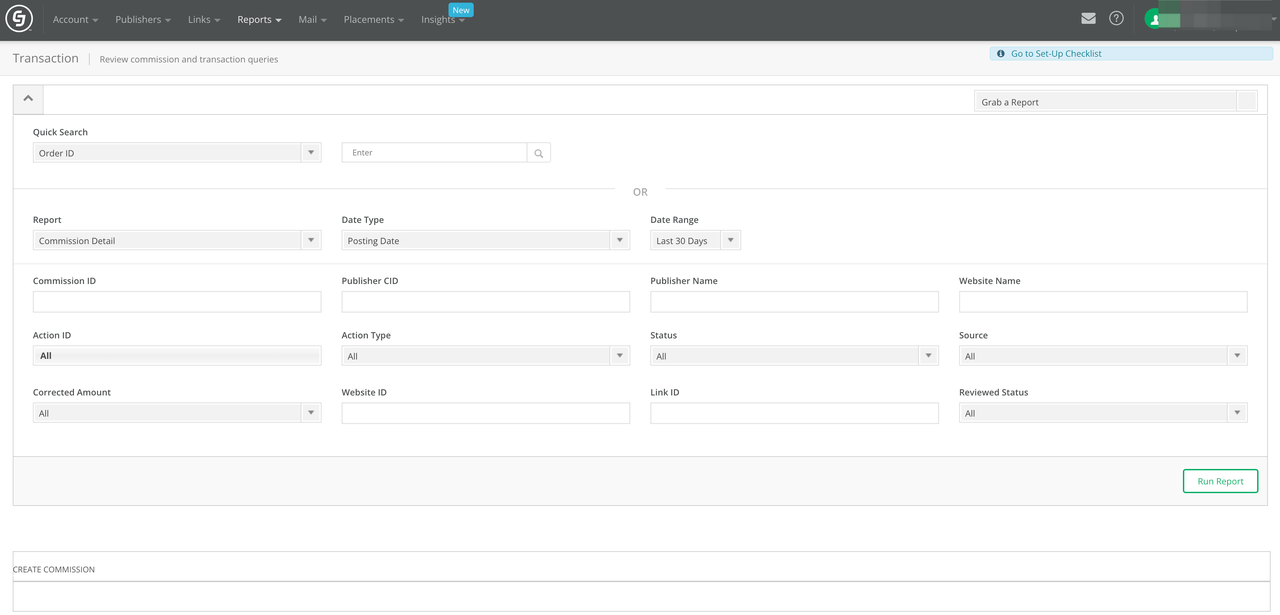
1. Customers who visit the online store through the promotion link and complete an order can be tracked. Log in to your CJ platform, navigate to Reports > Transaction to view.
For specific operational guidance on the plugin, please refer to the help documentation: CJ Tracking Integration g Integration.

Comments
Please sign in to leave a comment.