The SEO Optimizer is a Shoplazza admin app designed to boost your store’s visibility in search engines. This tool allows you to evaluate SEO performance, set meta tags, create alt tags for images, and address any broken links by setting up redirects. The app also supports configuring sitemaps and Google Snippets , making it easier for customers to find your store online.
Installing the SEO Optimizer
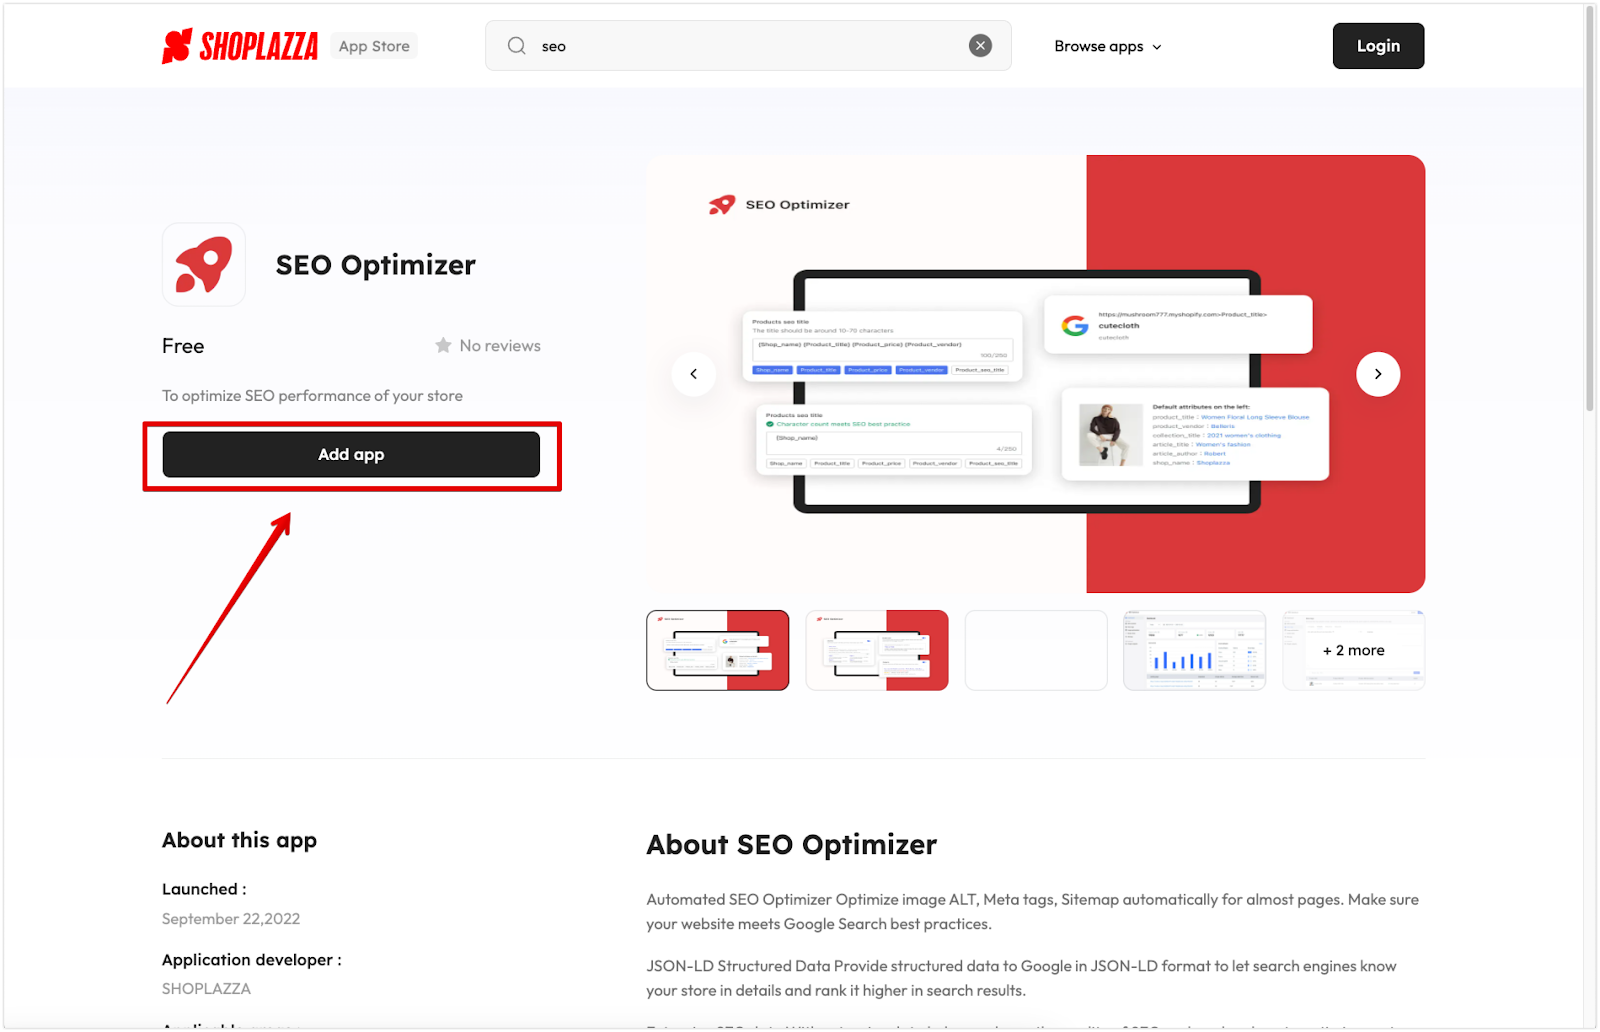
You can find the SEO Optimizer app in the Shoplazza App Store . Once installed, a dashboard will become available, allowing you to view and monitor your store’s SEO data.
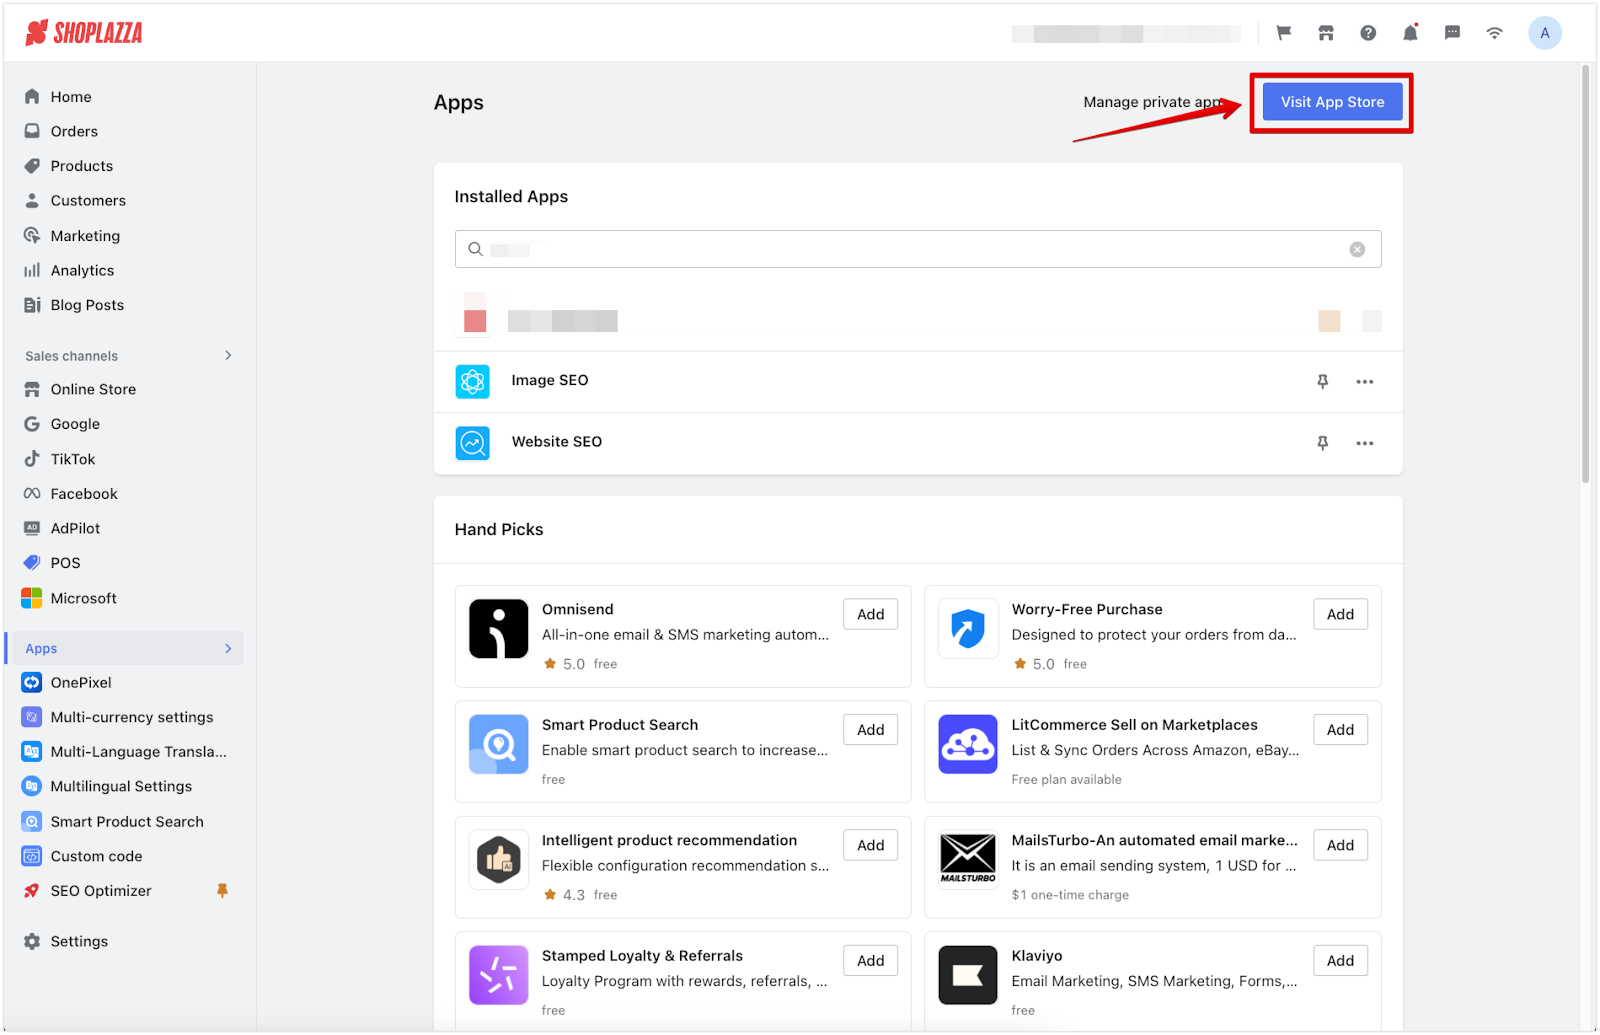
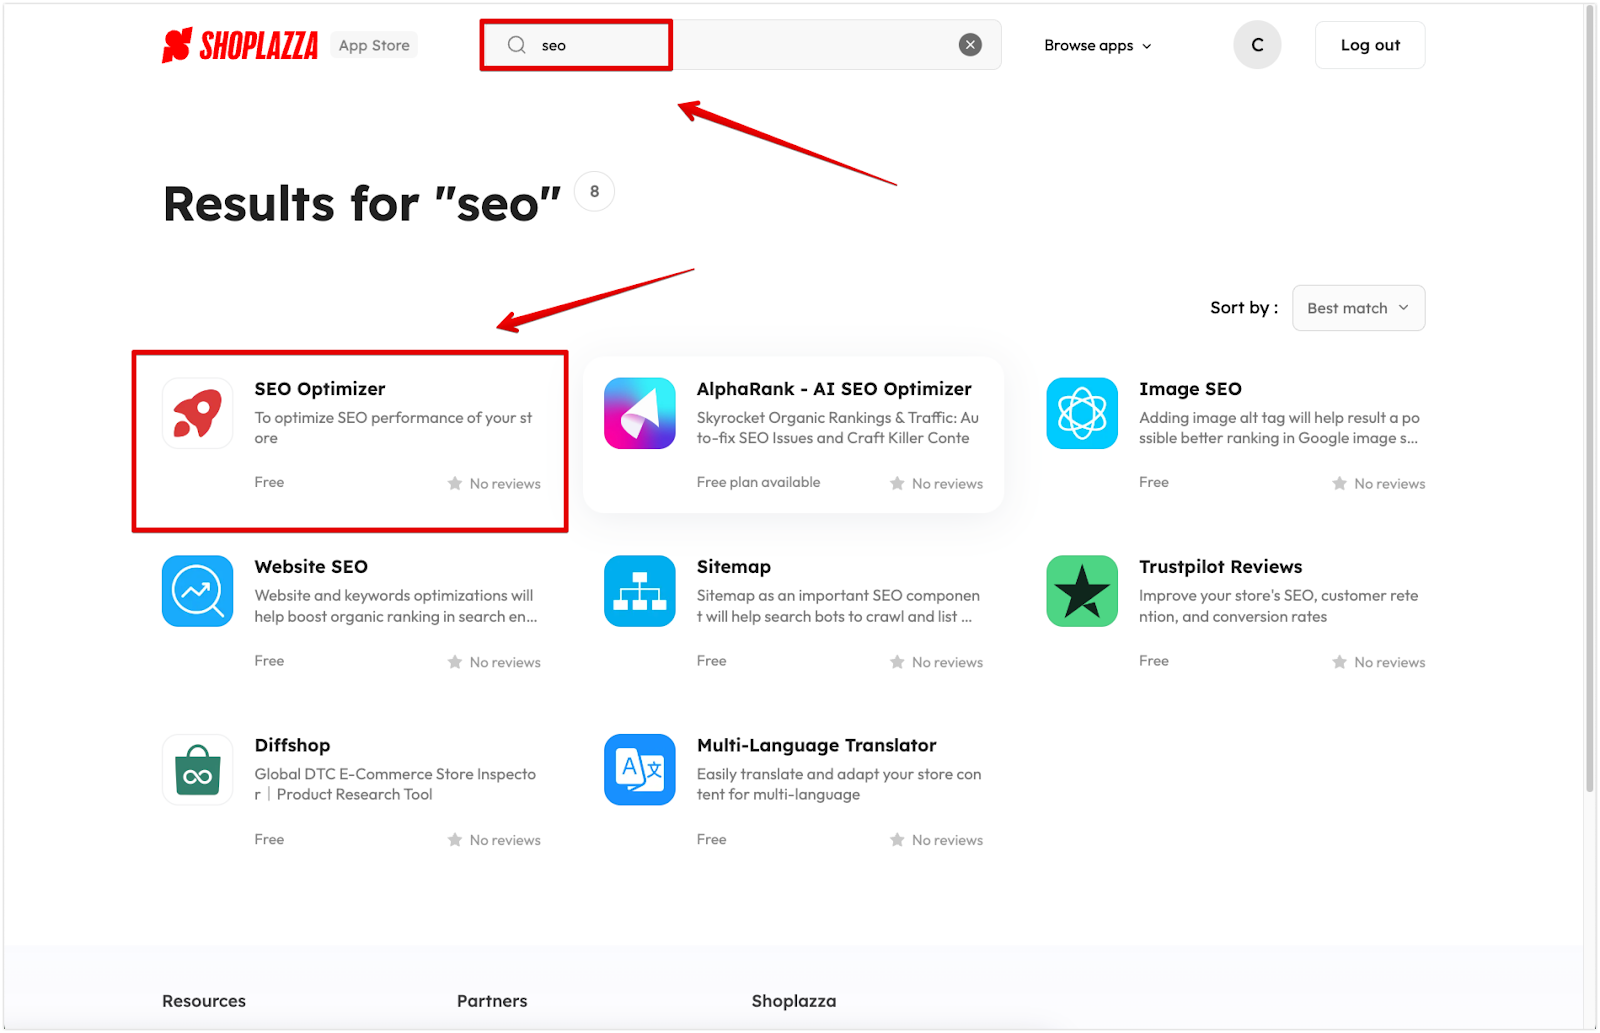
1. Install the App: From your Shoplazza Admin, go to Apps > Visit App Store. Enter “SEO” in the search bar, and select the SEO Optimizer app.
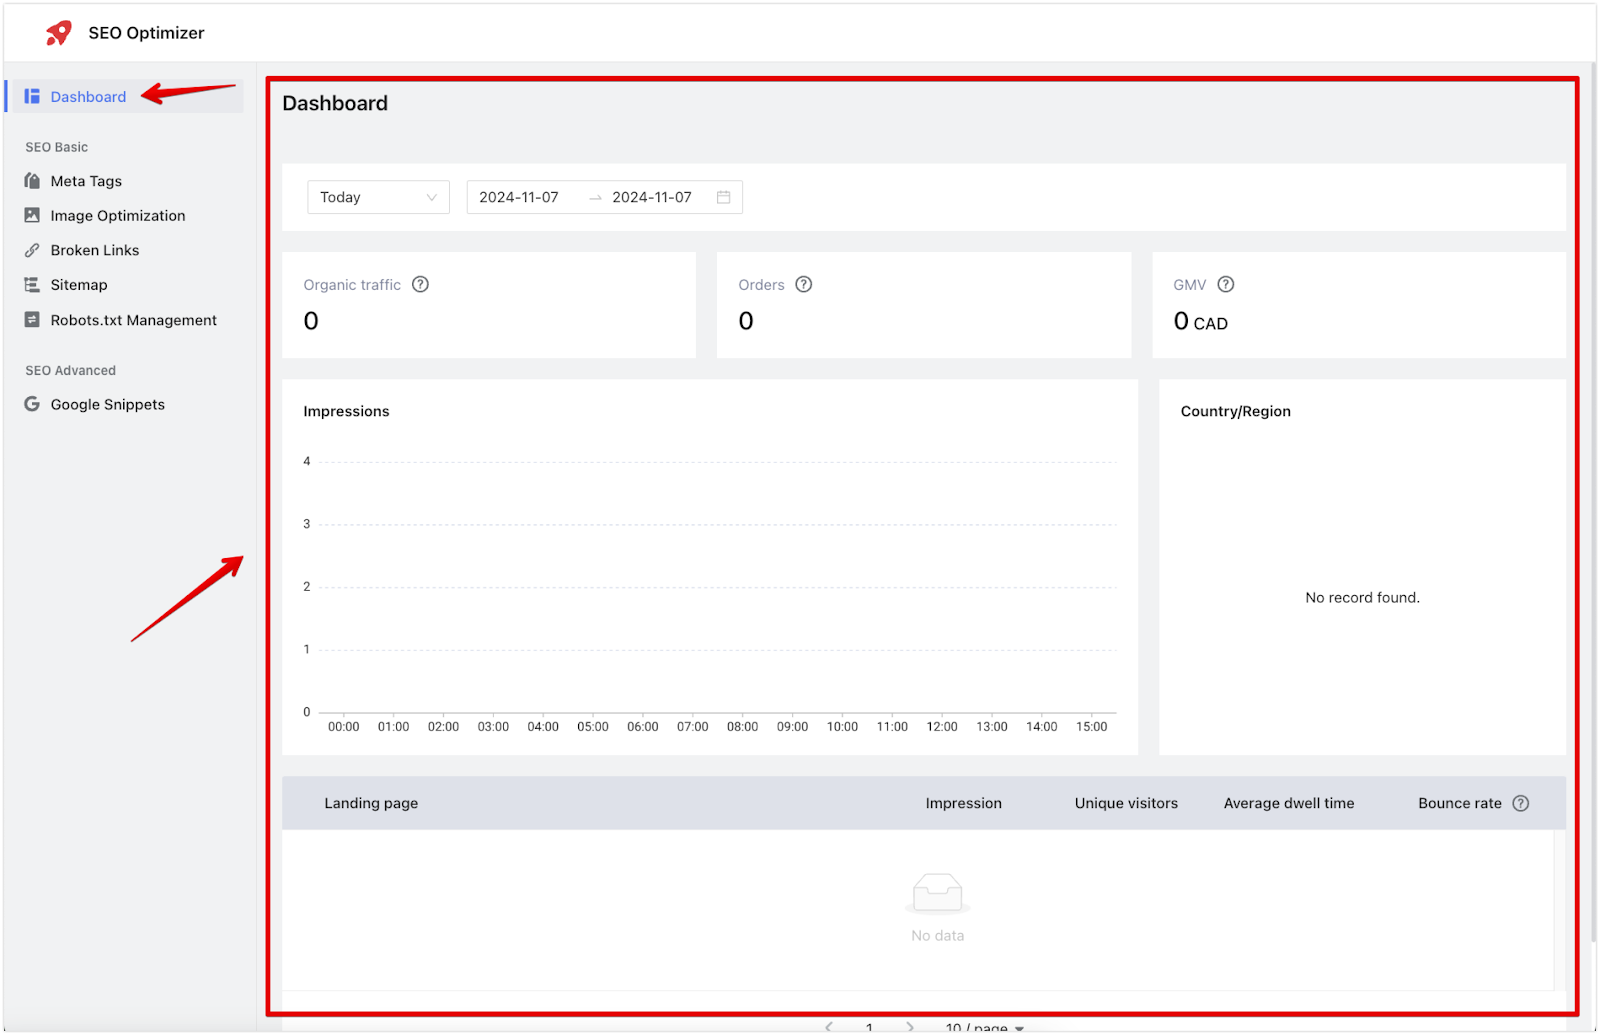
2. Dashboard overview: The dashboard displays essential SEO metrics, helping you track organic traffic and any resulting conversions. This data allows you to understand consumer behaviors on landing pages.
Adding Meta tags for your store
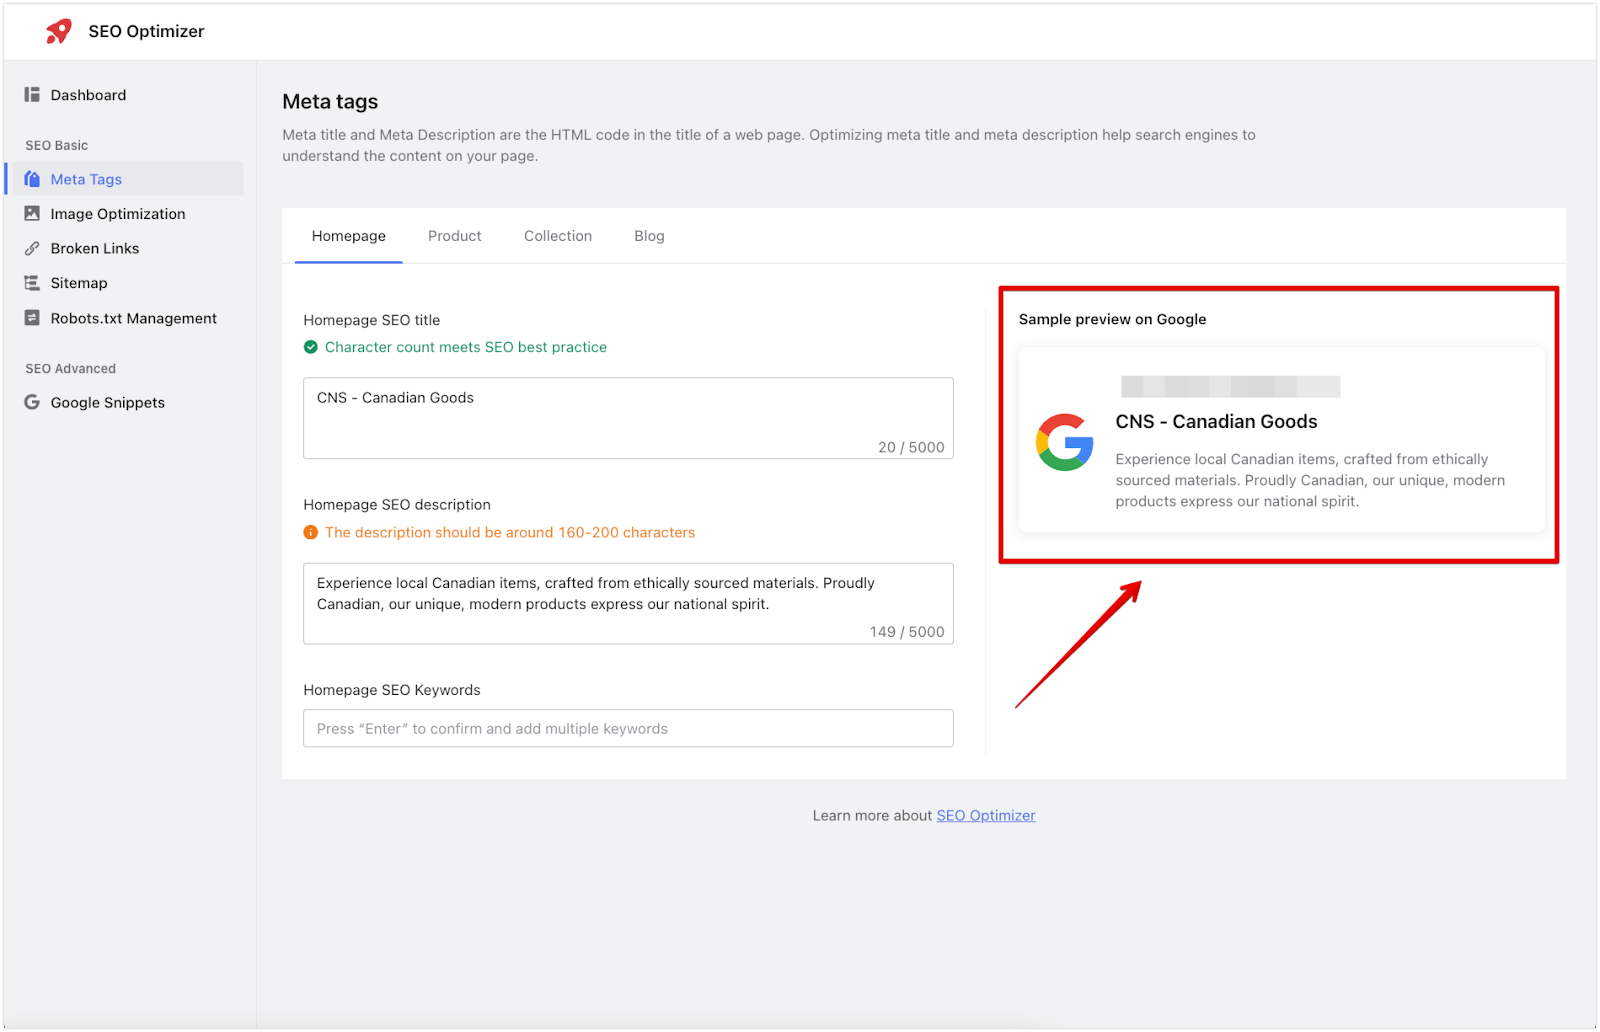
Meta tags are short descriptions that help search engines understand the content on your pages, improving visibility in search results. You can manage SEO tags for different pages by clicking on Meta tags and previewing how your changes will appear on Google.
1. Configure tag settings for each page: In the Meta tags section, navigate between the Homepage, Product, Collection, and Blog tabs to set SEO tags for each page type. Adjust the SEO title, description, and keywords to meet best practices for search optimization.
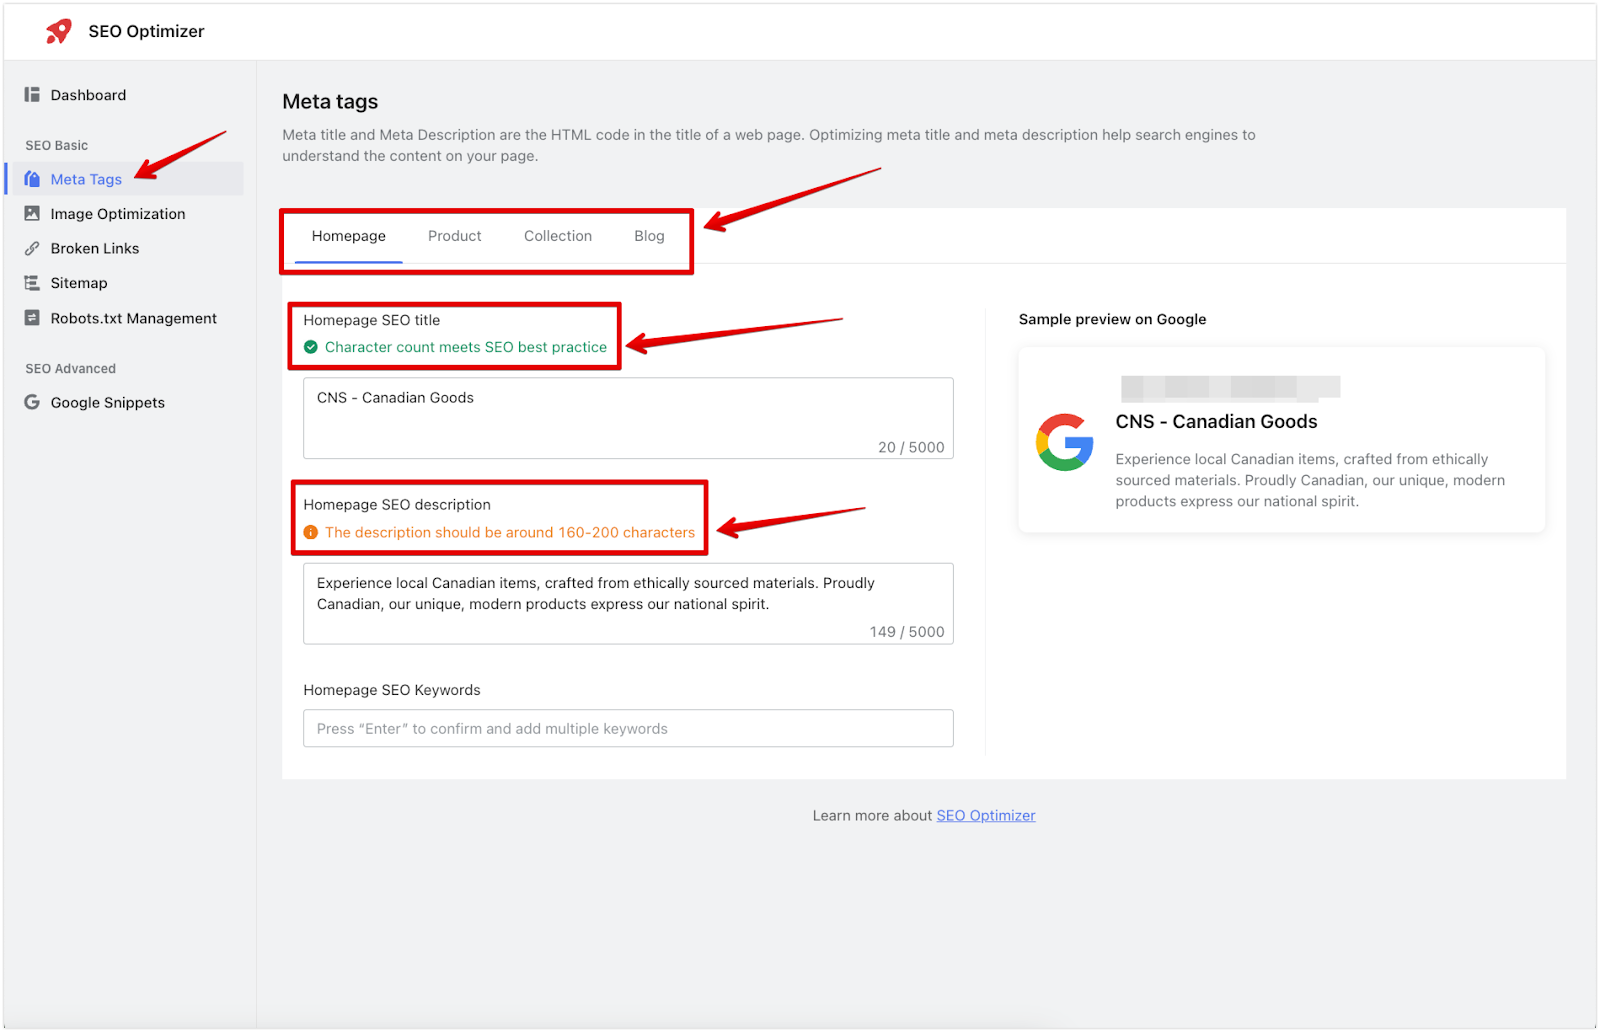
2. Preview changes: Use the Google Preview feature to see how your meta tags will look in search results. This helps ensure tags are optimized for better visibility.
Updating meta tags on individual pages
Within each section, you can adjust meta tags for specific parts of your store, like the homepage, product pages, collections, and blog posts. This ensures each page has optimized tags that align with your SEO goals.
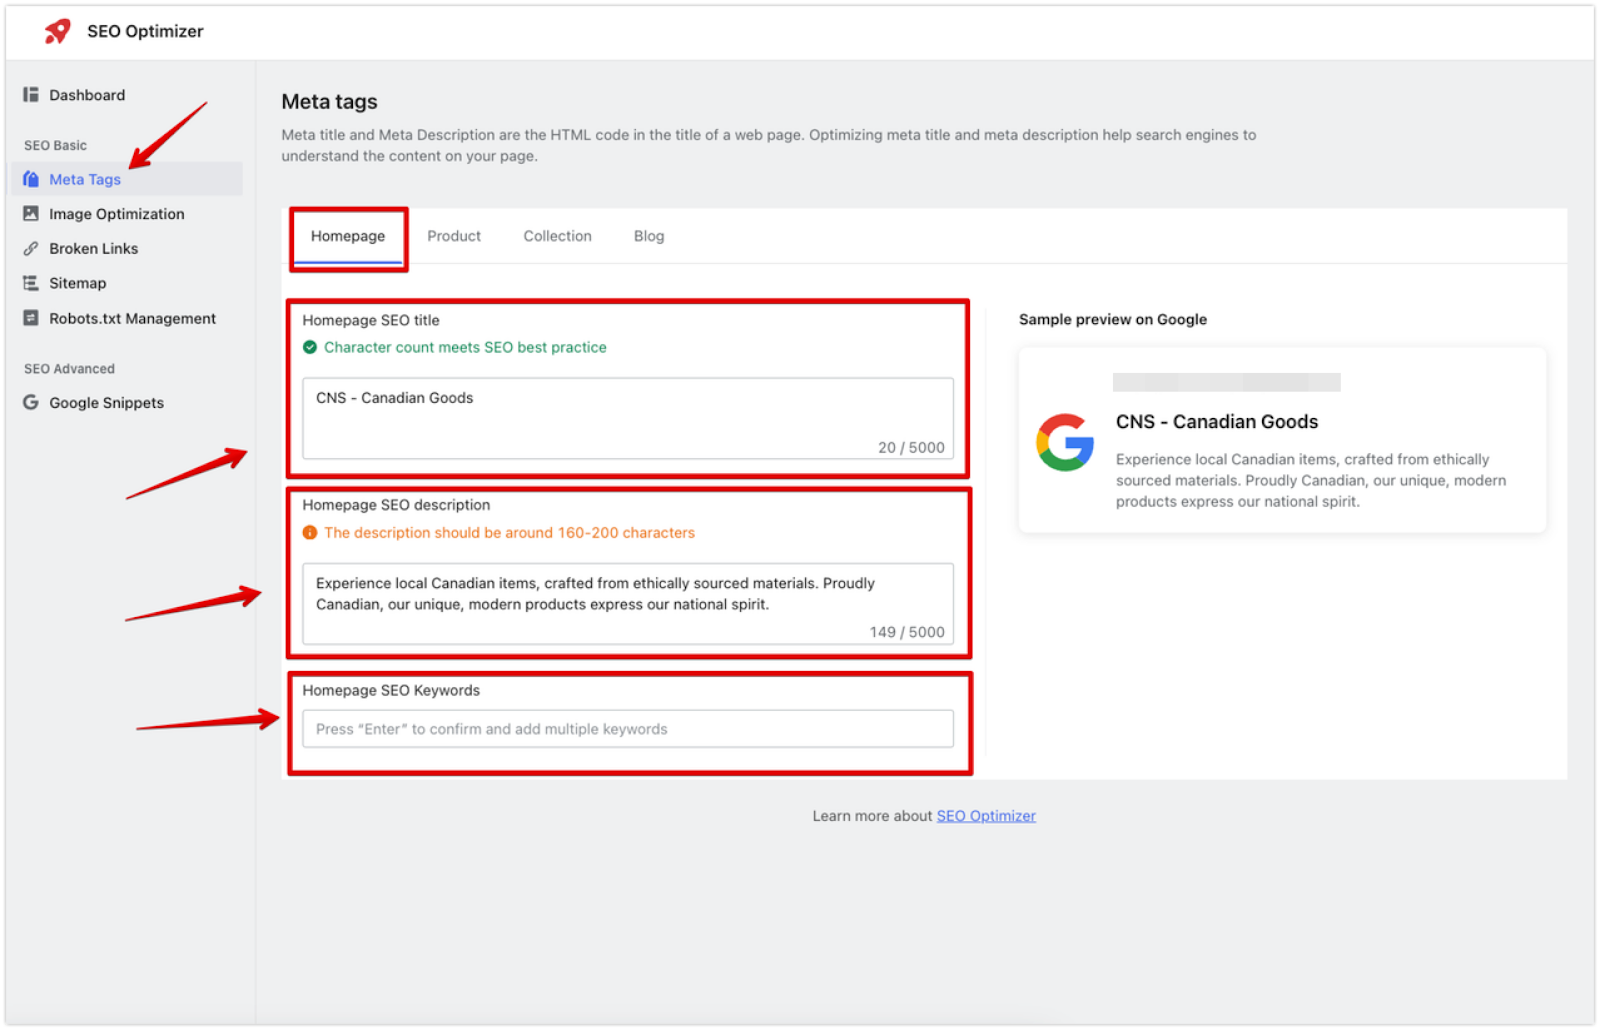
1. Homepage: Under the Homepage tab, set the SEO title, description, and relevant keywords for your store’s main page.
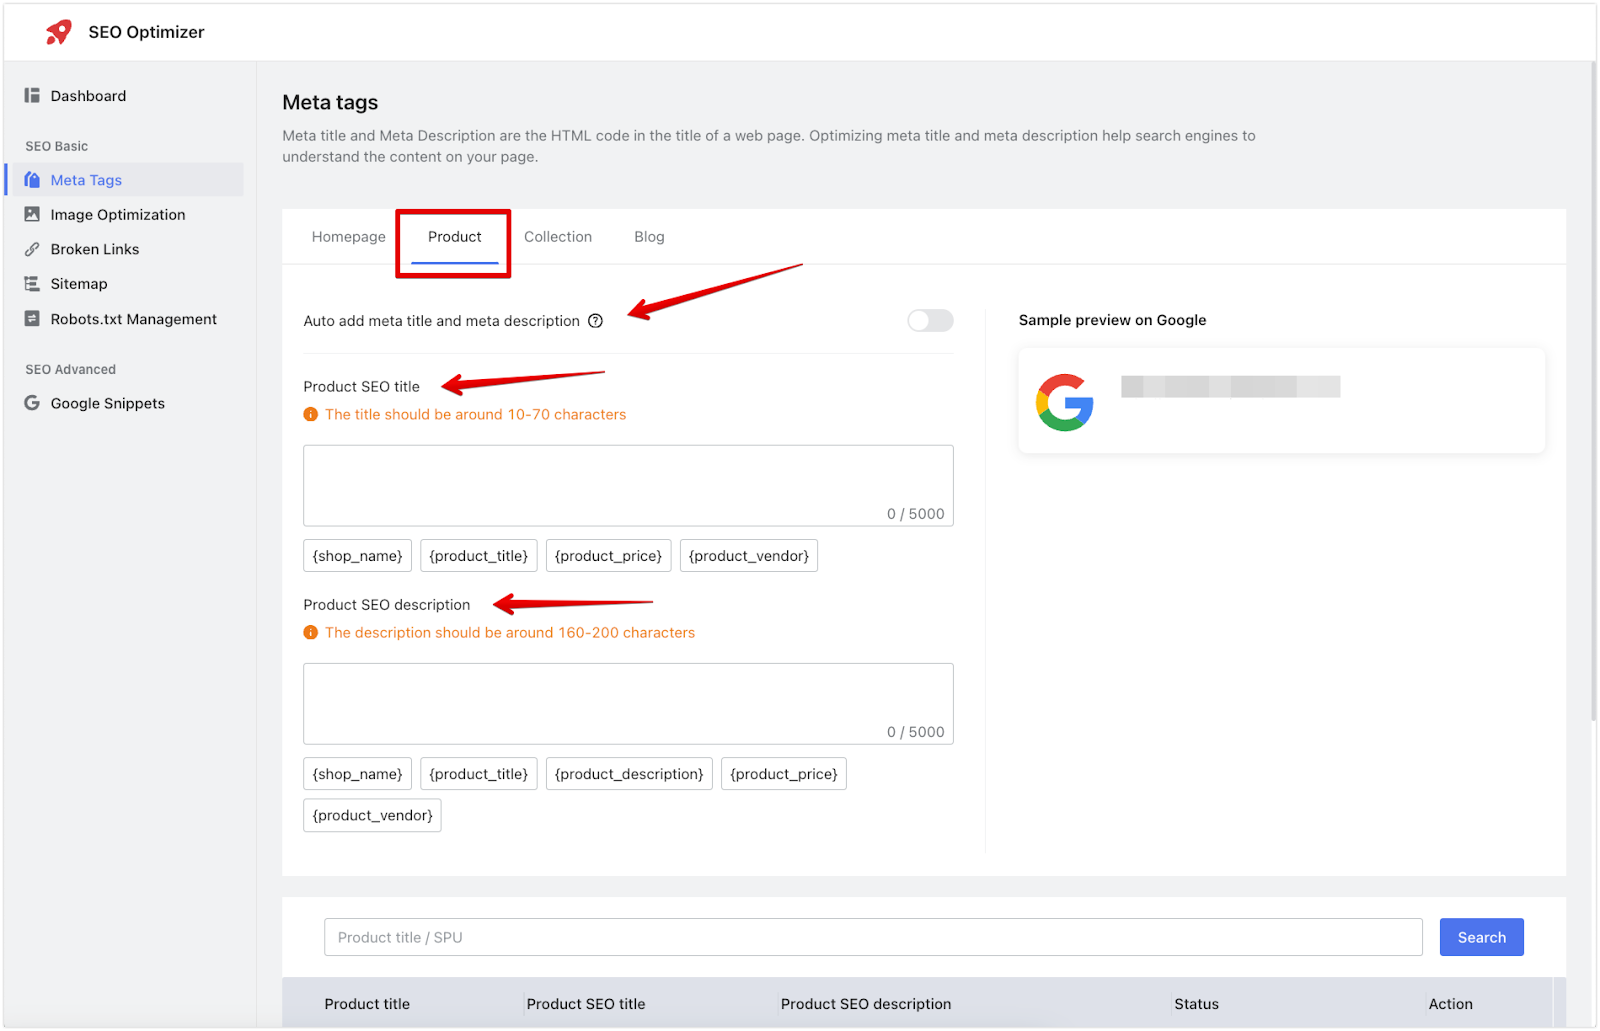
2. Product pages: In the Product tab, configure SEO tags for individual products. You can set a Product SEO title and Product SEO description by either entering text manually or using placeholders like {shop_name}, {product_title}, {product_price}, and {product_vendor}. Toggle Auto add meta title and meta description to apply these tags automatically to new products without manually assigned meta titles and descriptions.
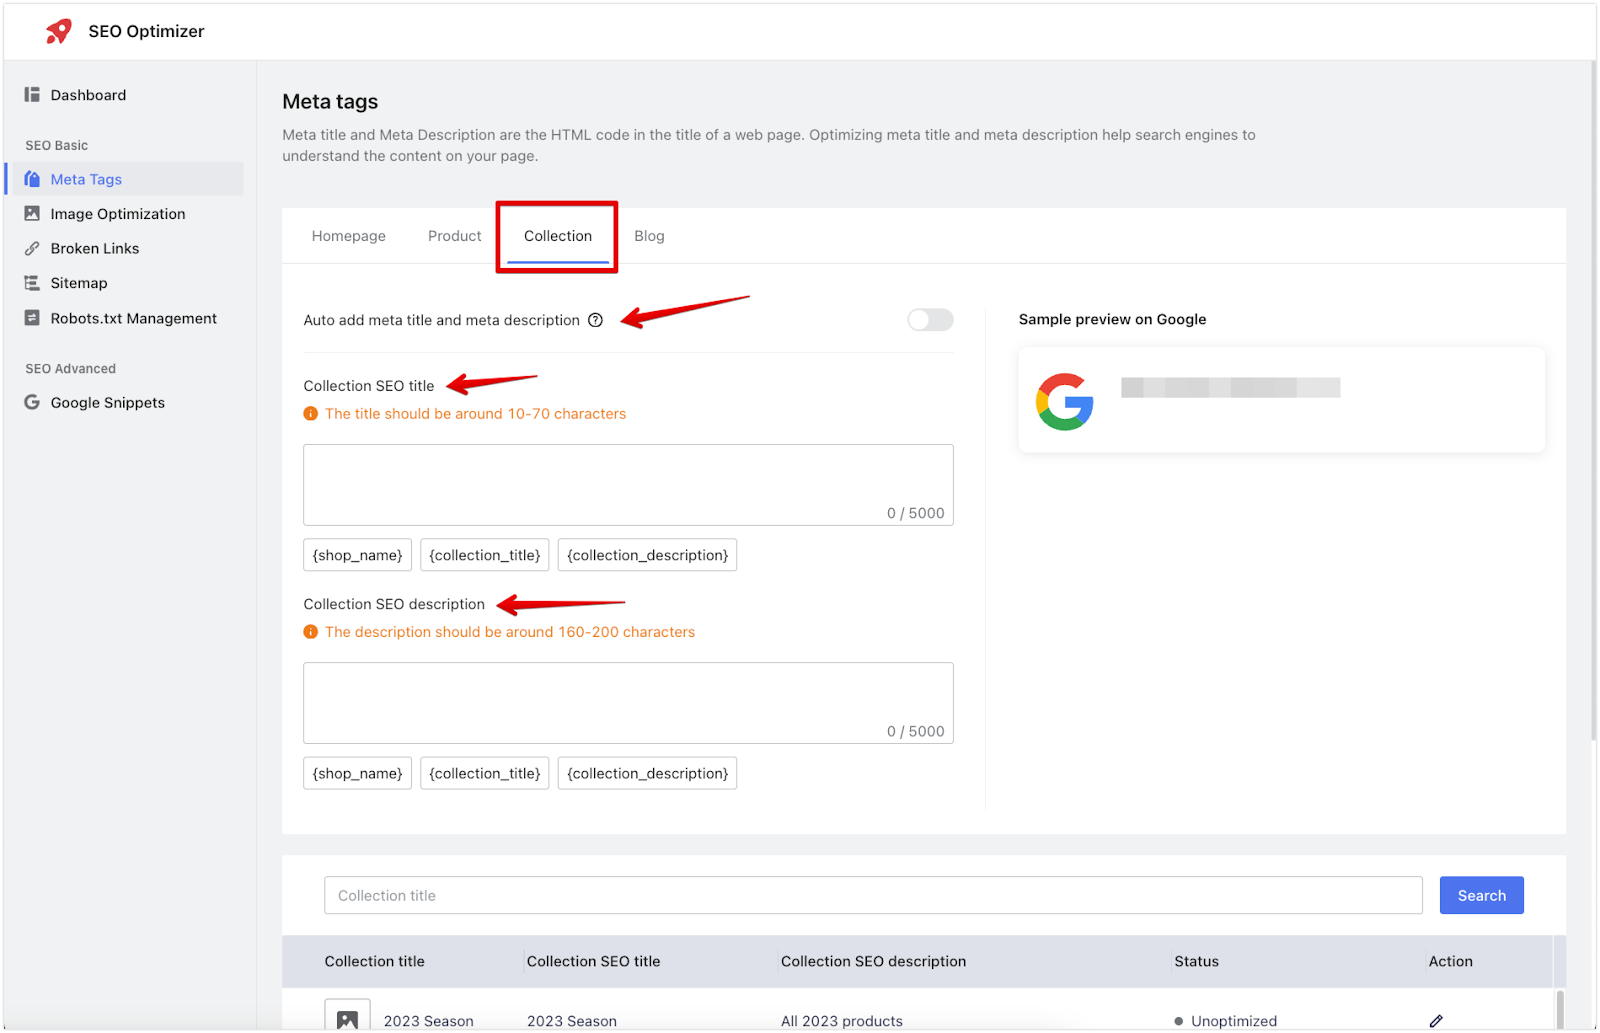
3. Collection pages: In the Collection tab, set SEO tags for individual collections. Customize the Collection SEO title and Collection SEO description by entering text or using placeholders like {shop_name}, {collection_title}, and {collection_description}. You can also enable Auto add meta title and meta description to automatically apply these tags to new collections without manually assigning meta information.
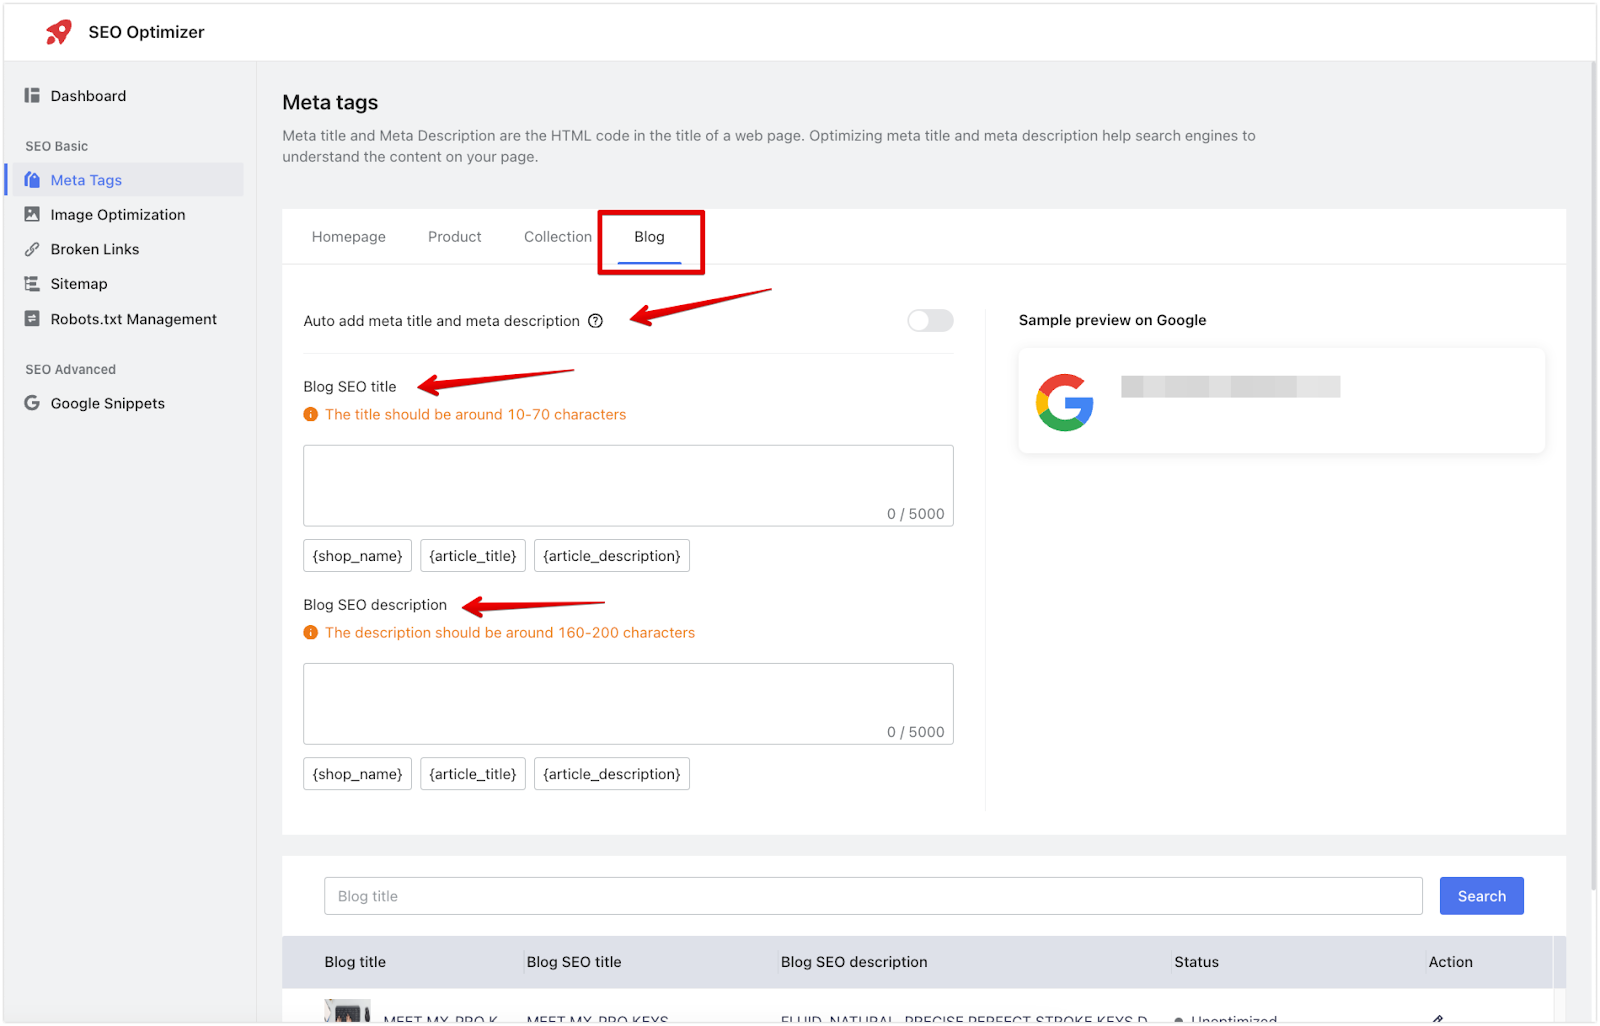
4. Blog posts: In the Blog tab, set SEO tags for individual blog posts. Customize the Blog SEO title and Blog SEO description fields by entering text or using placeholders such as {shop_name}, {article_title}, and {article_description}. You can also toggle Auto add meta title and meta description to automatically apply these tags to new articles without manually assigning meta titles and descriptions.
Adding Alt tags for images
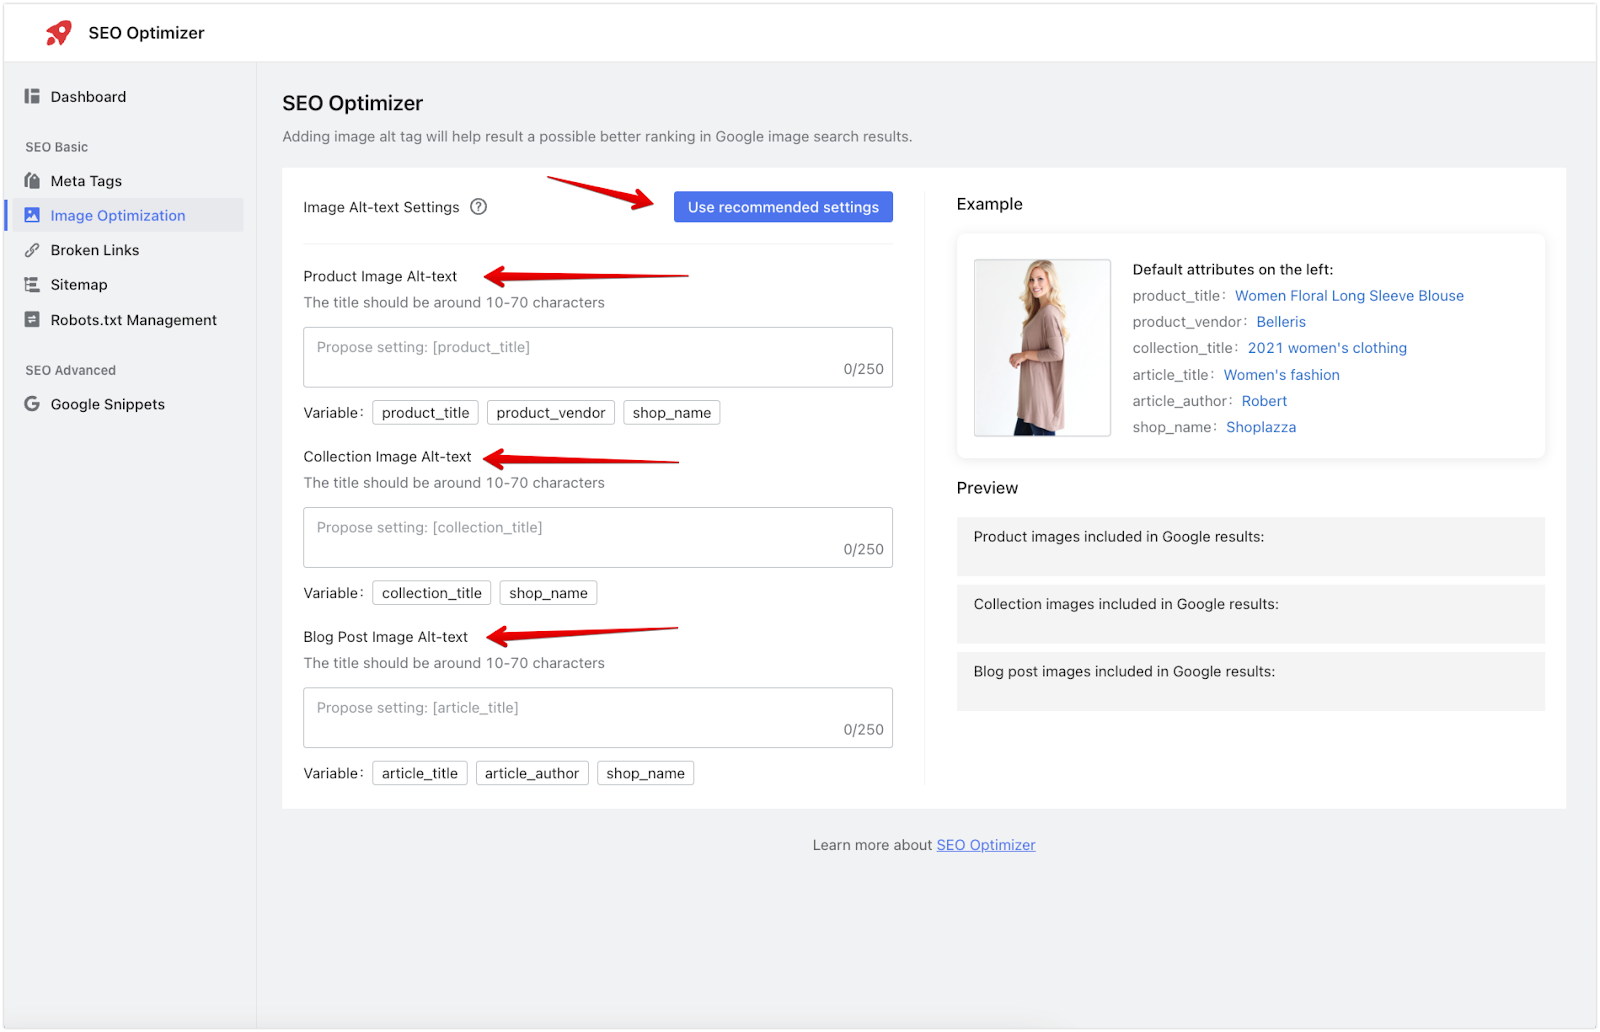
The Image Optimization section allows you to add alt text for images, helping search engines understand image content and improving SEO rankings. Alt text can be set for product images, collection images, and blog post images.
1. Image alt-text settings: Custom content and available variables can be set in the alt-text fields. Existing alt text will not be overwritten, and newly added images will automatically use these settings if specified.
- Product image alt text: In the Product Image Alt-text field, enter a description or use variables like {product_title}, {product_vendor}, and {shop_name} to populate alt text automatically. The title should ideally be 10-70 characters.
- Collection image alt text: In the Collection Image Alt-text field, set a description using placeholders such as {collection_title} and {shop_name}. Aim for a title length of 10-70 characters.
- Blog post image alt text: For blog post images, use the Blog Post Image Alt-text field. Enter descriptions manually or use placeholders like {article_title}, {article_author}, and {shop_name}.
- Use recommended settings: Click Use Recommended Settings to apply suggested alt text settings for each image type, enhancing SEO while saving time.
- Add image alt text: Enter the alt text for the image and click Save.
Note
- Alt attributes and Alt text: These are descriptions of the image used to display explanatory text when the image cannot be displayed.
- Search engine understanding: Images are more challenging for search engines to understand than text. Alt text helps search engines comprehend images and related web pages. Precise Alt text increases the likelihood of images being found in search queries.
- Linked images: Search engines treat Alt text like anchor text in-text links for linked images. Relevant links help improve search engine rankings.
- Consistent use: Ensure that Alt text is used on all images, whether they are from the gallery or newly created
Handling broken links
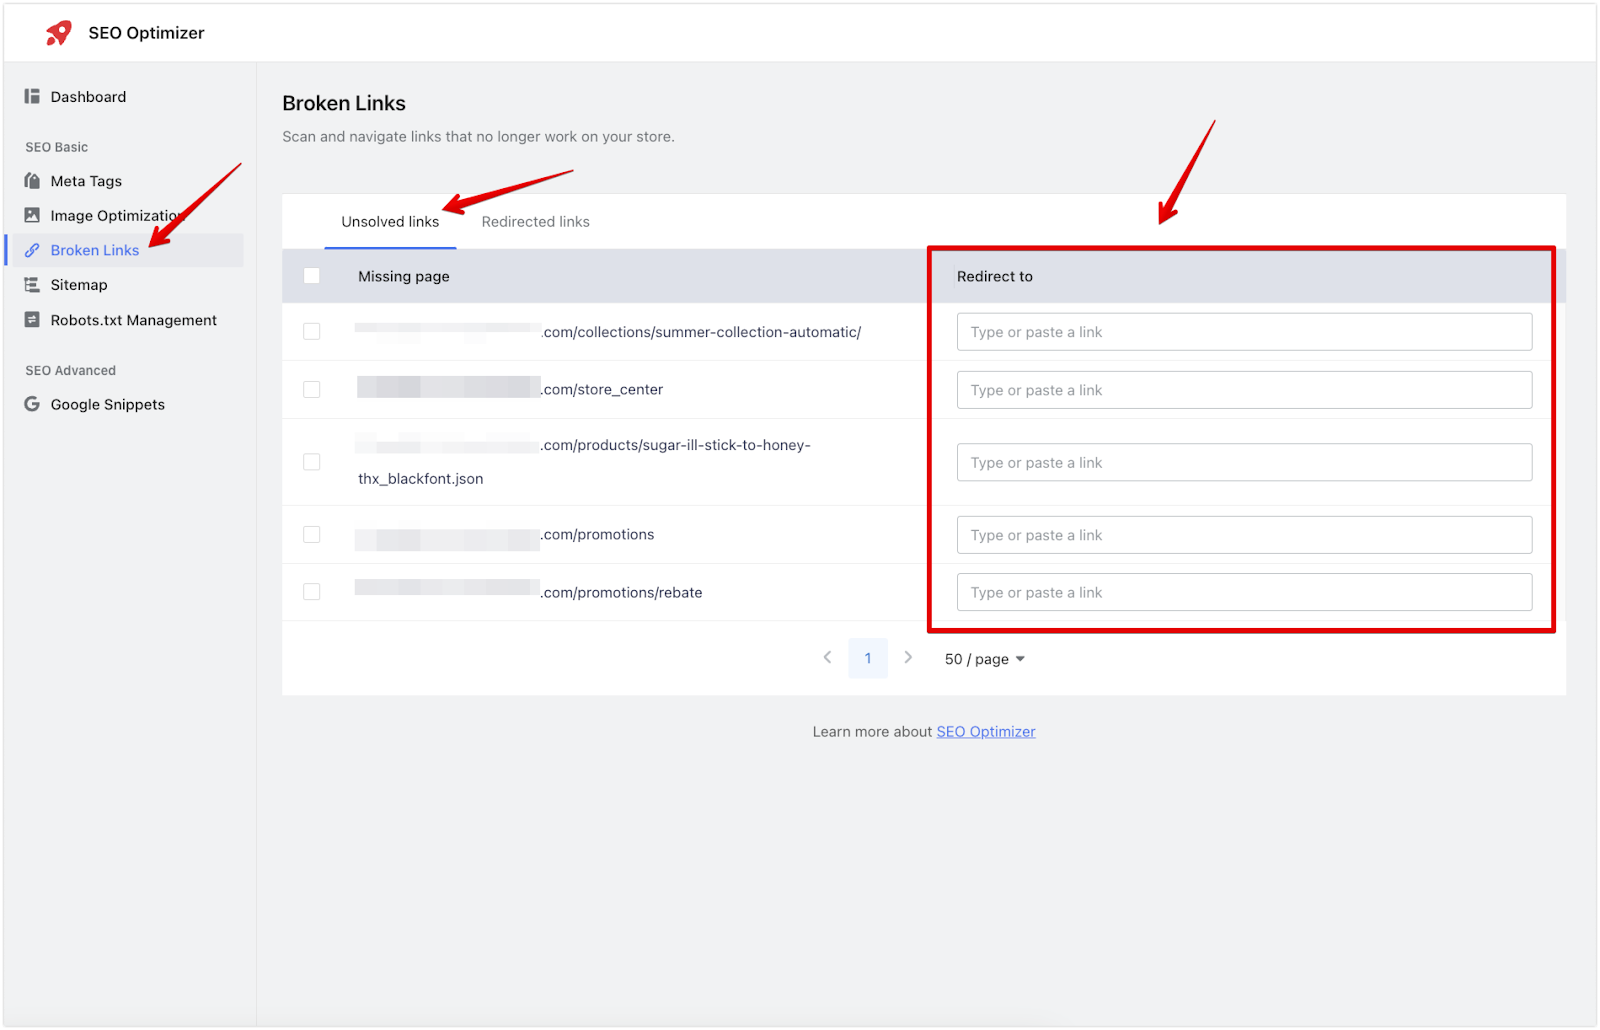
The Broken Links section helps you manage broken links by redirecting them to active pages. This improves user experience and SEO by preventing users from landing on error pages.
1. Identify and redirect broken links: When a product or page is removed, any links pointing to it may become broken. Redirect these links to ensure users are guided to relevant pages instead of error messages.
- To redirect to your store’s homepage, enter /.
- For specific collections, use a path like /collection/shirts.
- Enter the complete address to redirect to a full URL (e.g., http://www.yourstore.com/collection/shirts).
Setting up the Sitemap
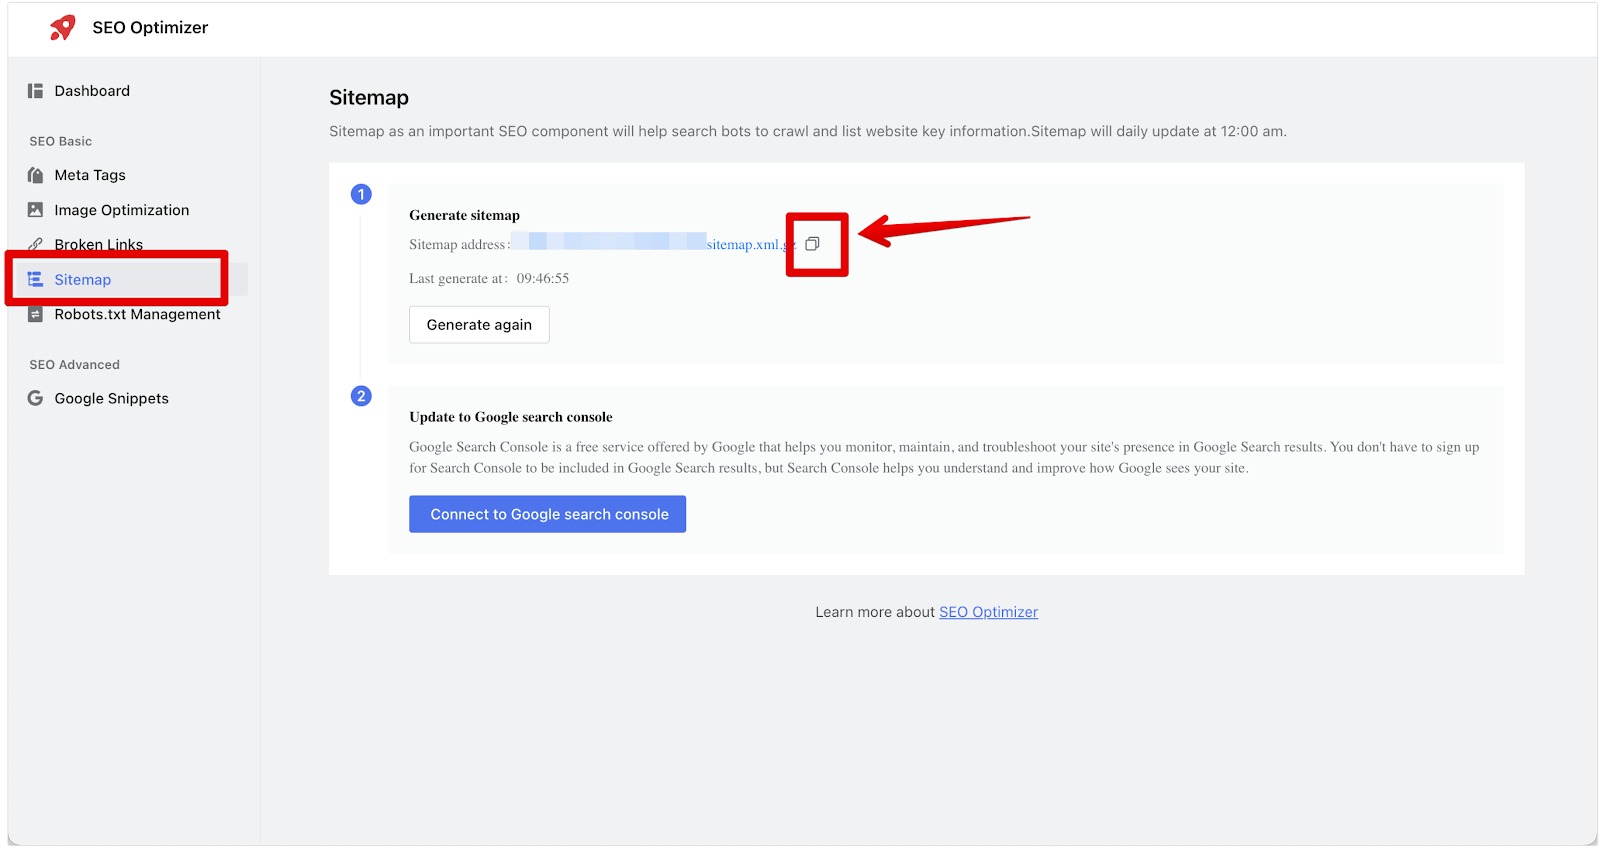
In the Sitemap section, you’ll find an automatically generated sitemap URL. Submit this URL to Google Search Console to help search engines index your pages efficiently.
1. Copy the sitemap address: Click the copy icon in the Sitemap section to save the sitemap URL for later use.
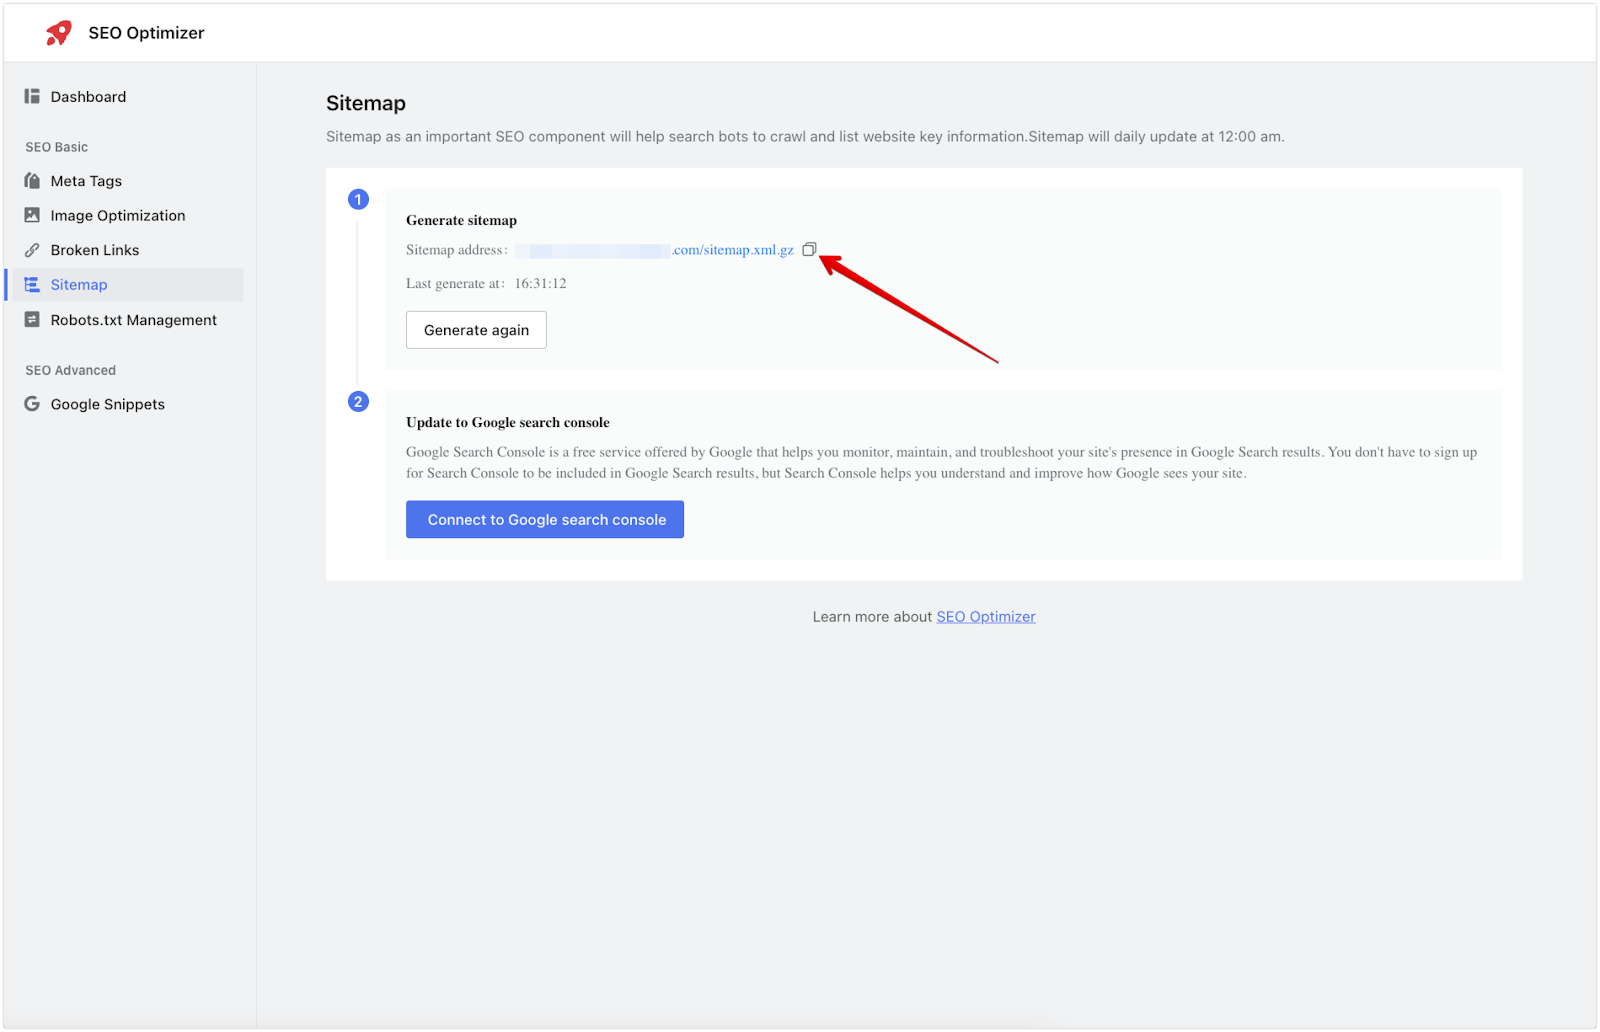
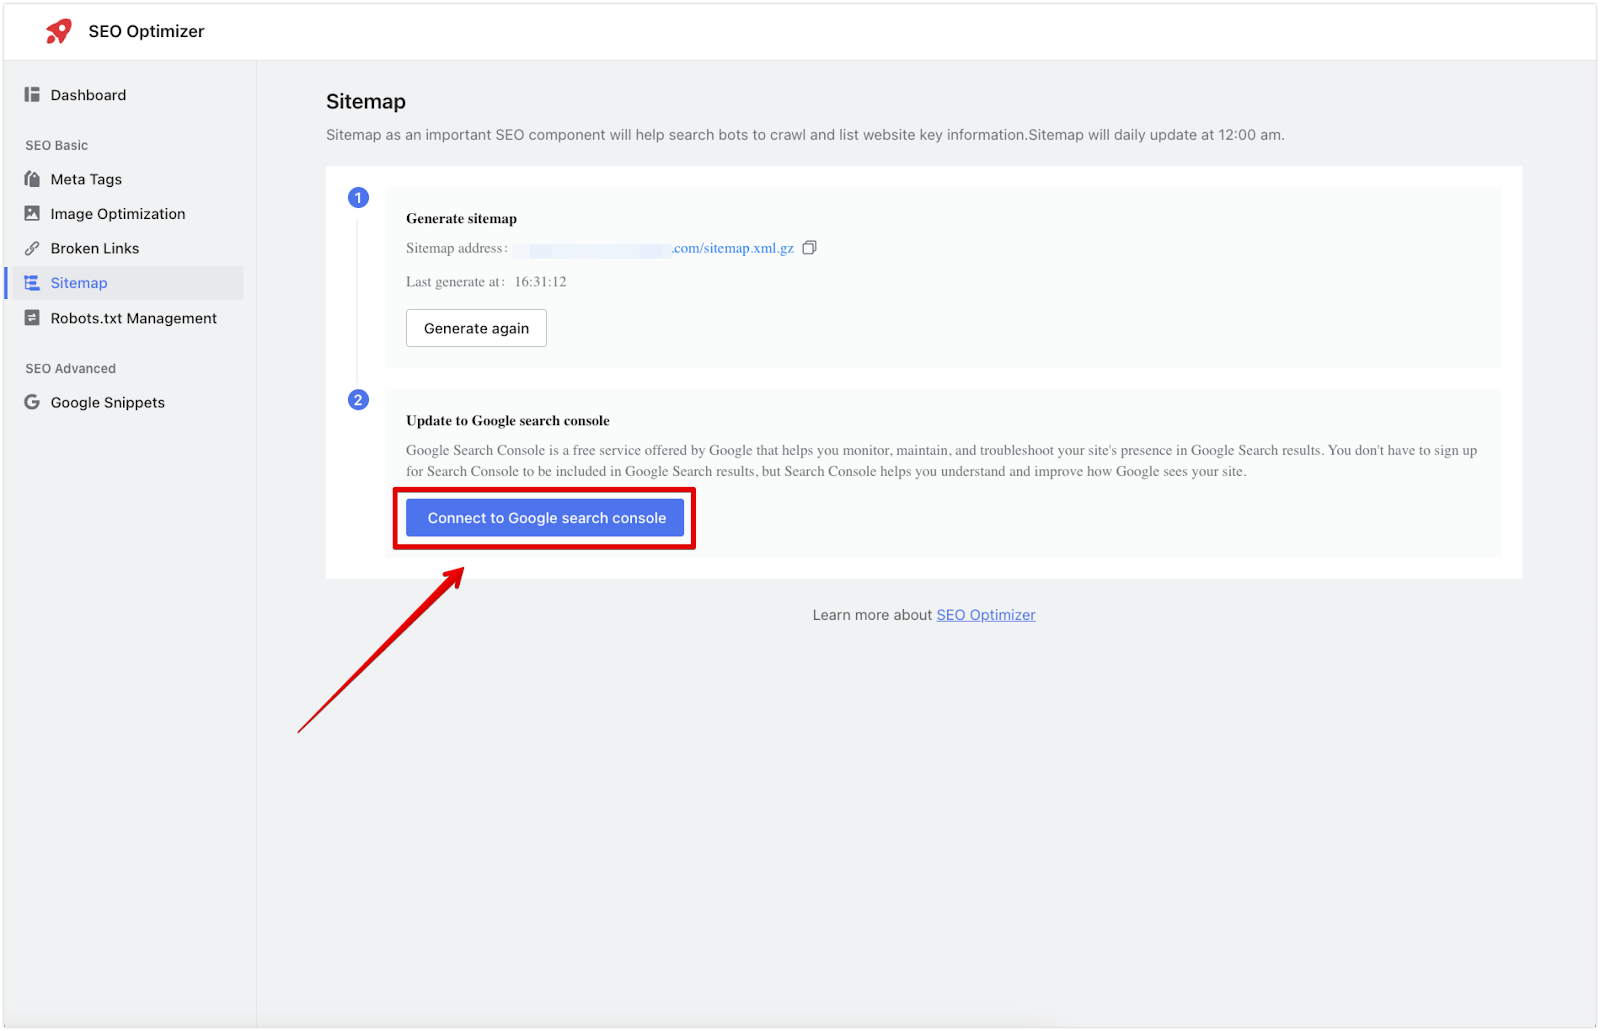
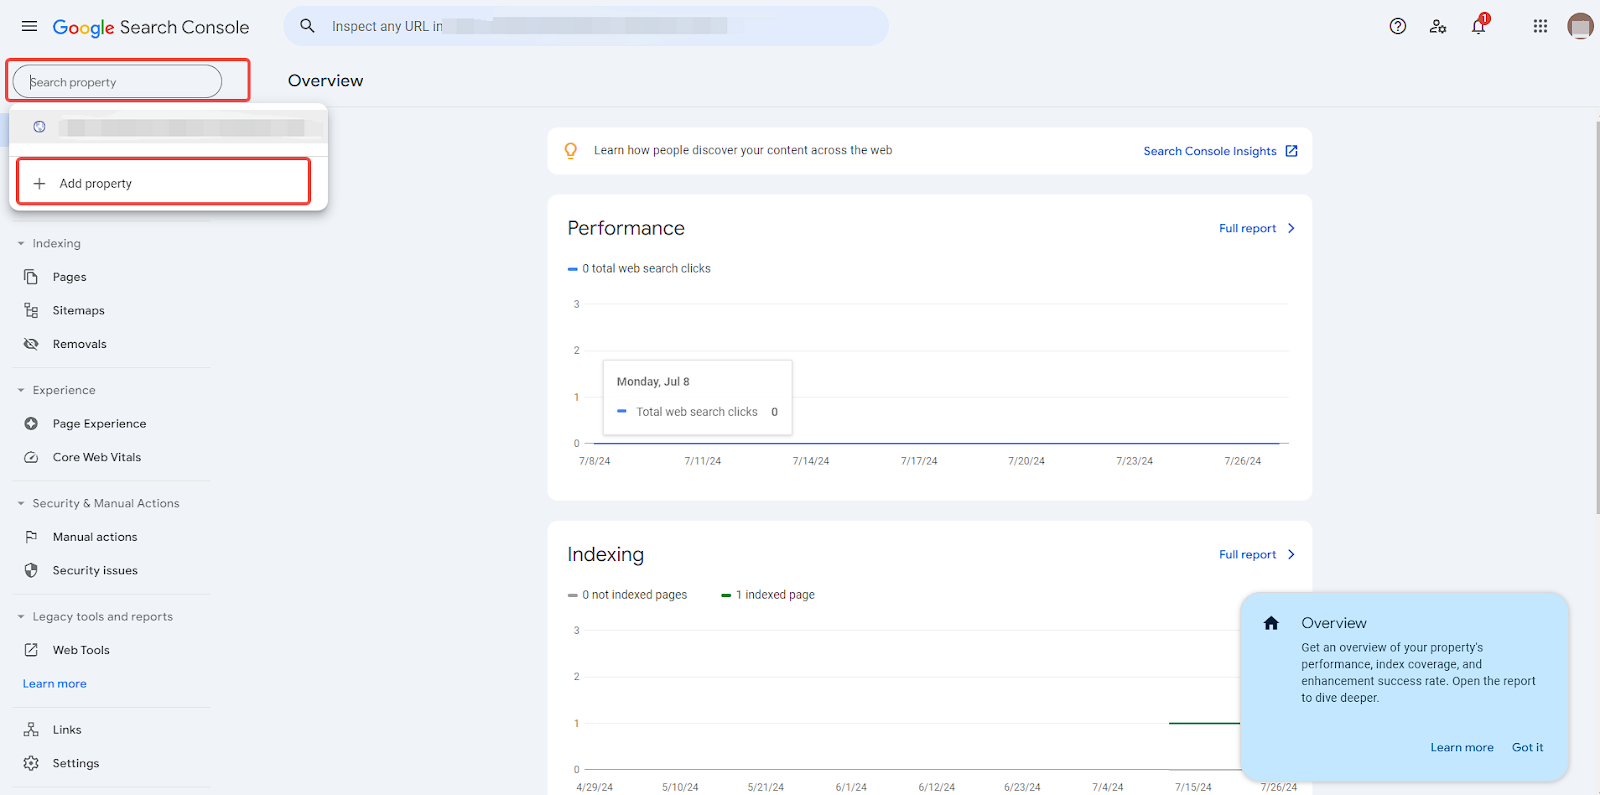
2. Add the sitemap address to the Google search console: Click Connect to Google Search Console to open Google’s page. Choose Add property to add your domain.
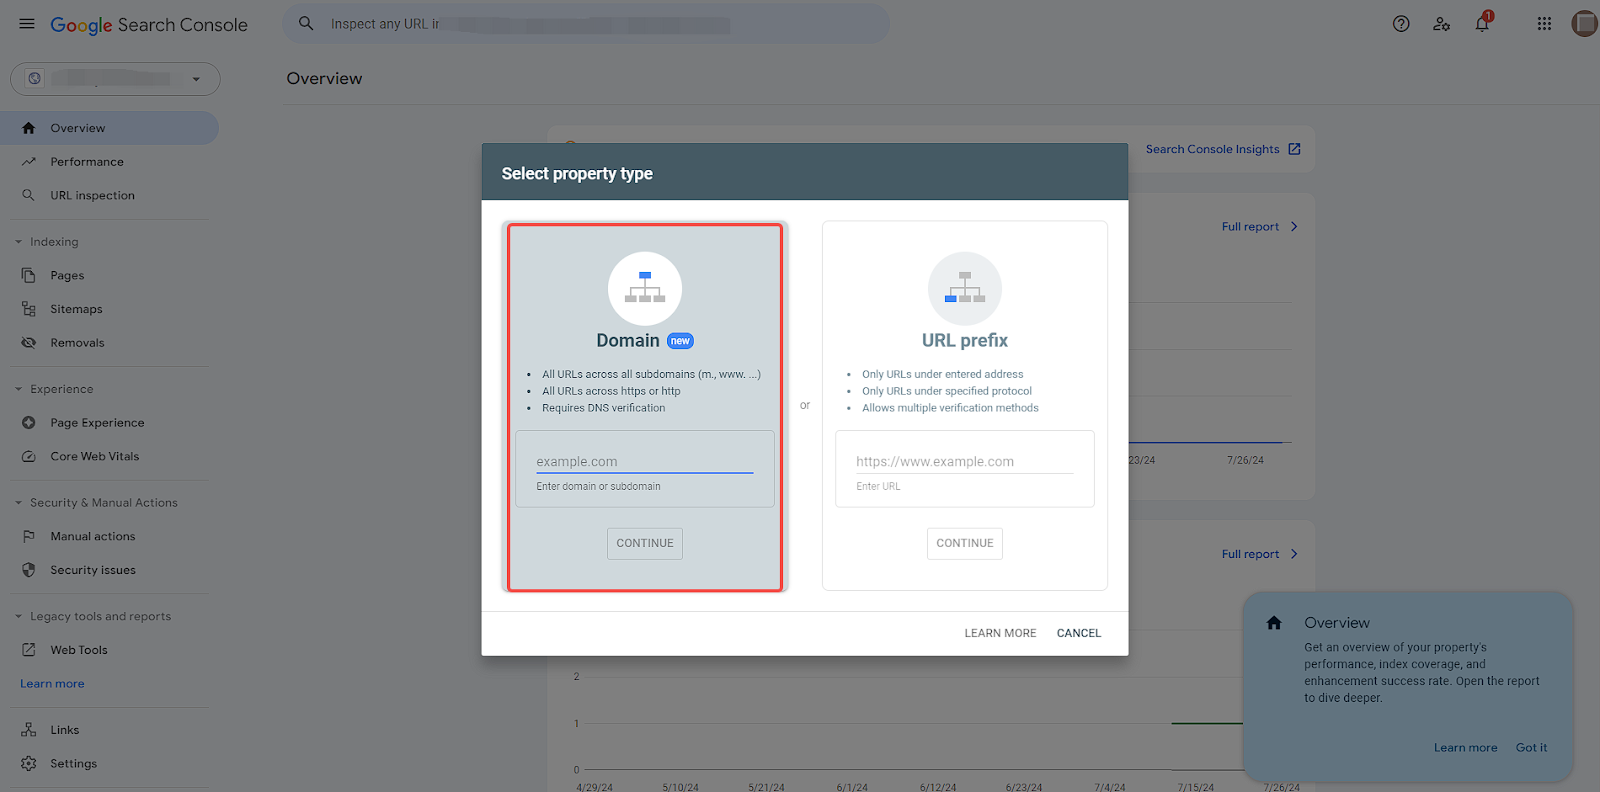
3. Enter your custom domain: Enter your custom domain for verification. Using the default domain provided by Shoplazza will not complete the verification.
4. Verify domain ownership: Copy the provided TXT record, paste it into your domain’s DNS settings, and return to Google to complete the verification.
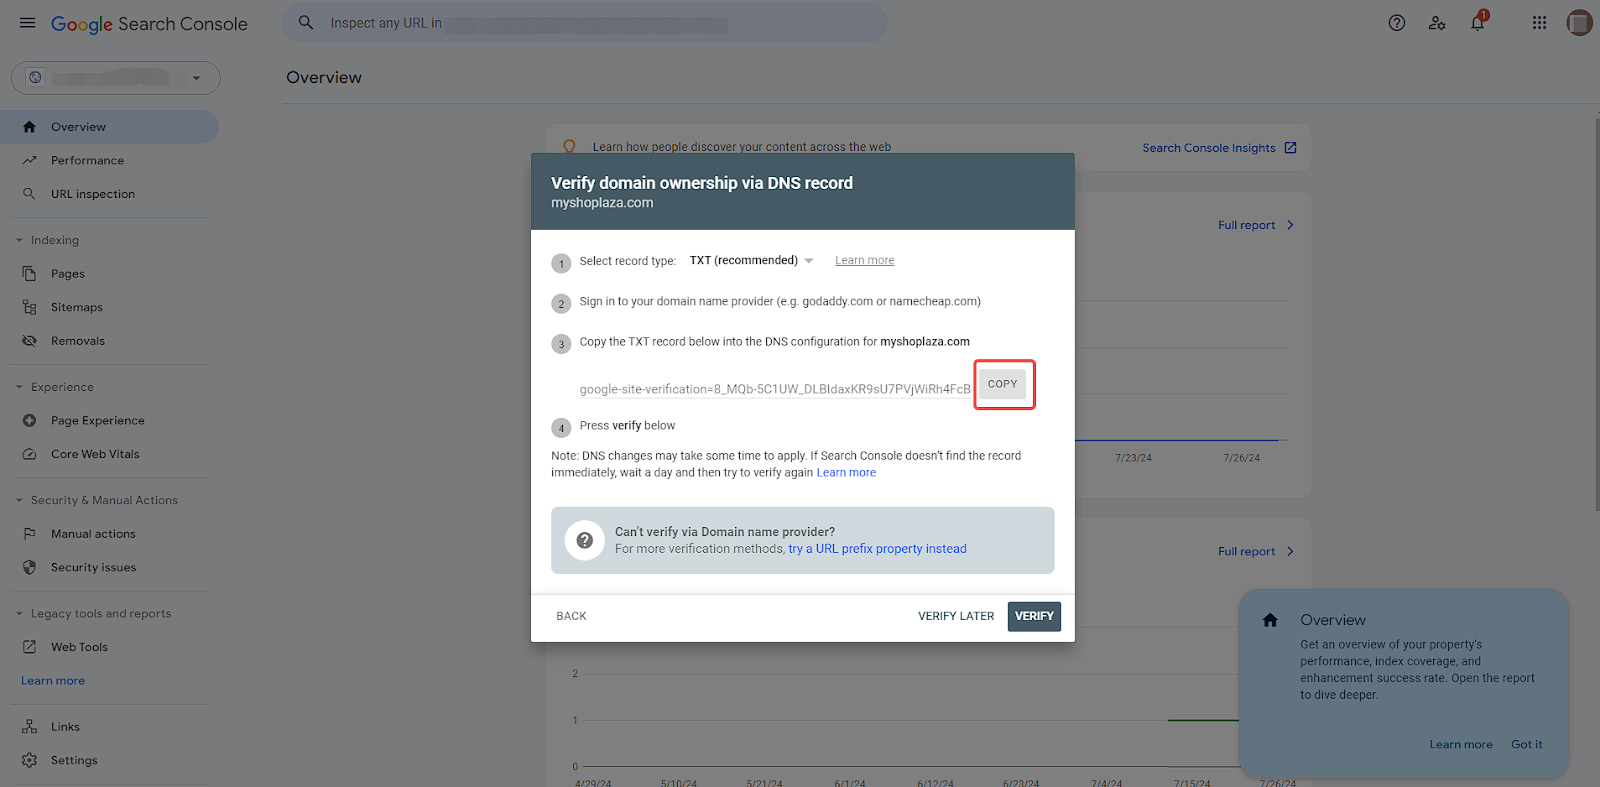
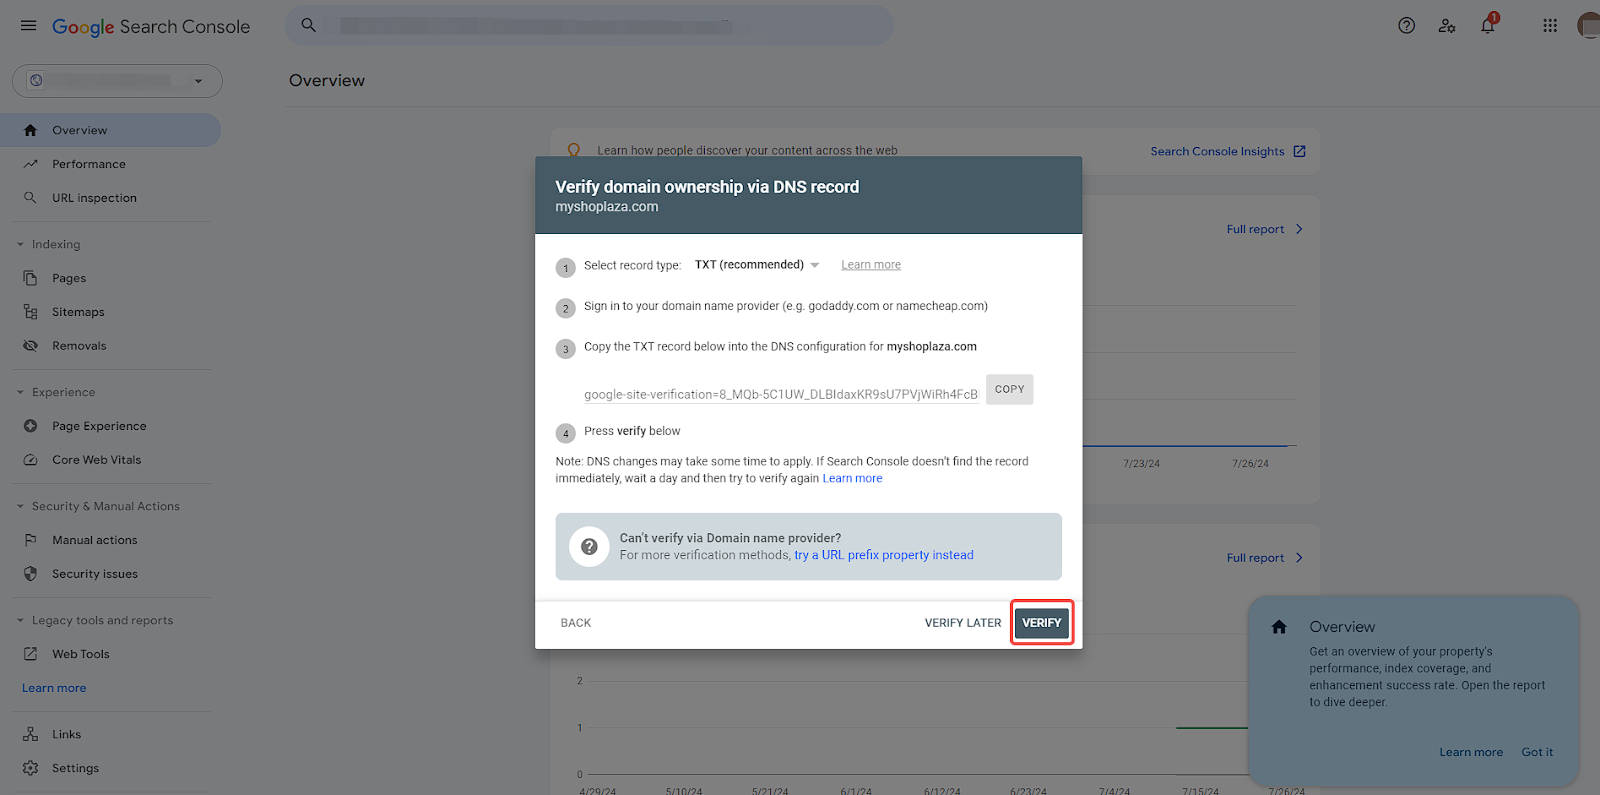
5. Finish the verification: Return to the Google Search Console page and click the Verify button to proceed.
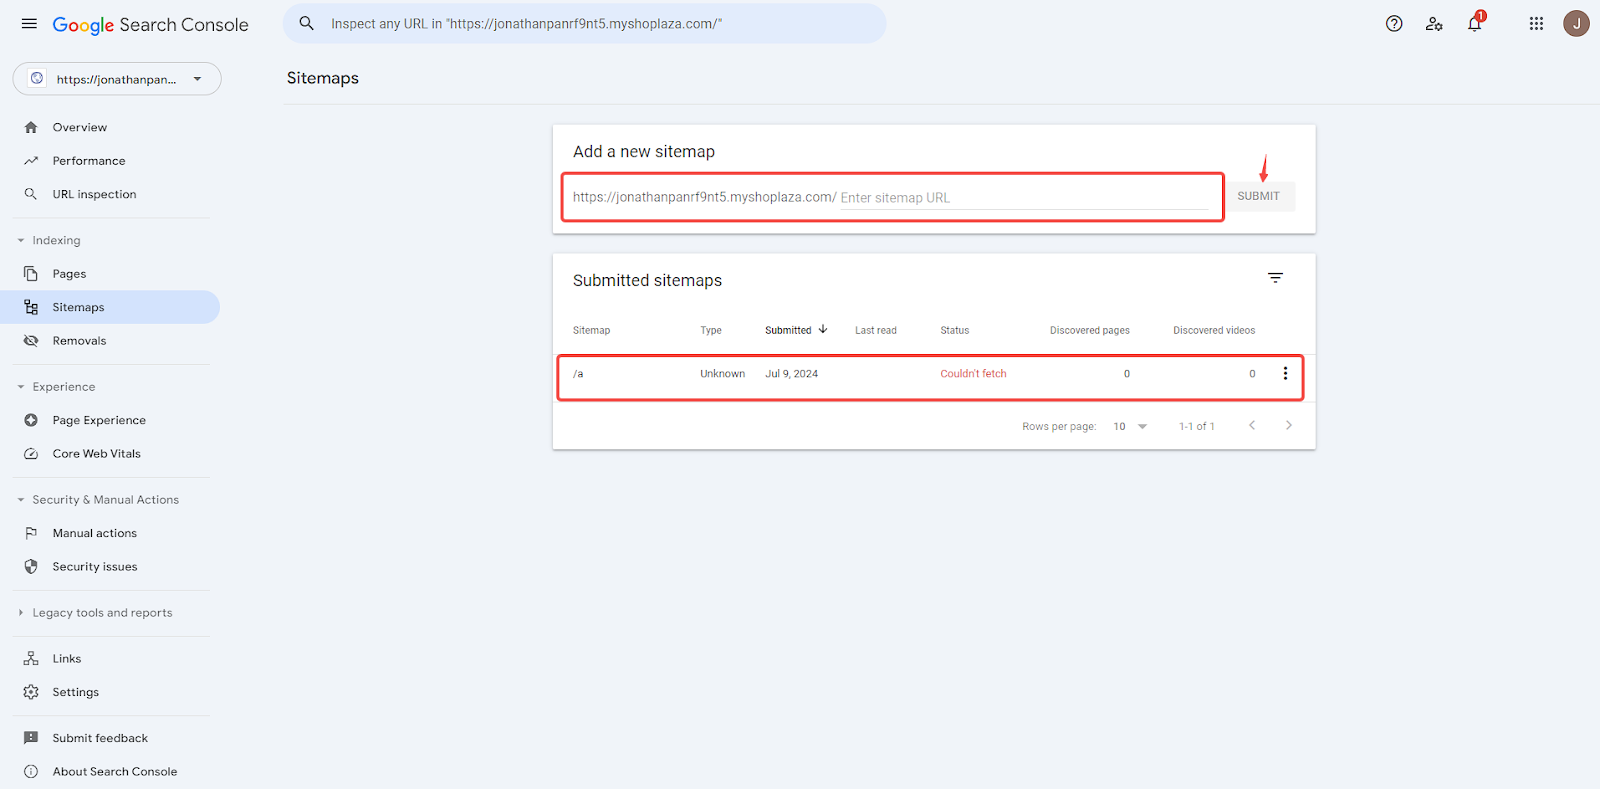
6. Submit the sitemap: Paste the sitemap address from earlier located in the Sitemap section in the SEO optimizer app and paste it into your Google Search Console.
7. Alternative method: Instead of verifying through the domain, verify using the URL by inserting the copied meta tag in the custom code app and selecting the top position for code placement. To learn more about the app, click here.
Note
After successful submission, the Shoplazza system will automatically update the sitemap daily at midnight. If any page changes, you can manually update it by resubmitting the sitemap. Since Google’s indexing is not in real-time, check the indexing results the day after submission.
Managing robots.txt
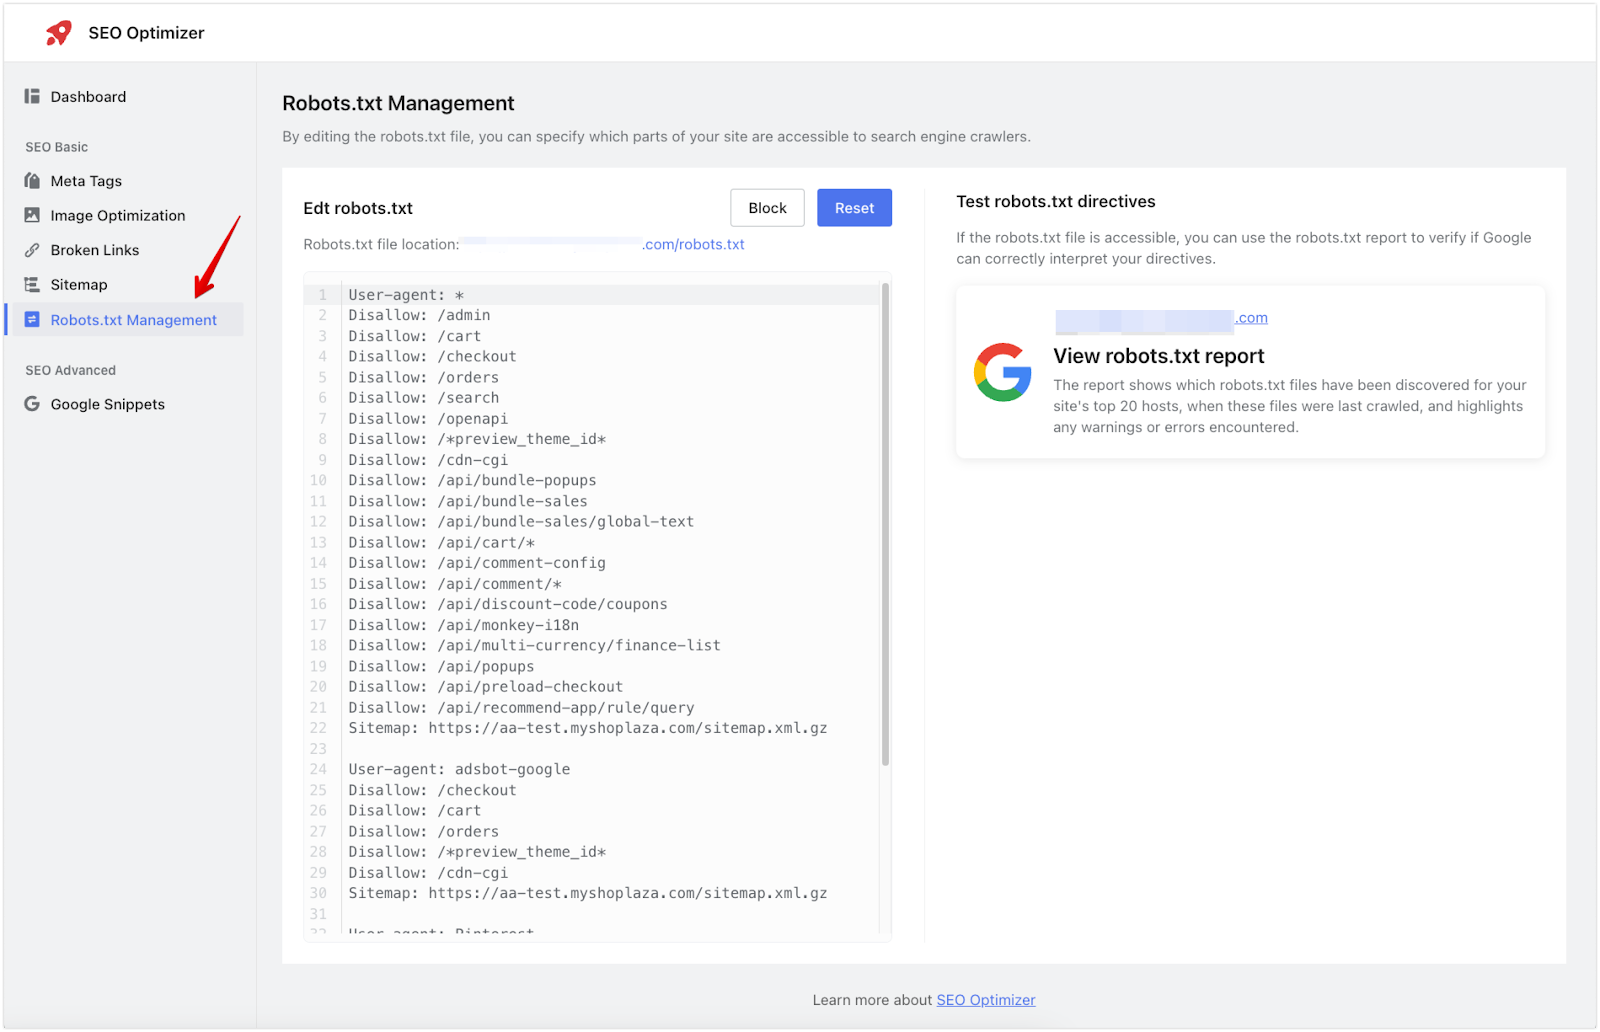
The Robots.txt Management section allows you to control which parts of your site are accessible to search engine crawlers. Adjusting the robots.txt file can help you manage which pages or resources are indexed by search engines, improving SEO focus on your priority content.
- Edit robots.txt: In the Edit robots.txt field, specify the paths you want to block or allow search engine crawlers. Common sections like /cart and /checkout are usually set to disallow by default to prevent indexing of sensitive pages.
- Block and reset options: Use the Block button to prevent crawlers from accessing additional pages or resources as needed. If you need to revert any changes, click Reset to restore the original settings.
- View robots.txt report: To verify that Google interprets your robots.txt directives correctly, click View robots.txt report. This report shows the last crawl time, any warnings or errors encountered, and which parts of your site have been identified by search engine crawlers.
Setting up Google Snippets
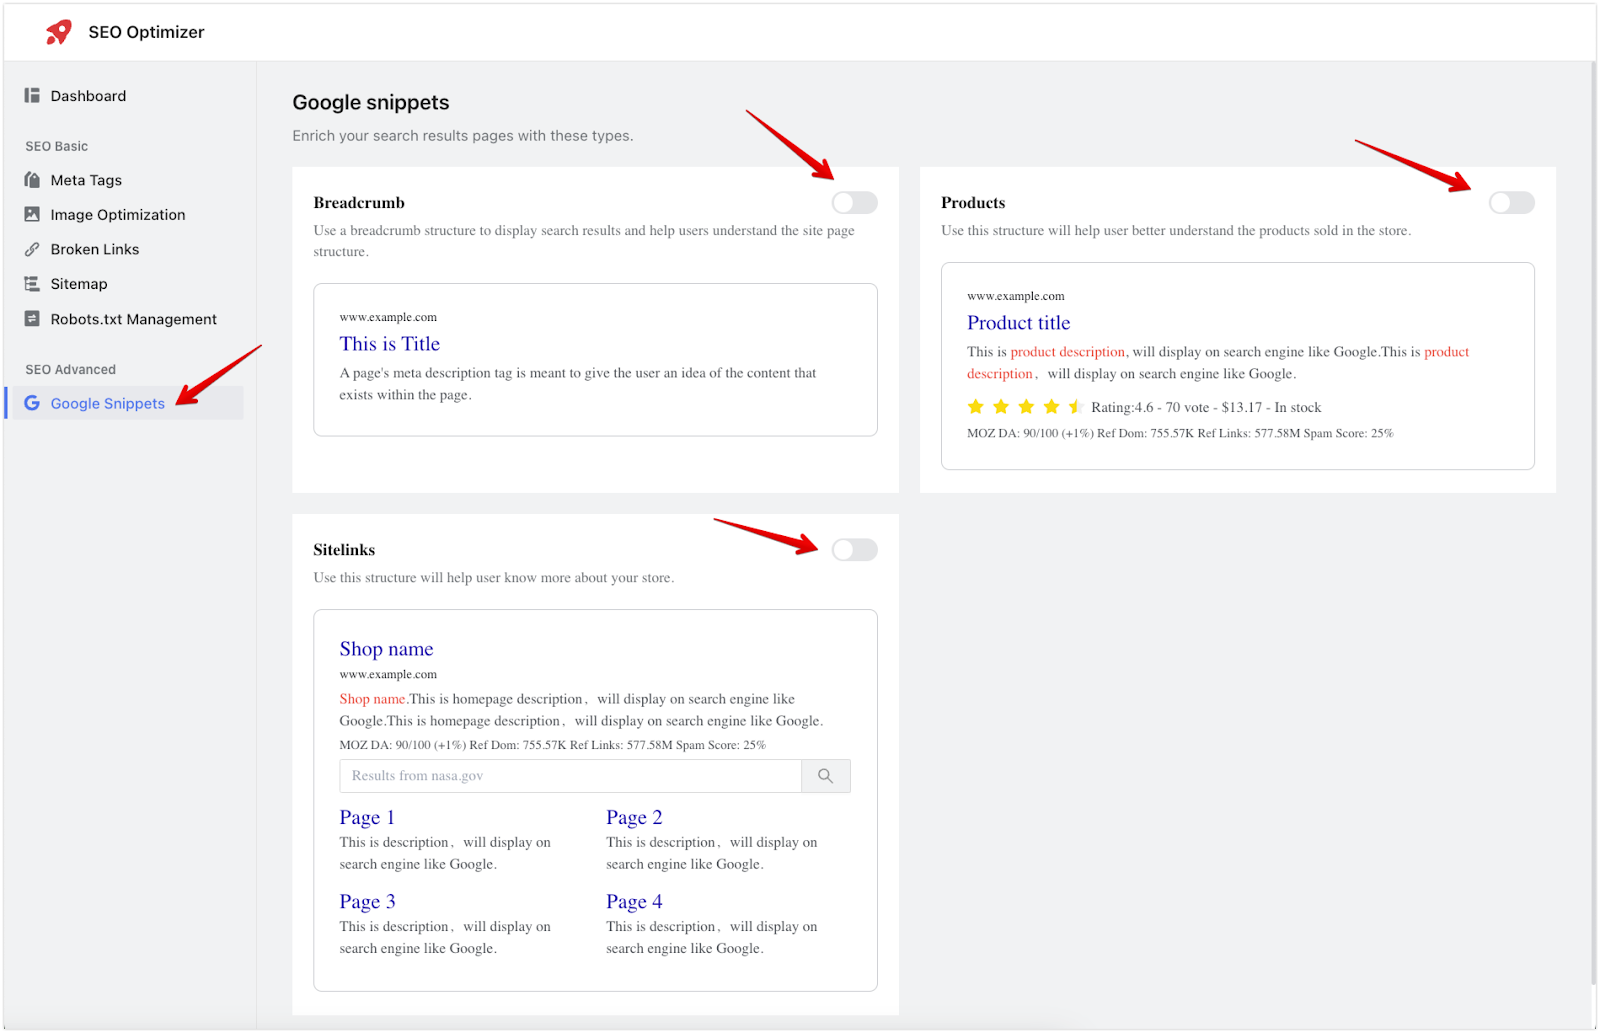
In the Google Snippets section, you can enable different snippets to improve your store's appearance in search results. Use the toggles to activate or deactivate the following options:
- Breadcrumbs: Displays a breadcrumb structure in search results to help users understand the layout of your site by showing a navigational path.
- Products: Shows product details in search results, including title, description, price, and rating, providing customers with a clearer view of your offer.
- Sitelinks: Add additional page links beneath your main website link in search results, making it easier for users to navigate directly to specific parts of your site.
SEO Optimizer is an essential app that enhances your store’s search engine optimization. With features like evaluating and improving SEO performance, identifying issues, setting meta tags, optimizing images, and fixing broken links, this tool ensures your store ranks higher in search results. It also supports the setup of sitemaps and Google Snippets, boosting visibility.


Comments
Please sign in to leave a comment.