
In this guide, you'll learn about EasyBuy Shop, its features, and how it can help you set up high-performance sales channels to boost your e-commerce sales and conversion rates instantly. We'll walk you through each step, showing you how to make the most of our features for optimal results.
Getting started
Begin your journey with EasyBuy Shop by setting up the essential configurations. This section covers multi-market setup, checkout page settings, and maintaining sufficient product inventory to ensure a smooth start.
1. Multi-market setup: EasyBuy Shop integrates seamlessly with Shoplazza’s multi-market capabilities, automatically detecting a visitor’s IP to display relevant market data. This feature leverages product management, language management, currency management, and market-specific settings to help you manage multi-market information more effectively. To get started:
- To use the single main domain mode across multiple markets, follow these steps: Shoplazza admin > Settings > Market > Select the market and click Manage > Domain and Language.
- For detailed instructions, refer to the guide: Setting up multi-markets.
2. Checkout page settings: The checkout page fields and their validation rules in EasyBuy Shop are controlled by the settings in your Shoplazza admin. Navigate to Shoplazza admin > Settings > Checkout Page to configure these fields. Ensure the fields for order/logistics information, tax number collection, ID number collection, and additional information are set up according to your business needs. For detailed steps, refer to the guide: Configuring your Checkout settings.
- Dynamic fields: Fields like tax numbers and ID collection can be set up for specific countries. These fields are available by default but will only appear on the checkout form if configured in your Shoplazza admin.
- Limitations: EasyBuy Shop does not support configuring email or phone number fields in the order/logistics information section.
- Consistency: Any mandatory fields in Shoplazza will also be mandatory in EasyBuy Shop.
3. Ensure sufficient product inventory: To avoid out-of-stock issues and ensure a seamless shopping experience for your customers, always maintain sufficient product inventory. Regularly monitor and update your product inventory in your Shoplazza admin admin to prevent stockouts. For detailed steps, refer to the guide: Editing product inventory.
Quick start
Once your initial setup is complete, dive into the basics of getting your store online. Follow these steps to connect your domain, create a checkout form, and launch your store effectively.
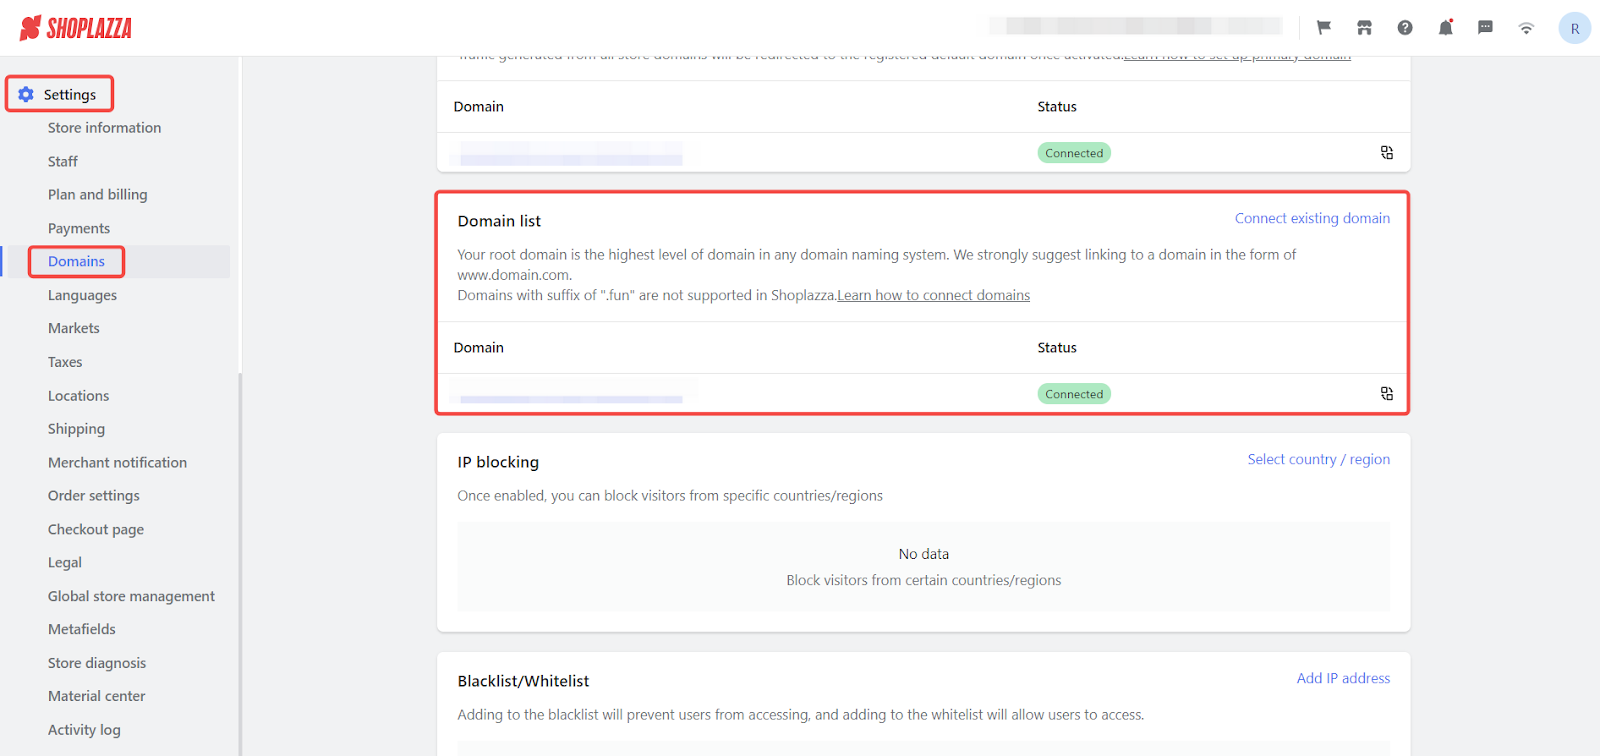
1. Connect domain: Connecting your store to your own domain enhances your brand’s professionalism and trust. Follow these steps to connect your domain:
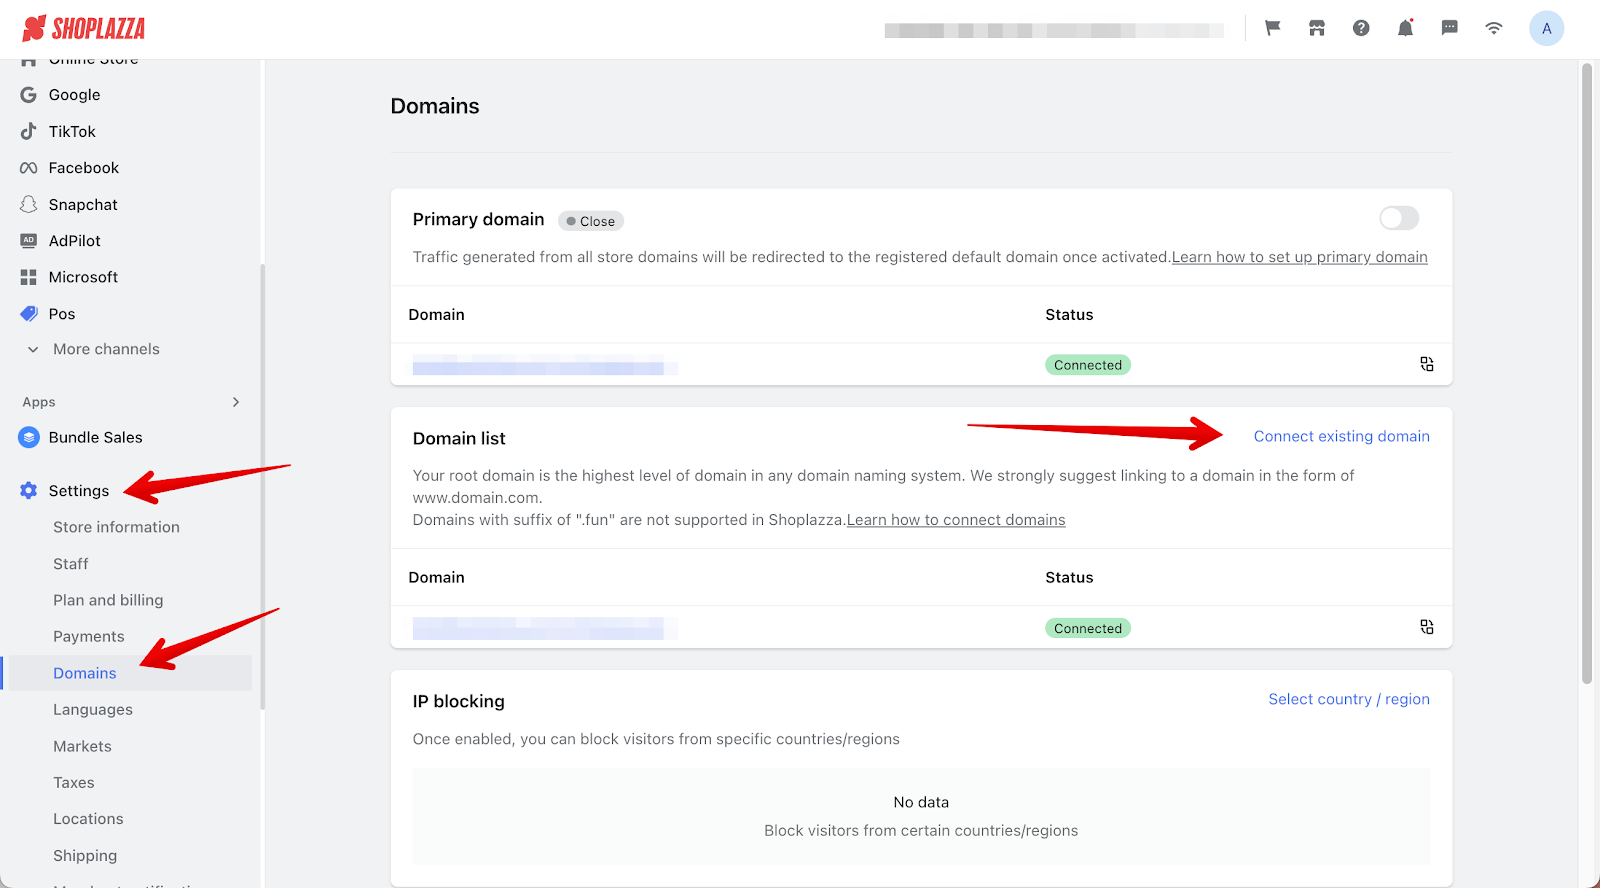
- Add domain: In your Shoplazza admin admin, navigate to Settings > Domain > Domain List, then select Connect existing domain to add your domain to your Shoplazza store. Refer to the guide: Verifying your domain.
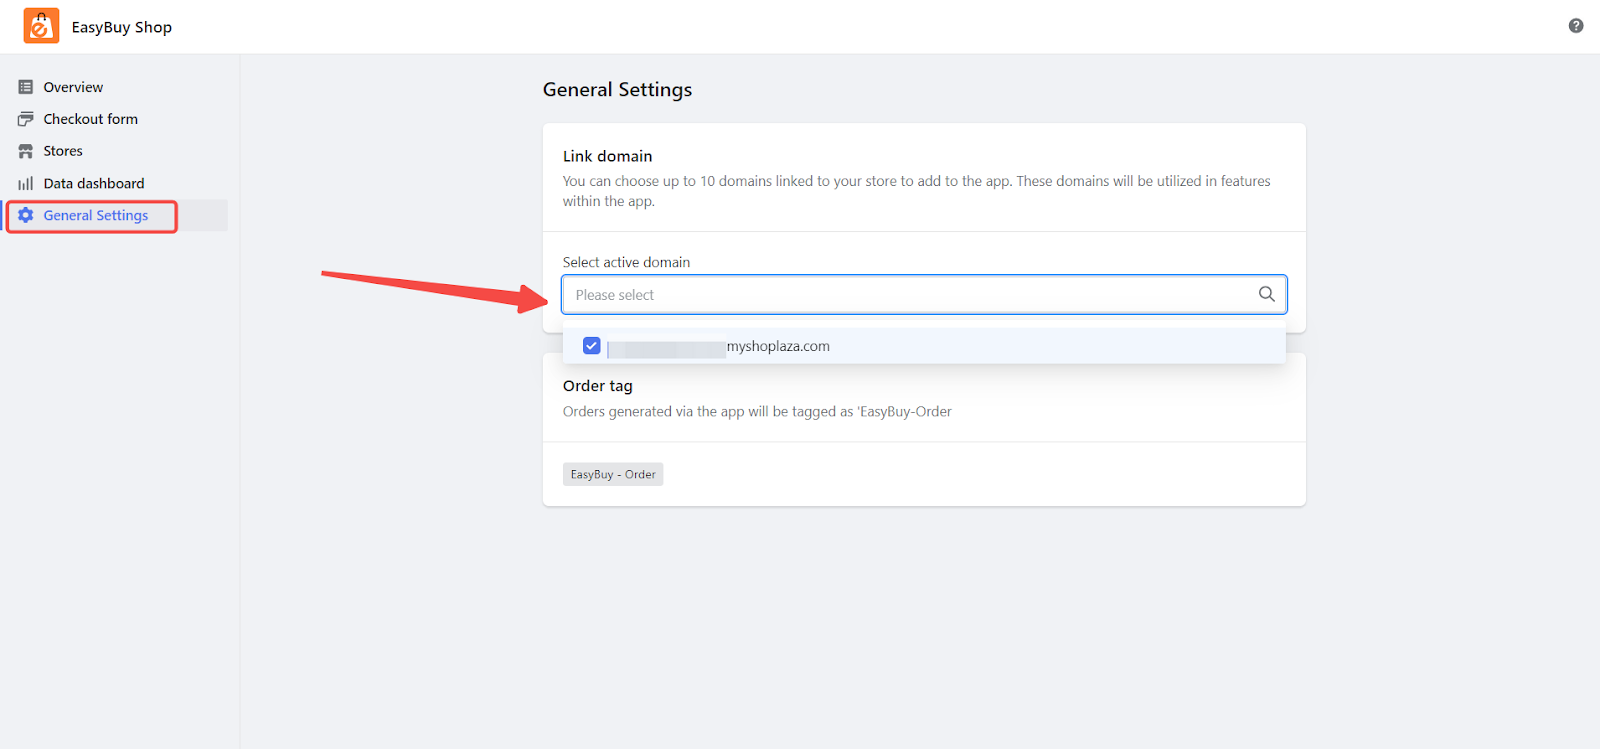
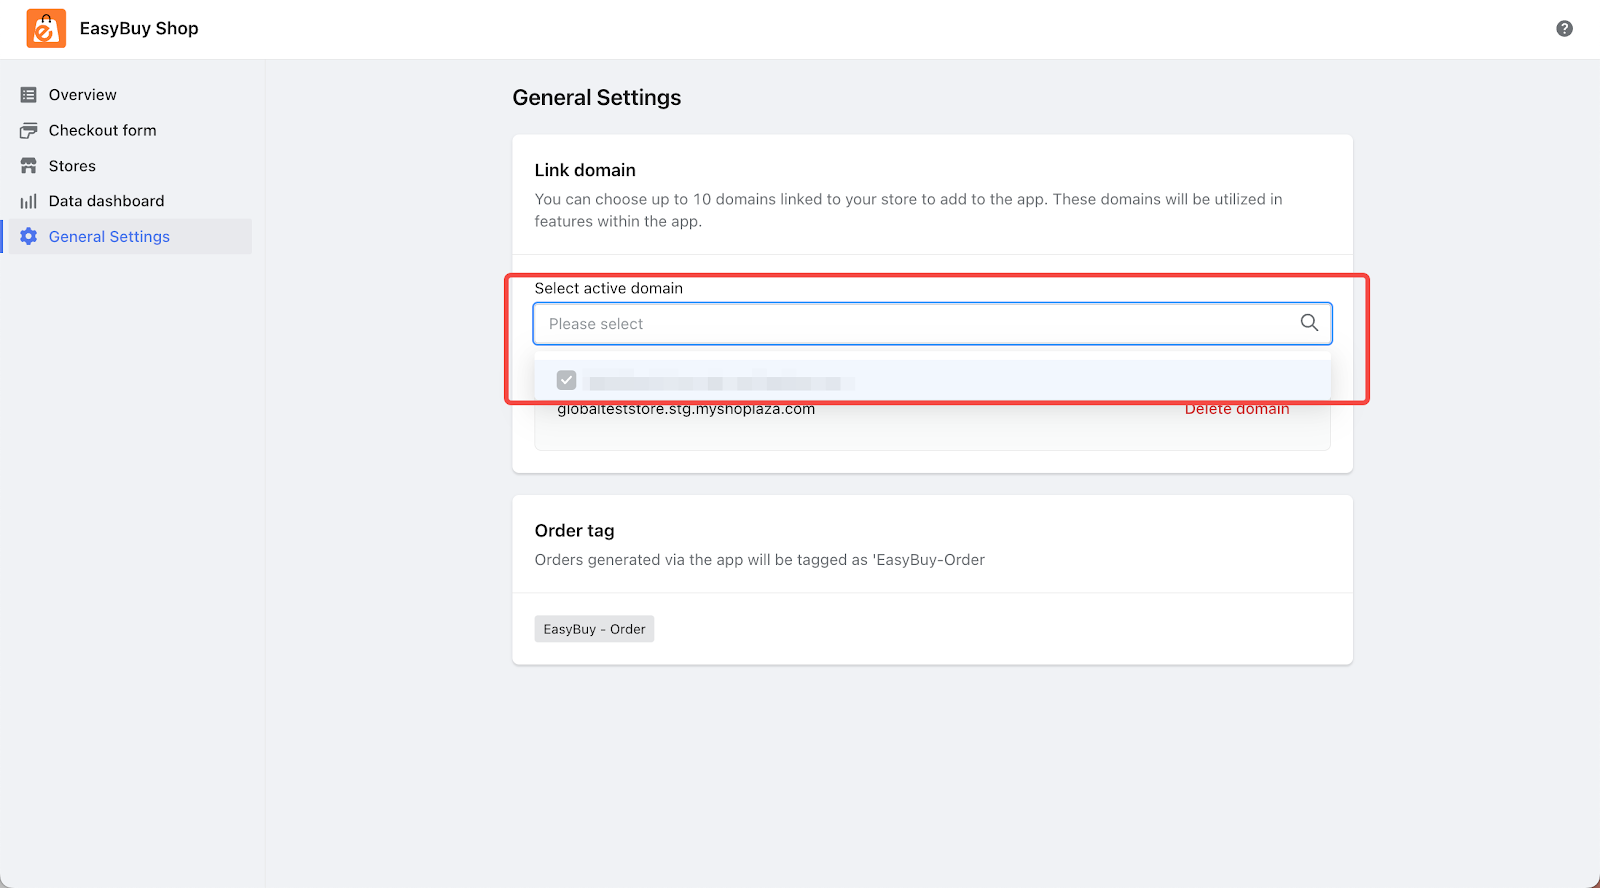
- Link domain: Navigate to Shoplazza admin > Apps > EasyBuy Shop > General Settings > Link Domain. Select the domain you want to link from the list. EasyBuy Shop supports up to 10 domains. Deleting a domain will unlink it from the store, making it inaccessible.
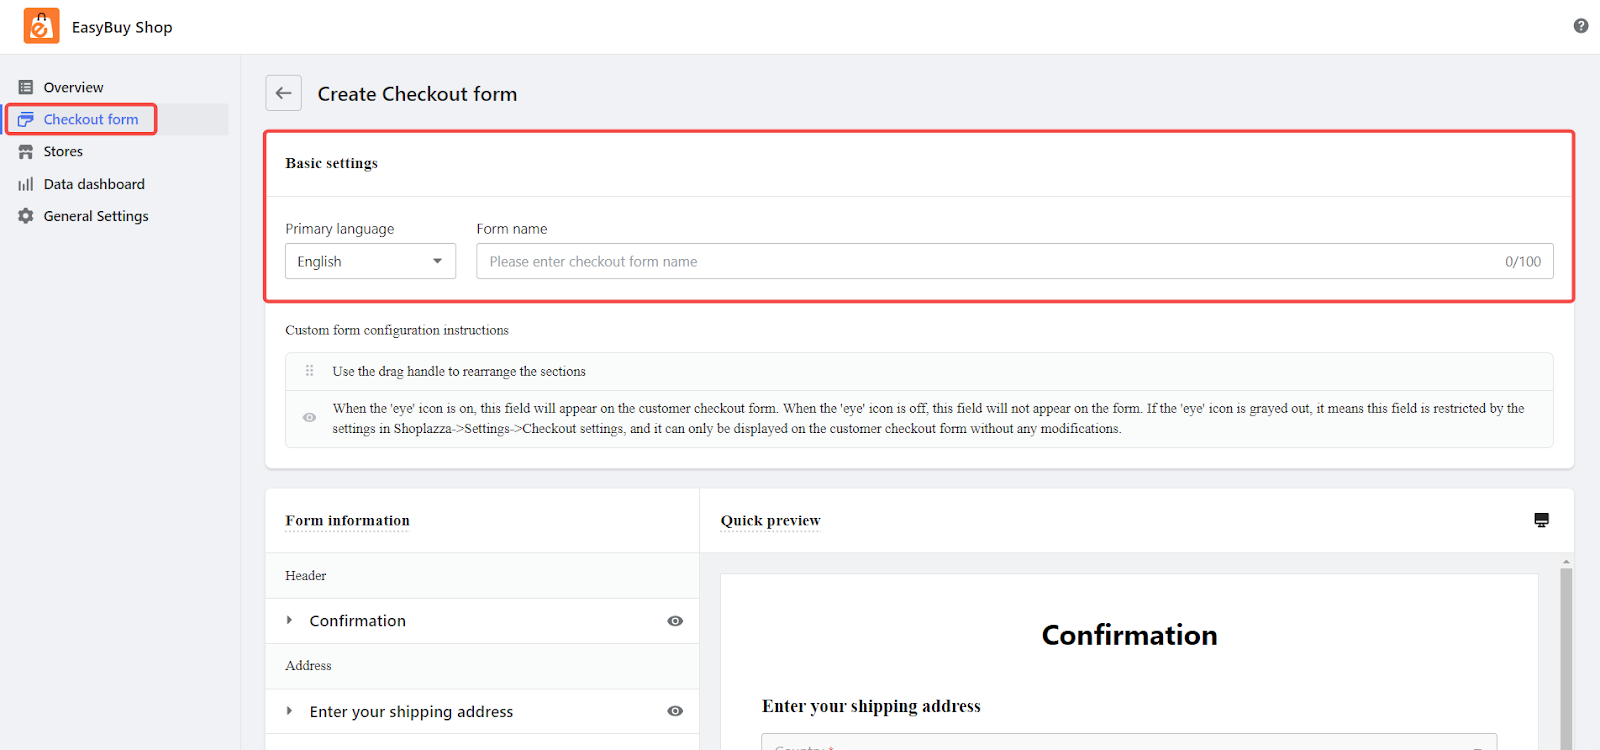
2. Create checkout form: Use various elements to create the desired checkout content, ensuring a smooth and customized checkout experience for your customers. Follow these steps:
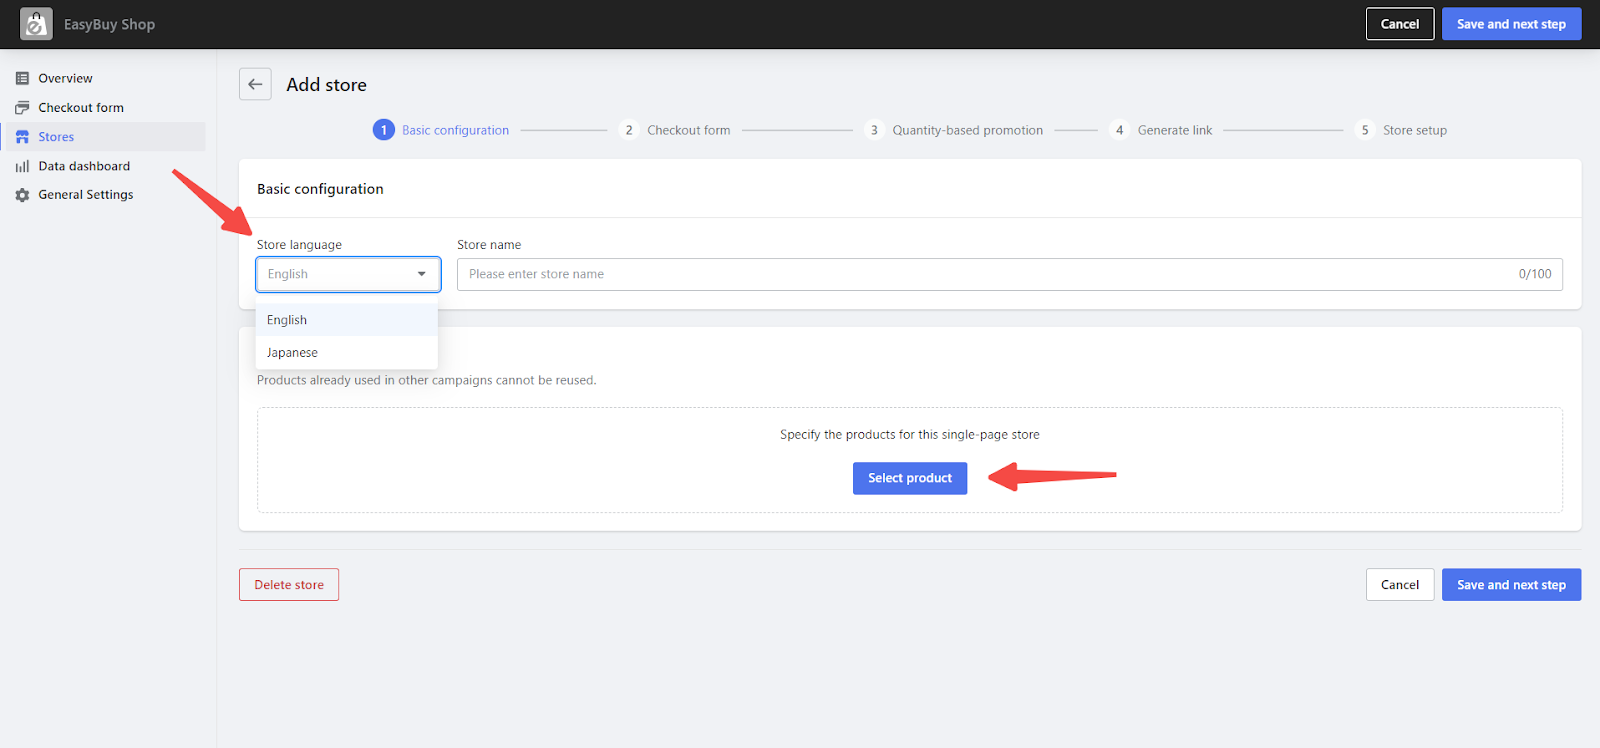
- Basic configuration: Select the primary language for the checkout form and add a name. Once saved, the name cannot be changed. This ensures that all subsequent configurations align with your store’s primary language.
- Checkout form customization: Customize your checkout form by setting the label content for each field based on the form language. Hide unnecessary fields and adjust the display position of fields for a logical layout.
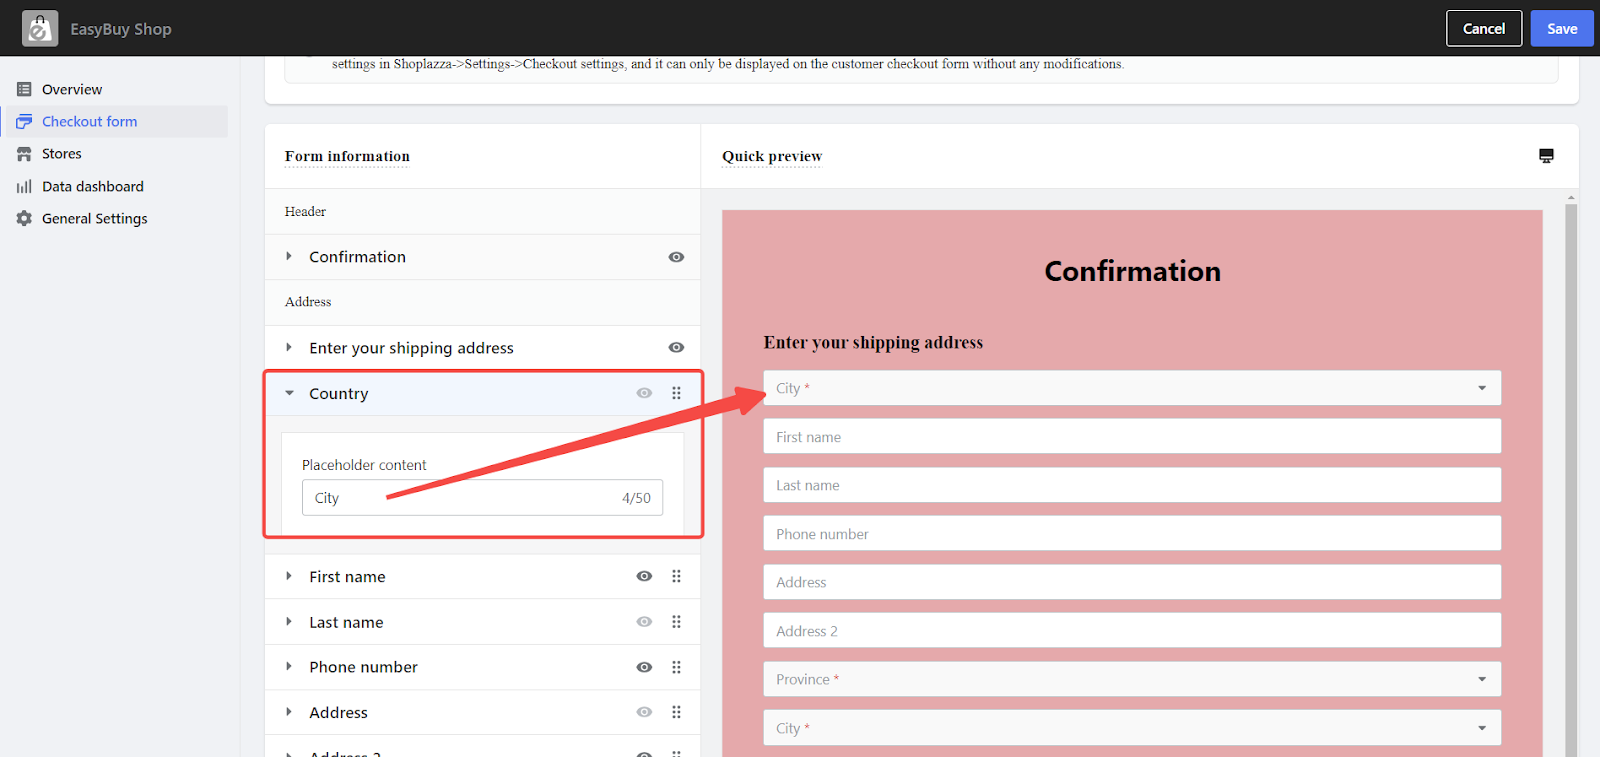
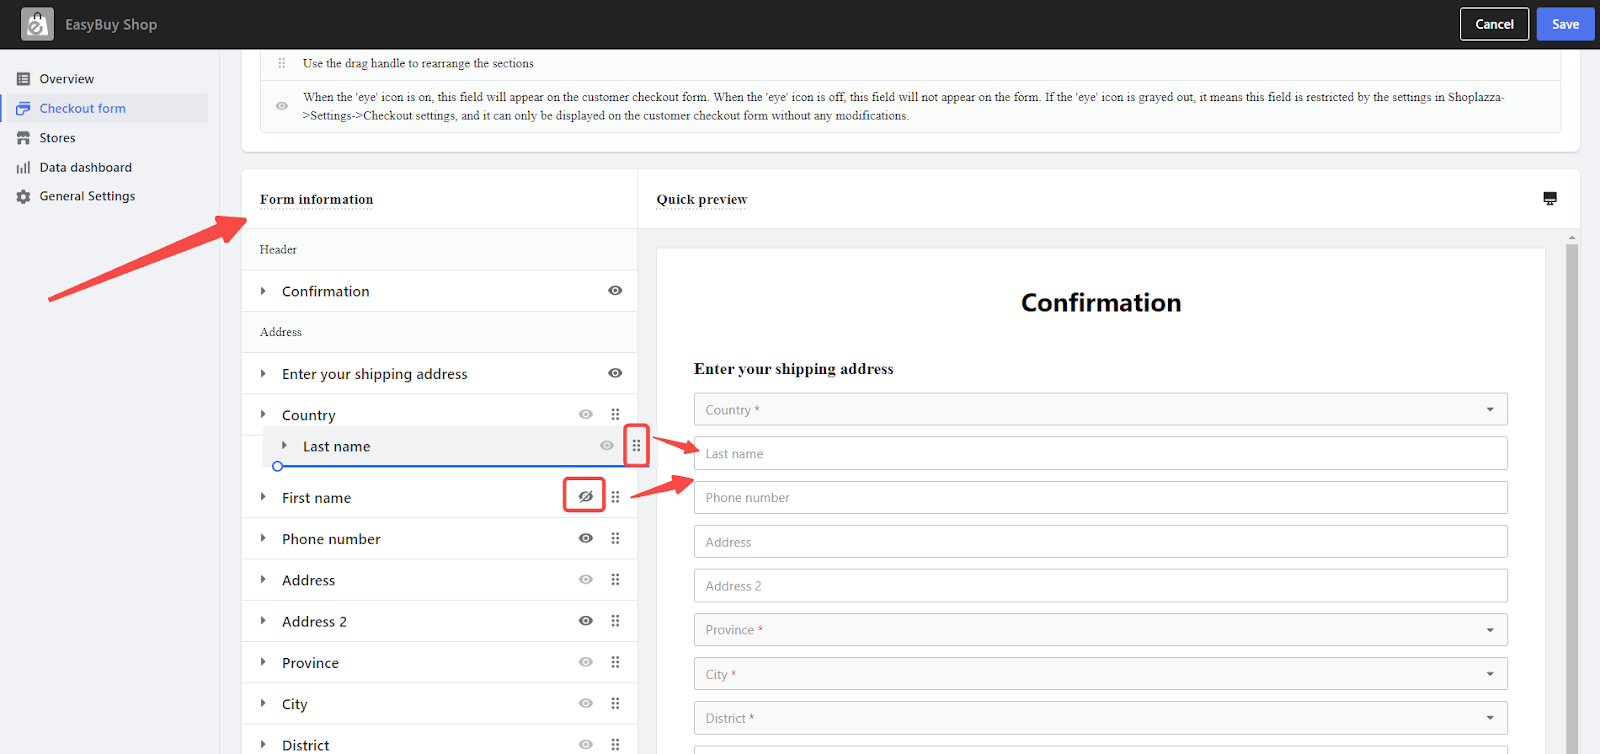
Note
The field settings here are aligned with your Shoplazza admin. For more details on configuring checkout page fields and their validation rules, including display settings, refer to the "Checkout page settings" section in "Getting started."
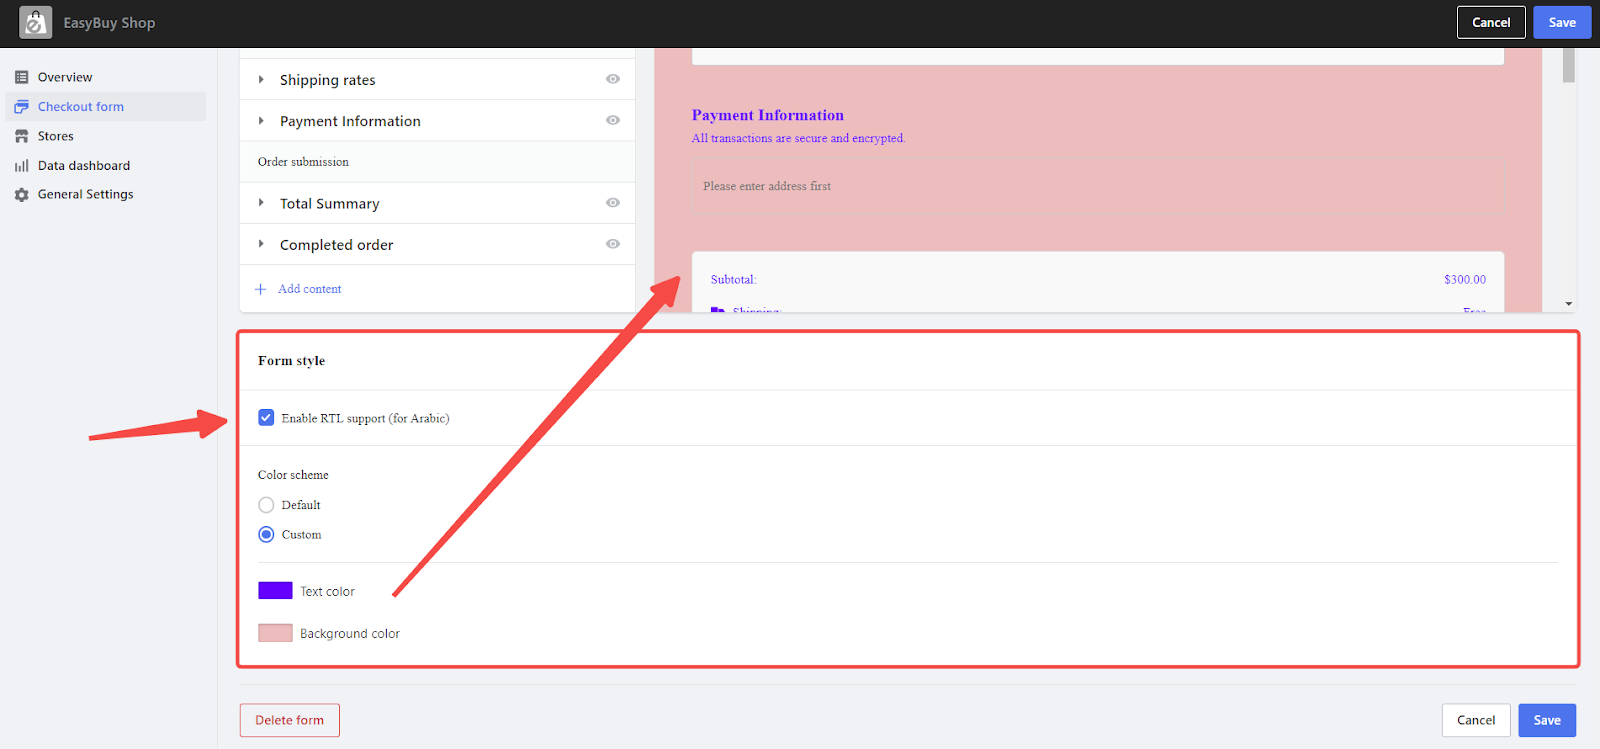
- Form style configuration: Enable RTL (right-to-left) support for languages like Arabic. Customize text and background colors to match your store’s branding.
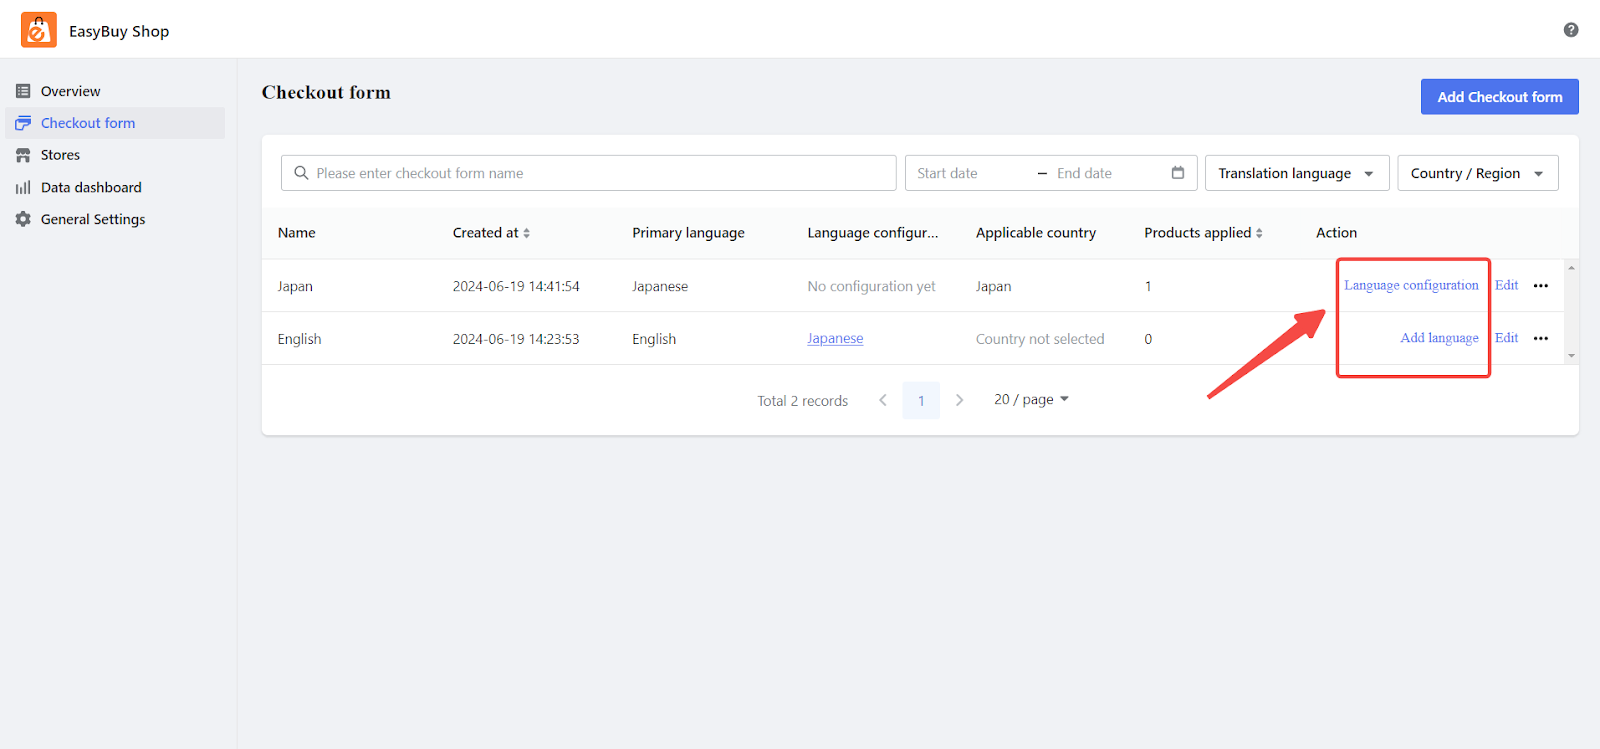
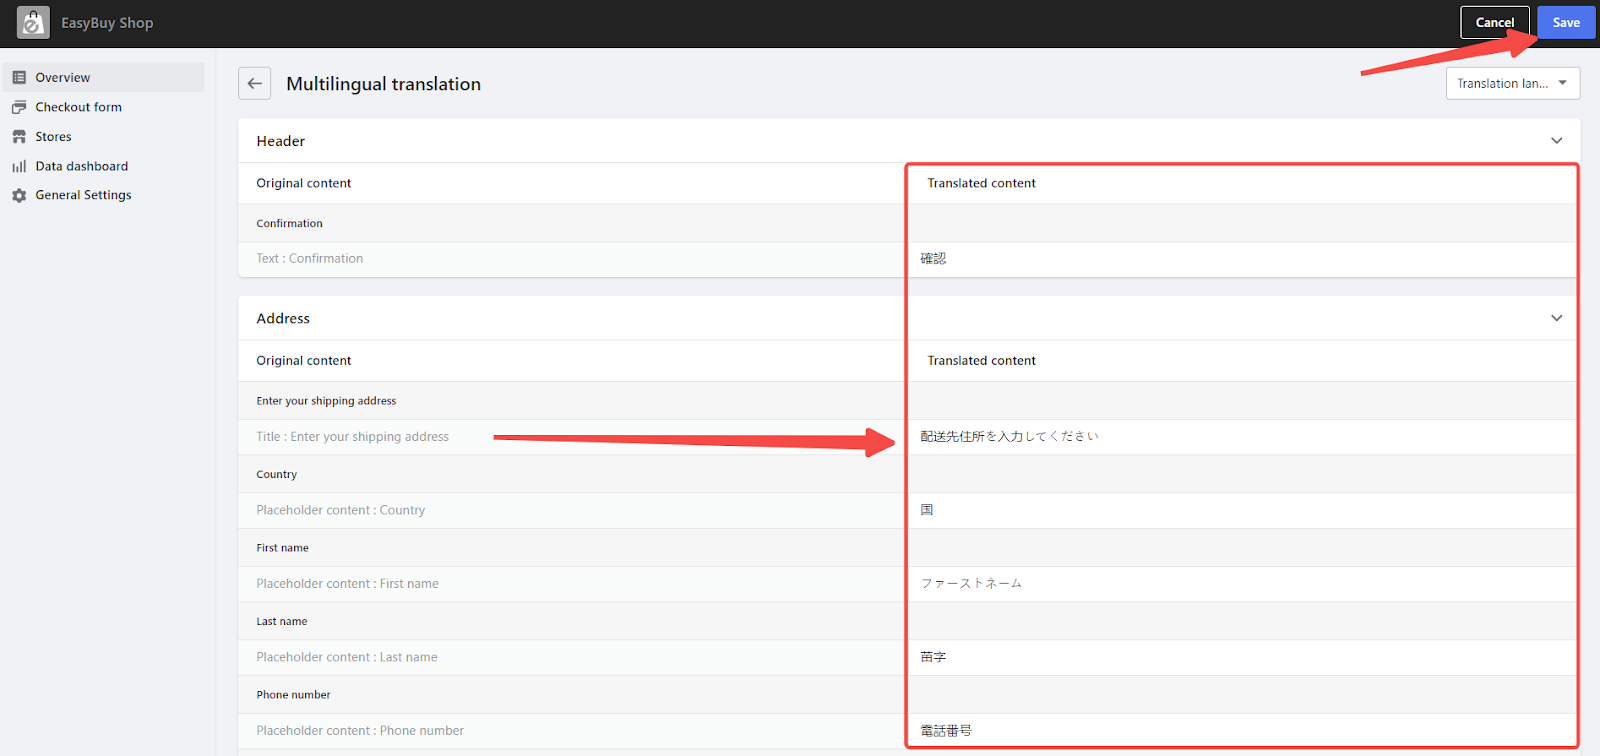
- Multi-language settings: Manually translate your checkout form content to ensure accuracy. Make sure all fields, buttons, and messages are in the correct languages, then Save and apply these changes.
3. Create store: Quickly create a store and open a new business channel
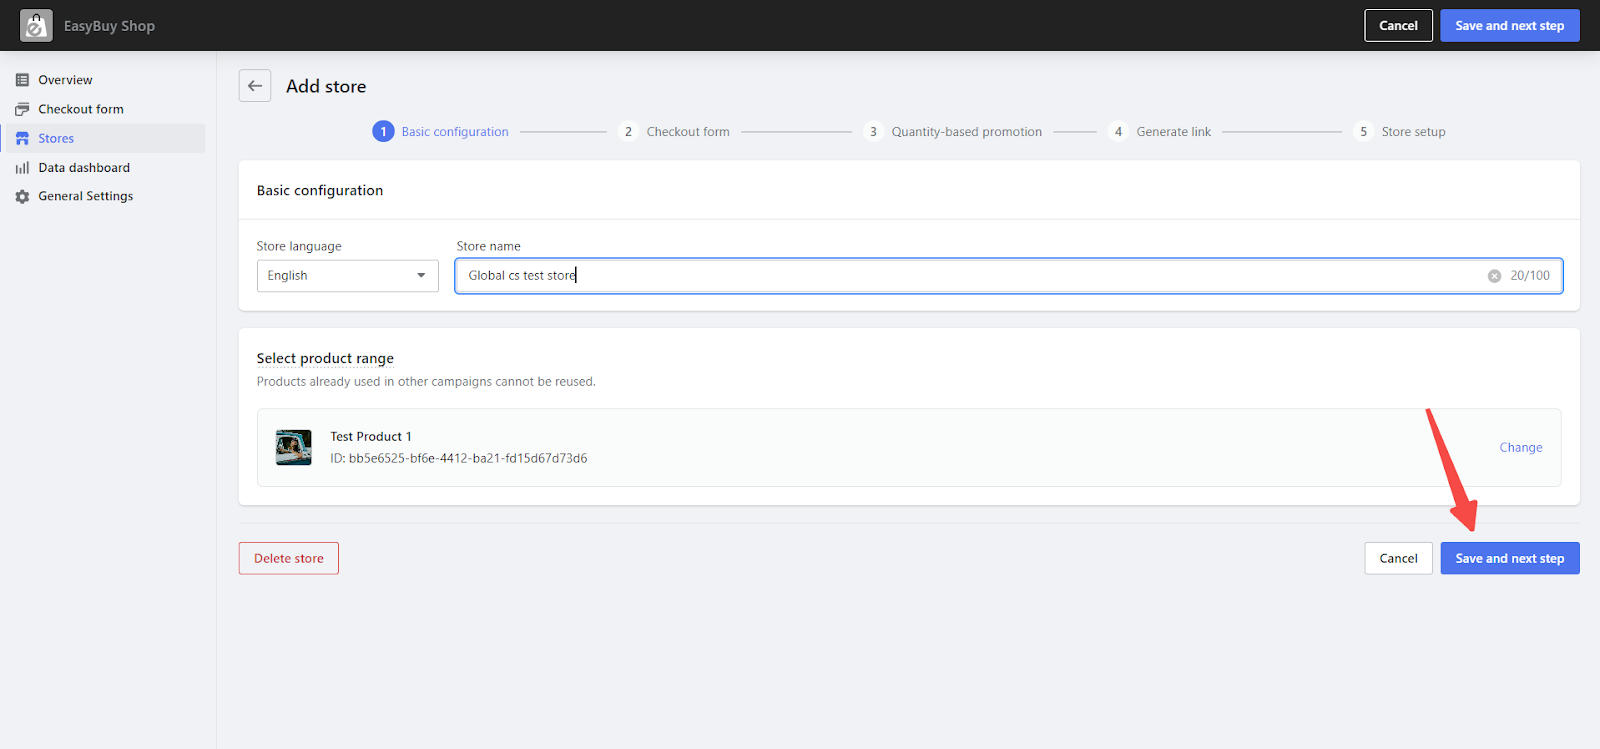
- Product selection: Set the store’s primary language and name, then choose the products to feature. Your product choices play a key role in your store's appeal and sales performance. Ensure they align with your target market's preferences. Once you’ve made your selections, click Save and next step.
Note
The store’s primary language and name cannot be changed once set, and products must be valid in your Shoplazza store and cannot be duplicated across multiple stores.
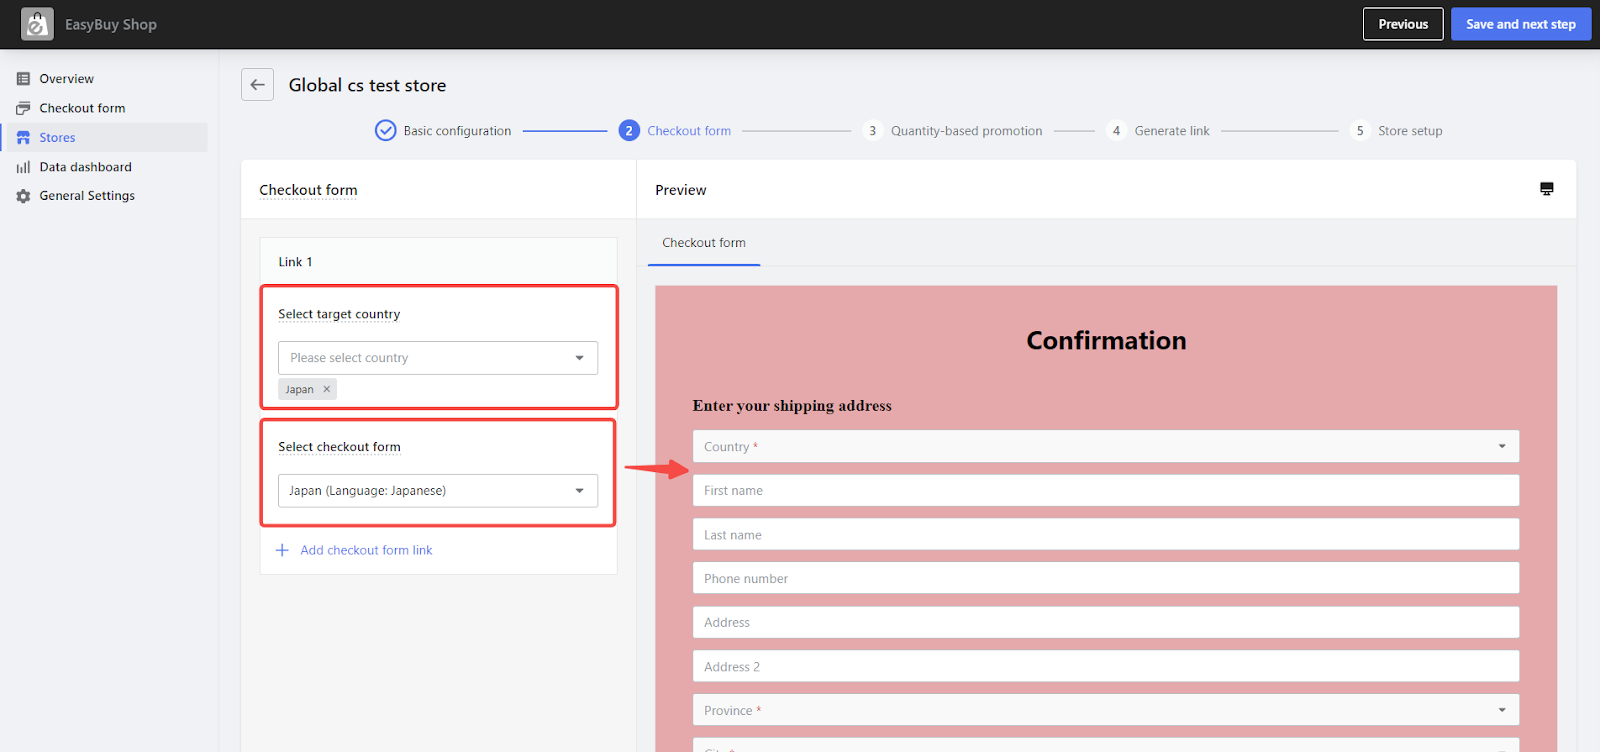
- Checkout setup: Choose the countries for the checkout form, select the appropriate checkout form for each country, and add it to the store. This allows you to set different checkout forms for different countries.
Note
Countries support multiple selections, but each checkout form can only be selected once and cannot be duplicated.
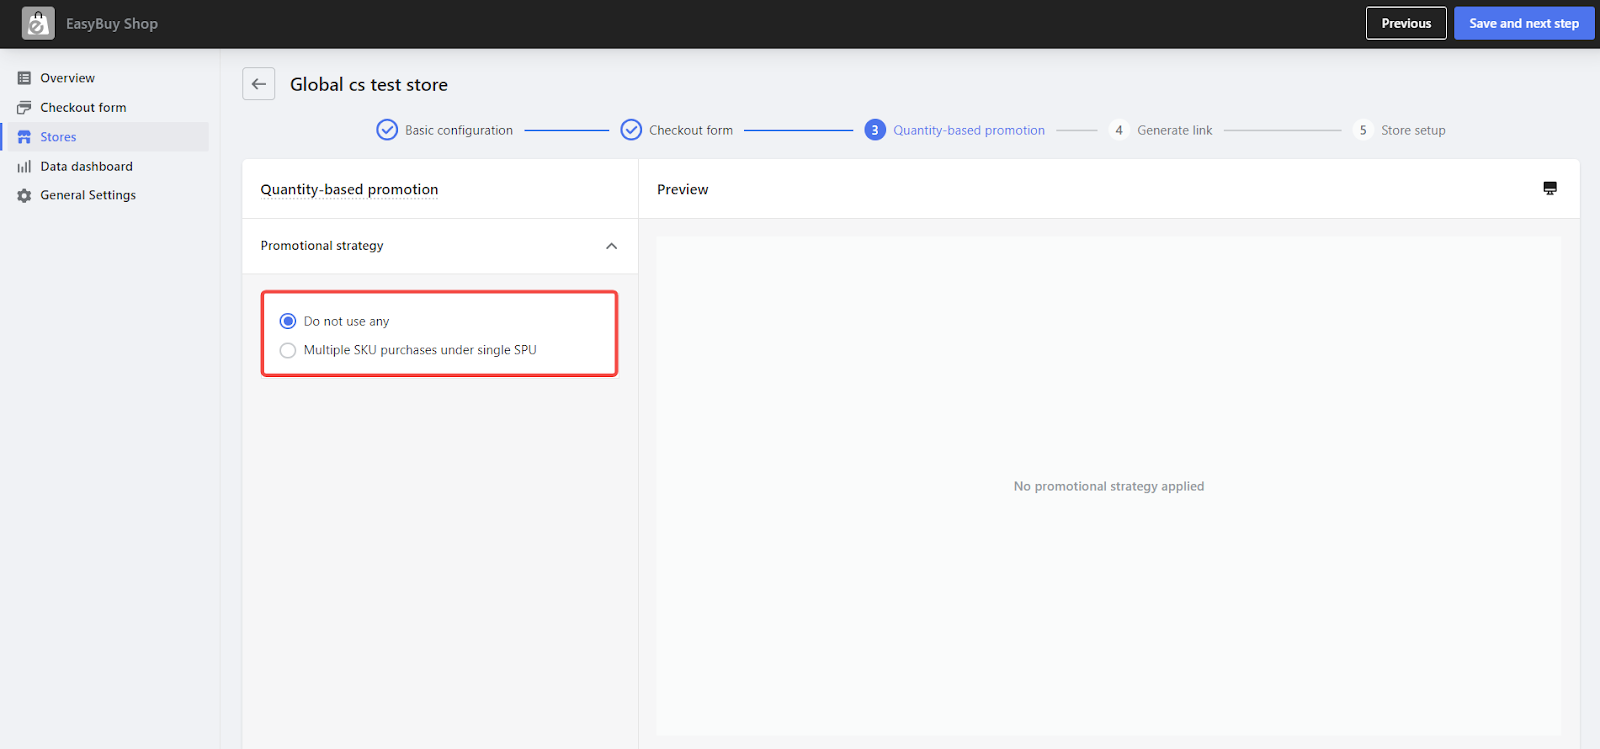
- Marketing activities: Choose the marketing method for the products in your store. If you choose not to use any marketing effects, the default product content will be used.
-
-
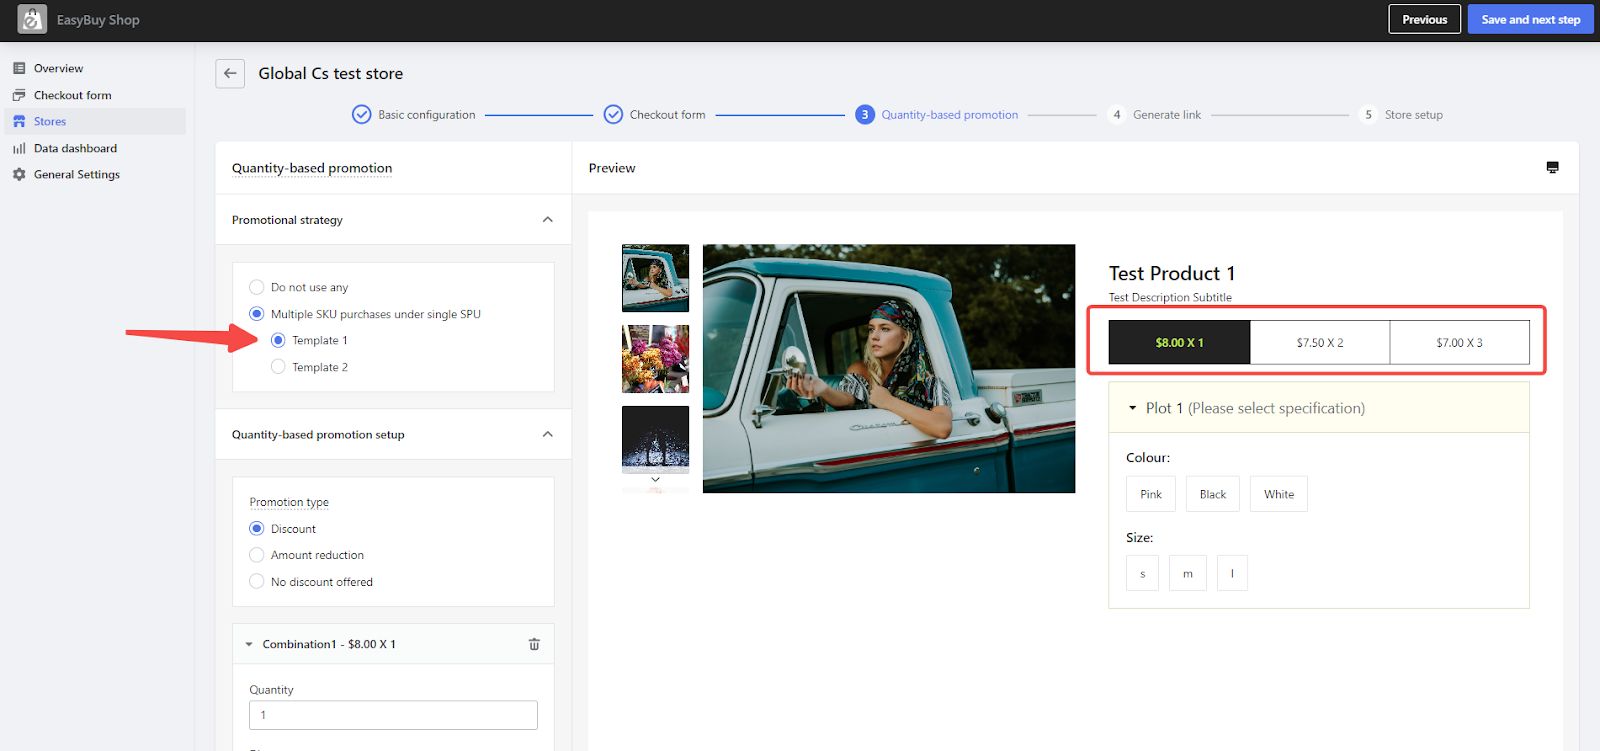
Multiple SKU purchases under single SPU: In this mode, two template effects are supported. You can choose the template effect you prefer.
- Template 1: Discounts and fixed amounts off apply to individual products.
-
Multiple SKU purchases under single SPU: In this mode, two template effects are supported. You can choose the template effect you prefer.
-
-
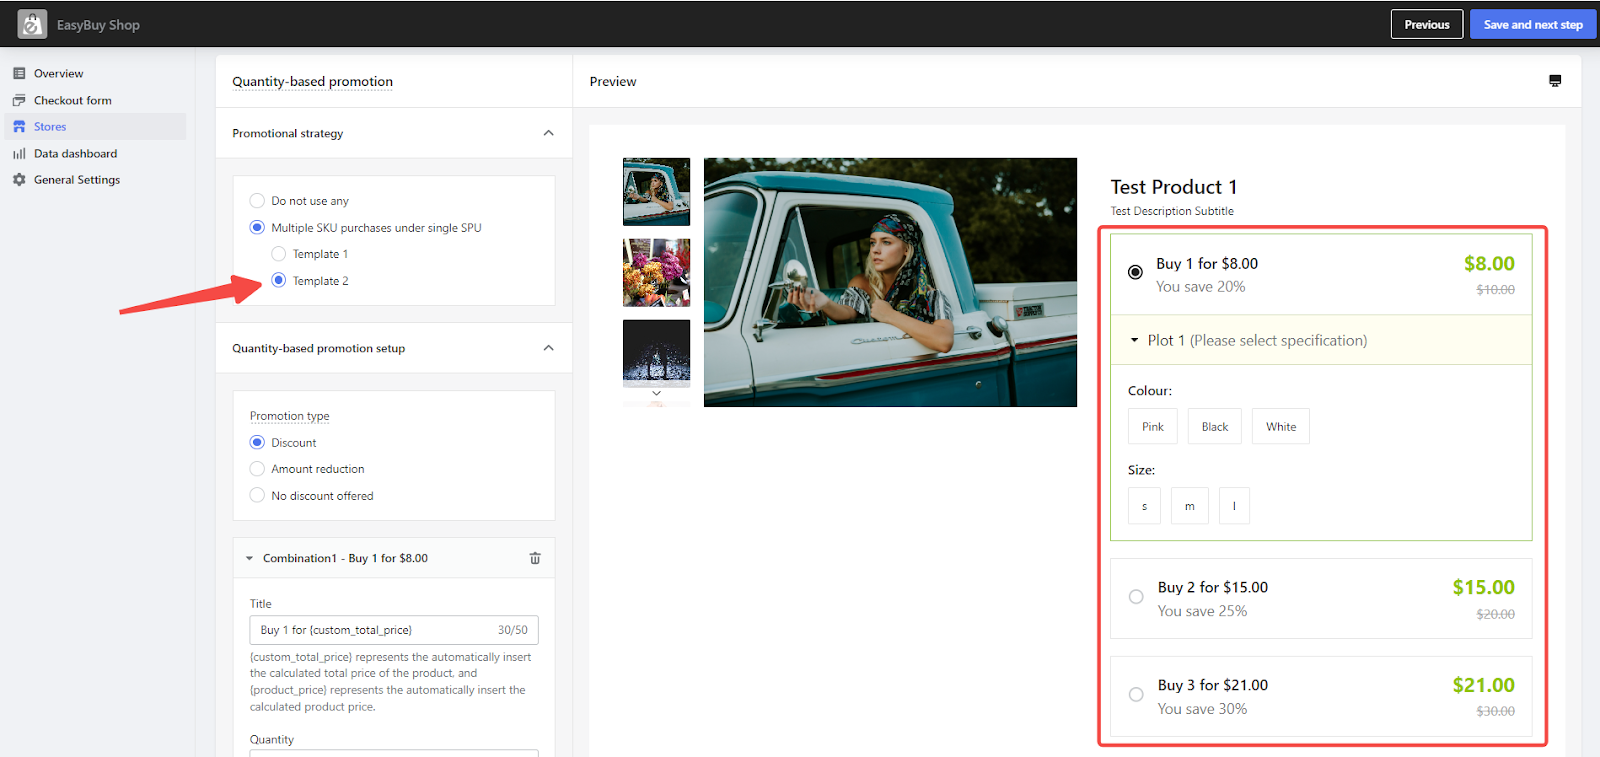
- Template 2: Discounts and fixed amounts off apply to the total price of the products.
-
-
-
Set the discount type:
- Discount: Reduce product prices by a specific percentage across all markets. Once set, the product will be sold at a discounted price.
- Amount reduction: Lower product prices by a fixed amount based on the main market price. The discount for other markets will be adjusted according to the exchange rate, ensuring consistent savings.
- No discount offered: Keep the original product price, offering no discounts.
-
Examples of template differences:
-
-
Template 1: The discount amount applies to individual SKUs.
-
Example: A merchant selects Product A for the store. Product A offers $5 off for every 2 items, with SKUs priced at $10, $15, and $20 respectively.
- Backend display: $10 x 2 (based on the lowest SKU price within the SPU).
- Frontend display: Custom unit price x 2.
- Custom unit price calculation: (Total selected SKU price - $5 * 2) / 2.
-
Example: A merchant selects Product A for the store. Product A offers $5 off for every 2 items, with SKUs priced at $10, $15, and $20 respectively.
-
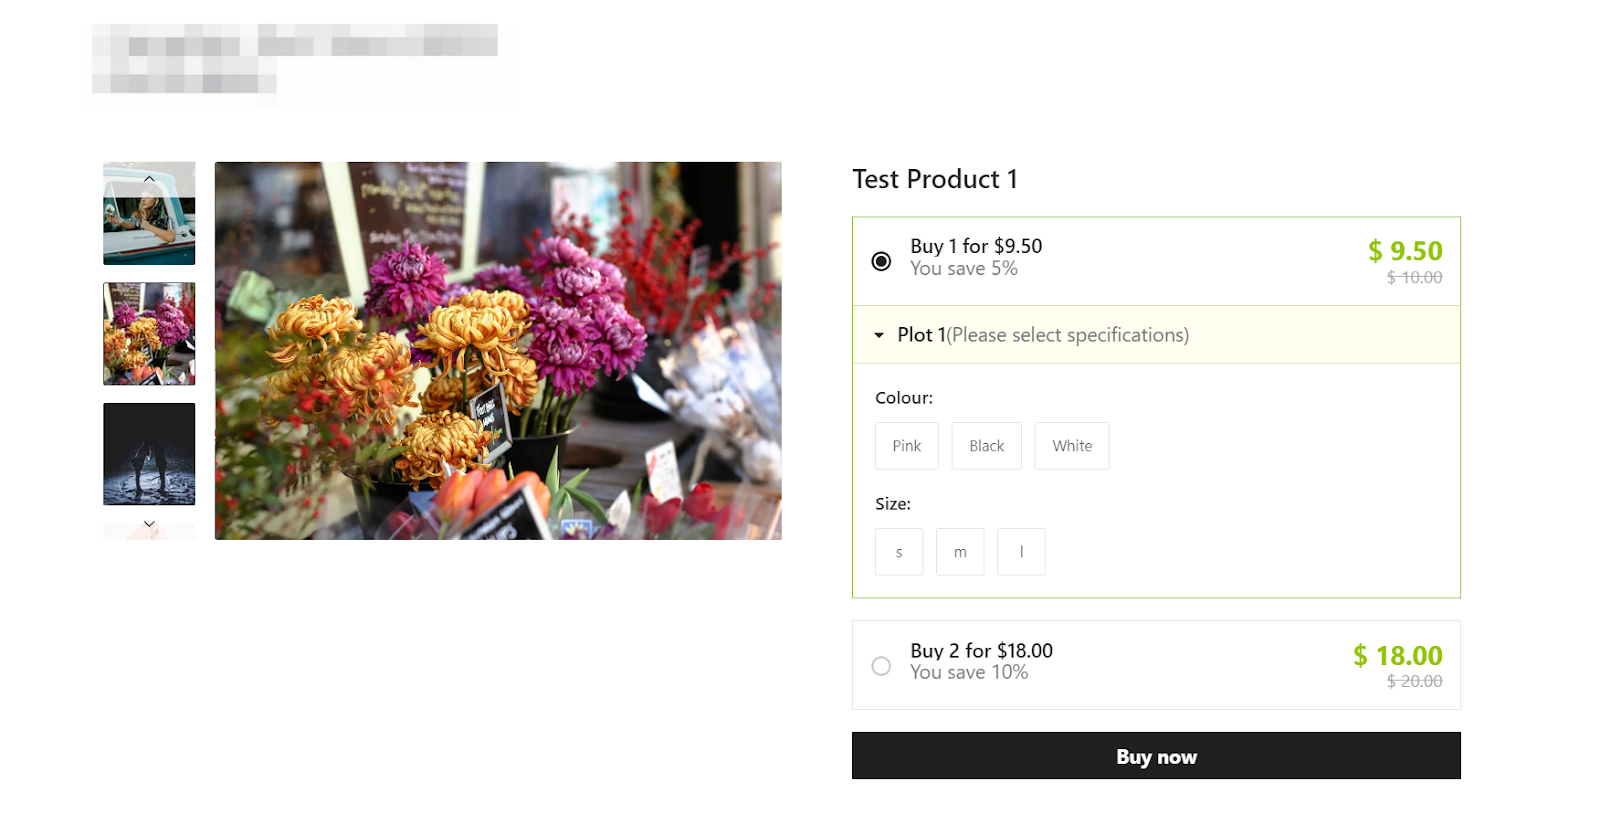
Template 2: The discount amount applies to the total price of the specified number of SKUs.
-
Example: A merchant selects Product A for the store. Product A offers $5 off for every 2 items, with SKUs priced at $10, $15, and $20 respectively.
- Backend display {custom_total_price}: $15 (lowest SKU price within the SPU - discount amount).
- Backend display {custom_price}: $7.5 ((lowest SKU price within the SPU * 2 - discount amount) / 2).
-
Example: A merchant selects Product A for the store. Product A offers $5 off for every 2 items, with SKUs priced at $10, $15, and $20 respectively.
-
Template 1: The discount amount applies to individual SKUs.
-
-
Set the discount type:
-
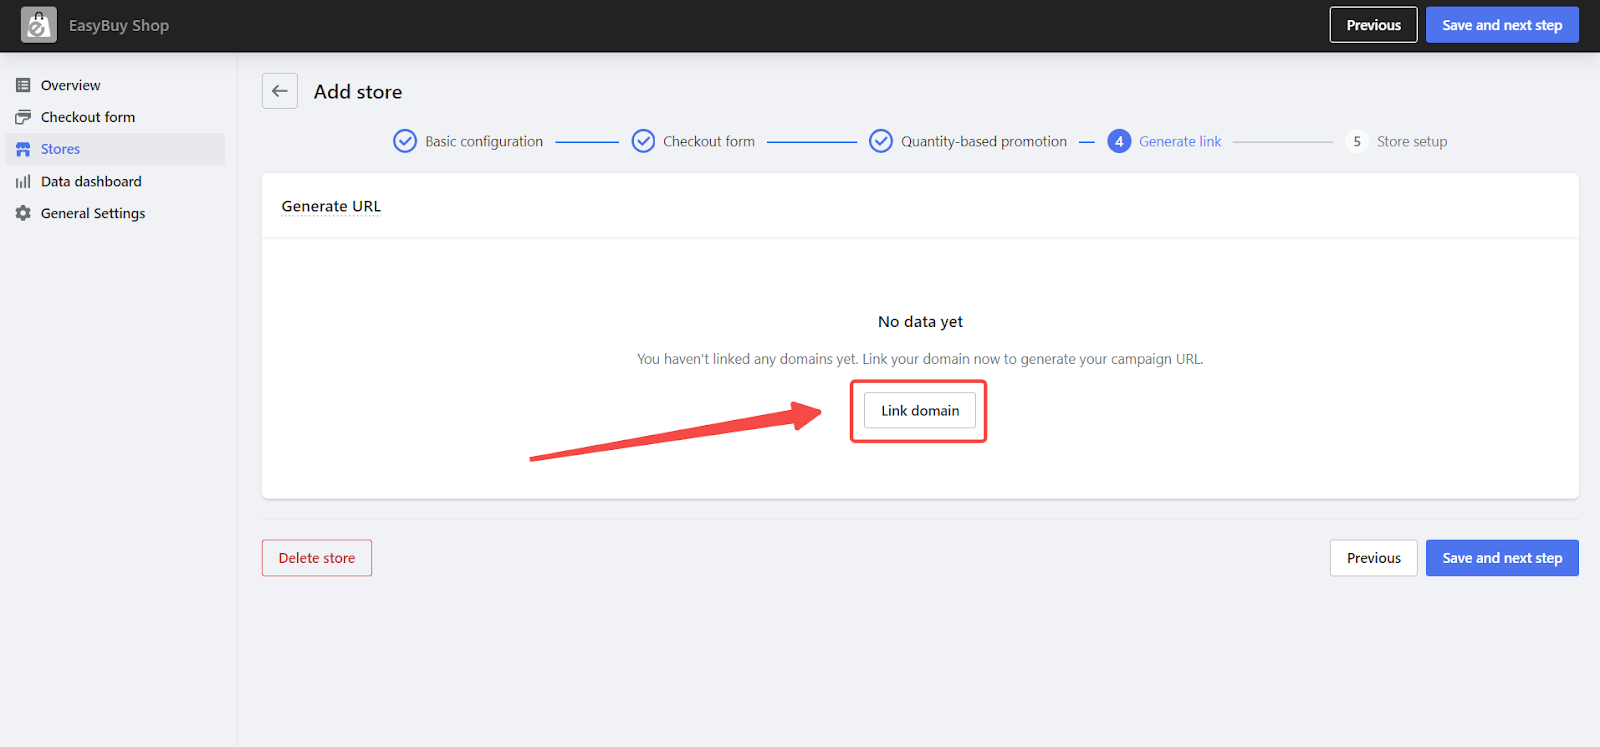
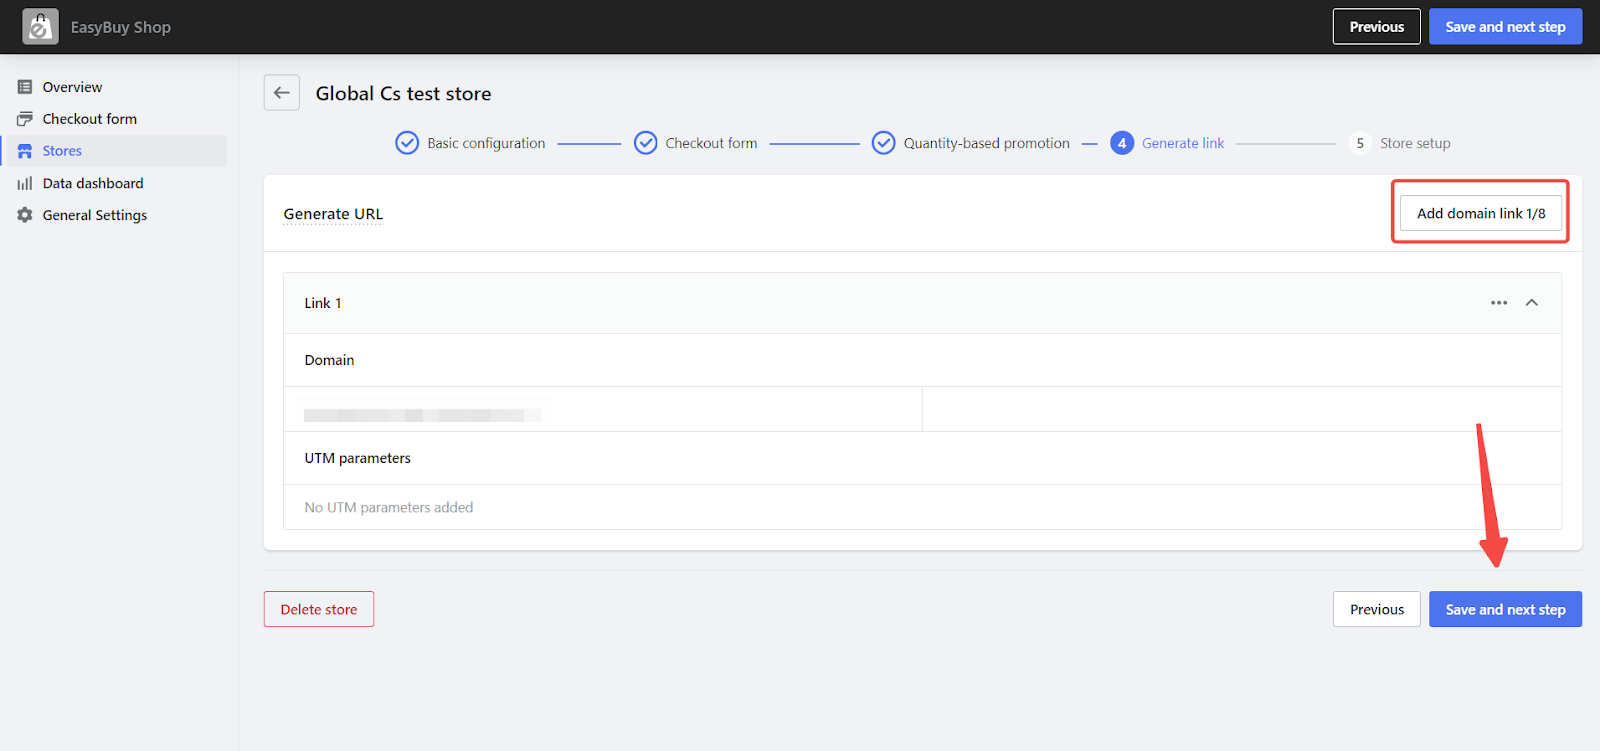
Generating a URL: Link domains to your store to create access links for shopping. Follow these steps:
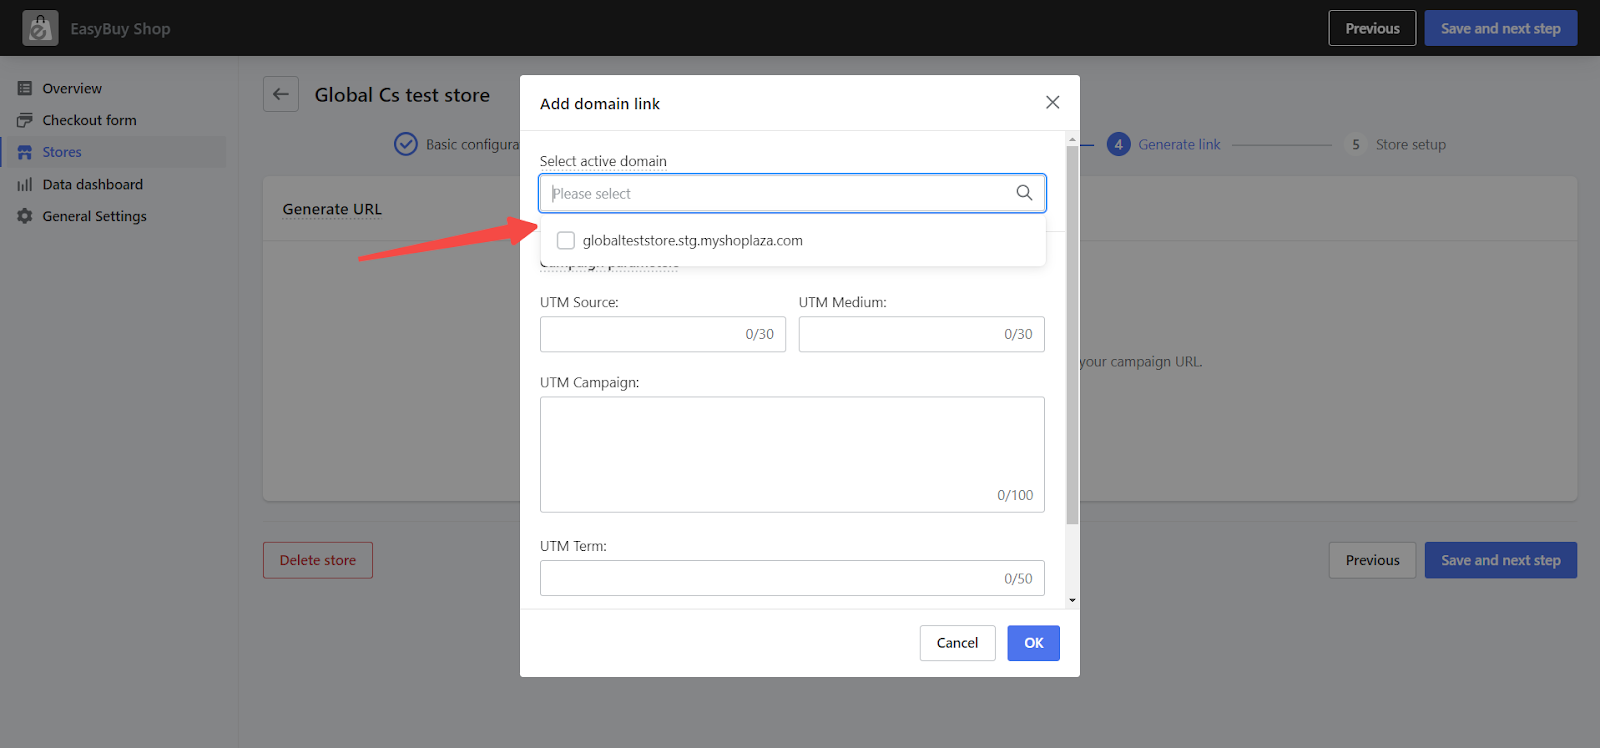
- Create a new connection: Click on Link Domain, select the domains to connect (multiple selections allowed), add tracking parameters if needed (optional), and click OK to create the store URL.
-
- Proceed to customization: EasyBuy Shop supports up to 8 sets of access links. You can add tracking parameters directly to the domain connection, allowing you to generate a URL and a short link for immediate use. Click Save and Next Step to continue to the store customization process.
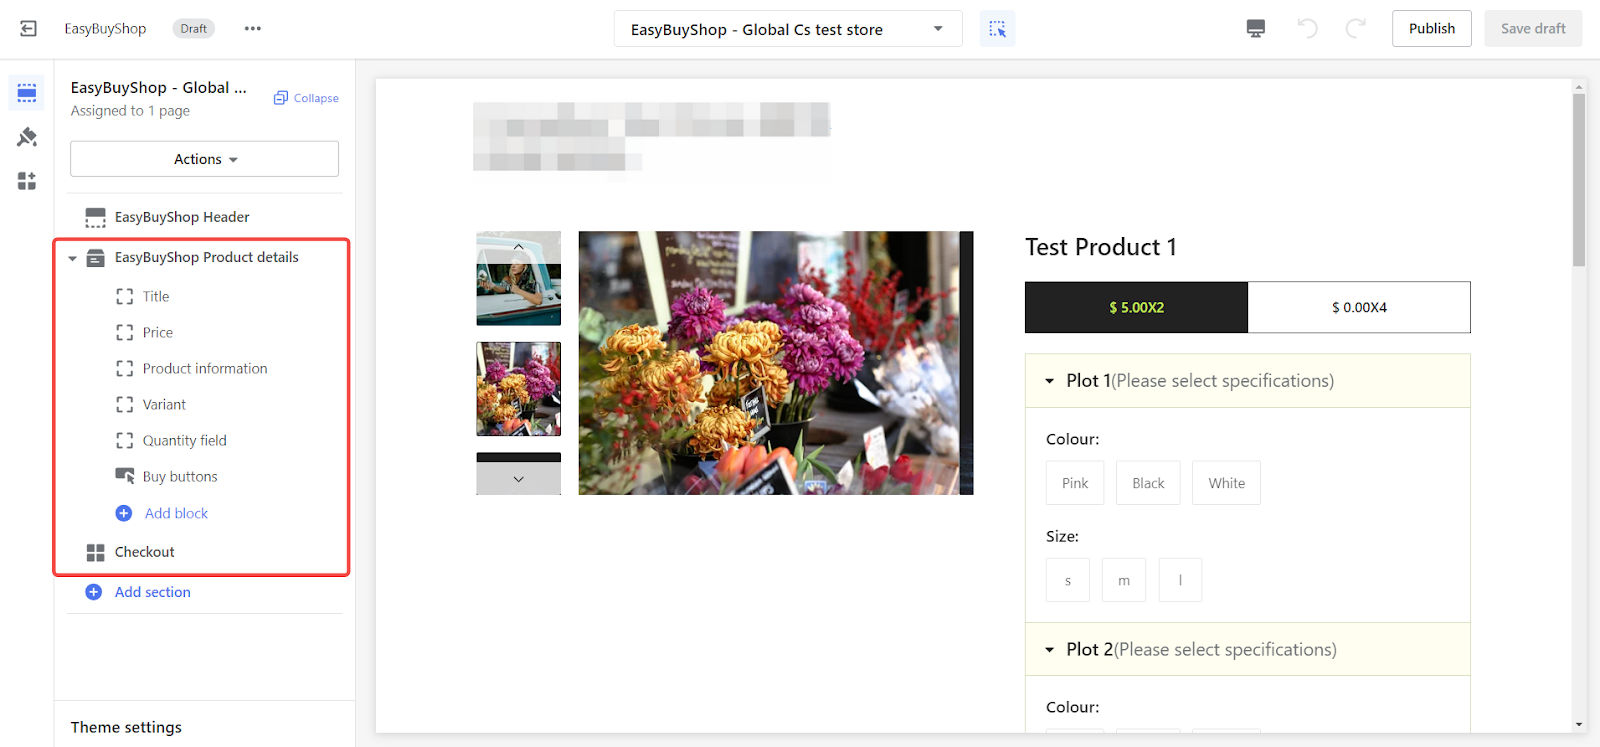
- Store customization: Click Set up store to be redirected to the theme editor. Use “EasyBuyShop” cards to build your page. Once completed, publish the page to see the updates in your store.
Changing your domain
Learn how to switch domains if you encounter issues with your current one. This section guides you through updating your domain settings to keep your store accessible.
1. Navigate to domain settings: Go to your Shoplazza admin > Settings > Domain > Domain list, Connect existing domain, and in EasyBuy Shop, go to General Settings > Link domain to update your domains.
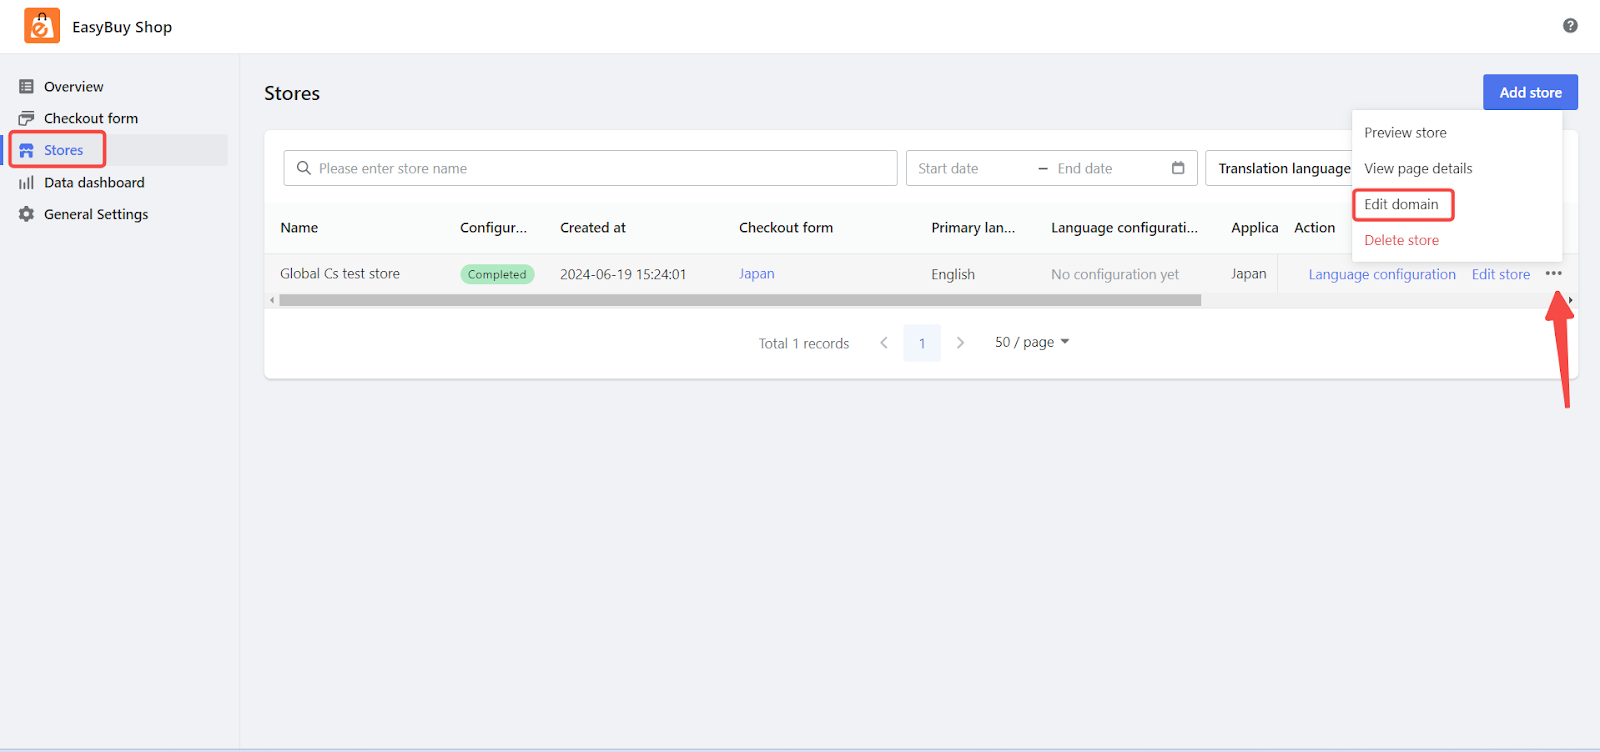
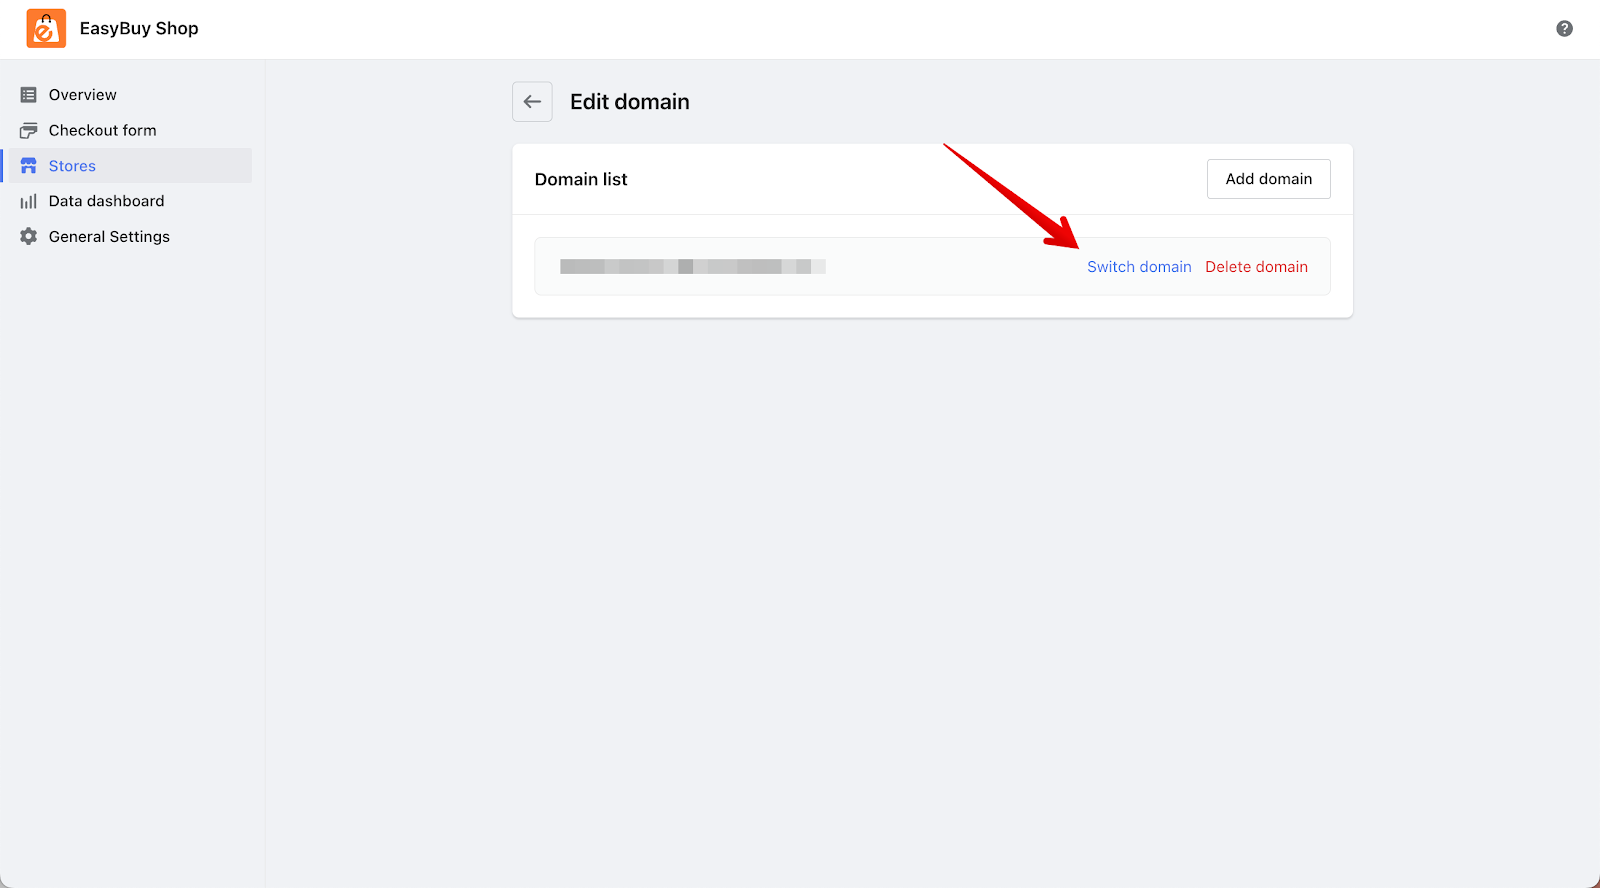
2. Replace Domain: Select the store to change the domain, click Edit domain, click on Switch domain, choose the new domain from the dropdown, and click OK. This will replace the original domain and generate a new URL for the store.
Advanced features
Discover how to leverage advanced features like data analysis and conversion funnels. This section will help you evaluate your business performance and gain deeper insights into customer behavior.
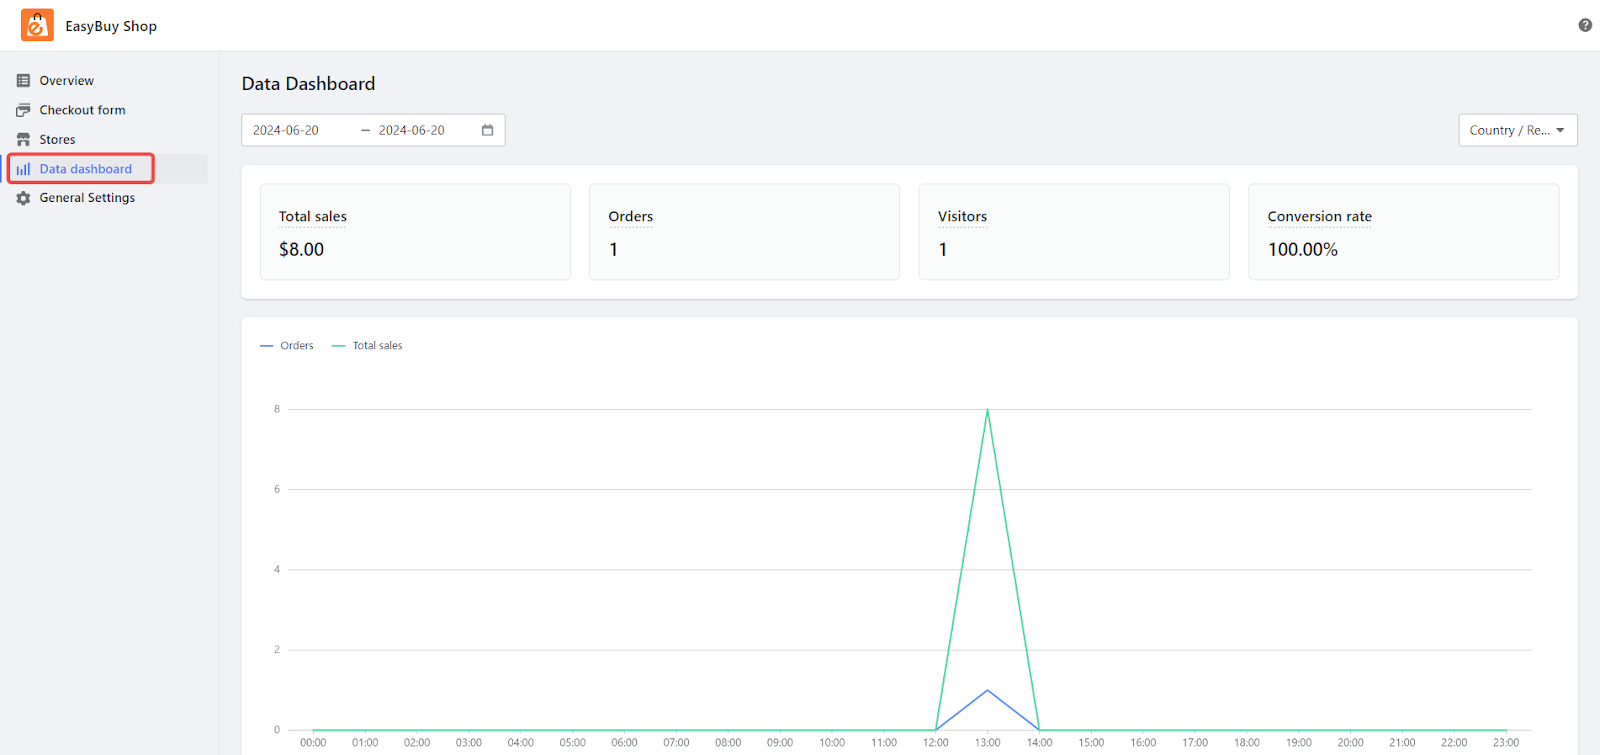
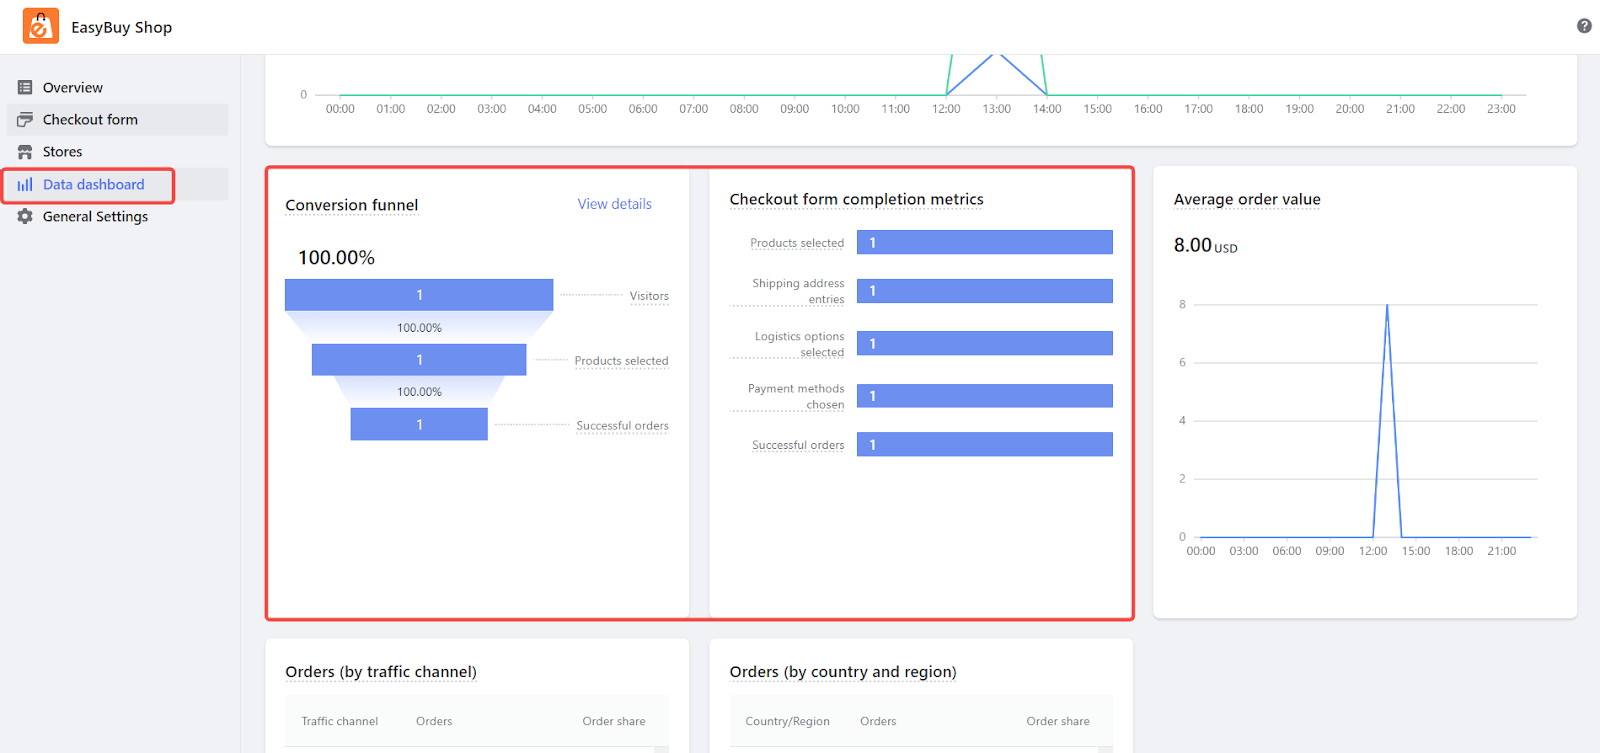
1. Data analysis: Evaluate your business performance with data dashboards and conversion funnels:
- Data dashboard: Overview of total sales, unique orders, visits, and conversion rates.
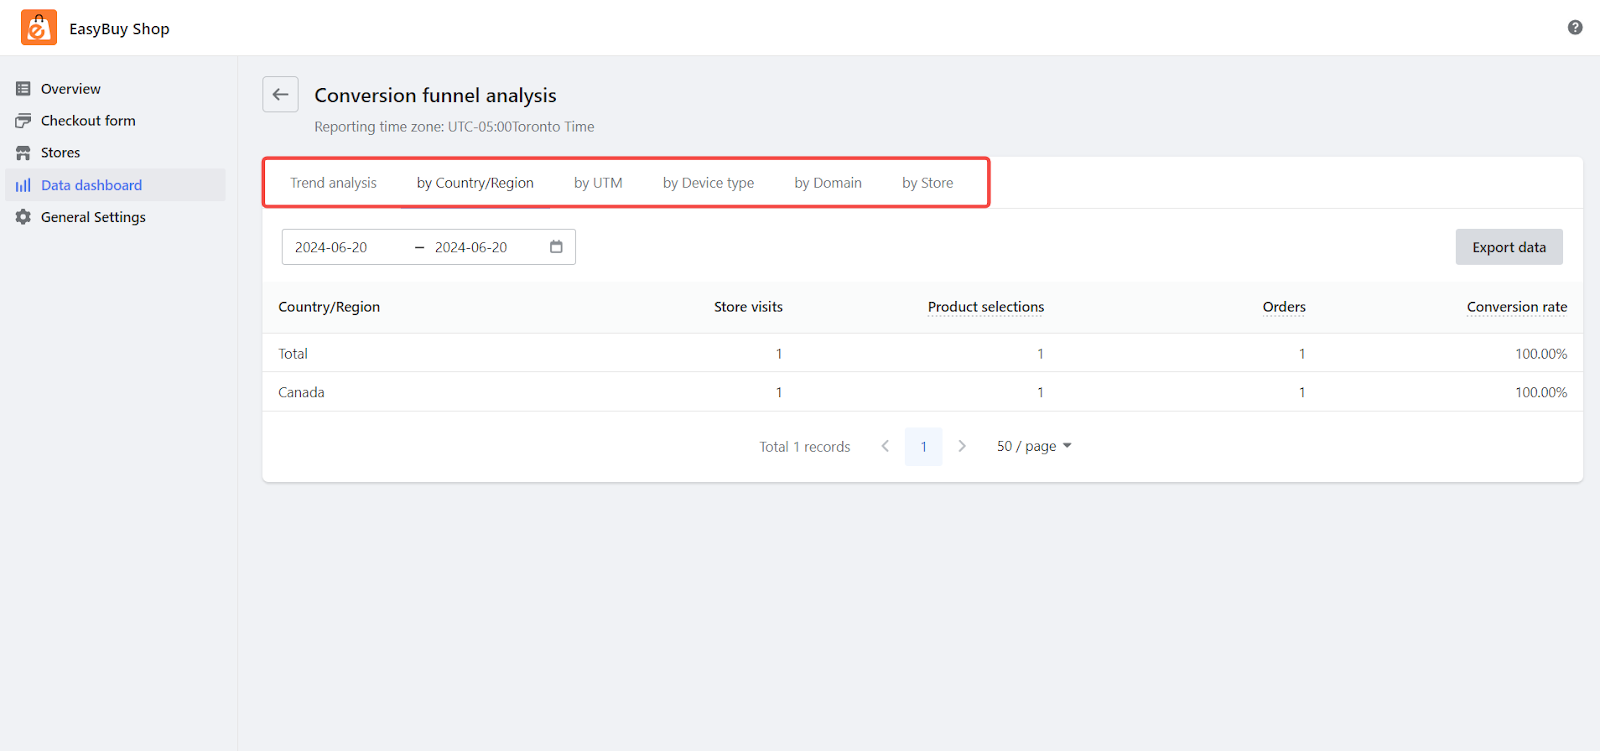
- Conversion funnel: Analyzes data across different stages of the customer journey, such as visitors, product selection, and completed orders. It includes detailed metrics that break down data by dimensions like country, UTM parameters, and store sections to gain deeper insights.
Supported Apps
Enhance your EasyBuy Shop experience with a variety of quality apps from the Shoplazza App Store. Find out which apps can help you improve ad performance, translate content, manage currencies, and more.
- OnePixel : Integrate all media channel pixels for better ad performance.
- Multi-Language Translator : Easily translate store content within a visual editor, supporting automatic translation, manual editing, and review.
- Multilingual settings : Translates store language into different languages, making it easier for customers to browse.
- Multi-Currency Settings : Set multiple currencies for different regions.
- GeoPin Address: Simplify checkout address input.
- Discount for Payment Methods : Configure discounts for all valid payment methods.
- Custom Address Book : Upload custom address libraries for order address matching.
- COD Risk Control : Identify and mitigate risks in COD orders, improving order completion rates.
Frequently asked questions
Q:How is the shopping funnel in the data dashboard divided into Conversion funnel and Checkout form completion metrics?
A: In EasyBuy Shop, the checkout process for single-product stores operates in a single-page mode. This can result in consumers filling out the form in a less structured manner. To address this, we divided the analysis into two parts:
- Conversion Funnel: Analyzes the funnel based on user traffic, product selection, and order conversion.
- Checkout Form Completion: Displays data based on the parts of the form filled out by the consumer, recording data for each section to help merchants analyze as needed.
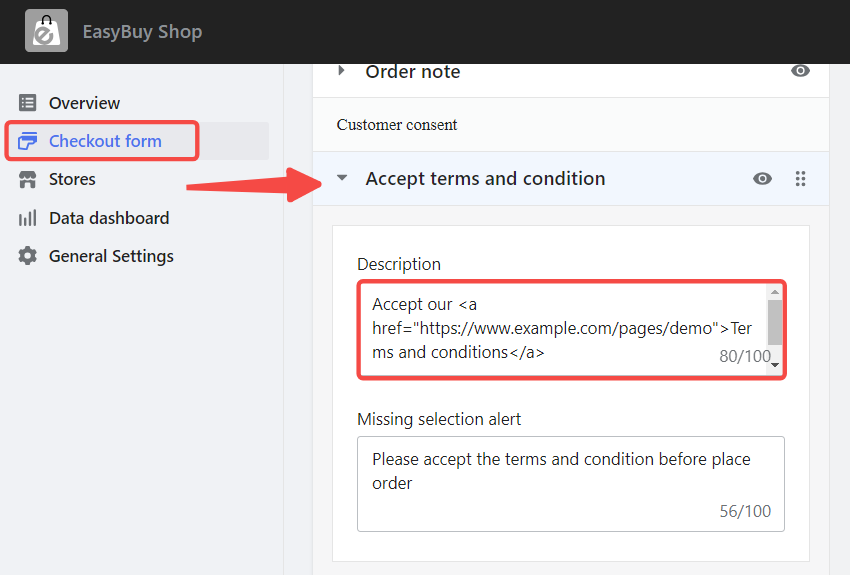
Q:How do I set the Accept terms and conditions field in the checkout form?
A: The Accept terms and conditions field is added to comply with regional policy requirements. You can set your own relevant terms on a custom page, obtain the link to this page, and then add the link to the Description of the field using the <a href=""> tag.
- Example: If the link to your custom page is https://www.example.com/pages/demo, add this link to the href attribute in the content as follows: <a href="https://www.example.com/pages/demo">content</a>. This ensures that when consumers click on the description content, they will be redirected to the privacy terms page to view the relevant information.
EasyBuy Shop enhances your Shoplazza platform by providing efficient multi-market management, optimized checkout processes, convenient domain management, flexible checkout forms, and powerful data analysis. By following this guide and utilizing these features, you can quickly boost your e-commerce sales and conversion rates.
Comments
Please sign in to leave a comment.