
On This Page
1. Updated feature: Bulk editing your product metafields
2. Updated Feature: Manually updating your product feed across sales channels
3. New feature: Shop the look (one-click bundles) in Bundle sales app
4. Updated feature: Add to Cart Animator- in Booster & Store Conversion App
5. Update: Data metrics in Wishlist app
6. Updated: Product customizer
7. New feature: Shoplazza now supports adding Iraqi currency
8. Updated feature: Card advanced settings - Smart retry
9. Updated: Aligning shipping country with market currency for COD orders
10. Updated: Separate tax rates for provinces in Canada
11. Updated feature: Customize your local delivery area with radius settings
12. Updated: Optimized shipping address settings
13. Updated: Recommended local pickup tailored to customer preferences
14. Updated: Enhanced features at checkout
15. Improved product price display on shopping cart and checkout page
16. New feature: Shipping Protection app
1. Updated feature: Bulk editing your product metafields
Usage scenarios:
You can use the product metafields to add custom information about your products. To make it easier for you to edit these fields, we've added the ability to bulk edit them. This feature is designed to help you save time and manage your product information more efficiently.
Usage path:
- Navigate to your Shoplazza admin > Products > All products, select the products you need to edit. Click on More > More bulk actions and you can edit the needed fields for the products.
Feature overview:


2. Updated Feature: Manually updating your product feed across sales channels
Usage scenarios:
When information about your products changes, you can easily update it manually as needed. You don't have to rely on automated systems for updates. This way, you can quickly respond to any changes in your product information.
Usage path:
Navigate to your Shoplazza admin > Products > Product feed, and click on the products you need to update.
Feature overview:
To update the feed data, select the feed you want to update, click on the "..." icon on the right, and then click on the Update now button. This will manually update the feed immediately.

3. New feature: Shop the look (one-click bundles) in Bundle sales app
Usage scenarios:
The Shop the look feature in the Bundle Sales app streamlines the shopping experience by allowing customers to purchase a curated set of products with a single click. You can enhance this feature by adding a visually appealing cover image for each bundle, spotlighting your brand's unique qualities. Adding the option for special discounts on these sets not only encourages higher order values but also boosts overall sales. Both you and your customers benefit from this approach, making it an effective strategy for improving sales and building brand loyalty.
Usage path:
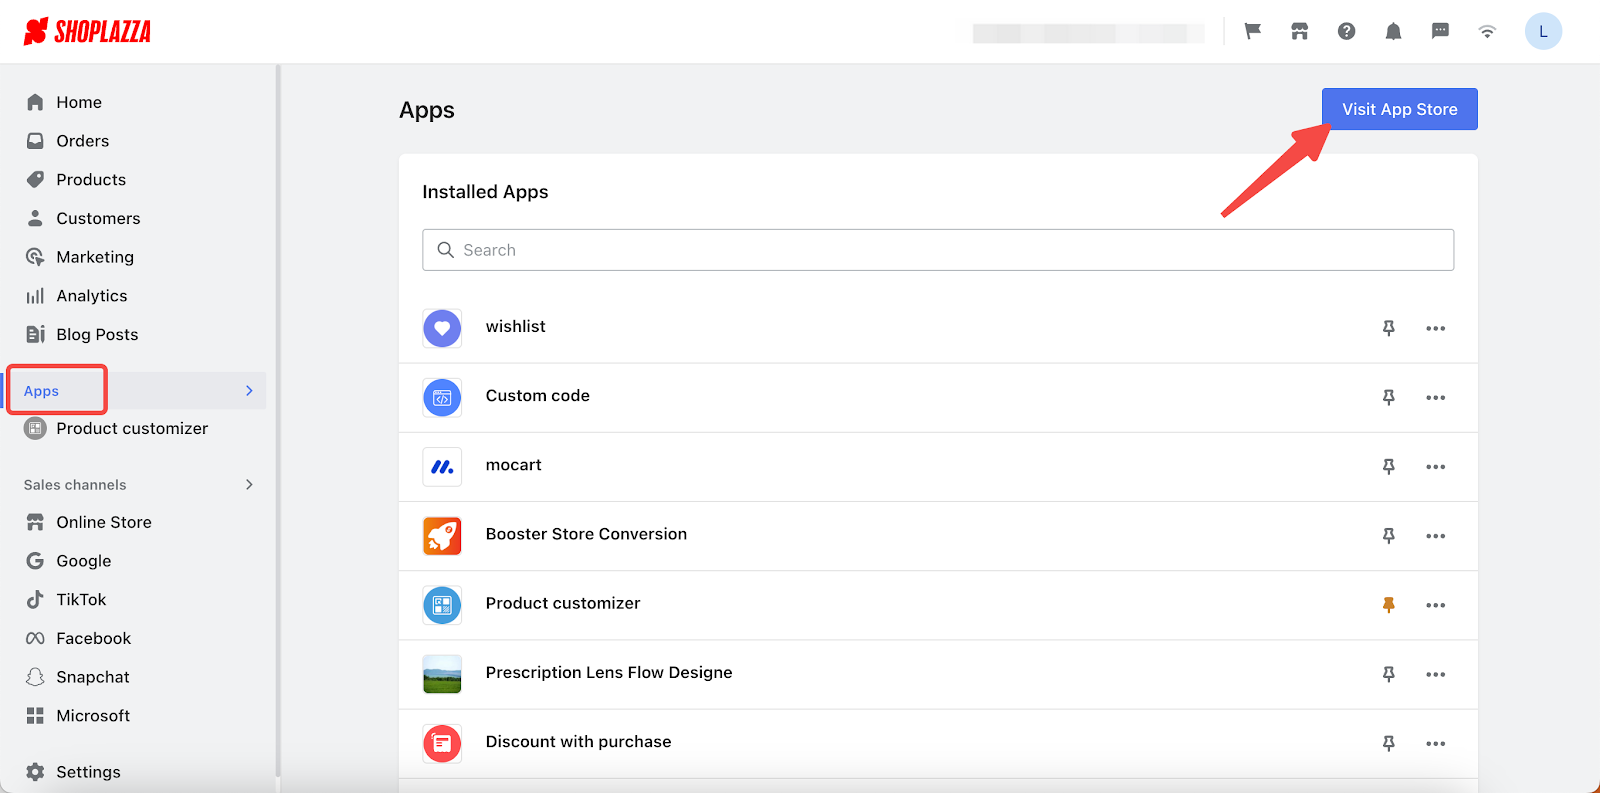
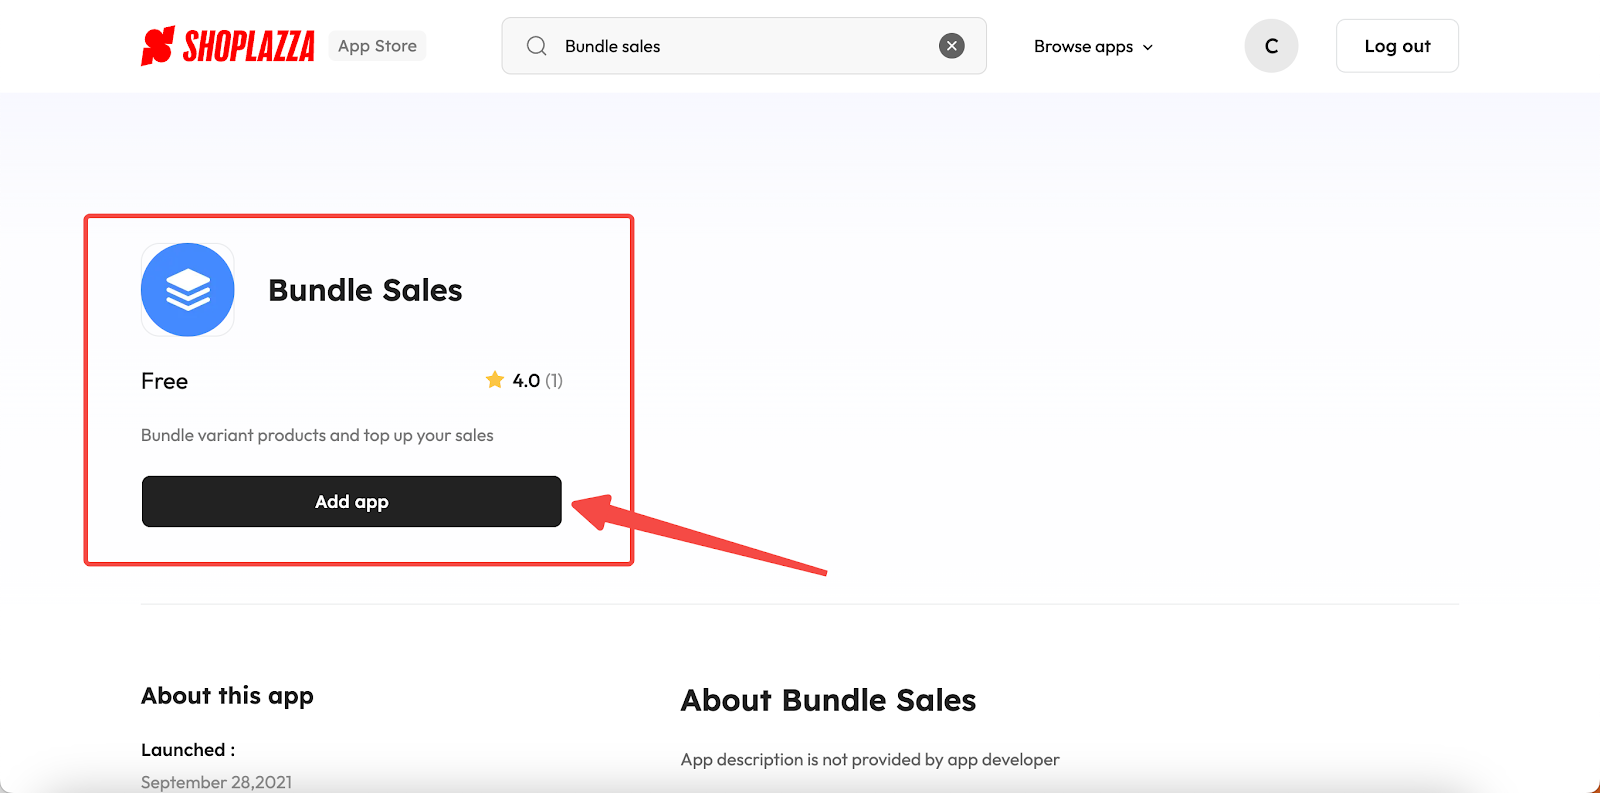
1. Navigate to your Shoplazza admin > Apps > Visit App Store. Search for the app Bundle sales then add it to your store.
2. Click on Shop the look in the app.

Feature overview:
3.1 Creating a new campaign
1. Click Create campaign.

2. Customize your campaign using the split-screen interface: the left side is for editing options, while the right side offers a live preview of the changes.
-
-
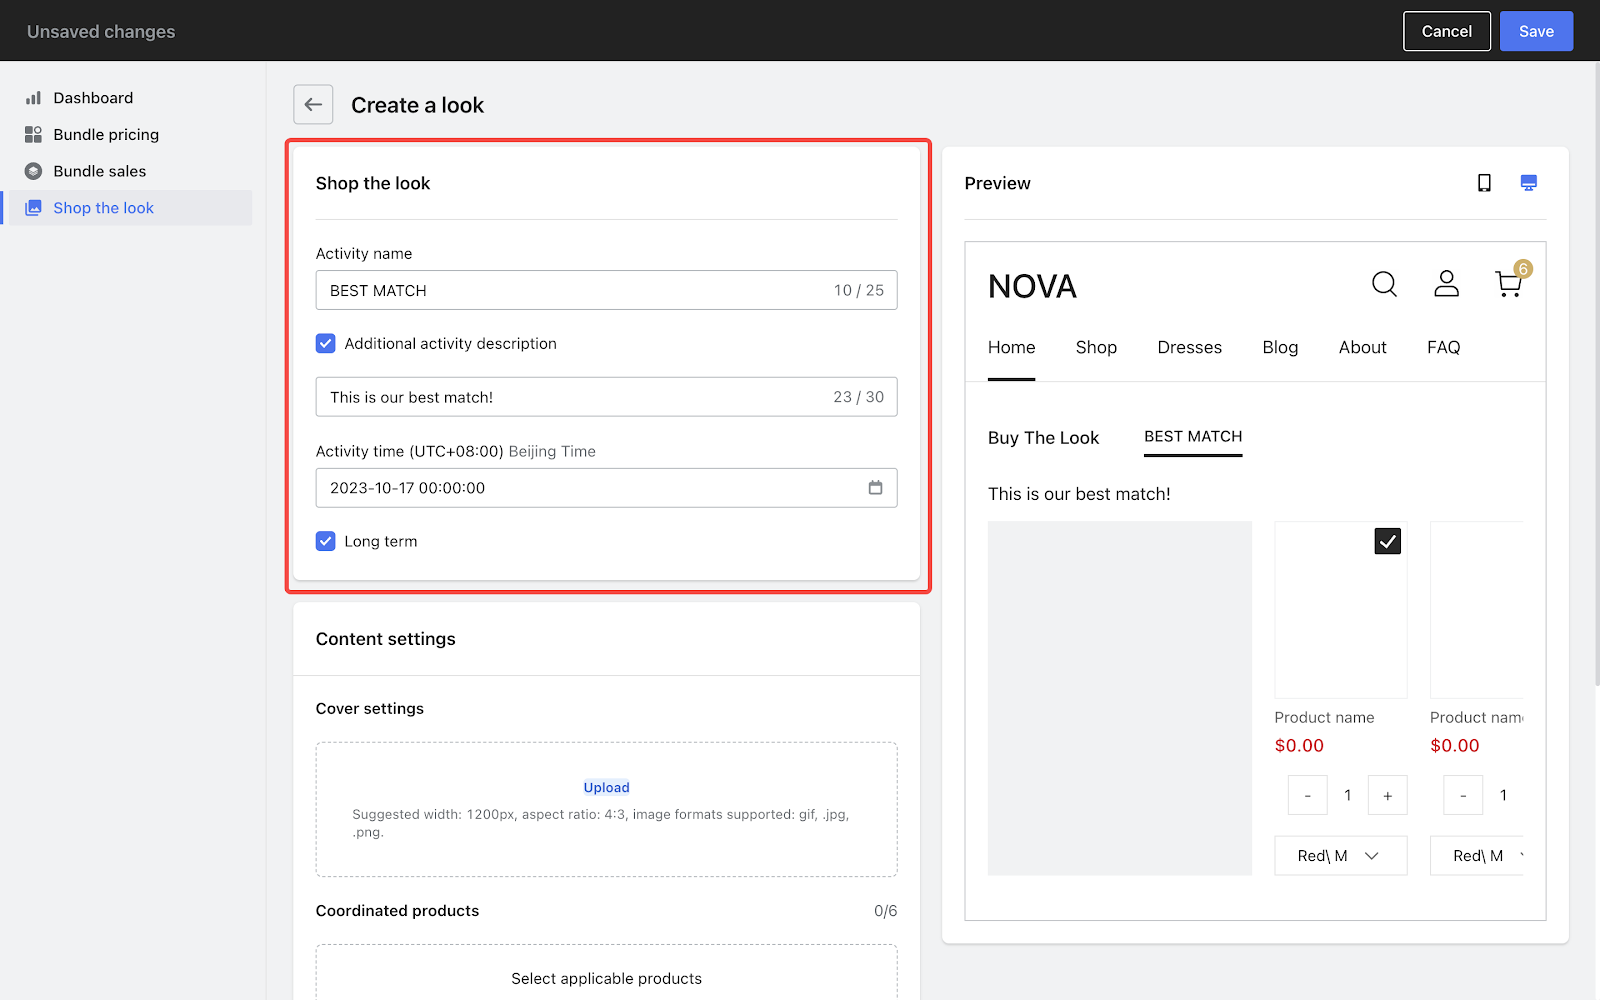
Shop the look (basic settings): Name the campaign, add description, and set its duration in this block.
- Activity name: Name of the campaign.
- Additional activity description: If you want to add any additional remarks to this campaign, check this part and fill in the text box below.
-
Activity time: Duration of the campaign. You can also select the Long term option to make the campaign remain valid all the time.
-
Shop the look (basic settings): Name the campaign, add description, and set its duration in this block.
-
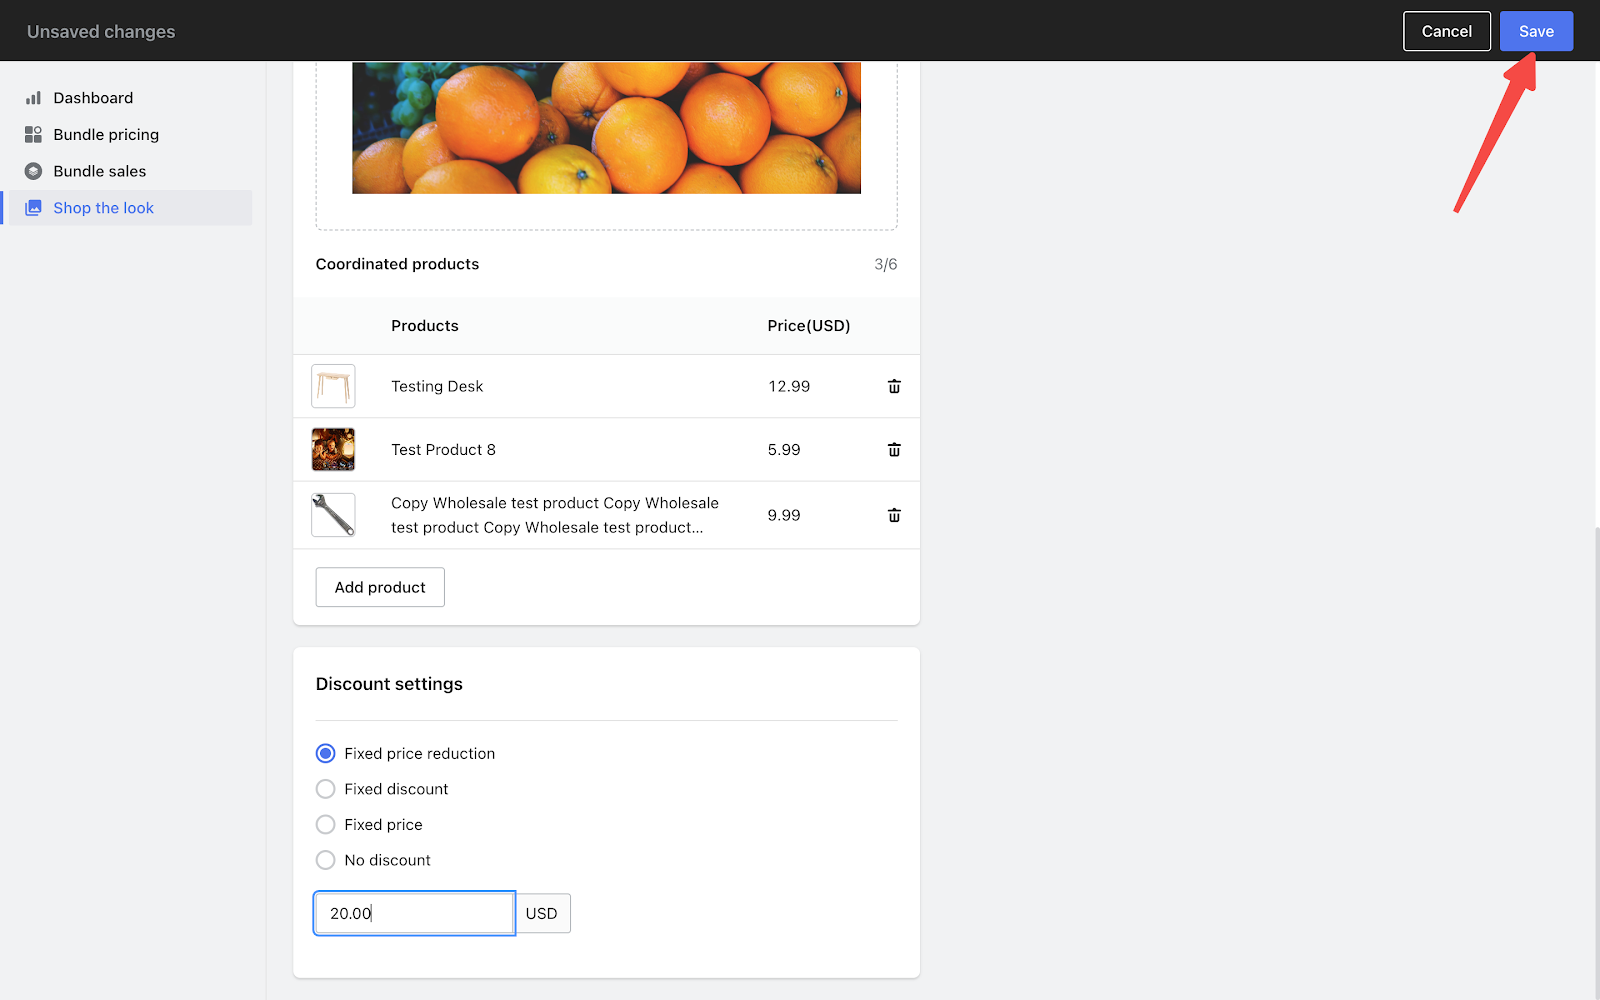
Content settings: You can set an image as the cover of this campaign and select products to be sold in a package.
- Cover settings: Upload an image for the campaign cover. Recommended dimensions are 1200 px, 4:3 ratio, and .gif, .jpg, or .png formats.
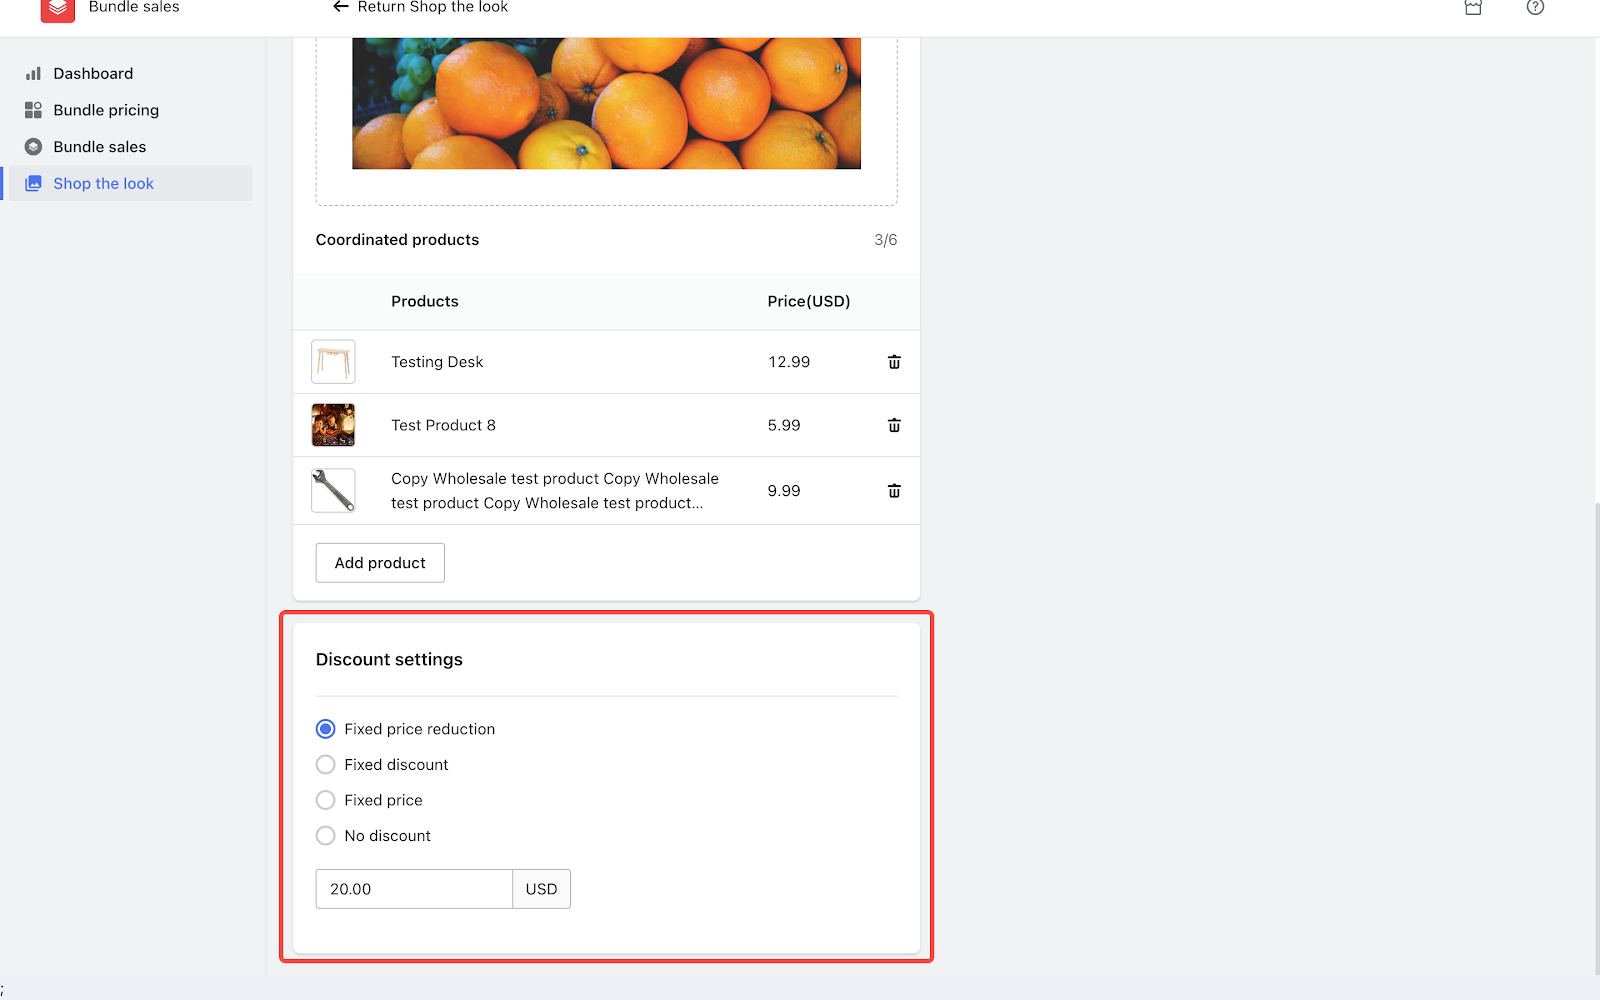
- Coordinated products: Click Choose product to add items to your bundle set. Up to 6 products can be included.

- Discount settings: You can set a discount for customers buying this set.
- Fixed price reduction: Reduce the total cost by a fixed dollar amount.
- Fixed discount: Reduce the total price by a specified percentage.
- Fixed price: Offer the bundle at a fixed price.
-
No discount: Items included in this set are all sold at their regular prices.
3. Click Save to complete your settings.
3.2 Integrating campaigns into your store theme
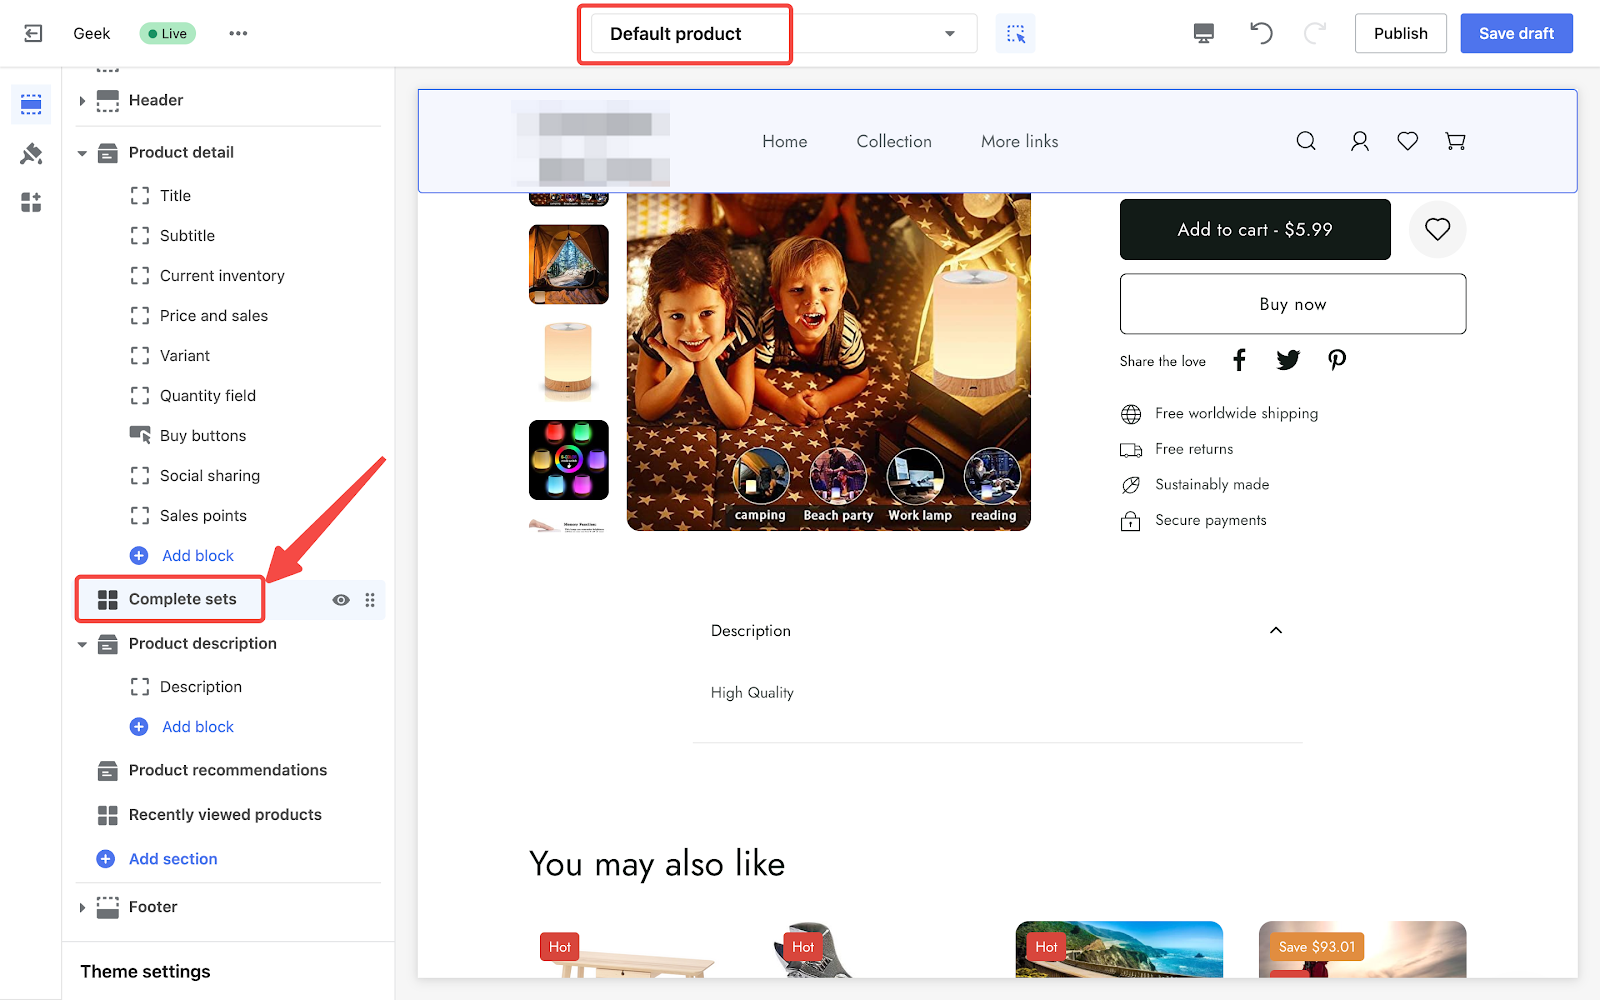
- Theme Integration: After you've successfully created a new campaign, the "Complete Sets" section is automatically integrated into your Default Product page. This saves you a step and enhances your customer's shopping experience right away.
- Customize Further: Should you wish to feature this section on other pages of your store, a one-time popup will appear immediately after you set up the campaign. Click on Theme Decoration to manually add the "Complete sets" section to your chosen pages. If you close or miss this popup, you'll have to head over to your theme editor to make this modification manually.
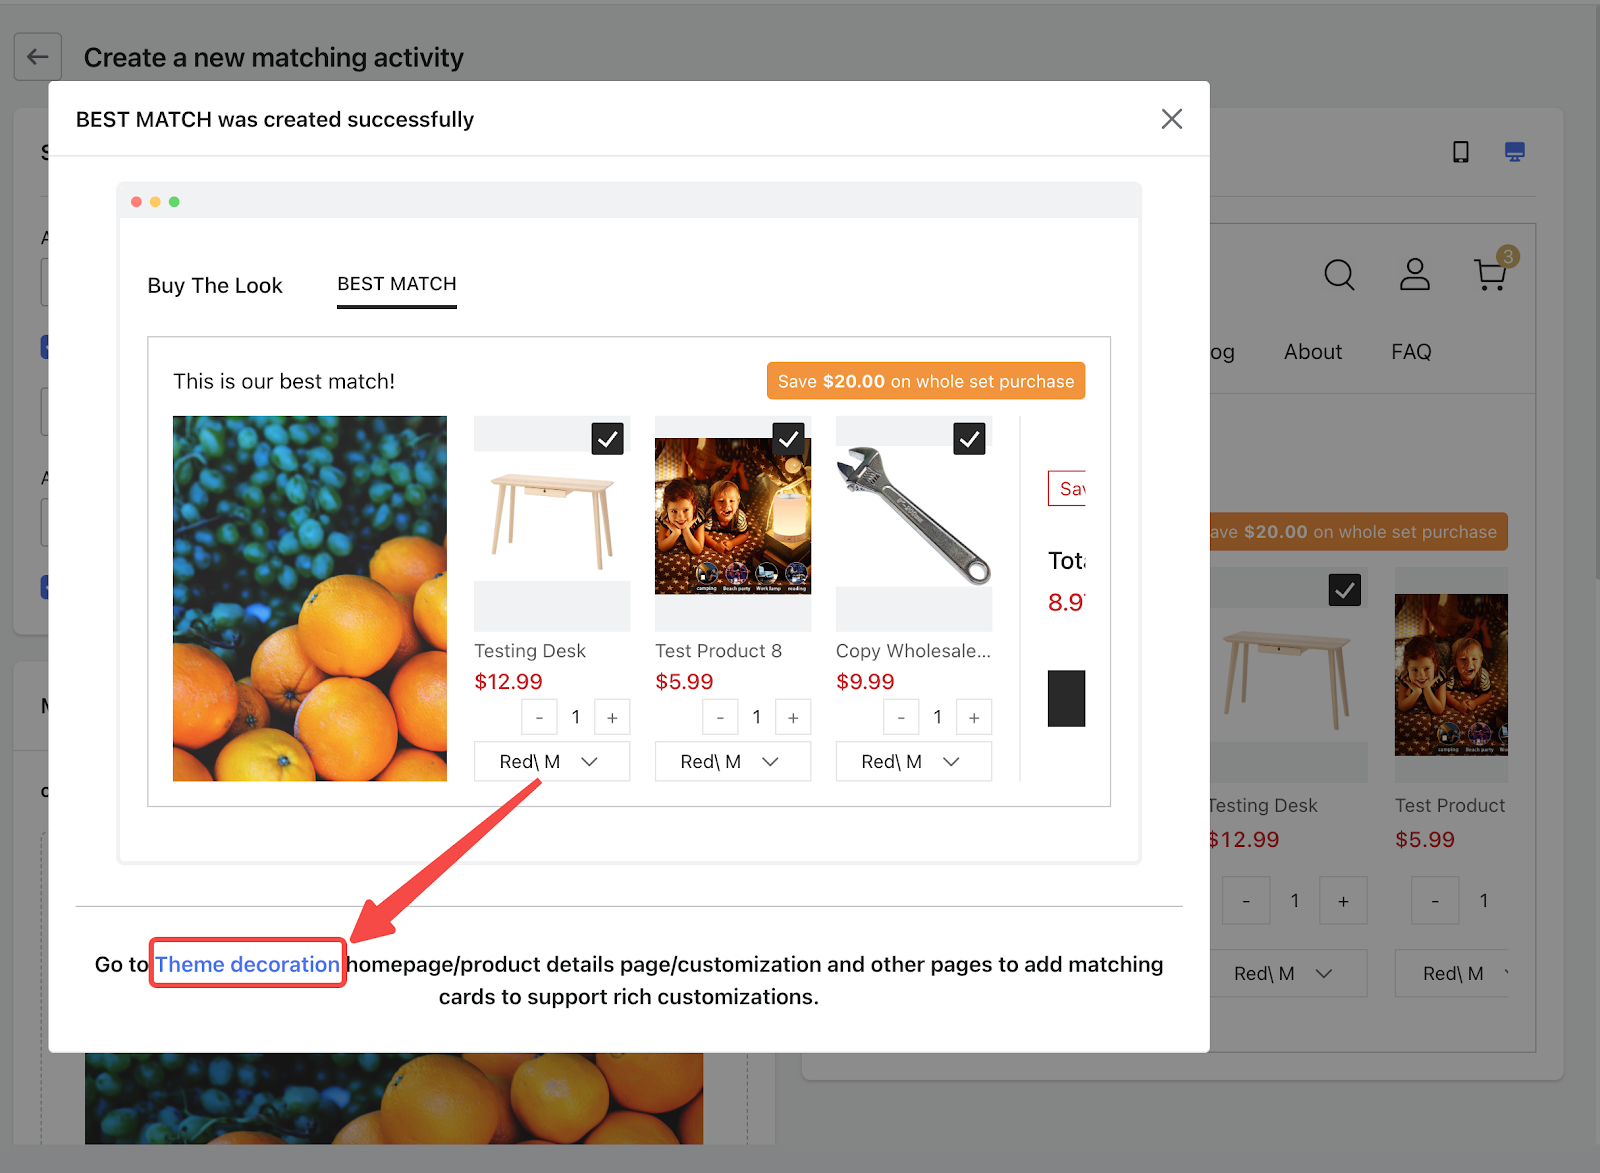
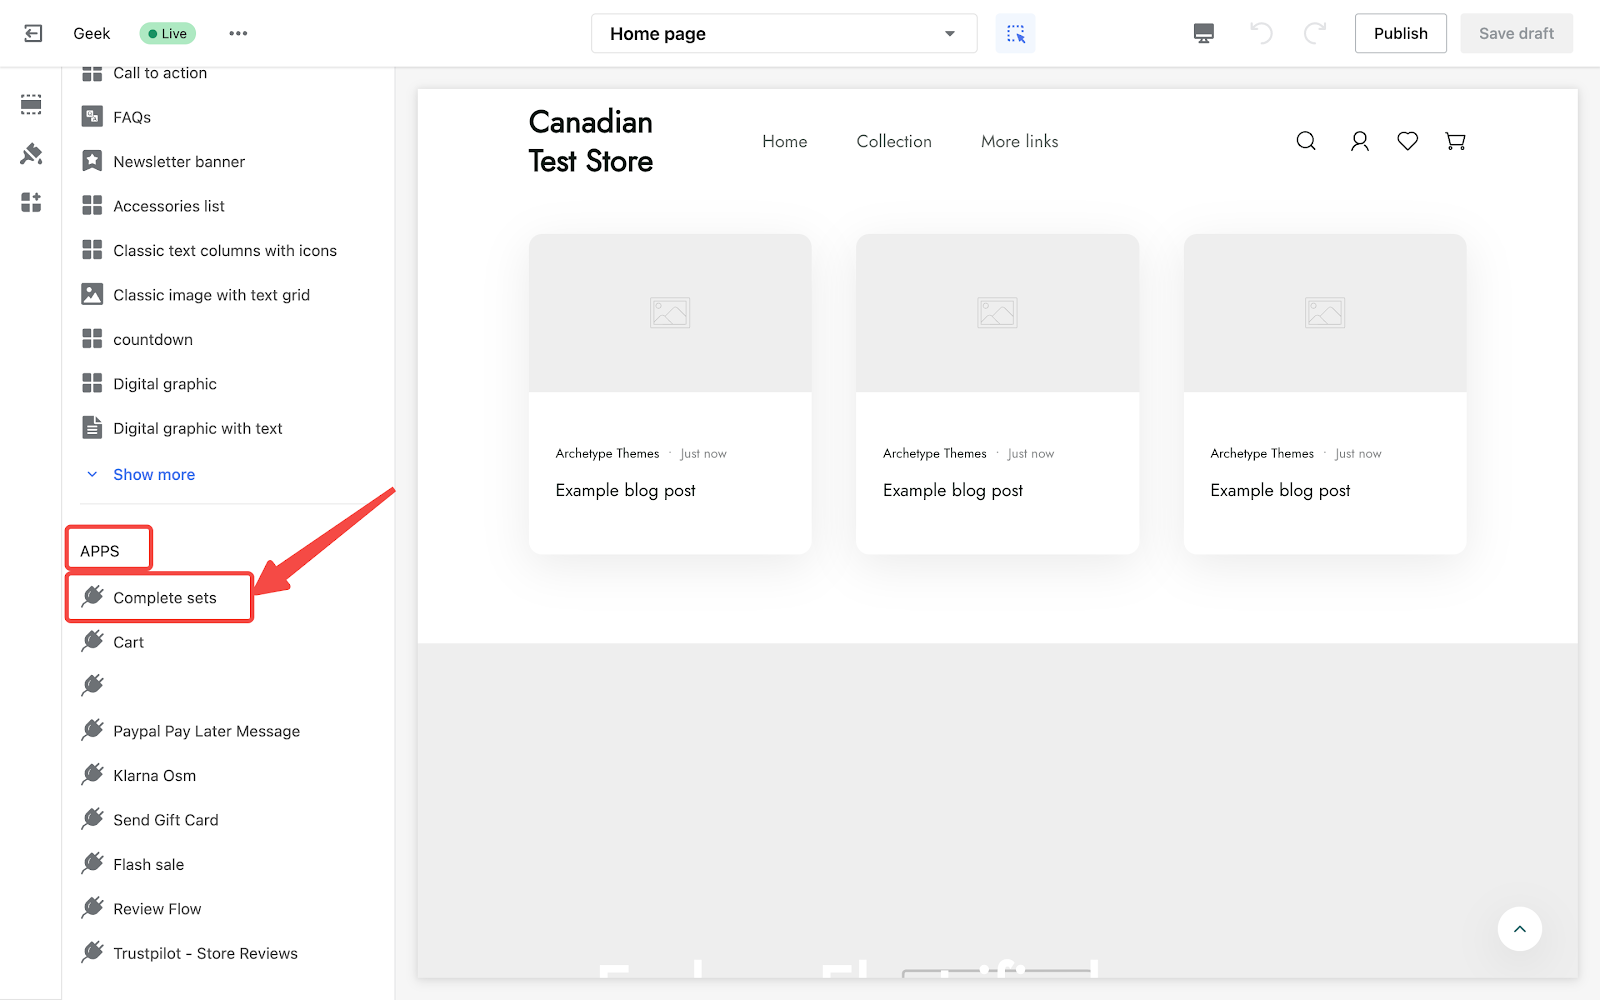
- If you close or miss this popup, head over to your theme editor. Simply select corresponding page in the dropdown at top of the theme decoration page.
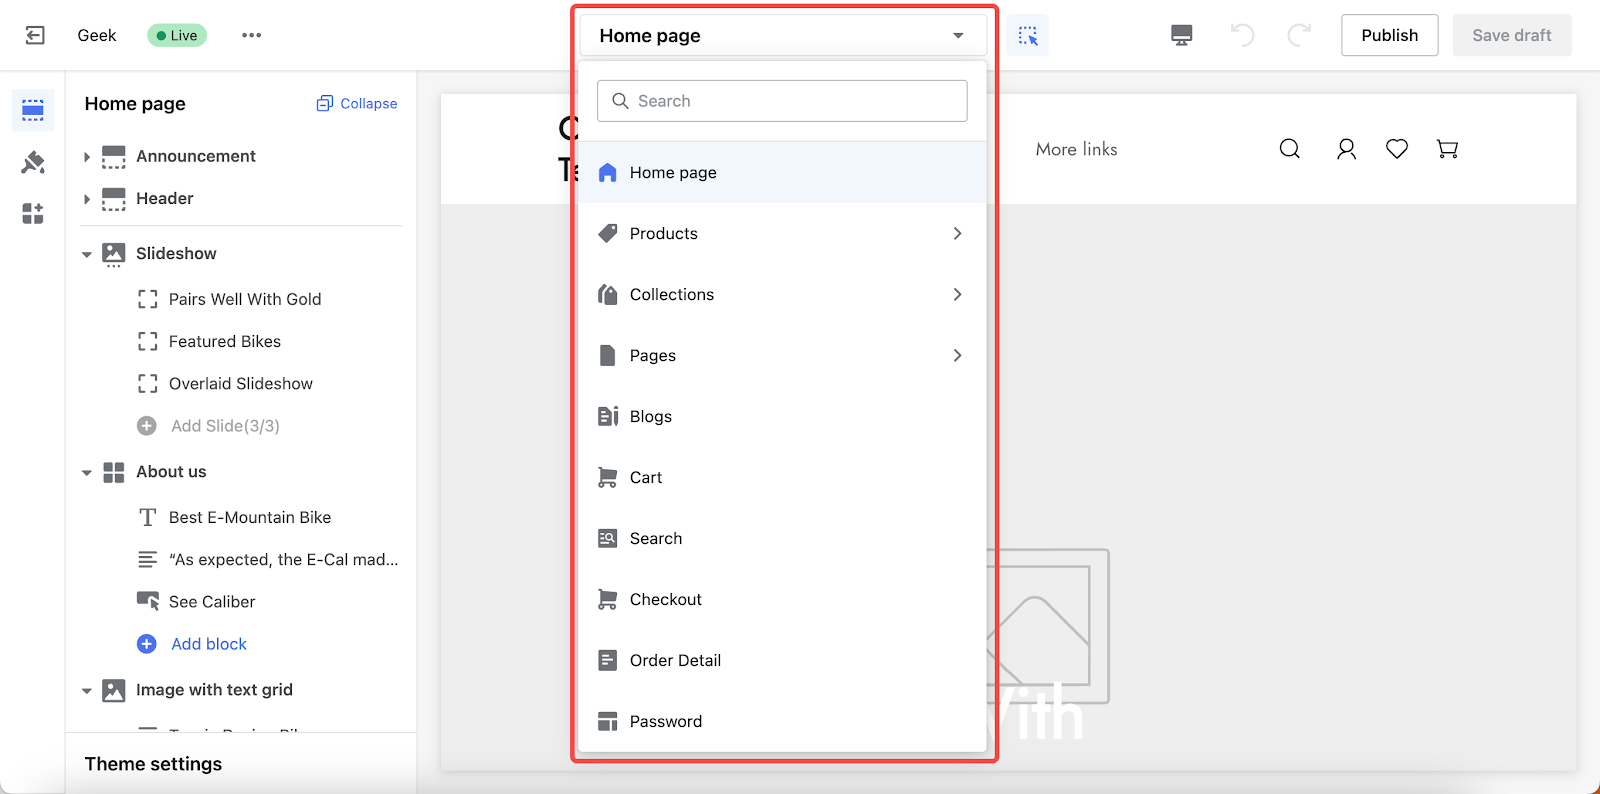
- Click Add section.

- Scroll down to find the Complete sets section under APPS. Then, click to add it to the page.
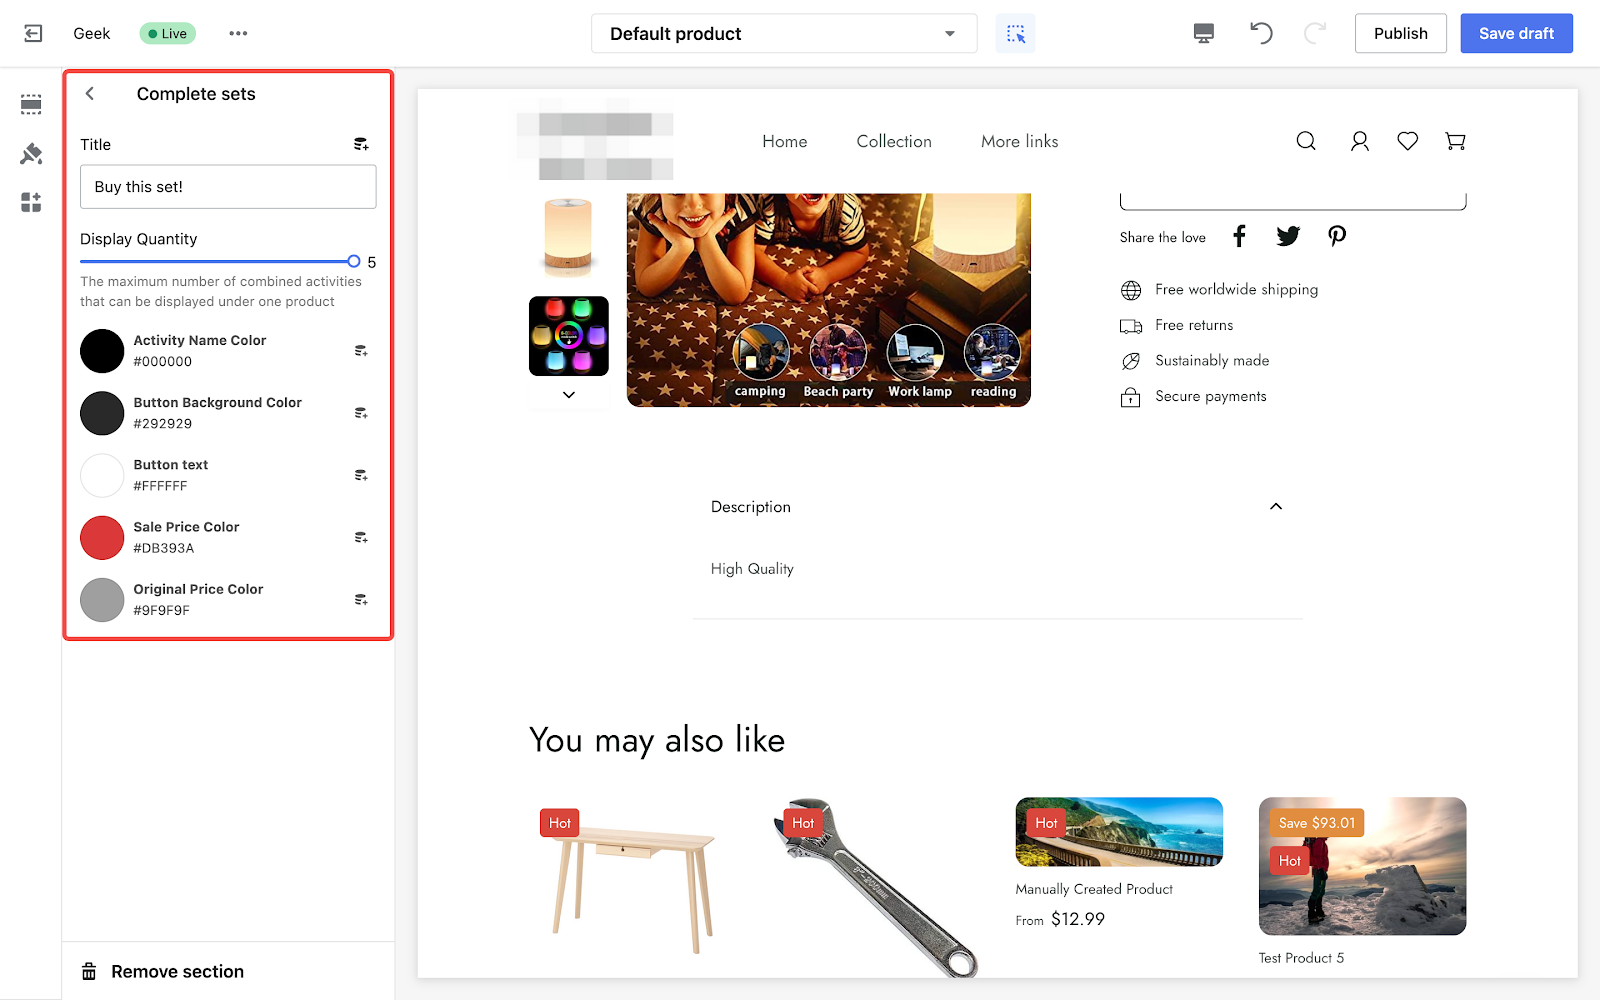
- Refining the display: Inside your theme editor, you can customize the "Complete sets" section by clicking on the title. Options include changing the title, adjusting the number of items displayed, and altering text colors to better match your store's theme.
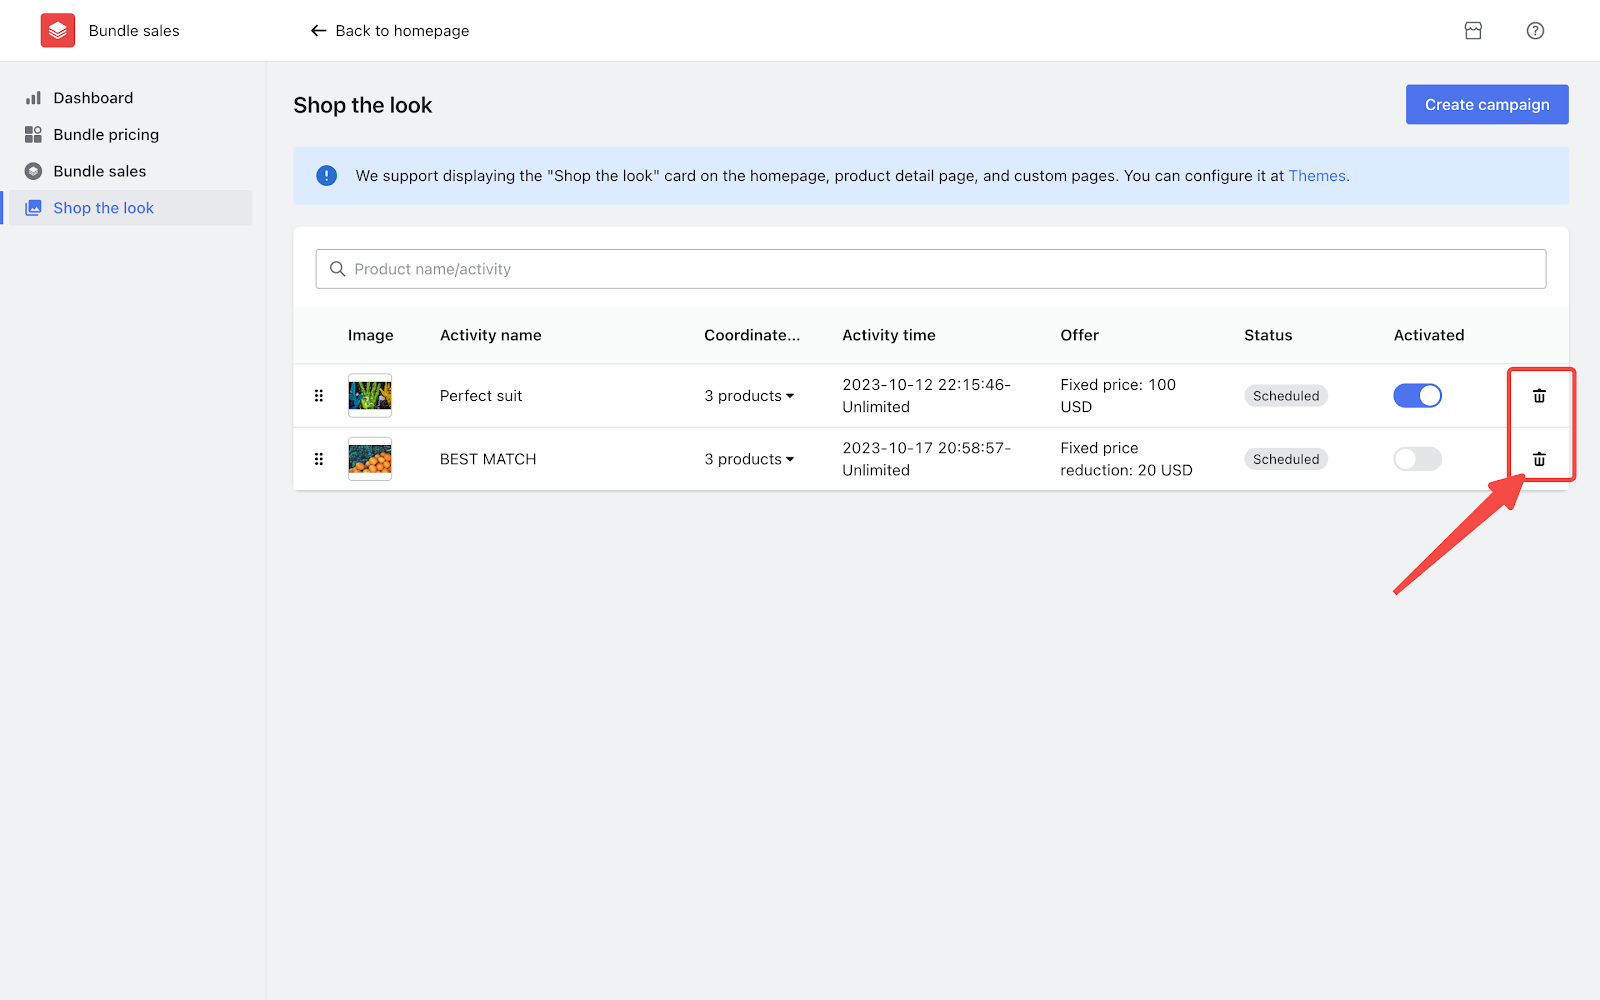
3.3 Managing your campaigns
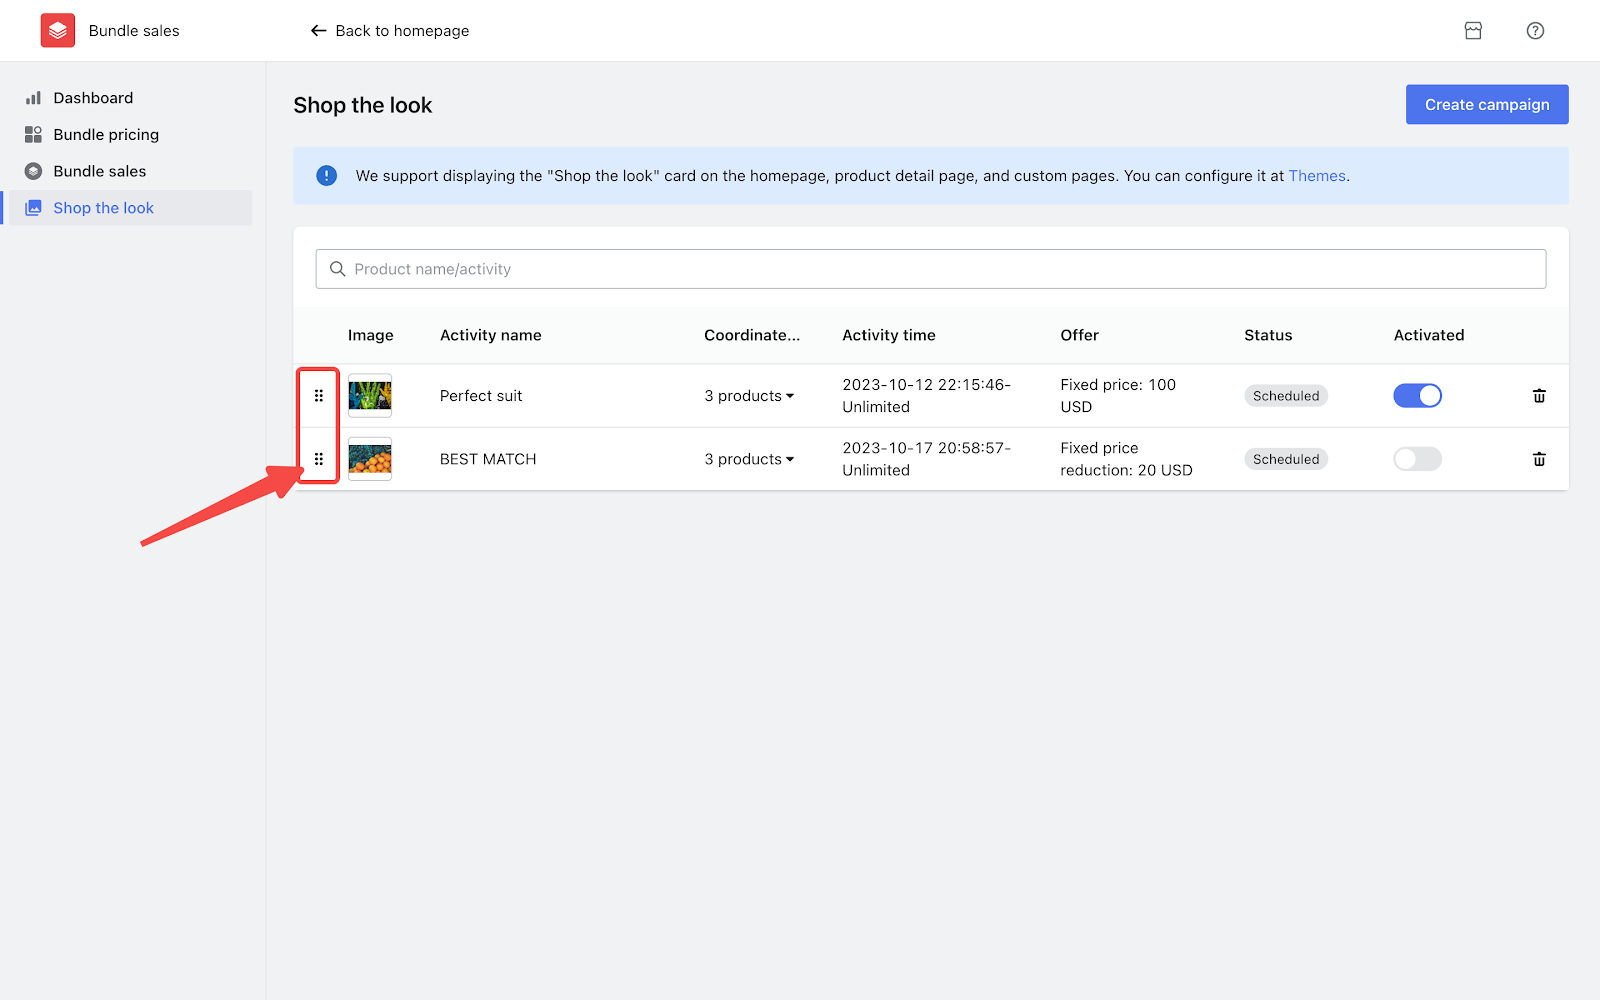
Your campaigns can be managed from the Shop the look section in the app.
- Click and drag the drop icon to reorganize the campaigns.
- Activate or deactivate a campaign. Deactivated campaigns will not be visible to customers.
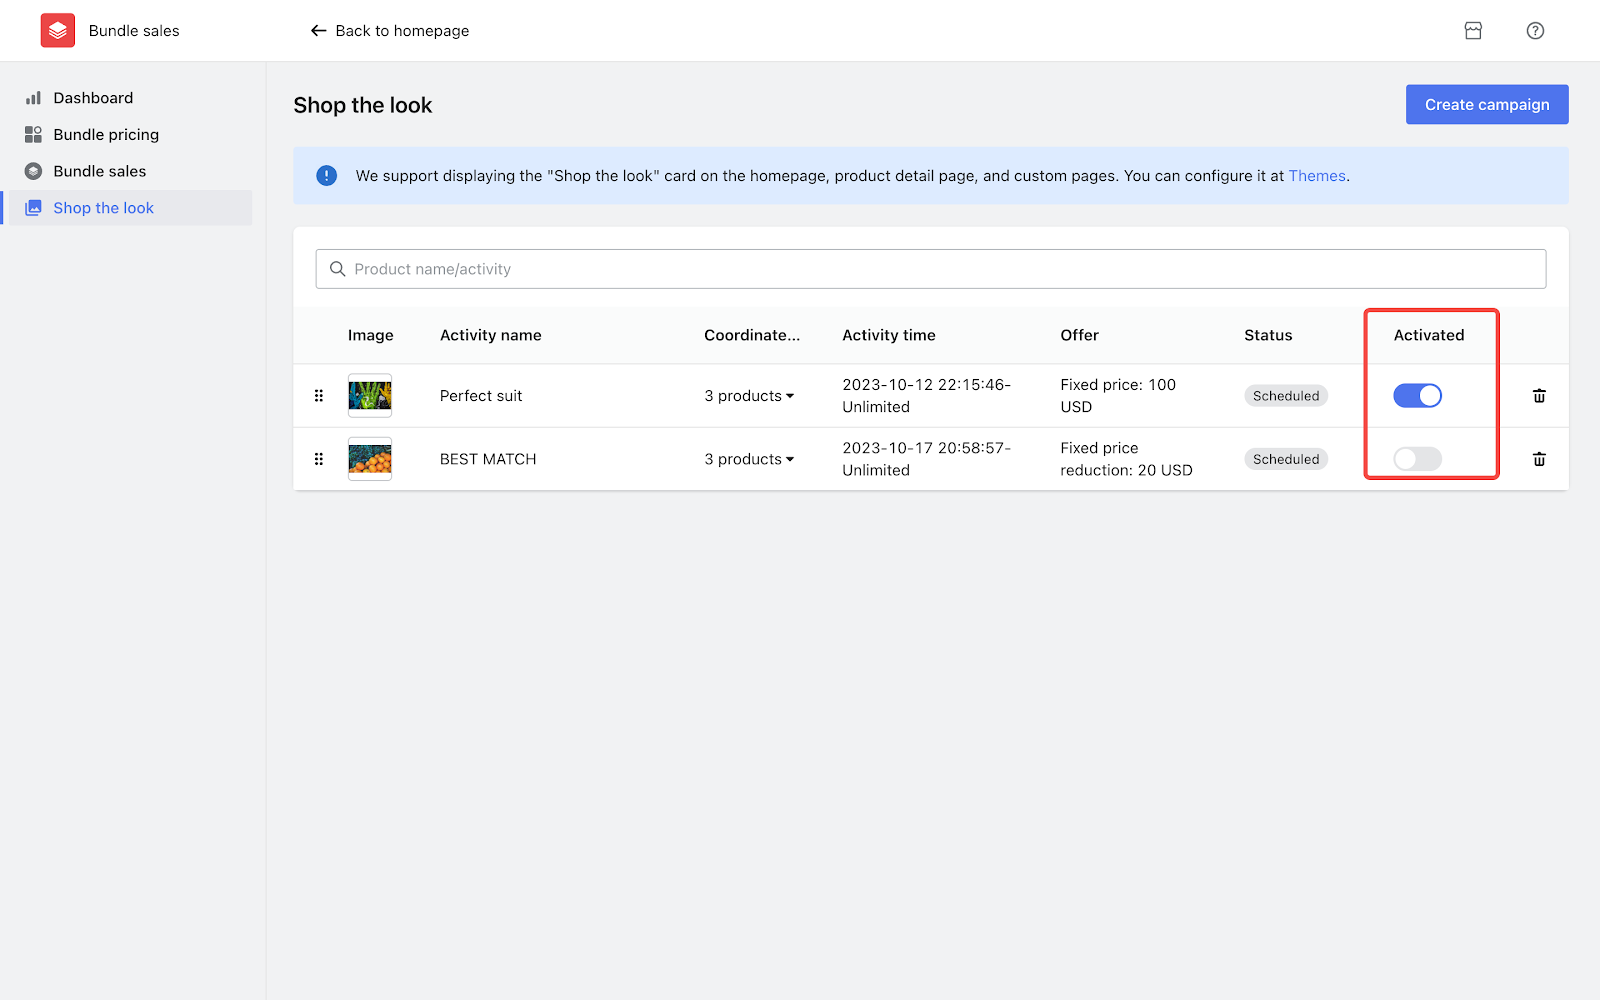
- Click on the trash can icon to delete a campaign. Please note that deleted campaigns can not be restored.
4. Updated feature: Add to Cart Animator- in Booster & Store Conversion App
Usage scenarios:
As a business owner, you can now add some animations to the Add to Cart button on your product page. This helps grab the attention of your customers and reminds them to add items to their cart, ultimately boosting conversions.
Usage path:
- Navigate to your Shoplazza admin > Apps > Visit App Store, search the app name Booster & Store Conversion then add it to your store.
- Switch over to Add to Cart Animator and you can configure your settings.

Feature overview:
- Click on the toggle switch button to enable / disable animation effect.
- Customize the interval time for the animation playback, which ranges from 5 to 20 seconds. The default interval is set to 5 seconds.
- Configure the number of times the animation loops. By default, it is set to infinite loop, but you can set it to loop between 1 and 1000 times.
- There are three animation styles to choose from: Swing, Shrink, and Elasticity. Preview the animation effect on the right-hand preview page after selecting an animation style.

Note
The OnePage theme does not support the use of the button animation, but it can be used with other themes.
5. Update: Data metrics in Wishlist app
Usage scenarios:
Unlock insights about your online store through the Wishlist App's new Data Dashboard feature. This guide walks you through the essential metrics in both the Overview Dashboard and the more specific Wishlist Product and Customer Data Dashboards.
Usage path:
Navigate to your Shoplazza admin > Apps > Visit App Store. Search for the app Wishlist then add it to your store.
Feature overview:
5.1 Overview dashboard
The Overview Dashboard provides a snapshot of key metrics such as revenue, orders, number of favorites, wishlist products, and customer data.
- Basic metrics
| Feature | Description |
| Revenue | Total net sales of items converted from wishlist to orders today. |
| Orders | Total orders converted from wishlist today. |
| Number of Favorites | Total number of times items have been added to the wishlist today. |
| Wishlist Products | Number of products that have been on the wishlist within the selected time range. |
| Customers | Number of customers who have added items to their wishlist today. |

Note
In the Wishlist Funnel section, this helps you understand the flow from wishlist to cart and finally to order.
5.2 Wishlist Funnel Metrics in the overview dashboard
| Feature | Description | What the Numbers and Percentages Mean |
| Wishlist Funnel | Number of items from wishlist to order within selected time range divided by Number of items that have been in the wishlist today. | This equation calculates the conversion rate. It tells you how many items on wishlists actually ended up being bought, relative to how many were added to wishlists today. |
| Wishlist Products | Number of products that have been in the wishlist within the selected time range. | The numerical value shows the count of unique products added to wishlists. The percentage indicates what proportion of your total product catalog has been added to wishlists within the selected time frame. |
| Cart Products | Number of items moved from the wishlist to the shopping cart within the selected time range. | The numerical value is the count of items that have gone from the wishlist to the shopping cart. The percentage shows what share of the items originally wishlisted made it to the cart stage within the selected time range. |
| Order Products | Number of items converted from wishlist to orders within the selected time range. Includes items that moved from wishlist to cart and were ordered within 6 hours, as well as those directly ordered from the wishlist. | This is represented only as a numerical value, showing the total number of items that completed the journey from wishlist to order. No percentage is given for this metric. |

5.3 Wishlist Product Data Dashboard
In this section, you’ll see various data points focused on individual products in your store. The metrics are based on the time range you select at the top of the dashboard.
- Product Name: The name of the product.
- Status: Indicates whether the product is available or out of stock.
- Favourites: This is the total number of times the product has appeared on customers’ wishlists during the selected time range.
- Conversion Rate: This metric is calculated by taking the number of orders that include the product from the wishlist and dividing it by the total number of times the product was favorited. It helps you gauge how effective the wishlist is at driving sales for this specific product.
- Price: The current price of the product.
- SPU: Stock Keeping Unit for the product, used for inventory purposes.

5.4 Customers Data Dashboard
This dashboard focuses on customer-specific data and metrics, also based on your selected time range.
- Contact Information: Basic contact details of the customer.
- Customer Name: The name of the customer.
- Wishlist Count: This is the total number of unique products that the customer has added to their wishlist.
- Conversion Rate: Similar to the product data dashboard, this rate is the number of wishlist items that were purchased by the customer divided by the total number of products they favorited.
- Amount Spent: This reflects the total value of products that the customer ordered from their wishlist.
- Action (View Favorited Products): This provides a list of all the products that the customer has added to their wishlist during the selected time range.

Note
The statistics provided are based on customers who have logged in and added products to their favorites. Customers who are not logged in or have not registered are not included in the data.
6. Updated: Product customizer
We've made improvements to the Product Customizer, focusing on enhancing your customization process and better supporting multiple markets. These updates are designed to improve the user experience.
Usage path:
Navigate to your Shoplazza admin > Apps > Product customizer.

6.1 Supporting multiple markets
Usage scenarios:
If you've configured different currencies for various markets, the price of customized products will automatically adjust based on your customers' IP addresses and their respective markets. For instance, a product priced at 1 US dollar in the Chinese market will display as 7.4 yuan.
6.2 Enhanced product selection process
Usage scenarios:
You no longer need to create a collection before selecting customized products. Instead, you can directly select target products.
Feature overview:
1. Click Customize product within the app to open the pop-up window for selecting products.

2. In the pop up window, you can proceed with the following actions:
- Searching for a specific product by its name or SPU.
- Selecting certain collection as the search scope.
- Viewing the image, name, status and SPU of the selected products.

6.3 Support for multiple customer-uploaded image styles
Usage scenarios:
The images uploaded by consumers can be cut into multiple shapes to meet their diverse personalized customization needs.


6.4 Customizing position and printing area for attributes
Usage scenarios:
When adding Swatch/Text/Image Upload options in the app, you may need to adjust the size or location of certain attributes. With our latest update, it's now much easier to customize these attributes, saving you from repetitive tasks.
Usage path:
Click Customize product within the app to open the pop-up window and select your target products.
Feature overview:
Take the swatch option as an example:
1. When you change the position or size of an attribute, the Cancel and Confirm buttons will appear in the preview section. Simply click Confirm when you've finished customizing.

2. Next, a pop-up window will appear, allowing you to set how these changes apply. Choose whether they should affect only the current property value or all attribute values. This simplifies the customization process, making it more straightforward.

6.5 Support for uploading fonts
Usage scenarios:
You can upload your specialized fonts to better showcase the brand style and uniqueness of the product.
Usage path:
- After selecting a customized product, add a Text option and scroll down the page to activate "Preview custom effects". Then, click Upload Font.
- Only ttf format fonts of no more than 20M are supported. When you add a new font, it will be added to the dropdown and saved in your store admin.


7. New feature: Shoplazza now supports adding Iraqi currency
Usage scenarios:
When you're expanding the Iraqi market, it's a good idea to display your product prices in the local currency. This approach is more aligned with the local customs and will make it easier for you to relate to the people there.
Usage path:
- Navigate to your Shoplazza admin > Settings > General settings, select IQD as your store currency.

- Navigate to your Shoplazza admin > Settings > Markets, select IQD as the currency in other markets.

- Basic information about currency:
| Currency code | Currency name | Countries and regions that use this currency | Symbol | Common denominations |
| IQD | Iraqi Dina | Iraq(IQ) | د.ع | 25 |
Note
Iraqi currency only supports Cash on Delivery (COD) as the payment method. If you have set Iraqi currency, please ensure that you enable COD in your payment method.
8. Updated feature: Card advanced settings - Smart retry
Usage scenarios:
Smart Retry enhances your payment experience by automatically re-attempting unsuccessful card transactions. Activating this feature reduces interruptions in the payment process and increases the likelihood of successful transactions. Once Smart Retry is enabled, the system takes over in case of a payment failure. It assesses whether a retry is appropriate and selects the most suitable channel for it. Your customers won't need to take any extra steps, and they won't be aware that a retry has taken place.
Usage path:
- Navigate to your Shoplazza admin > Settings > Payments, click on Card Advanced Settings.
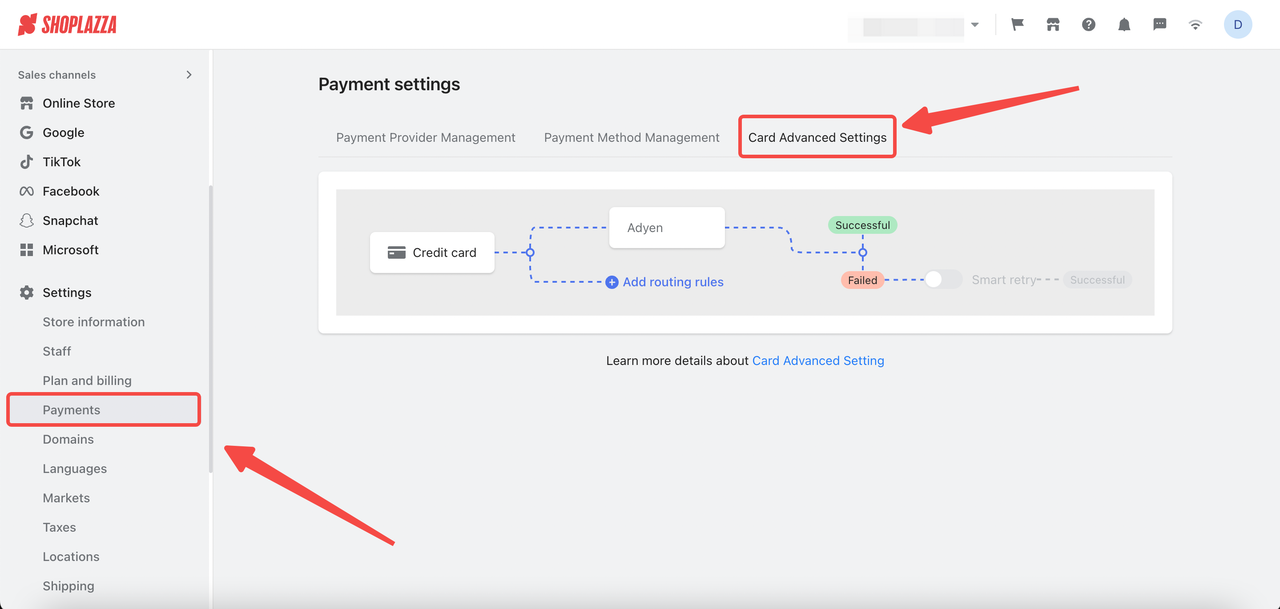
Feature overview:
- Before activating Smart Retry, ensure you have at least two payment methods that support this function.
- Ensure you have a retry provider that's currently available.
Note
In order to enable the Smart Retry feature, you'll need to connect at least one of the following payment channels on the dashboard:
Shoplazza Payments, Oceanpayment, Airwallex, Payoneer, Worldpay, PhotonPay, Asiabill, Pacypay, or Useepay.
-
Activating Smart retry
- Enable Smart retry: To activate, click the Smart retry button on the Card Advanced Settings page.

-
- Add Providers: After activation, if you wish to add more providers, click the Edit button in the pop-up window.


9. Updated: Aligning shipping country with market currency for COD orders
Usage scenarios:
When fulfilling COD orders, there may be a problem that the payout currency of the order is different with the currency received. This update has optimized the shipping address filling rules at checkout. After the update, customers can only select the targeting countries of your preset market when filling in the shipping country. This ensures that logistics providers can successfully receive the payment and complete orders. Here is an example:
You have set up a US market with the currency being USD. When a customer selects Mexico as the country of receipt and chooses to pay with COD (Cash on Delivery), the logistics provider may not be able to get paid in US dollars in Mexico, resulting in a failed delivery.
Usage path:
From your Shoplazza Admin, go to Settings > Markets, click Manage of the target market, find the Shipping block and click Manage for editing.


Feature overview:
By default, the feature is not enabled.
- Enabling the feature: customers can only fill in the countries included in the preset market of your store at checkout.
- Disabling the feature: customers can fill in all the countries covered by all shipping profiles of your store at checkout.
You can view shipping profiles relevant to the countries where your products are available for sale. If no shipping profiles have been set up for those countries, a message will appear to notify you.

10. Updated: Separate tax rates for provinces in Canada
Usage scenarios:
Different provinces in Canada have their own tax policies. To make it easier for you to comply with these rules, we've rolled out an update. Now you can set tax rates for each Canadian province.
Usage path:
Navigate to your Shoplazza Admin > Settings > Taxes. From here, you can either manage your existing base tax profile or create a new tax override profile.

Feature overview:
For details on setting up tax profiles for Canada, see Tax settings for Canada.
10.1 Setting up Base tax profile
1. Click Manage profile.

2. Search for Canada in the search bar and click the pencil icon to edit the profile.

3. Enter the tax rate for each Canadian province. Then, click Save to complete your settings.

10.2 Setting up a Tax override profile
1. Click Create profile to set up a new profile especially for Canada. If you have already created one, click Manage profile.

2. After selecting target products, click Select zones.

3. Search for Canada, then select all the regions on the right side and click Confirm.

4. Click the arrow icon to reveal the list of provinces and edit the sales tax rate. Then, click Save to complete your settings.

Note
If you have previously set up a tax profile for Canada, you need to save it again for this feature to take effect. If not, the system will default to the previous configuration.
11. Updated feature: Customize your local delivery area with radius settings
Usage scenarios:
Across the globe, there are some vast and sparsely populated areas, where a single ZIP code / postal code can cover a large geographic region. This can sometimes lead to issues where your actual location may be outside the delivery range of a business. To address this, we have implemented an optimized solution. You can now set a delivery point as your starting point and define a radius to designate your delivery area. This way, no matter how large the ZIP code coverage is, you can ensure that you are within the delivery range.
Usage path:
- Setting up delivery starting point: Navigate to your Shoplazza admin > Settings > Locations, click on Add location.
- Setting up delivery radius: Navigate to your Shoplazza admin > Settings > Shipping > Local delivery, chooose the location you need to set up.
Feature overview:
Setting delivery starting point
- When setting up a location, you can add a delivery point as the starting point. It is recommended to use Find address to add on map to ensure the location has clear coordinates and enable better configuration of the delivery radius.

Setting up delivery radius
- You can only select and activate one delivery range method.
- If your location lacks exact coordinates, the option to set a delivery radius will be unavailable. A notification will appear that reads, "The location cannot determine latitude and longitude; please provide a valid address using Map location."
- The unit for the delivery radius range can be switched between kilometers and miles.
- Enter a radius distance ranging from 0 to 160 kilometers or 0 to 100 miles.
- Set different delivery fees based on different radius ranges, which expands the delivery area for your location. Each range must have a greater radius value than the previous range. For example, if you set the delivery fee for a radius of 5 km to be $3, you could set the fee for a 10 km radius to be $5. Just remember, each subsequent radius must be greater than the previous one.

Note
When customers reach checkout, delivery points that meet these conditions will be highlighted:
- Accurate Address: The location has been pinpointed accurately, reducing the chance of delivery errors.
- Enough Inventory: The location has a sufficient stock of the items in the customer's cart, minimizing delays.
- Low Delivery Fees: The location offers competitive or lower delivery fees, making it a cost-effective choice for the customer.
- Nearby Location: The location is closer to the customer's address, potentially resulting in quicker delivery.
12. Updated: Optimized shipping address settings
Usage scenarios:
Previously, you could only set a general shipping fee for an entire country and the address dropdown was only in English. Now, you can set shipping fees by state or province. When your customers fill in either postal codes or addresses, the system auto-fills the missing information for either or. Customers can also view checkout addresses in languages other than English.
Usage path:
For all new features, updates will automatically apply. To set state or province-specific shipping fees, go to your Shoplazza Admin > Settings > Shipping, choose the Shipping plan and click the pencil icon to edit your profile.
Feature overview:
- Address autocomplete
When customers fill out their shipping addresses, the system can provide continuous suggestions for the detailed address they may want to fill in. For example, when they input the postcode, the system will autocomplete the corresponding state/province and city; and when they input the state/provice and city, the system will autocomplete the corresponding postcode.
- Address correction
The system checks and corrects the postal code and verifies the related location details.
Note
Address correction is enabled automatically when you set up your checkout zipcode feature. For details about setting up checkout zipcode, see Setting up checkout zip code.
- Multi-language address base
Customers can now see checkout addresses in different languages, depending on the store's language settings.
Note
Currently only the Arabic version addresses for Arab states of the Persian Gulf is available, while the languages for other countries' addresses remain English. There will be more languages added in future updates.
- Enhanced geographic information
We've updated our database with more details for countries like the U.S., Canada, and others.
Note
Only these countries' information will be updated this time: the United States, Brazil, Canada, Australia, Vietnam, Philippines, and South Korea.
- Customizable state and province shipping fees
For countries including Vietnam, Philippines, and South Korea, you can now set the shipping fee for each of their states/provinces.
13. Updated: Recommended local pickup tailored to customer preferences
Usage scenarios:
To make things easier, we've updated how our system suggests pickup locations. Now it will show either the closest location or the one a customer visits most often. This makes picking up orders more straightforward for your customers. For example, let's say a customer frequently orders from a pickup location near their office. With our updated system, this location will be highlighted as a suggestion when they're about to place a new order.
Usage path:
Navigate to your Shoplazza admin > Settings > Shipping, click on Local pickup. For more details on how to set up local pickup, please refer to the Local pickup.
Feature overview:
- On the Checkout page, the system will highlight the pickup location where the customer last collected an order. This makes it easy for customers to choose a familiar spot, enhancing their overall shopping experience.

14. Updated: Enhanced features at checkout
We've made some improvements to streamline your checkout experience. From adding a map for easier address selection to revamping how shipping addresses are presented, we’ve addressed various aspects to simplify the process. These new features can help customers complete the checkout more efficiently.
14.1 Map feature at checkout
Usage scenarios:
Customers often prefer a simpler way to enter their shipping addresses. Now they can just pick an address on a map directly.
Usage path:
This feature is only available for Pro Users. If you're on the Pro plan, just contact your key account manager (if available) or our customer service team to activate this feature.
Feature overview:
- The map at checkout helps customers fill in addresses more efficiently and accurately, encouraging them to place orders without hesitation.
- We offer three quick ways to capture a customer’s address:
- Using the location from the customer’s device.
- Clicking a spot on the map.
- Typing in an address search.
- The feature is currently available to Pro Users and in select Middle East countries: Saudi Arabia, United Arab Emirates, Kuwait, Qatar, Oman, and Bahrain. For additional needs, please get in touch with your key account manager (if available) or our customer service team.

14.2 Checkout address options based on delivery coverage
Usage scenarios:
Previously, customers would enter their addresses only to find out later that shipping wasn't available to their location. This could lead to a less than optimal experience and even abandoned carts. With the latest update, the system smartly aligns address options with your actual delivery areas, ensuring that customers see only viable shipping options.
Usage path:
This update is automatic, so the new features will appear without requiring any action from you.
Feature overview:
If your delivery coverage is limited, customers won't see options for places you can't ship to. This means no more confusion over.
14.3 Updated feature: Checkout Reminder to Fill in House / Apartment Number
Usage scenarios:
In order to improve the success rate of your deliveries, we recommend reminding customers to provide their apartment or room number when they check out. This will help ensure smooth logistics and accurate delivery.
Usage path:
- Navigate to your Shoplazza admin > Settings > Checkout, scroll down to Apartment/floor/room number section and click on the box to activate the reminder feature.

Feature overview:
- If you have enabled the Apartment/floor/room number Reminder feature, customers will be prompted to enter their apartment number based on the store's configuration requirements when filling out their address.
- If the store only requires the street address (Address 1), the apartment number should be entered in the street address input box.
- If the store requires the apartment number and unit number (Address 2), the house number should be entered in the apartment building and unit number input box. If the corresponding input box detects that the customer has not entered a house number, a reminder message will be displayed.

- Feature supported countries / regions: United States, United Kingdom, Canada, Australia, Germany, Mexico, France, Italy, Poland, Brazil, Spain, Czech Republic, Romania, Hungary, New Zealand, Argentina, South Africa
Note
This feature is just a reminder for customers to enter their apartment/house number. If they forget to enter it, don't worry, they can still submit the order without any issues.
14.4 Updated: Display of product image at checkout
Usage scenarios:
If you have a store that sells custom products or giftcards, you're probably familiar with how product images are displayed at checkout. Until now, these images were represented by a simple paperclip icon. The latest update changes that. Now, customers can see the actual images of the products they're buying right on the checkout page. This adds an extra layer of clarity and improves the overall shopping experience.
Usage path:
This update is automatic, requiring no action from you.
Feature overview:
The screenshot below showcases the comparison between the checkout page before and after the update:

15. Improved product price display on shopping cart and checkout page
Usage scenarios:
To make it easier for you to know about our special offers, we have added the discount information to your shopping cart and checkout page. This allows you to see at a glance which products have discounts or free gifts. You can now clearly see how much you are saving, which can encourage you to make more purchases with us.
Usage path:
- This update is automatic, so the new features will appear without requiring any action from you. Any promotional discounts for items in your cart or during checkout will be displayed automatically.
Feature overview:
- Free Gifts Highlighted: When a product comes with a free gift, it will be tagged with a Free gift label and displayed separately for easy recognition.


- Clearer Price Display: Products with discounts will show both the original and discounted price, with the original price struck through.

- Total Price in Cart: Your shopping cart will now show the total cost for each type of product, rather than the price per item. This gives you a quick snapshot of your overall spend.

16. New feature: Shipping Protection app
Usage scenarios:
The Shipping Protection service is a type of customer protection service provided by Seel . It aims at avoiding various problems that may occur during shipping process. This service can reduce the risk of loss, delay, or damage to goods caused by logistics or other reasons, thereby minimizing customer losses and ensuring customer satisfaction. It can also decrease the risk of shopping and enhance customers' trust in your store. In the event of a claim, the customer deals directly with a third-party insurance company that covers all compensation, freeing you from involvement. This approach not only improves the efficiency of complaint handling process, but also ensures that customers receive compensation in a timely manner.
Usage path:
Navigate to your Shoplazza admin > Apps > Visit App Store. Search for Shipping Protection then add it to your store.

Feature overview:
16.1 Configuration section: Configuring the activity
- Activating the service
After entering the app, find the Configuration section and click Activate in Shipping protection section. This will enable the shipping protection option at checkout for your customers. A preview of the customer-facing page is available on the right side.

Note
- This feature is provided by a third-party organization. Before using this feature, we kindly recommend reviewing Seel Buyer Protection Terms Of Service beforehand.
- Protection coverage:
- Supported currencies: USD, EUR, GBP, AUD, CAD, NZD
- Available delivery locations: The United States, Canada
- Prompts will appear for unsupported delivery addresses or payment methods.

- Managing checkout options
The service comes with an option called Default Shipping Protection at Checkout, which is enabled by default.
-
- When this option is enabled (which is the default setting), the shipping protection service is automatically selected at checkout. Customers can either keep it or remove it. If they choose to keep it, you get a 15% share of the premium.
- If you decide to disable this option, the shipping protection service will still be available at checkout but won't be pre-selected. If a customer chooses to add it, your share will be 5% of the premium.

- Setting Up a Claims Channel
To provide your customers with a channel for complaints, click Configure it now in the Claim portal section to navigate to theme editor.

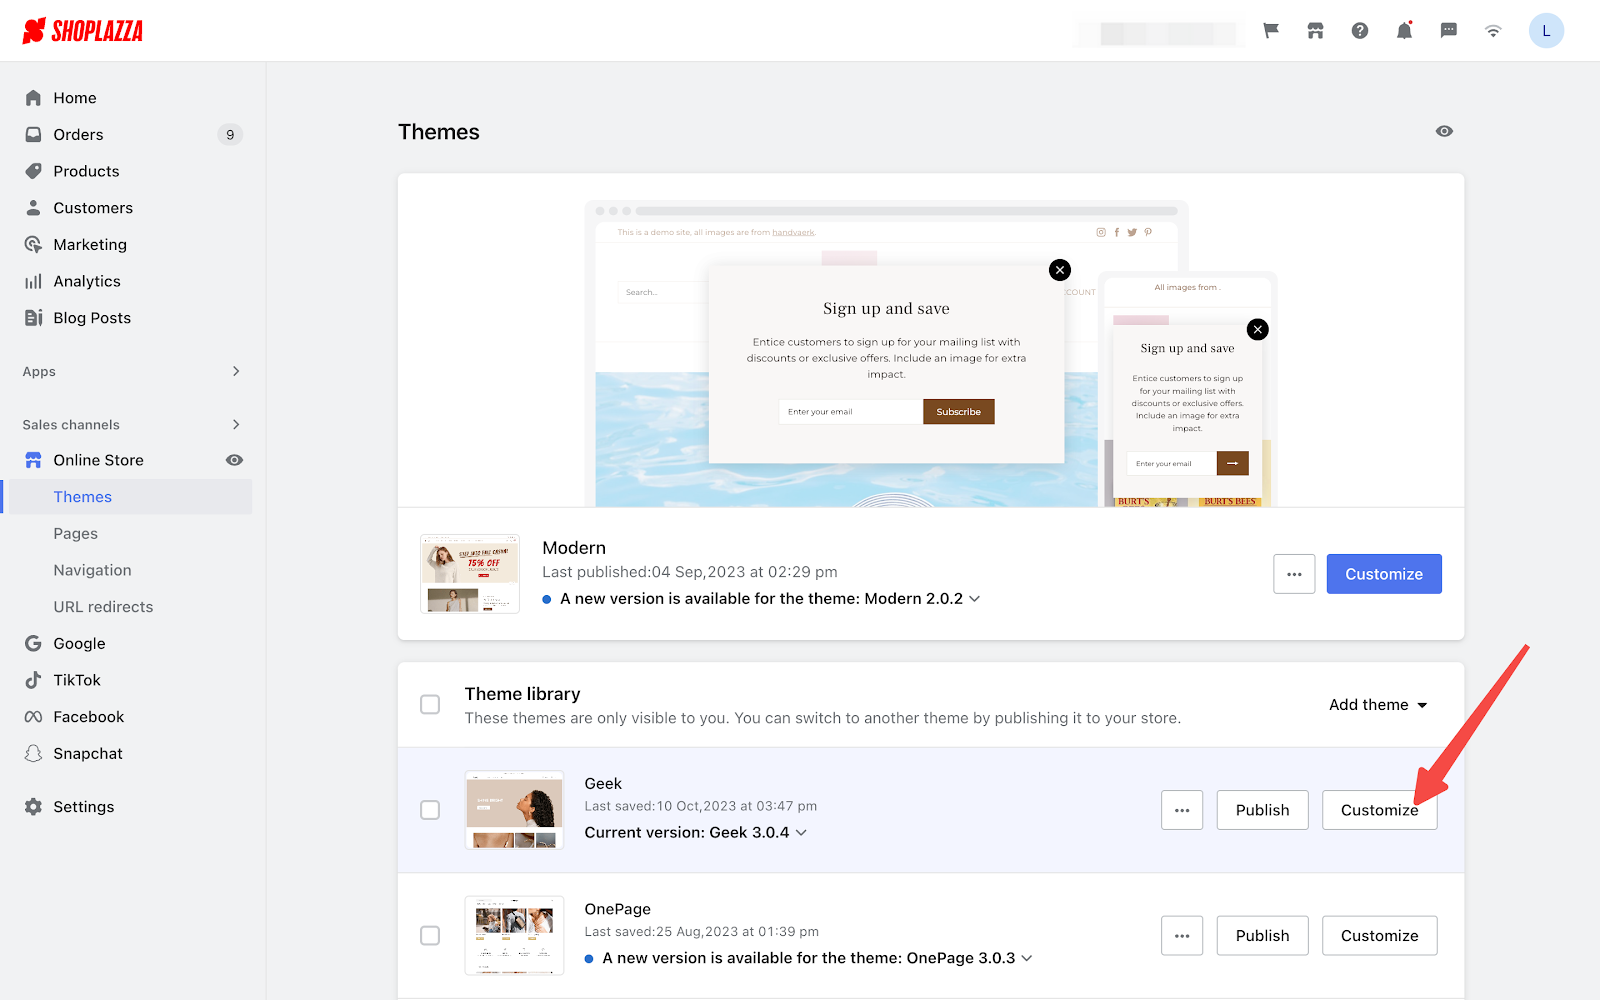
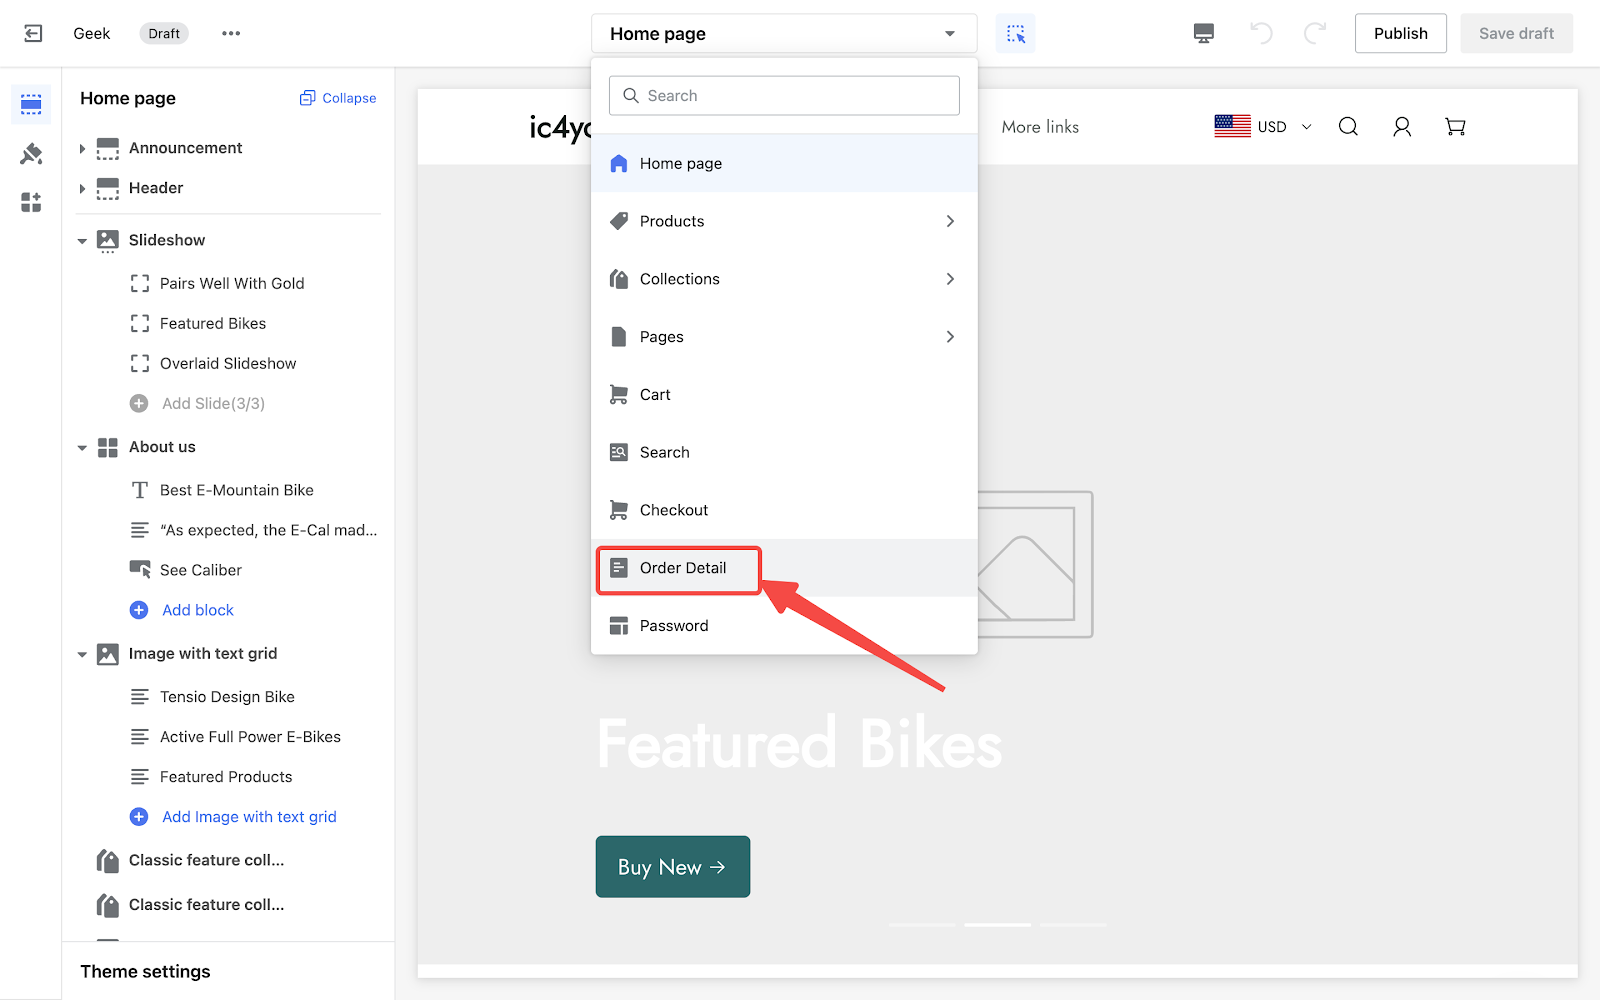
1. Select your preferred theme and click Customize. Then choose Order Detail from the dropdown menu.
2. Click Add section.
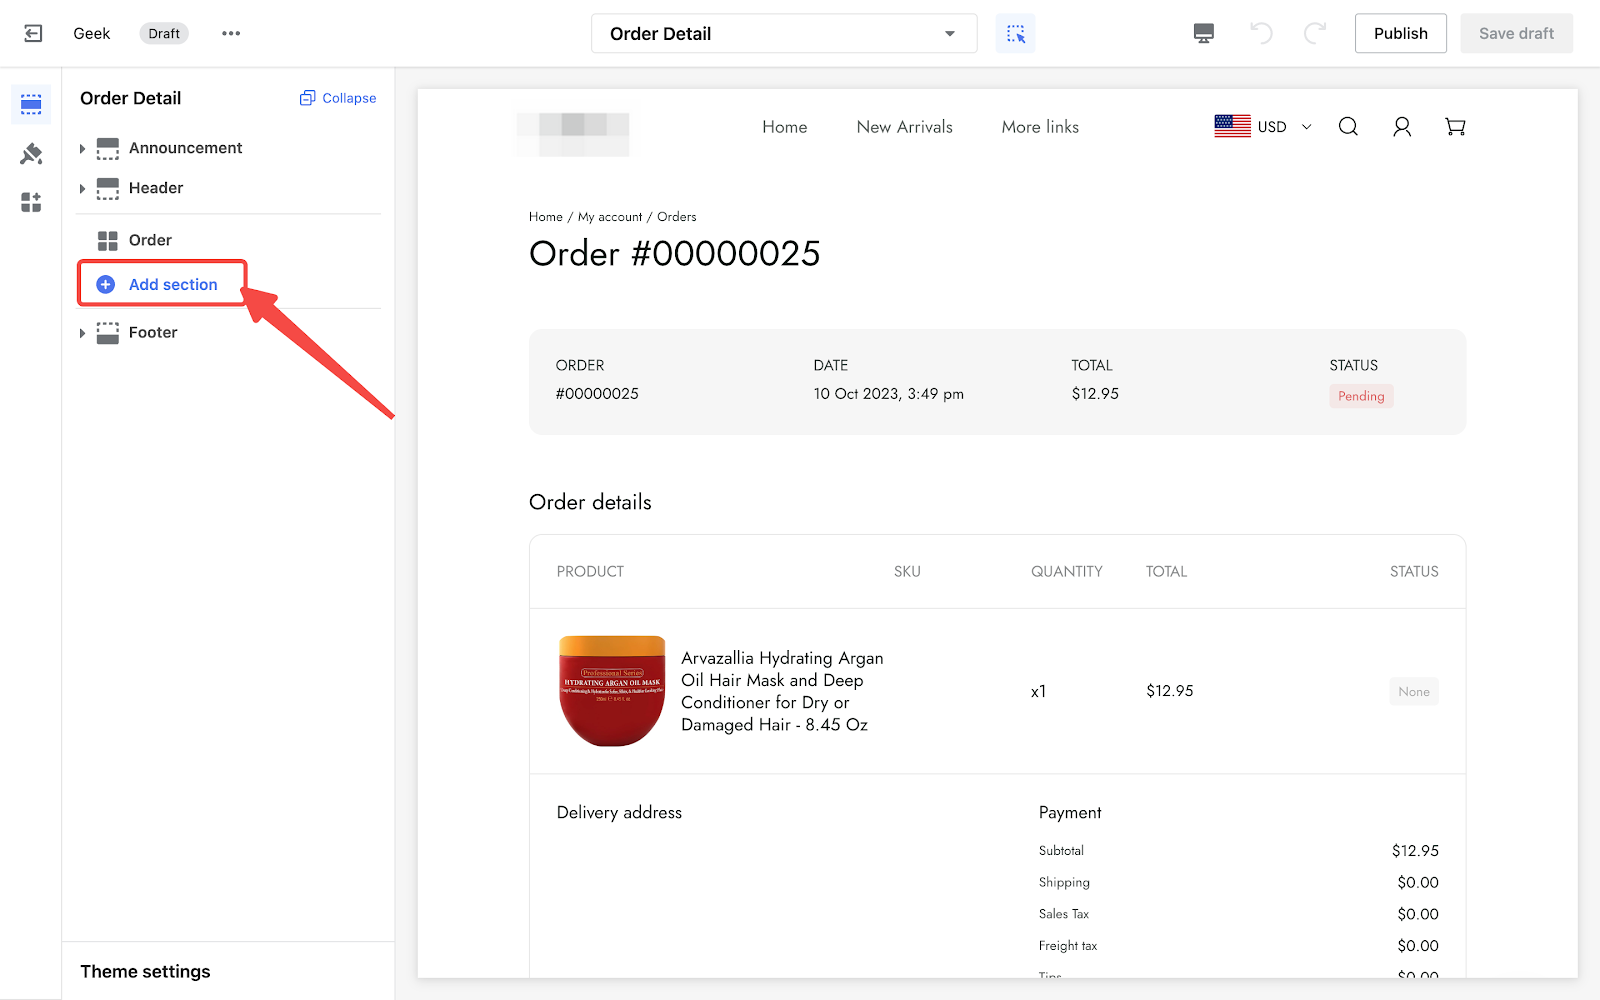
3. Find and click Shipping Protection under APPS.

4. You can now preview the section.

5. This creates a section on the order detail page where customers can submit their claims.
Note
The customer service email displayed for claims can be edited in Shoplazza Admin > Settings > Store Information.
16.2 Policy section: Post-purchase policy details
After customers have purchased the shipping protection service and successfully placed orders, the basic information of the insurance policy will be displayed on this page.

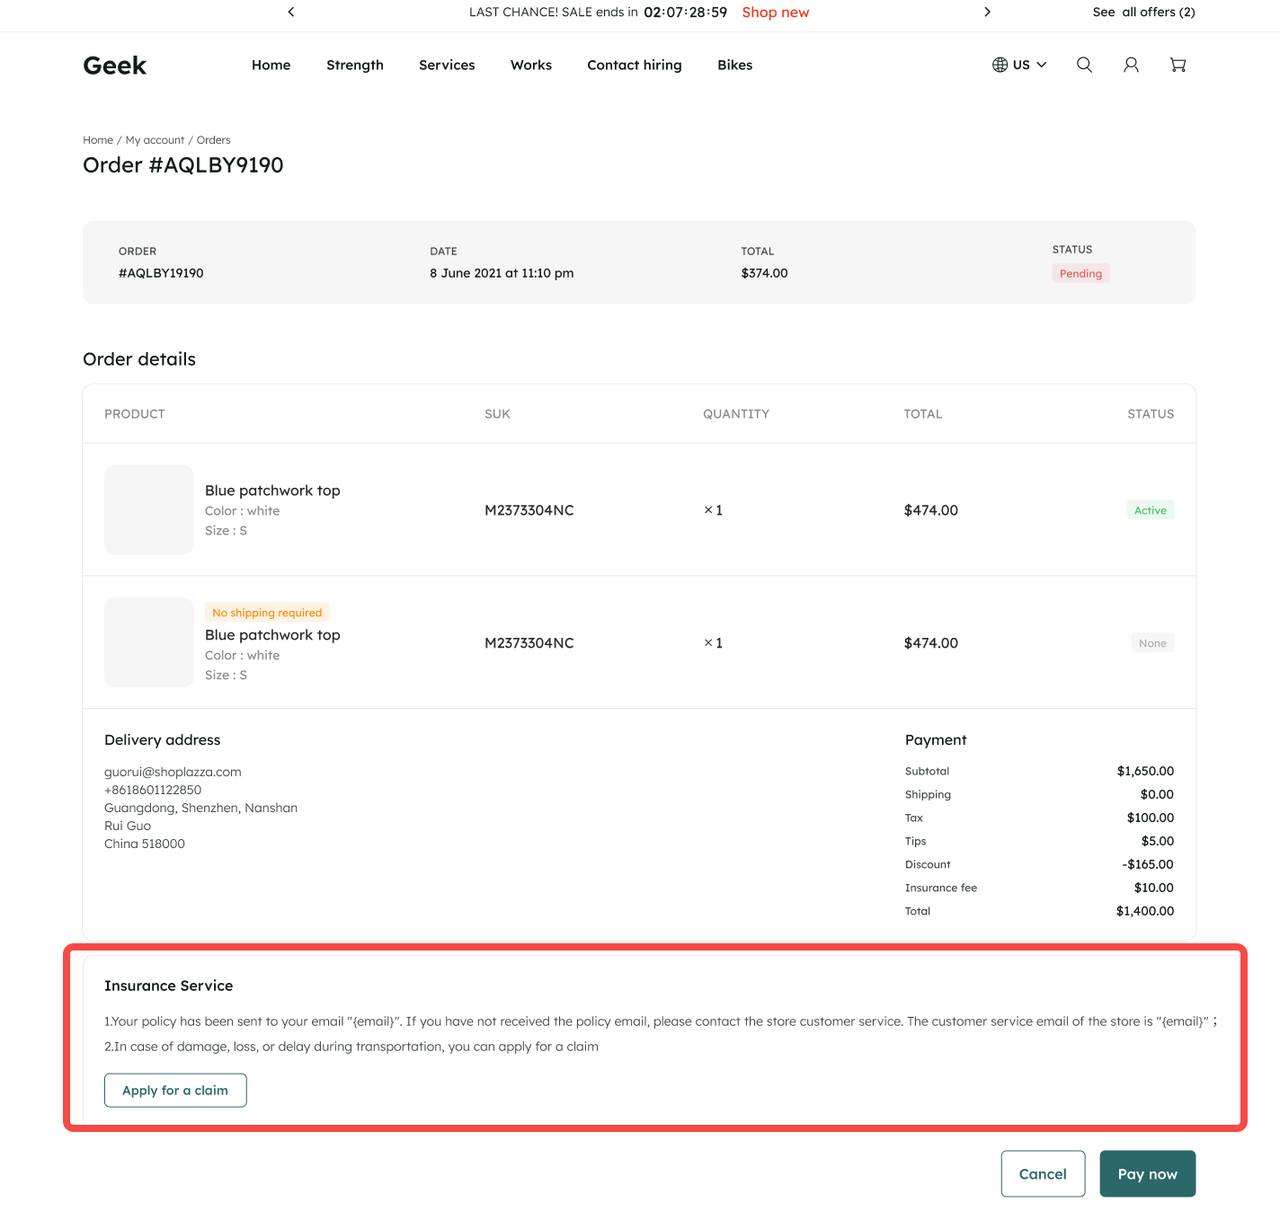
16.3 Appeal section: Managing customer claims
If any issue such as loss, delay, or damage with the purchased items occurs during delivery, customers have the option to file complaints. The relevant information regarding the claims will be displayed on this page.

Comments
Please sign in to leave a comment.